Random wanderings through Microsoft Azure esp. PaaS plumbing, the IoT bits, AI on Micro controllers, AI on Edge Devices, .NET nanoFramework, .NET Core on *nix and ML.NET+ONNX
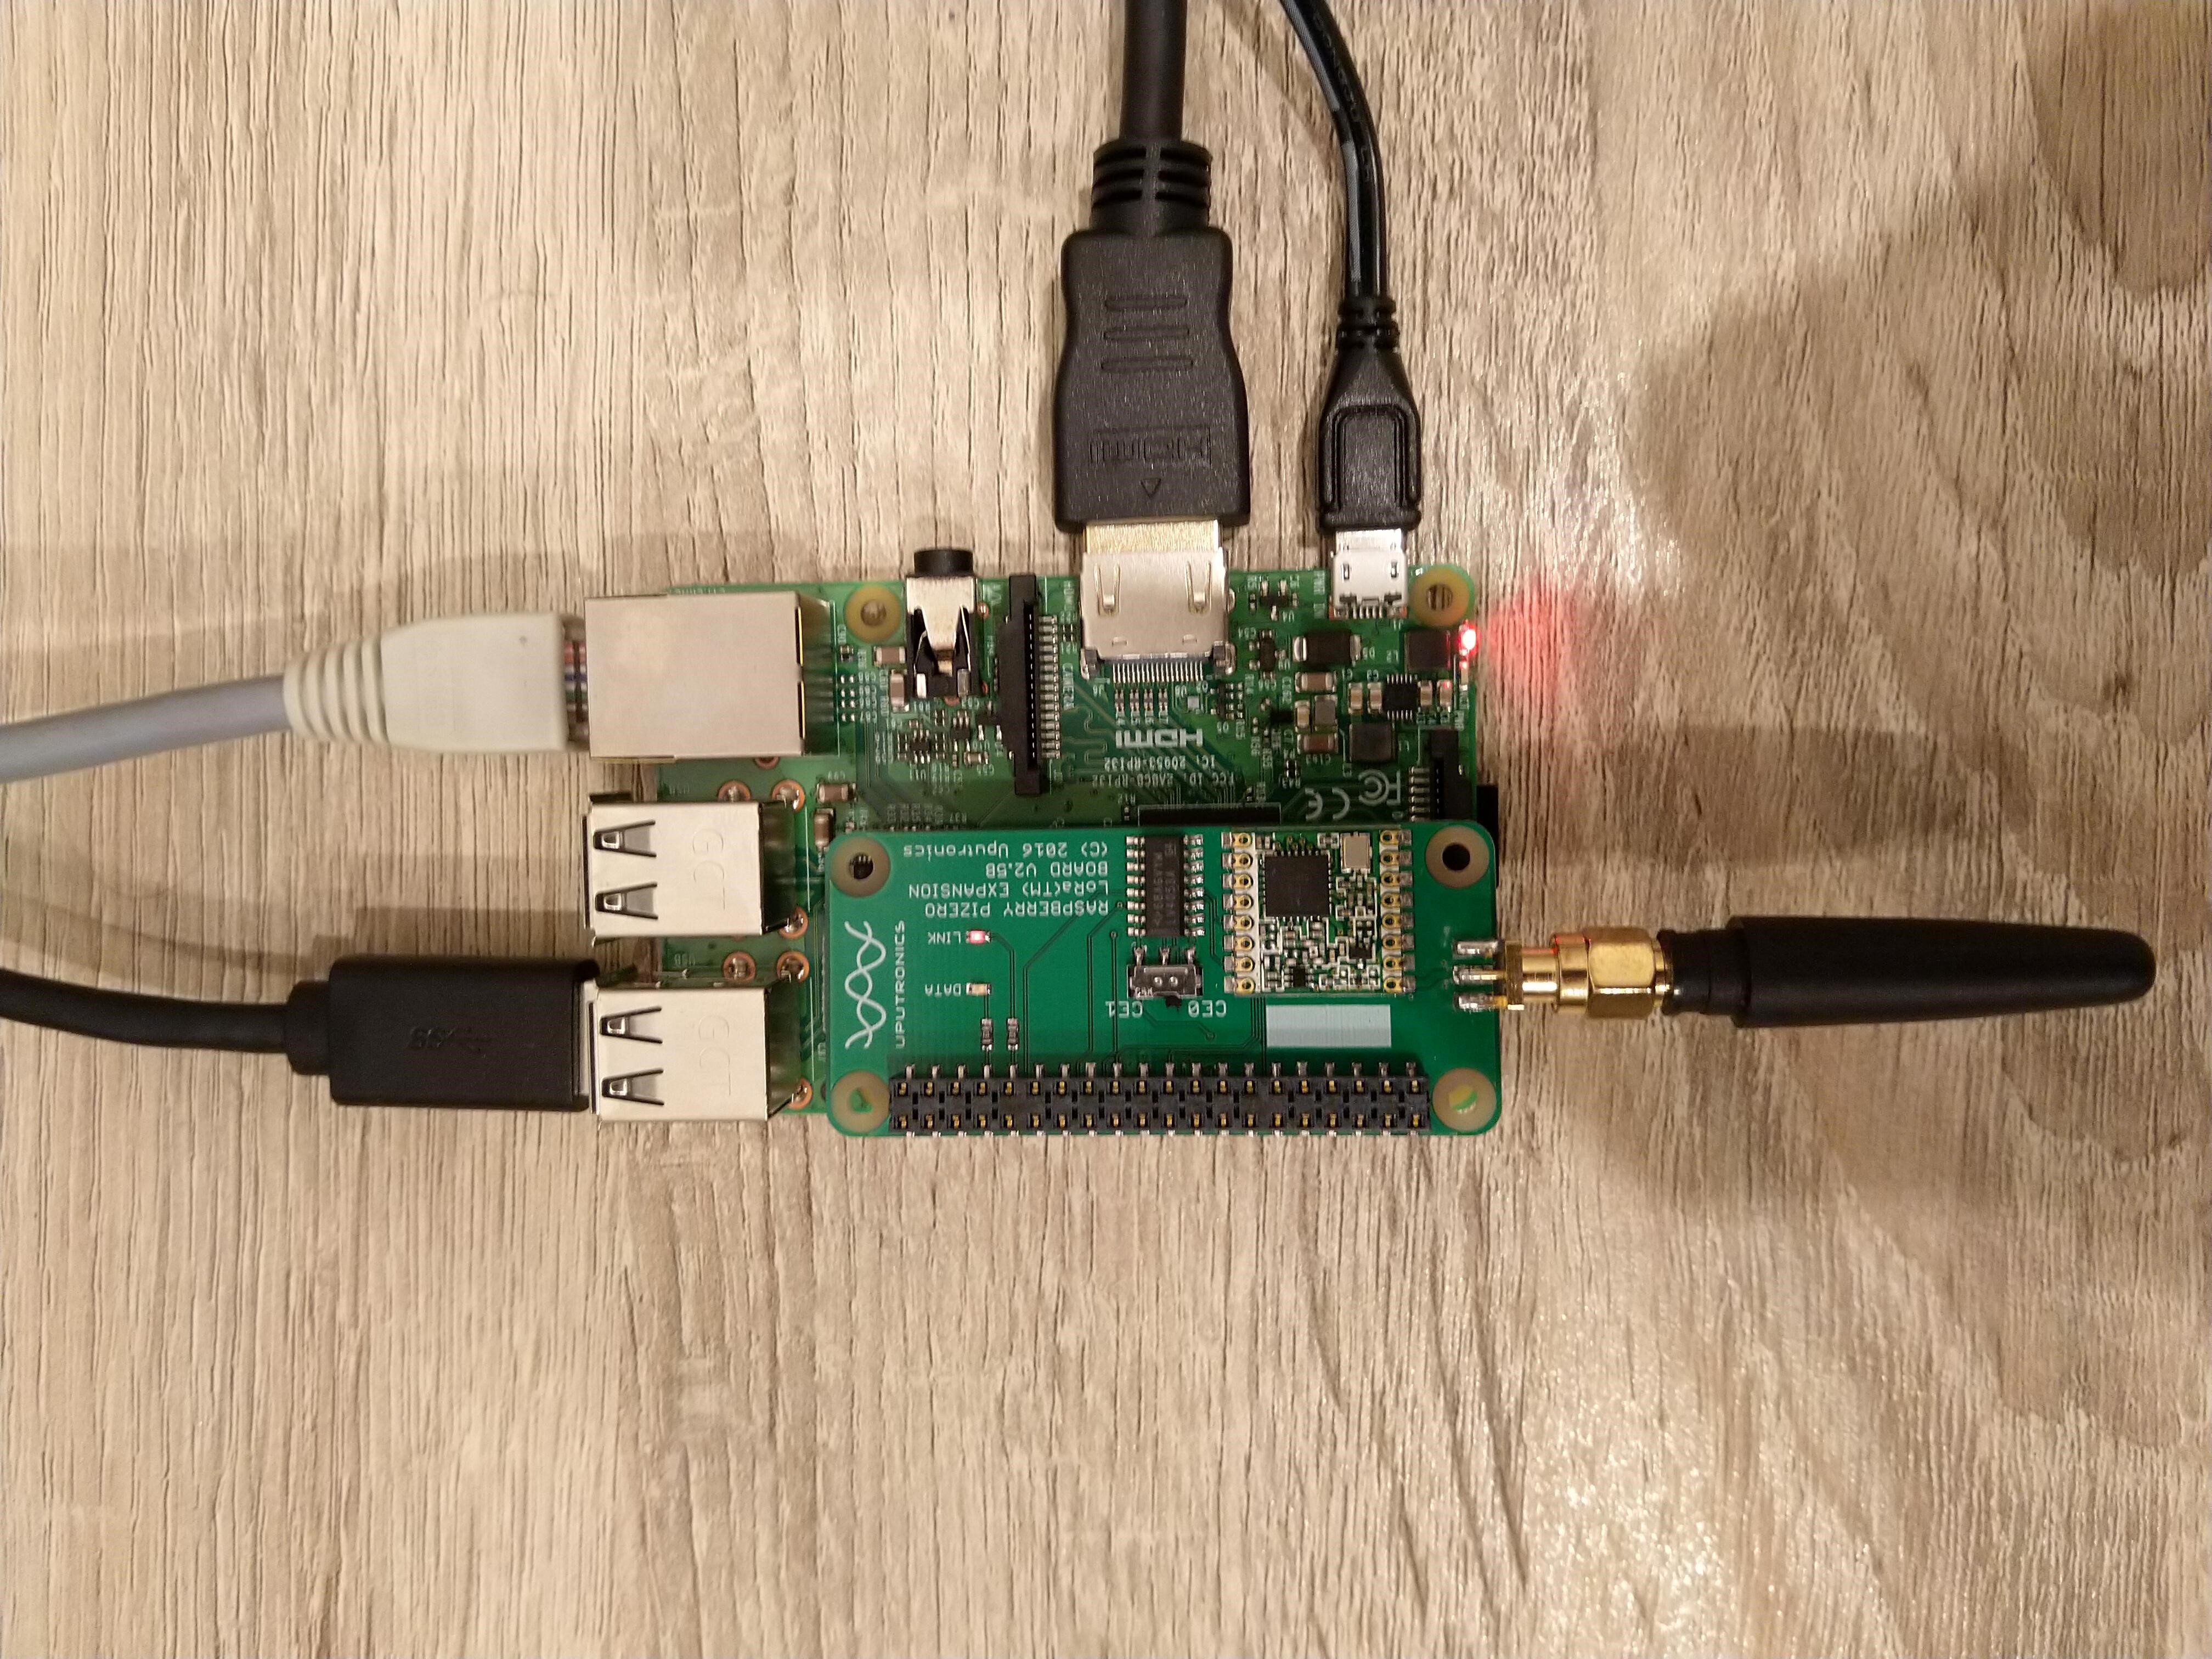
Uputronics Raspberry PIZero LoRa Expansion board on a Raspberry 3 device
The Uputronics pHat has a pair of Light Emitting Diodes(LEDs) so I adapted some code from a previous post to flash these to confirm the card was working.
static void UputronicsLeds()
{
	const int RedLedPinNumber = 6;
	const int GreenLedPinNumber = 13;

	GpioController controller = new GpioController(PinNumberingScheme.Logical);

	controller.OpenPin(RedLedPinNumber, PinMode.Output);
	controller.OpenPin(GreenLedPinNumber, PinMode.Output);

	while (true)
	{
		if (controller.Read(RedLedPinNumber) == PinValue.Low)
		{
			controller.Write(RedLedPinNumber, PinValue.High);
			controller.Write(GreenLedPinNumber, PinValue.Low);
		}
		else
		{
			controller.Write(RedLedPinNumber, PinValue.Low);
			controller.Write(GreenLedPinNumber, PinValue.High);
		}

		Thread.Sleep(1000);
	}
}
The first Uputronics pHat version using spiDevice.TransferFullDuplex didn’t work. I tried allocating memory for the buffers with new and stackalloc which didn’t seem to make any difference in my trivial example. I tried different Chip Select(CS) pin options, frequencies and modes (the mode used is based on the timings specified in the SX127X datasheet).
static void TransferFullDuplex()
{
	//byte[] writeBuffer = new byte[1]; // Memory allocation didn't seem to make any difference
    //byte[] readBuffer = new byte[1];
	Span<byte> writeBuffer = stackalloc byte[1];
	Span<byte> readBuffer = stackalloc byte[1];

	//var settings = new SpiConnectionSettings(0)
	var settings = new SpiConnectionSettings(0, 0)
	//var settings = new SpiConnectionSettings(0, 1)
	{
		ClockFrequency = 5000000,
		//ClockFrequency = 500000, // Frequency didn't seem to make any difference
		Mode = SpiMode.Mode0,   // From SemTech docs pg 80 CPOL=0, CPHA=0
	};

	SpiDevice spiDevice = SpiDevice.Create(settings);

	Thread.Sleep(500);

	while (true)
	{
		try
		{
			for (byte registerIndex = 0; registerIndex <= 0x42; registerIndex++)
			{
				writeBuffer[0] = registerIndex;
				spiDevice.TransferFullDuplex(writeBuffer, readBuffer);
				//Debug.WriteLine("Register 0x{0:x2} - Value 0X{1:x2} - Bits {2}", writeBuffer[0], readBuffer[0], Convert.ToString(readBuffer[0], 2).PadLeft(8, '0')); // Debug output stopped after roughly 3 times round for loop often debugger would barf as well
				Console.WriteLine("Register 0x{0:x2} - Value 0X{1:x2} - Bits {2}", writeBuffer[0], readBuffer[0], Convert.ToString(readBuffer[0], 2).PadLeft(8, '0'));

				// Would be nice if SpiDevice has a TransferSequential
				/*
				writeBuffer[0] = registerIndex;
				spiDevice.TransferSequential(writeBuffer, readBuffer);
				Console.WriteLine("Register 0x{0:x2} - Value 0X{1:x2} - Bits {2}", writeBuffer[0], readBuffer[0], Convert.ToString(readBuffer[0], 2).PadLeft(8, '0'));
				*/
			}

			Console.WriteLine("");
			Thread.Sleep(5000);
		}
		catch (Exception ex)
		{
			Console.WriteLine(ex.Message);
		}
	}
}
static void ReadWriteChipSelectStandard()
{
	var settings = new SpiConnectionSettings(0) // Doesn't work
	//	var settings = new SpiConnectionSettings(0, 0) // Doesn't work
	//var settings = new SpiConnectionSettings(0, 1) // Doesn't Work
	{
		ClockFrequency = 5000000,
		ChipSelectLineActiveState = PinValue.Low,
		Mode = SpiMode.Mode0,   // From SemTech docs pg 80 CPOL=0, CPHA=0
	};

	SpiDevice spiDevice = SpiDevice.Create(settings);

	Thread.Sleep(500);

	while (true)
	{
		try
		{
			for (byte registerIndex = 0; registerIndex <= 0x42; registerIndex++)
			{
				spiDevice.WriteByte(registerIndex);
				//Thread.Sleep(5); These made no difference
				//Thread.Sleep(10);
				//Thread.Sleep(20);
				//Thread.Sleep(40);
				byte registerValue = spiDevice.ReadByte();

				Console.WriteLine("Register 0x{0:x2} - Value 0X{1:x2} - Bits {2}", registerIndex, registerValue, Convert.ToString(registerValue, 2).PadLeft(8, '0'));
			}
			Console.WriteLine("");

			Thread.Sleep(5000);
		}
		catch (Exception ex)
		{
			Console.WriteLine(ex.Message);
		}
	}
}
The third Uputronics pHat version using spiDevice.ReadByte() and spiDevice.WriteByte() with DIY Chip Select(CS) worked. In previous SPI device libraries I have found that “managing” the CS line in code can be easier to get working The MicroFramework also has more connectionSettings options for better control of CS line timings which reduces the need for DIY.
static void ReadWriteChipSelectDiy()
{
	const int CSPinNumber = 8; // CS0
	//const int CSPinNumber = 7; // CS1

	// DIY CS0 implented with GPIO pin application controls
	GpioController controller = new GpioController(PinNumberingScheme.Logical);

	controller.OpenPin(CSPinNumber, PinMode.Output);
	//controller.Write(CSPinNumber, PinValue.High);

	//var settings = new SpiConnectionSettings(0) // Doesn't work
	var settings = new SpiConnectionSettings(0, 1) // Works, have to point at unused CS1, this could be a problem is other device on CS1
	//var settings = new SpiConnectionSettings(0, 0) // Works, have to point at unused CS0, this could be a problem is other device on CS0
	{
		ClockFrequency = 5000000,
		Mode = SpiMode.Mode0,   // From SemTech docs pg 80 CPOL=0, CPHA=0
	};

	SpiDevice spiDevice = SpiDevice.Create(settings);

	Thread.Sleep(500);

	while (true)
	{
		try
		{
			for (byte registerIndex = 0; registerIndex <= 0x42; registerIndex++)
			{
				controller.Write(CSPinNumber, PinValue.Low);
				spiDevice.WriteByte(registerIndex);
				//Thread.Sleep(2); // This maybe necessary
				byte registerValue = spiDevice.ReadByte();
				controller.Write(CSPinNumber, PinValue.High);

				Console.WriteLine("Register 0x{0:x2} - Value 0X{1:x2} - Bits {2}", registerIndex, registerValue, Convert.ToString(registerValue, 2).PadLeft(8, '0'));
			}
			Console.WriteLine("");

			Thread.Sleep(5000);
		}
		catch (Exception ex)
		{
			Console.WriteLine(ex.Message);
		}
	}
}
The dotNet/IoT doesn’t support (July2021) the option to “exclusively” open a port so there could be issues with other applications assuming they control CS0/CS1.
Loaded '/usr/lib/dotnet/shared/Microsoft.NETCore.App/5.0.4/Microsoft.Win32.Primitives.dll'. Skipped loading symbols. Module is optimized and the debugger option 'Just My Code' is enabled.
Register 0x00 - Value 0X00 - Bits 00000000
Register 0x01 - Value 0X09 - Bits 00001001
Register 0x02 - Value 0X1a - Bits 00011010
Register 0x03 - Value 0X0b - Bits 00001011
Register 0x04 - Value 0X00 - Bits 00000000
Register 0x05 - Value 0X52 - Bits 01010010
Register 0x06 - Value 0X6c - Bits 01101100
Register 0x07 - Value 0X80 - Bits 10000000
Register 0x08 - Value 0X00 - Bits 00000000
Register 0x09 - Value 0X4f - Bits 01001111
Register 0x0a - Value 0X09 - Bits 00001001
Register 0x0b - Value 0X2b - Bits 00101011
Register 0x0c - Value 0X20 - Bits 00100000
Register 0x0d - Value 0X08 - Bits 00001000
Register 0x0e - Value 0X02 - Bits 00000010
Register 0x0f - Value 0X0a - Bits 00001010
Register 0x10 - Value 0Xff - Bits 11111111
Register 0x11 - Value 0X70 - Bits 01110000
Register 0x12 - Value 0X15 - Bits 00010101
Register 0x13 - Value 0X0b - Bits 00001011
Register 0x14 - Value 0X28 - Bits 00101000
Register 0x15 - Value 0X0c - Bits 00001100
Register 0x16 - Value 0X12 - Bits 00010010
Register 0x17 - Value 0X47 - Bits 01000111
Register 0x18 - Value 0X32 - Bits 00110010
Register 0x19 - Value 0X3e - Bits 00111110
Register 0x1a - Value 0X00 - Bits 00000000
Register 0x1b - Value 0X00 - Bits 00000000
Register 0x1c - Value 0X00 - Bits 00000000
Register 0x1d - Value 0X00 - Bits 00000000
Register 0x1e - Value 0X00 - Bits 00000000
Register 0x1f - Value 0X40 - Bits 01000000
Register 0x20 - Value 0X00 - Bits 00000000
Register 0x21 - Value 0X00 - Bits 00000000
Register 0x22 - Value 0X00 - Bits 00000000
Register 0x23 - Value 0X00 - Bits 00000000
Register 0x24 - Value 0X05 - Bits 00000101
Register 0x25 - Value 0X00 - Bits 00000000
Register 0x26 - Value 0X03 - Bits 00000011
Register 0x27 - Value 0X93 - Bits 10010011
Register 0x28 - Value 0X55 - Bits 01010101
Register 0x29 - Value 0X55 - Bits 01010101
Register 0x2a - Value 0X55 - Bits 01010101
Register 0x2b - Value 0X55 - Bits 01010101
Register 0x2c - Value 0X55 - Bits 01010101
Register 0x2d - Value 0X55 - Bits 01010101
Register 0x2e - Value 0X55 - Bits 01010101
Register 0x2f - Value 0X55 - Bits 01010101
Register 0x30 - Value 0X90 - Bits 10010000
Register 0x31 - Value 0X40 - Bits 01000000
Register 0x32 - Value 0X40 - Bits 01000000
Register 0x33 - Value 0X00 - Bits 00000000
Register 0x34 - Value 0X00 - Bits 00000000
Register 0x35 - Value 0X0f - Bits 00001111
Register 0x36 - Value 0X00 - Bits 00000000
Register 0x37 - Value 0X00 - Bits 00000000
Register 0x38 - Value 0X00 - Bits 00000000
Register 0x39 - Value 0Xf5 - Bits 11110101
Register 0x3a - Value 0X20 - Bits 00100000
Register 0x3b - Value 0X82 - Bits 10000010
Register 0x3c - Value 0Xf6 - Bits 11110110
Register 0x3d - Value 0X02 - Bits 00000010
Register 0x3e - Value 0X80 - Bits 10000000
Register 0x3f - Value 0X40 - Bits 01000000
Register 0x40 - Value 0X00 - Bits 00000000
Register 0x41 - Value 0X00 - Bits 00000000
Register 0x42 - Value 0X12 - Bits 00010010
The fourth Uputronics pHat version using spiDevice.TransferFullDuplex with read and write buffers two bytes long and the leading bye of the response ignored worked.
...
while (true)
{
	try
	{
		for (byte registerIndex = 0; registerIndex <= 0x42; registerIndex++)
		{
			// Doesn't work
			writeBuffer[0] = registerIndex;
			spiDevice.TransferFullDuplex(writeBuffer, readBuffer);
			Console.WriteLine("Register 0x{0:x2} - Value 0X{1:x2} - Bits {2}", registerIndex, readBuffer[0], Convert.ToString(readBuffer[0], 2).PadLeft(8, '0'));

			// Does work
			writeBuffer[0] = registerIndex;
			spiDevice.TransferFullDuplex(writeBuffer, readBuffer);
			Console.WriteLine("Register 0x{0:x2} - Value 0X{1:x2} - Bits {2}", registerIndex, readBuffer[1], Convert.ToString(readBuffer[1], 2).PadLeft(8, '0'));

			// Does work
			writeBuffer[1] = registerIndex;
			spiDevice.TransferFullDuplex(writeBuffer, readBuffer);
			Console.WriteLine("Register 0x{0:x2} - Value 0X{1:x2} - Bits {2}", registerIndex, readBuffer[1], Convert.ToString(readBuffer[1], 2).PadLeft(8, '0'));

			Console.WriteLine("");
		}

		Console.WriteLine("");
		Thread.Sleep(5000);
	}
	catch (Exception ex)
	{
		Console.WriteLine(ex.Message);
	}
}
Register 0x00 - Value 0X00 - Bits 00000000
Register 0x00 - Value 0X00 - Bits 00000000
Register 0x00 - Value 0X00 - Bits 00000000

...

Register 0x42 - Value 0X00 - Bits 00000000
Register 0x42 - Value 0X12 - Bits 00010010
Register 0x42 - Value 0X12 - Bits 00010010
M2M Single channel shield on Raspberry Pi 3 Device
The first M2M pHat version using SpiDevice.Read and SpiDevice.Write with a “custom” CS pin worked.
...
// Chip select with pin which isn't CS0 or CS1 needs M2M shield
static void ReadWriteDiyChipSelectNonStandard()
{
	const int CSPinNumber = 25;

	// DIY CS0 implented with GPIO pin application controls
	GpioController controller = new GpioController(PinNumberingScheme.Logical);

	controller.OpenPin(CSPinNumber, PinMode.Output);
	//controller.Write(CSPinNumber, PinValue.High);

	// Work, this could be a problem is other device on CS0/CS1
	var settings = new SpiConnectionSettings(0)
	//var settings = new SpiConnectionSettings(0, 0)
	//var settings = new SpiConnectionSettings(0, 1)
	{
		ClockFrequency = 5000000,
		Mode = SpiMode.Mode0,   // From SemTech docs pg 80 CPOL=0, CPHA=0
	};

	SpiDevice spiDevice = SpiDevice.Create(settings);

	Thread.Sleep(500);

	while (true)
	{
		try
		{
			for (byte registerIndex = 0; registerIndex <= 0x42; registerIndex++)
			{
				controller.Write(CSPinNumber, PinValue.Low);
				spiDevice.WriteByte(registerIndex);
				//Thread.Sleep(2); // This maybe necessary
				byte registerValue = spiDevice.ReadByte();
				controller.Write(CSPinNumber, PinValue.High);

				Console.WriteLine("Register 0x{0:x2} - Value 0X{1:x2} - Bits {2}", registerIndex, registerValue, Convert.ToString(registerValue, 2).PadLeft(8, '0'));
			}
			Console.WriteLine("");

			Thread.Sleep(5000);
		}
		catch (Exception ex)
		{
			Console.WriteLine(ex.Message);
		}
	}
}
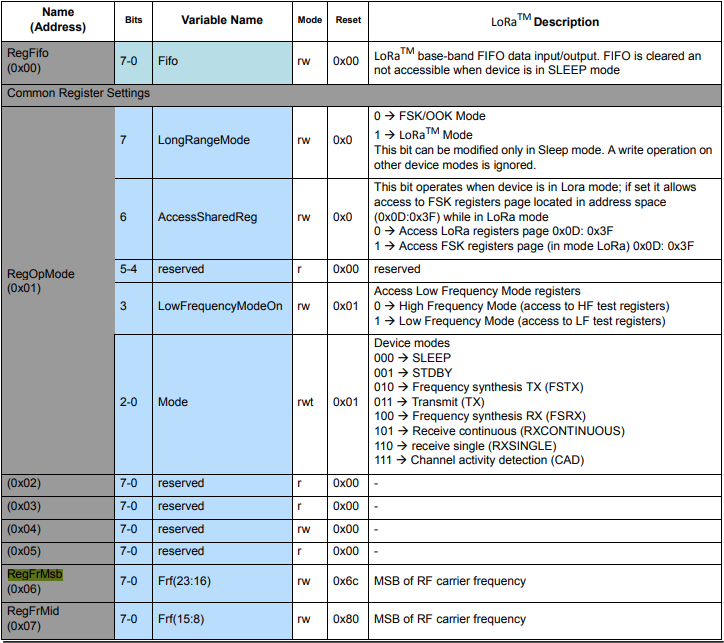
The next step was to read an array of bytes, using spiDevice.TransferFullDuplex. The SX127X transmit/receive frequency is specified in registers 0x06 RegFrMSB, 0x07 RegFrMid, and 0x08 RegFrLsb. The default frequency is 868MHz which is 0xE4, 0xC0, 0x00
static void TransferFullDuplexBufferBytesRead()
{
	const byte length = 3;
	byte[] writeBuffer = new byte[length + 1];
	byte[] readBuffer = new byte[length + 1];

	// Read the frequency which is 3 bytes RegFrMsb 0x6c, RegFrMid 0x80, RegFrLsb 0x00
	writeBuffer[0] = 0x06; //

	// Works, have to point at unused CS0/CS1, others could be a problem is another another SPI device is on on CS0/CS1
	//var settings = new SpiConnectionSettings(0)
	var settings = new SpiConnectionSettings(0, 0)
	//var settings = new SpiConnectionSettings(0, 1)
	{
		ClockFrequency = 5000000,
		Mode = SpiMode.Mode0,   // From SemTech docs pg 80 CPOL=0, CPHA=0
	};

	SpiDevice spiDevice = SpiDevice.Create(settings);

	spiDevice.TransferFullDuplex(writeBuffer, readBuffer);

	Console.WriteLine($"Register 0x06-0x{readBuffer[1]:x2} 0x07-0x{readBuffer[2]:x2} 0x08-0x{readBuffer[3]:x2}");
}
-------------------------------------------------------------------
You may only use the Microsoft .NET Core Debugger (vsdbg) with
Visual Studio Code, Visual Studio or Visual Studio for Mac software
to help you develop and test your applications.
-------------------------------------------------------------------
Loaded '/usr/lib/dotnet/shared/Microsoft.NETCore.App/5.0.4/System.Private.CoreLib.dll'. Skipped loading symbols. Module is optimized and the debugger option 'Just My Code' is enabled.
...
Loaded '/usr/lib/dotnet/shared/Microsoft.NETCore.App/5.0.4/Microsoft.Win32.Primitives.dll'. Skipped loading symbols. Module is optimized and the debugger option 'Just My Code' is enabled.
Register 0x06-0xe4 0x07-0xc0 0x08-0x00
The final step was write an array of bytes, using spiDevice.TransferFullDuplex to change the transmit/receive frequency to 915MHz. To write a value the first bit of the address byte must be set to 1 hence the 0x86 RegFrMsb address.
static void TransferFullDuplexBufferBytesWrite()
{
	const byte length = 3;
	byte[] writeBuffer = new byte[length + 1];
	byte[] readBuffer = new byte[length + 1];

	// Write the frequency which is 3 bytes RegFrMsb 0x6c, RegFrMid 0x80, RegFrLsb or with 0x00 the write mask
	writeBuffer[0] = 0x86 ;

	// Works, have to point at unused CS0/CS1, others could be a problem is another another SPI device is on on CS0/CS1
	//var settings = new SpiConnectionSettings(0)
	var settings = new SpiConnectionSettings(0, 0)
	//var settings = new SpiConnectionSettings(0, 1)
	{
		ClockFrequency = 5000000,
		Mode = SpiMode.Mode0,   // From SemTech docs pg 80 CPOL=0, CPHA=0
	};

	SpiDevice spiDevice = SpiDevice.Create(settings);

	// Set the frequency to 915MHz
	writeBuffer[1] = 0xE4;
	writeBuffer[2] = 0xC0;
	writeBuffer[3] = 0x00;

	spiDevice.TransferFullDuplex(writeBuffer, readBuffer);
}
-------------------------------------------------------------------
You may only use the Microsoft .NET Core Debugger (vsdbg) with
Visual Studio Code, Visual Studio or Visual Studio for Mac software
to help you develop and test your applications.
-------------------------------------------------------------------
Loaded '/usr/lib/dotnet/shared/Microsoft.NETCore.App/5.0.4/System.Private.CoreLib.dll'. Skipped loading symbols. Module is optimized and the debugger option 'Just My Code' is enabled.
...
Loaded '/usr/lib/dotnet/shared/Microsoft.NETCore.App/5.0.4/Microsoft.Win32.Primitives.dll'. Skipped loading symbols. Module is optimized and the debugger option 'Just My Code' is enabled.
Register 0x06-0x6c 0x07-0x80 0x08-0x00
Register 0x06-0xe4 0x07-0xc0 0x08-0x00
The program 'dotnet' has exited with code 0 (0x0).
Summary
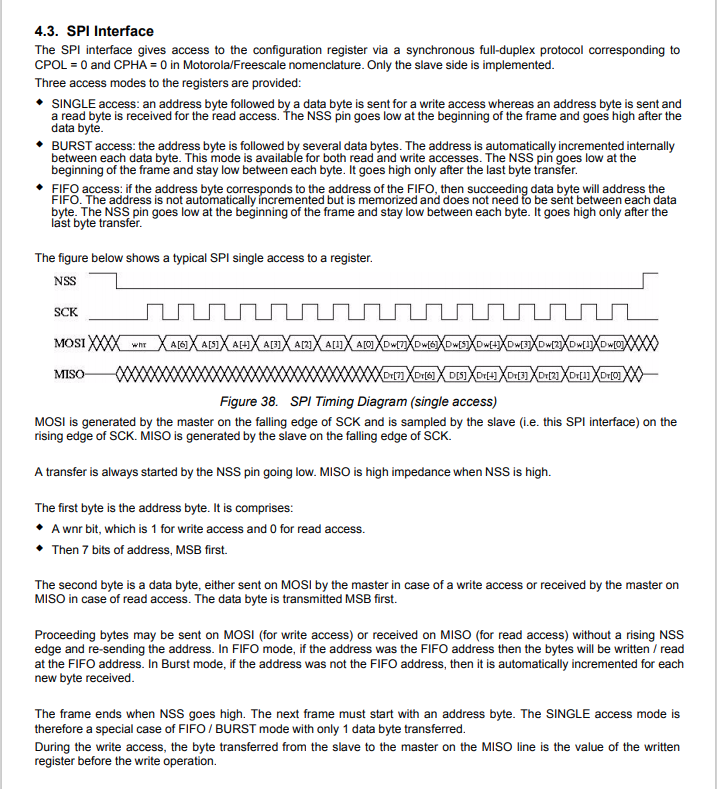
This exceptionally long post was to highlight that with SPI it’s all about timing, first read the datasheet, then build code to validate your understanding.
SX127X SPI interface timing diagram
Some platforms have native TransferSequential implementations but the dotNet/IoT library only has TransferFullDuplex. SPI hardware is always full duplex, if “sequential” is available the implementation will write the provided bytes and then follow them with zeros to read the requested bytes.
-------------------------------------------------------------------
You may only use the Microsoft .NET Core Debugger (vsdbg) with
Visual Studio Code, Visual Studio or Visual Studio for Mac software
to help you develop and test your applications.
-------------------------------------------------------------------
...
Loaded '/usr/lib/dotnet/shared/Microsoft.NETCore.App/5.0.4/Microsoft.Win32.Primitives.dll'. Skipped loading symbols. Module is optimized and the debugger option 'Just My Code' is enabled.
Main thread:1
Doing stuff
Doing stuff
Doing stuff
Doing stuff
Doing stuff
Interrupt Thread:6Doing stuff
Doing stuff
Doing stuff
Interrupt Thread:6Doing stuff
Doing stuff
Interrupt Thread:6Doing stuff
Doing stuff
Doing stuff
Doing stuff
Doing stuff
Doing stuff
The program 'dotnet' has exited with code 0 (0x0).
The ManagedThreadId for the main loop(1) was different to the callback(6) which needs some further investigation.
using System;
using System.Diagnostics;
using System.Threading;

namespace devMobile.NetCore.ConsoleApp
{
	class Program
	{
		static void Main(string[] args)
		{
			while (true)
			{
				Console.WriteLine($"{DateTime.UtcNow:HH:mm:ss} Hello World!");

				Thread.Sleep(1000);
			}
		}
	}
}
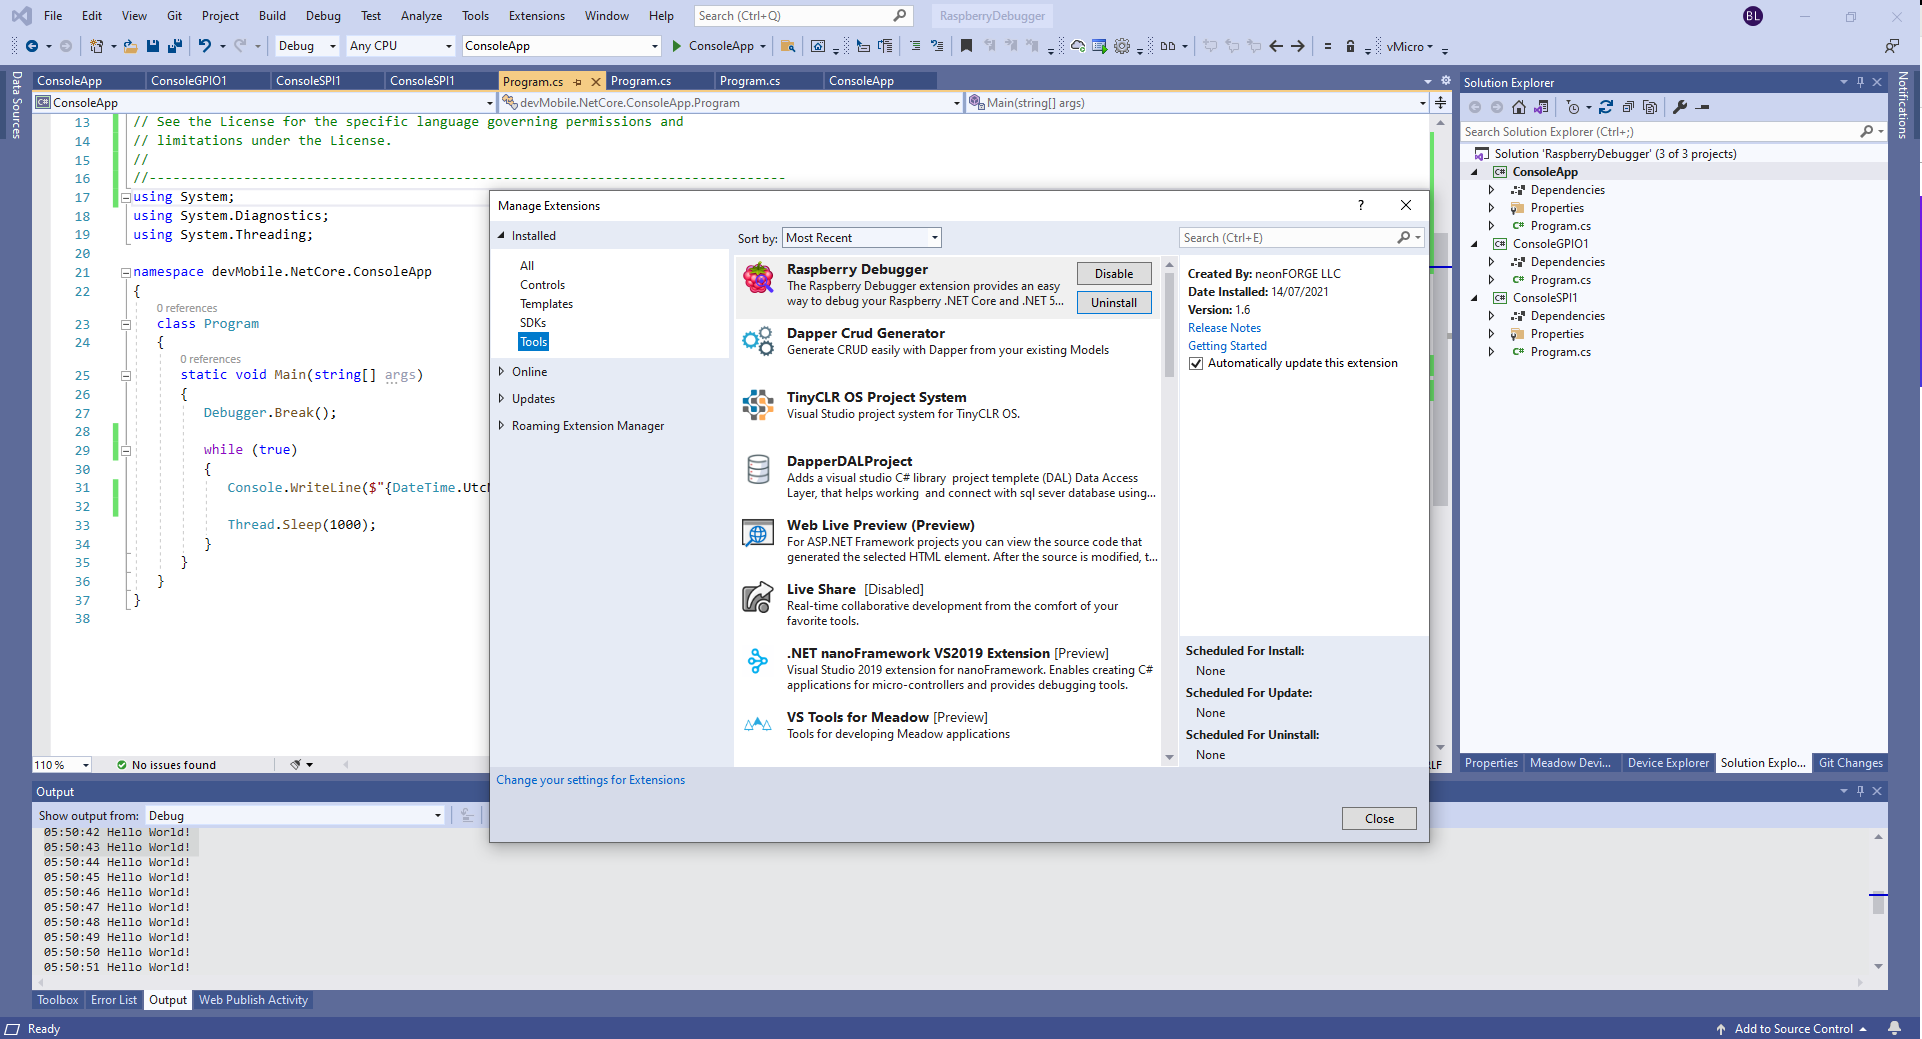
The RaspberryDebugger is really simple to install, and “frictionless” to use. The developers have put a lot of effort into making it easy to deploy and debug a .Net Core application running on a Raspberry PI with Visual Studio. All I had to do was search for, then download and install their Visual Studio Extension(VSIX).
Visual Studio Manage Extensions search
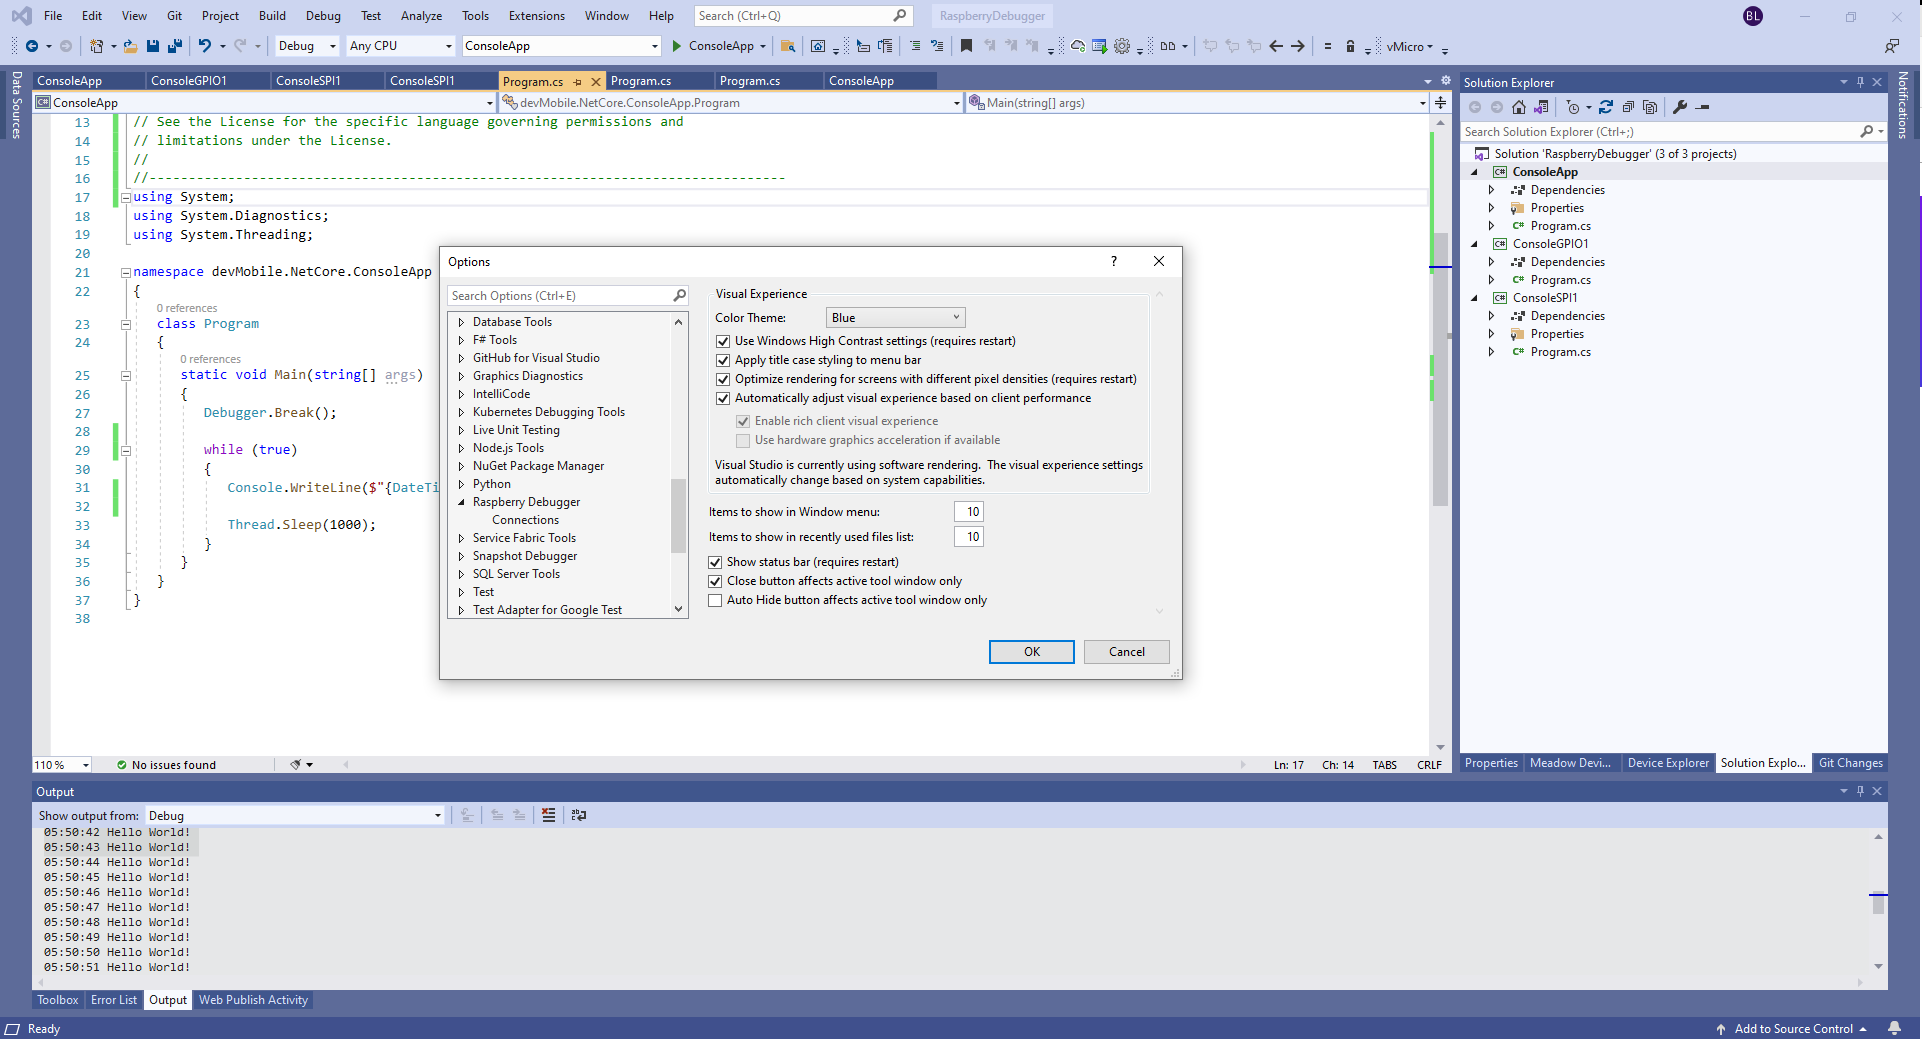
Then configure the connection information for the devices I wanted to use.
Visual Studio Options menu for RaspberryDebugger
On my main development system I was using multiple Raspberry PI devices so it was great to be able to pre-configure several devices.
RaspberryDebugger device(s) configuration)
I had connected to each device with PuTTY to check that connectivity was sorted.
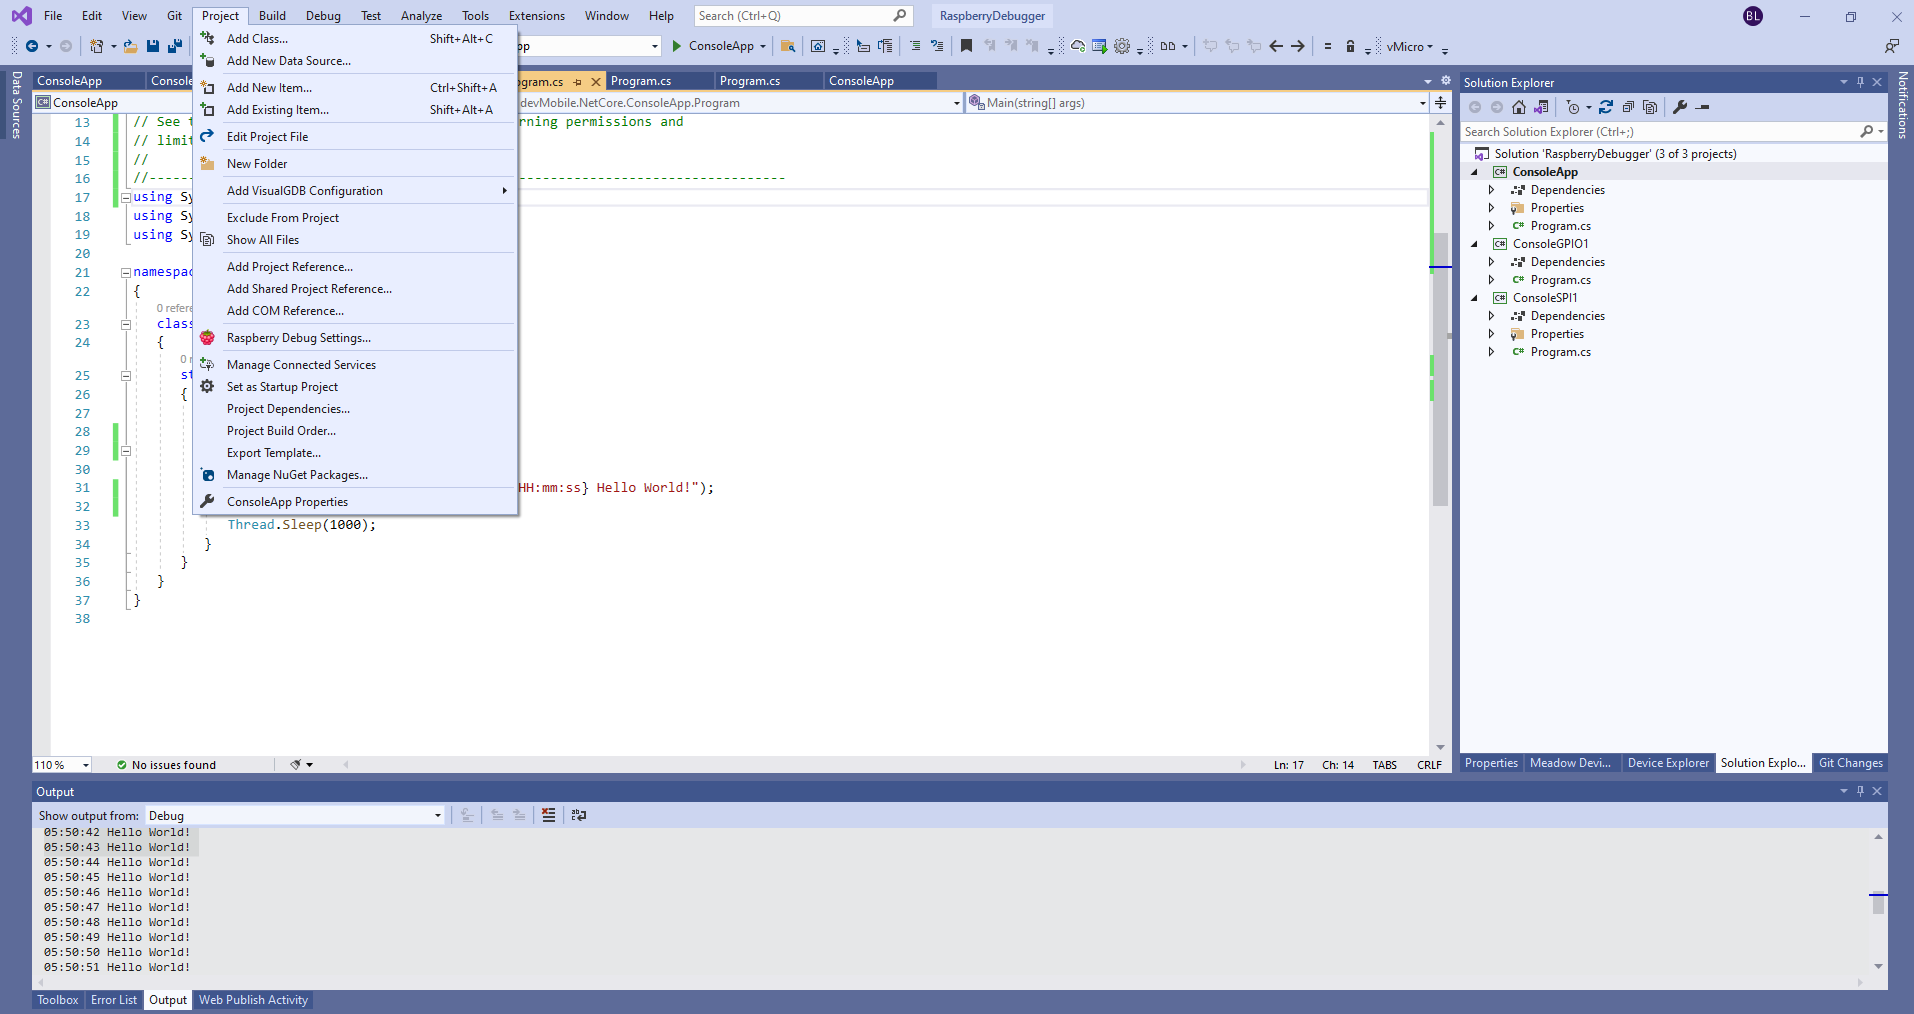
After typing in my “Hello world” application I had to select the device I wanted to use
Project menu RaspberryDebugger option
RaspberryDebugger device selection
Then I pressed F5 and it worked! It’s very unusual for things to work first time so I was stunned. The application was “automagically” downloaded and run in the debugger on the device.
-------------------------------------------------------------------
You may only use the Microsoft .NET Core Debugger (vsdbg) with
Visual Studio Code, Visual Studio or Visual Studio for Mac software
to help you develop and test your applications.
-------------------------------------------------------------------
Loaded '/usr/lib/dotnet/shared/Microsoft.NETCore.App/5.0.4/System.Private.CoreLib.dll'. Skipped loading symbols. Module is optimized and the debugger option 'Just My Code' is enabled.
Loaded '/home/pi/vsdbg/ConsoleApp/ConsoleApp.dll'. Symbols loaded.
Loaded '/usr/lib/dotnet/shared/Microsoft.NETCore.App/5.0.4/System.Runtime.dll'. Skipped loading symbols. Module is optimized and the debugger option 'Just My Code' is enabled.
Loaded '/usr/lib/dotnet/shared/Microsoft.NETCore.App/5.0.4/System.Console.dll'. Skipped loading symbols. Module is optimized and the debugger option 'Just My Code' is enabled.
Loaded '/usr/lib/dotnet/shared/Microsoft.NETCore.App/5.0.4/System.Threading.Thread.dll'. Skipped loading symbols. Module is optimized and the debugger option 'Just My Code' is enabled.
Loaded '/usr/lib/dotnet/shared/Microsoft.NETCore.App/5.0.4/System.Threading.dll'. Skipped loading symbols. Module is optimized and the debugger option 'Just My Code' is enabled.
Loaded '/usr/lib/dotnet/shared/Microsoft.NETCore.App/5.0.4/System.Text.Encoding.Extensions.dll'. Skipped loading symbols. Module is optimized and the debugger option 'Just My Code' is enabled.
Loaded '/usr/lib/dotnet/shared/Microsoft.NETCore.App/5.0.4/Microsoft.Win32.Primitives.dll'. Skipped loading symbols. Module is optimized and the debugger option 'Just My Code' is enabled.
05:50:37 Hello World!
05:50:39 Hello World!
05:50:40 Hello World!
05:50:41 Hello World!
05:50:42 Hello World!
05:50:43 Hello World!
...
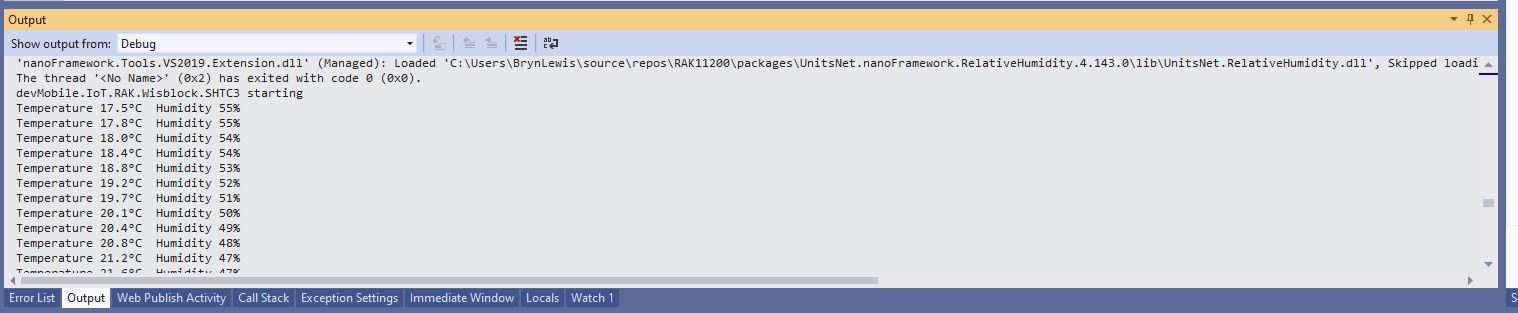
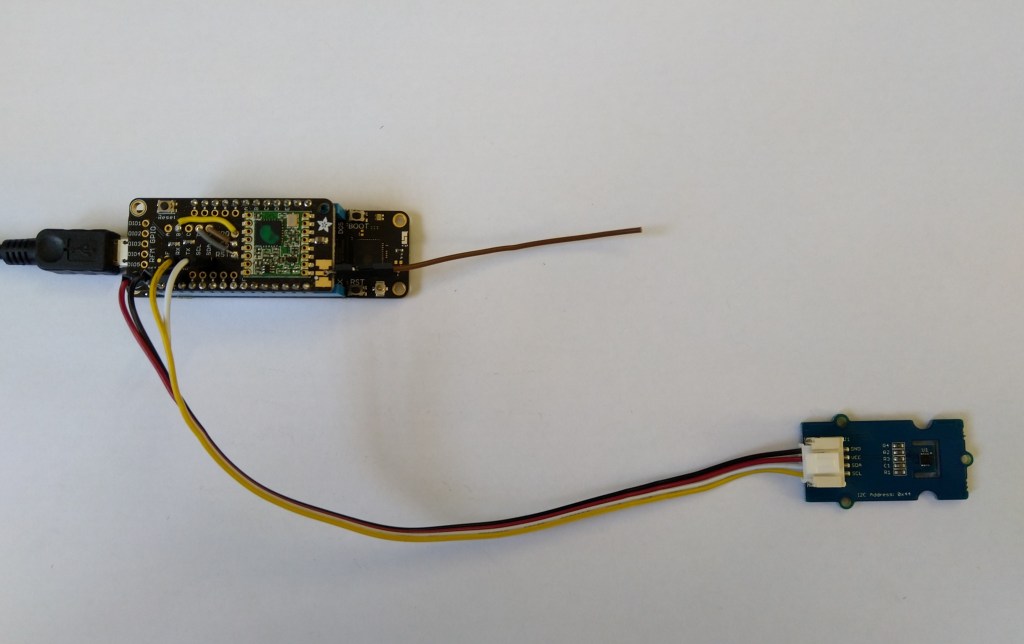
This sample client is an Wilderness Labs Meadow with a Sensiron SHT31 Temperature & humidity sensor (supported by meadow foundation), and a generic nRF24L01 device connected with jumper cables.
After sorting out power to the SHT31 (I had to push the jumper cable further into the back of the jumper cable plug). I could see temperature and humidity values getting uploaded to Adafruit.IO.
Visual Studio 2019 debug output
Adafruit.IO “automagically” provisions new feeds which is helpful when building a proof of concept (PoC)
Adafruit.IO feed with default feed IDs
I then modified the feed configuration to give it a user friendly name.
//---------------------------------------------------------------------------------
// Copyright (c) January 2020, devMobile Software
//
// Licensed under the Apache License, Version 2.0 (the "License");
// you may not use this file except in compliance with the License.
// You may obtain a copy of the License at
//
//     http://www.apache.org/licenses/LICENSE-2.0
//
// Unless required by applicable law or agreed to in writing, software
// distributed under the License is distributed on an "AS IS" BASIS,
// WITHOUT WARRANTIES OR CONDITIONS OF ANY KIND, either express or implied.
// See the License for the specific language governing permissions and
// limitations under the License.
//
//---------------------------------------------------------------------------------
namespace devMobile.IoT.FieldGateway.Client
{
   using System;
   using System.Text;
   using System.Threading;

   using devMobile.IoT.Rfm9x;

   using Meadow;
   using Meadow.Devices;
   using Meadow.Foundation.Leds;
   using Meadow.Foundation.Sensors.Atmospheric;
   using Meadow.Hardware;
   using Meadow.Peripherals.Leds;

   public class MeadowClient : App<F7Micro, MeadowClient>
   {
      private const double Frequency = 915000000.0;
      private readonly byte[] fieldGatewayAddress = Encoding.UTF8.GetBytes("LoRaIoT1");
      private readonly byte[] deviceAddress = Encoding.UTF8.GetBytes("Meadow");
      private readonly Rfm9XDevice rfm9XDevice;
      private readonly TimeSpan periodTime = new TimeSpan(0, 0, 60);
      private readonly Sht31D sensor;
      private readonly ILed Led;

      public MeadowClient()
      {
         Led = new Led(Device, Device.Pins.OnboardLedGreen);

         try
         {
            sensor = new Sht31D(Device.CreateI2cBus());

            ISpiBus spiBus = Device.CreateSpiBus(500);

            rfm9XDevice = new Rfm9XDevice(Device, spiBus, Device.Pins.D09, Device.Pins.D10, Device.Pins.D12);

            rfm9XDevice.Initialise(Frequency, paBoost: true, rxPayloadCrcOn: true);
#if DEBUG
            rfm9XDevice.RegisterDump();
#endif
            rfm9XDevice.OnReceive += Rfm9XDevice_OnReceive;
            rfm9XDevice.Receive(deviceAddress);
            rfm9XDevice.OnTransmit += Rfm9XDevice_OnTransmit;
         }
         catch (Exception ex)
         {
            Console.WriteLine(ex.Message);
         }

         while (true)
         {
            sensor.Update();

            Console.WriteLine($"{DateTime.UtcNow:HH:mm:ss}-TX T:{sensor.Temperature:0.0}C H:{sensor.Humidity:0}%");

            string payload = $"t {sensor.Temperature:0.0},h {sensor.Humidity:0}";

            Led.IsOn = true;

            rfm9XDevice.Send(fieldGatewayAddress, Encoding.UTF8.GetBytes(payload));

            Thread.Sleep(periodTime);
         }
      }

      private void Rfm9XDevice_OnReceive(object sender, Rfm9XDevice.OnDataReceivedEventArgs e)
      {
         try
         {
            string addressText = UTF8Encoding.UTF8.GetString(e.Address);
            string addressHex = BitConverter.ToString(e.Address);
            string messageText = UTF8Encoding.UTF8.GetString(e.Data);

            Console.WriteLine($"{DateTime.UtcNow:HH:mm:ss}-RX PacketSnr {e.PacketSnr:0.0} Packet RSSI {e.PacketRssi}dBm RSSI {e.Rssi}dBm = {e.Data.Length} byte message {messageText}");
         }
         catch (Exception ex)
         {
            Console.WriteLine(ex.Message);
         }
      }

      private void Rfm9XDevice_OnTransmit(object sender, Rfm9XDevice.OnDataTransmitedEventArgs e)
      {
         Led.IsOn = false;

         Console.WriteLine("{0:HH:mm:ss}-TX Done", DateTime.Now);
      }
   }
}
The Meadow platform is a work in progress (Jan 2020) so I haven’t put any effort into minimising power consumption but will revisit this in a future post.
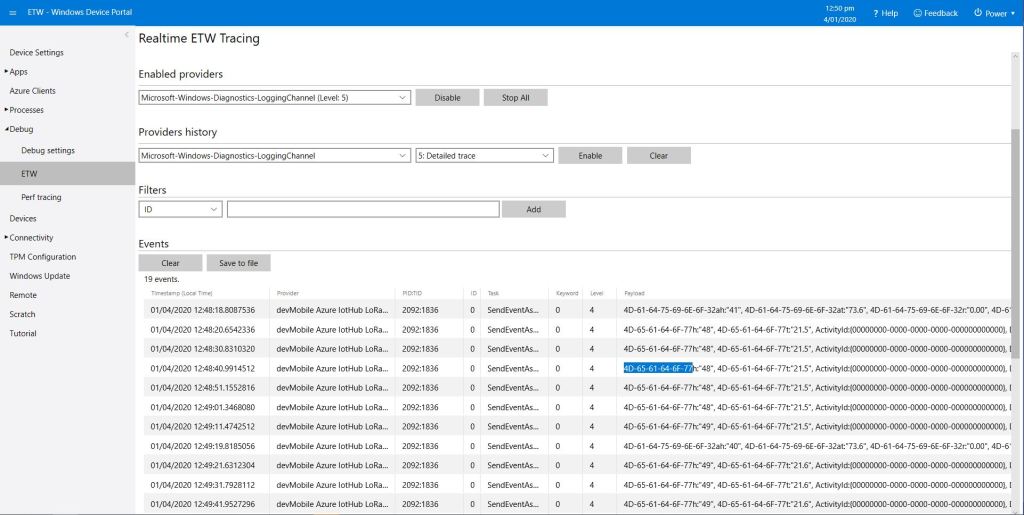
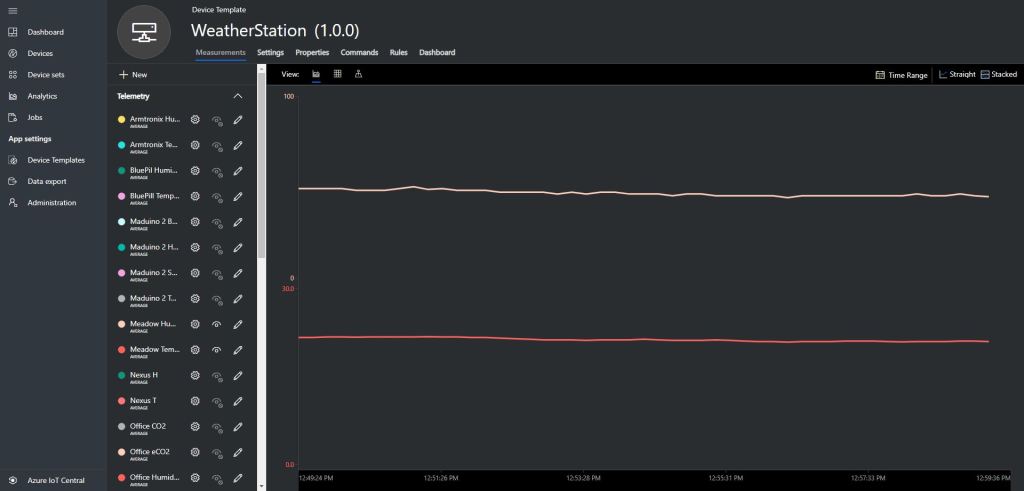
Meadow device with Seeedstudio SHT31 temperature & humidity sensorMeadow sensor data in Field Gateway ETW loggingMeadow Sensor data in Azure IoT Central
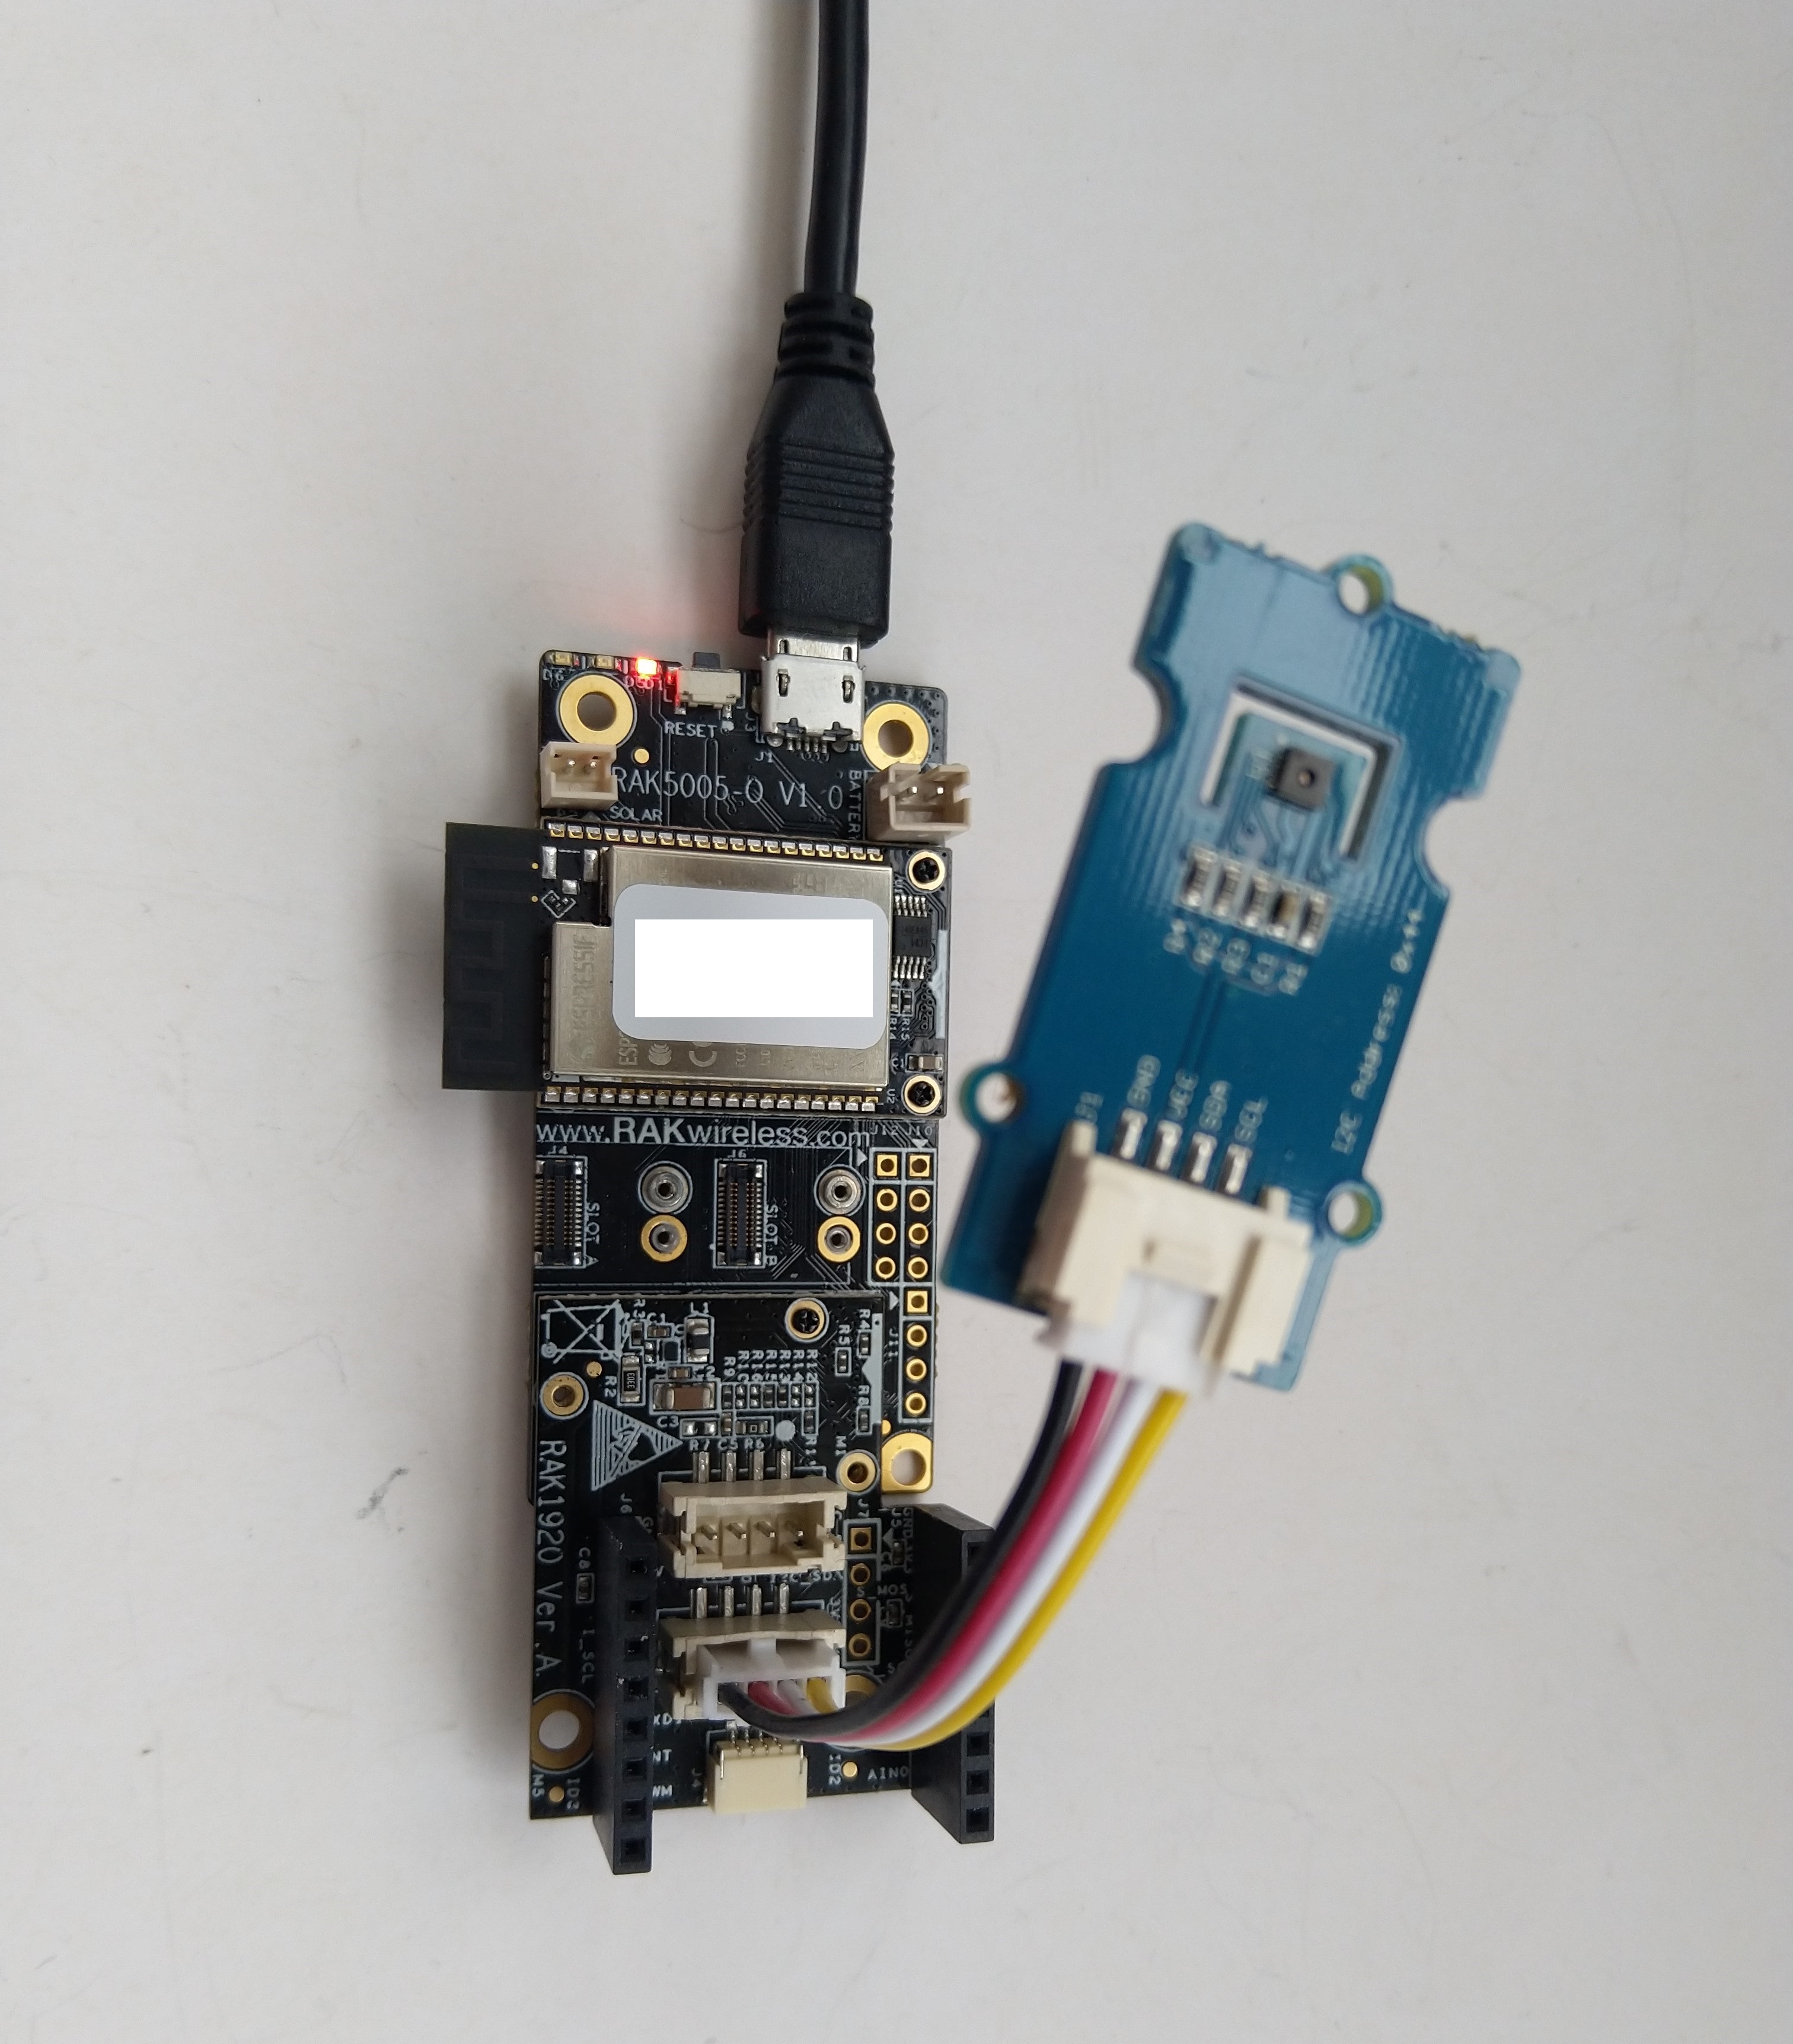
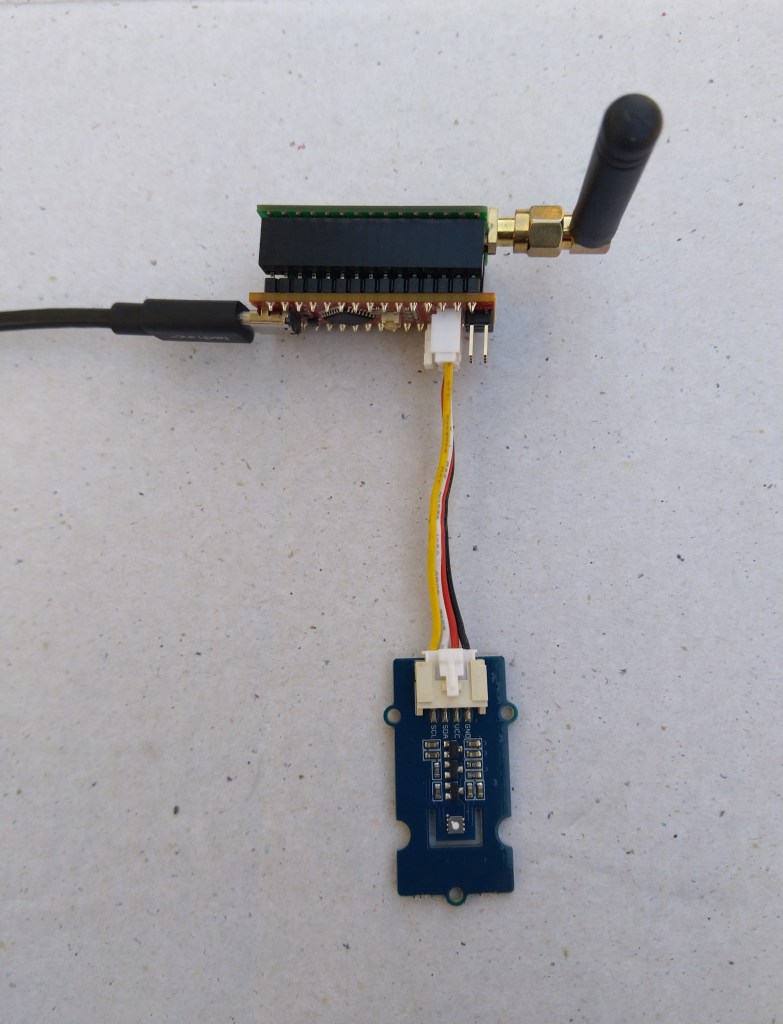
Seeeduino Nano easySensors shield and Grove VOC & eCO2 Sensor
Seeeduino Nano devices have a single on-board I2C socket which meant I didn’t need a Grove Shield for Arduino Nano which reduced the size and cost of the sensor node.
My first attempt failed with an issues accessing an Analog port to read the serial number from the Microchip ATSHA204 security chip. After looking at the Seeed SGP30 library source code (based on Sensiron samples) I think the my Nano device was running out of memory. I then searched for other Arduino compatible SGP30 libraries and rebuilt he application with the one from Sparkfun,
/*
  Copyright ® 2019 August devMobile Software, All Rights Reserved

  THIS CODE AND INFORMATION IS PROVIDED "AS IS" WITHOUT WARRANTY OF ANY
  KIND, EITHER EXPRESSED OR IMPLIED, INCLUDING BUT NOT LIMITED TO THE
  IMPLIED WARRANTIES OF MERCHANTABILITY AND/OR FITNESS FOR A PARTICULAR
  PURPOSE.

  You can do what you want with this code, acknowledgment would be nice.
  http://www.devmobile.co.nz

  Seeedstudio Grove - VOC and eCO2 Gas Sensor (SGP30)
  https://www.seeedstudio.com/Grove-VOC-and-eCO2-Gas-Sensor-SGP30-p-3071.html

  Seeeduino Nano
  https://www.seeedstudio.com/Seeeduino-Nano-p-4111.html

  Polycarbonate enclosure approx 3.5" x 4.5"
    2 x Cable glands
    1 x Grommet to seal SMA antenna connector
    3M command adhesive strips to hold battery & device in place

*/
#include <stdlib.h>
#include "SparkFun_SGP30_Arduino_Library.h"
#include <LoRa.h>
#include <sha204_library.h>

//#define DEBUG
//#define DEBUG_TELEMETRY
//#define DEBUG_LORA
#define DEBUG_VOC_AND_CO2

#define UNITS_VOC "ppb"
#define UNITS_CO2 "ppm"

// LoRa field gateway configuration (these settings must match your field gateway)
const byte DeviceAddressMaximumLength = 15 ;
const char FieldGatewayAddress[] = {"LoRaIoT1"};
const float FieldGatewayFrequency =  915000000.0;
const byte FieldGatewaySyncWord = 0x12 ;

// Payload configuration
const int ChipSelectPin = 10;
const int ResetPin = 9;
const int InterruptPin = 2;

// LoRa radio payload configuration
const byte SensorIdValueSeperator = ' ' ;
const byte SensorReadingSeperator = ',' ;
const unsigned long SensorUploadDelay = 60000;

// ATSHA204 secure authentication, validation with crypto and hashing (currently only using for unique serial number)
const byte Atsha204Port = A3;
atsha204Class sha204(Atsha204Port);
const byte DeviceSerialNumberLength = 9 ;
byte deviceSerialNumber[DeviceSerialNumberLength] = {""};

SGP30 mySensor; //create an object of the SGP30 class

const byte PayloadSizeMaximum = 64 ;
byte payload[PayloadSizeMaximum];
byte payloadLength = 0 ;


void setup()
{
  Serial.begin(9600);

#ifdef DEBUG
  while (!Serial);
#endif

  Serial.println("Setup called");

  Serial.print("Field gateway:");
  Serial.print(FieldGatewayAddress ) ;
  Serial.print(" Frequency:");
  Serial.print( FieldGatewayFrequency,0 ) ;
  Serial.print("MHz SyncWord:");
  Serial.print( FieldGatewaySyncWord ) ;
  Serial.println();

   // Retrieve the serial number then display it nicely
  if(sha204.getSerialNumber(deviceSerialNumber))
  {
    Serial.println("sha204.getSerialNumber failed");
    while (true); // Drop into endless loop requiring restart
  }

  Serial.print("SNo:");
  DisplayHex( deviceSerialNumber, DeviceSerialNumberLength);
  Serial.println();

  Serial.println("LoRa setup start");

  // override the default chip select and reset pins
  LoRa.setPins(ChipSelectPin, ResetPin, InterruptPin);
  if (!LoRa.begin(FieldGatewayFrequency))
  {
    Serial.println("LoRa begin failed");
    while (true); // Drop into endless loop requiring restart
  }

  // Need to do this so field gateway pays attention to messsages from this device
  LoRa.enableCrc();
  LoRa.setSyncWord(FieldGatewaySyncWord);

#ifdef DEBUG_LORA
  LoRa.dumpRegisters(Serial);
#endif
  Serial.println("LoRa Setup done.");

  // Configure the DF Robot SHT20, temperature & humidity sensor
  Serial.println("SGP30 setup start");
  Wire.begin();
  if(mySensor.begin() == false)
  {
    Serial.println("SQP-30 initialisation failed");
    while (true); // Drop into endless loop requiring restart
  }
  mySensor.initAirQuality();
  delay(1000);
  Serial.println("SGP30 setup done");

  PayloadHeader((byte *)FieldGatewayAddress,strlen(FieldGatewayAddress), deviceSerialNumber, DeviceSerialNumberLength);

  Serial.println("Setup done");
  Serial.println();
}


void loop()
{
  unsigned long currentMilliseconds = millis();

  Serial.println("Loop called");

  mySensor.measureAirQuality();

  PayloadReset();

  PayloadAdd( "v", mySensor.TVOC, false);

  PayloadAdd( "c", mySensor.CO2, false);

  #ifdef DEBUG_VOC_AND_CO2
    Serial.print("VoC:");
    Serial.print( mySensor.TVOC ) ;
    Serial.print( UNITS_VOC ) ;
    Serial.print(" Co2:");
    Serial.print( mySensor.CO2 ) ;
    Serial.println( UNITS_CO2 ) ;
  #endif

  #ifdef DEBUG_TELEMETRY
    Serial.println();
    Serial.print("RFM9X/SX127X Payload length:");
    Serial.print(payloadLength);
    Serial.println(" bytes");
  #endif

  LoRa.beginPacket();
  LoRa.write(payload, payloadLength);
  LoRa.endPacket();

  Serial.println("Loop done");
  Serial.println();

  delay(SensorUploadDelay - (millis() - currentMilliseconds ));
}


void PayloadHeader( const byte *to, byte toAddressLength, const byte *from, byte fromAddressLength)
{
  byte addressesLength = toAddressLength + fromAddressLength ;

  payloadLength = 0 ;

  // prepare the payload header with "To" Address length (top nibble) and "From" address length (bottom nibble)

  payload[payloadLength] = (toAddressLength << 4) | fromAddressLength ;
  payloadLength += 1;

  // Copy the "To" address into payload
  memcpy(&payload[payloadLength], to, toAddressLength);
  payloadLength += toAddressLength ;

  // Copy the "From" into payload
  memcpy(&payload[payloadLength], from, fromAddressLength);
  payloadLength += fromAddressLength ;
}


void PayloadAdd( const char *sensorId, float value, byte decimalPlaces, bool last)
{
  byte sensorIdLength = strlen( sensorId ) ;

  memcpy( &payload[payloadLength], sensorId,  sensorIdLength) ;
  payloadLength += sensorIdLength ;
  payload[ payloadLength] = SensorIdValueSeperator;
  payloadLength += 1 ;
  payloadLength += strlen( dtostrf(value, -1, decimalPlaces, (char *)&payload[payloadLength]));
  if (!last)
  {
    payload[ payloadLength] = SensorReadingSeperator;
    payloadLength += 1 ;
  }

#ifdef DEBUG_TELEMETRY
  Serial.print("PayloadAdd float-payloadLength:");
  Serial.print( payloadLength);
  Serial.println( );
#endif
}


void PayloadAdd( char *sensorId, int value, bool last )
{
  byte sensorIdLength = strlen(sensorId) ;

  memcpy(&payload[payloadLength], sensorId,  sensorIdLength) ;
  payloadLength += sensorIdLength ;
  payload[ payloadLength] = SensorIdValueSeperator;
  payloadLength += 1 ;
  payloadLength += strlen(itoa( value,(char *)&payload[payloadLength],10));
  if (!last)
  {
    payload[ payloadLength] = SensorReadingSeperator;
    payloadLength += 1 ;
  }

#ifdef DEBUG_TELEMETRY
  Serial.print("PayloadAdd int-payloadLength:" );
  Serial.print(payloadLength);
  Serial.println( );
#endif
}


void PayloadAdd( char *sensorId, unsigned int value, bool last )
{
  byte sensorIdLength = strlen(sensorId) ;

  memcpy(&payload[payloadLength], sensorId,  sensorIdLength) ;
  payloadLength += sensorIdLength ;
  payload[ payloadLength] = SensorIdValueSeperator;
  payloadLength += 1 ;
  payloadLength += strlen(utoa( value,(char *)&payload[payloadLength],10));
  if (!last)
  {
    payload[ payloadLength] = SensorReadingSeperator;
    payloadLength += 1 ;
  }

#ifdef DEBUG_TELEMETRY
  Serial.print("PayloadAdd uint-payloadLength:");
  Serial.print(payloadLength);
  Serial.println( );
#endif
}


void PayloadReset()
{
  byte fromAddressLength = payload[0] & 0xf ;
  byte toAddressLength = payload[0] >> 4 ;

  payloadLength = toAddressLength + fromAddressLength + 1;
}


void DisplayHex( byte *byteArray, byte length)
{
  for (int i = 0; i < length ; i++)
  {
    // Add a leading zero
    if ( byteArray[i] < 16)
    {
      Serial.print("0");
    }
    Serial.print(byteArray[i], HEX);
    if ( i < (length-1)) // Don't put a - after last digit
    {
      Serial.print("-");
    }
  }
}
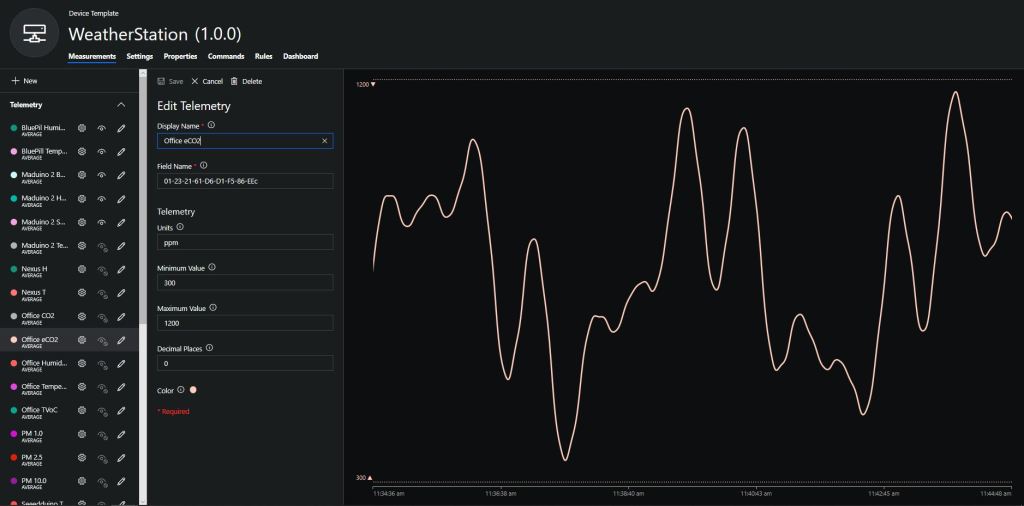
To configure the device in Azure IoT Central (similar process for Adafruit.IO, working on support for losant, and ubidots) I copied the SNo: from the Arduino development tool logging window and appended c for the CO2 parts per million (ppm), v for VOC parts per billion (ppb) unique serial number from the ATSHA204A chip. (N.B. pay attention to the case of the field names they are case sensitive)
Azure IoT Central configuration
Overall the performance of the VoC sensor data is looking pretty positive, the eCO2 readings need some further investigation as they track the VOC levels. The large spike in the graph below is me putting an open vivid marker on my desk near the sensor.
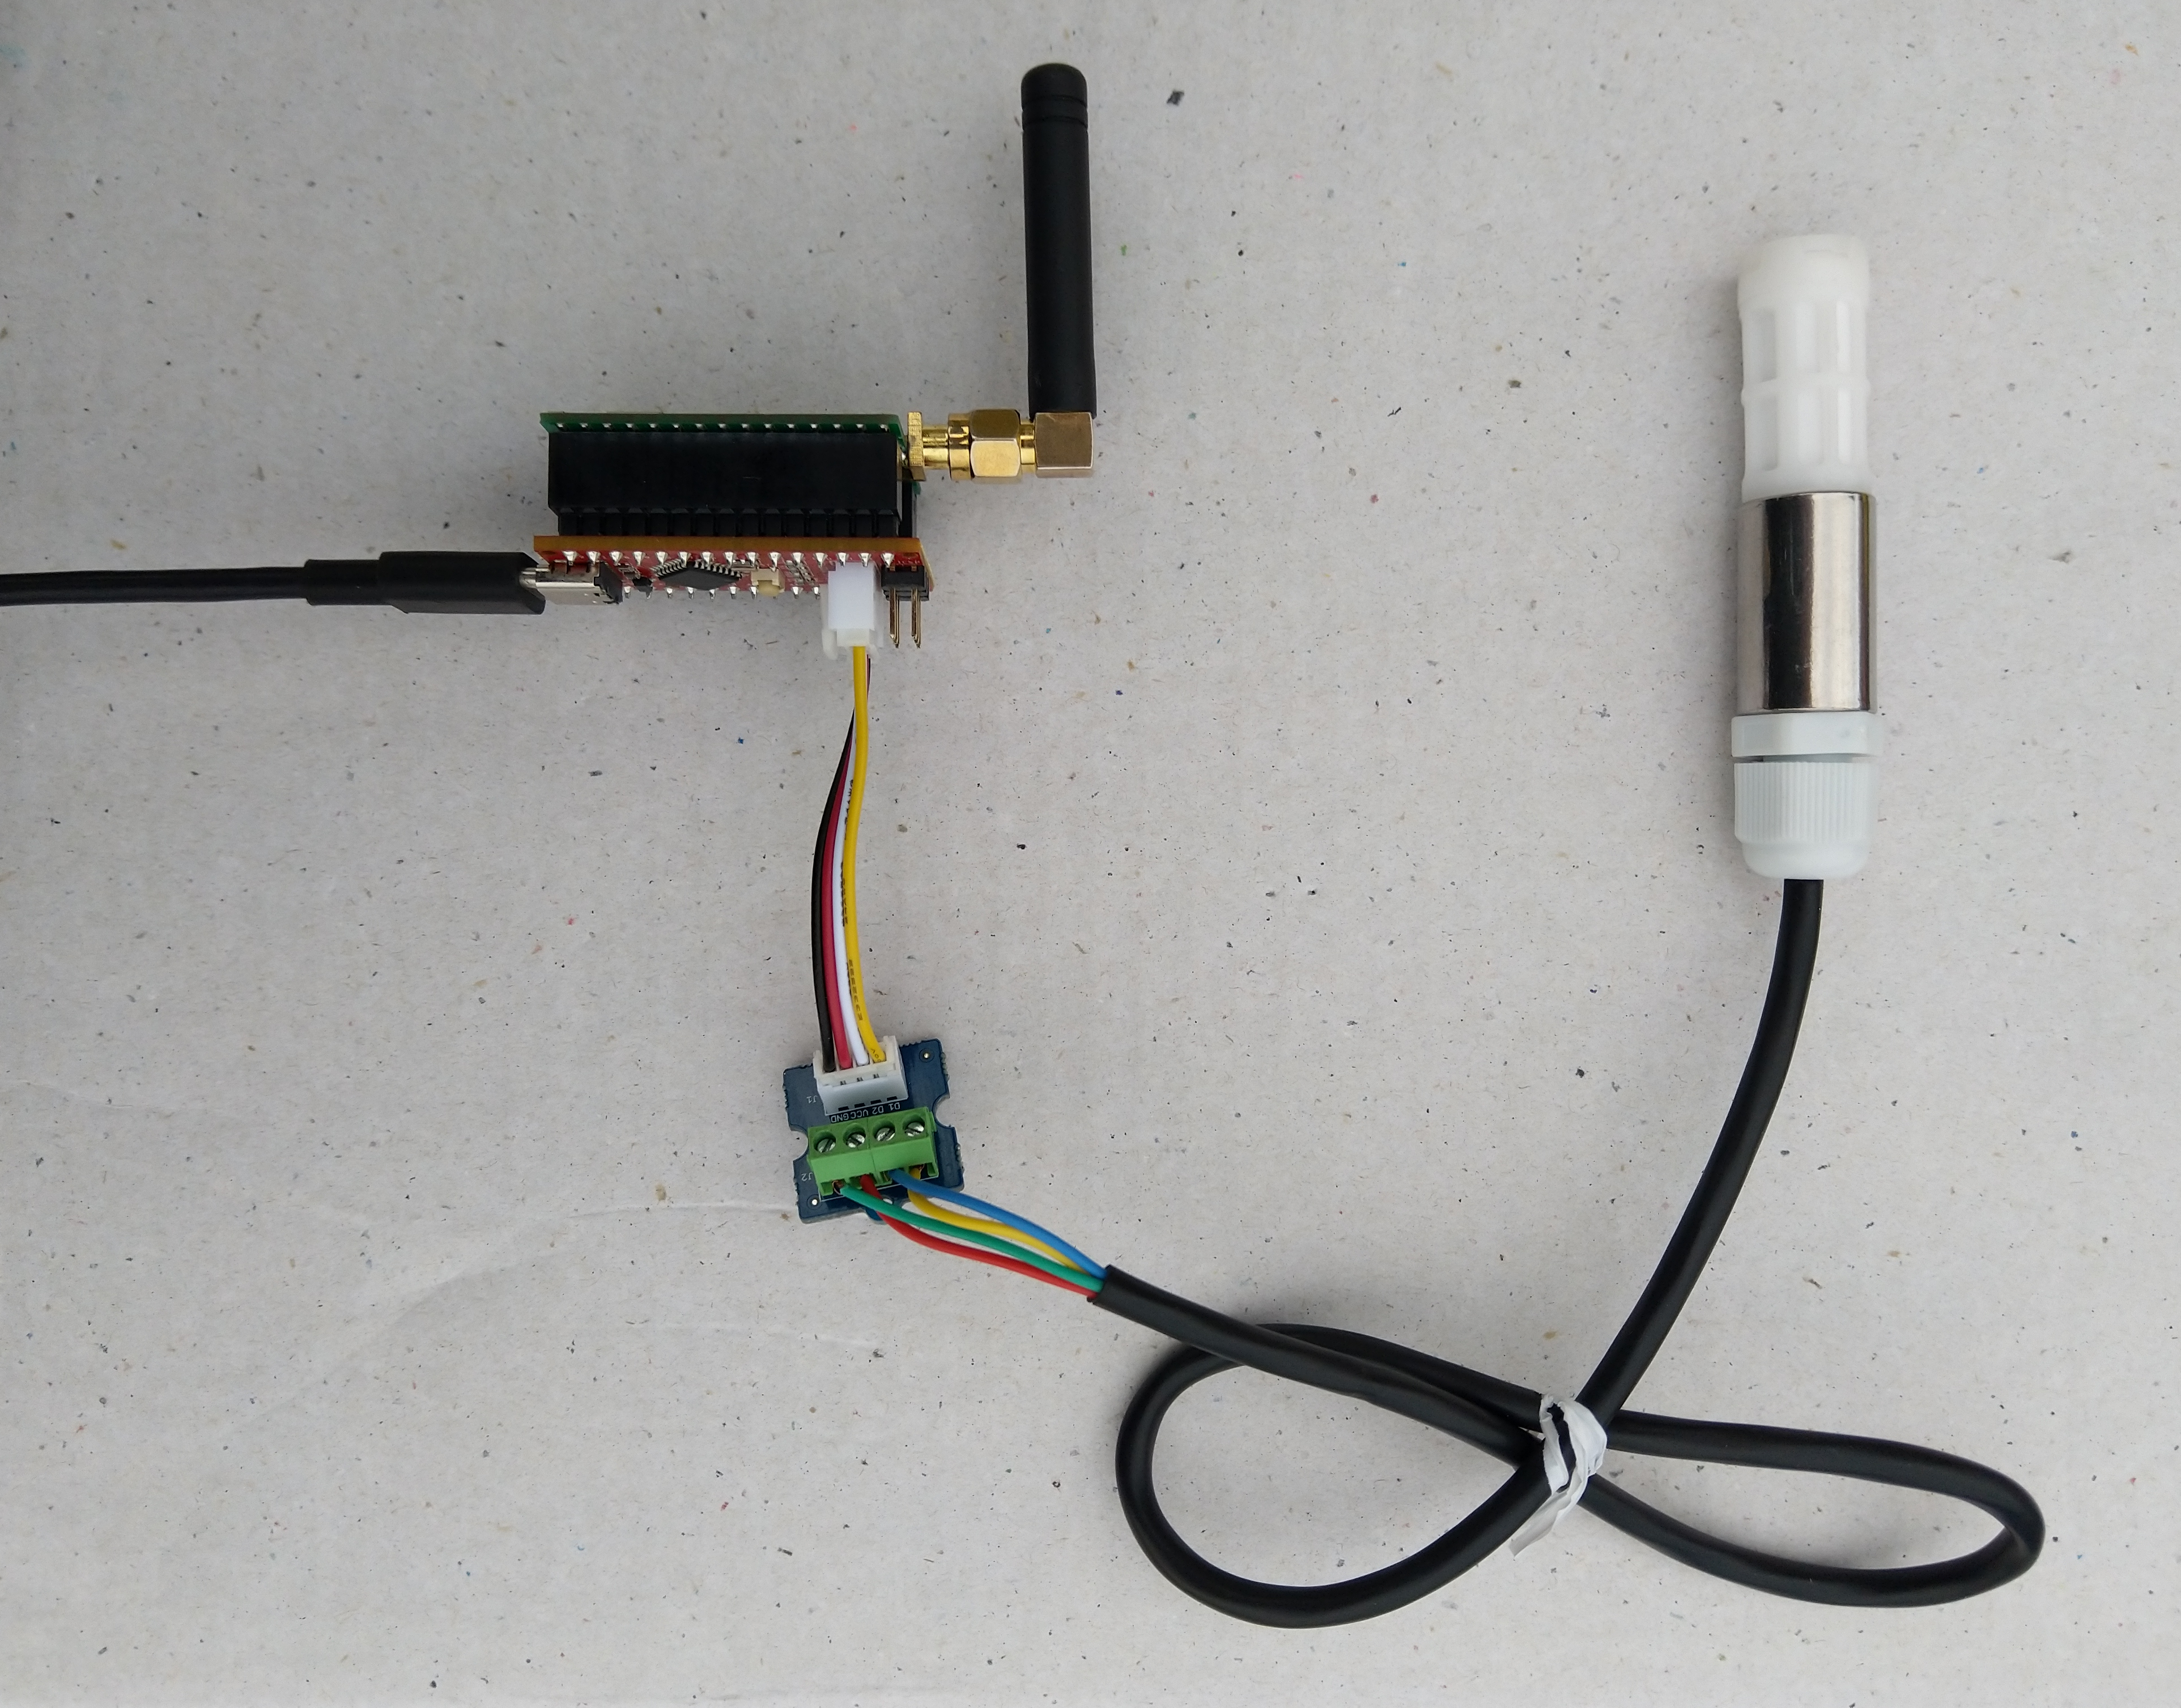
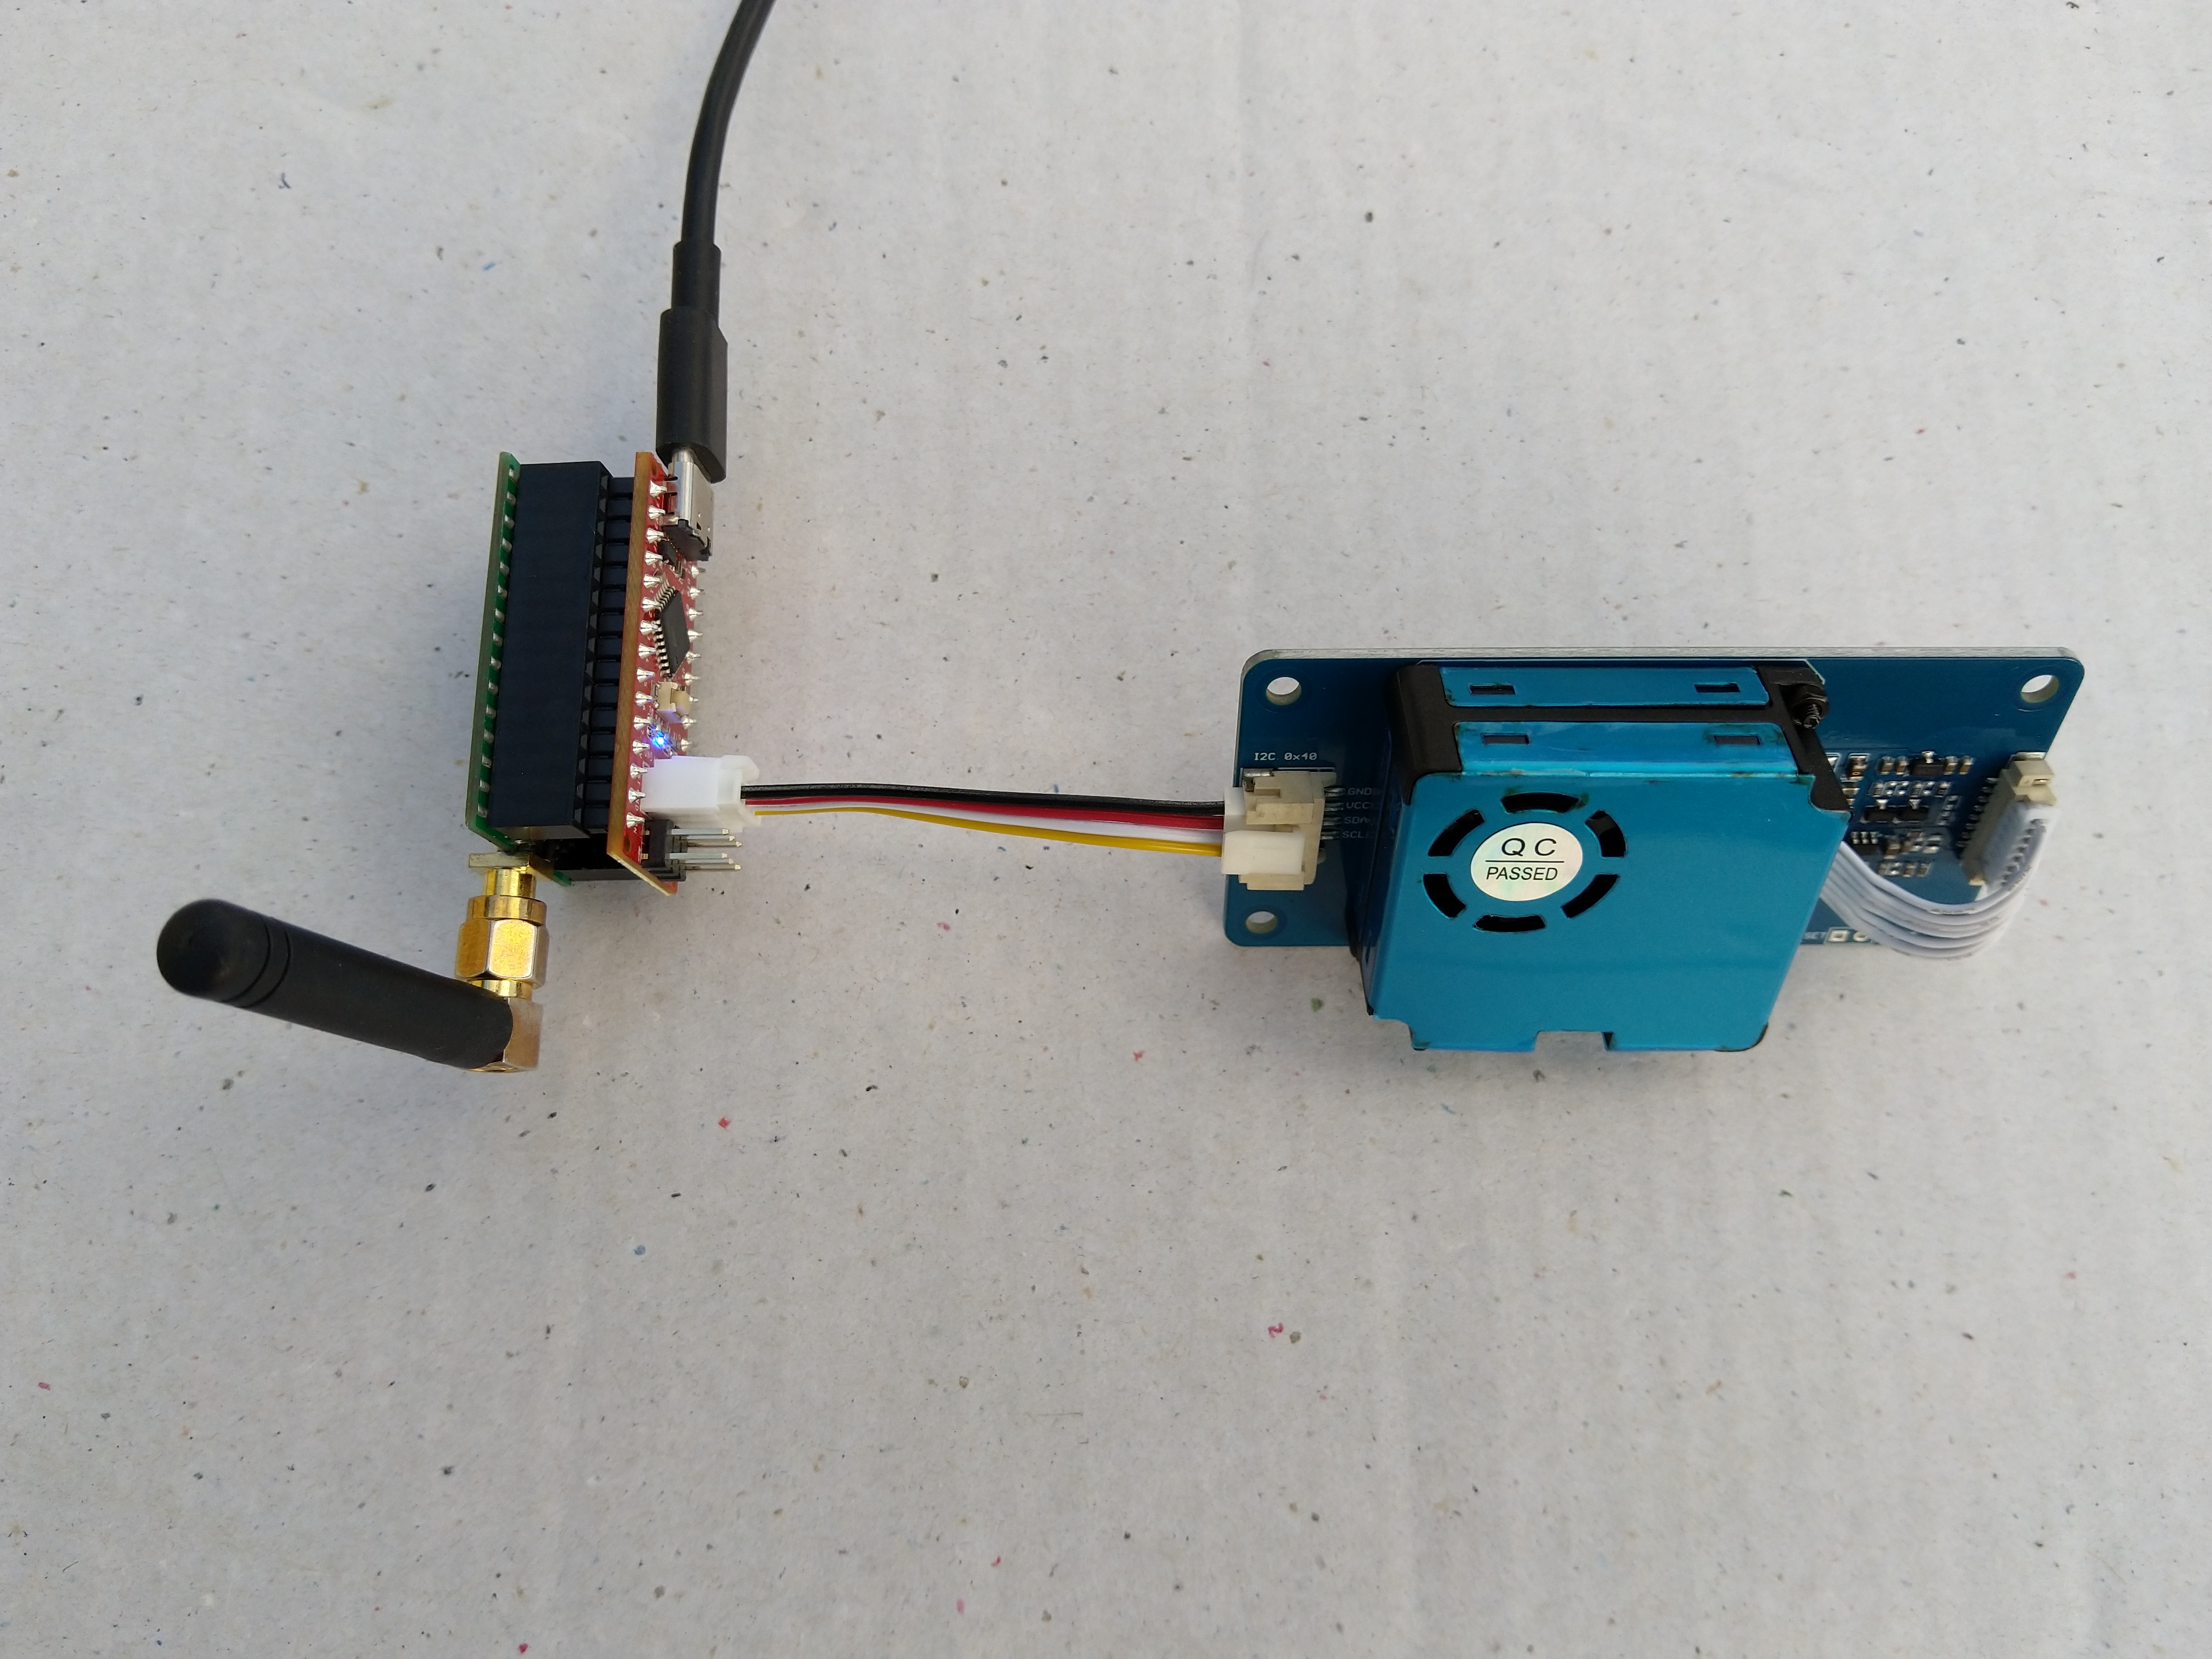
Seeeduino Nano, EasySensors Shield & DF Robot Sensor test rig
The Seeeduino Nano devices I’m testing have a single on-board I2C socket which meant I didn’t need a Grove Shield for Arduino Nano which reduced the size and cost of the sensor node.
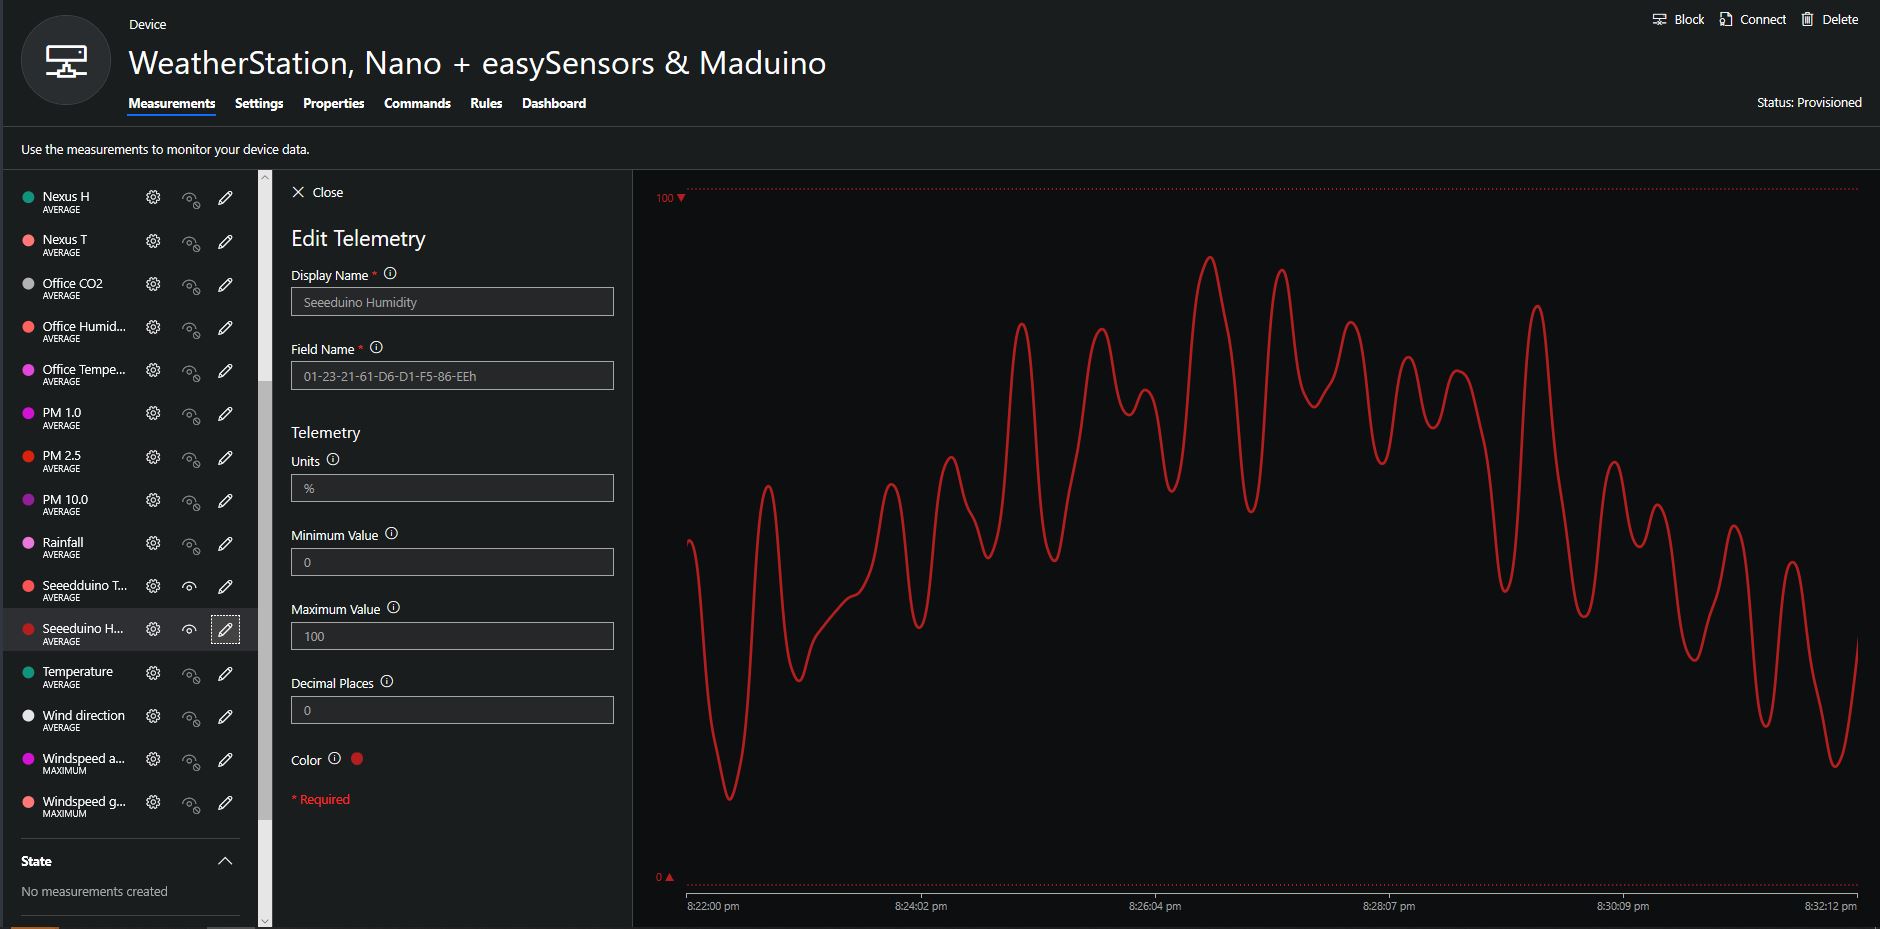
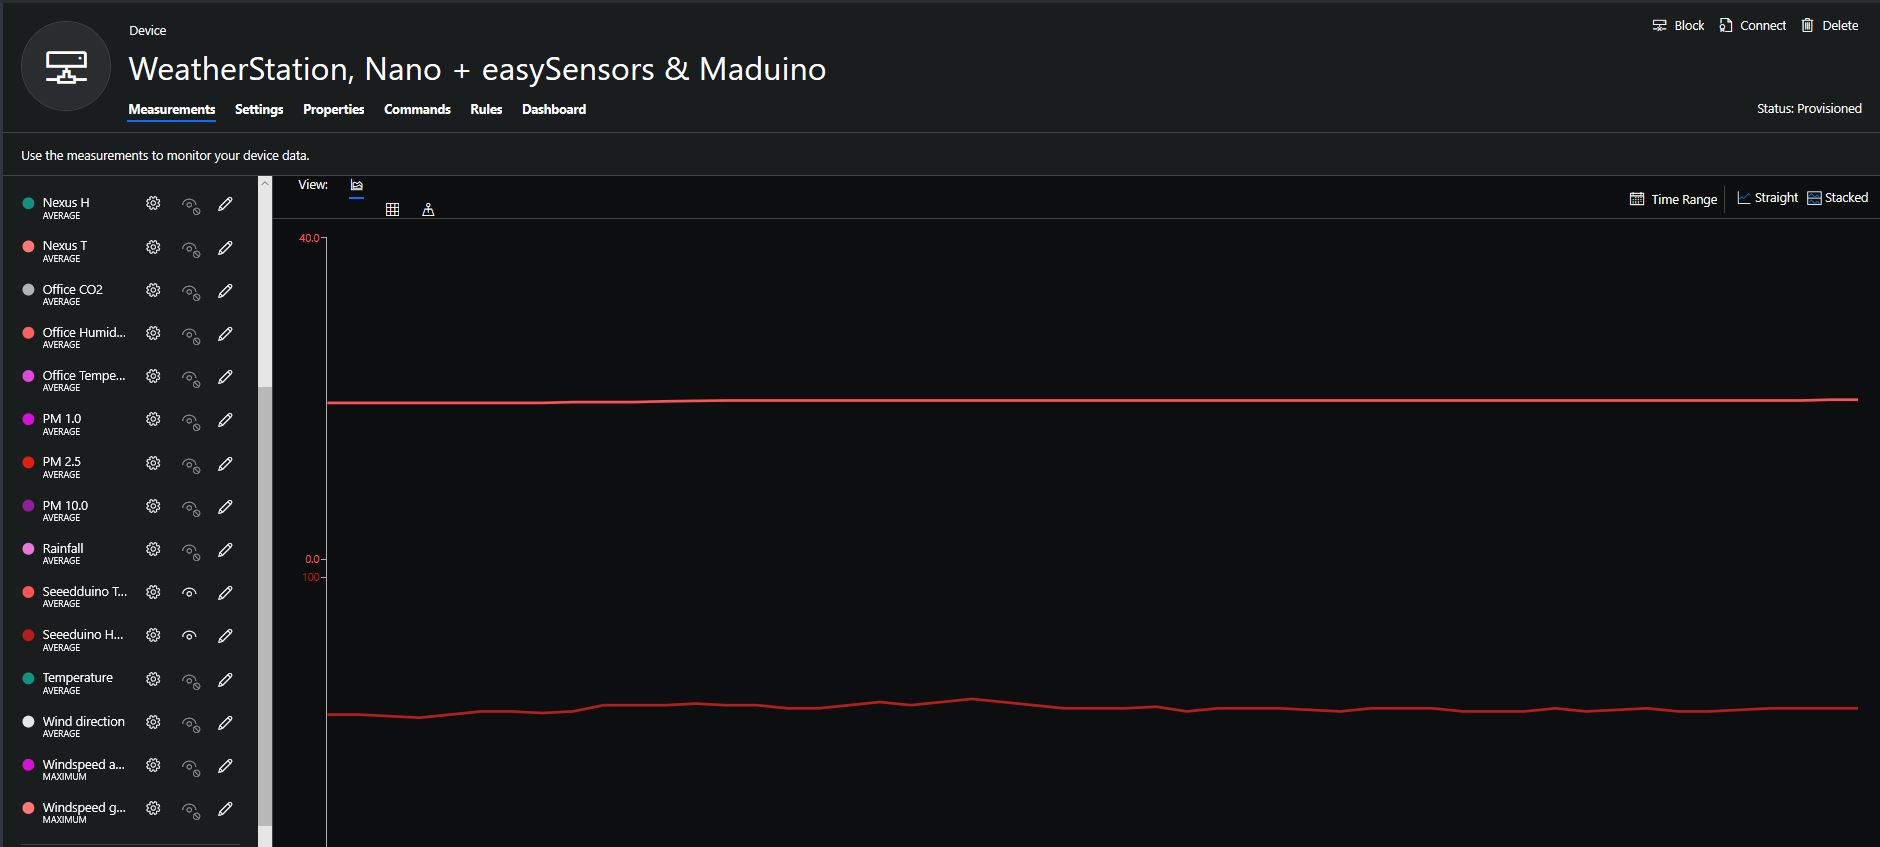
To configure the device in Azure IoT Central (similar process for Adafruit.IO, working on support for losant,and ubidots I copied the SNo: from the Arduino development tool logging window and appended p10 for PM 1 value, p25 for PM2.5 value and p100 for PM10 value to the unique serial number from the ATSHA204A chip. (N.B. pay attention to the case of the field names they are case sensitive)
When I moved the sensor indoors it appeared to take a while to warm up and after a while the metal body still felt cold. The sensor element is surrounded by quite a bit of protective packaging for outdoors use and I that would have a bit more thermal inertia the than the lightweight indoor enclosure.
It would be good to run the sensor alongside a calibrated temperature & humidity sensor to see how accurate and responsive it is.
The Seeeduino Nano devices I’m testing have a single on-board I2C socket which meant I didn’t need a Grove Shield for Arduino Nano which reduced the size and cost of the sensor node.
After looking at the demo application I stripped out the checksum code and threw the rest away. In my test harness I have extracted only the PM1.0/PM2.5/PM10.0 (concentration CF=1, Standard particulate) in μg/ m3 values from the sensor response payload.
/*
  Copyright ® 2019 August devMobile Software, All Rights Reserved

  THIS CODE AND INFORMATION IS PROVIDED "AS IS" WITHOUT WARRANTY OF ANY
  KIND, EITHER EXPRESSED OR IMPLIED, INCLUDING BUT NOT LIMITED TO THE
  IMPLIED WARRANTIES OF MERCHANTABILITY AND/OR FITNESS FOR A PARTICULAR
  PURPOSE.

  You can do what you want with this code, acknowledgment would be nice.

  http://www.devmobile.co.nz

*/
#include <stdlib.h>
#include <LoRa.h>
#include <sha204_library.h>
#include "Seeed_HM330X.h"

//#define DEBUG
//#define DEBUG_TELEMETRY
//#define DEBUG_LORA

const byte SensorPayloadLength = 28 ;
const byte SensorPayloadBufferSize  = 29 ;
const byte SensorPayloadPM1_0Position = 4;
const byte SensorPayloadPM2_5Position = 6;
const byte SensorPayloadPM10_0Position = 8;

HM330X sensor;
byte SensorPayload[SensorPayloadBufferSize];

// LoRa field gateway configuration (these settings must match your field gateway)
const byte DeviceAddressMaximumLength = 15 ;
const char FieldGatewayAddress[] = {"LoRaIoT1"};
const float FieldGatewayFrequency =  915000000.0;
const byte FieldGatewaySyncWord = 0x12 ;

// Payload configuration
const int ChipSelectPin = 10;
const int ResetPin = 9;
const int InterruptPin = 2;

// LoRa radio payload configuration
const byte SensorIdValueSeperator = ' ' ;
const byte SensorReadingSeperator = ',' ;
const unsigned long SensorUploadDelay = 60000;

// ATSHA204 secure authentication, validation with crypto and hashing (currently only using for unique serial number)
const byte Atsha204Port = A3;
atsha204Class sha204(Atsha204Port);
const byte DeviceSerialNumberLength = 9 ;
byte deviceSerialNumber[DeviceSerialNumberLength] = {""};

const byte PayloadSizeMaximum = 64 ;
byte payload[PayloadSizeMaximum];
byte payloadLength = 0 ;


void setup()
{
  Serial.begin(9600);

#ifdef DEBUG
  while (!Serial);
#endif

  Serial.println("Setup called");

  Serial.print("Field gateway:");
  Serial.print(FieldGatewayAddress ) ;
  Serial.print(" Frequency:");
  Serial.print( FieldGatewayFrequency,0 ) ;
  Serial.print("MHz SyncWord:");
  Serial.print( FieldGatewaySyncWord ) ;
  Serial.println();

   // Retrieve the serial number then display it nicely
  if(sha204.getSerialNumber(deviceSerialNumber))
  {
    Serial.println("sha204.getSerialNumber failed");
    while (true); // Drop into endless loop requiring restart
  }

  Serial.print("SNo:");
  DisplayHex( deviceSerialNumber, DeviceSerialNumberLength);
  Serial.println();

  Serial.println("LoRa setup start");

  // override the default chip select and reset pins
  LoRa.setPins(ChipSelectPin, ResetPin, InterruptPin);
  if (!LoRa.begin(FieldGatewayFrequency))
  {
    Serial.println("LoRa begin failed");
    while (true); // Drop into endless loop requiring restart
  }

  // Need to do this so field gateway pays attention to messsages from this device
  LoRa.enableCrc();
  LoRa.setSyncWord(FieldGatewaySyncWord);

#ifdef DEBUG_LORA
  LoRa.dumpRegisters(Serial);
#endif
  Serial.println("LoRa Setup done.");

  // Configure the Seeedstudio CO2, temperature & humidity sensor
  Serial.println("HM3301 setup start");
  if(sensor.init())
  {
    Serial.println("HM3301 init failed");
    while (true); // Drop into endless loop requiring restart

  }
  delay(100);
  Serial.println("HM3301 setup done");

  PayloadHeader((byte *)FieldGatewayAddress,strlen(FieldGatewayAddress), deviceSerialNumber, DeviceSerialNumberLength);

  Serial.println("Setup done");
  Serial.println();
}

void loop()
{
  unsigned long currentMilliseconds = millis();
  byte sum=0;
  short pm1_0 ;
  short pm2_5 ;
  short pm10_0 ;

  Serial.println("Loop called");

  if(sensor.read_sensor_value(SensorPayload,SensorPayloadBufferSize) == NO_ERROR)
  {
    // Calculate then validate the payload "checksum"
    for(int i=0;i<SensorPayloadLength;i++)
    {
        sum+=SensorPayload[i];
    }
    if(sum!=SensorPayload[SensorPayloadLength])
    {
        Serial.println("Invalid checksum");
        return;
    }

    PayloadReset();

    pm1_0 = (u16)SensorPayload[SensorPayloadPM1_0Position]<<8|SensorPayload[SensorPayloadPM1_0Position+1];
    Serial.print("PM1.5: ");
    Serial.print(pm1_0);
    Serial.println("ug/m3 ") ;

    PayloadAdd( "P10", pm1_0, false);

    pm2_5 = (u16)SensorPayload[SensorPayloadPM2_5Position]<<8|SensorPayload[SensorPayloadPM2_5Position+1];
    Serial.print("PM2.5: ");
    Serial.print(pm2_5);
    Serial.println("ug/m3 ") ;

    PayloadAdd( "P25", pm2_5, 1, false);

    pm10_0 = (u16)SensorPayload[SensorPayloadPM10_0Position]<<8|SensorPayload[SensorPayloadPM10_0Position+1];
    Serial.print("PM10.0: ");
    Serial.print(pm10_0);
    Serial.println("ug/m3 ");

    PayloadAdd( "P100", pm10_0, 0, true) ;

    #ifdef DEBUG_TELEMETRY
      Serial.println();
      Serial.print("RFM9X/SX127X Payload length:");
      Serial.print(payloadLength);
      Serial.println(" bytes");
    #endif

    LoRa.beginPacket();
    LoRa.write(payload, payloadLength);
    LoRa.endPacket();
  }
  Serial.println("Loop done");
  Serial.println();

  delay(SensorUploadDelay - (millis() - currentMilliseconds ));
}

void PayloadHeader( const byte *to, byte toAddressLength, const byte *from, byte fromAddressLength)
{
  byte addressesLength = toAddressLength + fromAddressLength ;

  payloadLength = 0 ;

  // prepare the payload header with "To" Address length (top nibble) and "From" address length (bottom nibble)

  payload[payloadLength] = (toAddressLength << 4) | fromAddressLength ;
  payloadLength += 1;

  // Copy the "To" address into payload
  memcpy(&payload[payloadLength], to, toAddressLength);
  payloadLength += toAddressLength ;

  // Copy the "From" into payload
  memcpy(&payload[payloadLength], from, fromAddressLength);
  payloadLength += fromAddressLength ;
}

void PayloadAdd( const char *sensorId, float value, byte decimalPlaces, bool last)
{
  byte sensorIdLength = strlen( sensorId ) ;

  memcpy( &payload[payloadLength], sensorId,  sensorIdLength) ;
  payloadLength += sensorIdLength ;
  payload[ payloadLength] = SensorIdValueSeperator;
  payloadLength += 1 ;
  payloadLength += strlen( dtostrf(value, -1, decimalPlaces, (char *)&payload[payloadLength]));
  if (!last)
  {
    payload[ payloadLength] = SensorReadingSeperator;
    payloadLength += 1 ;
  }

#ifdef DEBUG_TELEMETRY
  Serial.print("PayloadAdd float-payloadLength:");
  Serial.print( payloadLength);
  Serial.println( );
#endif
}

void PayloadAdd( char *sensorId, int value, bool last )
{
  byte sensorIdLength = strlen(sensorId) ;

  memcpy(&payload[payloadLength], sensorId,  sensorIdLength) ;
  payloadLength += sensorIdLength ;
  payload[ payloadLength] = SensorIdValueSeperator;
  payloadLength += 1 ;
  payloadLength += strlen(itoa( value,(char *)&payload[payloadLength],10));
  if (!last)
  {
    payload[ payloadLength] = SensorReadingSeperator;
    payloadLength += 1 ;
  }

#ifdef DEBUG_TELEMETRY
  Serial.print("PayloadAdd int-payloadLength:" );
  Serial.print(payloadLength);
  Serial.println( );
#endif
}

void PayloadAdd( char *sensorId, unsigned int value, bool last )
{
  byte sensorIdLength = strlen(sensorId) ;

  memcpy(&payload[payloadLength], sensorId,  sensorIdLength) ;
  payloadLength += sensorIdLength ;
  payload[ payloadLength] = SensorIdValueSeperator;
  payloadLength += 1 ;
  payloadLength += strlen(utoa( value,(char *)&payload[payloadLength],10));
  if (!last)
  {
    payload[ payloadLength] = SensorReadingSeperator;
    payloadLength += 1 ;
  }

#ifdef DEBUG_TELEMETRY
  Serial.print("PayloadAdd uint-payloadLength:");
  Serial.print(payloadLength);
  Serial.println( );
#endif
}

void PayloadReset()
{
  byte fromAddressLength = payload[0] & 0xf ;
  byte toAddressLength = payload[0] >> 4 ;

  payloadLength = toAddressLength + fromAddressLength + 1;
}

void DisplayHex( byte *byteArray, byte length)
{
  for (int i = 0; i < length ; i++)
  {
    // Add a leading zero
    if ( byteArray[i] < 16)
    {
      Serial.print("0");
    }
    Serial.print(byteArray[i], HEX);
    if ( i < (length-1)) // Don't put a - after last digit
    {
      Serial.print("-");
    }
  }
}
To configure the device in Azure IoT Central (similar process for Adafruit.IO, working on support for losant, and ubidots) I copied the SNo: from the Arduino development tool logging window and appended p10 for PM 1 value, p25 for PM2.5 value and p100 for PM10 value to the unique serial number from the ATSHA204A chip. (N.B. pay attention to the case of the field names they are case sensitive)
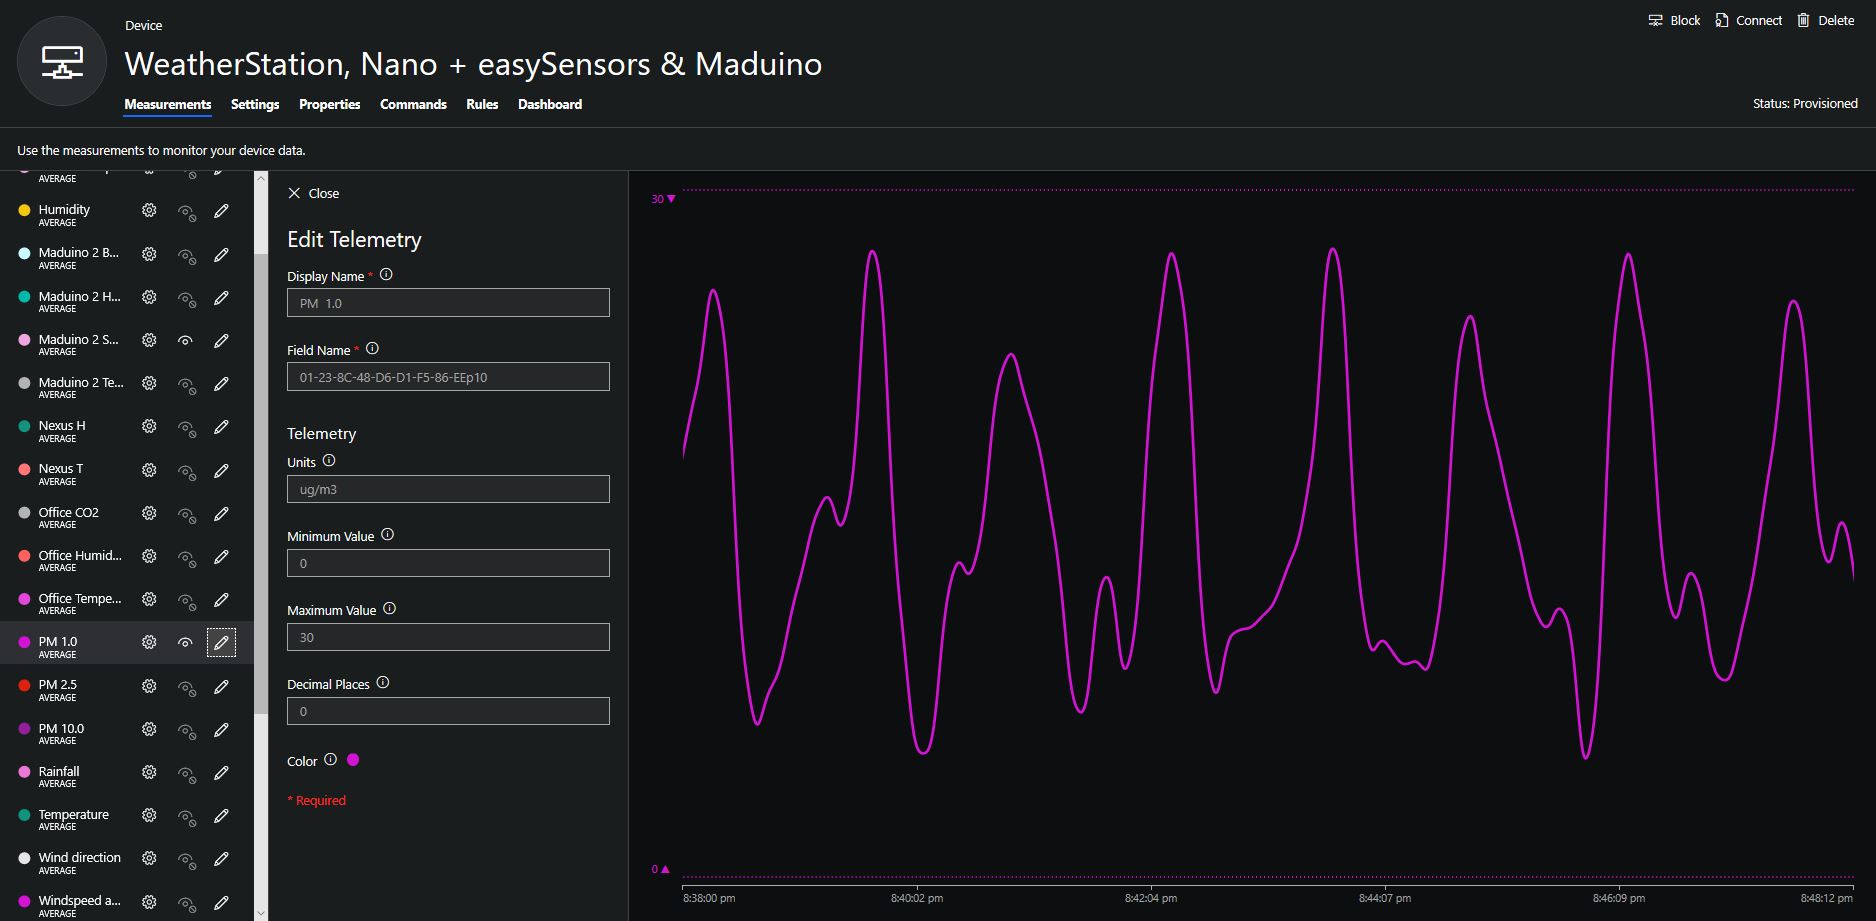
Azure IoT Central telemetry configuration
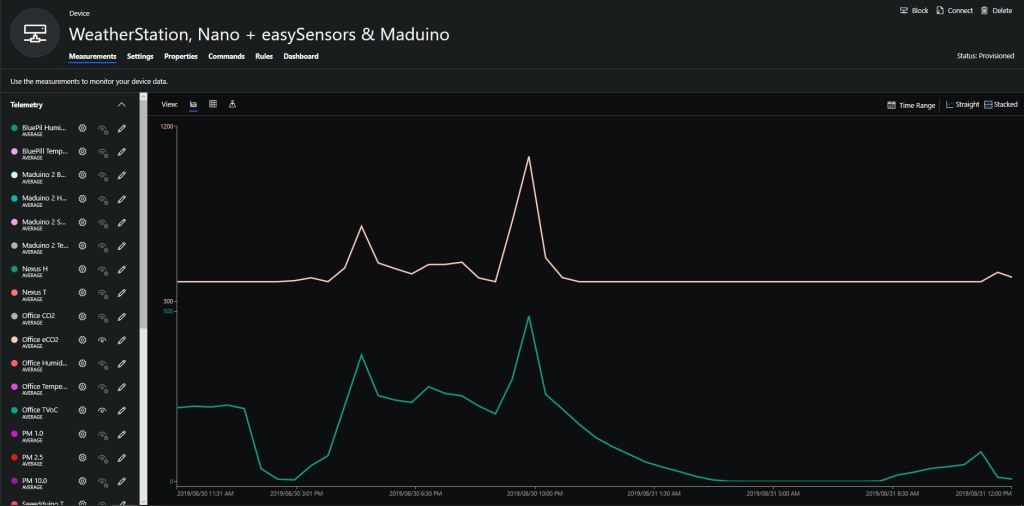
The rapidly settled into a narrow range of readings, but spiked when I took left it outside (winter in New Zealand) and the values spiked when food was being cooked in the kitchen which is next door to my office.
It would be good to run the sensor alongside a professional particulates monitor so the values could be compared and used to adjust the readings of the Grove sensor if necessary.
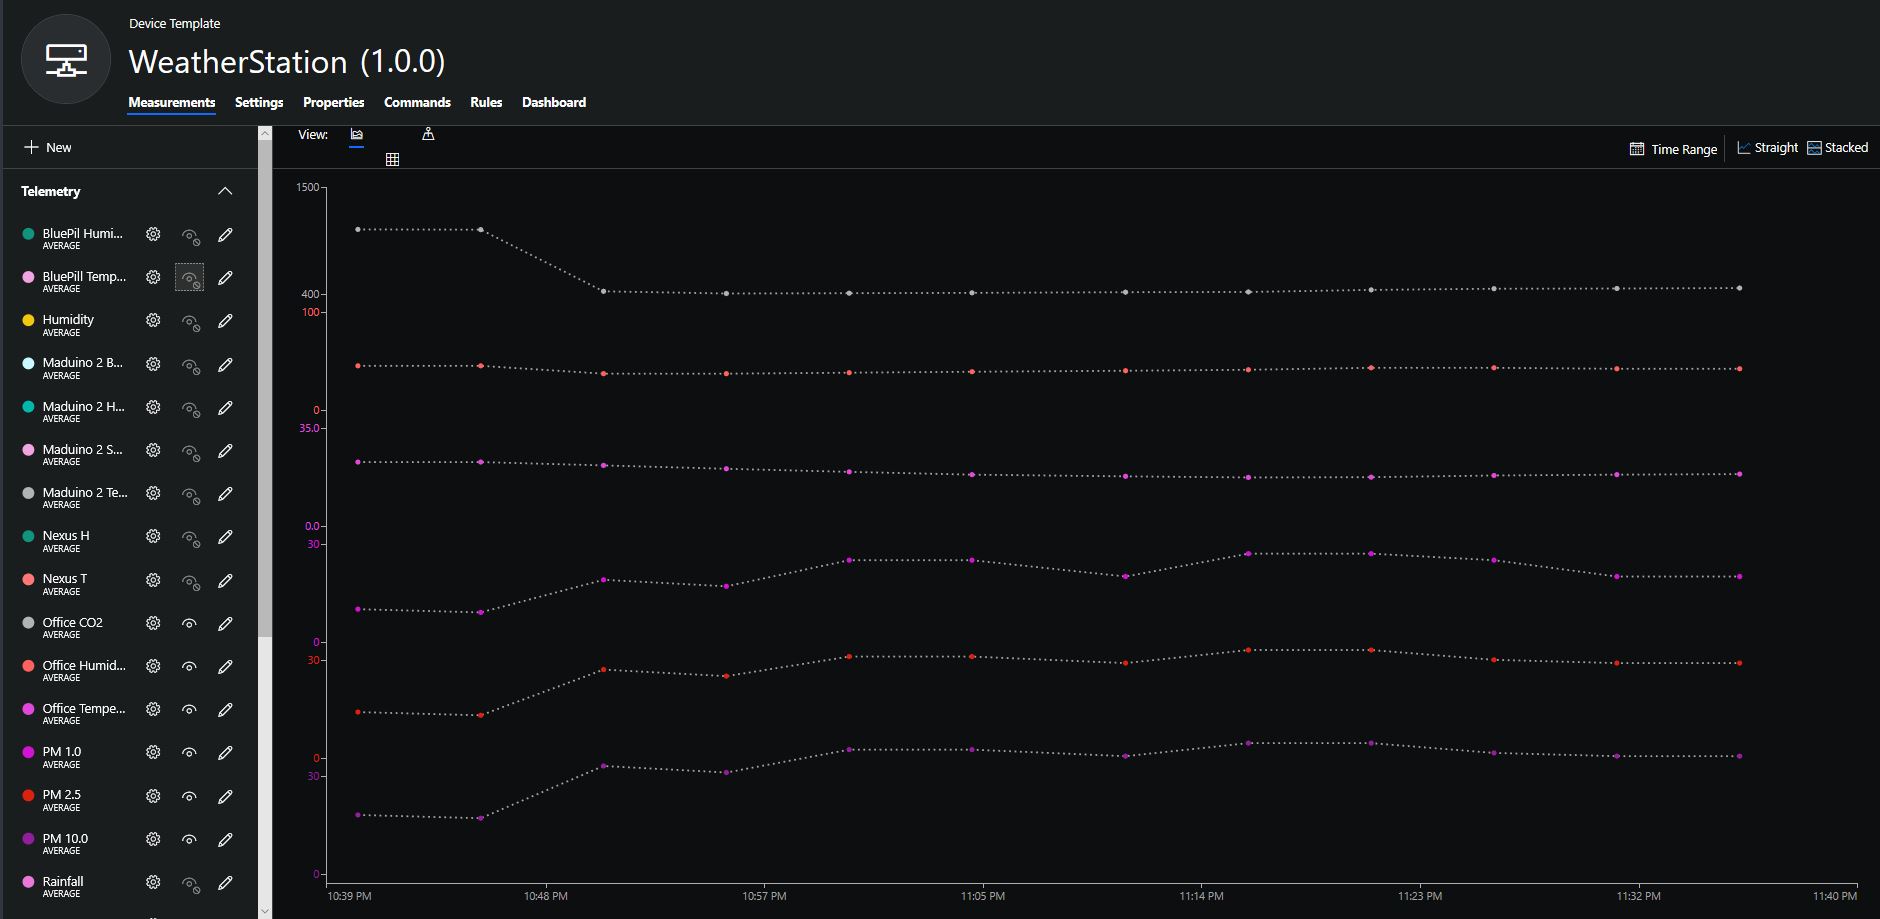
Hour of PM1, PM2.5 & PM10 readings in my office early eveningCO2 and particulates values while outside on my deck from 10:30pm to 11:30pm