Mikrobus.Net Quail Robot

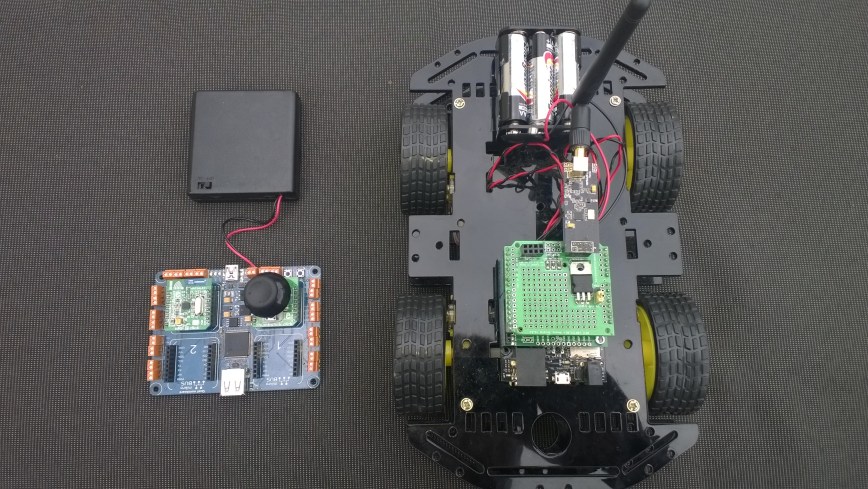
In a previous post I had replaced a Netduino and Elecfreaks Joystick shield based remote control with a MikrobusNet Quail, thumbstick click and an nRF-C click. The next step was to replace the Netduino on the robot chassis with a MikrobusNet Quail, a pair of DC Motor Clicks and an nRF-C click.

Bill of materials (prices in USD as at Feb 2016)

The first version of the robot uses a pair of battery packs one for the motors the other for the Quail board.

MikrobusNetQual4WDRobot

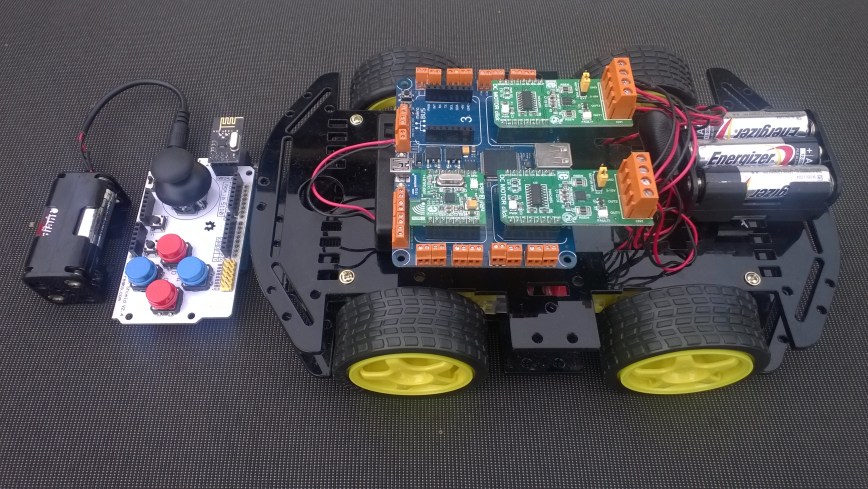
The drivers developed by MikroBUSNet team greatly reduced the amount of code I had to write to get the robot to work.

public class Program
{
   private static double Scale = 100.0;
   private static byte RobotControlChannel = 10;
   private static byte[] ControllerAddress = Encoding.UTF8.GetBytes("RC1");
   private static byte[] RobotAddress = Encoding.UTF8.GetBytes("RB1");
   private static TimeSpan MessageMaximumInterval = new TimeSpan(0, 0, 1);
   private static DateTime _MessageLastReceivedAt = DateTime.UtcNow;
   private static DCMotorClick motor1 = new DCMotorClick(Hardware.SocketOne);
   private static DCMotorClick motor2 = new DCMotorClick(Hardware.SocketTwo);

public static void Main()
{
   NRFC nrf = new NRFC(Hardware.SocketFour);
   nrf.Configure(RobotAddress, RobotControlChannel);
   nrf.OnTransmitFailed += nrf_OnTransmitFailed;
   nrf.OnTransmitSuccess += nrf_OnTransmitSuccess;
   nrf.OnDataReceived += nrf_OnDataReceived;
   nrf.Enable();

   Timer CommunicationsMonitorTimer = new Timer(CommunicationsMonitorTimerProc, null, 500, 500);

   Thread.Sleep(Timeout.Infinite);
}

static void nrf_OnDataReceived(byte[] data)
{
   Hardware.Led1.Write(true);
   _MessageLastReceivedAt = DateTime.UtcNow;

   if (data.Length != 5)
   {
   return;
   }

   Debug.Print("M1D=" + data[0].ToString() + " M2D=" + data[1].ToString() + " M1S=" + data[2].ToString() + " M2S=" + data[3].ToString());
   if (data[0] == 1)
   {
      motor1.Move(DCMotorClick.Directions.Forward, (data[2] / Scale ));
   }
   else
   {
     motor1.Move(DCMotorClick.Directions.Backward, (data[2] / Scale ));
   }

   if (data[1] == 1)
   {
      motor2.Move(DCMotorClick.Directions.Forward, (data[3] / Scale ));
   }
   else
   {
      motor2.Move(DCMotorClick.Directions.Backward, (data[3] / Scale ));
   }
}

private static void CommunicationsMonitorTimerProc(object status)
{
   if ((DateTime.UtcNow - _MessageLastReceivedAt) > MessageMaximumInterval)
   {
      Debug.Print("Communications timeout");

      motor1.Move(MBN.Modules.DCMotorClick.Directions.Forward, 0.0);
      motor2.Move(MBN.Modules.DCMotorClick.Directions.Forward, 0.0);
   }
}

I have kept the communications monitoring functionality which stops the motors when the robot gets out of range of the remote control software fails.


Mikrobus.Net Quail Robot Remote Control

In a previous pair of posts  (part1 & part2) in February 2014 I built a 4WD Robot and remote control using a pair of Netduinos, an elecfreaks Smart Car Chassis 4WD, an elecfreaks joystick 2.4, an Embedded coolness nRF24Lo1 shield and a Pololu MC33926 motor shield.

My Quail device looked like a good platform for building a handheld control with a different form factor.

Bill of materials (prices in USD as at Jan 2016)

Quail4WDRobotController

The Quail device and battery pack aren’t quite small enough to work with one hand. A Mikrobus.Net Dalmatian or Tuatara based remote might be easier to use.

I tried using the thumbstick button pushed message for the horn functionality but it made the throttle and heading jump.

The first version of the code is just to test the wireless link, the motor speed code needs a little work.(Currently the device won’t rotate with motors going in opposite directions)

public class Program
{
   private const double Deadband = 0.1;
   private static double Scale = 100.0;
   private static byte RobotControlChannel = 10;
   private static byte[] ControllerAddress = Encoding.UTF8.GetBytes("RC1");
   private static byte[] RobotAddress = Encoding.UTF8.GetBytes("RB1");

   public static void Main()
   {
      ThumbstickClick thumbStick = new ThumbstickClick(Hardware.SocketThree);
      thumbStick.ThumbstickOrientation = ThumbstickClick.Orientation.RotateZeroDegrees;
      thumbStick.Calibrate();

      NRFC nrf = new NRFC(Hardware.SocketFour);
      nrf.Configure(ControllerAddress, RobotControlChannel );
      nrf.OnTransmitFailed += nrf_OnTransmitFailed;
      nrf.OnTransmitSuccess += nrf_OnTransmitSuccess;
      nrf.Enable();

      while (true)
      {
         byte motor1Direction, motor2Direction;
         byte motor1Speed, motor2Speed;
         double x = thumbStick.GetPosition().X;
         double y = thumbStick.GetPosition().Y;

         Debug.Print("X=: + x.ToString("F1") + " Y=" + y.ToString("F1") + " IsPressed=" + thumbStick.IsPressed);

         // See if joystick x or y is in centre deadband
         if (System.Math.Abs(x) < Deadband)
         {
            x = 0.0;
         }

         // See if joystick y is in centre deadband
         if (System.Math.Abs(y) < Deadband)
         {
            y = 0.0;
         }

         // Set direction of both motors, no swivel on spot yet
         if (y >= 0.0)
         {
            motor1Direction = (byte)1;
            motor2Direction = (byte)1;
         }
         else
         {
            motor1Direction = (byte)0;
            motor2Direction = (byte)0;
         }

         // Straight ahead/backward
         if (x == 0.0)
         {
            motor1Speed = (byte)(System.Math.Abs(y) * Scale);
            motor2Speed = (byte)(System.Math.Abs(y) * Scale);
         }
         // Turning right
         else if (x > 0.0)
         {
            motor1Speed = (byte)(System.Math.Abs(y) * Scale);
            motor2Speed = (byte)(System.Math.Abs(y) * (1.0 - System.Math.Abs(x)) * Scale);
         }
         // Turning left
         else
         {
            motor1Speed = (byte)(System.Math.Abs(y) * (1.0 - System.Math.Abs(x)) * Scale);
            motor2Speed = (byte)(System.Math.Abs(y) * Scale);
         }

         Debug.Print("X=" + x.ToString("F1") + " Y=" + y.ToString("F1") + " IsPressed=" + thumbStick.IsPressed + " M1D=" + motor1Direction.ToString() + " M2D=" + motor2Direction.ToString() + " M1S=" + motor1Speed.ToString() + " M2S=" + motor2Speed.ToString());

         byte[] command =
         {
            motor1Direction,
            motor2Direction,
            motor1Speed,
            motor2Speed,
            (byte)0)
         };
         nrf.SendTo(RobotAddress, command );

         MBN.Hardware.Led1.Write(true);

         Thread.Sleep(250);
      }
   }

   static void nrf_OnTransmitSuccess()
   {
     MBN.Hardware.Led1.Write(false);
     Debug.Print("nrf_OnTransmitSuccess");
   }

   static void nrf_OnTransmitFailed()
   {
      Debug.Print("nrf_OnTransmitFailed");
   }
}

The Mikrobus.Net team have done a great job with the number and quality of the drivers for the Mikroe click boards. The Mikroe click boards are individually packaged with professionally written click specific and handling instructions.

Mikrobus.Net Quail, EthClick and xively

My second proof of concept application for the Mikrobus.Net Quail and EthClick uploads temperature and humidity data to Xively every 30 seconds for display and analysis.

Temperature and humidity Xively data stream

Temperature and humidity Xively data stream

The Xively REST API uses an HTTP PUT which initially didn’t work because the payload was not getting attached.

I patched the AssembleRequest method in the EtherClick driver to fix this issue.

private byte[] AssembleRequest()
{
   var a = RequestType;
   a += " " + Path + " " + Protocol + "\r\nHost: ";
   a += Host + "\r\n";

   foreach (object aHeader in Headers.Keys)
      a += (string)aHeader + ": " + (string)Headers[aHeader] + "\r\n";

   a += "\r\n"; // Cache-Control: no-cache\r\n  //Accept-Charset: utf-8;\r\n

   if (Content != null && Content != string.Empty && (RequestType == "POST" || RequestType == "PUT")) a += Content;

   return Encoding.UTF8.GetBytes(a);
}

The code reads the WeatherClick temperature and humidity values then assembles a CSV payload which it uploads with an HTTP PUT

</pre>
public class Program
{
   private const string xivelyHost = @"api.xively.com";
   private const string xivelyApiKey = @"YourAPIKey";
   private const string xivelyFeedId = @"YourFeedID";

   public static void Main()
   {
      WeatherClick weatherClick = new WeatherClick(Hardware.SocketOne, WeatherClick.I2CAddresses.Address0);
      weatherClick.SetRecommendedMode(WeatherClick.RecommendedModes.WeatherMonitoring);

      EthClick ethClick = new EthClick(Hardware.SocketTwo);
      ethClick.Start(ethClick.GenerateUniqueMacAddress("devMobileSoftware"), "QuailDevice");

      // Wait for an internet connection
      while (true)
      {
         if (ethClick.ConnectedToInternet)
         {
            Debug.Print("Connected to Internet");
            break;
         }
         Debug.Print("Waiting on Internet connection");
      }

      while (true)
      {
         Debug.Print("T " + weatherClick.ReadTemperature().ToString("F1") + " H " + weatherClick.ReadHumidity().ToString("F1") + " P " + weatherClick.ReadPressure(PressureCompensationModes.Uncompensated).ToString("F1"));

         HttpRequest request = new HttpRequest(@"http://" + xivelyHost + @"/v2/feeds/" + xivelyFeedId + @".csv");
         request.Host = xivelyHost;
         request.RequestType = "PUT";
         request.Headers.Add("Content-Type", "text/csv");
         request.Headers.Add("X-ApiKey", xivelyApiKey );

         request.Content = "OfficeT," + weatherClick.ReadTemperature().ToString("F1") + "\r\n" + "OfficeH," + weatherClick.ReadHumidity().ToString("F1") ;
         request.Headers.Add("Content-Length", request.Content.Length.ToString());

         var response = request.Send();
         if (response != null)
         {
            Debug.Print("Response: " + response.Message);
         }
         else
         {
            Debug.Print("No response");
         }
      Thread.Sleep(30000);
      }
   }
}
MikrobustNet Quail with Eth and Weather Clicks

MikrobustNet Quail with Eth and Weather Clicks

This proof of concept code appears to be reliable and has run for days at a time. The IP stack looks like it needs a bit more work.

Mikrobus.Net Quail and EthClick

In my second batch of MikroElektronika Mikrobus clicks I had purchased an EthClick to explore the robustness and reliability of the Mikrobus.Net IP Stack.

My first trial application uses the Internet Chuck Norris database (ICNBD) to look up useful “facts” about the movie star.

public static void Main()
{
   EthClick ethClick = new EthClick(Hardware.SocketTwo);

   ethClick.Start(ethClick.GenerateUniqueMacAddress("devMobileSoftware"), "QuailDevice");

   while (true)
   {
      if (ethClick.ConnectedToInternet)
      {
         Debug.Print("Connected to Internet");
         break;
      }
   Debug.Print("Waiting on Internet connection");
   }

   while (true)
   {
      var r = new HttpRequest(@&amp;quot;http://api.icndb.com/jokes/random&amp;quot;);

      r.Headers.Add("Accept", "*/*");

      var response = r.Send();
      if (response != null)
      {
         if (response.Status == "HTTP/1.1 200 OK")
         {
            Debug.Print(response.Message);
         }

      }
      else
      {
         Debug.Print("No response");
      }
      Thread.Sleep(10000);
   }
}

The ran first time and returned the following text

7c
{ "type": "success, "value": { "id": 496, "joke": "Chuck Norris went out of an infinite loop.", "categories": ["nerdy"]}}
0

85
{ "type": "success", "value": { "id": 518, "joke": "Chuck Norris doesn't cheat death. He wins fair and square.", "categories": []}}
0

It looks like the HTTP response parsing is not quite right as each message starts with the length of the message in bytes in hex and the terminating “0”.

Mikrobus.Net Quail and Weather Click

In my second batch of MikroElektronika Mikrobus sensors I had purchased a Weather click because I was interested to see how the temperature and humidity values it returned compared with the Silicon labs Si7005 devices I use with my Arduino and Netduino devices. (I was a bit suspicious of the Si7005 humidity values)

I downloaded the Mikrobus.Net driver for the BME280 and created a simple console application to see how well the sensor and driver worked

public class Program
{
   public static void Main()
   {
      WeatherClick weatherClick = new WeatherClick(Hardware.SocketOne, WeatherClick.I2CAddresses.Address0);

      weatherClick.SetRecommendedMode(WeatherClick.RecommendedModes.WeatherMonitoring);

      while (true)
      {
         Debug.Print("T " + weatherClick.ReadTemperature().ToString(" F1 ") +
" H " + weatherClick.ReadHumidity().ToString("F1") +
" P " + weatherClick.ReadPressure(PressureCompensationModes.Uncompensated).ToString("F1"));

         Thread.Sleep(30000);
      }
   }
}

The temperature values looked pretty good but the humidity values were rough half of what I was getting from the SI7005 connected to a devDuino V2 on the desk next to my Quail board

The thread ‘<No Name>’ (0x2) has exited with code 0 (0x0).
T 24.9 H 49.3 P 1014.8
T 25.0 H 49.4 P 1014.9
T 25.0 H 49.1 P 1014.8
T 25.0 H 49.9 P 1014.8
T 24.9 H 49.1 P 1014.9
T 25.0 H 50.8 P 1014.9
T 25.0 H 49.2 P 1015.0

The code for doing the conversions looked pretty complex so I modified a Netduino BME280 driver (uses a different approach for conversions) I have used on another projects to work on the Quail/Mikrobus architecture.

The modified driver returned roughly the same values so it looks like the problem is most probably with the SI7005 code.(or my understand of the humidity values it returns)