Random wanderings through Microsoft Azure esp. PaaS plumbing, the IoT bits, AI on Micro controllers, AI on Edge Devices, .NET nanoFramework, .NET Core on *nix and ML.NET+ONNX
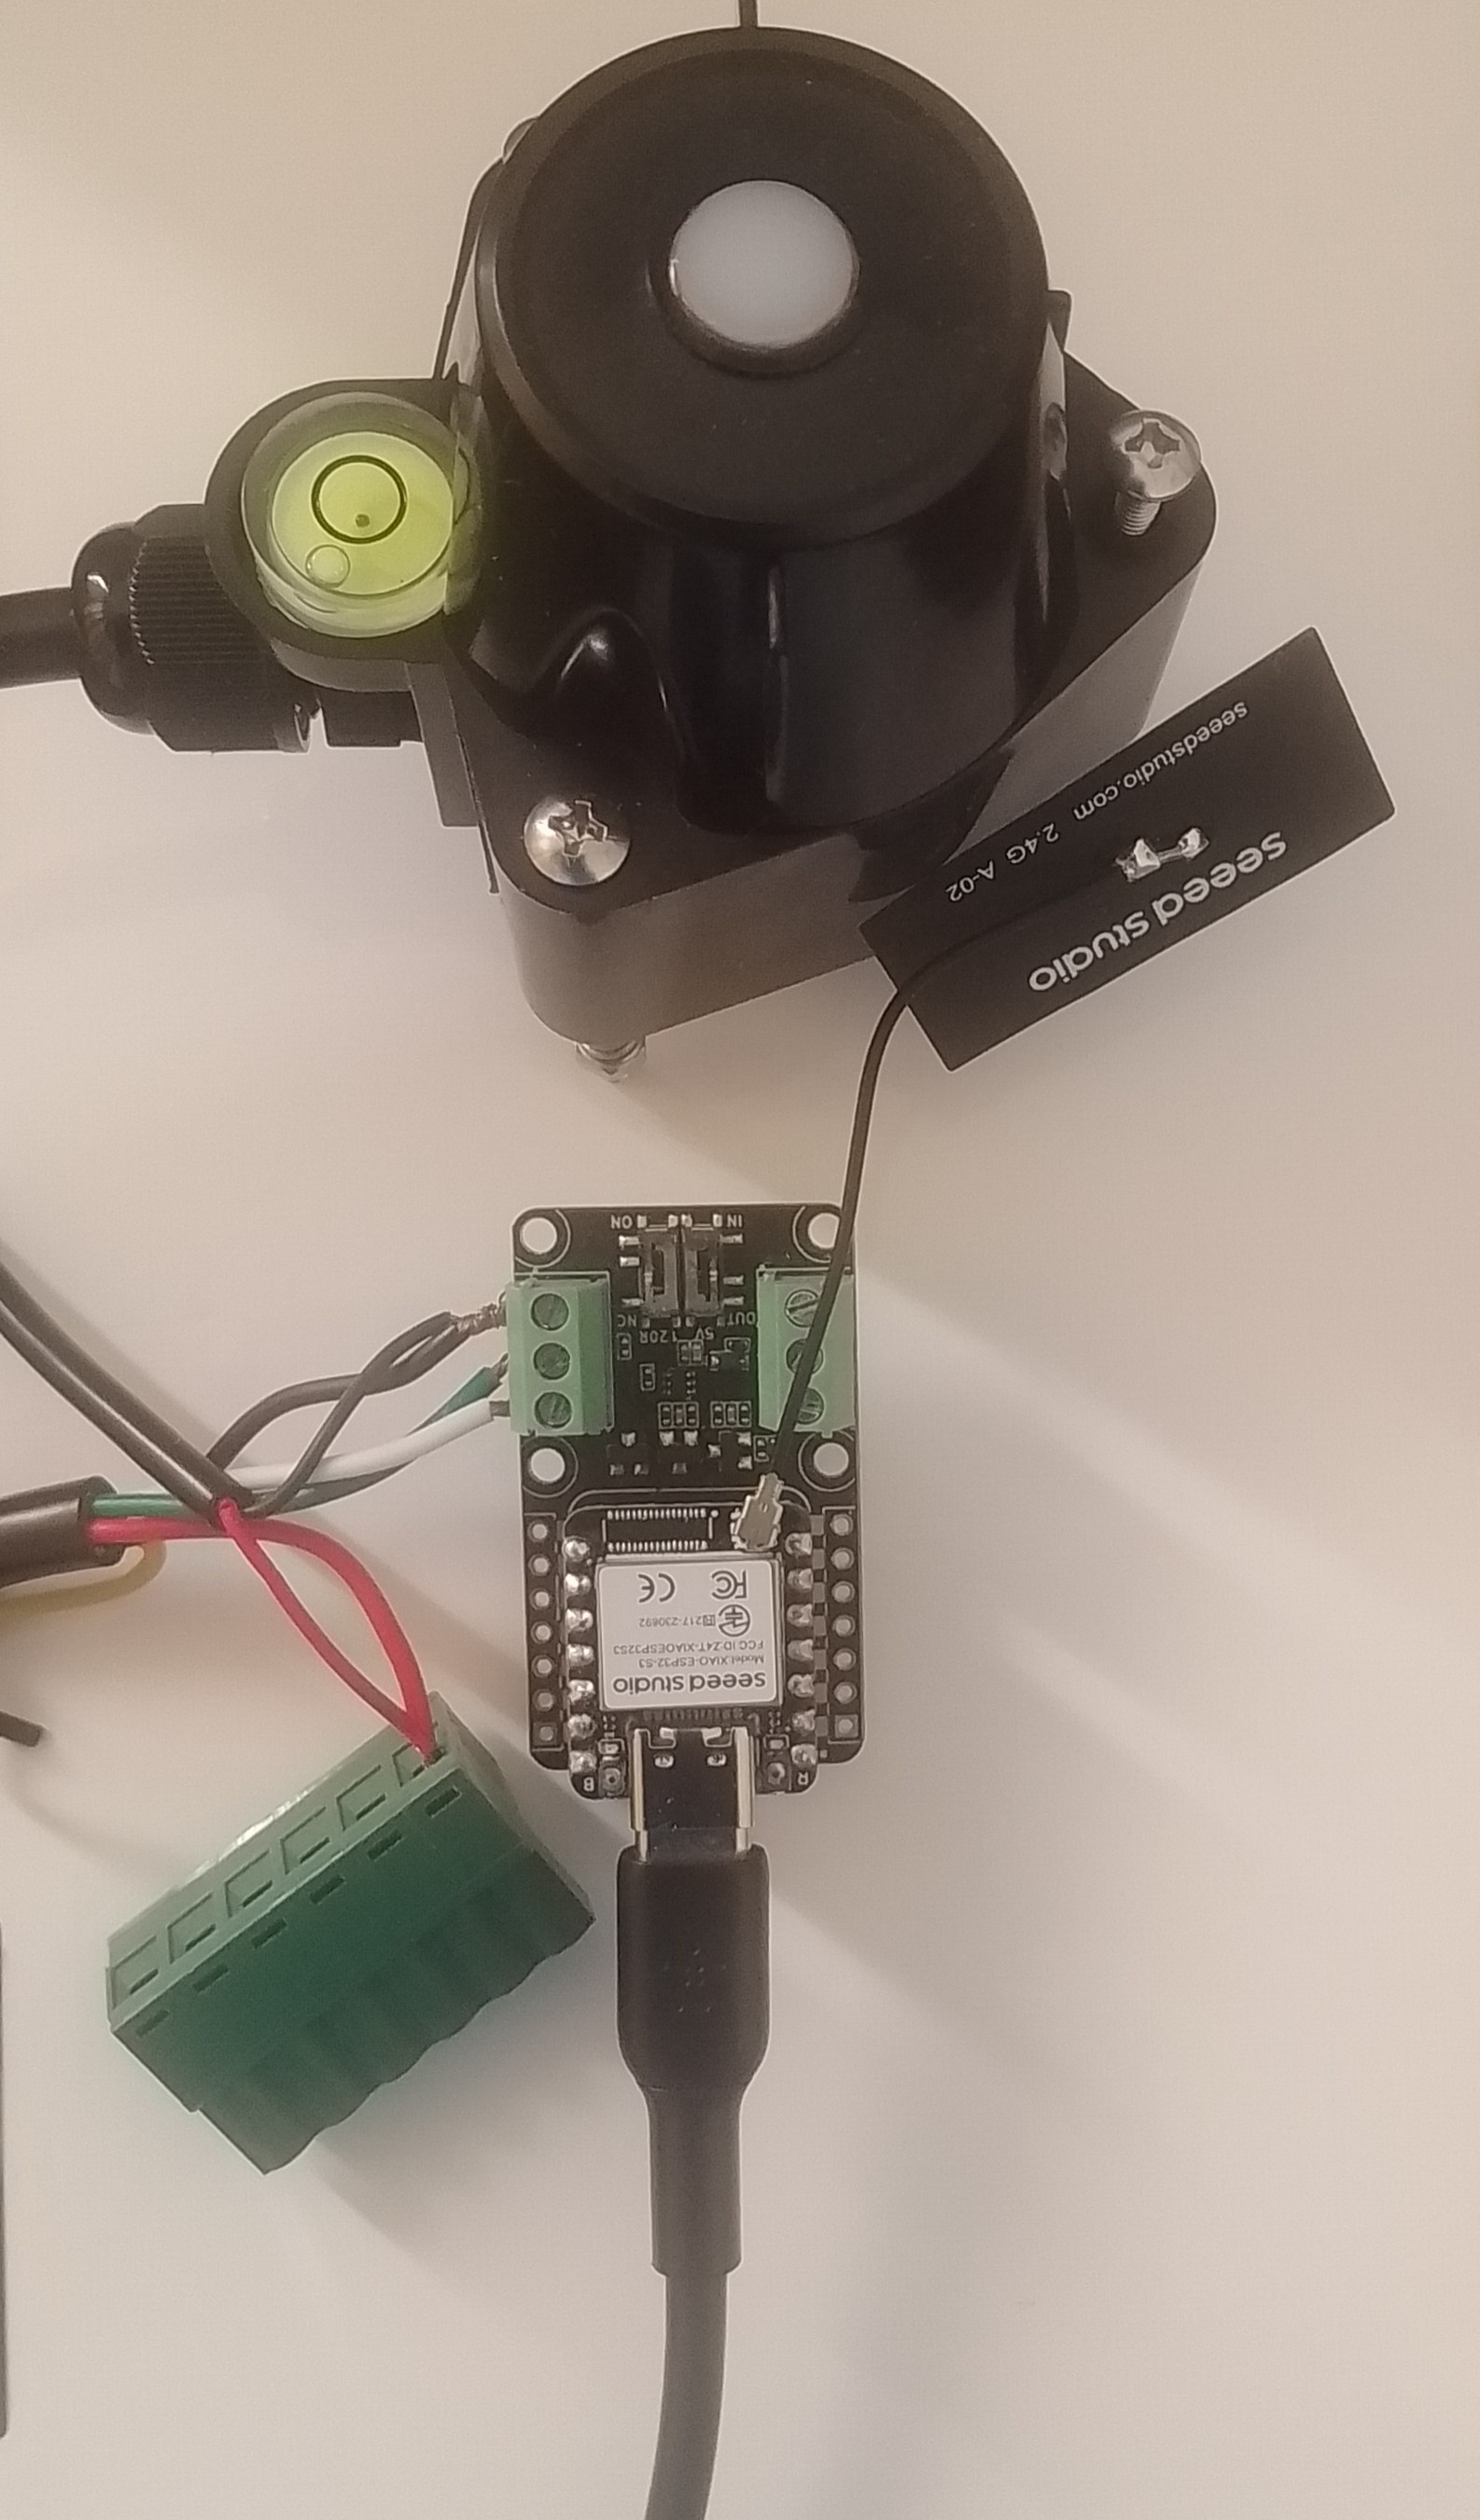
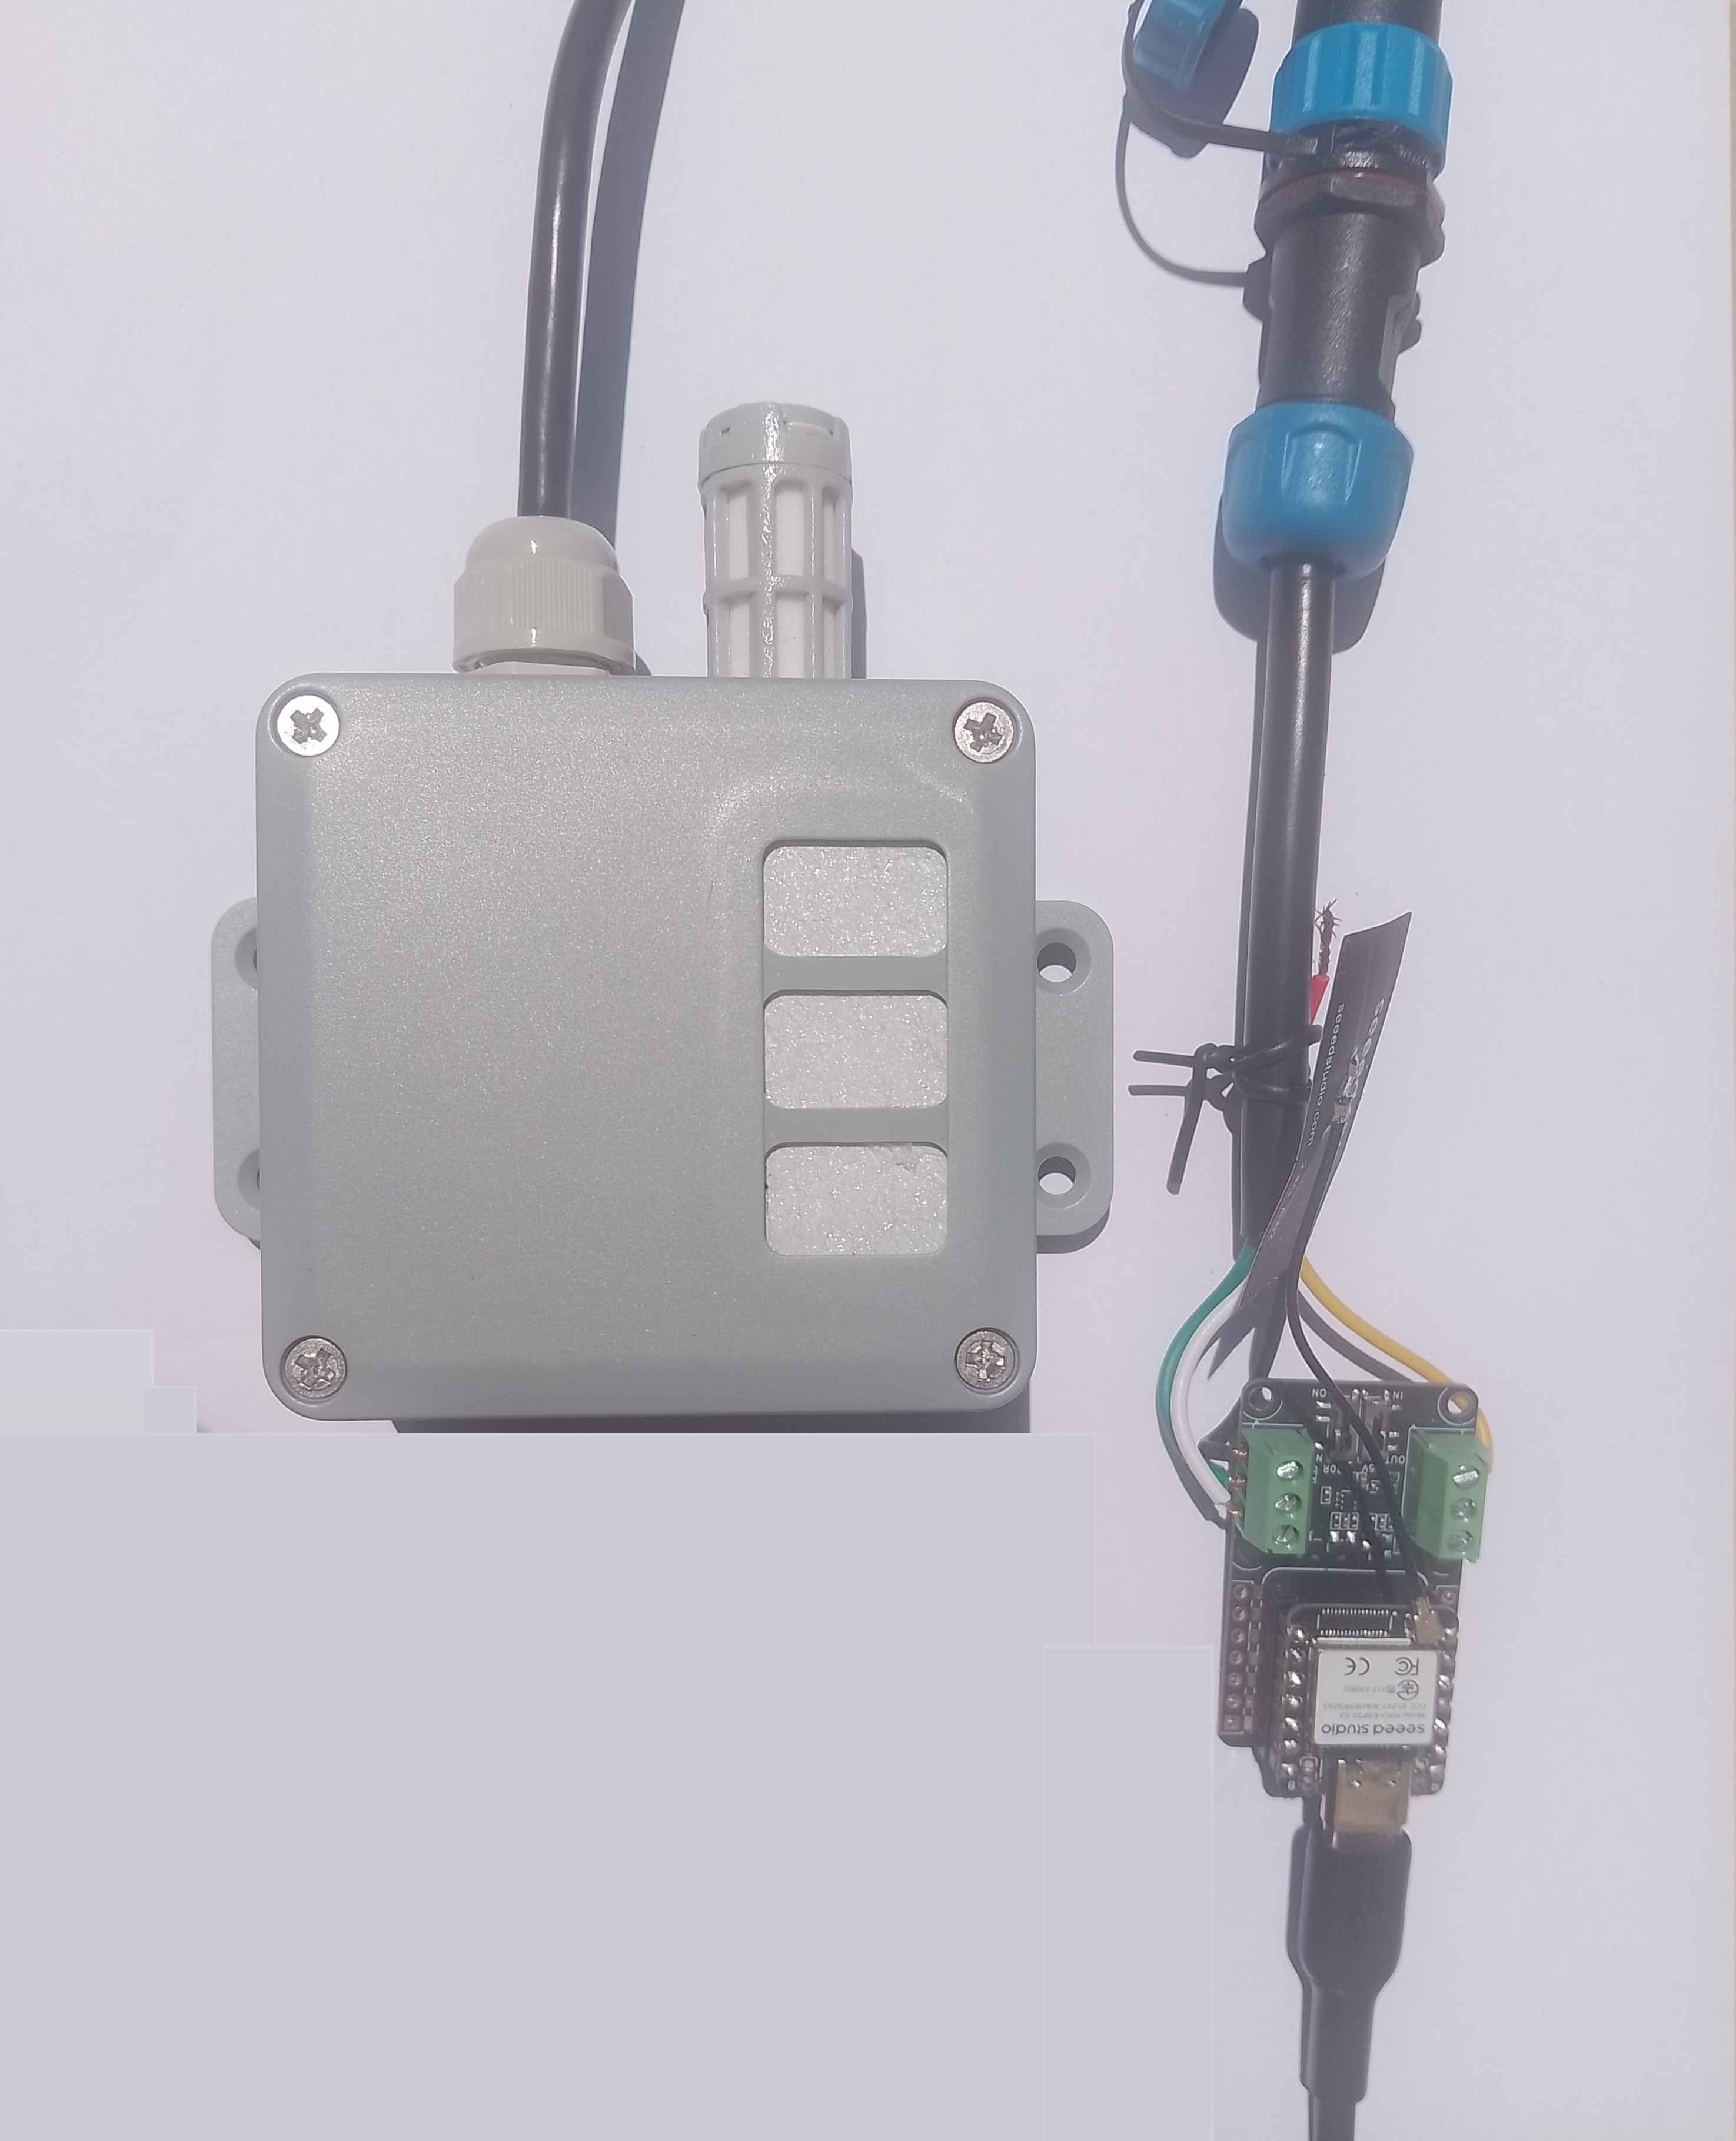
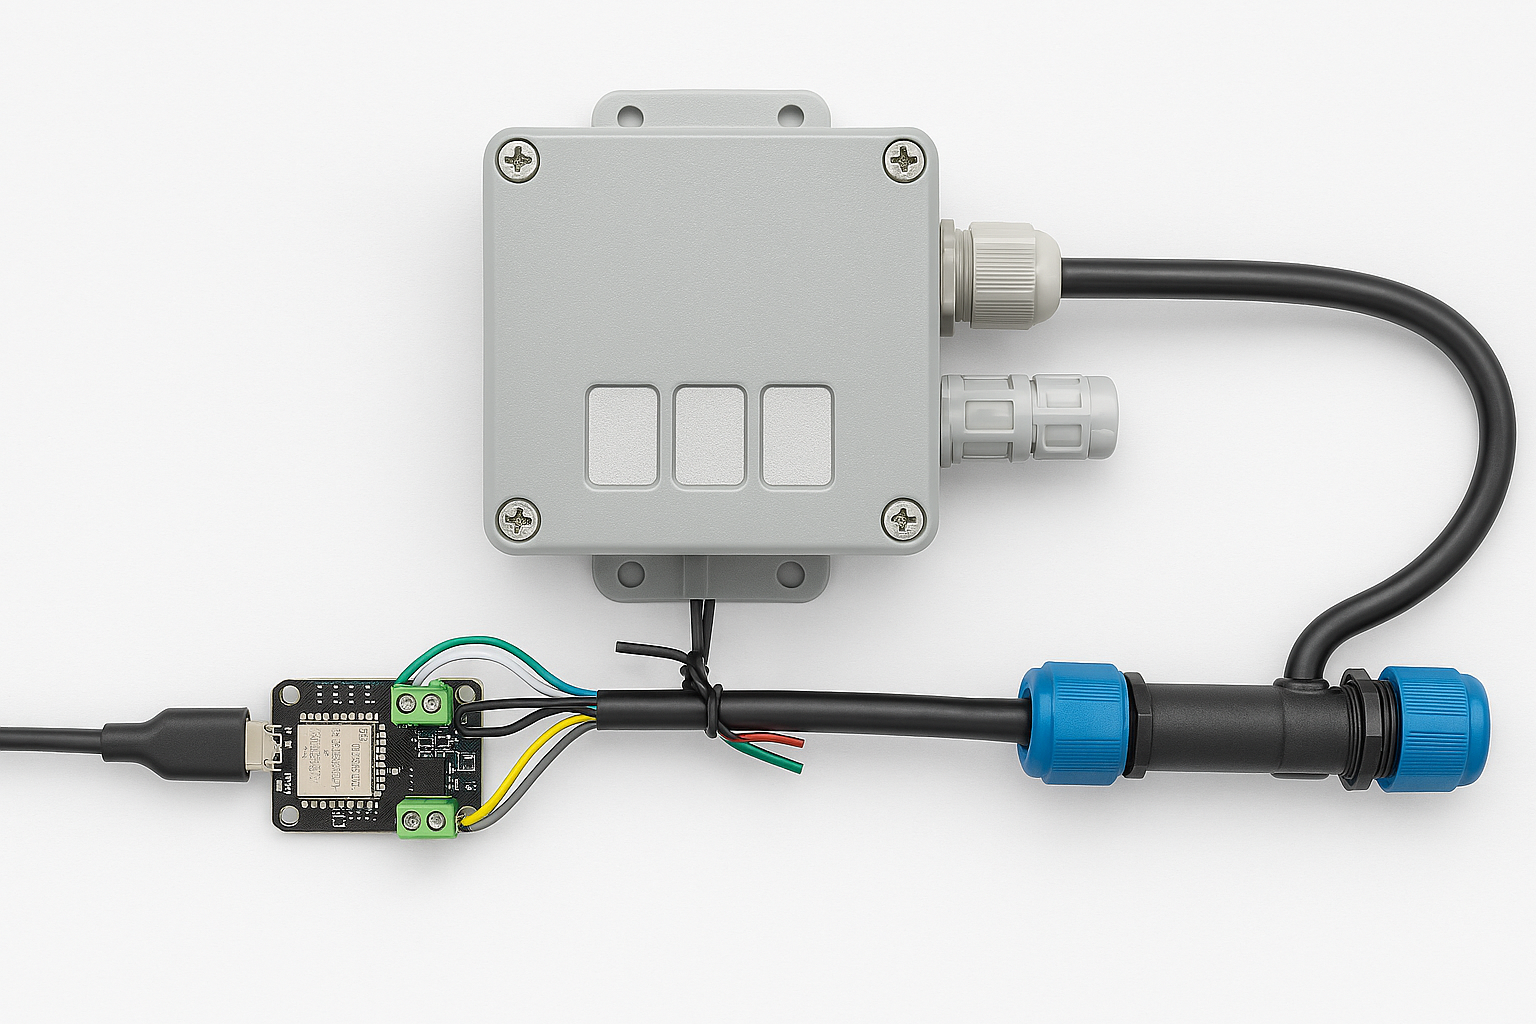
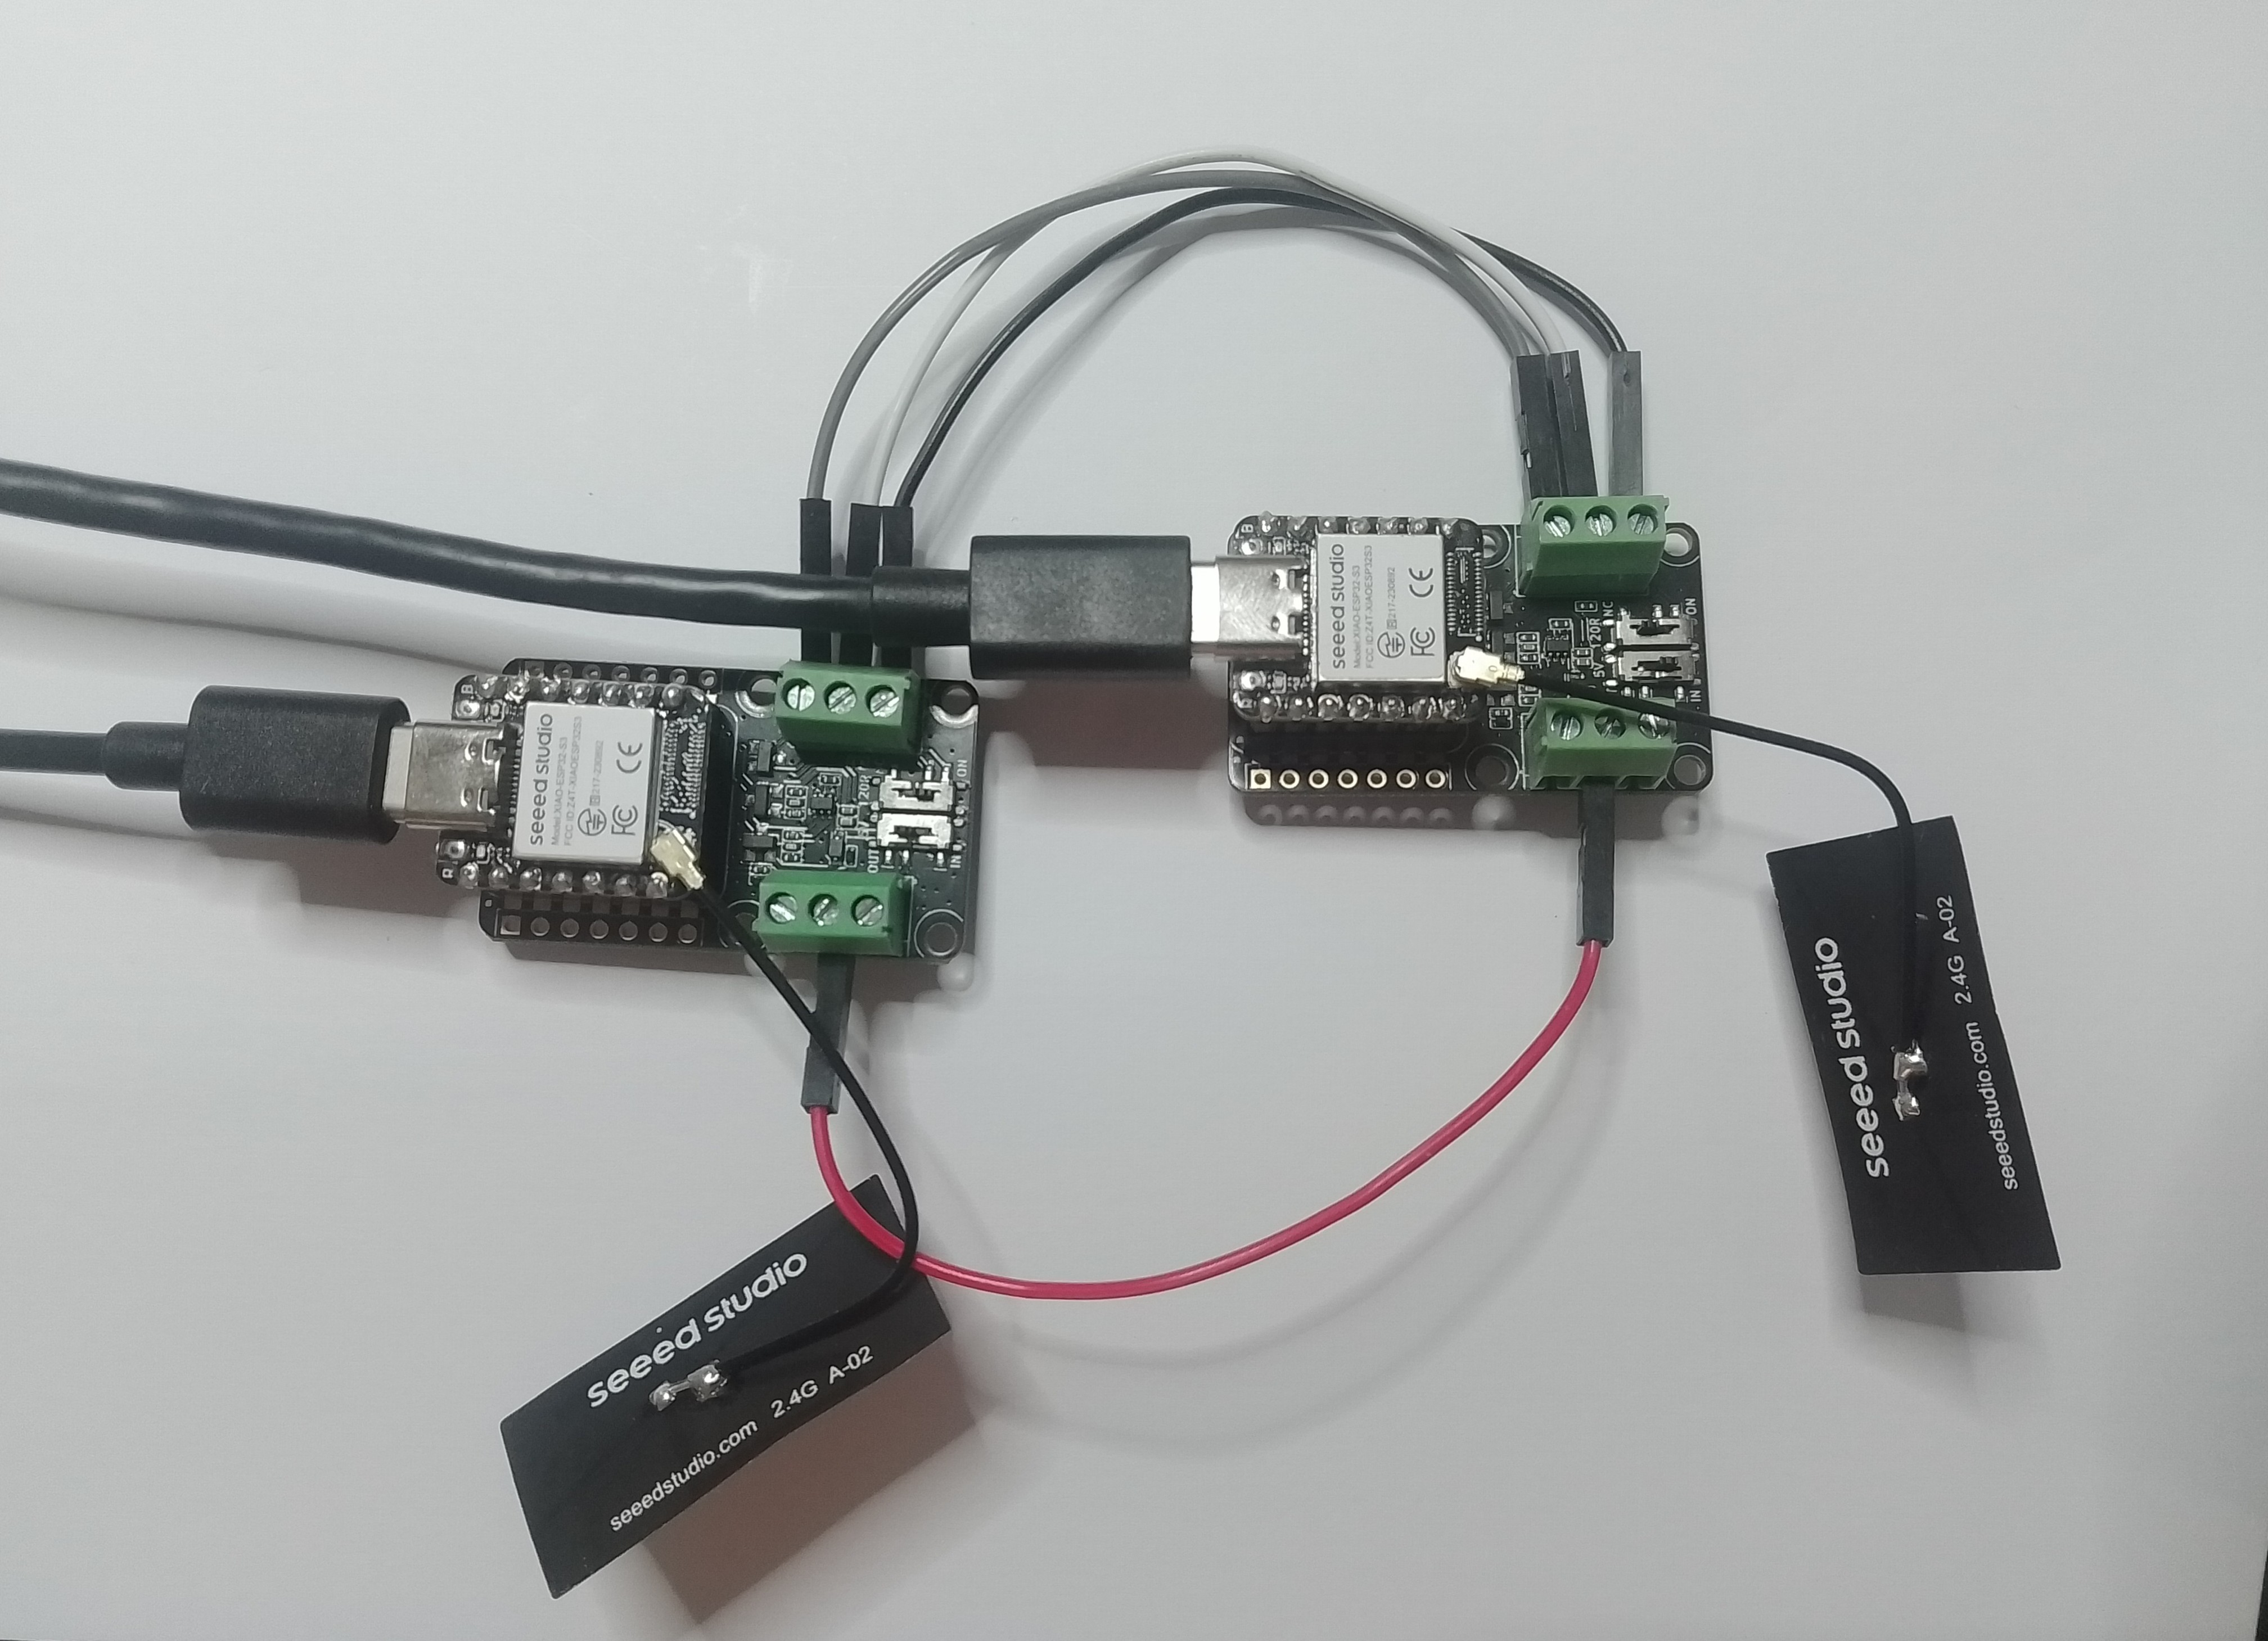
// XIAO ESP32S3 + RS485 breakout + Seeed 101991042 (RS-485 Modbus RTU)
// Reads: 0x0100 (calculated distance, mm), 0x0101 (real-time distance, mm),
//        0x0102 (temperature, 0.1°C). Can write 0x0200 (slave address).
// Serial: 9600 8N1 per datasheet. (Default slave addr = 0x01)

//Iot.Device.Modbus (namespace Iot.Device.Modbus.Client)
//using Iot.Device.Modbus;
using Iot.Device.Modbus.Client;
//using Microsoft.Extensions.Logging;
using nanoFramework.Hardware.Esp32;
//using nanoFramework.Logging.Debug;
using System;
using System.Diagnostics;
using System.IO.Ports;
using System.Threading;


namespace SeeedRS485500cmUltrasonicLevelSensor
{
   public class Program
   {
      // === Sensor Modbus params (from Seeed datasheet) ===
      private const byte SlaveAddress = 0x01;      // default
      private const ushort RegCalcDistance = 0x0100;// mm, ~500ms processing
      //private const ushort RegRealDistance = 0x0101;// mm, ~100ms
      private const ushort RegTemperature = 0x0102;// INT16, 0.1°C units
      private const ushort RegSlaveAddress = 0x0200;// R/W address register

      public static void Main()
      {
         ModbusClient _client;

         Console.WriteLine("Modbus: Seeed SKU101991042 Starting");

         Configuration.SetPinFunction(Gpio.IO06, DeviceFunction.COM2_RX);
         Configuration.SetPinFunction(Gpio.IO05, DeviceFunction.COM2_TX);
         // This port number is a bit weird, need to double check in RS485 Sender/Receiver apps
         Configuration.SetPinFunction(Gpio.IO03, DeviceFunction.COM2_RTS);

         var ports = SerialPort.GetPortNames();

         Debug.WriteLine("Available ports: ");
         foreach (string port in ports)
         {
            Debug.WriteLine($" {port}");
         }

         using (_client = new ModbusClient("COM2"))
         {
            _client.ReadTimeout = _client.WriteTimeout = 2000;

            //_client.Logger = new DebugLogger("ModbusClient")
            //{
            //   MinLogLevel = LogLevel.Debug
            //};

            while (true)
            {
               try
               {
                   // 0x0100 Calculated distance (mm). Takes ~500ms to compute per datasheet.
                  short[] calc = _client.ReadHoldingRegisters(SlaveAddress, RegCalcDistance, 1);
                  ushort calcMm = (ushort)calc[0];
                  float calcCm = calcMm / 10.0f;
                  Console.WriteLine($"Calculated distance: {calcMm} mm ({calcCm:F1} cm)");

                  /*
                  // 0x0101 Real-time distance (mm). Faster ~100ms response.
                  short[] real = _client.ReadHoldingRegisters(SlaveAddress, RegRealDistance, 1);
                  short realMm = real[0];
                  float realCm = realMm / 10.0f;
                  Console.WriteLine($"Real-time distance:  {realMm} mm ({realCm:F1} cm)");
                  */

                  // 0x0102 Temperature (INT16, 0.1°C)
                  short[] temp = _client.ReadHoldingRegisters(SlaveAddress, RegTemperature, 1);
                  short tempRaw = unchecked((short)temp[0]); // signed per datasheet
                  float tempC = tempRaw / 10.0f;
                  Console.WriteLine($"Temperature: {tempC:F1} °C");
               }
               catch (Exception ex)
               {
                  Console.WriteLine($"Modbus read failed: {ex.Message}");
               }

               Thread.Sleep(10000);
            }
         }
      }
   }
}
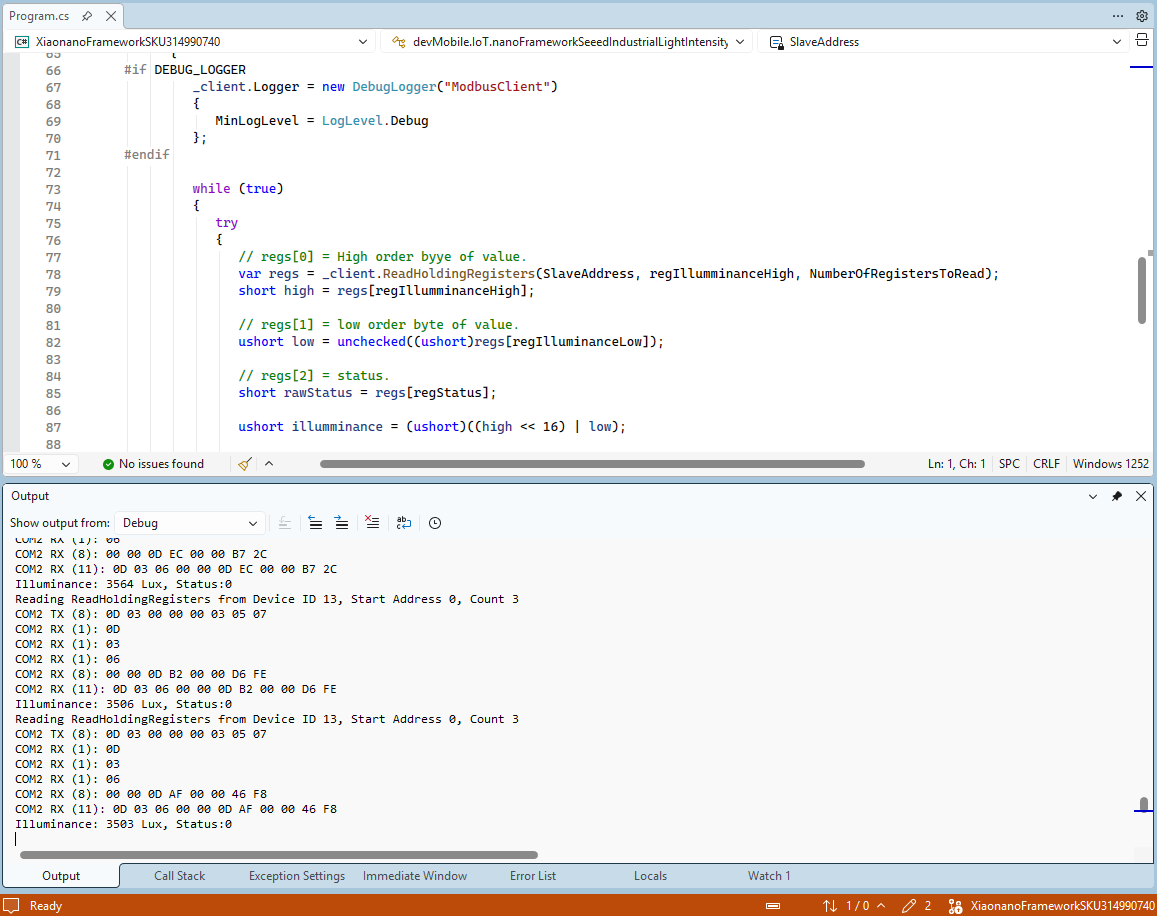
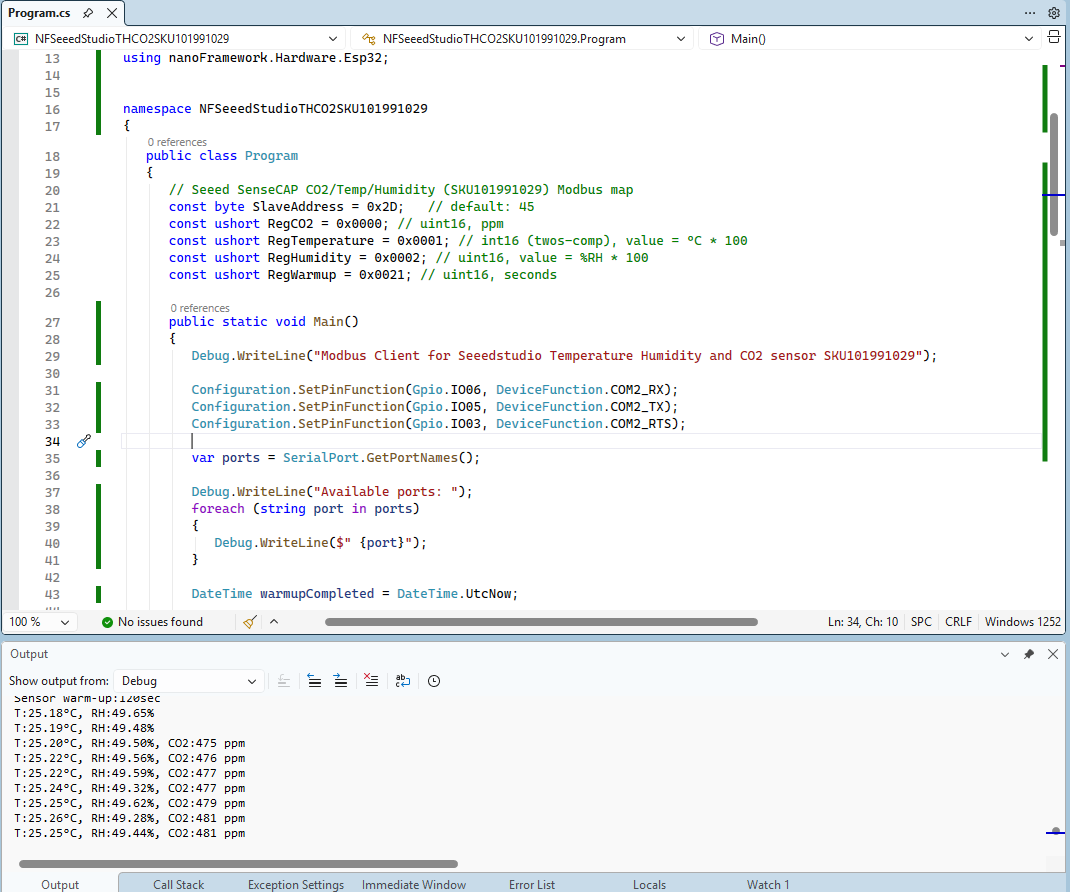
The nanoFramework logging support made debugging connectivity issues much faster. So much so I started with the nanoFramework application then progressed to the Arduino version.
I had to add a short delay between each Modbus sensor value read to stop timeout errors.
This took a bit longer than I expected mainly because running two instances of Visual Studio 2026 was a problem (running Visual Studio 2022 for one device and Visual Studio 2026 for the other, though not 100% confident this was an issue) as there were some weird interactions.
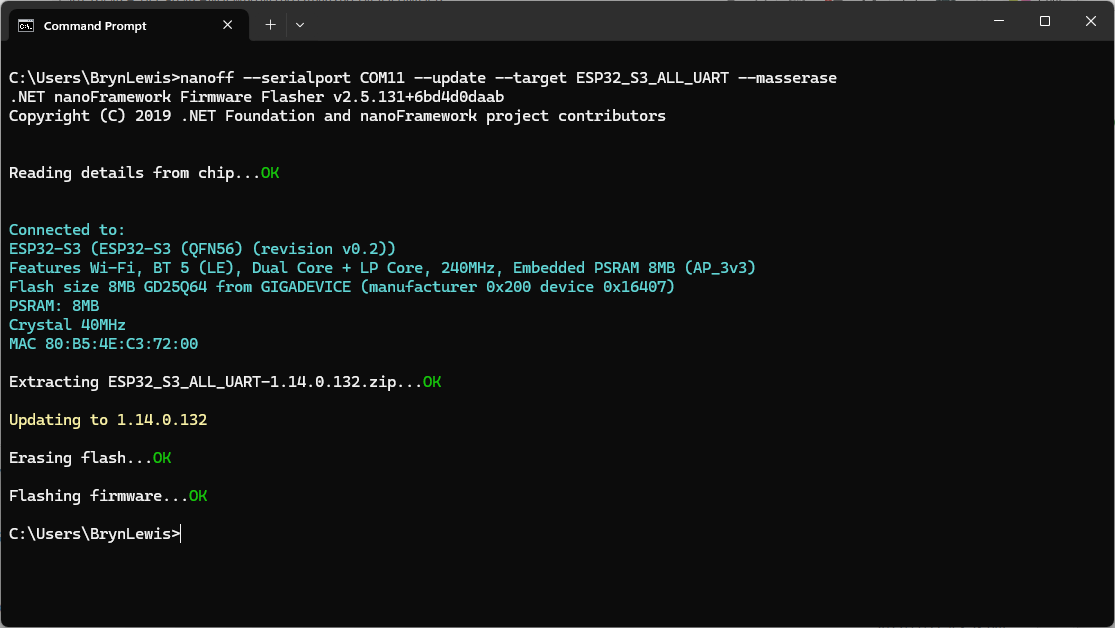
using nanoff to flash a device with the latest version of ESP32_S3_ALL_UART
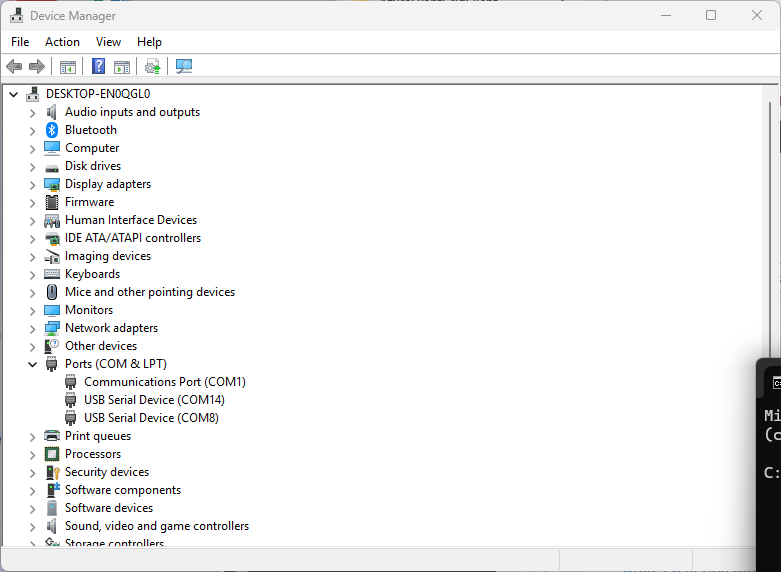
As I moved between the Arduino tooling and flashing devices with nanoff the serial port numbers would change watching the port assignments in Windows Device Manager was key.
Windows Device manager displaying the available serial ports
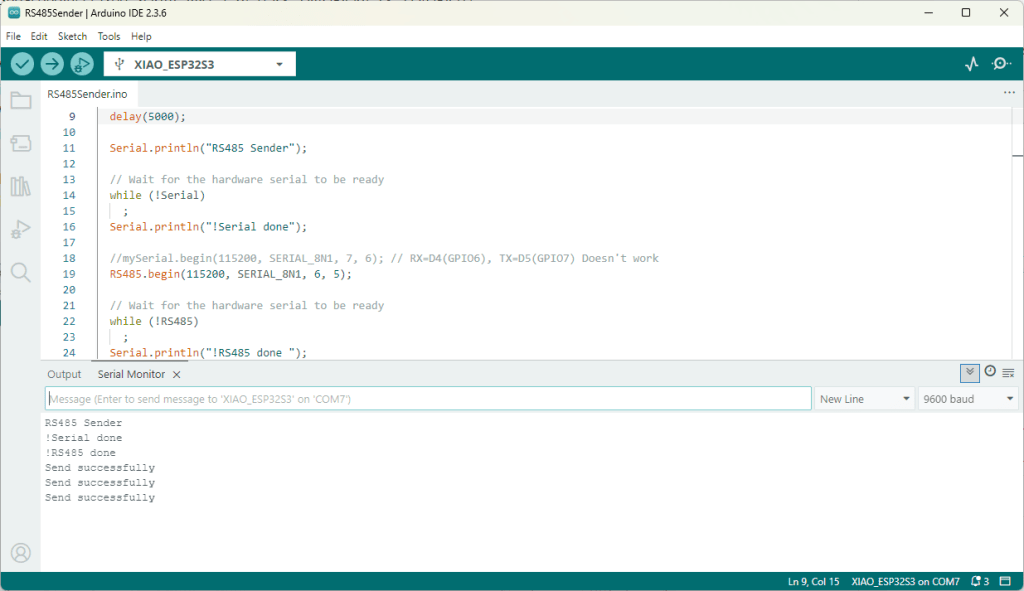
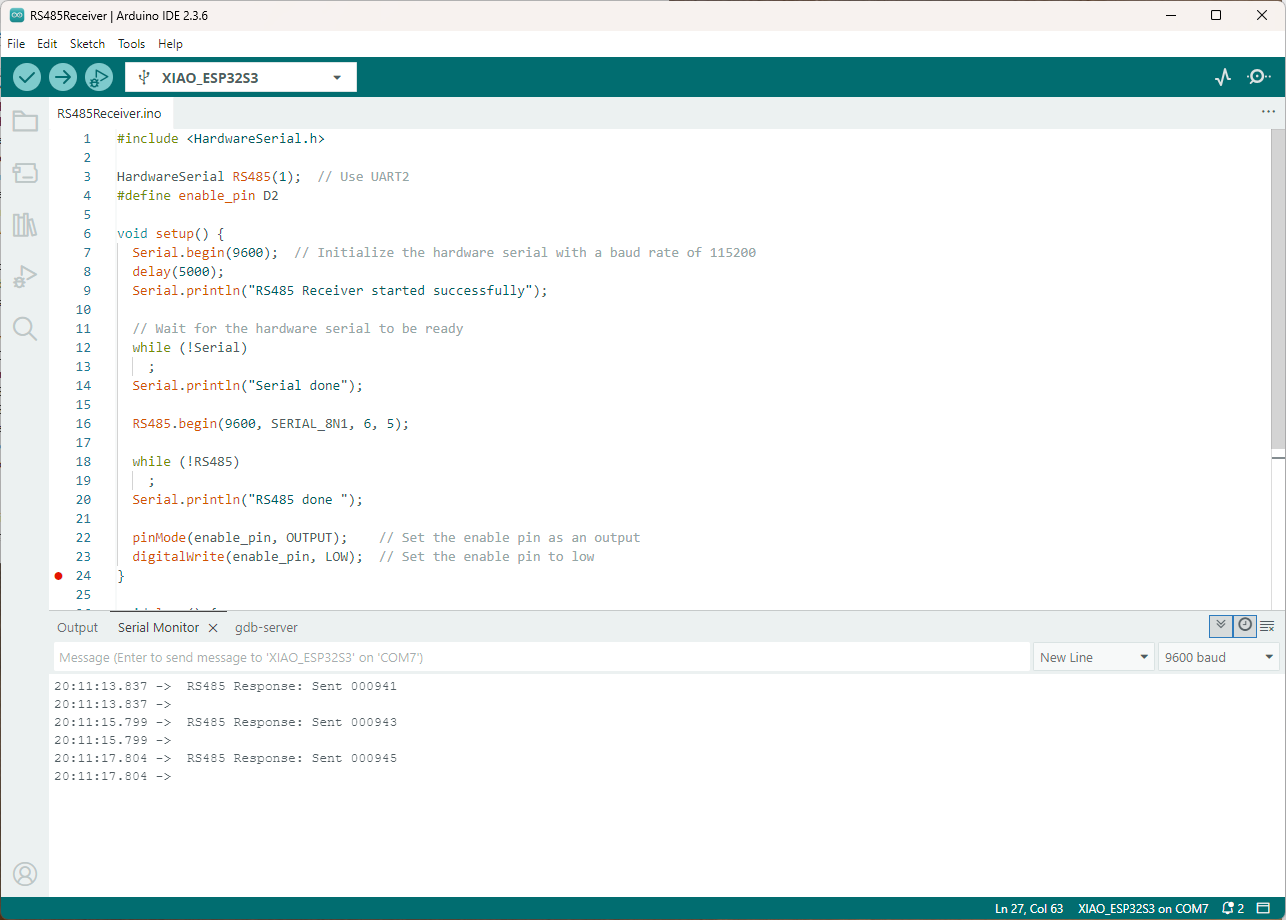
Rather than debugging both the nanoFramework RS485Sender and RS485Receiver applications simultaneously, I used the Arduino RS485Sender and RS485 Receiver application but had similar issues with the port assignments changing.
Arduino RS485 Sender application
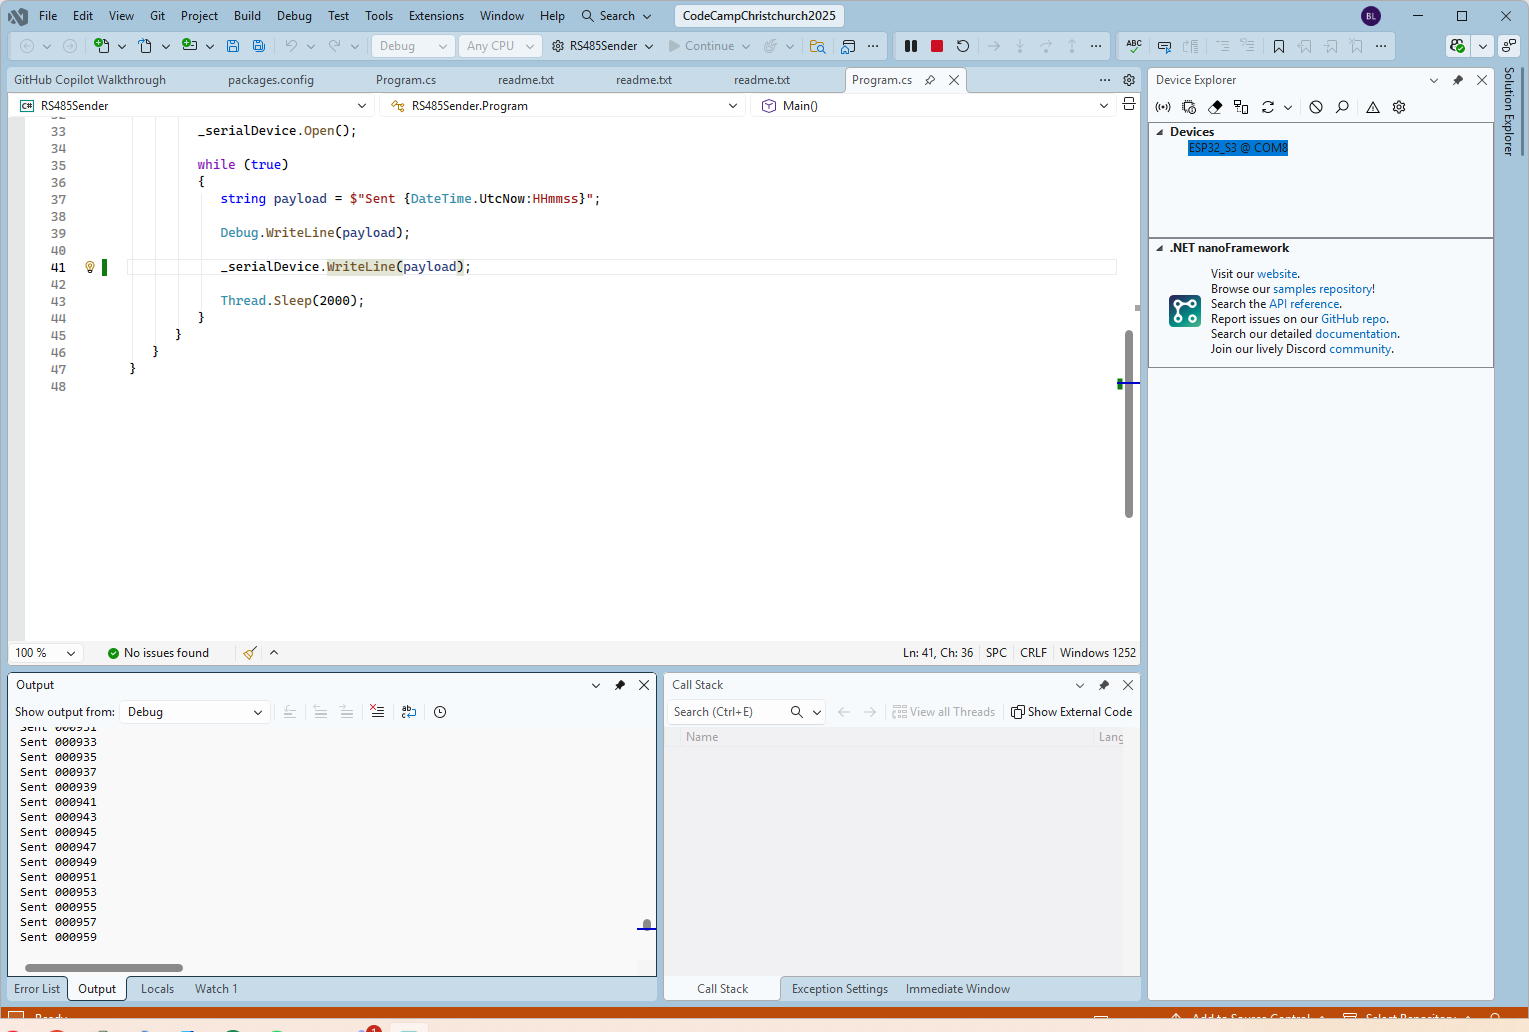
The nanoFramework sender application
public class Program
{
   static SerialPort _serialDevice;

   public static void Main()
   {
      Configuration.SetPinFunction(Gpio.IO06, DeviceFunction.COM2_RX);
      Configuration.SetPinFunction(Gpio.IO05, DeviceFunction.COM2_TX);
      Configuration.SetPinFunction(Gpio.IO02, DeviceFunction.COM2_RTS);

      Debug.WriteLine("RS485 Sender: ");

      var ports = SerialPort.GetPortNames();

      Debug.WriteLine("Available ports: ");
      foreach (string port in ports)
      {
         Debug.WriteLine($" {port}");
      }

      _serialDevice = new SerialPort("COM2");
      _serialDevice.BaudRate = 9600;
      _serialDevice.Mode = SerialMode.RS485;

      _serialDevice.Open();

      Debug.WriteLine("Sending...");
      while (true)
      {
         string payload = $"{DateTime.UtcNow:HHmmss}";

         Debug.WriteLine($"Sent:{DateTime.UtcNow:HHmmss}");

         Debug.WriteLine(payload);

         _serialDevice.WriteLine(payload);

         Thread.Sleep(2000);
      }
   }
}
if I had built the nanoFramework RS485Sender and RS485Receiver applications first debugging the Arduino RS485Sender and RS485Receiver would been similar.
Arduino receiver application displaying messages from the nanoFramework sender application
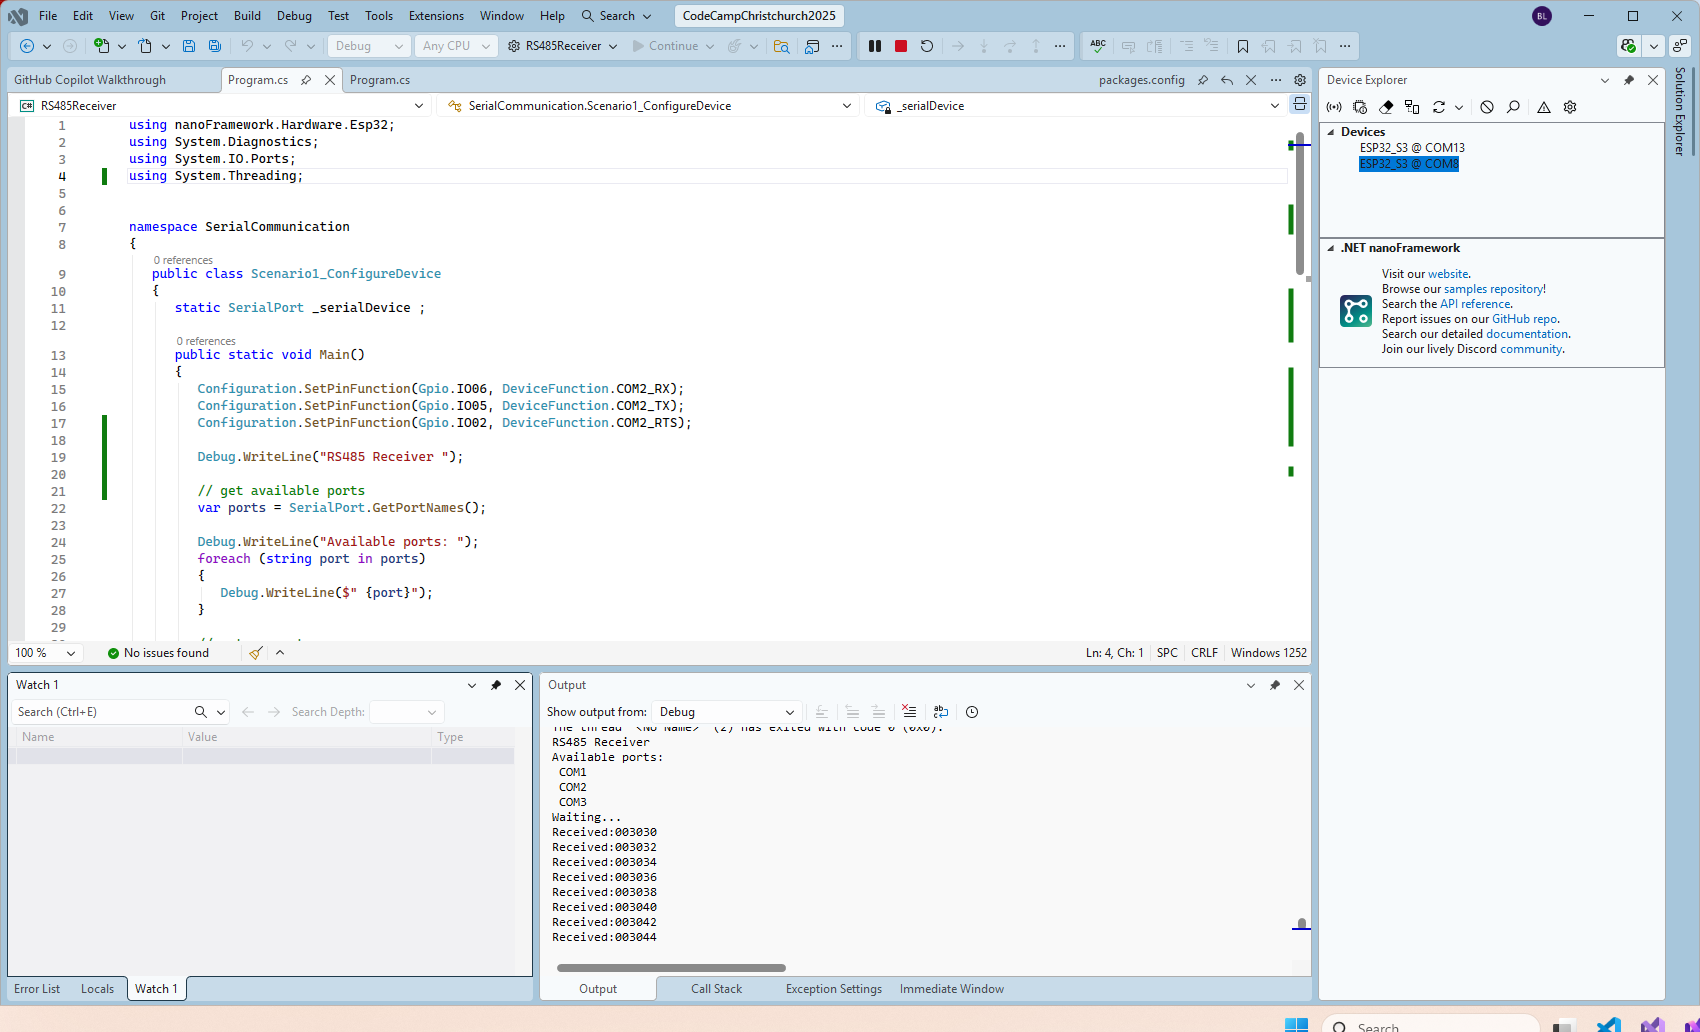
The nanoFramework Receiver receiving messages from the nanoFramework Sender
public class Program
{
   static SerialPort _serialDevice ;

   public static void Main()
   {
      Configuration.SetPinFunction(Gpio.IO06, DeviceFunction.COM2_RX);
      Configuration.SetPinFunction(Gpio.IO05, DeviceFunction.COM2_TX);
      Configuration.SetPinFunction(Gpio.IO02, DeviceFunction.COM2_RTS);

      Debug.WriteLine("RS485 Receiver ");

      // get available ports
      var ports = SerialPort.GetPortNames();

      Debug.WriteLine("Available ports: ");
      foreach (string port in ports)
      {
         Debug.WriteLine($" {port}");
      }

      // set parameters
      _serialDevice = new SerialPort("COM2");
      _serialDevice.BaudRate = 9600;
      _serialDevice.Mode = SerialMode.RS485;

      // set a watch char to be notified when it's available in the input stream
      _serialDevice.WatchChar = '\n';

      // setup an event handler that will fire when a char is received in the serial device input stream
      _serialDevice.DataReceived += SerialDevice_DataReceived;

      _serialDevice.Open();

      Debug.WriteLine("Waiting...");
      Thread.Sleep(Timeout.Infinite);
   }

   private static void SerialDevice_DataReceived(object sender, SerialDataReceivedEventArgs e)
   {
      SerialPort serialDevice = (SerialPort)sender;

      switch (e.EventType)
      {
         case SerialData.Chars:
         //break;

         case SerialData.WatchChar:
            string response = serialDevice.ReadExisting();
            Debug.Write($"Received:{response}");
            break;
         default:
            Debug.Assert(false, $"e.EventType {e.EventType} unknown");
            break;
      }
   }
}
The changing of serial port numbers while running different combinations of Arduino and nanoFramework environments concurrently combined with the sender and receiver applications having to be deployed to the right devices (also initially accidentally different baud rates) was a word of pain, and with the benefit of hindsight I should have used two computers.
The PEM encoded root CA certificate chain that is used to validate the server
public const string CA_ROOT_PEM = @"-----BEGIN CERTIFICATE-----
CN: CN = Microsoft Azure ECC TLS Issuing CA 03
-----END CERTIFICATE-----
-----BEGIN CERTIFICATE-----
CN: CN = DigiCert Global Root G3
-----END CERTIFICATE-----";

The PEM encoded certificate chain that is used to authenticate the device
public const string CLIENT_CERT_PEM_A = @"-----BEGIN CERTIFICATE-----
-----BEGIN CERTIFICATE-----
 CN=Self signed device certificate
-----END CERTIFICATE-----
-----BEGIN CERTIFICATE-----
 CN=Self signed Intermediate certificate
-----END CERTIFICATE-----";

 The PEM encoded private key of device
public const string CLIENT_KEY_PEM_A = @"-----BEGIN EC PRIVATE KEY-----
-----END EC PRIVATE KEY-----";
The unpacking of the value standard particulate, environmental particulate and particle count values is fairly repetitive, but I will fix it in the next version.
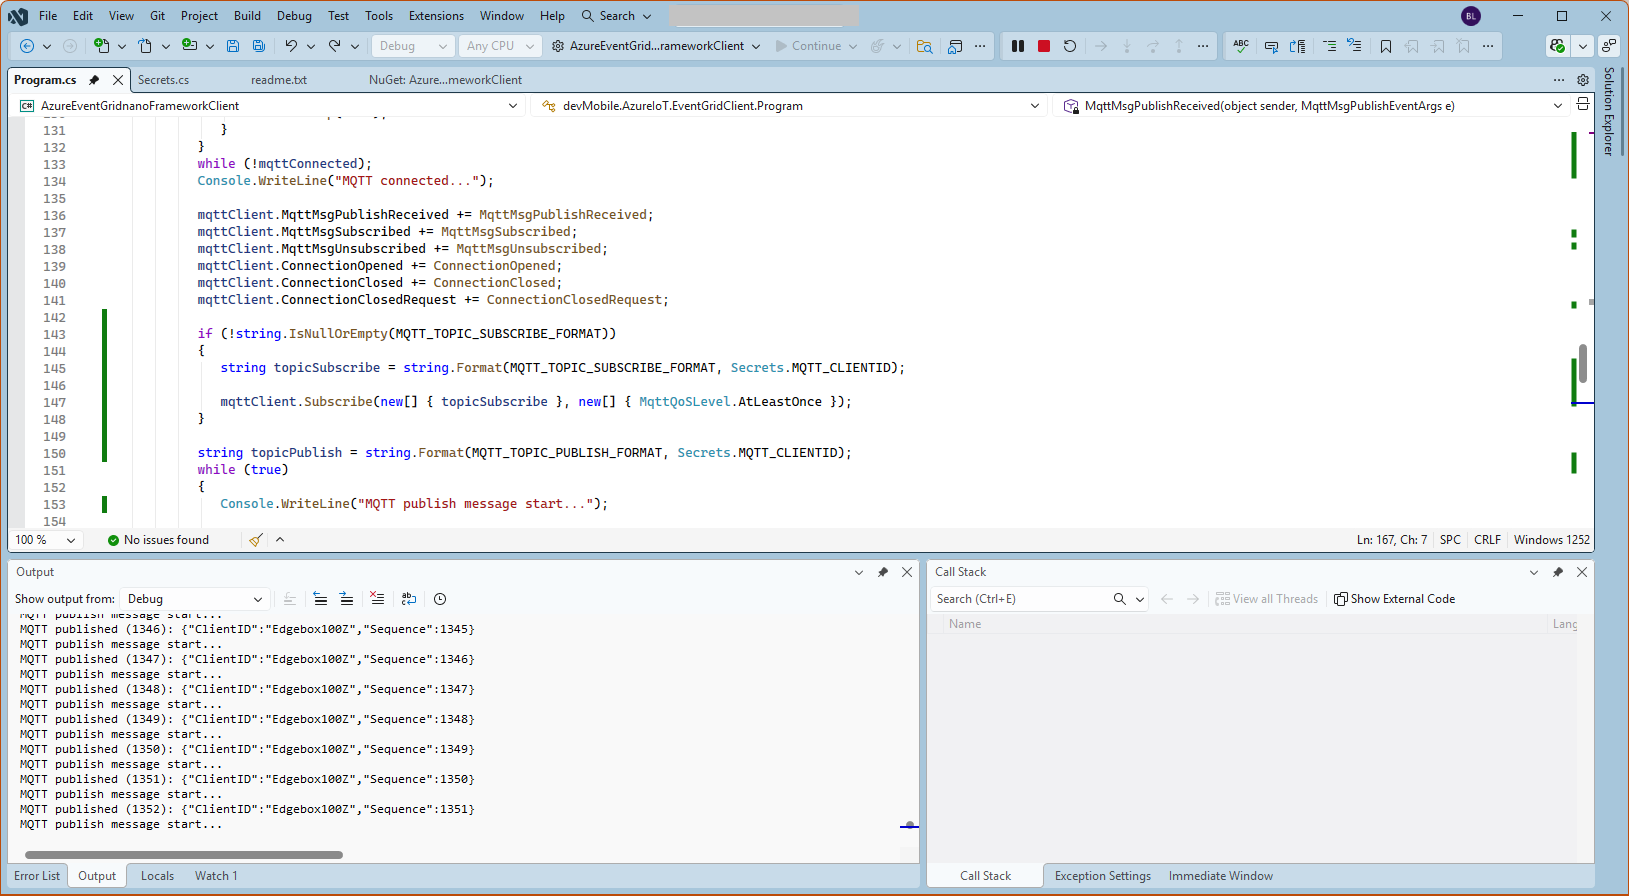
Visual Studio 2022 Debug Output
The checksum calculation isn’t great even a simple cyclic redundancy check(CRC) would be an improvement on summing the 28 bytes of the payload.
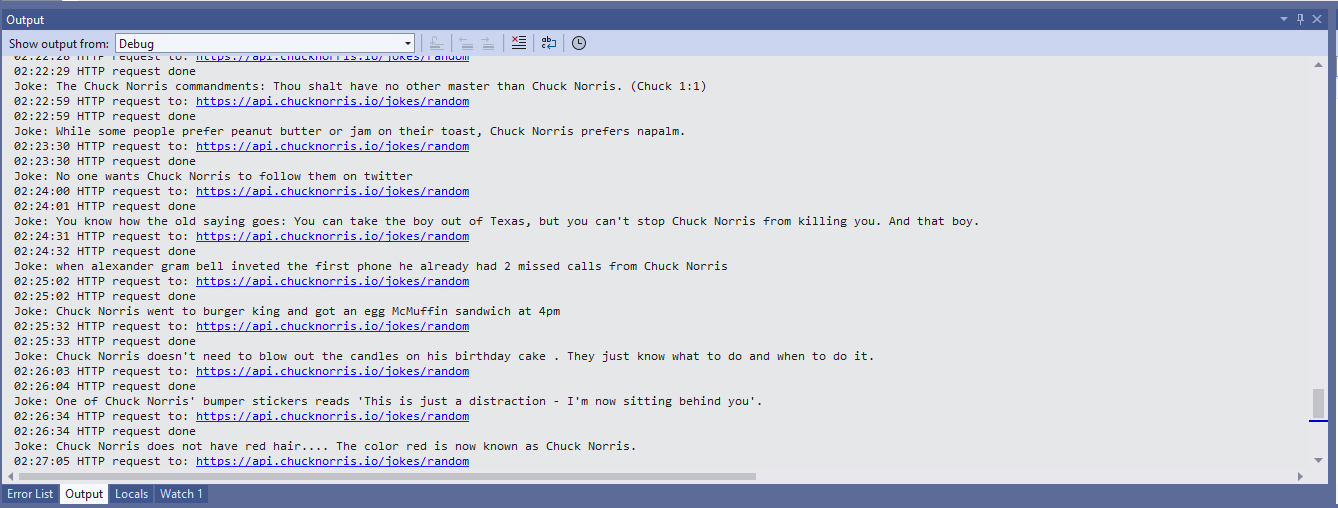
Some of the Chuck Norris facts are not suitable for school students so the request Uniform Resource Locator (URL) can be modified to ensure only “age appropriate” ones are returned.
The first step was to flash the WT32-SC01 with the latest version of the .NET nanoFramework for ESP32 devices. To get the device into “boot” mode I used a jumper wire to connect GPIO0 to ground before powering it up.
WT32-SC01 boot loader mode jumper
The .NET nanoFramework nanoff utility identified the device, downloaded the runtime package, and updated the device.
updating the WT32-SC01 with the nanoff utility
The next step was to run the blank NET nanoFramework sample application.
using System;
using System.Diagnostics;
using System.Threading;

namespace HelloWorld
{
    public class Program
    {
        public static void Main()
        {
            Debug.WriteLine("Hello from nanoFramework!");

            Thread.Sleep(Timeout.Infinite);

            // Browse our samples repository: https://github.com/nanoframework/samples
            // Check our documentation online: https://docs.nanoframework.net/
            // Join our lively Discord community: https://discord.gg/gCyBu8T
        }
    }
}
Microsoft Visual Studio 2022 displaying output of .NET nanoFramework Blank application
//
// Copyright (c) .NET Foundation and Contributors
// See LICENSE file in the project root for full license information.
//

using System.Device.Gpio;
using System;
using System.Threading;
using nanoFramework.Hardware.Esp32;

namespace Blinky
{
    public class Program
    {
        private static GpioController s_GpioController;
        public static void Main()
        {
            s_GpioController = new GpioController();

            // IO23 is LCD backlight
            GpioPin led = s_GpioController.OpenPin(Gpio.IO23,PinMode.Output );

            led.Write(PinValue.Low);

            while (true)
            {
                led.Toggle();
                Thread.Sleep(125);
                led.Toggle();
                Thread.Sleep(125);
                led.Toggle();
                Thread.Sleep(125);
                led.Toggle();
                Thread.Sleep(525);
            }
        }
    }
}
The
Flashing WT32-SC01 LCD backlight
Next steps getting the LCD+Touch panel and Wifi working
Important: make sure you setup the I2C pins especially on ESP32 Devices before creating the I2cDevice,
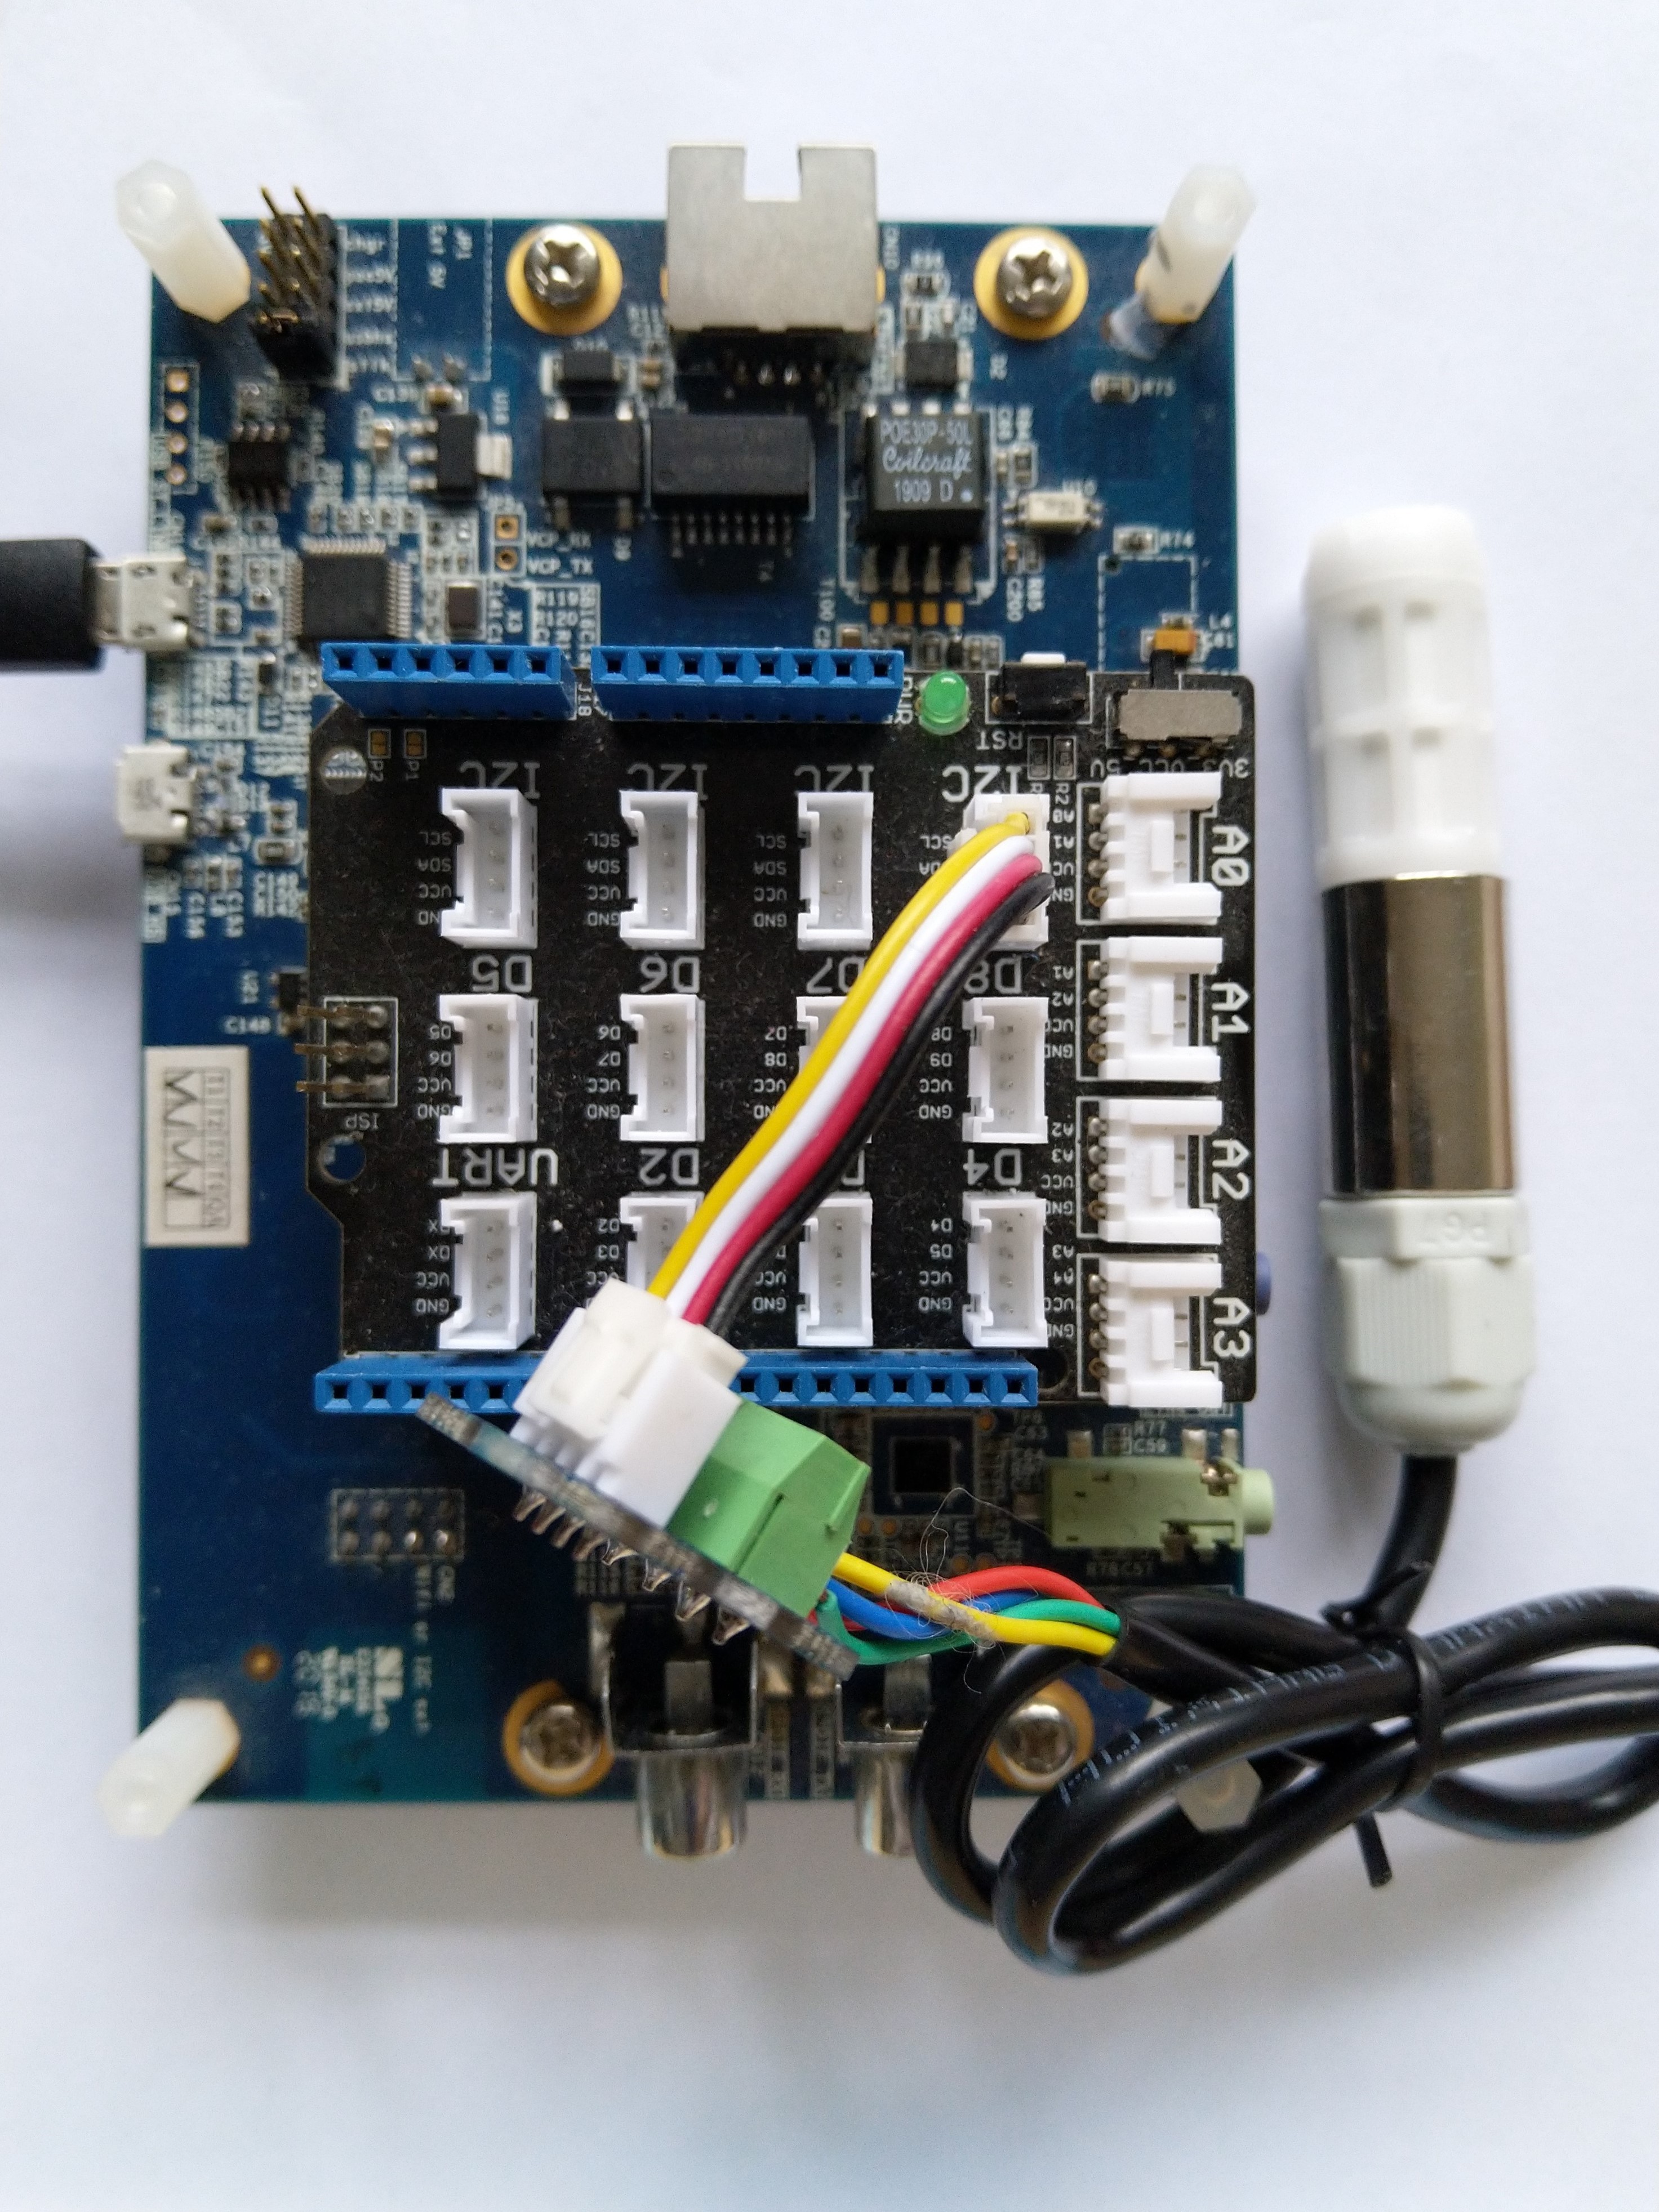
SHT20 +STM32F769 Discovery test rig
The .NET nanoFramework device libraries use a TryGet… pattern to retrieve sensor values, this library throws an exception if reading a sensor value fails. I’m not certain which approach is “better” as reading the Seeedstudio Grove – Laser PM2.5 Dust Sensor has never failed. The only time reading the “values” buffer failed was when I unplugged the device which I think is “exceptional”.
//---------------------------------------------------------------------------------
// Copyright (c) April 2023, devMobile Software
//
// Licensed under the Apache License, Version 2.0 (the "License");
// you may not use this file except in compliance with the License.
// You may obtain a copy of the License at
//
//     http://www.apache.org/licenses/LICENSE-2.0
//
// Unless required by applicable law or agreed to in writing, software
// distributed under the License is distributed on an "AS IS" BASIS,
// WITHOUT WARRANTIES OR CONDITIONS OF ANY KIND, either express or implied.
// See the License for the specific language governing permissions and
// limitations under the License.
//
// nanoff --target ST_STM32F769I_DISCOVERY --update
// nanoff --platform ESP32 --serialport COM7 --update
//
//---------------------------------------------------------------------------------
#define ST_STM32F769I_DISCOVERY
//#define  SPARKFUN_ESP32_THING_PLUS
namespace devMobile.IoT.Device.SeeedstudioHM3301
{
    using System;
    using System.Device.I2c;
    using System.Threading;

#if SPARKFUN_ESP32_THING_PLUS
    using nanoFramework.Hardware.Esp32;
#endif

    class Program
    {
        static void Main(string[] args)
        {
            const int busId = 1;

            Thread.Sleep(5000);

#if SPARKFUN_ESP32_THING_PLUS
            Configuration.SetPinFunction(Gpio.IO23, DeviceFunction.I2C1_DATA);
            Configuration.SetPinFunction(Gpio.IO22, DeviceFunction.I2C1_CLOCK);
#endif
            I2cConnectionSettings i2cConnectionSettings = new(busId, SeeedstudioHM3301.DefaultI2cAddress);

            using I2cDevice i2cDevice = I2cDevice.Create(i2cConnectionSettings);
            {
                using (SeeedstudioHM3301 seeedstudioHM3301 = new SeeedstudioHM3301(i2cDevice))
                {
                    while (true)
                    {
                        SeeedstudioHM3301.ParticulateMeasurements particulateMeasurements = seeedstudioHM3301.Read();

                        Console.WriteLine($"Standard PM1.0: {particulateMeasurements.Standard.PM1_0} ug/m3   PM2.5: {particulateMeasurements.Standard.PM2_5} ug/m3  PM10.0: {particulateMeasurements.Standard.PM10_0} ug/m3 ");
                        Console.WriteLine($"Atmospheric PM1.0: {particulateMeasurements.Atmospheric.PM1_0} ug/m3   PM2.5: {particulateMeasurements.Atmospheric.PM2_5} ug/m3  PM10.0: {particulateMeasurements.Standard.PM10_0} ug/m3");

                        // Always 0, checked payload so not a conversion issue. will check in Seeedstudio forums
                        // Console.WriteLine($"Count 0.3um: {particulateMeasurements.Count.Diameter0_3}/l 0.5um: {particulateMeasurements.Count.Diameter0_5} /l 1.0um : {particulateMeasurements.Count.Diameter1_0}/l 2.5um : {particulateMeasurements.Count.Diameter2_5}/l 5.0um : {particulateMeasurements.Count.Diameter5_0}/l 10.0um : {particulateMeasurements.Count.Diameter10_0}/l");

                        Thread.Sleep(new TimeSpan(0,1,0));
                    }
                }
            }
        }
    }
}
I’m going to soak test the library for a week to check that is working okay, then most probably refactor the code so it can be added to the nanoFramework IoT.Device Library repository.