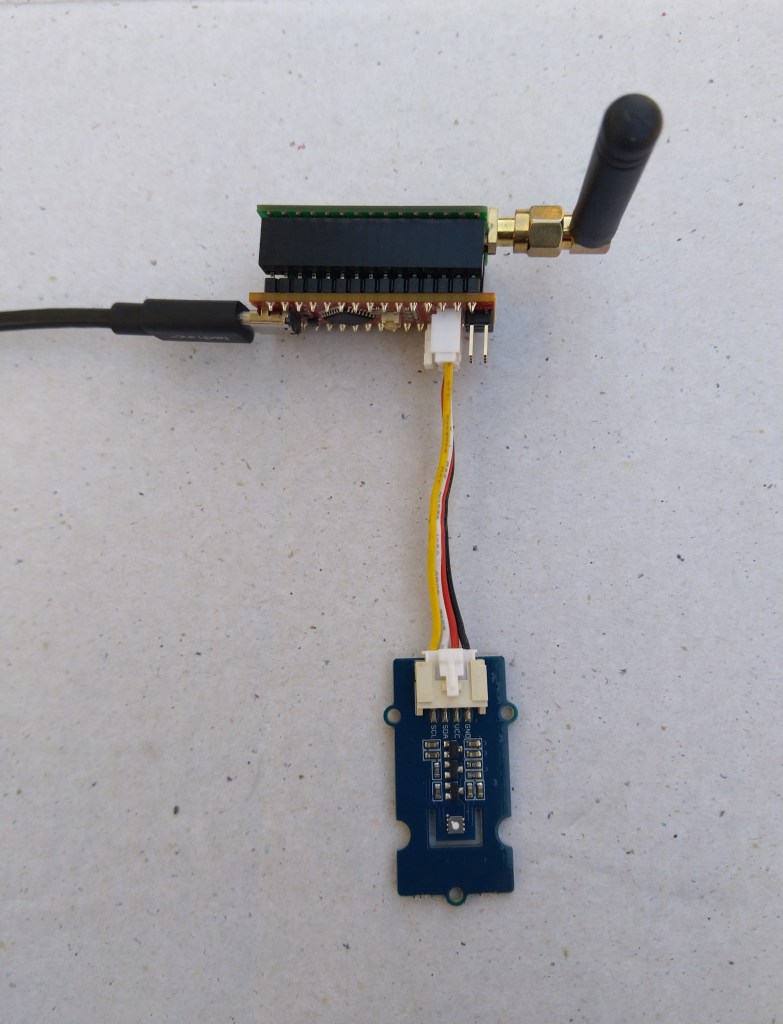
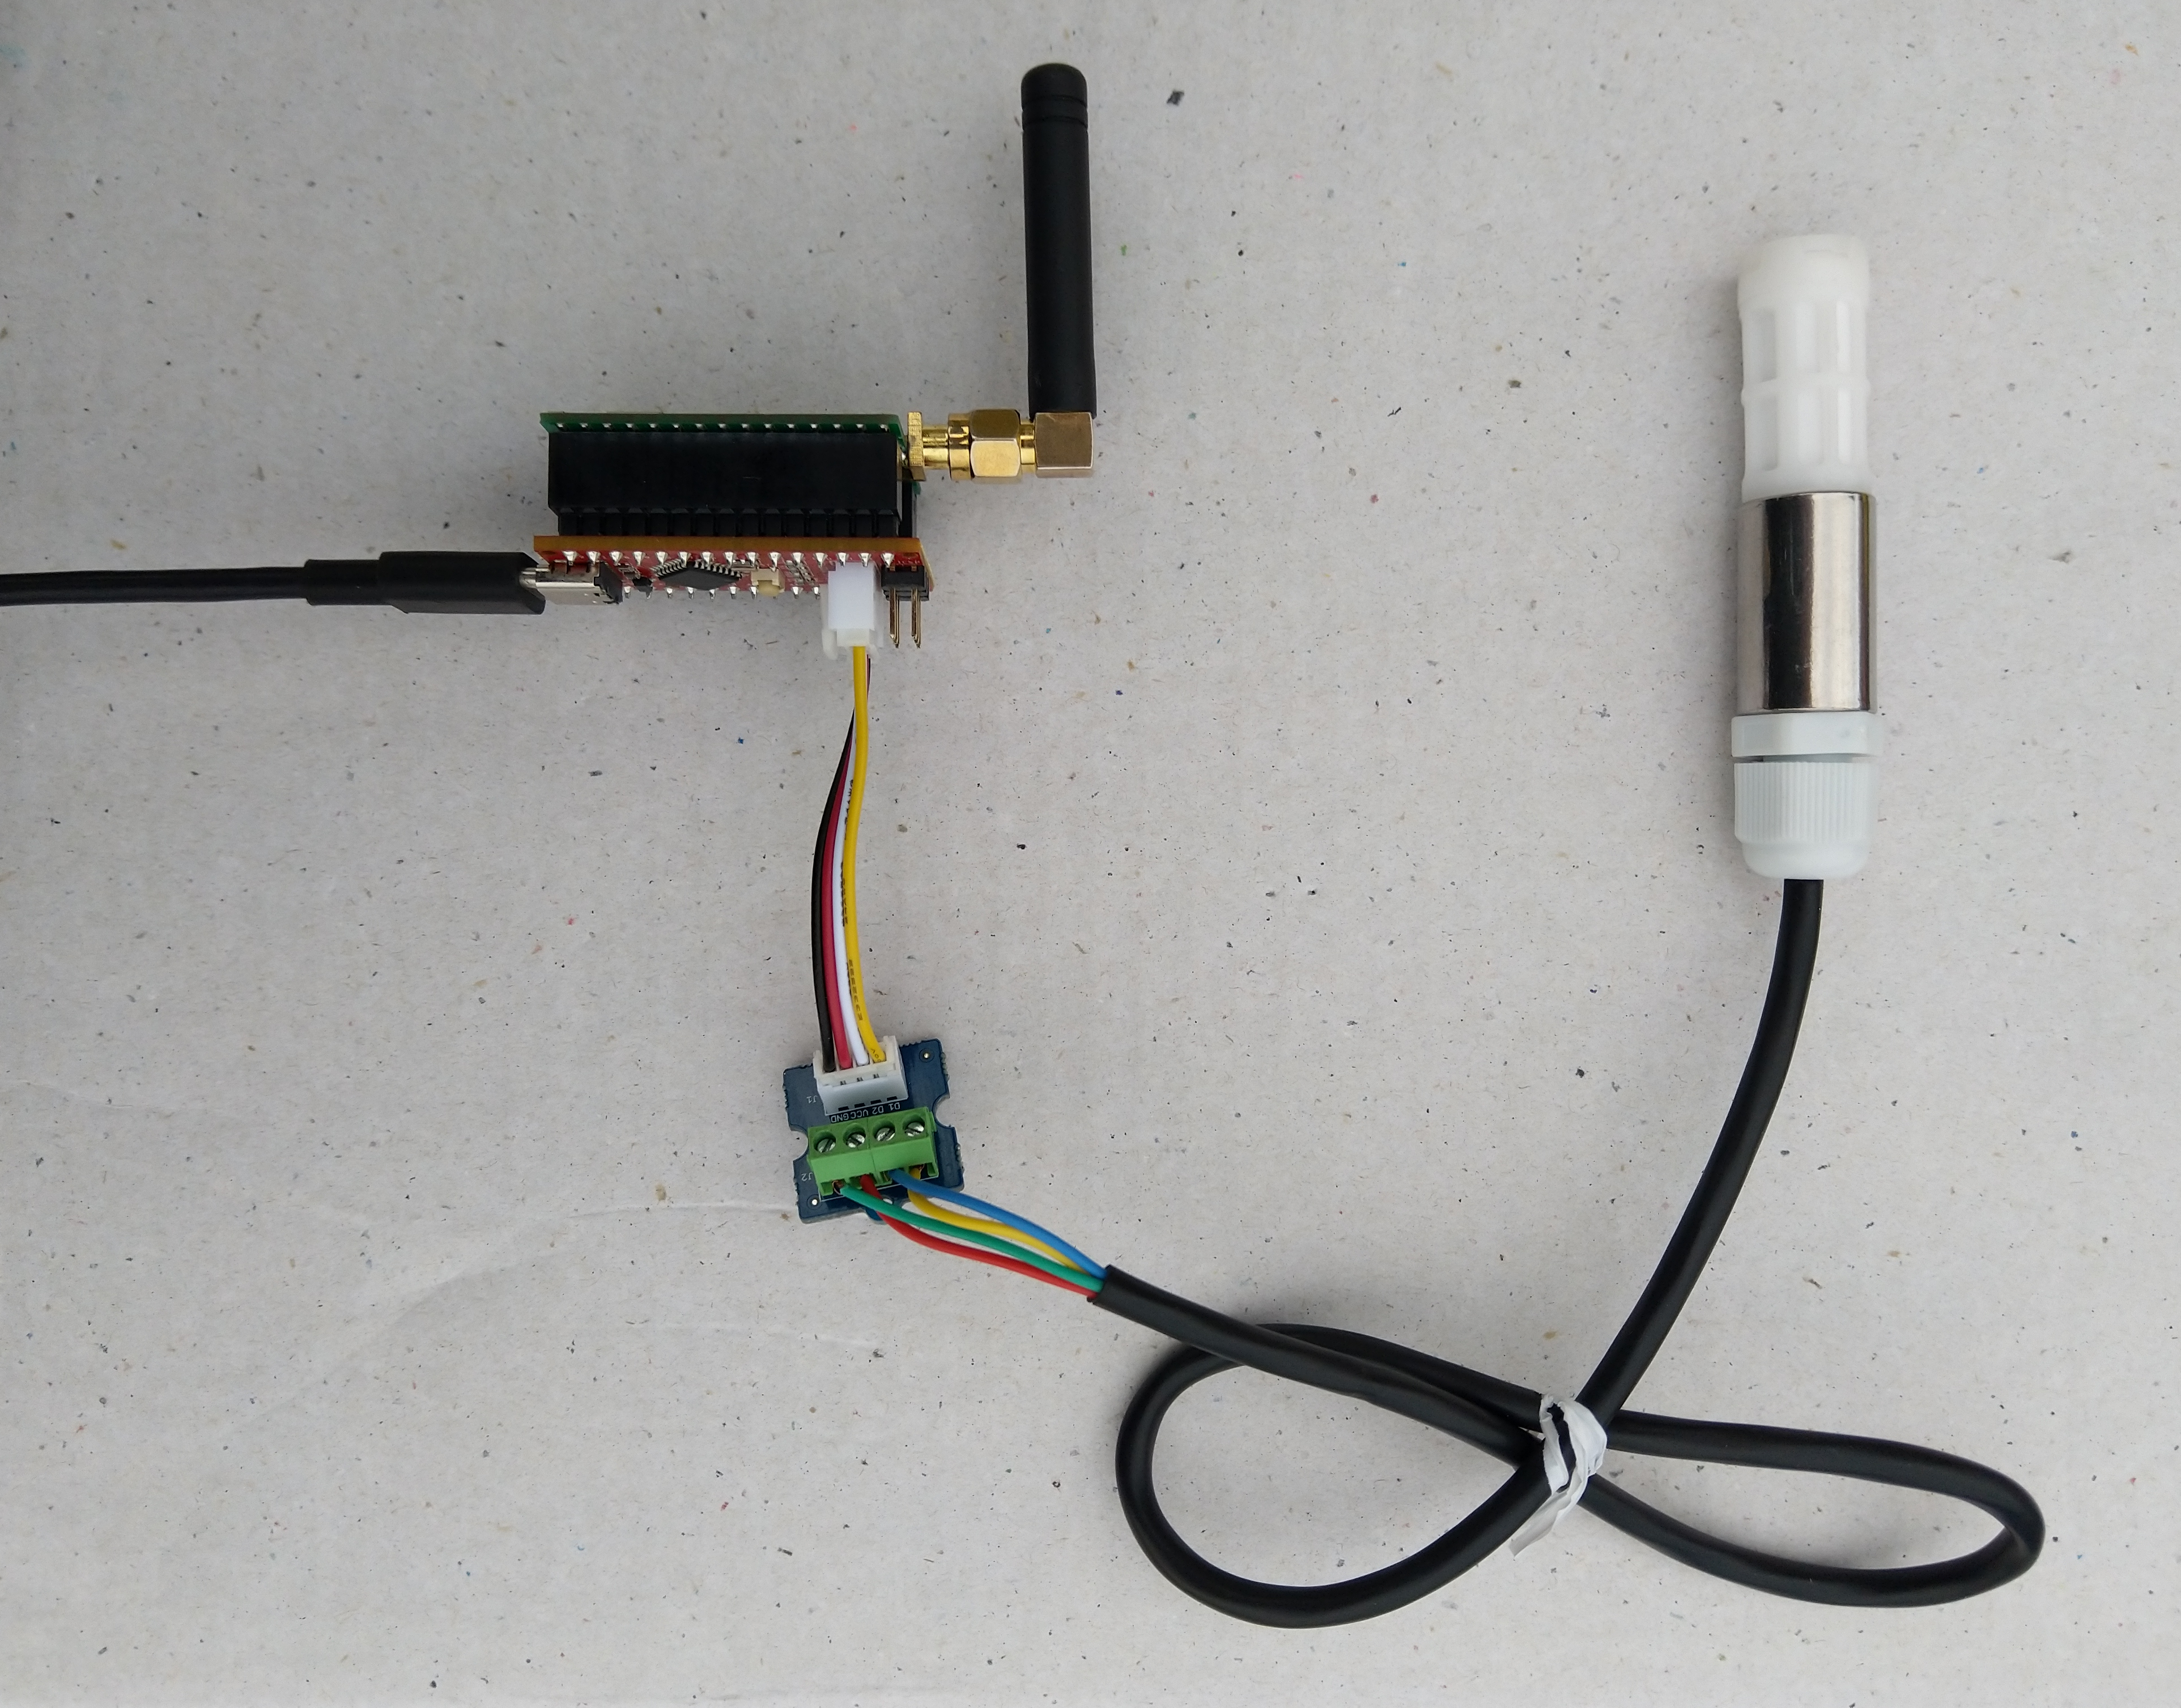
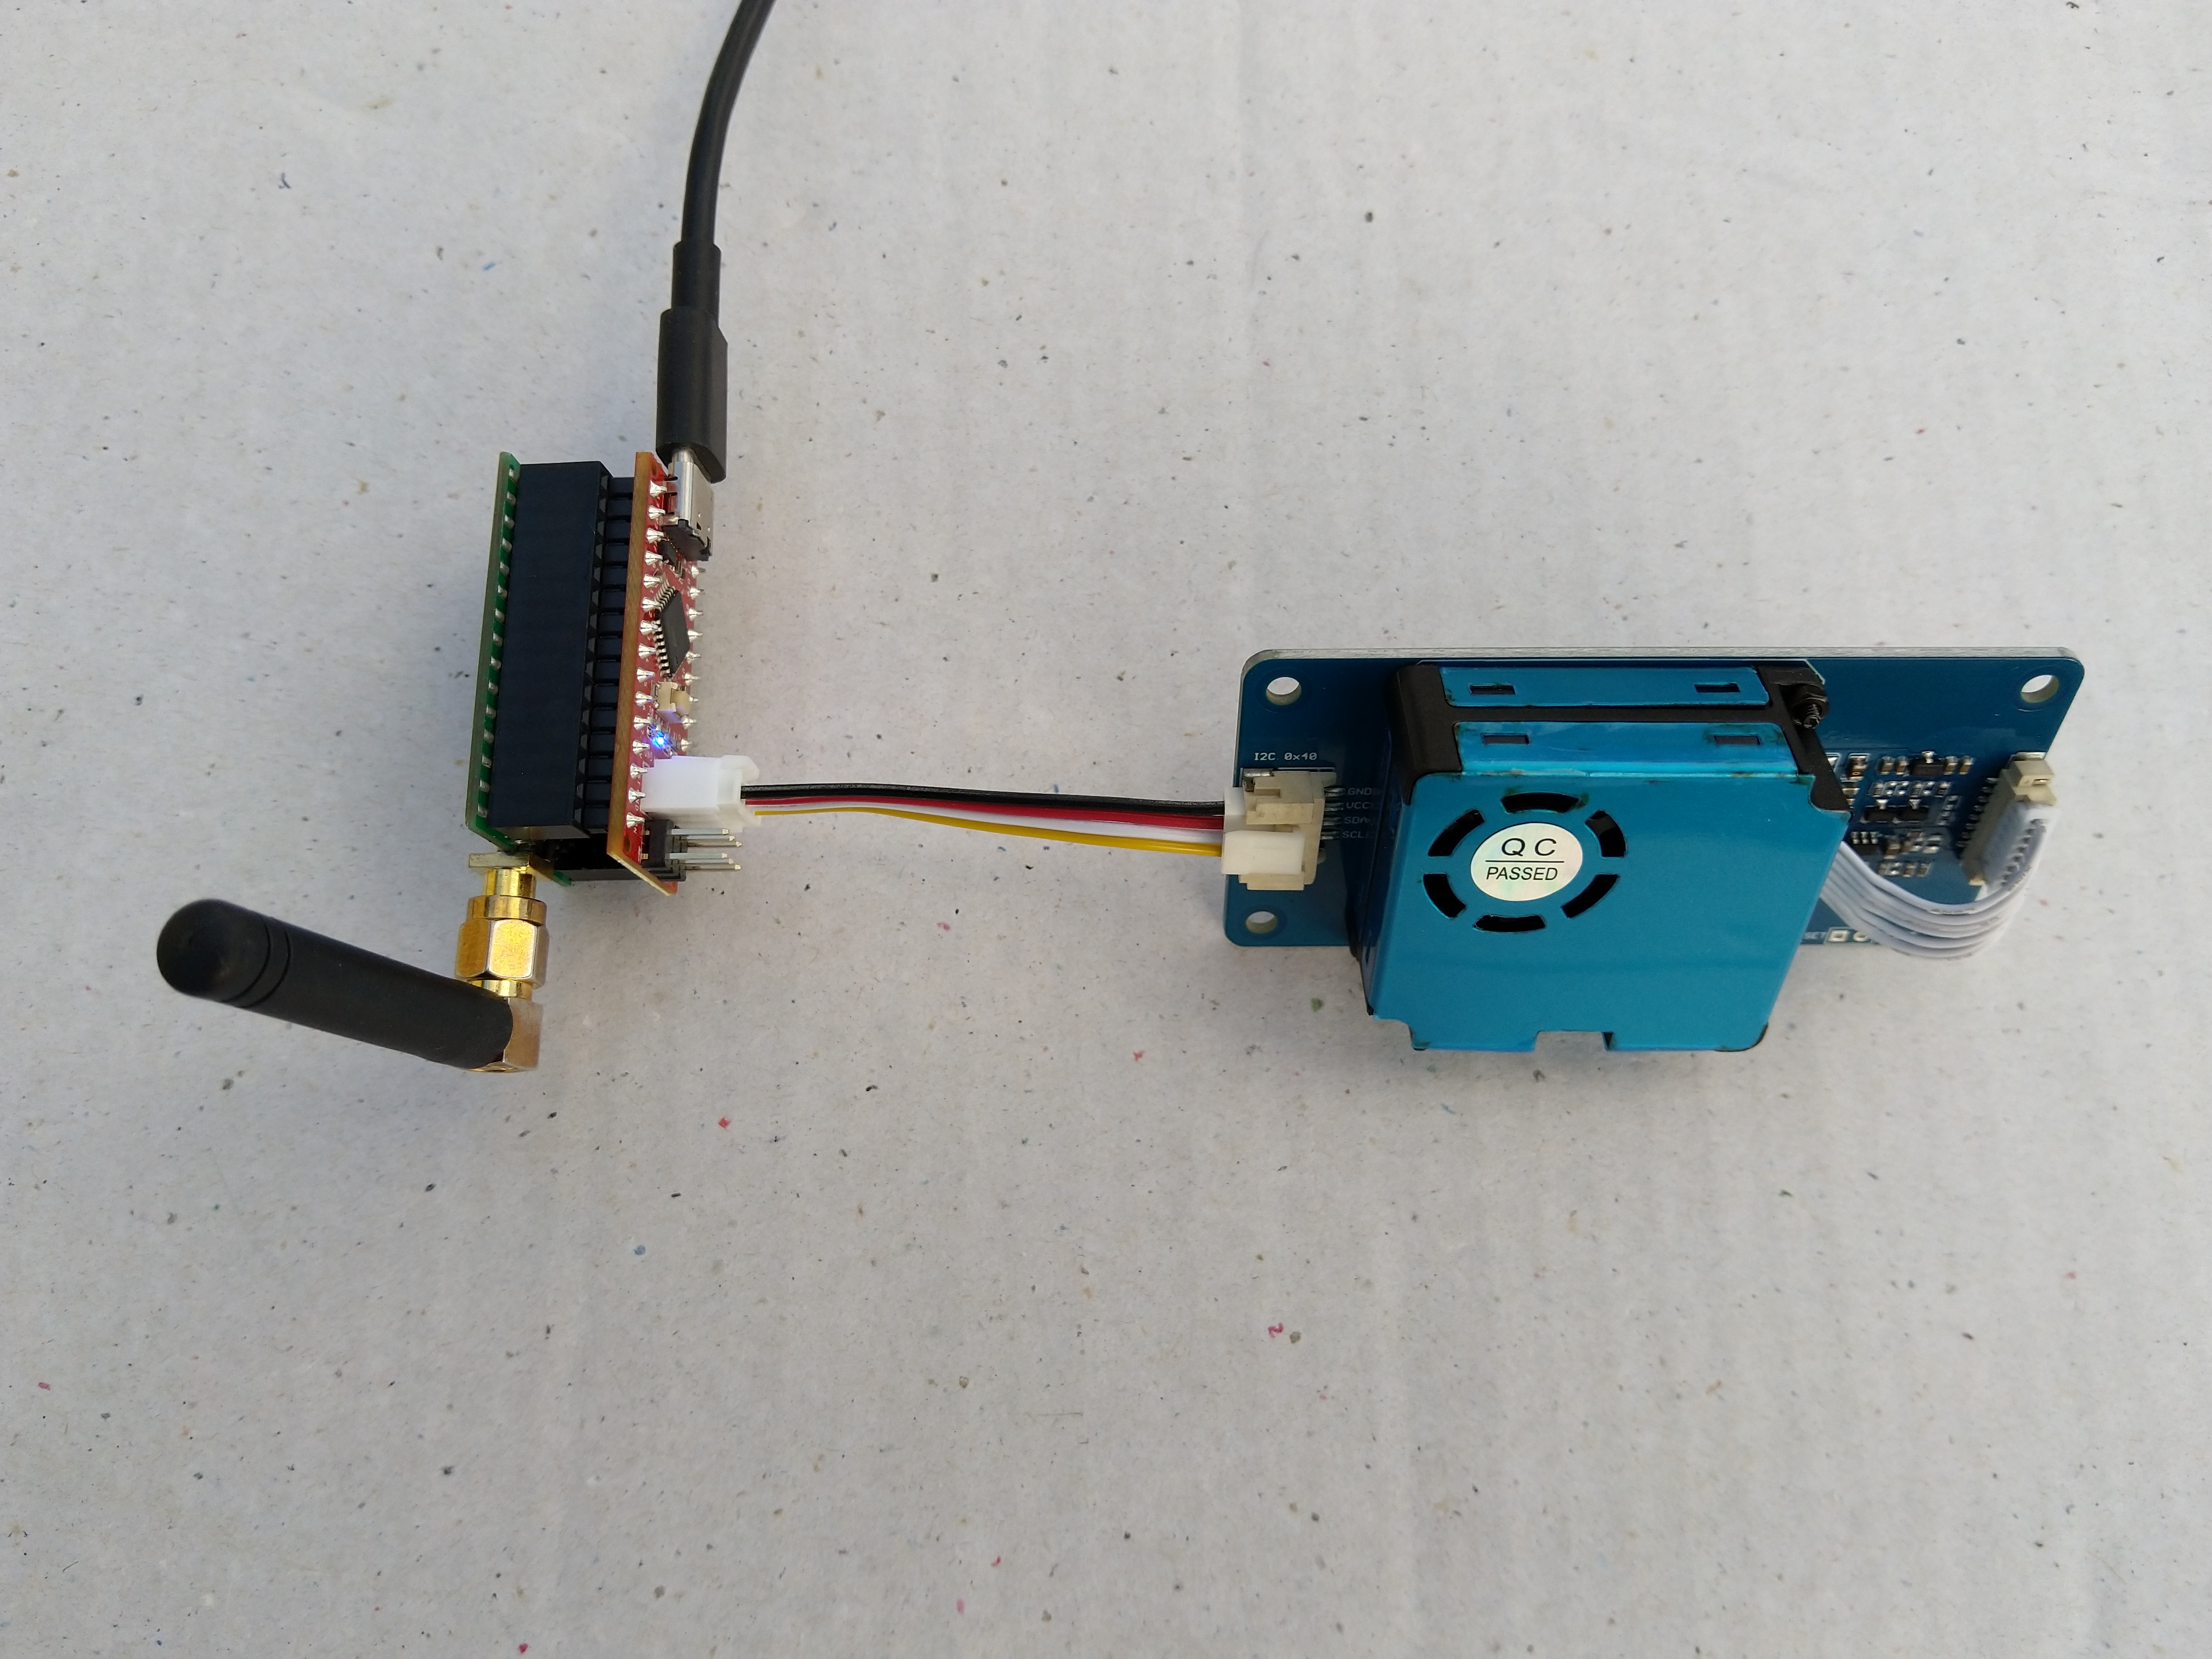
This sample client is an Wilderness Labs Meadow with a Sensiron SHT31 Temperature & humidity sensor (supported by meadow foundation), and a generic nRF24L01 device connected with jumper cables.
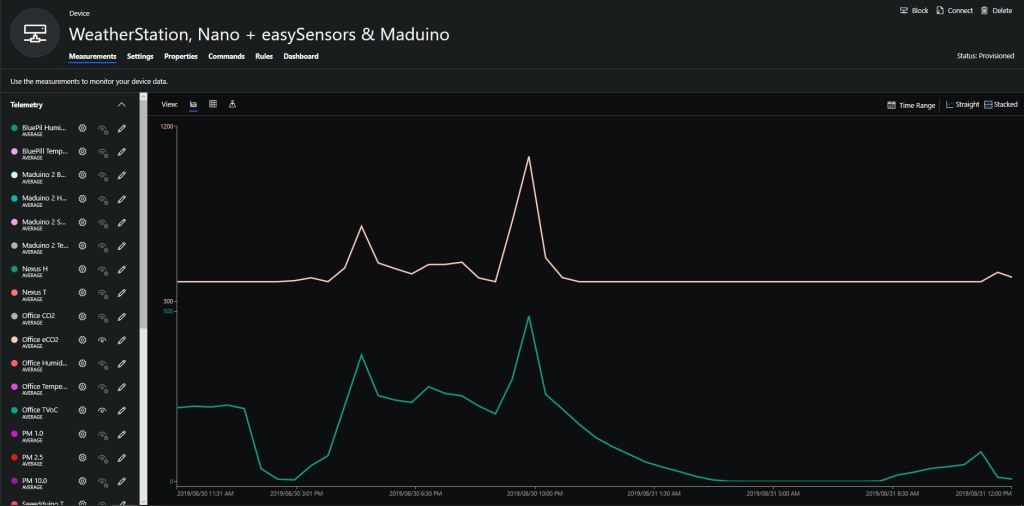
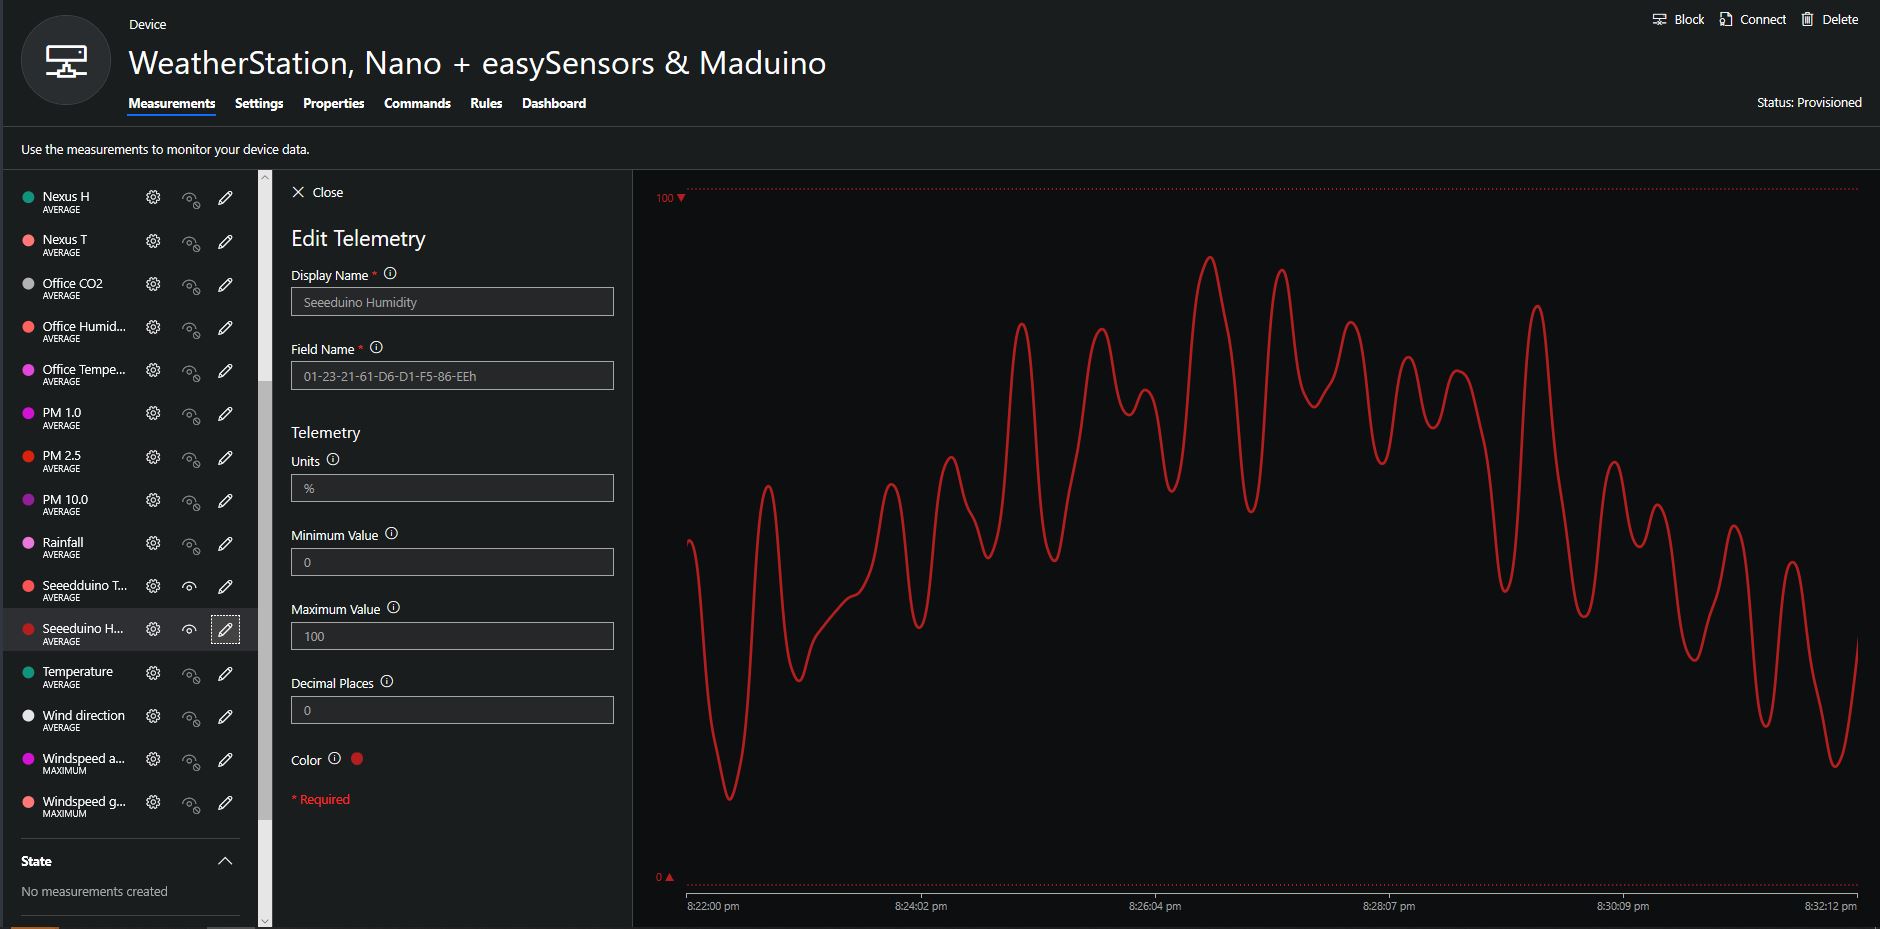
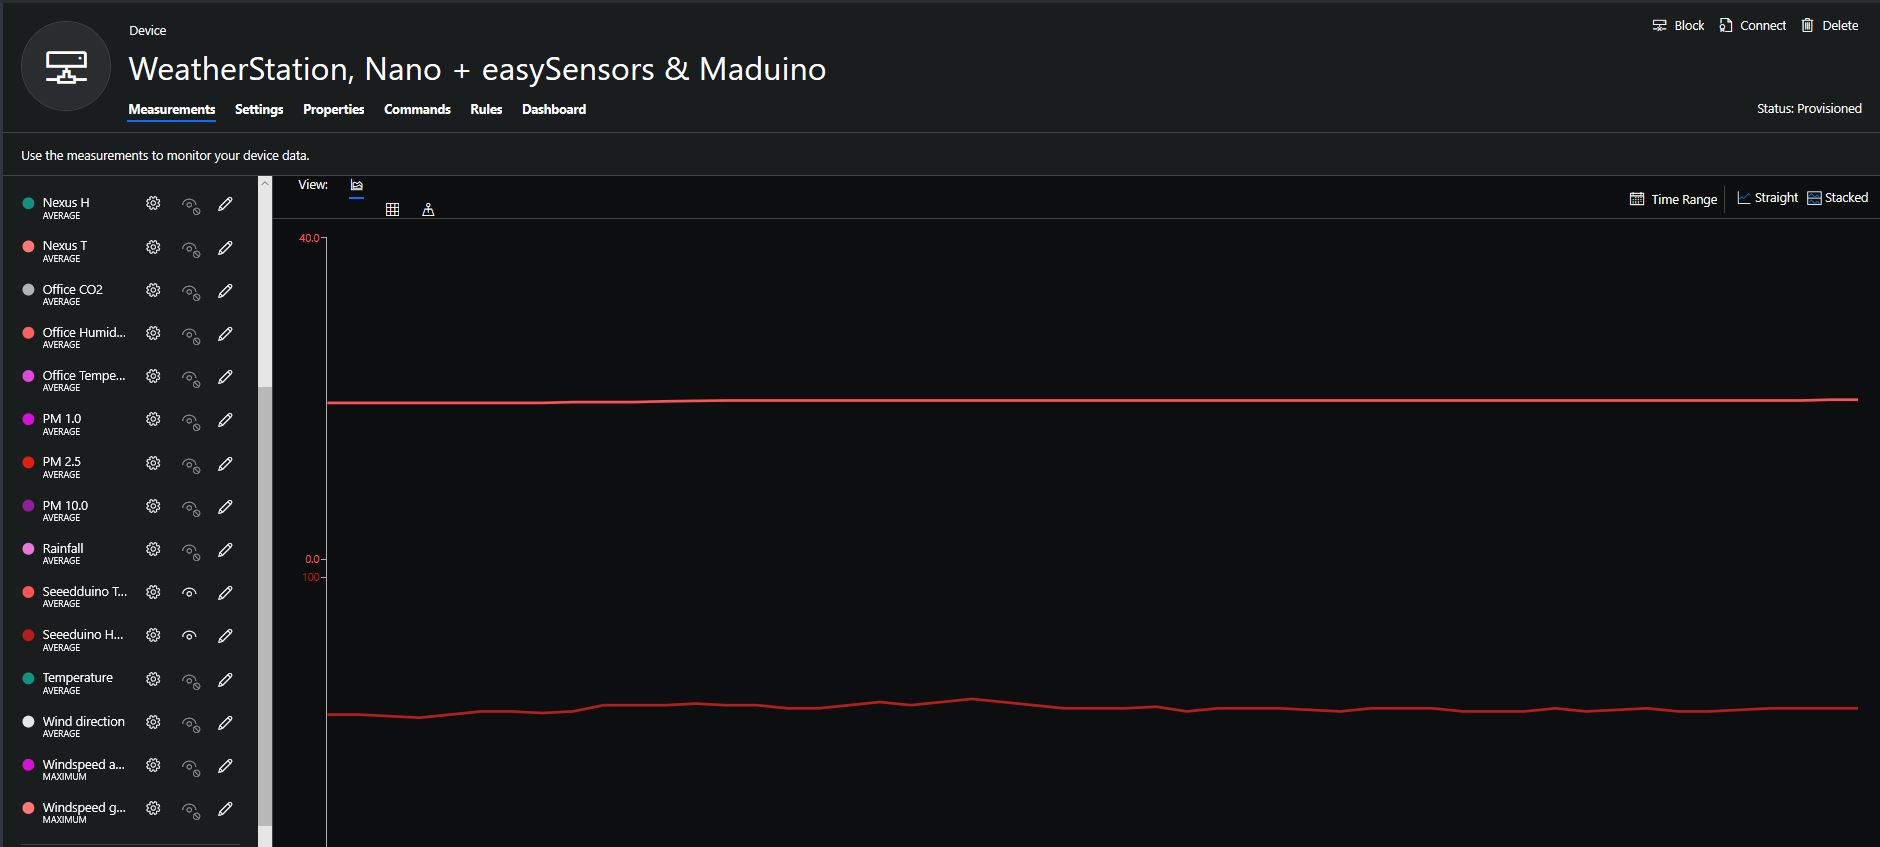
After sorting out power to the SHT31 (I had to push the jumper cable further into the back of the jumper cable plug). I could see temperature and humidity values getting uploaded to Adafruit.IO.
Visual Studio 2019 debug output
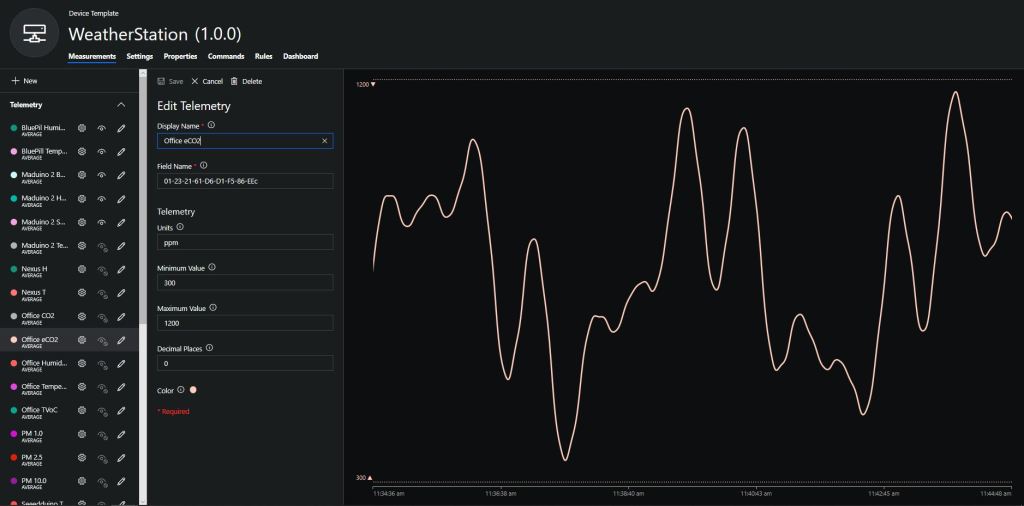
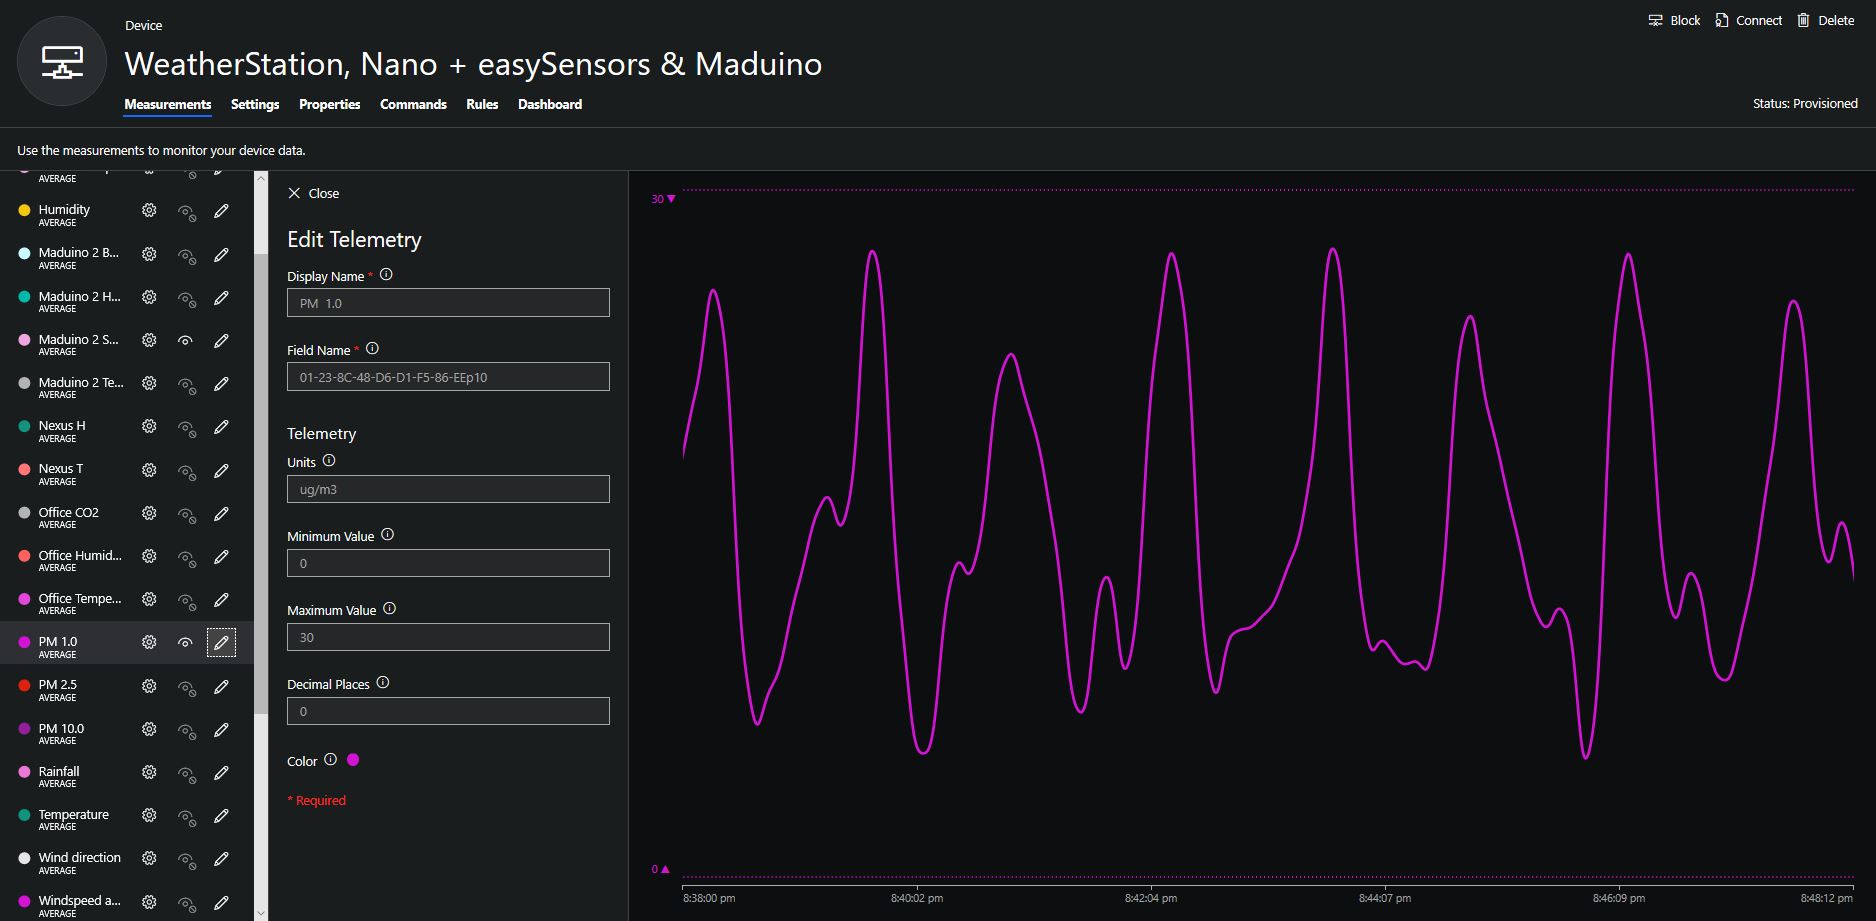
Adafruit.IO “automagically” provisions new feeds which is helpful when building a proof of concept (PoC)
Adafruit.IO feed with default feed IDs
I then modified the feed configuration to give it a user friendly name.
Application Insights logging with message unpackingApplication Insights logging message payload
Then in the last log entry the decoded message payload
/*
Copyright ® 2020 Feb devMobile Software, All Rights Reserved
MIT License
Permission is hereby granted, free of charge, to any person obtaining a copy
of this software and associated documentation files (the "Software"), to deal
in the Software without restriction, including without limitation the rights
to use, copy, modify, merge, publish, distribute, sublicense, and/or sell
copies of the Software, and to permit persons to whom the Software is
furnished to do so, subject to the following conditions:
The above copyright notice and this permission notice shall be included in all
copies or substantial portions of the Software.
THE SOFTWARE IS PROVIDED "AS IS", WITHOUT WARRANTY OF ANY KIND, EXPRESS OR
IMPLIED, INCLUDING BUT NOT LIMITED TO THE WARRANTIES OF MERCHANTABILITY,
FITNESS FOR A PARTICULAR PURPOSE AND NONINFRINGEMENT. IN NO EVENT SHALL THE
AUTHORS OR COPYRIGHT HOLDERS BE LIABLE FOR ANY CLAIM, DAMAGES OR OTHER
LIABILITY, WHETHER IN AN ACTION OF CONTRACT, TORT OR OTHERWISE, ARISING FROM,
OUT OF OR IN CONNECTION WITH THE SOFTWARE OR THE USE OR OTHER DEALINGS IN THE
SOFTWARE
Default URL for triggering event grid function in the local environment.
http://localhost:7071/runtime/webhooks/EventGrid?functionName=functionname
*/
namespace EventGridProcessorAzureIotHub
{
using System;
using System.IO;
using System.Reflection;
using Microsoft.Azure.WebJobs;
using Microsoft.Azure.EventGrid.Models;
using Microsoft.Azure.WebJobs.Extensions.EventGrid;
using log4net;
using log4net.Config;
using Newtonsoft.Json;
public static class Telemetry
{
[FunctionName("Telemetry")]
public static void Run([EventGridTrigger]Microsoft.Azure.EventGrid.Models.EventGridEvent eventGridEvent, ExecutionContext executionContext )//, TelemetryClient telemetryClient)
{
ILog log = log4net.LogManager.GetLogger(System.Reflection.MethodBase.GetCurrentMethod().DeclaringType);
var logRepository = LogManager.GetRepository(Assembly.GetEntryAssembly());
XmlConfigurator.Configure(logRepository, new FileInfo(Path.Combine(executionContext.FunctionAppDirectory, "log4net.config")));
log.Info($"eventGridEvent.Data-{eventGridEvent}");
log.Info($"eventGridEvent.Data.ToString()-{eventGridEvent.Data.ToString()}");
IotHubDeviceTelemetryEventData iOThubDeviceTelemetryEventData = (IotHubDeviceTelemetryEventData)JsonConvert.DeserializeObject(eventGridEvent.Data.ToString(), typeof(IotHubDeviceTelemetryEventData));
log.Info($"iOThubDeviceTelemetryEventData.Body.ToString()-{iOThubDeviceTelemetryEventData.Body.ToString()}");
byte[] base64EncodedBytes = System.Convert.FromBase64String(iOThubDeviceTelemetryEventData.Body.ToString());
log.Info($"System.Text.Encoding.UTF8.GetString(-{System.Text.Encoding.UTF8.GetString(base64EncodedBytes)}");
}
}
}
Overall it took roughly half a page of code (mainly generated by a tool) to unpack and log the contents of an Azure IoT Hub EventGrid payload to Application Insights.
I have one an Azure IoT HubLoRa Telemetry Field Gateway running in my office and I wanted to process the data collected by the sensors around my property without using a Software as a Service(SaaS) Internet of Things (IoT) package.
Rather than lots of screen grabs of my configuration steps I figured people reading this series of posts would be able to figure the details out themselves.
I downloaded the JSON configuration file template from my Windows 10 device (which is created on first startup after installation) and configured the Azure IoT Hub connection string.
I then uploaded this to my Windows 10 IoT Core device and restarted the Azure IoT Hub Field gateway so it picked up the new settings.
I could then see on the device messages from sensor nodes being unpacked and uploaded to my Azure IoT Hub.
ETW logging on device
In the Azure IoT Hub metrics I graphed the number of devices connected and the number of telemetry messages sent and could see my device connect then start uploading telemetry.
Azure IoT Hub metrics
One of my customers uses Azure Event Grid for application integration and I wanted to explore using it in an IoT solution. The first step was to create an Event Grid Domain.
To confirm my event subscriptions were successful I previously found the “simplest” approach was to use an Azure storage queue endpoint. I had to create an Azure Storage Account with two Azure Storage Queues one for device connectivity (.DeviceConnected & .DeviceDisconnected) events and the other for device telemetry (.DeviceTelemetry) events.
I created a couple of other subscriptions so I could compare the different Event schemas (Event Grid Schema & Cloud Event Schema v1.0). At this stage I didn’t configure any Filters or Additional Features.
Azure IoT Hub Telemetry Event Metrics
I use Cerebrate Cerculean for monitoring and managing a couple of other customer projects so I used it to inspect the messages in the storage queues.
Without writing any code (I will script the configuration) I could upload sensor data to an Azure IoT Hub, subscribe to a selection of events the Azure IoT Hub publishes and then inspect them in an Azure Storage Queue.
I did notice that the .DeviceConnected and .DeviceDisconnected events did take a while to arrive. When I started the field gateway application on the device I would get several DeviceTelemetry events before the DeviceConnected event arrived.
Seeeduino Nano easySensors shield and Grove VOC & eCO2 Sensor
Seeeduino Nano devices have a single on-board I2C socket which meant I didn’t need a Grove Shield for Arduino Nano which reduced the size and cost of the sensor node.
My first attempt failed with an issues accessing an Analog port to read the serial number from the Microchip ATSHA204 security chip. After looking at the Seeed SGP30 library source code (based on Sensiron samples) I think the my Nano device was running out of memory. I then searched for other Arduino compatible SGP30 libraries and rebuilt he application with the one from Sparkfun,
/*
Copyright ® 2019 August devMobile Software, All Rights Reserved
THIS CODE AND INFORMATION IS PROVIDED "AS IS" WITHOUT WARRANTY OF ANY
KIND, EITHER EXPRESSED OR IMPLIED, INCLUDING BUT NOT LIMITED TO THE
IMPLIED WARRANTIES OF MERCHANTABILITY AND/OR FITNESS FOR A PARTICULAR
PURPOSE.
You can do what you want with this code, acknowledgment would be nice.
http://www.devmobile.co.nz
Seeedstudio Grove - VOC and eCO2 Gas Sensor (SGP30)
https://www.seeedstudio.com/Grove-VOC-and-eCO2-Gas-Sensor-SGP30-p-3071.html
Seeeduino Nano
https://www.seeedstudio.com/Seeeduino-Nano-p-4111.html
Polycarbonate enclosure approx 3.5" x 4.5"
2 x Cable glands
1 x Grommet to seal SMA antenna connector
3M command adhesive strips to hold battery & device in place
*/
#include <stdlib.h>
#include "SparkFun_SGP30_Arduino_Library.h"
#include <LoRa.h>
#include <sha204_library.h>
//#define DEBUG
//#define DEBUG_TELEMETRY
//#define DEBUG_LORA
#define DEBUG_VOC_AND_CO2
#define UNITS_VOC "ppb"
#define UNITS_CO2 "ppm"
// LoRa field gateway configuration (these settings must match your field gateway)
const byte DeviceAddressMaximumLength = 15 ;
const char FieldGatewayAddress[] = {"LoRaIoT1"};
const float FieldGatewayFrequency = 915000000.0;
const byte FieldGatewaySyncWord = 0x12 ;
// Payload configuration
const int ChipSelectPin = 10;
const int ResetPin = 9;
const int InterruptPin = 2;
// LoRa radio payload configuration
const byte SensorIdValueSeperator = ' ' ;
const byte SensorReadingSeperator = ',' ;
const unsigned long SensorUploadDelay = 60000;
// ATSHA204 secure authentication, validation with crypto and hashing (currently only using for unique serial number)
const byte Atsha204Port = A3;
atsha204Class sha204(Atsha204Port);
const byte DeviceSerialNumberLength = 9 ;
byte deviceSerialNumber[DeviceSerialNumberLength] = {""};
SGP30 mySensor; //create an object of the SGP30 class
const byte PayloadSizeMaximum = 64 ;
byte payload[PayloadSizeMaximum];
byte payloadLength = 0 ;
void setup()
{
Serial.begin(9600);
#ifdef DEBUG
while (!Serial);
#endif
Serial.println("Setup called");
Serial.print("Field gateway:");
Serial.print(FieldGatewayAddress ) ;
Serial.print(" Frequency:");
Serial.print( FieldGatewayFrequency,0 ) ;
Serial.print("MHz SyncWord:");
Serial.print( FieldGatewaySyncWord ) ;
Serial.println();
// Retrieve the serial number then display it nicely
if(sha204.getSerialNumber(deviceSerialNumber))
{
Serial.println("sha204.getSerialNumber failed");
while (true); // Drop into endless loop requiring restart
}
Serial.print("SNo:");
DisplayHex( deviceSerialNumber, DeviceSerialNumberLength);
Serial.println();
Serial.println("LoRa setup start");
// override the default chip select and reset pins
LoRa.setPins(ChipSelectPin, ResetPin, InterruptPin);
if (!LoRa.begin(FieldGatewayFrequency))
{
Serial.println("LoRa begin failed");
while (true); // Drop into endless loop requiring restart
}
// Need to do this so field gateway pays attention to messsages from this device
LoRa.enableCrc();
LoRa.setSyncWord(FieldGatewaySyncWord);
#ifdef DEBUG_LORA
LoRa.dumpRegisters(Serial);
#endif
Serial.println("LoRa Setup done.");
// Configure the DF Robot SHT20, temperature & humidity sensor
Serial.println("SGP30 setup start");
Wire.begin();
if(mySensor.begin() == false)
{
Serial.println("SQP-30 initialisation failed");
while (true); // Drop into endless loop requiring restart
}
mySensor.initAirQuality();
delay(1000);
Serial.println("SGP30 setup done");
PayloadHeader((byte *)FieldGatewayAddress,strlen(FieldGatewayAddress), deviceSerialNumber, DeviceSerialNumberLength);
Serial.println("Setup done");
Serial.println();
}
void loop()
{
unsigned long currentMilliseconds = millis();
Serial.println("Loop called");
mySensor.measureAirQuality();
PayloadReset();
PayloadAdd( "v", mySensor.TVOC, false);
PayloadAdd( "c", mySensor.CO2, false);
#ifdef DEBUG_VOC_AND_CO2
Serial.print("VoC:");
Serial.print( mySensor.TVOC ) ;
Serial.print( UNITS_VOC ) ;
Serial.print(" Co2:");
Serial.print( mySensor.CO2 ) ;
Serial.println( UNITS_CO2 ) ;
#endif
#ifdef DEBUG_TELEMETRY
Serial.println();
Serial.print("RFM9X/SX127X Payload length:");
Serial.print(payloadLength);
Serial.println(" bytes");
#endif
LoRa.beginPacket();
LoRa.write(payload, payloadLength);
LoRa.endPacket();
Serial.println("Loop done");
Serial.println();
delay(SensorUploadDelay - (millis() - currentMilliseconds ));
}
void PayloadHeader( const byte *to, byte toAddressLength, const byte *from, byte fromAddressLength)
{
byte addressesLength = toAddressLength + fromAddressLength ;
payloadLength = 0 ;
// prepare the payload header with "To" Address length (top nibble) and "From" address length (bottom nibble)
payload[payloadLength] = (toAddressLength << 4) | fromAddressLength ;
payloadLength += 1;
// Copy the "To" address into payload
memcpy(&payload[payloadLength], to, toAddressLength);
payloadLength += toAddressLength ;
// Copy the "From" into payload
memcpy(&payload[payloadLength], from, fromAddressLength);
payloadLength += fromAddressLength ;
}
void PayloadAdd( const char *sensorId, float value, byte decimalPlaces, bool last)
{
byte sensorIdLength = strlen( sensorId ) ;
memcpy( &payload[payloadLength], sensorId, sensorIdLength) ;
payloadLength += sensorIdLength ;
payload[ payloadLength] = SensorIdValueSeperator;
payloadLength += 1 ;
payloadLength += strlen( dtostrf(value, -1, decimalPlaces, (char *)&payload[payloadLength]));
if (!last)
{
payload[ payloadLength] = SensorReadingSeperator;
payloadLength += 1 ;
}
#ifdef DEBUG_TELEMETRY
Serial.print("PayloadAdd float-payloadLength:");
Serial.print( payloadLength);
Serial.println( );
#endif
}
void PayloadAdd( char *sensorId, int value, bool last )
{
byte sensorIdLength = strlen(sensorId) ;
memcpy(&payload[payloadLength], sensorId, sensorIdLength) ;
payloadLength += sensorIdLength ;
payload[ payloadLength] = SensorIdValueSeperator;
payloadLength += 1 ;
payloadLength += strlen(itoa( value,(char *)&payload[payloadLength],10));
if (!last)
{
payload[ payloadLength] = SensorReadingSeperator;
payloadLength += 1 ;
}
#ifdef DEBUG_TELEMETRY
Serial.print("PayloadAdd int-payloadLength:" );
Serial.print(payloadLength);
Serial.println( );
#endif
}
void PayloadAdd( char *sensorId, unsigned int value, bool last )
{
byte sensorIdLength = strlen(sensorId) ;
memcpy(&payload[payloadLength], sensorId, sensorIdLength) ;
payloadLength += sensorIdLength ;
payload[ payloadLength] = SensorIdValueSeperator;
payloadLength += 1 ;
payloadLength += strlen(utoa( value,(char *)&payload[payloadLength],10));
if (!last)
{
payload[ payloadLength] = SensorReadingSeperator;
payloadLength += 1 ;
}
#ifdef DEBUG_TELEMETRY
Serial.print("PayloadAdd uint-payloadLength:");
Serial.print(payloadLength);
Serial.println( );
#endif
}
void PayloadReset()
{
byte fromAddressLength = payload[0] & 0xf ;
byte toAddressLength = payload[0] >> 4 ;
payloadLength = toAddressLength + fromAddressLength + 1;
}
void DisplayHex( byte *byteArray, byte length)
{
for (int i = 0; i < length ; i++)
{
// Add a leading zero
if ( byteArray[i] < 16)
{
Serial.print("0");
}
Serial.print(byteArray[i], HEX);
if ( i < (length-1)) // Don't put a - after last digit
{
Serial.print("-");
}
}
}
To configure the device in Azure IoT Central (similar process for Adafruit.IO, working on support for losant, ubidots and MyDevices) I copied the SNo: from the Arduino development tool logging window and appended c for the CO2 parts per million (ppm), v for VOC parts per billion (ppb) unique serial number from the ATSHA204A chip. (N.B. pay attention to the case of the field names they are case sensitive)
Azure IoT Central configuration
Overall the performance of the VoC sensor data is looking pretty positive, the eCO2 readings need some further investigation as they track the VOC levels. The large spike in the graph below is me putting an open vivid marker on my desk near the sensor.
Seeeduino Nano, EasySensors Shield & DF Robot Sensor test rig
The Seeeduino Nano devices I’m testing have a single on-board I2C socket which meant I didn’t need a Grove Shield for Arduino Nano which reduced the size and cost of the sensor node.
To configure the device in Azure IoT Central (similar process for Adafruit.IO, working on support for losant, ubidots and MyDevices) I copied the SNo: from the Arduino development tool logging window and appended p10 for PM 1 value, p25 for PM2.5 value and p100 for PM10 value to the unique serial number from the ATSHA204A chip. (N.B. pay attention to the case of the field names they are case sensitive)
When I moved the sensor indoors it appeared to take a while to warm up and after a while the metal body still felt cold. The sensor element is surrounded by quite a bit of protective packaging for outdoors use and I that would have a bit more thermal inertia the than the lightweight indoor enclosure.
It would be good to run the sensor alongside a calibrated temperature & humidity sensor to see how accurate and responsive it is.
The Seeeduino Nano devices I’m testing have a single on-board I2C socket which meant I didn’t need a Grove Shield for Arduino Nano which reduced the size and cost of the sensor node.
After looking at the demo application I stripped out the checksum code and threw the rest away. In my test harness I have extracted only the PM1.0/PM2.5/PM10.0 (concentration CF=1, Standard particulate) in μg/ m3 values from the sensor response payload.
/*
Copyright ® 2019 August devMobile Software, All Rights Reserved
THIS CODE AND INFORMATION IS PROVIDED "AS IS" WITHOUT WARRANTY OF ANY
KIND, EITHER EXPRESSED OR IMPLIED, INCLUDING BUT NOT LIMITED TO THE
IMPLIED WARRANTIES OF MERCHANTABILITY AND/OR FITNESS FOR A PARTICULAR
PURPOSE.
You can do what you want with this code, acknowledgment would be nice.
http://www.devmobile.co.nz
*/
#include <stdlib.h>
#include <LoRa.h>
#include <sha204_library.h>
#include "Seeed_HM330X.h"
//#define DEBUG
//#define DEBUG_TELEMETRY
//#define DEBUG_LORA
const byte SensorPayloadLength = 28 ;
const byte SensorPayloadBufferSize = 29 ;
const byte SensorPayloadPM1_0Position = 4;
const byte SensorPayloadPM2_5Position = 6;
const byte SensorPayloadPM10_0Position = 8;
HM330X sensor;
byte SensorPayload[SensorPayloadBufferSize];
// LoRa field gateway configuration (these settings must match your field gateway)
const byte DeviceAddressMaximumLength = 15 ;
const char FieldGatewayAddress[] = {"LoRaIoT1"};
const float FieldGatewayFrequency = 915000000.0;
const byte FieldGatewaySyncWord = 0x12 ;
// Payload configuration
const int ChipSelectPin = 10;
const int ResetPin = 9;
const int InterruptPin = 2;
// LoRa radio payload configuration
const byte SensorIdValueSeperator = ' ' ;
const byte SensorReadingSeperator = ',' ;
const unsigned long SensorUploadDelay = 60000;
// ATSHA204 secure authentication, validation with crypto and hashing (currently only using for unique serial number)
const byte Atsha204Port = A3;
atsha204Class sha204(Atsha204Port);
const byte DeviceSerialNumberLength = 9 ;
byte deviceSerialNumber[DeviceSerialNumberLength] = {""};
const byte PayloadSizeMaximum = 64 ;
byte payload[PayloadSizeMaximum];
byte payloadLength = 0 ;
void setup()
{
Serial.begin(9600);
#ifdef DEBUG
while (!Serial);
#endif
Serial.println("Setup called");
Serial.print("Field gateway:");
Serial.print(FieldGatewayAddress ) ;
Serial.print(" Frequency:");
Serial.print( FieldGatewayFrequency,0 ) ;
Serial.print("MHz SyncWord:");
Serial.print( FieldGatewaySyncWord ) ;
Serial.println();
// Retrieve the serial number then display it nicely
if(sha204.getSerialNumber(deviceSerialNumber))
{
Serial.println("sha204.getSerialNumber failed");
while (true); // Drop into endless loop requiring restart
}
Serial.print("SNo:");
DisplayHex( deviceSerialNumber, DeviceSerialNumberLength);
Serial.println();
Serial.println("LoRa setup start");
// override the default chip select and reset pins
LoRa.setPins(ChipSelectPin, ResetPin, InterruptPin);
if (!LoRa.begin(FieldGatewayFrequency))
{
Serial.println("LoRa begin failed");
while (true); // Drop into endless loop requiring restart
}
// Need to do this so field gateway pays attention to messsages from this device
LoRa.enableCrc();
LoRa.setSyncWord(FieldGatewaySyncWord);
#ifdef DEBUG_LORA
LoRa.dumpRegisters(Serial);
#endif
Serial.println("LoRa Setup done.");
// Configure the Seeedstudio CO2, temperature & humidity sensor
Serial.println("HM3301 setup start");
if(sensor.init())
{
Serial.println("HM3301 init failed");
while (true); // Drop into endless loop requiring restart
}
delay(100);
Serial.println("HM3301 setup done");
PayloadHeader((byte *)FieldGatewayAddress,strlen(FieldGatewayAddress), deviceSerialNumber, DeviceSerialNumberLength);
Serial.println("Setup done");
Serial.println();
}
void loop()
{
unsigned long currentMilliseconds = millis();
byte sum=0;
short pm1_0 ;
short pm2_5 ;
short pm10_0 ;
Serial.println("Loop called");
if(sensor.read_sensor_value(SensorPayload,SensorPayloadBufferSize) == NO_ERROR)
{
// Calculate then validate the payload "checksum"
for(int i=0;i<SensorPayloadLength;i++)
{
sum+=SensorPayload[i];
}
if(sum!=SensorPayload[SensorPayloadLength])
{
Serial.println("Invalid checksum");
return;
}
PayloadReset();
pm1_0 = (u16)SensorPayload[SensorPayloadPM1_0Position]<<8|SensorPayload[SensorPayloadPM1_0Position+1];
Serial.print("PM1.5: ");
Serial.print(pm1_0);
Serial.println("ug/m3 ") ;
PayloadAdd( "P10", pm1_0, false);
pm2_5 = (u16)SensorPayload[SensorPayloadPM2_5Position]<<8|SensorPayload[SensorPayloadPM2_5Position+1];
Serial.print("PM2.5: ");
Serial.print(pm2_5);
Serial.println("ug/m3 ") ;
PayloadAdd( "P25", pm2_5, 1, false);
pm10_0 = (u16)SensorPayload[SensorPayloadPM10_0Position]<<8|SensorPayload[SensorPayloadPM10_0Position+1];
Serial.print("PM10.0: ");
Serial.print(pm10_0);
Serial.println("ug/m3 ");
PayloadAdd( "P100", pm10_0, 0, true) ;
#ifdef DEBUG_TELEMETRY
Serial.println();
Serial.print("RFM9X/SX127X Payload length:");
Serial.print(payloadLength);
Serial.println(" bytes");
#endif
LoRa.beginPacket();
LoRa.write(payload, payloadLength);
LoRa.endPacket();
}
Serial.println("Loop done");
Serial.println();
delay(SensorUploadDelay - (millis() - currentMilliseconds ));
}
void PayloadHeader( const byte *to, byte toAddressLength, const byte *from, byte fromAddressLength)
{
byte addressesLength = toAddressLength + fromAddressLength ;
payloadLength = 0 ;
// prepare the payload header with "To" Address length (top nibble) and "From" address length (bottom nibble)
payload[payloadLength] = (toAddressLength << 4) | fromAddressLength ;
payloadLength += 1;
// Copy the "To" address into payload
memcpy(&payload[payloadLength], to, toAddressLength);
payloadLength += toAddressLength ;
// Copy the "From" into payload
memcpy(&payload[payloadLength], from, fromAddressLength);
payloadLength += fromAddressLength ;
}
void PayloadAdd( const char *sensorId, float value, byte decimalPlaces, bool last)
{
byte sensorIdLength = strlen( sensorId ) ;
memcpy( &payload[payloadLength], sensorId, sensorIdLength) ;
payloadLength += sensorIdLength ;
payload[ payloadLength] = SensorIdValueSeperator;
payloadLength += 1 ;
payloadLength += strlen( dtostrf(value, -1, decimalPlaces, (char *)&payload[payloadLength]));
if (!last)
{
payload[ payloadLength] = SensorReadingSeperator;
payloadLength += 1 ;
}
#ifdef DEBUG_TELEMETRY
Serial.print("PayloadAdd float-payloadLength:");
Serial.print( payloadLength);
Serial.println( );
#endif
}
void PayloadAdd( char *sensorId, int value, bool last )
{
byte sensorIdLength = strlen(sensorId) ;
memcpy(&payload[payloadLength], sensorId, sensorIdLength) ;
payloadLength += sensorIdLength ;
payload[ payloadLength] = SensorIdValueSeperator;
payloadLength += 1 ;
payloadLength += strlen(itoa( value,(char *)&payload[payloadLength],10));
if (!last)
{
payload[ payloadLength] = SensorReadingSeperator;
payloadLength += 1 ;
}
#ifdef DEBUG_TELEMETRY
Serial.print("PayloadAdd int-payloadLength:" );
Serial.print(payloadLength);
Serial.println( );
#endif
}
void PayloadAdd( char *sensorId, unsigned int value, bool last )
{
byte sensorIdLength = strlen(sensorId) ;
memcpy(&payload[payloadLength], sensorId, sensorIdLength) ;
payloadLength += sensorIdLength ;
payload[ payloadLength] = SensorIdValueSeperator;
payloadLength += 1 ;
payloadLength += strlen(utoa( value,(char *)&payload[payloadLength],10));
if (!last)
{
payload[ payloadLength] = SensorReadingSeperator;
payloadLength += 1 ;
}
#ifdef DEBUG_TELEMETRY
Serial.print("PayloadAdd uint-payloadLength:");
Serial.print(payloadLength);
Serial.println( );
#endif
}
void PayloadReset()
{
byte fromAddressLength = payload[0] & 0xf ;
byte toAddressLength = payload[0] >> 4 ;
payloadLength = toAddressLength + fromAddressLength + 1;
}
void DisplayHex( byte *byteArray, byte length)
{
for (int i = 0; i < length ; i++)
{
// Add a leading zero
if ( byteArray[i] < 16)
{
Serial.print("0");
}
Serial.print(byteArray[i], HEX);
if ( i < (length-1)) // Don't put a - after last digit
{
Serial.print("-");
}
}
}
To configure the device in Azure IoT Central (similar process for Adafruit.IO, working on support for losant, ubidots and MyDevices) I copied the SNo: from the Arduino development tool logging window and appended p10 for PM 1 value, p25 for PM2.5 value and p100 for PM10 value to the unique serial number from the ATSHA204A chip. (N.B. pay attention to the case of the field names they are case sensitive)
Azure IoT Central telemetry configuration
The rapidly settled into a narrow range of readings, but spiked when I took left it outside (winter in New Zealand) and the values spiked when food was being cooked in the kitchen which is next door to my office.
It would be good to run the sensor alongside a professional particulates monitor so the values could be compared and used to adjust the readings of the Grove sensor if necessary.
Hour of PM1, PM2.5 & PM10 readings in my office early eveningCO2 and particulates values while outside on my deck from 10:30pm to 11:30pm
Seeeduino Nano devices have a single on-board I2C socket which meant I didn’t need a Grove Shield for Arduino Nano which reduced the size and cost of the sensor node.
I downloaded the seeedstudio wiki example calibration code, compiled and uploaded it to one of my Seeeduino Nano devices. When activated for the first time a period of minimum 7 days is needed so that the sensor algorithm can find its initial parameter set. During this period the sensor has to be exposed to fresh air for at least 1 hour every day.
During the calibration process I put the device in my garage and left the big door open for at least an hour every day. Once the sensor was calibrated I bought it inside at put it on the bookcase in my office.
To configure the device in Azure IoT Central (similar process for Adafruit.IO, working on support for losant, ubidots and MyDevices) I copied the SNo: from the Arduino development tool logging window and appended c for the CO2 parts per million (ppm), h for the humidity % and t for the temperature °C to the unique serial number from the ATSHA204A chip. (N.B. pay attention to the case of the field names they are case sensitive)
Azure IoT Central telemetry configuration
Overall the performance of the sensor is looking pretty positive, the CO2 levels fluctuate in a acceptable range (based on office occupancy), and the temperature + humidity readings track quite closely to the other two sensor nodes in my office. The only issue so far is my lack of USB-C cables to power the devices in the field
CO2, Humidity and Temperature in my office for a day
This project is now live on Hackster.IO and github.com with sample *duino, Devduino and Netduino clients. While building the AdaFruit.IO field gateway, Azure IOT Hub field gateways and sample clients I changed the structure of the message payload and spent a bit of time removing non-core functionality and code.
The diagnostics logging code was refactored several times and after reading this reference on docs.Microsoft.com I settled on the published approach.
I considered using the built in Universal Windows Platform (UWP) application data class but this would have made configuration in the field hard for most of the targeted users school students & IT departments.
I have the application running at my house and it has proved pretty robust, last week I though it had crashed because the telemetry data stopped for about 20 minutes. I had a look at the Device portal and it was because Windows 10 IoT core had downloaded some updates, applied them and then rebooted automatically (as configured).
I put a socket on the Raspberry PI nRF24L01 Shield rather than soldering the module to the board so that I could compare the performance of the Low and High power modules. The antenna end of the high power module tends to droop so I put a small piece of plastic foam underneath to prop them up.
I had code to generate an empty JSON configuration but I removed that as it added complexity compared to putting a sample in the github repository.
I considered using a binary format (the nRF24L01 max message length is 32 bytes) but the code required to make it sufficiently flexible rapidly got out of hand and as most of my devices didn’t have a lot of sensors (battery/solar powered *duinos) and it wasn’t a major hassle to send another message so I removed it.
I need to tidy up the project and remove the unused Visual Assets and have a look at the automated update support.