ML.Net YoloV5 Object Detection on ARM64 Raspberry PI

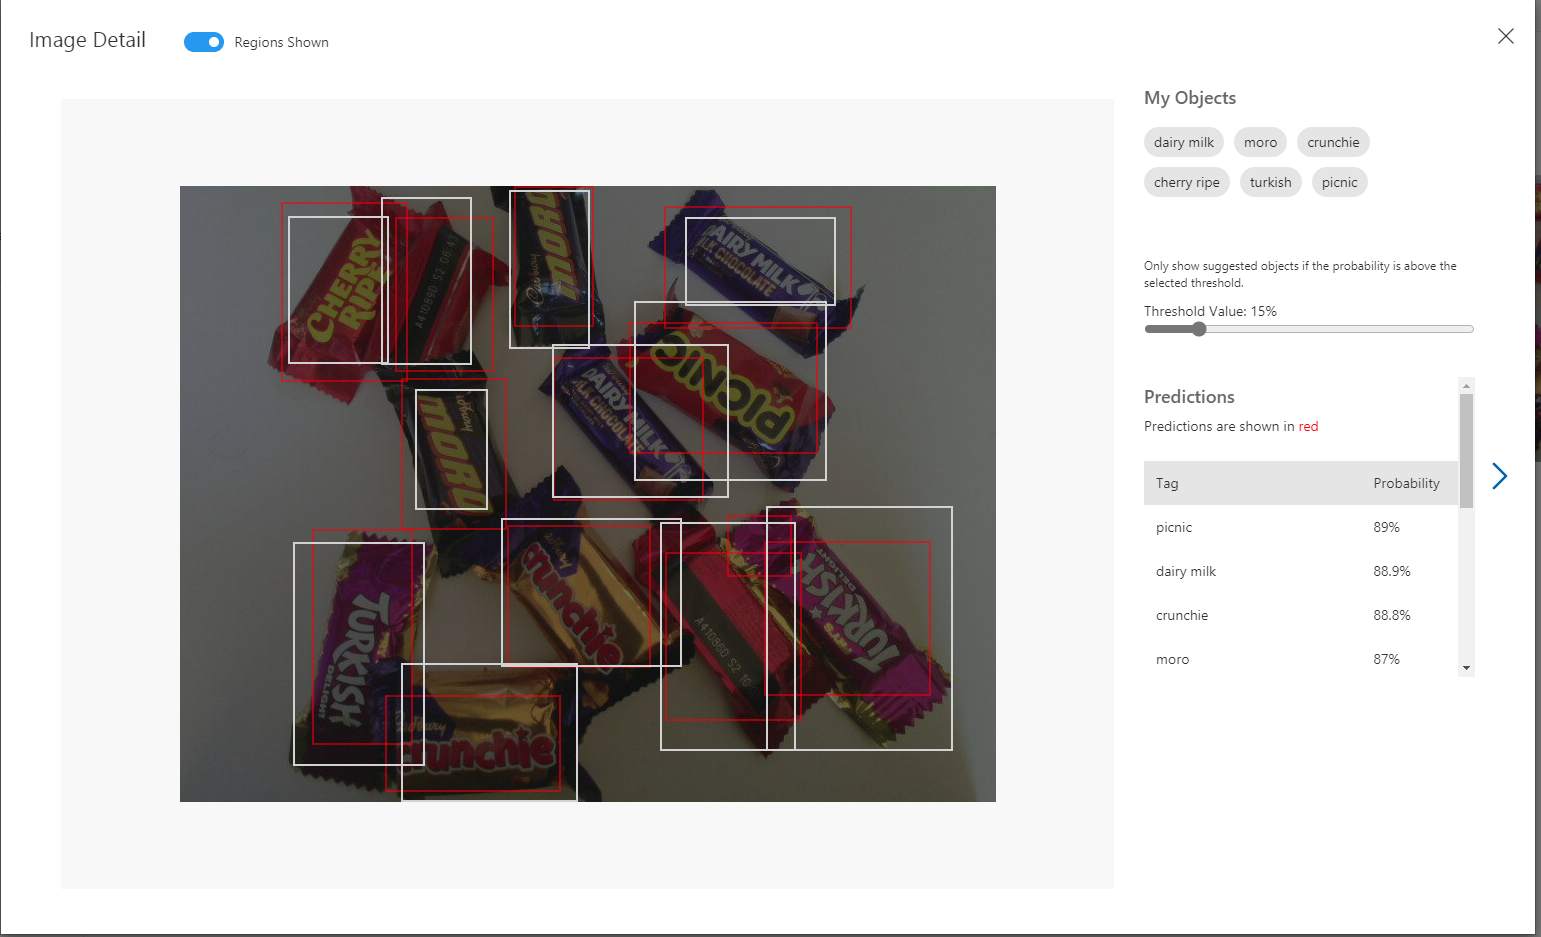
For the last month I have been using preview releases of ML.Net with a focus on Open Neural Network Exchange(ONNX) support. A company I work with has a YoloV5 based solution for tracking the cattle in stockyards so I figured I would try getting YoloV5 working with .Net Core and ML.Net on ARM64.

After some searching I found a repository created by Github user Mentalstack for an ONNX based YoloV5 implementation which I cloned and started hacking. I stared by updating the NuGet packages for the scorer and sample application and fixing what broke.

Yolo V5 Scorer NuGet packages

I didn’t update the System.Drawing.Common Nuget as my Raspberry PI V4 has got .Net Core V5 installed.

Yolo V5 Sample application NuGet Packages

The sample application only had one dependency Microsoft.ML.OnnxRuntime which I was able to drop as it was referenced by the YoloV5Net.Scorer.

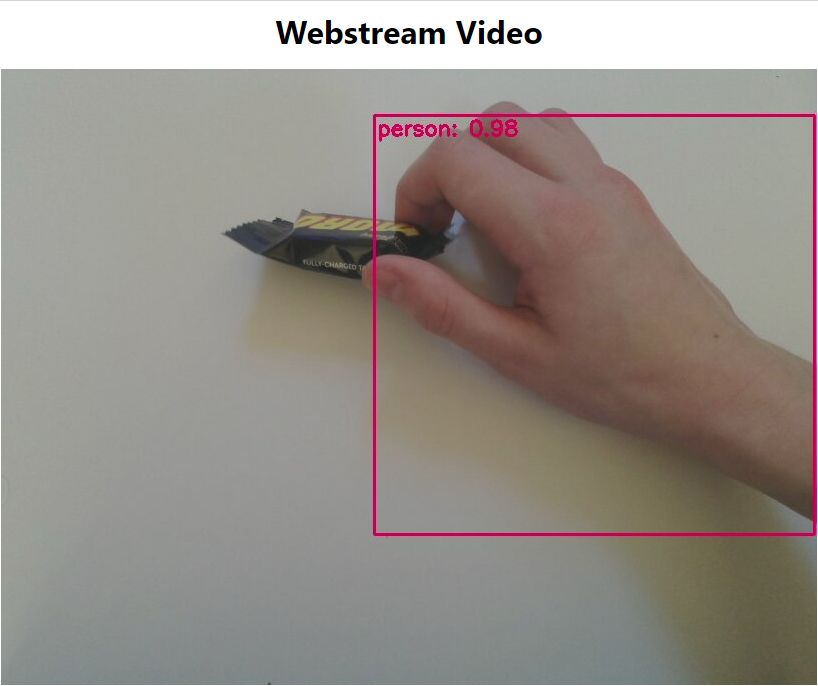
I then modified the sample application to process all the images in an “input” folder and save the processed images with Minimum Bounding Boxes(MBRs) to the output folder.

using System;
using System.Collections.Generic;
using System.Drawing;
using System.IO;
using Yolov5Net.Scorer;
using Yolov5Net.Scorer.Models;

namespace Yolov5Net.App
{
	class Program
	{
		static void Main(string[] args)
		{
			var scorer = new YoloScorer<YoloCocoP5Model>("Assets/Weights/yolov5s.onnx");

			DateTime startedAtUtc = DateTime.UtcNow;

			Console.WriteLine($"{startedAtUtc:yyyy:MM:dd HH:mm:ss} Start");

			string[] imageFilesPaths = Directory.GetFiles("Assets/inputs");

			foreach (string imageFilePath in imageFilesPaths)
			{
				using (Image image = Image.FromFile(imageFilePath))
				using (Graphics graphics = Graphics.FromImage(image))
				{
					List<YoloPrediction> predictions = scorer.Predict(image);

					foreach (var prediction in predictions) // iterate predictions to draw results
					{
						double score = Math.Round(prediction.Score, 2);

						graphics.DrawRectangles(new Pen(prediction.Label.Color, 1), new[] { prediction.Rectangle });

						var (x, y) = (prediction.Rectangle.X - 3, prediction.Rectangle.Y - 23);

						graphics.DrawString($"{prediction.Label.Name} ({score})", new Font("Consolas", 16, GraphicsUnit.Pixel), new SolidBrush(prediction.Label.Color), new PointF(x, y));
					}

					image.Save($"Assets/outputs/{Path.GetFileName(imageFilePath)}");
				}
			}

			DateTime finishedAtUtc = DateTime.UtcNow;
			TimeSpan duration = finishedAtUtc - startedAtUtc;

			Console.WriteLine($"{finishedAtUtc:yyyy:MM:dd HH:mm:ss} Finish Duration:{duration.TotalMilliseconds}mSec");
		}
	}
}

The sample images are from wikimedia commons site. Go to Wikimediacommon.md to refer to the image urls and their licenses.

YoloV5Net Solution with sample images

The next step of my Proof of Concept(PoC) was to get the YoloV5 Object Detection sample application working on my Intel(R) Core(TM) i7-8700T CPU @ 2.40GHz 2.40 GHz desktop development system. After debugging the software with Visual Studio I “published” the application to a folder.

Visual Studio 2019 Publish to folder
Desktop YoloV5 Sample application output

The application took roughly 0.9 seconds to process each of my 5 sample images. The next task was to get the YoloV5 sample application working on a Raspberry Pi 4 running Bullseye.

Copying application to RPI4 with Winscp

To deploy applications I often copy the contents of the “publish” directory to the device with WinSCP. Getting the Object sample application running on my Raspberry Pi4 took a couple of attempts…

Input image folder path invalid

I had forgotten then Unix paths are case sensitive inputs vs. Inputs

ONNX Runtime native binary missing exception
pi@raspberrypi4a:~/vsdbg/Yolov5Net.App $ dotnet Yolov5Net.App.dll
Unhandled exception. System.TypeInitializationException: The type initializer for 'Microsoft.ML.OnnxRuntime.NativeMethods' threw an exception.
 ---> System.DllNotFoundException: Unable to load shared library 'onnxruntime' or one of its dependencies. In order to help diagnose loading problems, consider setting the LD_DEBUG environment variable: libonnxruntime: cannot open shared object file: No such file or directory
   at Microsoft.ML.OnnxRuntime.NativeMethods.OrtGetApiBase()
   at Microsoft.ML.OnnxRuntime.NativeMethods..cctor()
   --- End of inner exception stack trace ---
   at Microsoft.ML.OnnxRuntime.SessionOptions..ctor()
   at Yolov5Net.Scorer.YoloScorer`1..ctor(String weights, SessionOptions opts) in C:\Users\BrynLewis\source\repos\yolov5-net\src\Yolov5Net.Scorer\YoloScorer.cs:line 326
   at Yolov5Net.App.Program.Main(String[] args) in C:\Users\BrynLewis\source\repos\yolov5-net\src\Yolov5Net.App\Program.cs:line 14
Aborted
pi@raspberrypi4a:~/vsdbg/Yolov5Net.App $
\

The ONNX runtime was missing so I confirmed the processor architecture with uname then copied the platform specific file to the application folder with Winscp.

Copying platform specific runtime to application folder with WInscp

I then checked Yolo V4 Sample application was generating output images with WinSCP.

Image output folder with marked up images
Sample image with YoloV5 generated MBRs

On the Raspberry PI4B the application took roughly 8.3 seconds to process each of my 5 sample images.

RPI4 Device YoloV5 Sample application output

I was “standing on the shoulders of giants” the Mentalstack code just worked, my changes were minimal and largely so I could collect some basic performance metrics. I need to spend some more time figuring out how the implementation works.

Azure Percept Pay Attention to the Warnings

Azure IoT Hub setup “Learnings”

After roughly an hour the telemetry stopped and the Azure Percept displayed a message which wasn’t terribly helpful.

I had manually created the Azure IoT Hub and selected the “Free Tier” (I was trying to keep my monthly billing reasonable) then as I was stepping through the Azure Percept setup wizard I didn’t read the warning message highlighted below.

Azure Percept Azure IoT Hub Warning

The Azure Percept generates a lot of messages and I had quickly hit the 8000 messages per day limit of the “Free Tier”.

Azure IoT Hub Daily Message Quota

I had to create a new Azure IoT Hub, repave the Azure Percept Device (there were some updates and I had made some mistakes in the initial setup) and reconfigure the device.

Azure IoT Hub Minimum Tier configuration

ML.Net ONNX Object Detection on ARM64 ASUS PE100A

I work on applications which need a device that will survive in a farm shed that is open to all weathers. The ASUS PE100A an ARM64 device which, with the right parts has an operational temperature range of -20~60°C should be fine for New Zealand conditions. The devices are usually shipped with Windows 10 IoT Core or Yocto but an Ubuntu image (which this post uses) is also available.

The Ubuntu install is distributed as a zip file which contains the NXP IMX flashing utility (uuu.exe), installation scripts and the device image. I won’t cover the process in detail as the very helpful local ASUS support person and the readme file were more than sufficient.

Contents of PE100 Ubuntu update
PE100 device dip switches which control boot process(see readme for details)
PE100 flashing process complete

After remembering to reset the DIP switches before powering up the device it booted to a simple console.

PE100 Ubuntu home screen

I then created a new user, set the password, updated the users permissions and manually installed the .Net Core runtime (using a hybrid of the Microsoft and these instructions). I then had a device that I could SSH into, copy files to with WinSCP and run simple console applications on.

I then deployed my ONNX Object Detection console application to the device and it wouldn’t start. I had forgotten to install support for System.Drawing.Common with

sudo apt-get install -y libgdiplus

Object Detection console application with code to draw MBRs on images
Object Detection console application without code to draw MBRs on images

The version of the application which draws Minimum Bounding Boxes(MBRs) on the output images was only slightly slower that the version which didn’t. (the PE100 has a 16G on board eMMC so disk access is going to be fairly quick)

The required operational temperature range and price point make the PE100A good platform for our product.

ML.Net ONNX Object Detection on ARM64 Raspberry PI

For the last month I have been working with preview releases of ML.Net with a focus on the Open Neural Network Exchange(ONNX) support. As part of my “day job” we have been running Object Detection models on X64 based industrial computers, but we are looking at moving to ARM64 as devices which support -20° to +60° operation appear to be easier to source.

The first step of my Proof of Concept(PoC) was to get the ONNX Object Detection sample working on a Raspberry Pi 4 running the 64bit version of Bullseye. I created a new solution which contained only the ONNX Object detection console application which would run on my desktop.

Initial Desktop Object Detection solution

To deploy applications I sometimes copy the contents of the “publish” directory to the device with WinSCP.

Object Detection application “publish to a folder configuration”

I also use Visual Studio Code with some scripts, or a modified version of Raspberry Debugger which supports deployment and debugging of applications to device running a 64 bit OS.

Object Detection console application release NuGet configuration

After updating my NuGet packages to the “release” versions the Object Detection console application would run on my desktop and process the sample images.

Object Detection console application running on my desktop

Getting the Object Detection console application running on my Raspberry Pi4 took a couple of attempts…

Debugging the Object Detection console application on my device

The first issue was the location of the sample images (changed assetsRelativePath)

using System;
using System.IO;
using System.Collections.Generic;
using System.Drawing;
using System.Drawing.Drawing2D;
using System.Linq;
using Microsoft.ML;
using ObjectDetection.YoloParser;
using ObjectDetection.DataStructures;

namespace ObjectDetection
{
    class Program
    {
      public static void Main()
      {
            var assetsRelativePath = @"assets";
            DateTime startedAtUtc = DateTime.UtcNow;

            Console.WriteLine($"{startedAtUtc:yyyy:MM:dd HH:mm:ss} Start");

            string assetsPath = GetAbsolutePath(assetsRelativePath);
            var modelFilePath = Path.Combine(assetsPath, "Model", "TinyYolo2_model.onnx");
            var imagesFolder = Path.Combine(assetsPath, "images");
            var outputFolder = Path.Combine(assetsPath, "images", "output");

            // Initialize MLContext
            MLContext mlContext = new MLContext();

            try
            {
                // Load Data
                IEnumerable<ImageNetData> images = ImageNetData.ReadFromFile(imagesFolder);
                IDataView imageDataView = mlContext.Data.LoadFromEnumerable(images);

                // Create instance of model scorer
                var modelScorer = new OnnxModelScorer(imagesFolder, modelFilePath, mlContext);

                // Use model to score data
                IEnumerable<float[]> probabilities = modelScorer.Score(imageDataView);

                // Post-process model output
                YoloOutputParser parser = new YoloOutputParser();

                var boundingBoxes =
                    probabilities
                    .Select(probability => parser.ParseOutputs(probability))
                    .Select(boxes => parser.FilterBoundingBoxes(boxes, 5, .5F));

                // Draw bounding boxes for detected objects in each of the images
                for (var i = 0; i < images.Count(); i++)
                {
                    string imageFileName = images.ElementAt(i).Label;
                    IList<YoloBoundingBox> detectedObjects = boundingBoxes.ElementAt(i);

                    DrawBoundingBox(imagesFolder, outputFolder, imageFileName, detectedObjects);

                    LogDetectedObjects(imageFileName, detectedObjects);
                }

            DateTime finishedAtUtc = DateTime.UtcNow;
            TimeSpan duration = finishedAtUtc - startedAtUtc;

            Console.WriteLine($"{finishedAtUtc:yyyy:MM:dd HH:mm:ss} Finish Duration:{duration.TotalMilliseconds}mSec");
         }
         catch (Exception ex)
            {
                Console.WriteLine(ex.ToString());
            }

            Console.WriteLine("========= End of Process..Hit any Key ========");
            Console.ReadLine();
        }

        public static string GetAbsolutePath(string relativePath)
        {
            FileInfo _dataRoot = new FileInfo(typeof(Program).Assembly.Location);
            string assemblyFolderPath = _dataRoot.Directory.FullName;

            string fullPath = Path.Combine(assemblyFolderPath, relativePath);

            return fullPath;
        }

        private static void DrawBoundingBox(string inputImageLocation, string outputImageLocation, string imageName, IList<YoloBoundingBox> filteredBoundingBoxes)
        {
            Image image = Image.FromFile(Path.Combine(inputImageLocation, imageName));

            var originalImageHeight = image.Height;
            var originalImageWidth = image.Width;

            foreach (var box in filteredBoundingBoxes)
            {
                // Get Bounding Box Dimensions
                var x = (uint)Math.Max(box.Dimensions.X, 0);
                var y = (uint)Math.Max(box.Dimensions.Y, 0);
                var width = (uint)Math.Min(originalImageWidth - x, box.Dimensions.Width);
                var height = (uint)Math.Min(originalImageHeight - y, box.Dimensions.Height);

                // Resize To Image
                x = (uint)originalImageWidth * x / OnnxModelScorer.ImageNetSettings.imageWidth;
                y = (uint)originalImageHeight * y / OnnxModelScorer.ImageNetSettings.imageHeight;
                width = (uint)originalImageWidth * width / OnnxModelScorer.ImageNetSettings.imageWidth;
                height = (uint)originalImageHeight * height / OnnxModelScorer.ImageNetSettings.imageHeight;

                // Bounding Box Text
                string text = $"{box.Label} ({(box.Confidence * 100).ToString("0")}%)";

                using (Graphics thumbnailGraphic = Graphics.FromImage(image))
                {
                    thumbnailGraphic.CompositingQuality = CompositingQuality.HighQuality;
                    thumbnailGraphic.SmoothingMode = SmoothingMode.HighQuality;
                    thumbnailGraphic.InterpolationMode = InterpolationMode.HighQualityBicubic;

                    // Define Text Options
                    Font drawFont = new Font("Arial", 12, FontStyle.Bold);
                    SizeF size = thumbnailGraphic.MeasureString(text, drawFont);
                    SolidBrush fontBrush = new SolidBrush(Color.Black);
                    Point atPoint = new Point((int)x, (int)y - (int)size.Height - 1);

                    // Define BoundingBox options
                    Pen pen = new Pen(box.BoxColor, 3.2f);
                    SolidBrush colorBrush = new SolidBrush(box.BoxColor);

                    // Draw text on image 
                    thumbnailGraphic.FillRectangle(colorBrush, (int)x, (int)(y - size.Height - 1), (int)size.Width, (int)size.Height);
                    thumbnailGraphic.DrawString(text, drawFont, fontBrush, atPoint);

                    // Draw bounding box on image
                    thumbnailGraphic.DrawRectangle(pen, x, y, width, height);
                }
            }

            if (!Directory.Exists(outputImageLocation))
            {
                Directory.CreateDirectory(outputImageLocation);
            }

            image.Save(Path.Combine(outputImageLocation, imageName));
        }

        private static void LogDetectedObjects(string imageName, IList<YoloBoundingBox> boundingBoxes)
        {
            Console.WriteLine($".....The objects in the image {imageName} are detected as below....");

            foreach (var box in boundingBoxes)
            {
                Console.WriteLine($"{box.Label} and its Confidence score: {box.Confidence}");
            }

            Console.WriteLine("");
        }
    }
}

The next issue was the location of the ONNX model on the device. I modified the properties of the TinyYolo2_model.onnx file so it was copied to the publish folder if it had been modified.

Visual Studio configured to copy TinyYolo2_model.onnx to the device

I then checked this was working as expected with WinSCP.

Confirming location of TinyYolo2_model.onnx on the device.

The platform specific runtime was missing so I confirmed the processor architecture with uname.

Using uname to get the processor architecture
Using WinSCP to copy the platform specified runtime to the application directory
Object Detection console application running on my Raspberry Pi4

I noticed that the Object Detection console application took significantly longer to run on the Raspberry PI4 so I added some code to display the duration.

Object Detection console application on my desktop
Object Detection application on the Raspberry PI

For my application I’m only interested in the Minimum Bounding Boxes(MBRs) so I disabled the code for drawing MBRs on the images.

Object Detection console application with no MBR drawing on my desktop
Object Detection console application with no MBR drawing on my Raspberry PI 4 device

Removing the code for drawing the MBRs on the images improved performance less than I was expecting.

Azure Percept “low code” integration Setup

Introduction

There have been blog posts showing how to build Azure Percept integrations with Power BI, Azure Logic Apps etc. with “zero code”.  But what do you do if your Azure Percept based solution needs some “glue” to connect to other systems?

I work on a SmartAg computer vision based application that uses security cameras to monitor the flow of cattle through stockyards. It has to control some local hardware, display real-time dashboards, and integrate with an existing application so a “zero code” solution wouldn’t work.

Having to connect an Azure Percept to 3rd party applications can’t be a unique problem so this series blog posts will show a couple of “low code” options that I have used to solve this issue. The technologies that will be covered include Azure IoT Hub Message Routing. Azure Storage Queues, Azure Service Bus Queues, Azure Service Bus Topics and Azure Functions.

The Pivot

The initial plan was to take the Azure Percept to a piggery to see if I could build a Proof of Concept(PoC) of a product that the CEO and I had been discussing for a couple of weeks.

But shortly after I started working on this series of blog posts New Zealand went into strict lockdown. Only essential shops like supermarkets and petrol stations were open, our groceries were being delivered, and schools were closed.

I needed a demonstration application which used props I could source from home and the local petrol station. In addition my teenage son’s school was closed so he could be the project “intern”.

While at the local petrol station to buy milk I observed that they had a large selection of confectionary so we decided to build a series of object detection models to count different types of chocolates.

In a retail scenario this could be counting products on shelves, pallets in a cold store, or at the SmartAg start-up I work for counting cattle in a yard.

Configuring The Test Environment

I have not included screen shots of the hardware configuration process as this has been covered by other bloggers. Though, for projects like this I always create a new resource group so I can easily delete all the resources so my Azure invoice doesn’t cause “bill shock”.

Azure Resource Group Creation blade

I also created the Azure IoT Hub before configuring the Percept device rather than via the Device provisioning process.

Azure Percept configuration assigning an Azure IoT Hub

The intern trialed different trays, camera orientations, and lighting as part of building a test rig on the living room floor. After some trial and error, he identified the optimal camera orientation (on top of the packing foam) and lighting (indirect sunlight with no shadows) for reliable inferencing. As this was a proof-of-concept project we limited the number of variables so we didn’t have to collect lots of images which the intern would then have to mark up.

Trialing image capture with M&M’s
Trialling Image capture with Cadbury Favourites

Azure Percept Studio + CustomVision.AI for capturing and marking up images

The intern created two Custom Vision projects, one for M&M’s and the other for Cadbury Favourites.

Azure M&M and Cadbury Favourites Percept Projects

The intern then spent an afternoon drawing minimum bounding rectangles (MBRs) around the different chocolates in the images he had collected.

M&M Size issue

The intern then decided to focus on the chocolate bars after realising they were much easier and faster to markup than the M&Ms.

Cadbury Favourites images before markup

Training

The intern repeatedly trained the model adding additional images and adjusting parameters until the results were “good enough”.

Fine-tuning the Configuration

After using the test rig one evening we found the performance of the model wasn’t great, so the intern collected more images with different lighting, shadows, chocolate bar placements, and orientations to improve the accuracy of the inferencing.

Manual reviewing of object detection results.

Inspecting the Inferencing Results

After several iterations the accuracy of the chocolate bar object detection model was acceptable I wanted to examine the telemetry that was being streamed to my Azure IoT Hub.

In Azure Percept Studio I could view (in a limited way) inferencing telemetry and check the quality and format of the results.

Azure Percept Studio device telemetry

I use Azure IoT Explorer on other projects to configure devices, view telemetry from devices, send messages to devices, view and modify device twin JSON etc. So I used it to inspect the inferencing results streamed to the Azure IoT Hub.

Azure IoT Explorer device telemetry

Summary

In an afternoon the intern had configured and trained a Custom Vision project for me that I could use to to build some “low code” integrations .

Project “Learnings”

If the image capture delay is too short there will be images with hands.

Captured image with interns hands

Though, the untrained model did identify the hands

The intern also discovered that by including images with “not favourites” the robustness of the model improved.

Cadbury Favourites with M&Ms

When I had to collect some more images for a blog post, I found the intern had consumed quite a few of the “props” and left the wrappers in the bottom of the Azure Percept packaging.

Cadbury Favourties wrappers