Mikrobus.Net Quail Robot Remote Control

In a previous pair of posts  (part1 & part2) in February 2014 I built a 4WD Robot and remote control using a pair of Netduinos, an elecfreaks Smart Car Chassis 4WD, an elecfreaks joystick 2.4, an Embedded coolness nRF24Lo1 shield and a Pololu MC33926 motor shield.

My Quail device looked like a good platform for building a handheld control with a different form factor.

Bill of materials (prices in USD as at Jan 2016)

Quail4WDRobotController

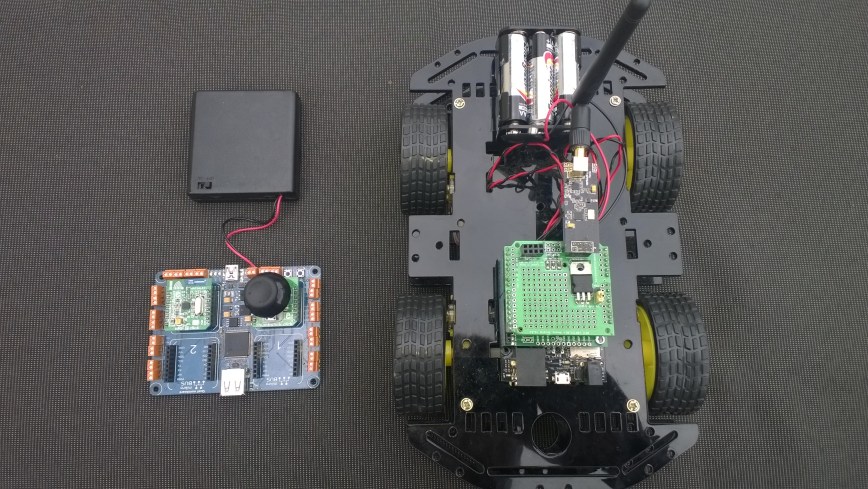
The Quail device and battery pack aren’t quite small enough to work with one hand. A Mikrobus.Net Dalmatian or Tuatara based remote might be easier to use.

I tried using the thumbstick button pushed message for the horn functionality but it made the throttle and heading jump.

The first version of the code is just to test the wireless link, the motor speed code needs a little work.(Currently the device won’t rotate with motors going in opposite directions)

public class Program
{
   private const double Deadband = 0.1;
   private static double Scale = 100.0;
   private static byte RobotControlChannel = 10;
   private static byte[] ControllerAddress = Encoding.UTF8.GetBytes("RC1");
   private static byte[] RobotAddress = Encoding.UTF8.GetBytes("RB1");

   public static void Main()
   {
      ThumbstickClick thumbStick = new ThumbstickClick(Hardware.SocketThree);
      thumbStick.ThumbstickOrientation = ThumbstickClick.Orientation.RotateZeroDegrees;
      thumbStick.Calibrate();

      NRFC nrf = new NRFC(Hardware.SocketFour);
      nrf.Configure(ControllerAddress, RobotControlChannel );
      nrf.OnTransmitFailed += nrf_OnTransmitFailed;
      nrf.OnTransmitSuccess += nrf_OnTransmitSuccess;
      nrf.Enable();

      while (true)
      {
         byte motor1Direction, motor2Direction;
         byte motor1Speed, motor2Speed;
         double x = thumbStick.GetPosition().X;
         double y = thumbStick.GetPosition().Y;

         Debug.Print("X=: + x.ToString("F1") + " Y=" + y.ToString("F1") + " IsPressed=" + thumbStick.IsPressed);

         // See if joystick x or y is in centre deadband
         if (System.Math.Abs(x) < Deadband)
         {
            x = 0.0;
         }

         // See if joystick y is in centre deadband
         if (System.Math.Abs(y) < Deadband)
         {
            y = 0.0;
         }

         // Set direction of both motors, no swivel on spot yet
         if (y >= 0.0)
         {
            motor1Direction = (byte)1;
            motor2Direction = (byte)1;
         }
         else
         {
            motor1Direction = (byte)0;
            motor2Direction = (byte)0;
         }

         // Straight ahead/backward
         if (x == 0.0)
         {
            motor1Speed = (byte)(System.Math.Abs(y) * Scale);
            motor2Speed = (byte)(System.Math.Abs(y) * Scale);
         }
         // Turning right
         else if (x > 0.0)
         {
            motor1Speed = (byte)(System.Math.Abs(y) * Scale);
            motor2Speed = (byte)(System.Math.Abs(y) * (1.0 - System.Math.Abs(x)) * Scale);
         }
         // Turning left
         else
         {
            motor1Speed = (byte)(System.Math.Abs(y) * (1.0 - System.Math.Abs(x)) * Scale);
            motor2Speed = (byte)(System.Math.Abs(y) * Scale);
         }

         Debug.Print("X=" + x.ToString("F1") + " Y=" + y.ToString("F1") + " IsPressed=" + thumbStick.IsPressed + " M1D=" + motor1Direction.ToString() + " M2D=" + motor2Direction.ToString() + " M1S=" + motor1Speed.ToString() + " M2S=" + motor2Speed.ToString());

         byte[] command =
         {
            motor1Direction,
            motor2Direction,
            motor1Speed,
            motor2Speed,
            (byte)0)
         };
         nrf.SendTo(RobotAddress, command );

         MBN.Hardware.Led1.Write(true);

         Thread.Sleep(250);
      }
   }

   static void nrf_OnTransmitSuccess()
   {
     MBN.Hardware.Led1.Write(false);
     Debug.Print("nrf_OnTransmitSuccess");
   }

   static void nrf_OnTransmitFailed()
   {
      Debug.Print("nrf_OnTransmitFailed");
   }
}

The Mikrobus.Net team have done a great job with the number and quality of the drivers for the Mikroe click boards. The Mikroe click boards are individually packaged with professionally written click specific and handling instructions.

Mikrobus.Net Quail, Weather & nRF-C clicks and xively

My next proof of concept uses a Weather click and nRF C click to upload temperature and humidity data to a Xively gateway running on a spare Netduino 2 Plus. I have a couple of Azure Event hub gateways (direct & queued) which require a Netduino 3 Wifi (for TLS/AMQPS support) and I’ll build a client for them in a coming post.

I initially purchased an nRF T click but something wasn’t quite right with its interrupt output. The interrupt line wasn’t getting pulled low at all so there were no send success/failure events. If I disabled the pull up resistor and strobed the interrupt pin on start-up the device would work for a while.


using (OutputPort Int = new OutputPort(socket.Int, true))
{
 Int.Write(true);
};

...

_irqPin = new InterruptPort(socket.Int, false, Port.ResistorMode.Disabled, Port.InterruptMode.InterruptEdgeLow);

The code sends a reading every 10 seconds and has been running for a couple of days. It strobes Led1 for each successful send and turns on Led2 when a send fails.

private static readonly byte[] deviceAddress = Encoding.UTF8.GetBytes(&quot;Quail&quot;);
private static readonly byte[] gatewayAddress = Encoding.UTF8.GetBytes(&quot;12345&quot;);
private const byte gatewayChannel = 10;
private const NRFC.DataRate gatewayDataRate = NRFC.DataRate.DR1Mbps;
private const int XivelyUpdateDelay = 10000;
private const char XivelyGatewayChannelIdTemperature = 'J';
private const char XivelyGatewayChannelIdHumidity = 'K';

public static void Main()
{
   NRFC nRF24Click = new NRFC(Hardware.SocketFour);
   nRF24Click.Configure(deviceAddress, gatewayChannel, gatewayDataRate);
   nRF24Click.OnTransmitFailed += nRF24Click_OnTransmitFailed;
   nRF24Click.OnTransmitSuccess += nRF24Click_OnTransmitSuccess;
   nRF24Click.Enable();

   // Configure the weather click
   WeatherClick weatherClick = new WeatherClick(Hardware.SocketOne, WeatherClick.I2CAddresses.Address0);
   weatherClick.SetRecommendedMode(WeatherClick.RecommendedModes.WeatherMonitoring);

   Thread.Sleep(XivelyUpdateDelay);

   while (true)
   {
      string temperatureMessage = XivelyGatewayChannelIdTemperature + weatherClick.ReadTemperature().ToString("F1");
      Debug.Print(temperatureMessage);
      MBN.Hardware.Led1.Write(true);
      nRF24Click.SendTo(gatewayAddress, Encoding.UTF8.GetBytes(temperatureMessage));

      Thread.Sleep(XivelyUpdateDelay);

      string humidityMessage = XivelyGatewayChannelIdHumidity + weatherClick.ReadHumidity().ToString("F1");
      Debug.Print(humidityMessage);
      MBN.Hardware.Led1.Write(true);
      nRF24Click.SendTo(gatewayAddress, Encoding.UTF8.GetBytes(humidityMessage));

      Thread.Sleep(XivelyUpdateDelay);
   }
}

static void nRF24Click_OnTransmitSuccess()
{
   MBN.Hardware.Led1.Write(false);
   if (MBN.Hardware.Led2.Read())
   {
      MBN.Hardware.Led2.Write(false);
   }

   Debug.Print("nRF24Click_OnTransmitSuccess");
}

static void nRF24Click_OnTransmitFailed()
{
   MBN.Hardware.Led2.Write(true);

   Debug.Print("nRF24Click_OnTransmitFailed");
}

I need to have a look at interfacing some more sensors and soak testing the solution.

The MikroBus.Net team have done a great job with the number & quality of the drivers they have available.

Fez Lemur & Panda III AnalogInput read rates

I had previously have measured the AnalogInput read rate of my Netduino devices and was surprised by some of the numbers. Now, I have another project in the planning phase which will be using a GHI Electronics Fez Lemur or Fez Panda III device and had time for a quick test.

This is just a simple test, not terribly representative of real world just to get comparable numbers.

public static void Main()
{
   int value;
   AnalogInput x1 = new AnalogInput(FEZLemur.AnalogInput.A0);
   Stopwatch stopwatch = Stopwatch.StartNew();

   Debug.Print("Starting");

   stopwatch.Start();
   for (int i = 0; i < SampleCount; i++)
   {
      value = x1.ReadRaw();
   }
   stopwatch.Stop();

   Debug.Print("Duration = " + stopwatch.ElapsedMilliseconds.ToString() + " mSec " + (SampleCount * 1000 / stopwatch.ElapsedMilliseconds).ToString() + "/sec");
}

Fez Lemur 84 MHz CPU
Duration = 2855 mSec 35026/sec
Duration = 2854 mSec 35038/sec
Duration = 2861 mSec 34952/sec

Duration = 2856 mSec 35014/sec
Duration = 2854 mSec 35038/sec
Duration = 2855 mSec 35026/sec
Duration = 2854 mSec 35038/sec

Fez Panda III 180MHz CPU
Duration = 1799 mSec 55586/sec

Duration = 1799 mSec 55586/sec

It looks like the GHI Team have a performant implementation of AnalogInput.ReadRaw()

Mikrobus.Net Quail, EthClick and xively

My second proof of concept application for the Mikrobus.Net Quail and EthClick uploads temperature and humidity data to Xively every 30 seconds for display and analysis.

Temperature and humidity Xively data stream

Temperature and humidity Xively data stream

The Xively REST API uses an HTTP PUT which initially didn’t work because the payload was not getting attached.

I patched the AssembleRequest method in the EtherClick driver to fix this issue.

private byte[] AssembleRequest()
{
   var a = RequestType;
   a += " " + Path + " " + Protocol + "\r\nHost: ";
   a += Host + "\r\n";

   foreach (object aHeader in Headers.Keys)
      a += (string)aHeader + ": " + (string)Headers[aHeader] + "\r\n";

   a += "\r\n"; // Cache-Control: no-cache\r\n  //Accept-Charset: utf-8;\r\n

   if (Content != null && Content != string.Empty && (RequestType == "POST" || RequestType == "PUT")) a += Content;

   return Encoding.UTF8.GetBytes(a);
}

The code reads the WeatherClick temperature and humidity values then assembles a CSV payload which it uploads with an HTTP PUT

</pre>
public class Program
{
   private const string xivelyHost = @"api.xively.com";
   private const string xivelyApiKey = @"YourAPIKey";
   private const string xivelyFeedId = @"YourFeedID";

   public static void Main()
   {
      WeatherClick weatherClick = new WeatherClick(Hardware.SocketOne, WeatherClick.I2CAddresses.Address0);
      weatherClick.SetRecommendedMode(WeatherClick.RecommendedModes.WeatherMonitoring);

      EthClick ethClick = new EthClick(Hardware.SocketTwo);
      ethClick.Start(ethClick.GenerateUniqueMacAddress("devMobileSoftware"), "QuailDevice");

      // Wait for an internet connection
      while (true)
      {
         if (ethClick.ConnectedToInternet)
         {
            Debug.Print("Connected to Internet");
            break;
         }
         Debug.Print("Waiting on Internet connection");
      }

      while (true)
      {
         Debug.Print("T " + weatherClick.ReadTemperature().ToString("F1") + " H " + weatherClick.ReadHumidity().ToString("F1") + " P " + weatherClick.ReadPressure(PressureCompensationModes.Uncompensated).ToString("F1"));

         HttpRequest request = new HttpRequest(@"http://" + xivelyHost + @"/v2/feeds/" + xivelyFeedId + @".csv");
         request.Host = xivelyHost;
         request.RequestType = "PUT";
         request.Headers.Add("Content-Type", "text/csv");
         request.Headers.Add("X-ApiKey", xivelyApiKey );

         request.Content = "OfficeT," + weatherClick.ReadTemperature().ToString("F1") + "\r\n" + "OfficeH," + weatherClick.ReadHumidity().ToString("F1") ;
         request.Headers.Add("Content-Length", request.Content.Length.ToString());

         var response = request.Send();
         if (response != null)
         {
            Debug.Print("Response: " + response.Message);
         }
         else
         {
            Debug.Print("No response");
         }
      Thread.Sleep(30000);
      }
   }
}
MikrobustNet Quail with Eth and Weather Clicks

MikrobustNet Quail with Eth and Weather Clicks

This proof of concept code appears to be reliable and has run for days at a time. The IP stack looks like it needs a bit more work.

Mikrobus.Net Quail and EthClick

In my second batch of MikroElektronika Mikrobus clicks I had purchased an EthClick to explore the robustness and reliability of the Mikrobus.Net IP Stack.

My first trial application uses the Internet Chuck Norris database (ICNBD) to look up useful “facts” about the movie star.

public static void Main()
{
   EthClick ethClick = new EthClick(Hardware.SocketTwo);

   ethClick.Start(ethClick.GenerateUniqueMacAddress("devMobileSoftware"), "QuailDevice");

   while (true)
   {
      if (ethClick.ConnectedToInternet)
      {
         Debug.Print("Connected to Internet");
         break;
      }
   Debug.Print("Waiting on Internet connection");
   }

   while (true)
   {
      var r = new HttpRequest(@&amp;quot;http://api.icndb.com/jokes/random&amp;quot;);

      r.Headers.Add("Accept", "*/*");

      var response = r.Send();
      if (response != null)
      {
         if (response.Status == "HTTP/1.1 200 OK")
         {
            Debug.Print(response.Message);
         }

      }
      else
      {
         Debug.Print("No response");
      }
      Thread.Sleep(10000);
   }
}

The ran first time and returned the following text

7c
{ "type": "success, "value": { "id": 496, "joke": "Chuck Norris went out of an infinite loop.", "categories": ["nerdy"]}}
0

85
{ "type": "success", "value": { "id": 518, "joke": "Chuck Norris doesn't cheat death. He wins fair and square.", "categories": []}}
0

It looks like the HTTP response parsing is not quite right as each message starts with the length of the message in bytes in hex and the terminating “0”.

Mikrobus.Net Quail and Weather Click

In my second batch of MikroElektronika Mikrobus sensors I had purchased a Weather click because I was interested to see how the temperature and humidity values it returned compared with the Silicon labs Si7005 devices I use with my Arduino and Netduino devices. (I was a bit suspicious of the Si7005 humidity values)

I downloaded the Mikrobus.Net driver for the BME280 and created a simple console application to see how well the sensor and driver worked

public class Program
{
   public static void Main()
   {
      WeatherClick weatherClick = new WeatherClick(Hardware.SocketOne, WeatherClick.I2CAddresses.Address0);

      weatherClick.SetRecommendedMode(WeatherClick.RecommendedModes.WeatherMonitoring);

      while (true)
      {
         Debug.Print("T " + weatherClick.ReadTemperature().ToString(" F1 ") +
" H " + weatherClick.ReadHumidity().ToString("F1") +
" P " + weatherClick.ReadPressure(PressureCompensationModes.Uncompensated).ToString("F1"));

         Thread.Sleep(30000);
      }
   }
}

The temperature values looked pretty good but the humidity values were rough half of what I was getting from the SI7005 connected to a devDuino V2 on the desk next to my Quail board

The thread ‘<No Name>’ (0x2) has exited with code 0 (0x0).
T 24.9 H 49.3 P 1014.8
T 25.0 H 49.4 P 1014.9
T 25.0 H 49.1 P 1014.8
T 25.0 H 49.9 P 1014.8
T 24.9 H 49.1 P 1014.9
T 25.0 H 50.8 P 1014.9
T 25.0 H 49.2 P 1015.0

The code for doing the conversions looked pretty complex so I modified a Netduino BME280 driver (uses a different approach for conversions) I have used on another projects to work on the Quail/Mikrobus architecture.

The modified driver returned roughly the same values so it looks like the problem is most probably with the SI7005 code.(or my understand of the humidity values it returns)

Enterprise Library V6 Logging with Azure SDK 2.8 and Azure Diagnostics 1.3

In a previous post I wrote about configuring the Enterprise Library V6 to work with Azure Diagnostics. There have been significant changes (detailed in this very helpful post) to the way the Azure Diagnostics infrastructure works for Azure SDK Versions 2.4/2.5. If the diagnostics infrastructure is not properly configured there will be no WADLogs tables created and/or trace information logged.

The following steps provision diagnostics for a Azure web role or worker role. This “cheat sheet” assumes you already have the Azure Service Management Cmdlets installed.

Add-AzureAccount This will prompt for Azure credentials

Get-AzureSubscription –Display details about your subscription(s)

SubscriptionId : 15daec19-f6e9-403c-8652-1234567890123
SubscriptionName : MyCompany
Environment : AzureCloud
DefaultAccount : me@mycompany.co.nz
IsDefault : False
IsCurrent : False
TenantId : e07af3b3-10c2-49a5-97cc-123456789012
CurrentStorageAccountName :
SubscriptionId : eba7ed1c-5503-4349-bcc7-123456789012
SubscriptionName : YourCompany
Environment : AzureCloud
DefaultAccount : you@yourcompany.co.nz
IsDefault : True
IsCurrent : True
TenantId : e07af3b3-10c2-49a5-97cc-1234567890
CurrentStorageAccountName :

If you have more than one Azure subscription you will need to select the one you want to use.

Select-AzureSubscription -Current -SubscriptionName “MyCompany” (beware names are case sensitive)

Get-AzureServiceDisplays a list of your Azure services

ServiceName : myDemoApp
Url : https://management.core.windows.net/eba7ed1c-5503-4349-bcc7-123456789012/services/hostedservices/myDemoApp
Label : myDemoApp
Description :
Location : Australia Southeast
AffinityGroup :
Status : Created
ExtendedProperties : {[ResourceGroup, myDemoApp], [ResourceLocation, Australia Southeast]}
DateModified : 7/01/2016 7:02:44 p.m.
DateCreated : 28/12/2015 6:23:44 p.m.
ReverseDnsFqdn :
WebWorkerRoleSizes : {A5, A6, A7, ExtraLarge, ExtraSmall, Large, Medium, Small, Standard_D1, Standard_D1_v2, Standard_D11, Standard_D11_v2, Standard_D12, Standard_D12_v2, Standard_D13,
Standard_D13_v2, Standard_D14, Standard_D14_v2, Standard_D2, Standard_D2_v2, Standard_D3, Standard_D3_v2, Standard_D4, Standard_D4_v2, Standard_D5_v2}
VirtualMachineRoleSizes : {A5, A6, A7, Basic_A0, Basic_A1, Basic_A2, Basic_A3, Basic_A4, ExtraLarge, ExtraSmall, Large, Medium, Small, Standard_D1, Standard_D1_v2, Standard_D11,
Standard_D11_v2, Standard_D12, Standard_D12_v2, Standard_D13, Standard_D13_v2, Standard_D14, Standard_D14_v2, Standard_D2, Standard_D2_v2, Standard_D3,
Standard_D3_v2, Standard_D4, Standard_D4_v2, Standard_D5_v2}
OperationDescription : Get-AzureService
OperationId : 73d37e69-d3d8-6769-94a2-123456789012
OperationStatus : Succeeded

Get-AzureRole -ServiceName “myDemoApp”

RoleName : WebRole
InstanceCount : 1
DeploymentID : cb4e439907774090be8d123456789012
ServiceName : myDemoApp
OperationDescription : Get-AzureRole
OperationId : 85233c60-f39a-6c01-b51a-123456789012
OperationStatus : Succeeded

RoleName : WorkerRole
InstanceCount : 1
DeploymentID : cb4e439907774090be8d123456789012
ServiceName : myDemoApp
OperationDescription : Get-AzureRole
OperationId : 85233c60-f39a-6c01-b51a-123456789012
OperationStatus : Succeeded

I then modified the role diagnostics config file (diagnostics.wadcfgx) by removing

<DiagnosticsConfiguration xmlns=”http://schemas.microsoft.com/ServiceHosting/2010/10/DiagnosticsConfiguration”&gt;
+
</DiagnosticMonitorConfiguration>

+

<PrivateConfig xmlns=”http://schemas.microsoft.com/ServiceHosting/2010/10/DiagnosticsConfiguration”&gt;
<StorageAccount endpoint=”” />
</PrivateConfig>
<IsEnabled>true</IsEnabled> – Not certain about this

I then uploaded it with the following powershell script
$storage_name = “entlib”
$key = “Storage key goes here==”
$config_path=”C:\..\diagnostics.xml”
$service_name=”myDemoApp”
$storageContext = New-AzureStorageContext -StorageAccountName $storage_name -StorageAccountKey $key
Set-AzureServiceDiagnosticsExtension -StorageContext $storageContext -DiagnosticsConfigurationPath $config_path -ServiceName $service_name -Slot Production -Role WebRole

Repeat for WorkerRole and WebRole

Mikrobus.Net Quail and ThumbStick Click

Back in June I purchased a MikroBus.Net Quail board and a selection of Mikro Elektronika click boards. After figuring out I had purchased a couple of click boards which didn’t have NetMF driver support, I placed another order (ensuring drivers available) which arrived just before Christmas.

The mikroBUS connector standard has quite a different approach to my arduino style boards where the analog, digital, I2C , SPI and other functionality of the microcontroller are exposed on headers.

The mikroBUS standard specifies several different mechanical configurations (small, medium & large) for clicks and the connections available on the 16 pins (2 x 8 pin female headers).

mikrobus_pinout_thumb_b

This impacts on the way sensors are connected, for example with Arduino style devices there are shields with joysticks and buttons which are read using analog inputs and interrupt ports for the buttons

The mikroBus click boards only have one analog port so the x & y axis values of the joystick are read by an MCP3204 Analog to Digital convertor connected to the SPI Bus and the joystick button is connected to the interrupt port.

The microbus team have done a lot of work developing 60+ drivers and the ThumbStick driver was one of the first I downloaded. The interface provided by the driver is relatively straight forward to use

using MBN;
using MBN.Modules;
using Microsoft.SPOT;
using System.Threading;

namespace ThumbstickClickTestApp
{
   public class Program
   {
      public static void Main()
      {
         ThumbstickClick thumbStick = new ThumbstickClick(Hardware.SocketOne);

         thumbStick.ThumbstickOrientation = ThumbstickClick.Orientation.RotateZeroDegrees;
         thumbStick.ThumbstickPressed += thumbstickPressed;
         thumbStick.ThumbstickReleased += thumbstickReleased;
         thumbStick.Calibrate();

         while (true)
         {
            var position = thumbStick.GetPosition();

            Debug.Print("X,Y,IsPressed " + position.X.ToString("F1") + "," + position.Y.ToString("F1") + "," + thumbStick.IsPressed);

            Thread.Sleep(1000);
         }
      }

      static void thumbstickReleased(ThumbstickClick sender, ThumbstickClick.ButtonState state)
      {
         Debug.Print("Thumbstick Released");
      }

      static void thumbstickPressed(ThumbstickClick sender, ThumbstickClick.ButtonState state)
      {
         Debug.Print("Thumbstick Pressed");
      }
   }
}

From the diagnostics output window in Visual Studio
X,Y,IsPressed 0.0,0.0,False
Thumbstick Pressed
Thumbstick Released
X,Y,IsPressed 0.0,-0.0,False
Thumbstick Pressed
X,Y,IsPressed 0.0,1.0,True
Thumbstick Released
X,Y,IsPressed 0.0,0.0,False