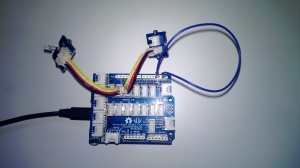
Netduino Crazyflie Wii Nunchuk Remote Control V1.0

After flying the Crazyflie for a couple of days with the Joystick shield based remote control I figured an alternate user interface based on a Wii Nunchuk could be interesting. (It might also make the Crazyflie easier to operate for novice pilots). After a couple of hours coding I have a proof of concept Netduino based Crazyflie Nanocopter Wii Nunchck remote control unit.

Initially the nanocopter was difficult to fly, bouncing up and down (thrust control issues) and swaying side to side (roll & pitch control issues). After some digging I found that every so often the Wii nunchuk (my cheap clone) would return a buffer full of 0xFF or 0x00 bytes.  The 0xFF case had been handled but not the 0x00 one. I added a second test into the GetData  method (around line 335) to catch the 0x00 scenario and this appeared to fix the problem.

cnt = 0;
for (int i = 0; i < inputBuffer.Length; i++)
   if (inputBuffer[i] == 0x0) cnt++;
if (cnt == inputBuffer.Length)
{
   return false;
}
CrazyFlie Netduino Wiichuck based Remote

CrazyFlie Netduino Wiichuck based Remote

Bill on Materials (Prices as at Jan 2014)

This software was built using tooling created and shared by others.

Big thanks to

Jakub Bartkowiak – Gralin.NETMF.Nordic.NRF24L01Plus

Szymon Kobalczyk – Wiichuck I2C driver

Antao Almada – HydraMF.BitConverter

The nunchuck accelerometer provides roll and pitch, the joystick is for thrust and yaw. The first version of the CrazyFlieWiiChuckV1.0 is pretty basic and I have intentionally reduced the maximum roll, pitch, thrust and yaw values to make it easier to fly. (Need to set the Grove Base Shield to 3V3 for my code to work)

Currently I only calculate offset values for thrust & yaw. After a couple of test flights some visual indication of the pitch and roll values from the nunchuk would be helpfull.

Netduino Crazyflie Joystick Shield Remote Control V1.0

Sometimes you start with a goal in mind then a couple of days later you have built something interesting but totally unrelated to what you originally intended to do….

I have several devices (both Netduino & Arduino) which I want to use to collect and upload data to the cloud so I can monitor the resource usage of my house.

I had read Clemens Vaster post on Service Assisted Communication and I was planning to use a Windows Server Essentials 2012 box I have running 24/7 in the hallway to forward updates to the cloud.

I wanted to connect the remote data acquisition nodes directly to the server using their baked in nRF24L01+ support. On the server end the Crazyradio 2.4 Hhz nRF24LU1 USB dongle looked ideal. After some initial positive results I found that the CrazyRadio firmware had been implemented in a way that made it not suitable for my application. (I even considered downloading the BitCraze development VM and building my own custom firmware)

After spending a few hours trying to get the CrazyRadio dongle working I looked at my Crazyflie Nano QuadCopter sitting on the bookshelf.

Then I realised what I really needed is a more portable Crazyflie remote control unit so I didn’t have to unpack my laptop. So two nights later I have a proof of concept Netduino based Crazyflie Nanocopter remote control unit.

CrazyFlie nano copter and Netduino Based Remote

CrazyFlie Netduino based Remote

Bill on Materials (Prices as at Jan 2014)

This software was built using tooling created and shared by others.

Big thanks to

Jakub Bartkowiak – Gralin.NETMF.Nordic.NRF24L01Plus

Antao Almada – HydraMF.BitConverter

Mike McCauley – NRF24 library for Arduino.

I used the NRF24 CrazyFlie emulator to debug my project. No doubt stopping me crashing my Crazyflie many times while debugging.

The Joystick shield has to be modified to work with the common Netduino nRF24L01 libraries which use interrupts rather than polling.

The joystick on the shield is for roll and pitch, the external joystick is for thrust and yaw. The first version of the JoystickShieldnRF24l01V1.0 is pretty basic but I’ll try and enhance it over the next couple of posts.

Netduino Plus and nRF24L01 module shield

A fortnight ago I purchased two shields from Embedded Coolness for a couple of nRF24L01 based projects (quadcopter & robot control system) I’m working on.The shields were very reasonably priced and took roughly 10-15 minutes each to assemble.

Embedded Coolness nRF24L01+ Shield

nRF24L01 Shield with short range module

Though intended for Arduino based projects the hardware SPI port works with the Nordic nRF24L01 .Net Micro Framework Driver on Codeplex.

I adapted the sample application included with the Nordic nRF24L01 .Net Micro Framework Driver source from codeplex to give a minimal working Netduino example.

...
public class EmbeddCoolnessTestHarness
{
private const byte channel = 10;
private readonly OutputPort _led = new OutputPort(Pins.ONBOARD_LED, false);
private readonly NRF24L01Plus _module;
private Timer _timer;
private byte _token;
private readonly byte[] _myAddress = Encoding.UTF8.GetBytes("NetP1");
private readonly byte[] _otherBoard = Encoding.UTF8.GetBytes("NetP2");

public EmbeddCoolnessTestHarness()
{
_module = new NRF24L01Plus();
}

public void Run()
{
_module.OnDataReceived += OnReceive;
_module.OnTransmitFailed += OnSendFailure;
_module.OnTransmitSuccess += OnSendSuccess;

// we need to call Initialize() and Configure() before we start using the module
_module.Initialize(SPI.SPI_module.SPI1, Pins.GPIO_PIN_D7, Pins.GPIO_PIN_D3, Pins.GPIO_PIN_D2);
_module.Configure(_myAddress, channel);
_module.Enable();

_timer = new Timer(SendMessage, null, new TimeSpan(0, 0, 0, 1), new TimeSpan(0, 0, 0, 1));
}

private void OnSendSuccess()
{
_led.Write(false);
}

private void OnSendFailure()
{
Debug.Print("Send failed!");
}

private void OnReceive(byte[] data)
{
Debug.Print("Token = " + data[0]);
}

private void SendMessage(object state)
{
_led.Write(true);
_module.SendTo(_otherBoard, new[] { _token });
_token++;
}
}

Someone else has a working NetMF Quadcopter

So according to cuno and co NetMF is a viable processing platform for a quadcopter. I was worried about the GC and it looks like as long as I’m really careful about allocating memory (strings, buffers etc.) I should be okay. It will be like writing code for embedded micro controllers (V25 & HC11) in C not long after I left university,

Have also been reading up about proportional-integral-derivative controllers (PID controller) here and building a basic C# implementation.

Next step some PWM code for interfacing to my Turnigy Multistar 10 Amp ESCs. I wonder if my larger scale quadcopter will cause any issues?

Netduino Plus 2 Interrupt Performance

I had been considering using the Quadcopter IMU to drive the execution of the orientation and stabilisation algorithms. The MPU 6050 has an interrupt output which can be configured to trigger when there is data available to be read etc.

I had read discussions about the maximum frequency which the Netduino & the NetMF could cope with and just wanted to check for myself. For this test I assumed that the PWM outputs (once initialised) consume little or no CPU and that with only an InterlockedIncrement in the interrupt handler that these would be the maximum possible values.

Netduino Plus 2 Interrupt Testing

I used the onboard PWM (D3) to drive an interrupt (D1) and then had a background thread display the number calls to the interrupt handler in the last second. The button (D4) in the picture above allowed me to increase the frequency of the PWM output in 100Hz steps. The desired count and actual count where displayed using Debug.Print and the .Net Microframework deployment tool

100 101
200 107
700 453
1000 867
1500 1225
1800 1629
2100 1943
2900 2470
3200 3093
3600 3432
4000 3799
4000 4020
4000 4021
4000 4020

The counts seemed to be reasonably accurate until roughly 13KHz then there would be major memory allocation issues and the device would crash.


MPU 6050 I2C read rates using Netduino plus 2

The quadcopter will need to determine it’s orientation then update the thrust to be delivered by each motor many times a second. So I was interested to see how fast my Nedtduino plus 2 could read data from the MPU 6050 accelerometer & gyroscope. I stumbled across this blog and it appears that they are building a Quadcopter as well(Google translation was hard work to read).

There was also some very useful C# NetMF code which I used as the basis for my performance test harness.

10,000 readings of 16bit values from the Accelerometer (X,Y,Z) Gyroscope (X,Y,Z) and temperature sensor. The initial run didn’t look to positive

21.78, 21.77, 21.77, 21.77, 21.77, 21.77, 21.77,21.77,21.77,21.77 sec Avg 21.77

Which is roughly 460/sec

I then had a look at the I2C interface code and noticed that the bus speed was set to 100KHz so I increased it to 400KHz

10.33, 10.23, 10.23,10.23,10.23,10.23,10.23,10.23,10.72,10.23 Avg 10.29

Which is roughly 970/sec

I then had a look at the I2C interface code and changed the way that the register values were read so the array of registers to read didn’t have to be loaded.

8.55,8.57,8.55,8.57,8.55,8.57,8.57,8.57,8.55,8.57 Avg 8.56

I think 1170/sec should be sufficient, but I’m going to have a look at the Digital Motion Processor (DMP) capabilities of the MPU6050. This will require significant effort as there currently (June 2013) doesn’t appear to be any NetMF support for this approach.

Quadcopter MPU 6050 IMU mounting board ordered

For testing I’m going to need a shield to mount my MPU 6050 breakout board and connectors for the four motor speed controllers so a protoshield looked like an ideal solution. The netduino plus 2 I am planning to use for the Quadcopter controller has a slightly different I2C setup to the original Netduino & Netduino plus. After some research it looks like the Netduino plus 2 arrangement is the same as the Arduino Uno & Arduino Leonardo with the I2C SDA & SCL pins next to the AREF pin. I did consider using a software based I2C implementation but discounted this because I was worried about performance and additional complexity.

Many of the Arduino/Netduino protoshields currently on sale (June 2013) don’t have the necessary SDA & SCL pins e.g. Sparkfun, Freetronics, Adafruit, Makershed, ladyada etc.

I have sourced 2 x Leoshield from GorillaBuilderz in Australia which look suitable.

Quadcopter frame and motors ordered

Using the suggested parts list for a quadcopter on Hovership. I have ordered

1x Turnigy Battery Strap 330mm
1x On-Board Lipoly Low Voltage Alarm
2x Turnigy nano-tech 1800mah 3S 25~50C Lipo Pack
1x Hobby King Quadcopter Power Distribution Board
5x Turnigy Multistar 10 Amp Multi-rotor Brushless
5x Turnigy Aerodrive SK3 – 2822-1090kv Brushless Outrunner Motor
5x 8045 SF Props 2pc Standard Rotation/2 pc RH Rotation
1x Hobbyking X525 V3 Glass Fiber Quadcopter Frame 600mm
1x Hobbyking X525 V3 Glass Fiber Main Frame Bottom Plate
1x Hobbyking X525 V3 Aluminum Square Booms (4pcs/bag)
2x Hobbyking X525 V3 Glass Fiber Motor Mount (4pcs/bag)
2x Hobbyking X525 Glass Fiber Landing Gear (4pcs/bag)
1x Hobbyking X525 V3 Glass Fiber Main Frame Upper Plate (1pc/bag)
1x CNC Alloy Prop Balancer for Propeller, EDF & Heli Shaft/Blade

I have ordered plenty of spare propellers, motor mounts and frame bits as based on my experience with my Crazyflie Nano Quadcopter there will be many crashes while I debug the software and learn how to fly. I will purchase a Lipoly charger and battery bag locally.