Random wanderings through Microsoft Azure esp. PaaS plumbing, the IoT bits, AI on Micro controllers, AI on Edge Devices, .NET nanoFramework, .NET Core on *nix and ML.NET+ONNX
After roughly an hour the telemetry stopped and the Azure Percept displayed a message which wasn’t terribly helpful.
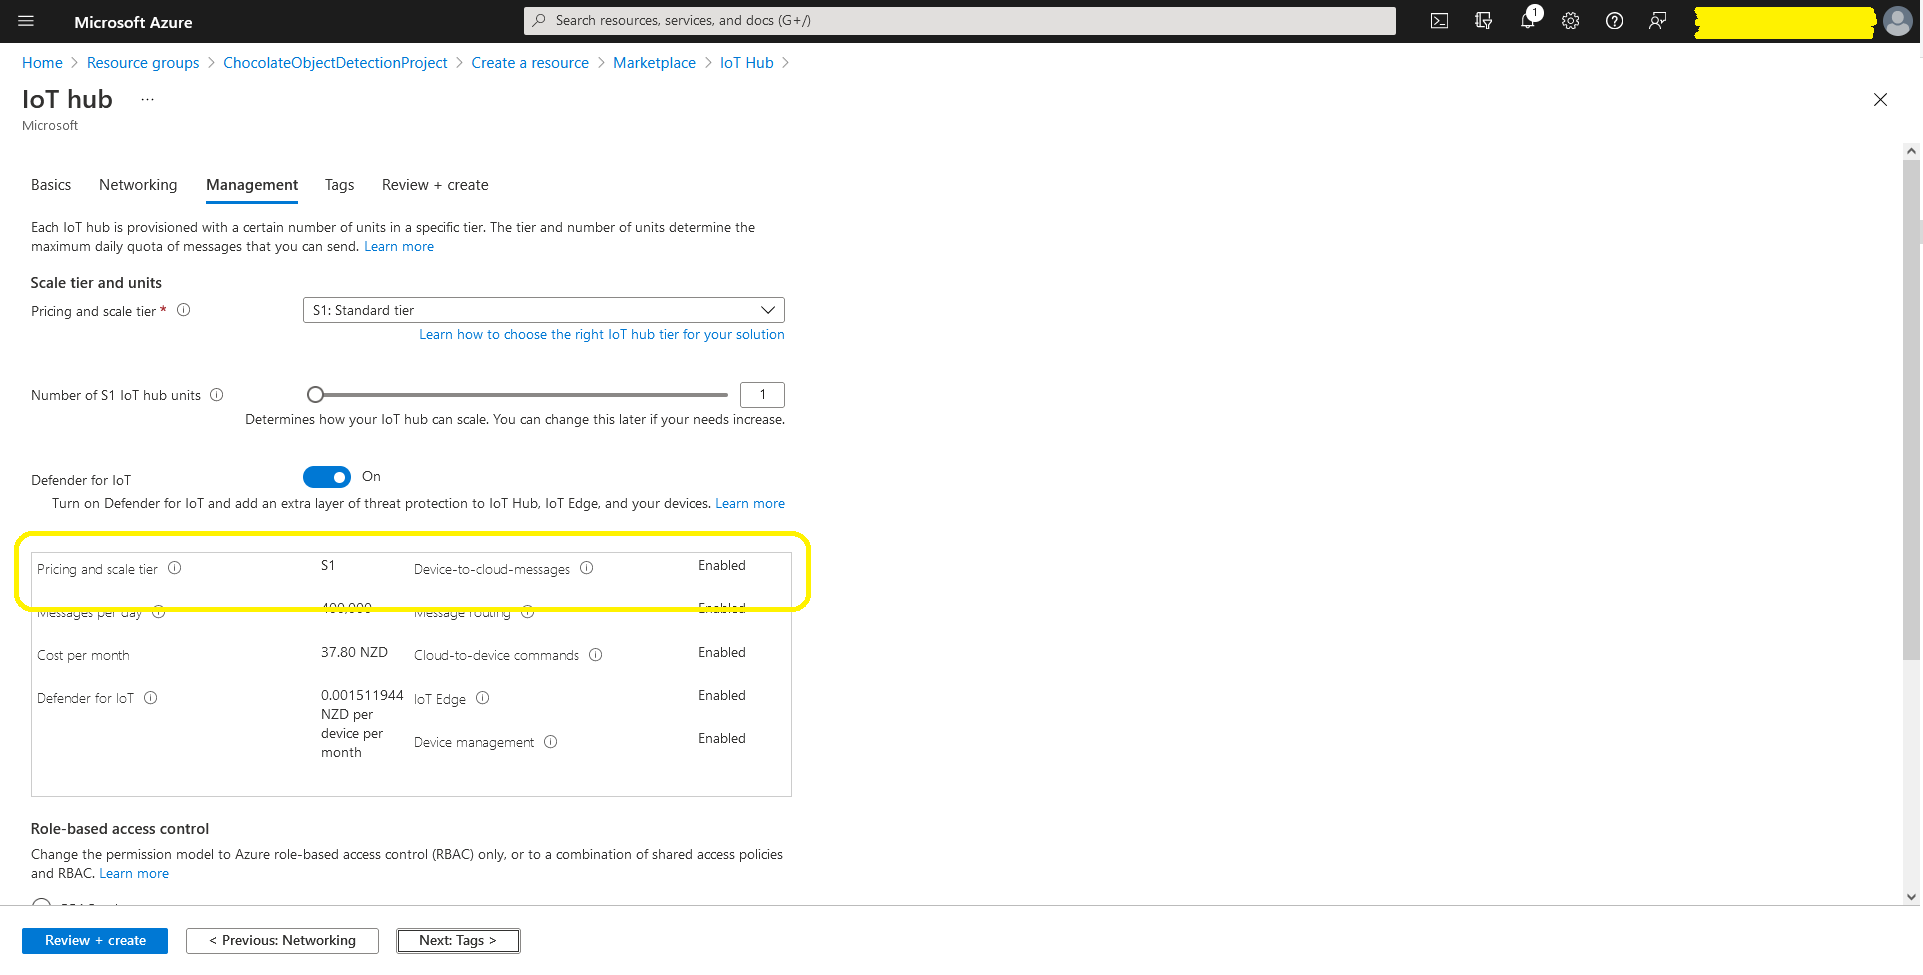
I had manually created the Azure IoT Hub and selected the “Free Tier” (I was trying to keep my monthly billing reasonable) then as I was stepping through the Azure Percept setup wizard I didn’t read the warning message highlighted below.
Azure Percept Azure IoT Hub Warning
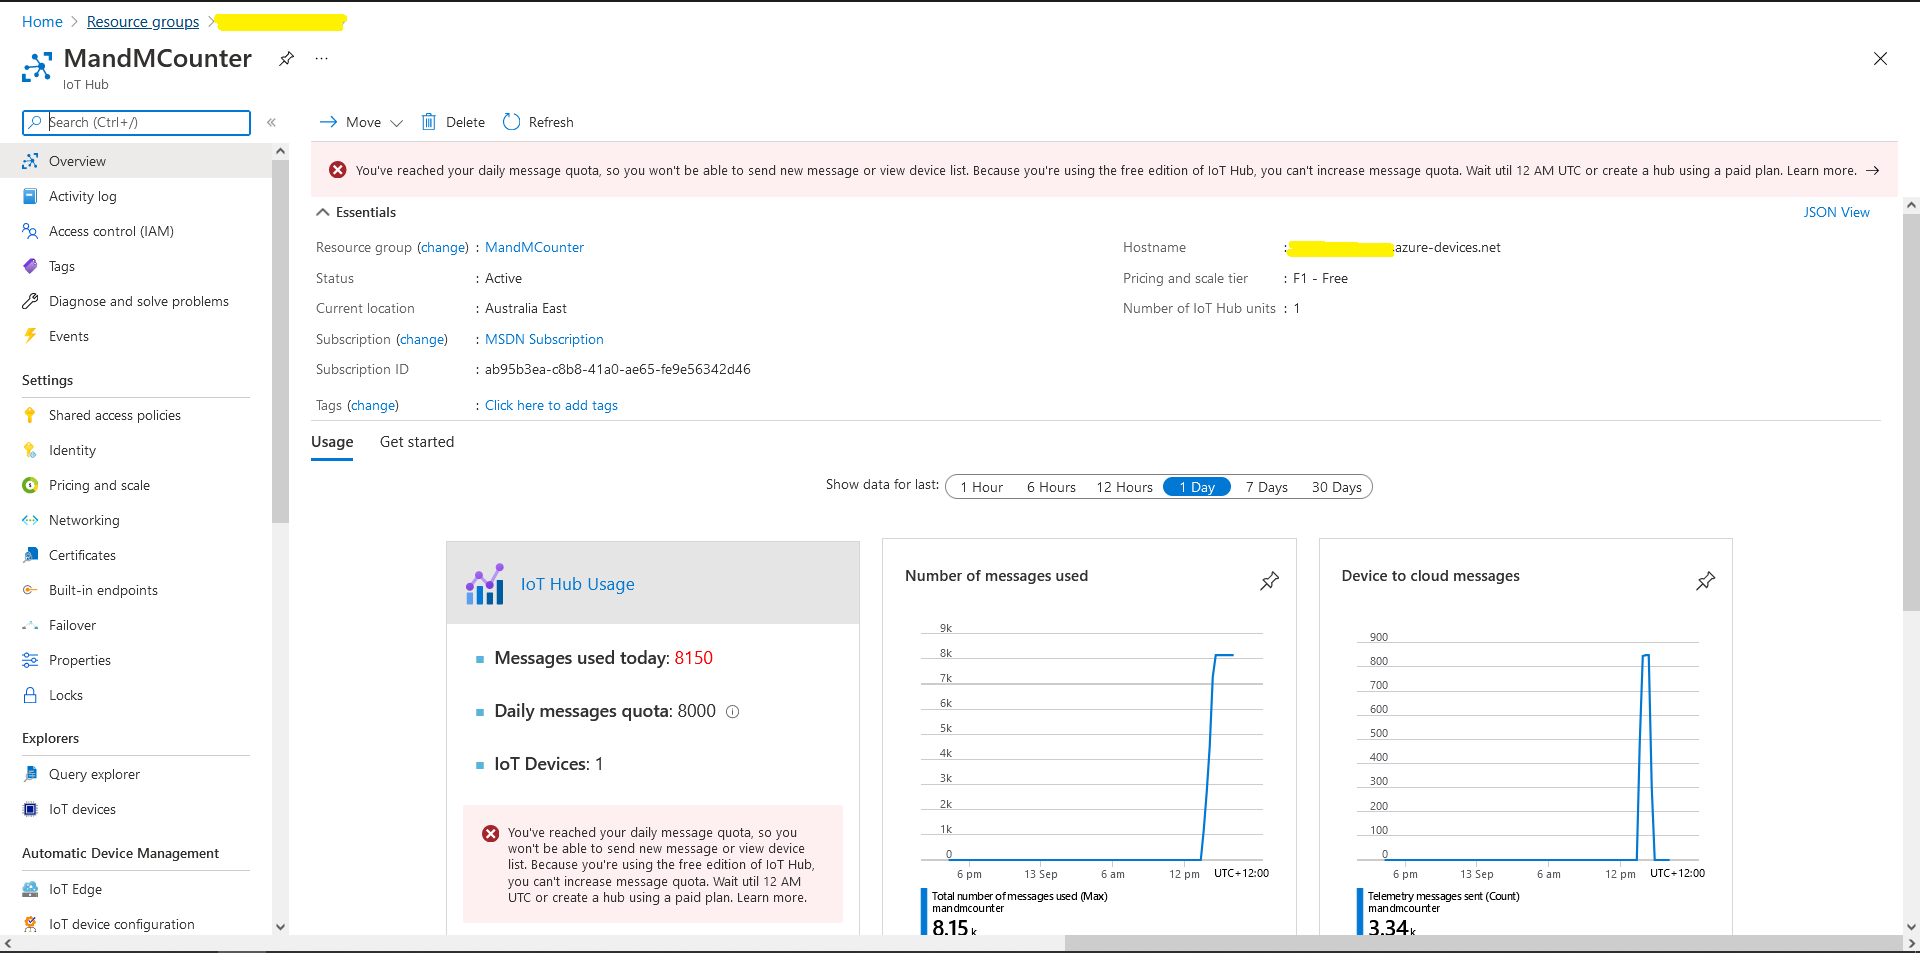
The Azure Percept generates a lot of messages and I had quickly hit the 8000 messages per day limit of the “Free Tier”.
Azure IoT Hub Daily Message Quota
I had to create a new Azure IoT Hub, repave the Azure Percept Device (there were some updates and I had made some mistakes in the initial setup) and reconfigure the device.
There have been blog posts showing how to build Azure Percept integrations with Power BI, Azure Logic Appsetc. with “zero code”. But what do you do if your Azure Percept based solution needs some “glue” to connect to other systems?
I work on a SmartAg computer vision based application that uses security cameras to monitor the flow of cattle through stockyards. It has to control some local hardware, display real-time dashboards, and integrate with an existing application so a “zero code” solution wouldn’t work.
The initial plan was to take the Azure Percept to a piggery to see if I could build a Proof of Concept(PoC) of a product that the CEO and I had been discussing for a couple of weeks.
But shortly after I started working on this series of blog posts New Zealand went into strict lockdown. Only essential shops like supermarkets and petrol stations were open, our groceries were being delivered, and schools were closed.
I needed a demonstration application which used props I could source from home and the local petrol station. In addition my teenage son’s school was closed so he could be the project “intern”.
While at the local petrol station to buy milk I observed that they had a large selection of confectionary so we decided to build a series of object detection models to count different types of chocolates.
In a retail scenario this could be counting products on shelves, pallets in a cold store, or at the SmartAg start-up I work for counting cattle in a yard.
Configuring The Test Environment
I have not included screen shots of the hardware configuration process as this has been covered by other bloggers. Though, for projects like this I always create a new resource group so I can easily delete all the resources so my Azure invoice doesn’t cause “bill shock”.
Azure Resource Group Creation blade
I also created the Azure IoT Hub before configuring the Percept device rather than via the Device provisioning process.
Azure Percept configuration assigning an Azure IoT Hub
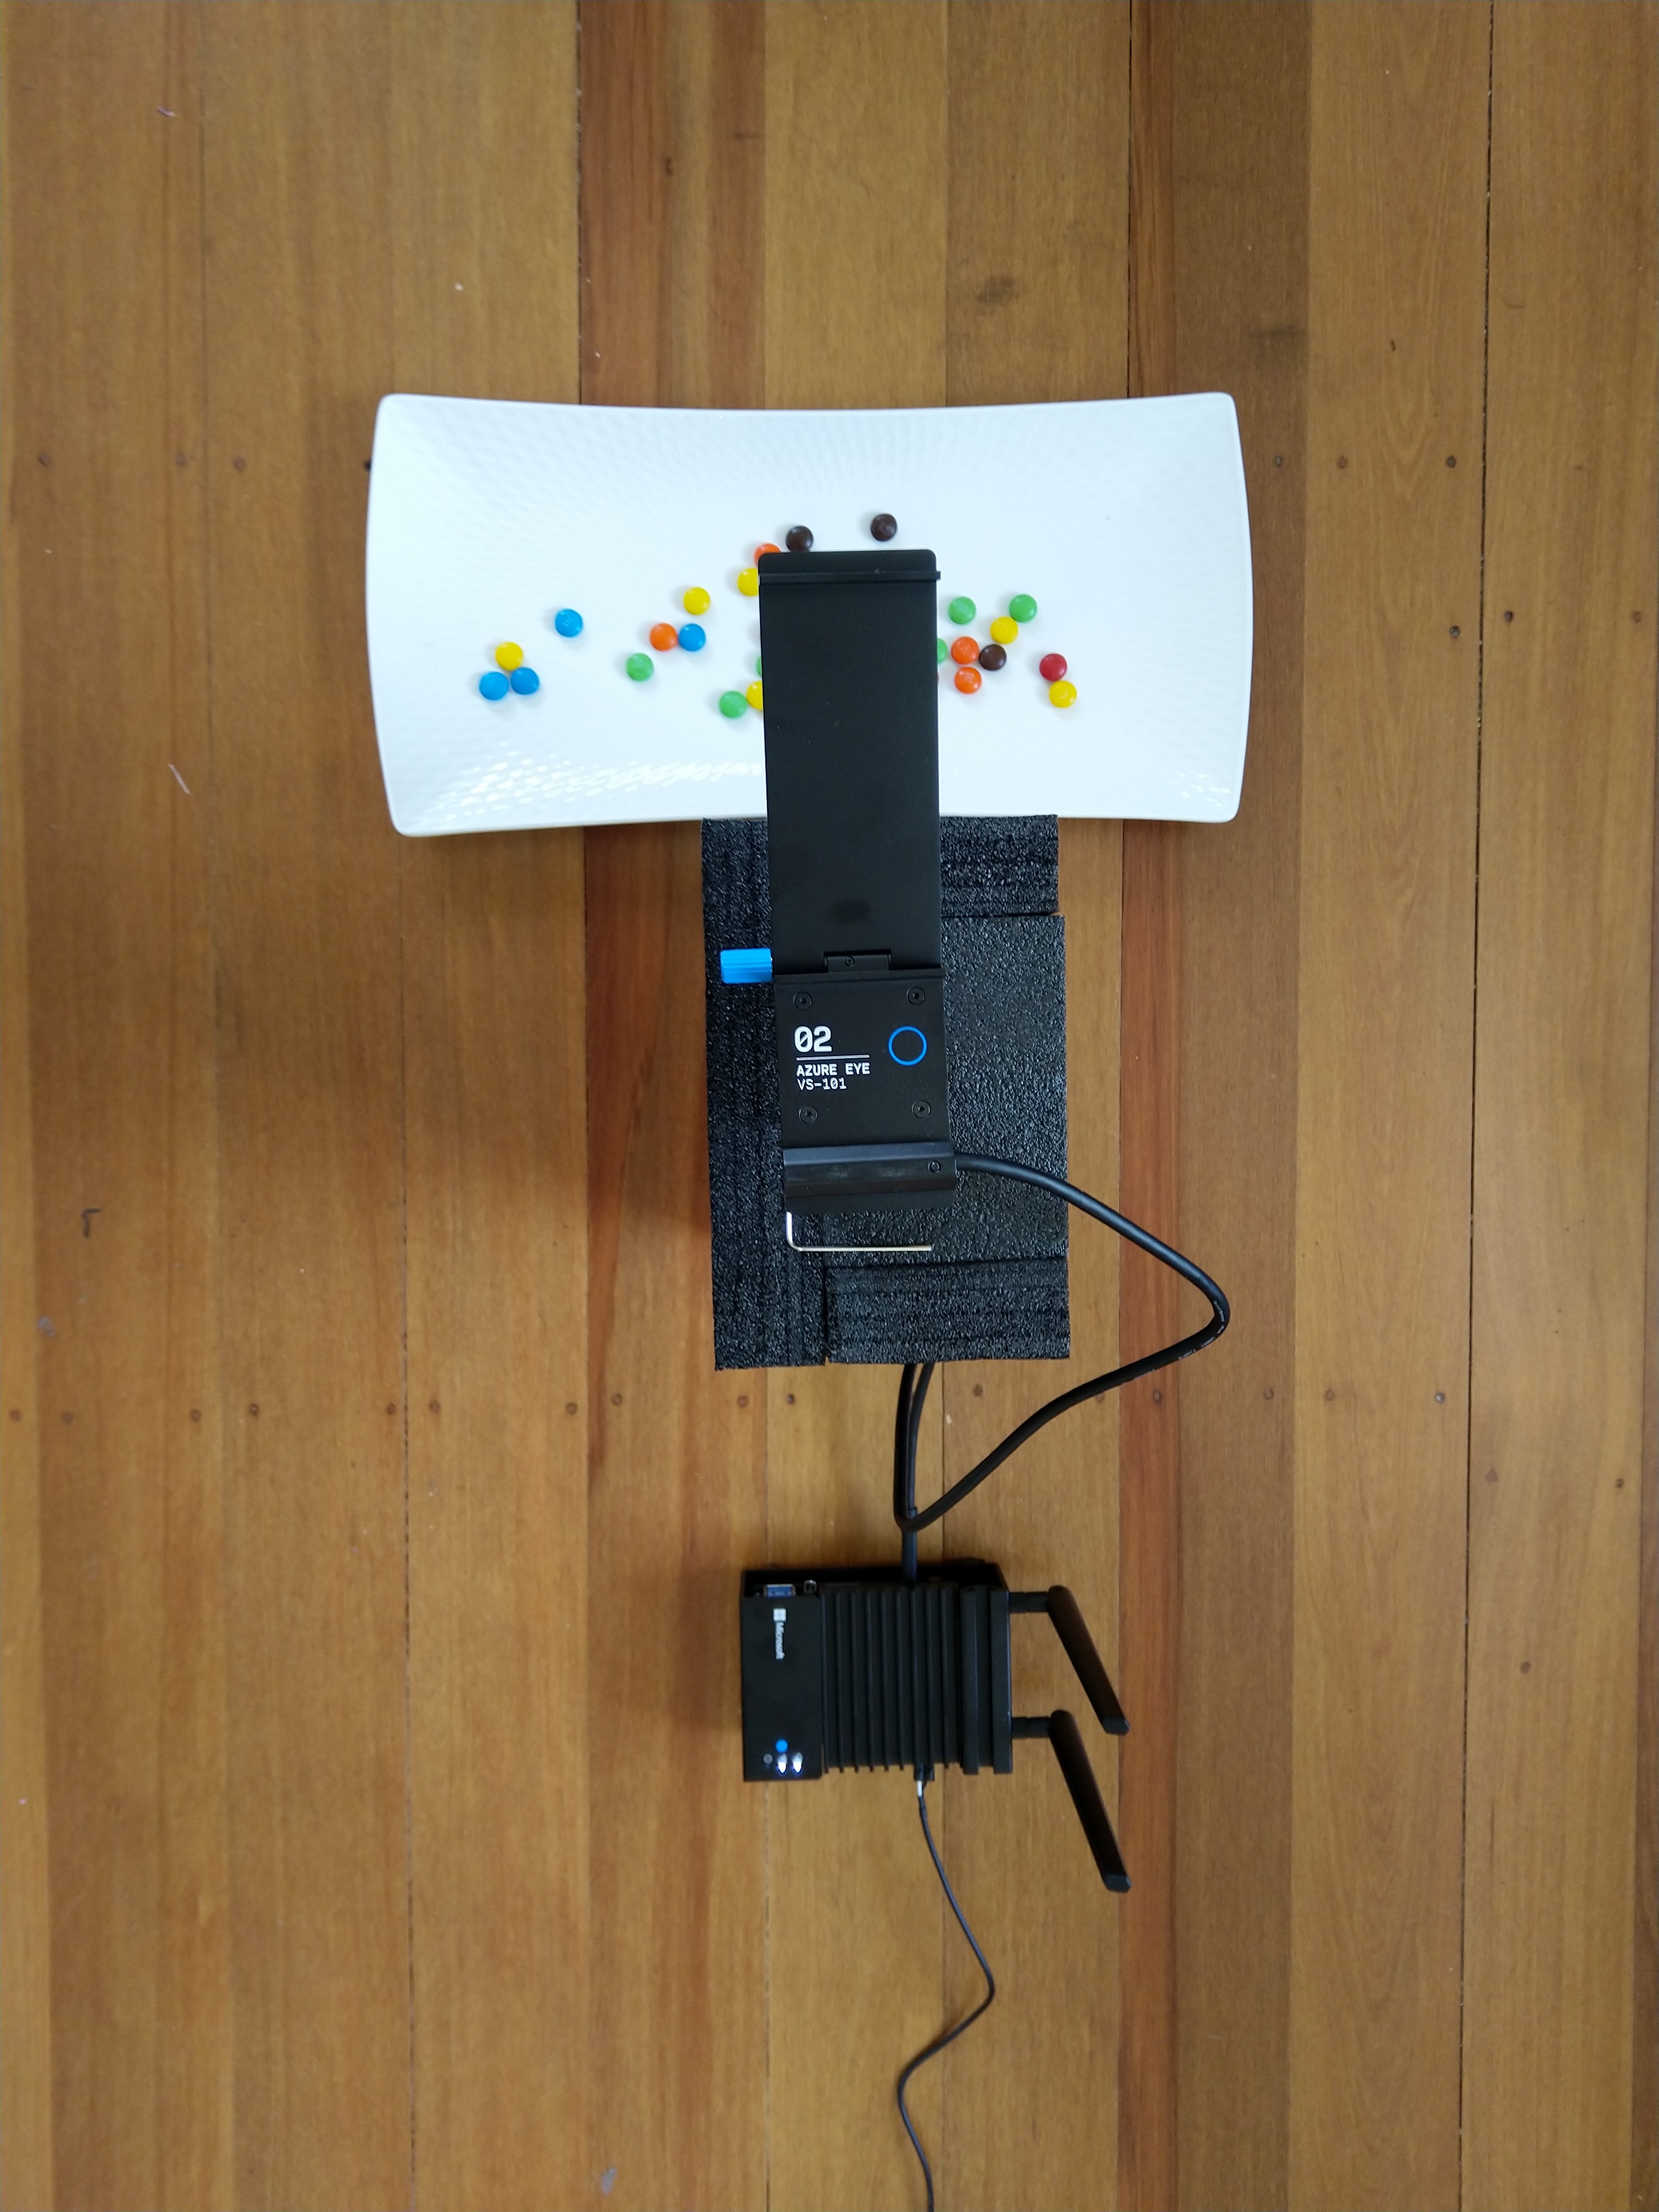
The intern trialed different trays, camera orientations, and lighting as part of building a test rig on the living room floor. After some trial and error, he identified the optimal camera orientation (on top of the packing foam) and lighting (indirect sunlight with no shadows) for reliable inferencing. As this was a proof-of-concept project we limited the number of variables so we didn’t have to collect lots of images which the intern would then have to mark up.
Trialing image capture with M&M’s
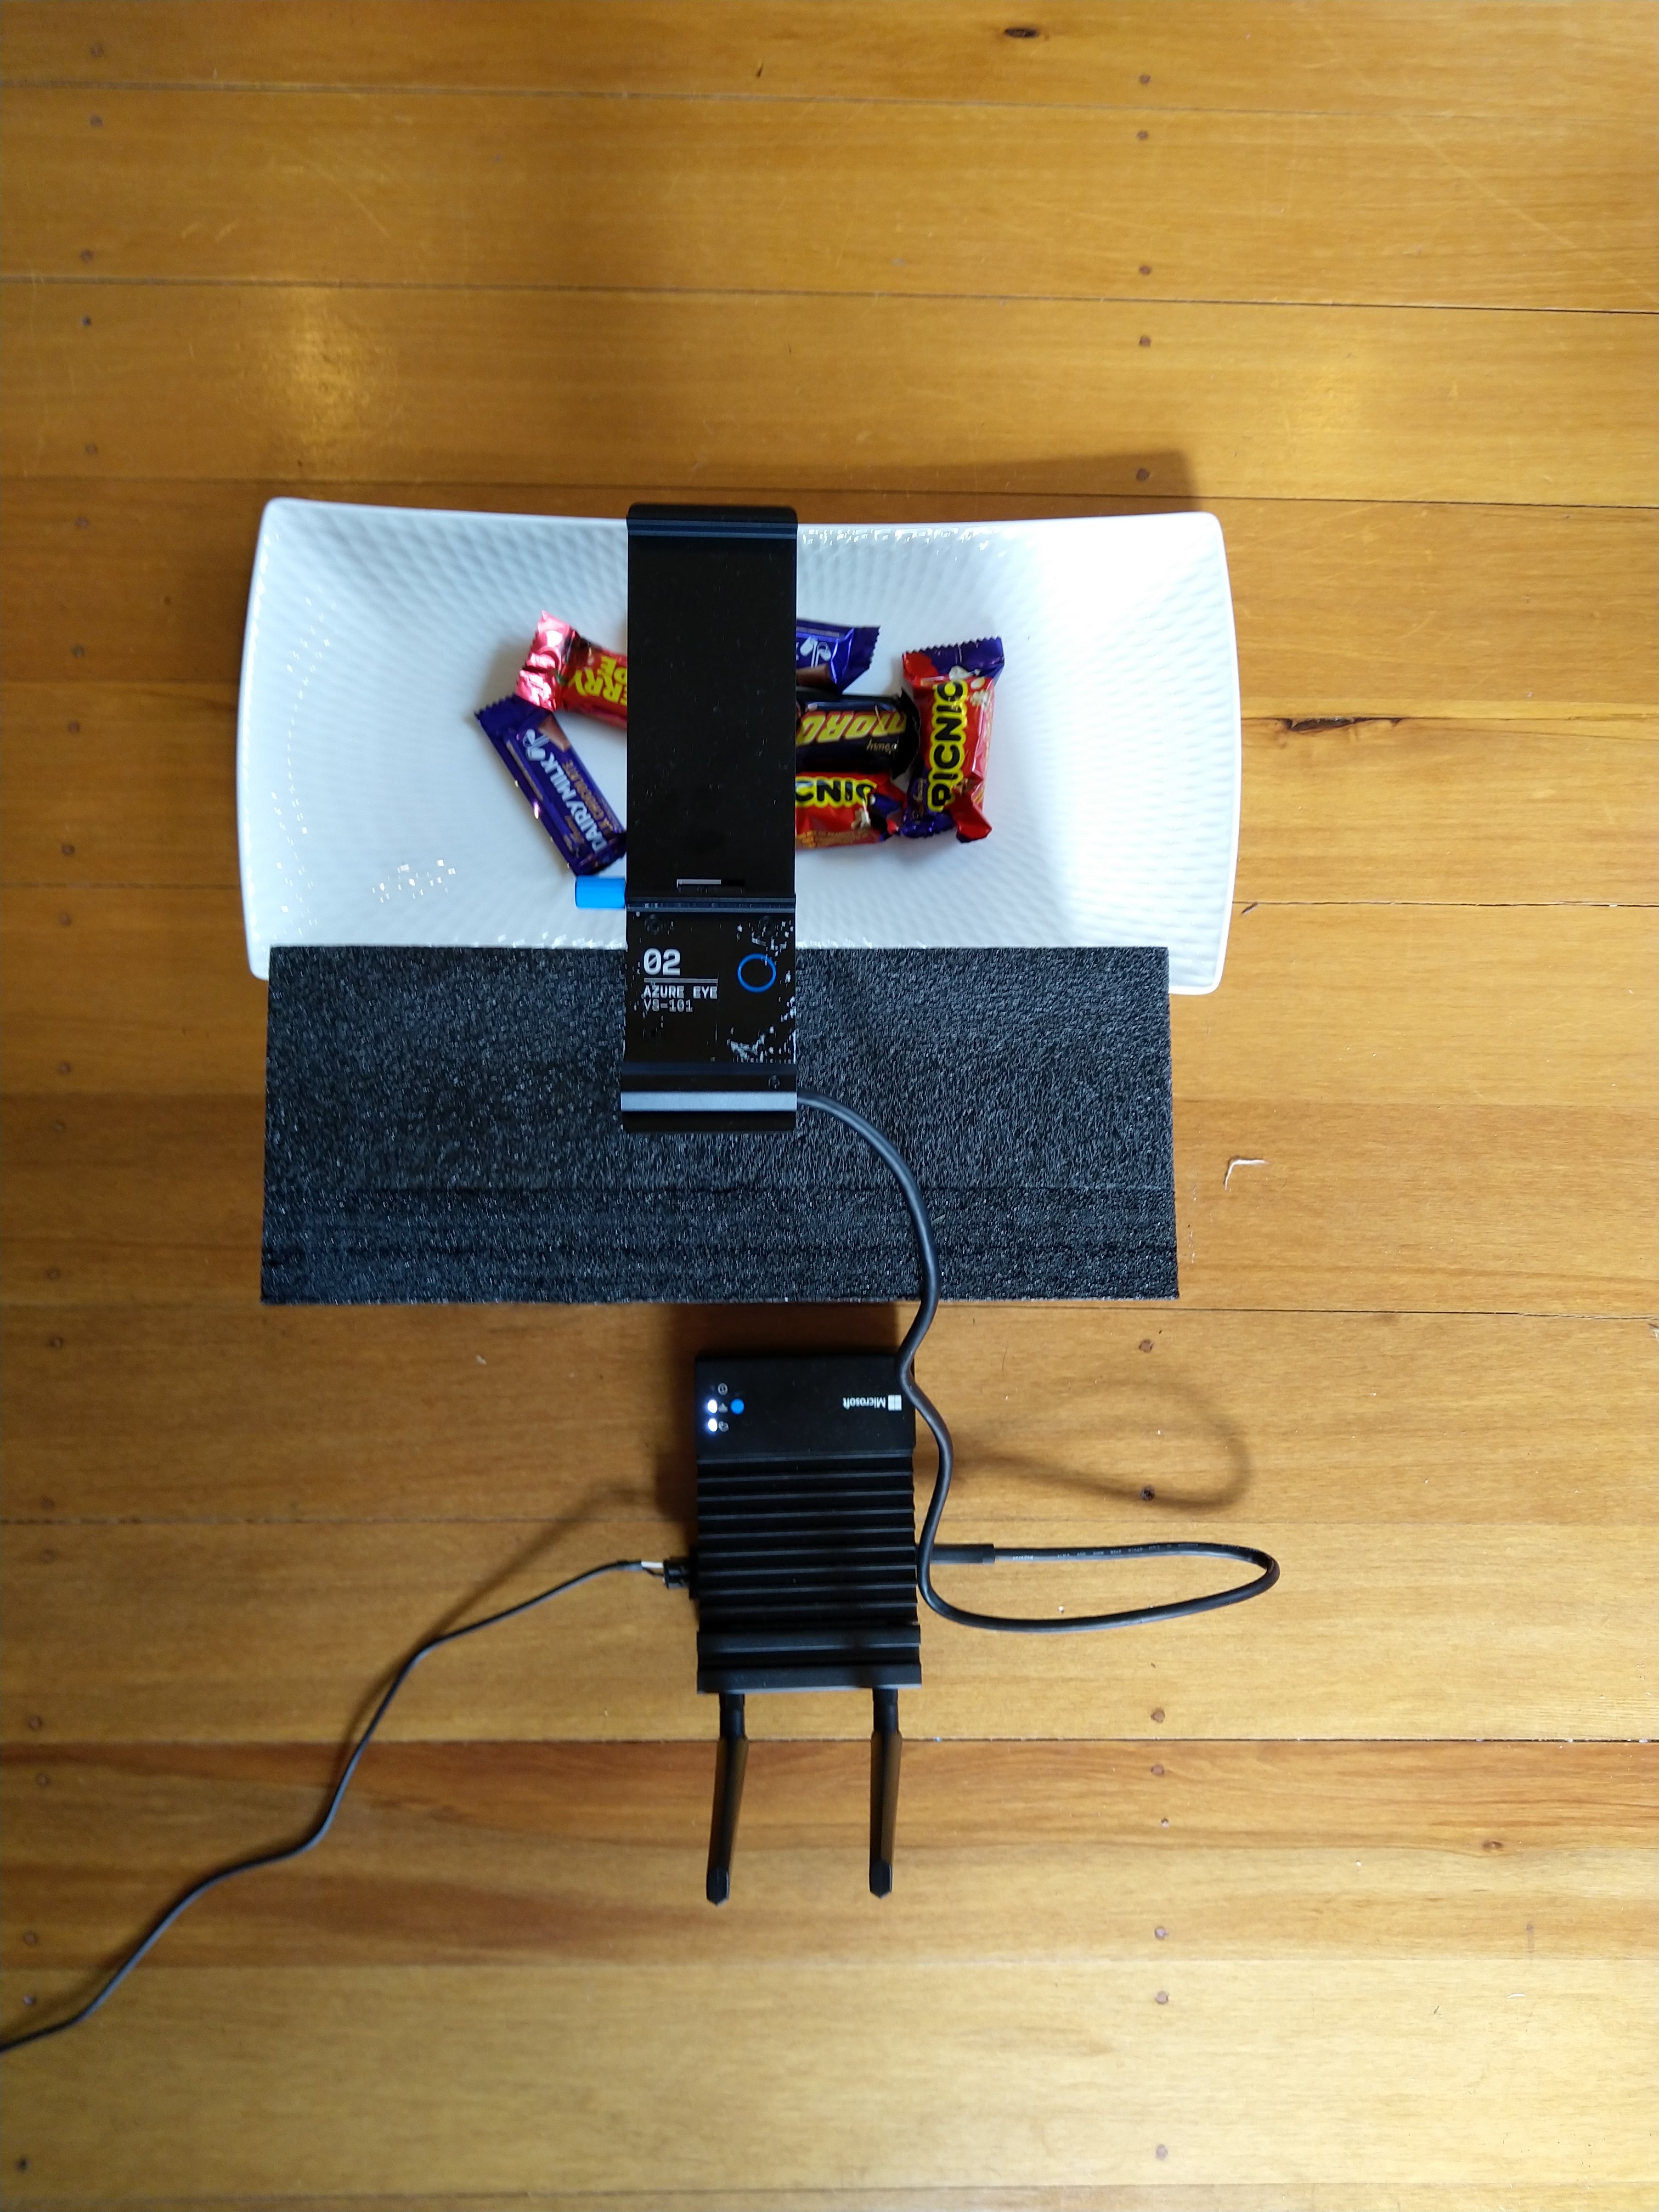
Trialling Image capture with Cadbury Favourites
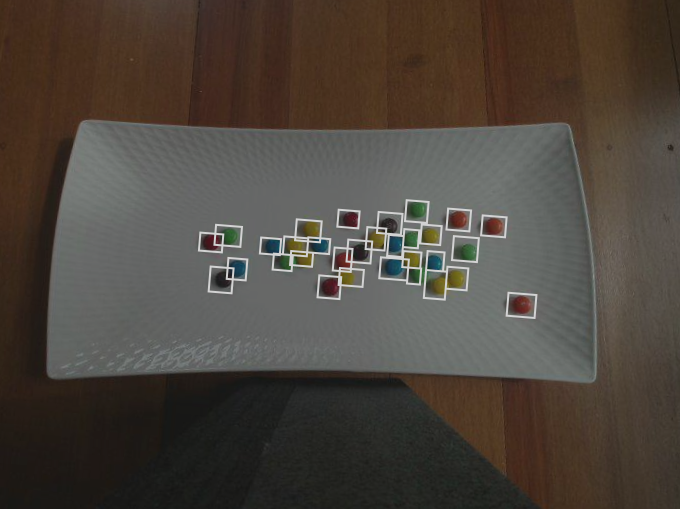
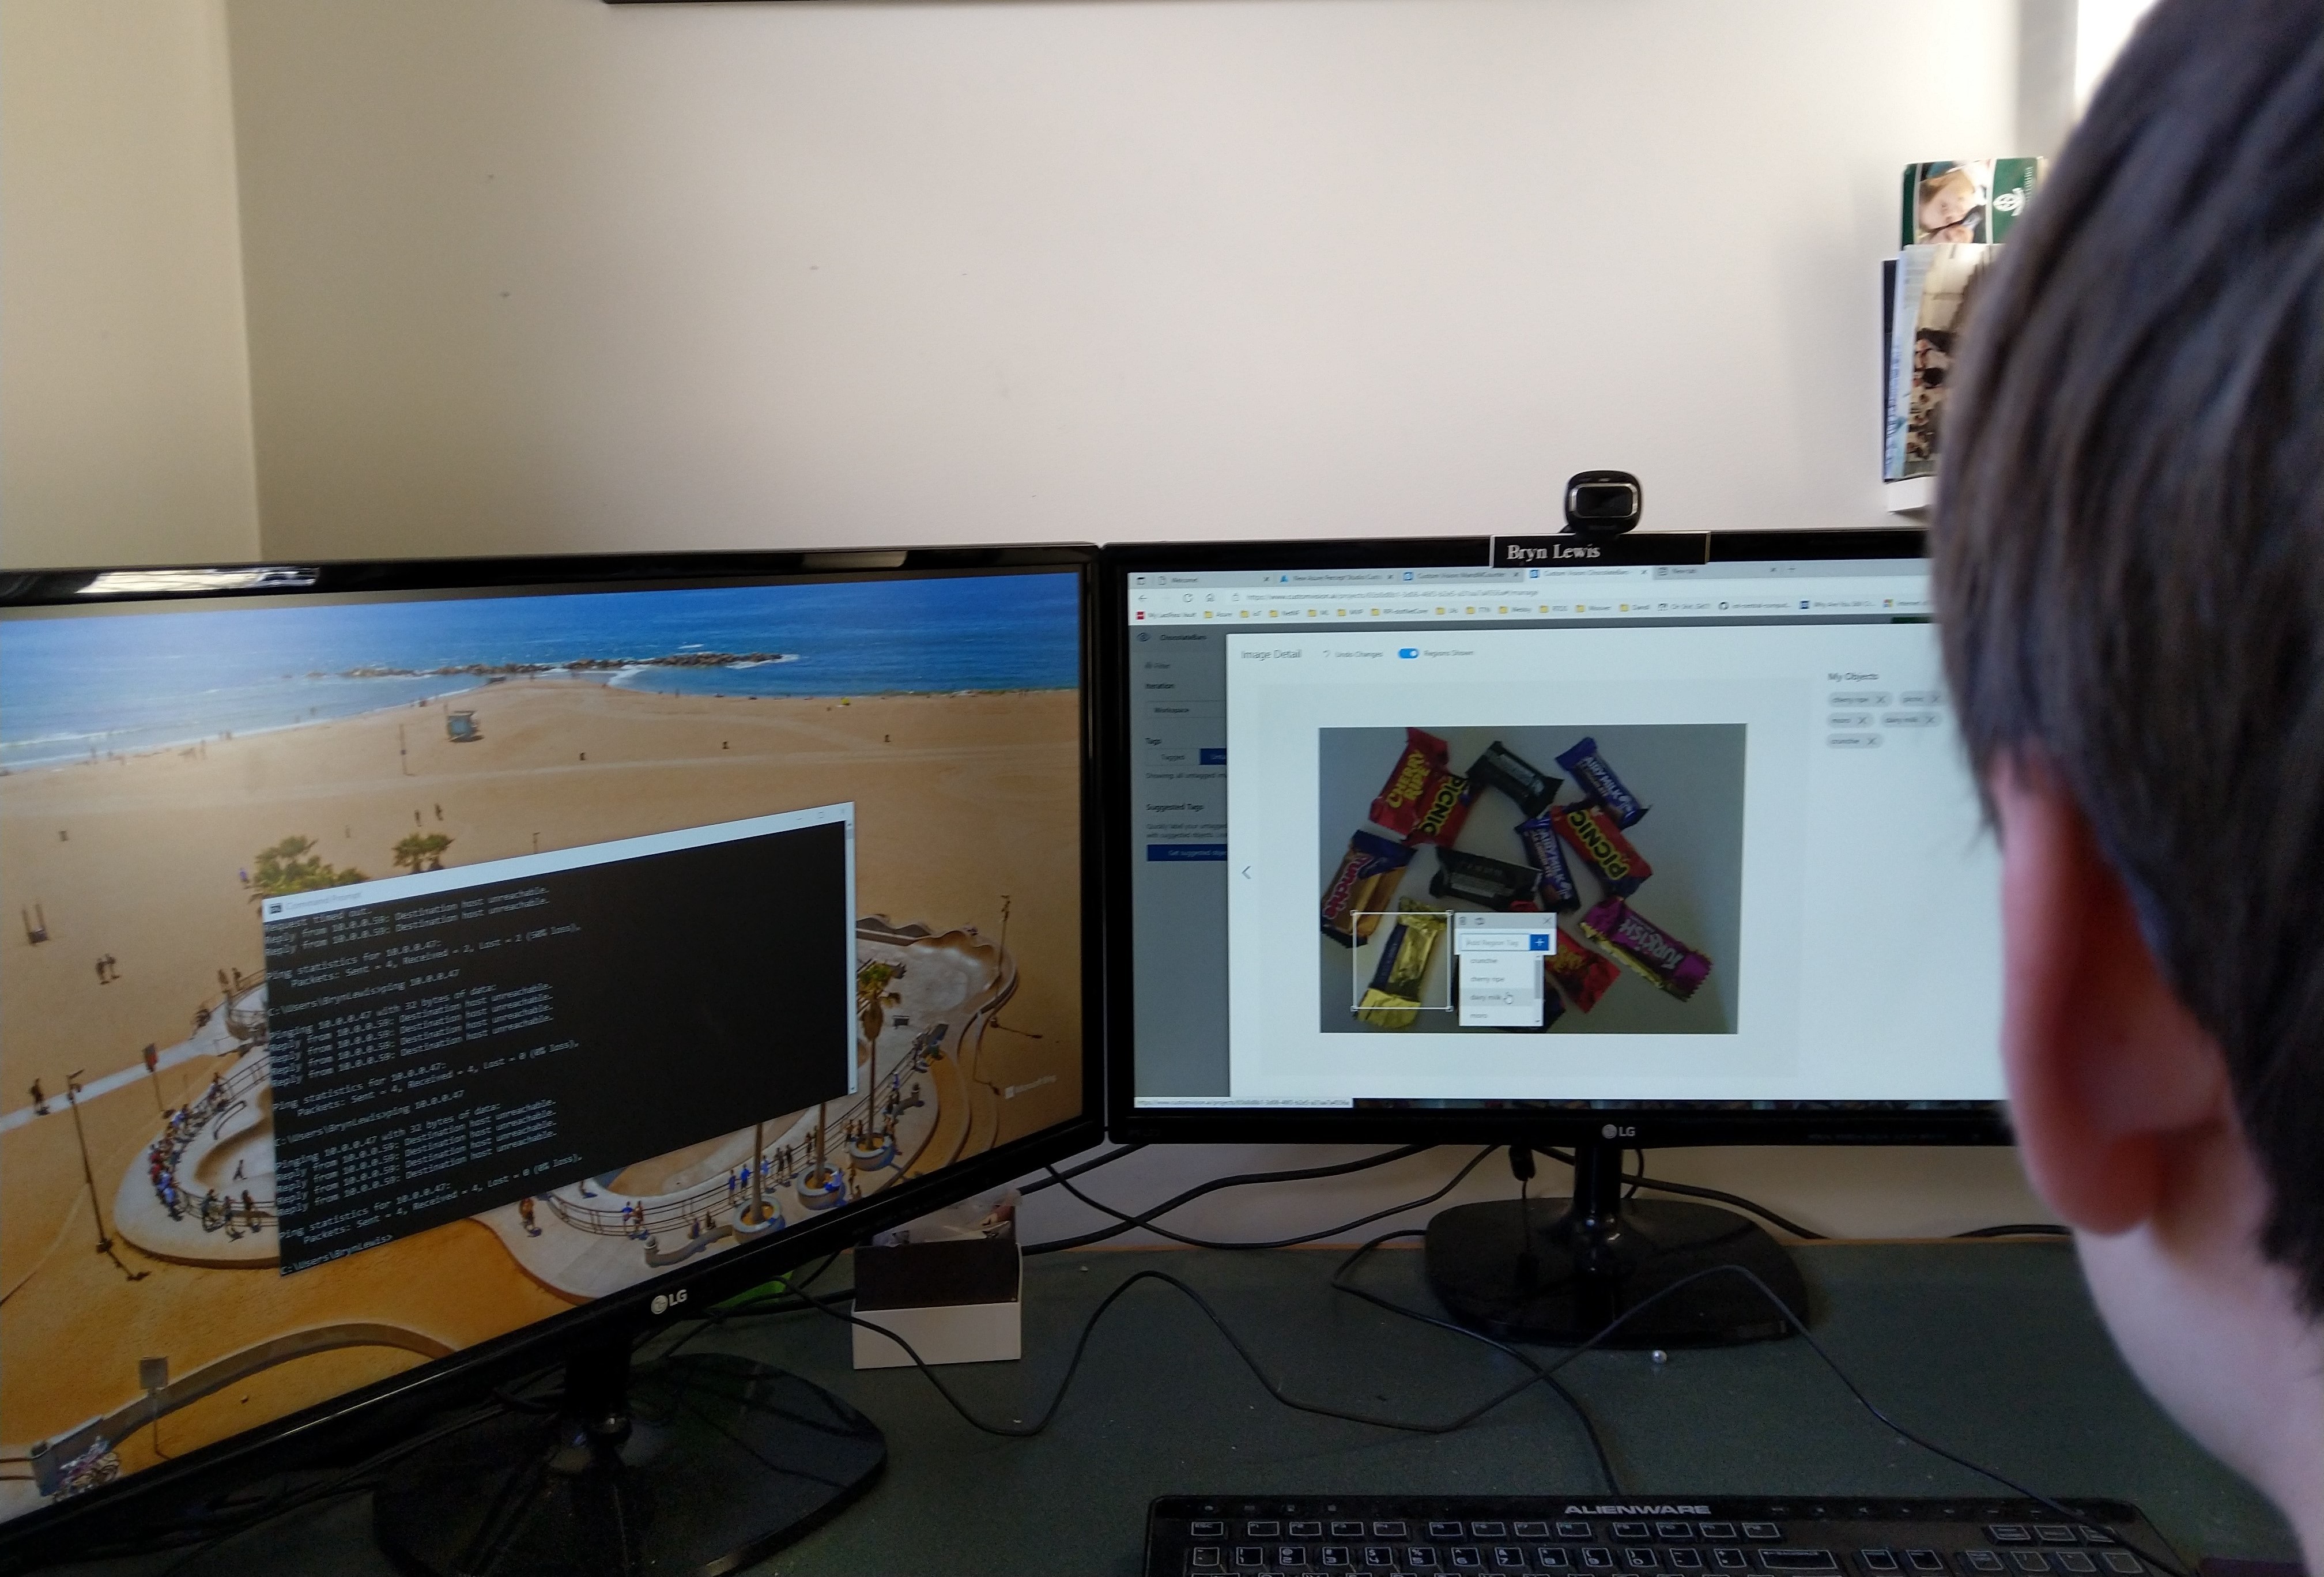
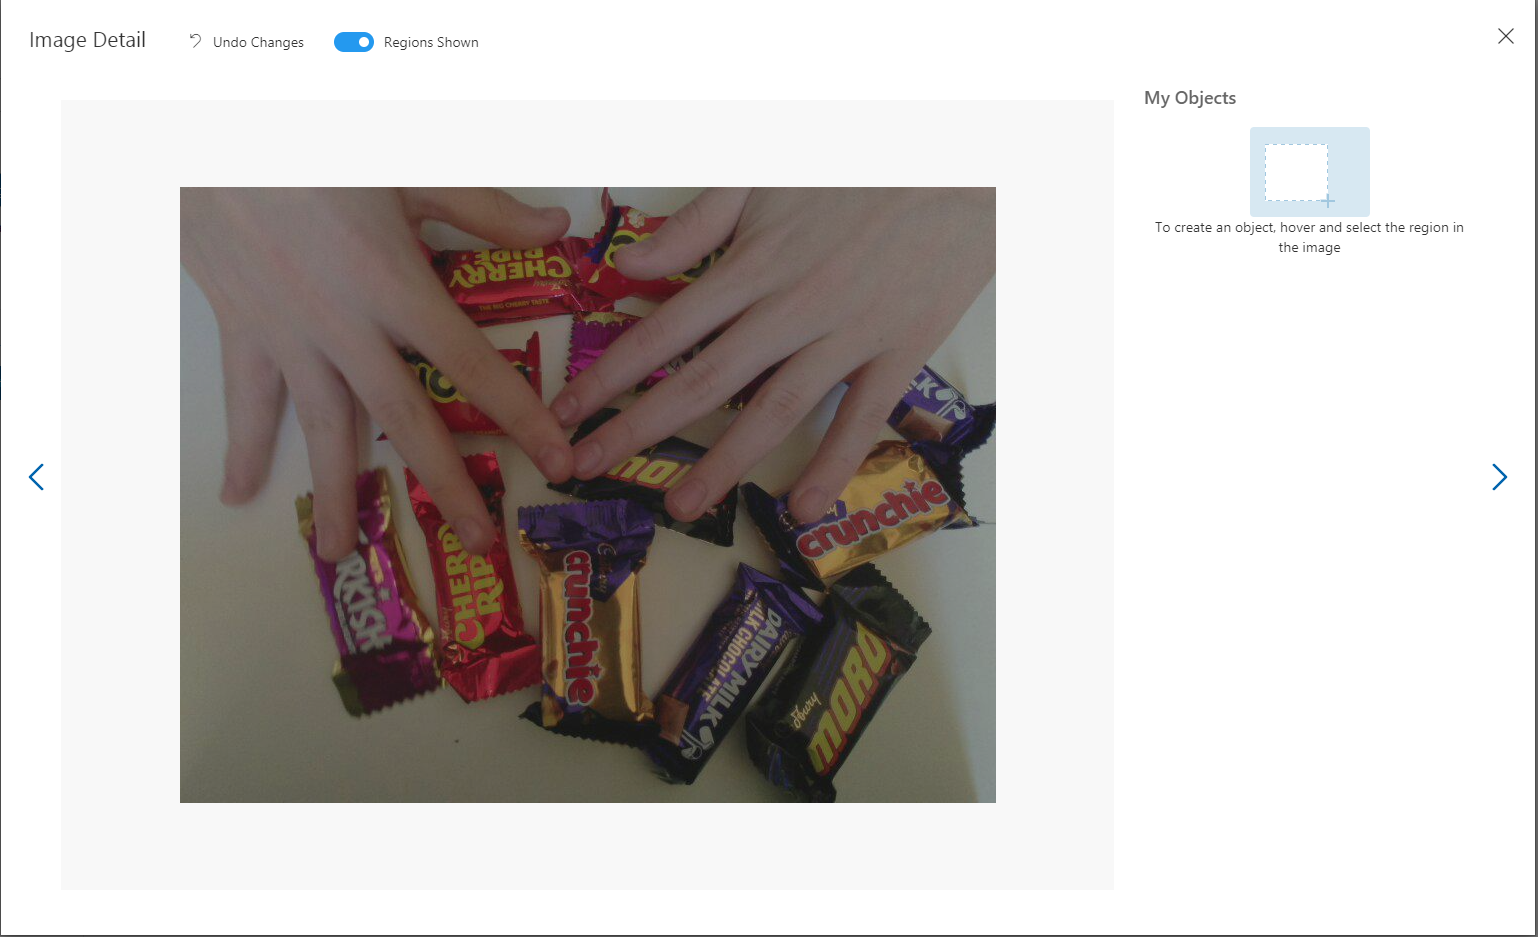
Azure Percept Studio + CustomVision.AI for capturing and marking up images
The intern then spent an afternoon drawing minimum bounding rectangles (MBRs) around the different chocolates in the images he had collected.
M&M Size issue
The intern then decided to focus on the chocolate bars after realising they were much easier and faster to markup than the M&Ms.
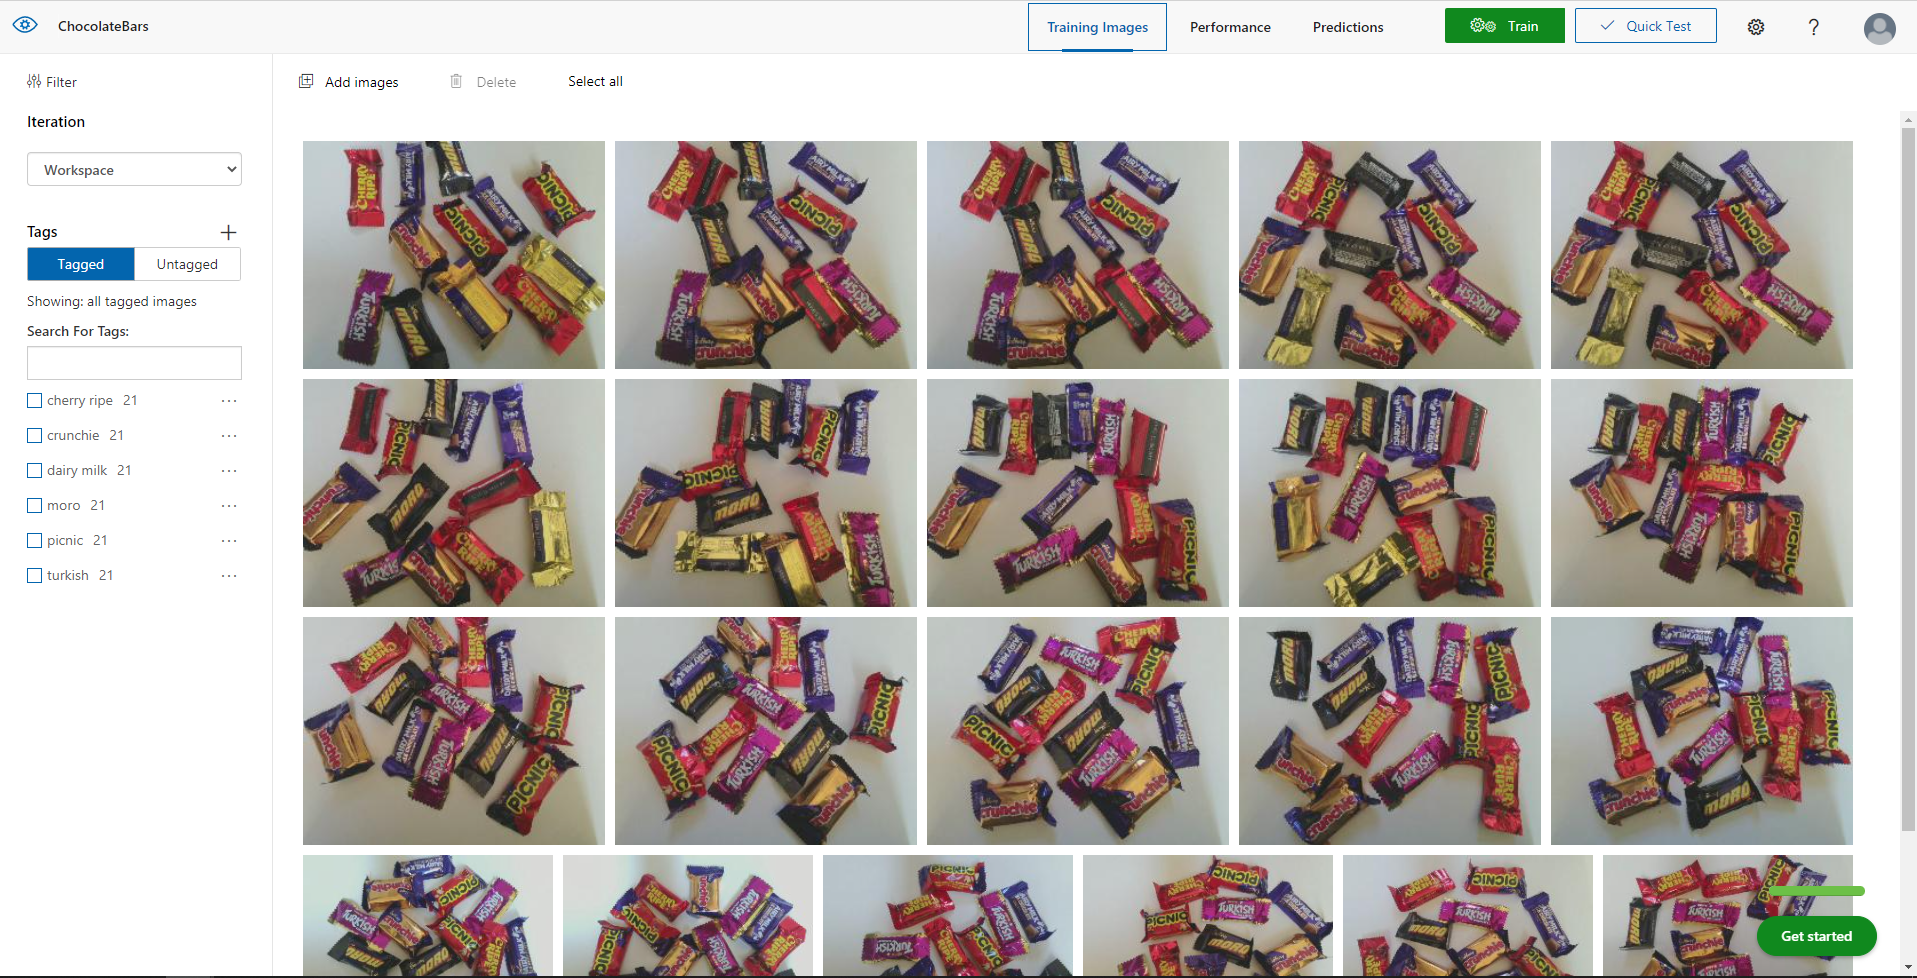
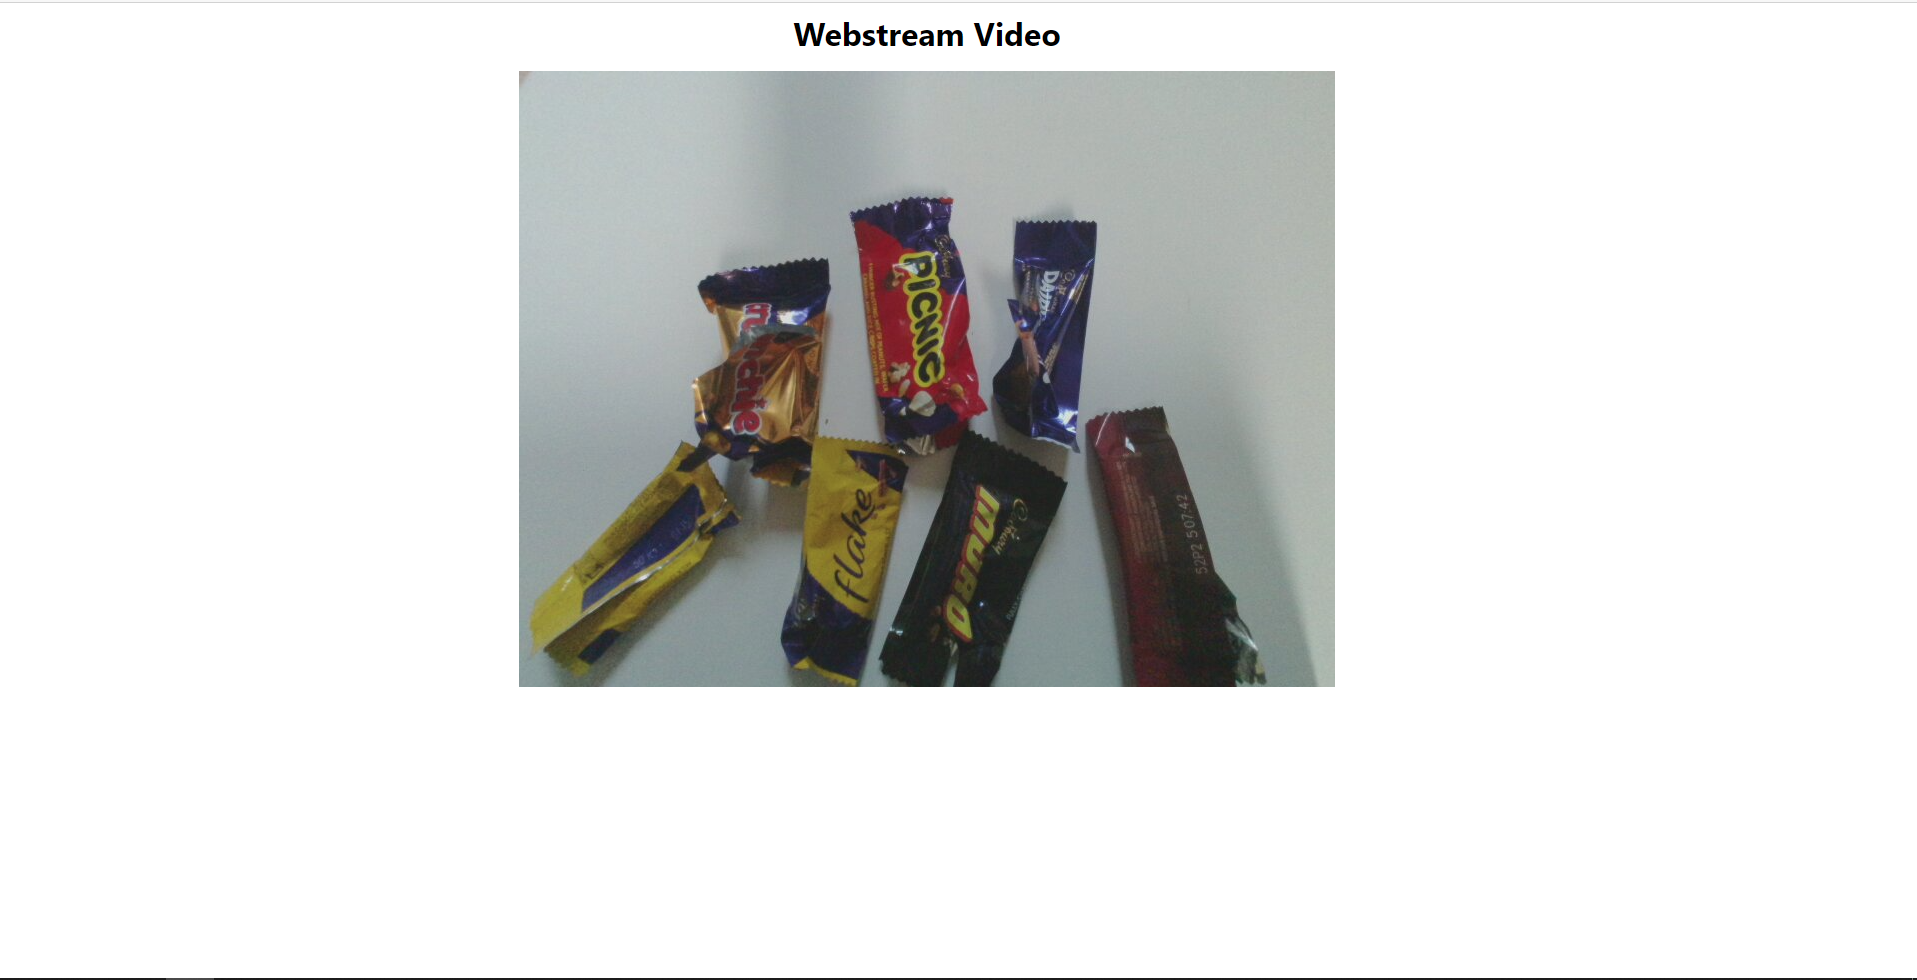
Cadbury Favourites images before markup
Training
The intern repeatedly trained the model adding additional images and adjusting parameters until the results were “good enough”.
Fine-tuning the Configuration
After using the test rig one evening we found the performance of the model wasn’t great, so the intern collected more images with different lighting, shadows, chocolate bar placements, and orientations to improve the accuracy of the inferencing.
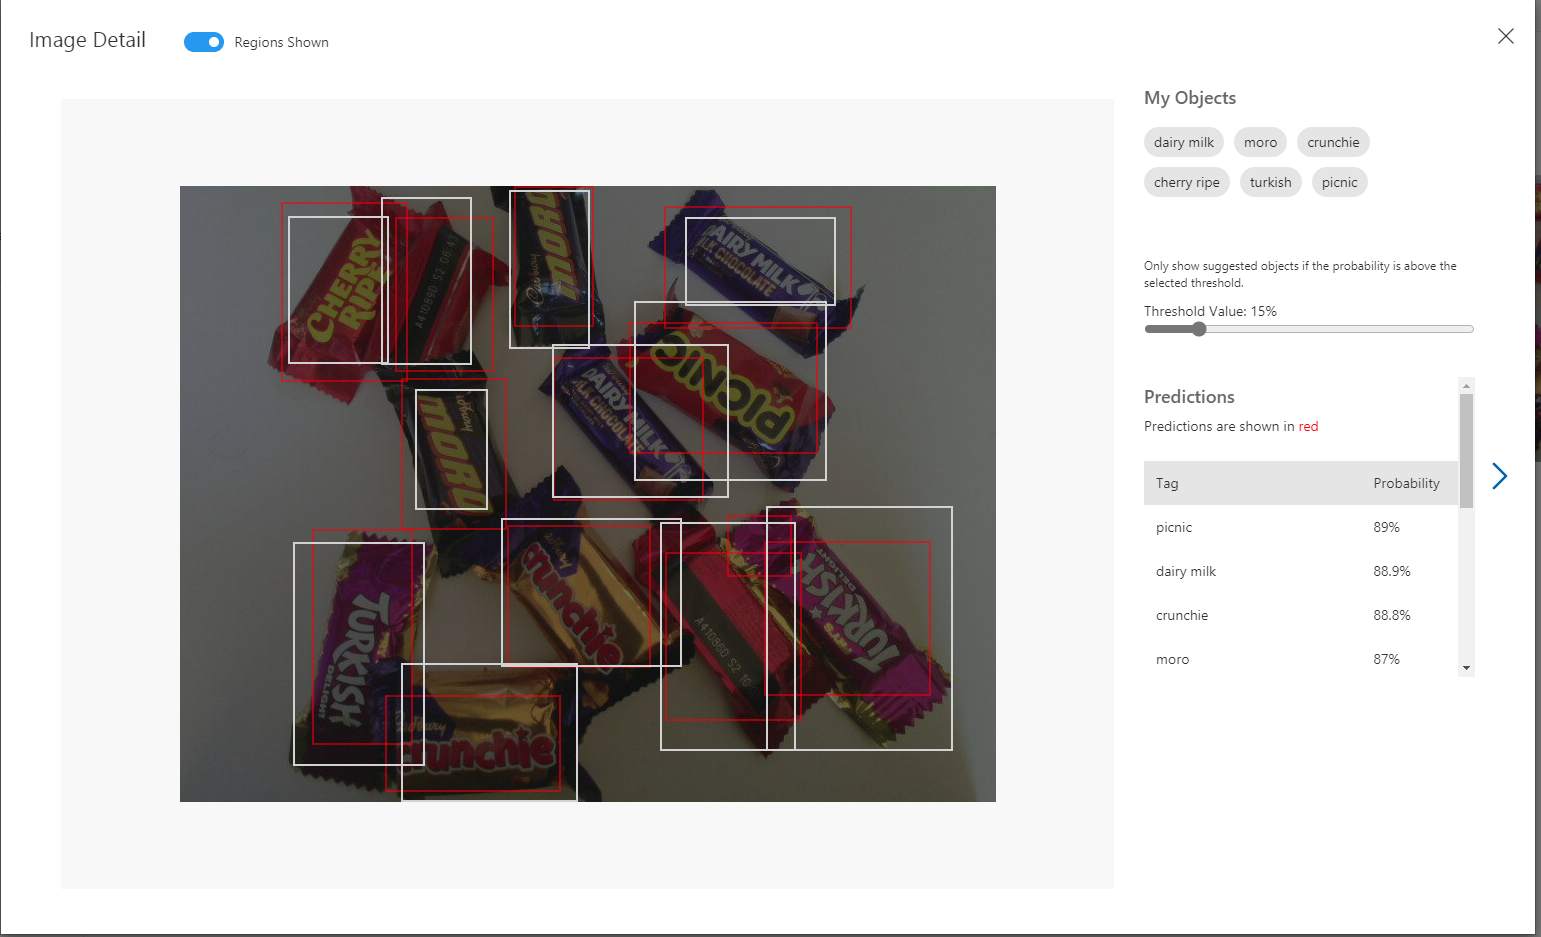
Manual reviewing of object detection results.
Inspecting the Inferencing Results
After several iterations the accuracy of the chocolate bar object detection model was acceptable I wanted to examine the telemetry that was being streamed to my Azure IoT Hub.
In Azure Percept Studio I could view (in a limited way) inferencing telemetry and check the quality and format of the results.
Azure Percept Studio device telemetry
I use Azure IoT Explorer on other projects to configure devices, view telemetry from devices, send messages to devices, view and modify device twinJSON etc. So I used it to inspect the inferencing results streamed to the Azure IoT Hub.
Azure IoT Explorer device telemetry
Summary
In an afternoon the intern had configured and trained a Custom Vision project for me that I could use to to build some “low code” integrations .
Project “Learnings”
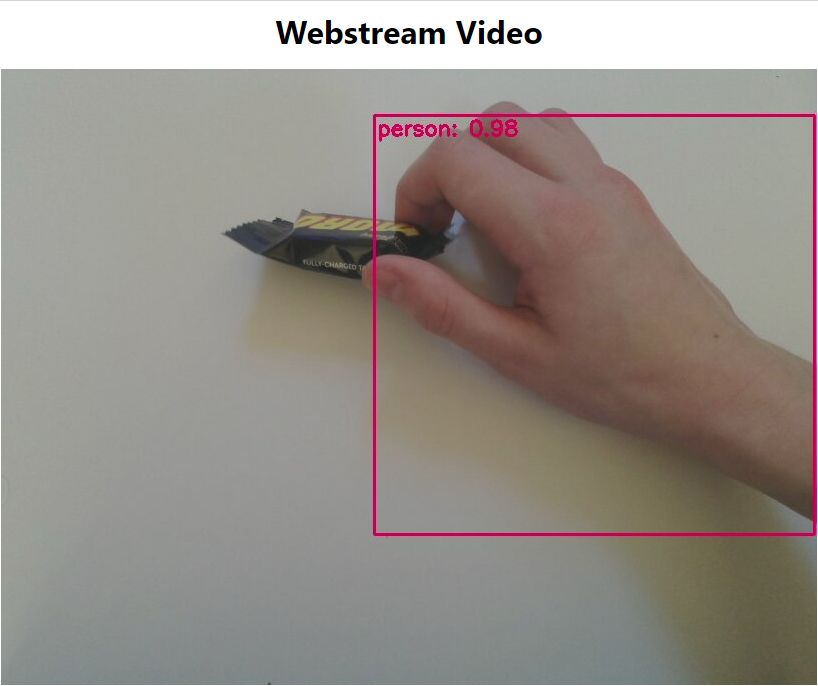
If the image capture delay is too short there will be images with hands.
Captured image with interns hands
Though, the untrained model did identify the hands
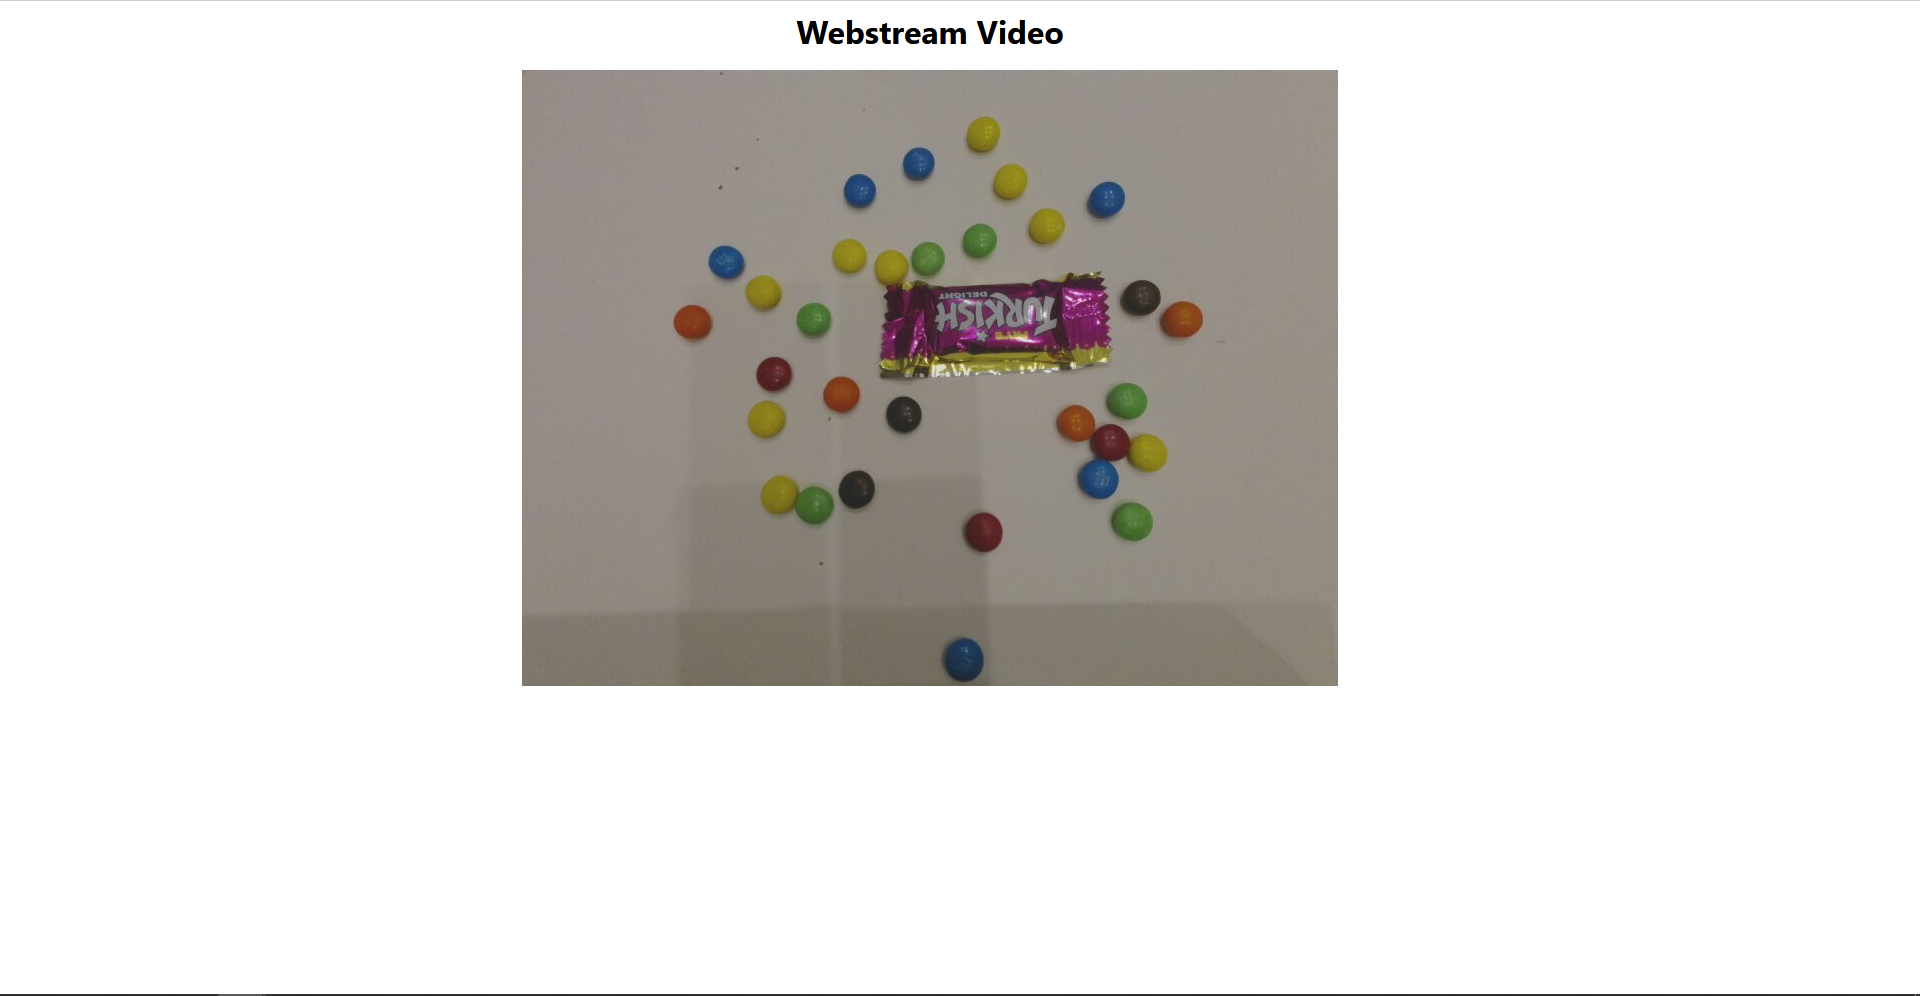
The intern also discovered that by including images with “not favourites” the robustness of the model improved.
Cadbury Favourites with M&Ms
When I had to collect some more images for a blog post, I found the intern had consumed quite a few of the “props” and left the wrappers in the bottom of the Azure Percept packaging.
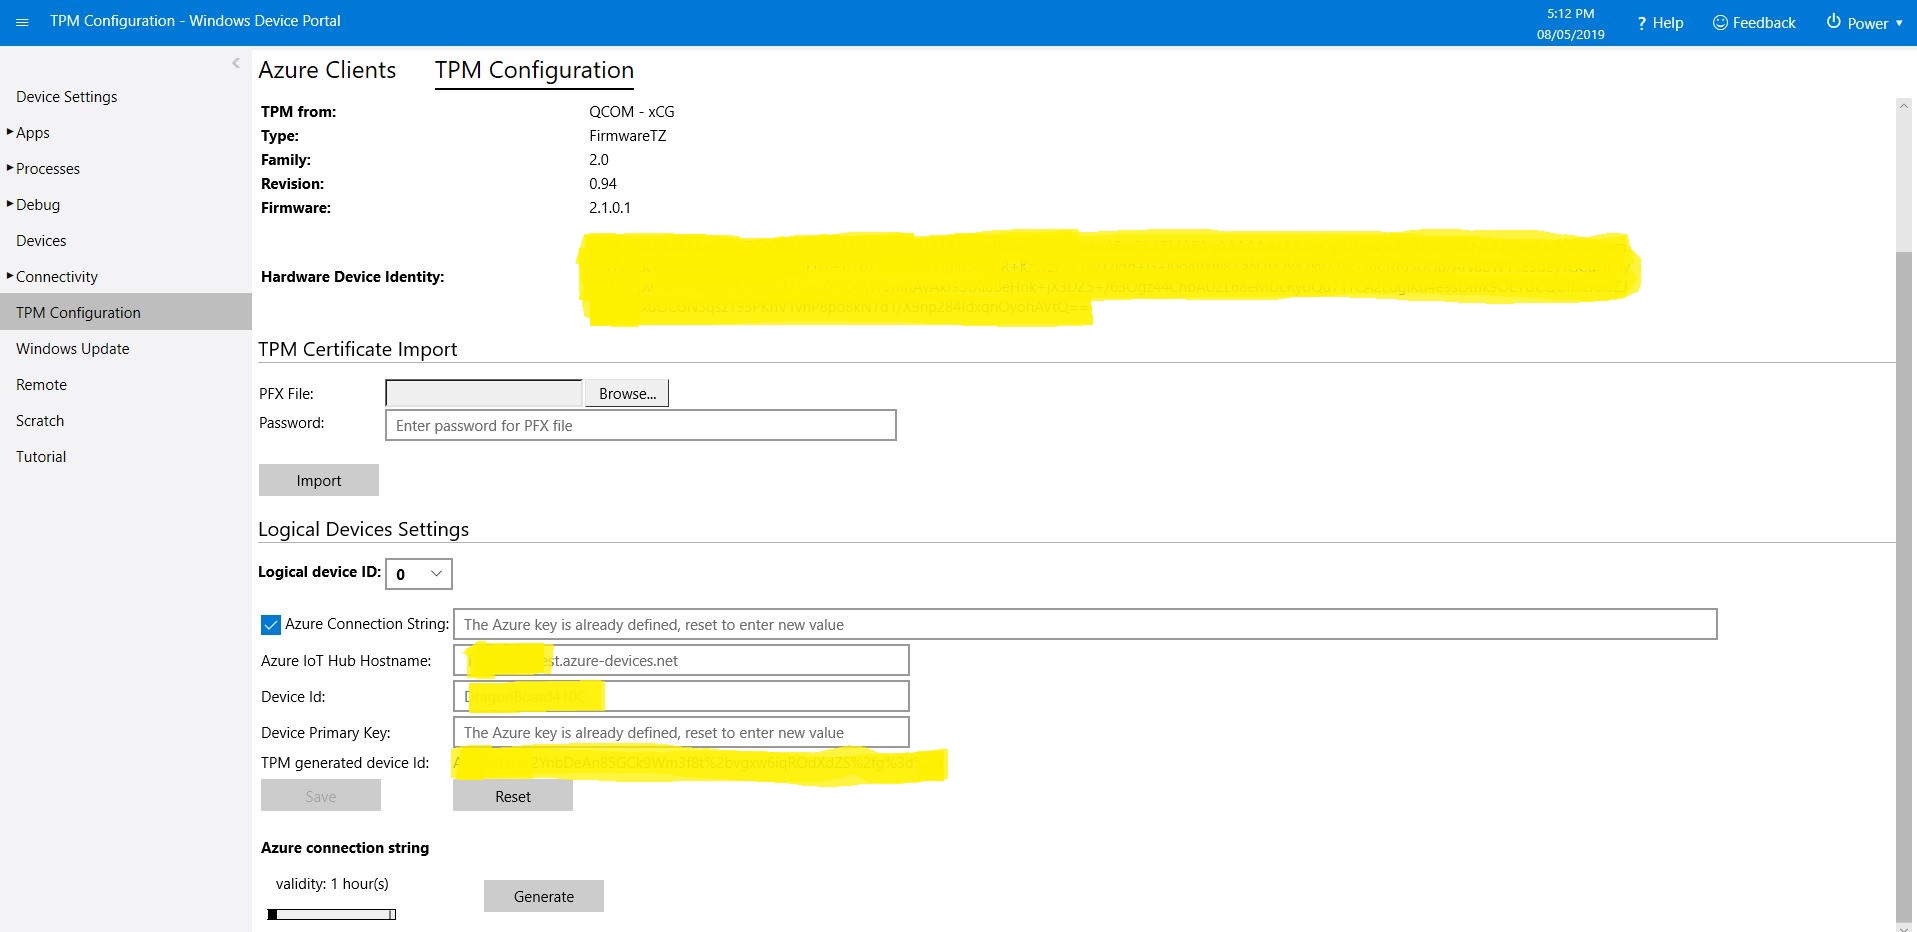
This is for people who were searching for why the SAS token issued by the TPM on their Windows 10 IoT Core device is expiring much quicker than expected or might have noticed that something isn’t quite right with the “validity” period. (as at early May 2019). If you want to “follow along at home” the code I used is available on GitHub.
I found the SAS key was expiring in roughly 5 minutes and the validity period in the configuration didn’t appear to have any effect on how long the SAS token was valid.
10:04:16 Application started
...
10:04:27 SAS token needs renewing
10:04:30 SAS token renewed
 10:04:30.984 AzureIoTHubClient SendEventAsync starting
 10:04:36.709 AzureIoTHubClient SendEventAsync starting
The thread 0x1464 has exited with code 0 (0x0).
 10:04:37.808 AzureIoTHubClient SendEventAsync finished
 10:04:37.808 AzureIoTHubClient SendEventAsync finished
The thread 0xb88 has exited with code 0 (0x0).
The thread 0x1208 has exited with code 0 (0x0).
The thread 0x448 has exited with code 0 (0x0).
The thread 0x540 has exited with code 0 (0x0).
 10:04:46.763 AzureIoTHubClient SendEventAsync starting
 10:04:47.051 AzureIoTHubClient SendEventAsync finished
The thread 0x10d8 has exited with code 0 (0x0).
The thread 0x6e0 has exited with code 0 (0x0).
The thread 0xf7c has exited with code 0 (0x0).
 10:04:56.808 AzureIoTHubClient SendEventAsync starting
 10:04:57.103 AzureIoTHubClient SendEventAsync finished
The thread 0xb8c has exited with code 0 (0x0).
The thread 0xc60 has exited with code 0 (0x0).
 10:05:06.784 AzureIoTHubClient SendEventAsync starting
 10:05:07.057 AzureIoTHubClient SendEventAsync finished
...
The thread 0x4f4 has exited with code 0 (0x0).
The thread 0xe10 has exited with code 0 (0x0).
The thread 0x3c8 has exited with code 0 (0x0).
 10:09:06.773 AzureIoTHubClient SendEventAsync starting
 10:09:07.044 AzureIoTHubClient SendEventAsync finished
The thread 0xf70 has exited with code 0 (0x0).
The thread 0x1214 has exited with code 0 (0x0).
 10:09:16.819 AzureIoTHubClient SendEventAsync starting
 10:09:17.104 AzureIoTHubClient SendEventAsync finished
The thread 0x1358 has exited with code 0 (0x0).
The thread 0x400 has exited with code 0 (0x0).
 10:09:26.802 AzureIoTHubClient SendEventAsync starting
 10:09:27.064 AzureIoTHubClient SendEventAsync finished
The thread 0x920 has exited with code 0 (0x0).
The thread 0x1684 has exited with code 0 (0x0).
The thread 0x4ec has exited with code 0 (0x0).
 10:09:36.759 AzureIoTHubClient SendEventAsync starting
'backgroundTaskHost.exe' (CoreCLR: CoreCLR_UWP_Domain): Loaded 'C:\Data\Programs\WindowsApps\Microsoft.NET.CoreFramework.Debug.2.2_2.2.27505.2_arm__8wekyb3d8bbwe\System.Net.Requests.dll'. Skipped loading symbols. Module is optimized and the debugger option 'Just My Code' is enabled.
'backgroundTaskHost.exe' (CoreCLR: CoreCLR_UWP_Domain): Loaded 'C:\Data\Programs\WindowsApps\Microsoft.NET.CoreFramework.Debug.2.2_2.2.27505.2_arm__8wekyb3d8bbwe\System.Net.WebSockets.dll'. Skipped loading symbols. Module is optimized and the debugger option 'Just My Code' is enabled.
Sending payload to AzureIoTHub failed:CONNECT failed: RefusedNotAuthorized
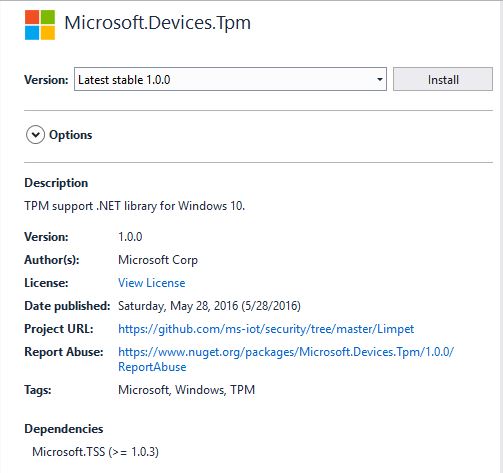
I went and looked at the NuGet package details and it seemed a bit old.
I have the RedGate Reflector plugin installed on my development box so I quickly disassembled the Microsoft.Devices.TPM assembly to see what was going on. The Reflector code is pretty readable and it wouldn’t take much “refactoring” to get it looking like “human” generated code.
public string GetSASToken(uint validity = 0xe10)
{
    string deviceId = this.GetDeviceId();
    string hostName = this.GetHostName();
    long num = (DateTime.get_Now().ToUniversalTime().ToFileTime() / 0x98_9680L) - 0x2_b610_9100L;
    string str3 = "";
    if ((hostName.Length > 0) && (deviceId.Length > 0))
    {
        object[] objArray1 = new object[] { hostName, "/devices/", deviceId, "\n", (long) num };
        byte[] bytes = new UTF8Encoding().GetBytes(string.Concat((object[]) objArray1));
        byte[] buffer2 = this.SignHmac(bytes);
        if (buffer2.Length != 0)
        {
            string str5 = this.AzureUrlEncode(Convert.ToBase64String(buffer2));
            object[] objArray2 = new object[] { "SharedAccessSignature sr=", hostName, "/devices/", deviceId, "&sig=", str5, "&se=", (long) num };
            str3 = string.Concat((object[]) objArray2);
        }
    }
    return str3;
}
The validity parameter appears to not used. Below is the current code from the Azure IoT CSharp SDK on GitHub repository and they are different, the validity is used.
public string GetSASToken(uint validity = 3600)
{
   const long WINDOWS_TICKS_PER_SEC = 10000000;
   const long EPOCH_DIFFERNECE = 11644473600;
   string deviceId = GetDeviceId();
   string hostName = GetHostName();
   long expirationTime = (DateTime.Now.ToUniversalTime().ToFileTime() / WINDOWS_TICKS_PER_SEC) - EPOCH_DIFFERNECE;
   expirationTime += validity;
   string sasToken = "";
   if ((hostName.Length > 0) && (deviceId.Length > 0))
   {
      // Encode the message to sign with the TPM
      UTF8Encoding utf8 = new UTF8Encoding();
      string tokenContent = hostName + "/devices/" + deviceId + "\n" + expirationTime;
      Byte[] encodedBytes = utf8.GetBytes(tokenContent);

      // Sign the message
      Byte[] hmac = SignHmac(encodedBytes);

      // if we got a signature foramt it
      if (hmac.Length > 0)
      {
         // Encode the output and assemble the connection string
         string hmacString = AzureUrlEncode(System.Convert.ToBase64String(hmac));
         sasToken = "SharedAccessSignature sr=" + hostName + "/devices/" + deviceId + "&sig=" + hmacString + "&se=" + expirationTime;
         }
   }
   return sasToken;
}
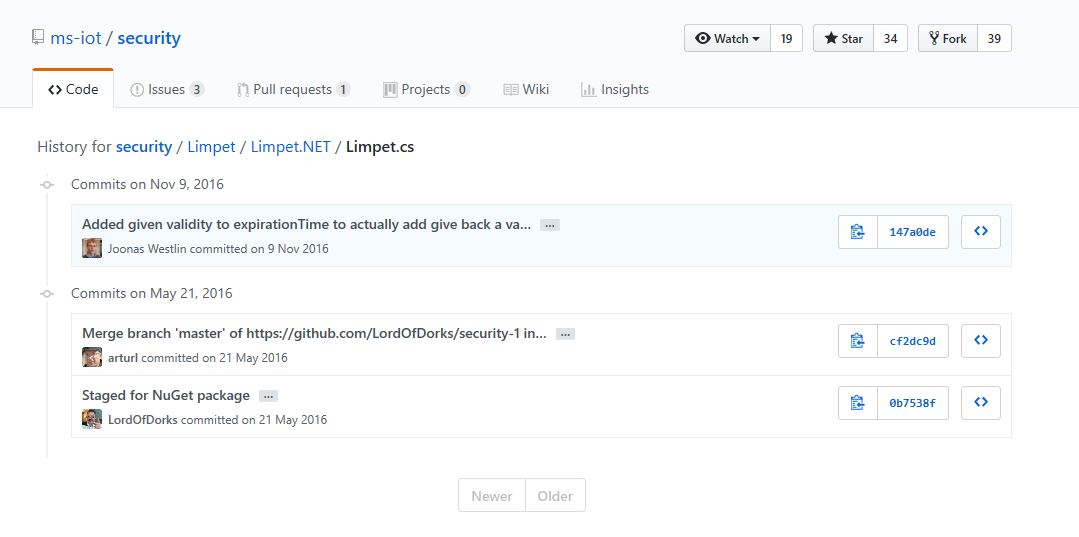
I went back and look at the Github history and it looks like a patch was applied after the NuGet packages were released in May 2016.
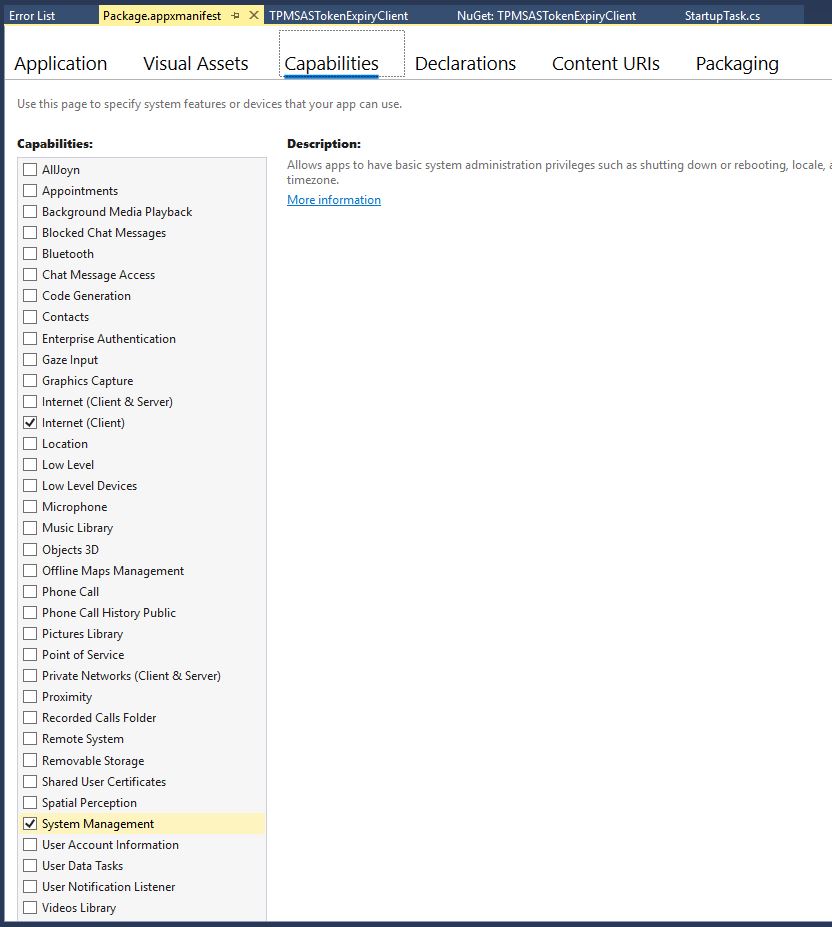
If you read from the TPM and get nothing make sure you’re using the right TPM slot number and have “System Management” checked in the capabilities tab of the application manifest.
I’m still not certain the validity is being applied correctly and will dig into in a future post.
Connecting wireless sensor nodes to the cloud is not the mission it used to be, because the Azure team (and many OS projects) have developed tooling which can help hobbyist and professional developers build solutions. How could you build a home scale robust, reliable and secure solution with off the shelf kit without blowing the budget?
Adafruit Perma-Proto Hat for Pi Mini Kit – No EEPROM USD4.95NZ7.00
You will also need some short lengths of wire and a soldering iron.
For those who want an “off the shelf” solution (still requires a minor modification for interrupt support) I have used the Raspberry Pi to NRF24l01+ Shield USD9.90
Instructions for modifications and software to follow.
I started by porting the REST API SendMessage implementation of Service Bus Event Hubs Large Scale Secure Publishing sample to NetMF. My approach was to get the application into my local source control and then cut ‘n’ paste the code into a NetMF project and see what breaks. I then modified the code over several iterations so it ran on both the desktop and NetMF clients.
The next step was to download the HTTPS certificates and add them to the project as resources so the requests could be secured. See this post for more detail.
For the connection to be secured you need to set the local time (so the certificate valid to/from can be checked) and load the certificates so they can be attached to the HTTP requests
void ProgramStarted()
{
   ...
   Microsoft.SPOT.Hardware.Utility.SetLocalTime(NtpClient.GetNetworkTime());
   caCerts = new X509Certificate[] { new X509Certificate(Resources.GetBytes(Resources.BinaryResources.Baltimore)) };
I used the Network Time Protocol (NTP) library from the OBD Recorder for .Net Micro Framework sample to get the current time.
The Service Bus Event Hubs Large Scale Secure Publishing uses an asynchronous HTTP request which is not available on the NetMF platform. So I had to replace it with a synchronous version.
The code to generate the SAS Token also required some modification as string.format, timespan, and SHA256 functionality are not natively available on the .NetMF platform. The GetExpiry, and SHA256 implementations were part of the OBD Recorder for .Net Micro Framework sample.
static string CreateSasToken(string uri, string keyName, string key)
{
   // Set token lifetime to 20 minutes. When supplying a device with a token, you might want to use a longer expiration time.
   uint tokenExpirationTime = GetExpiry(20 * 60);

   string stringToSign = HttpUtility.UrlEncode(uri) + "\n" + tokenExpirationTime;
   var hmac = SHA.computeHMAC_SHA256(Encoding.UTF8.GetBytes(key), Encoding.UTF8.GetBytes(stringToSign));

   string signature = Convert.ToBase64String(hmac);
   signature = Base64NetMf42ToRfc4648(signature);

   string token = "SharedAccessSignature sr=" + HttpUtility.UrlEncode(uri) + "&sig=" + HttpUtility.UrlEncode(signature) + "&se=" + tokenExpirationTime.ToString() + "&skn=" + keyName;
   return token;
}

static uint GetExpiry(uint tokenLifetimeInSeconds)
{
   const long ticksPerSecond = 1000000000 / 100; // 1 tick = 100 nano seconds</code>

   DateTime origin = new DateTime(1970, 1, 1, 0, 0, 0, 0);
   TimeSpan diff = DateTime.Now.ToUniversalTime() - origin;

   return ((uint)(diff.Ticks / ticksPerSecond)) + tokenLifetimeInSeconds;
}

private static string Base64NetMf42ToRfc4648(string base64netMf)
{
   var base64Rfc = string.Empty;
   for (var i = 0; i < base64netMf.Length; i++)
   {
      if (base64netMf[i] == '!')
      {
         base64Rfc += '+';
      }
      else if (base64netMf[i] == '*')
      {
         base64Rfc += '/';
      }
      else
      {
         base64Rfc += base64netMf[i];
      }
   }
return base64Rfc;
}
The HttpUtility class came from the OBD Recorder for .Net Micro Framework sample. The Base64NetMf42ToRfc4648 functionality is still necessary on NetMF 4.3.
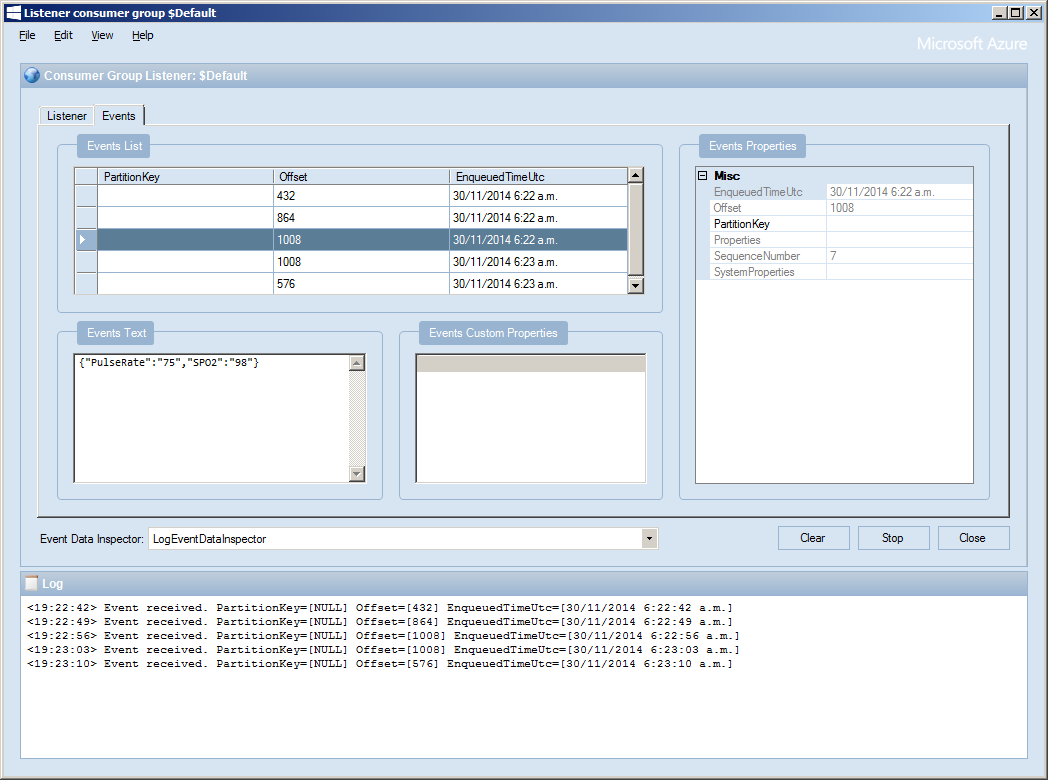
After a couple of hours I had data upload working.(No GPS data as the device was running on my desk where GPS coverage is poor)
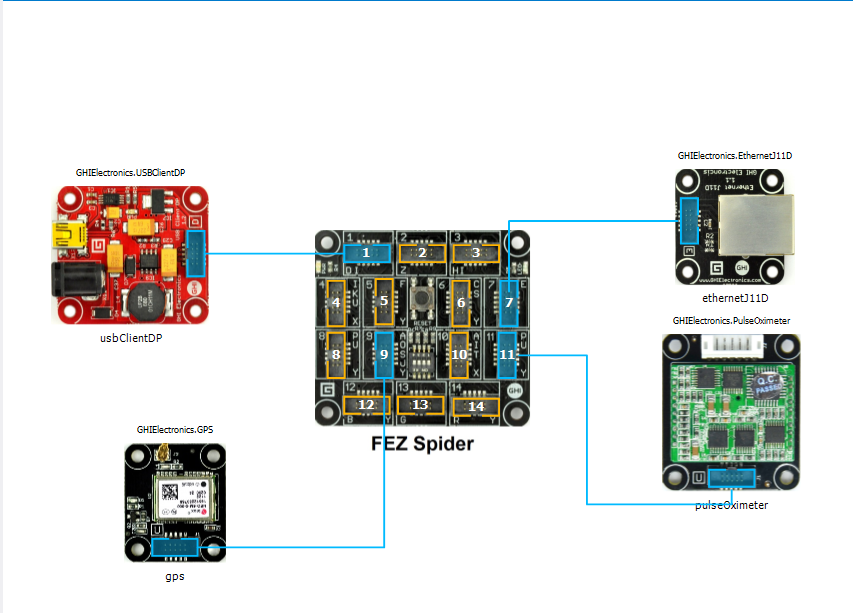
After a break from the GPSTracker samples I dug out my FEZ Spider devices, upgraded them to .NetMF 4.3 and downloaded the discontinued module drivers so my SeeedStudio GPS would work.
GPS Tracker built using FEZ Spider mainboard
I updated the root certificates in the Microsoft.ServiceBus.Micro resources to the current “Baltimore CyberTrust Root” ones using the process described here
Once the network interface has an IP address, the time on the FEZ Spider is set (so the certificate from and until times can be checked) and then the ServiceBus connection is initialised
IPAddress ip = IPAddress.GetDefaultLocalAddress();

// Setup the device time
if (ip != IPAddress.Any)
{
   ....
   DateTime networkTime = NtpClient.GetNetworkTime();
   Microsoft.SPOT.Hardware.Utility.SetLocalTime(networkTime);
...

   SASTokenProvider tp = new SASTokenProvider("device", "YourTopSecretKey=");
   messagingClient = new MessagingClient(new Uri(@"https://YourEndpoint.servicebus.windows.net/YourQueueName"), tp);</code>

   Once the GPS returns a valid position every so often a message is sent to the service bus queue

   SimpleMessage message = new SimpleMessage()
   {
      BrokerProperties = { { "SessionId", Guid.NewGuid().ToString()}, { "Label", "NMEAPositionData" } },
      Properties =
      {
         { "Latitude", gps.LastPosition.Latitude.ToString("F4") },
         { "Longitude", gps.LastPosition.Longitude.ToString("F4") },
      },
   };
   try
   {
      Debug.Print("Message send");
      messagingClient.Send(message);
      Debug.Print("Message sent OK");
   }
   catch (Exception ex)
   {
      Debug.Print(ex.Message);
   }
The send appeared to be quite slow (even on my home LAN so some further investigation is required)