RFM69 shield library Part1

Register Read

After building an RFM95 Windows 10 IoT Core C# library I wanted to see if I could source a couple of RFM69HCW hats and write another library. For some applications the RFM69HCW with the variety and number of low-power client devices available plus, its built in payload encryption and addressing make it a better option. For the RFM9X library I purchased several RM9X Raspberry PI Hats but I can only find a couple (May 2019) of suitable RFM69HCW ones.

  • Adafruit RFM69HCW Radio Bonnet 433/868/915MHz USD19.95
  • Seegel Systeme RaspyRFMII EUR17.90

I wanted a lightweight RFM69HCW library which didn’t try to hide how the chip functioned, and in the future could be configured to work with other vendors’ shields.

AdaFruit LoRa 9X/RFM69HCW Radio Bonnet
Seegel Systeme RaspyRFM-II

The first step was to build a basic universal windows platform (UWP) background task to confirm that I could reliably communicate with the AdaFruit shield over the SPI bus by reading a single register value (RegVersion the silicon version specified in the vendor datasheet).

/*
    Copyright ® 2019 May devMobile Software, All Rights Reserved
 
    MIT License

    Permission is hereby granted, free of charge, to any person obtaining a copy
    of this software and associated documentation files (the "Software"), to deal
    in the Software without restriction, including without limitation the rights
    to use, copy, modify, merge, publish, distribute, sublicense, and/or sell
    copies of the Software, and to permit persons to whom the Software is
    furnished to do so, subject to the following conditions:

    The above copyright notice and this permission notice shall be included in all
    copies or substantial portions of the Software.

    THE SOFTWARE IS PROVIDED "AS IS", WITHOUT WARRANTY OF ANY KIND, EXPRESS OR
    IMPLIED, INCLUDING BUT NOT LIMITED TO THE WARRANTIES OF MERCHANTABILITY,
    FITNESS FOR A PARTICULAR PURPOSE AND NONINFRINGEMENT. IN NO EVENT SHALL THE
    AUTHORS OR COPYRIGHT HOLDERS BE LIABLE FOR ANY CLAIM, DAMAGES OR OTHER
    LIABILITY, WHETHER IN AN ACTION OF CONTRACT, TORT OR OTHERWISE, ARISING FROM,
    OUT OF OR IN CONNECTION WITH THE SOFTWARE OR THE USE OR OTHER DEALINGS IN THE
    SOFTWARE

	 CS : CE1
	 RST : GPIO25
	 IRQ : GPIO22 (DIO0)
	 Unused : GPIO23 (DIO1)
	 Unused : GPIO24 (DIO2)
 */
namespace devMobile.IoT.Rfm69hcw.AdafruitSPI
{
	using System;
	using System.Diagnostics;
	using System.Threading;
	using Windows.ApplicationModel.Background;
	using Windows.Devices.Spi;

	public sealed class StartupTask : IBackgroundTask
	{
		private const byte RegVersion = 0x10;

		public void Run(IBackgroundTaskInstance taskInstance)
		{
			SpiController spiController = SpiController.GetDefaultAsync().AsTask().GetAwaiter().GetResult();
			var settings = new SpiConnectionSettings(1)
			{
				ClockFrequency = 500000,
				Mode = SpiMode.Mode0,
			};

			SpiDevice Device = spiController.GetDevice(settings);

			while (true)
			{
				byte[] writeBuffer = new byte[] { RegVersion }; // RegVersion
				byte[] readBuffer = new byte[1];

				Device.TransferSequential(writeBuffer, readBuffer);

				byte registerValue = readBuffer[0];
				Debug.WriteLine("Register 0x{0:x2} - Value 0X{1:x2} - Bits {2}", RegVersion, registerValue, Convert.ToString(registerValue, 2).PadLeft(8, '0'));

				Thread.Sleep(10000);
			}
		}
	}
}

The AdaFruit hat uses chip select 1

/*
    Copyright ® 2019 May devMobile Software, All Rights Reserved
 
    MIT License

    Permission is hereby granted, free of charge, to any person obtaining a copy
    of this software and associated documentation files (the "Software"), to deal
    in the Software without restriction, including without limitation the rights
    to use, copy, modify, merge, publish, distribute, sublicense, and/or sell
    copies of the Software, and to permit persons to whom the Software is
    furnished to do so, subject to the following conditions:

    The above copyright notice and this permission notice shall be included in all
    copies or substantial portions of the Software.

    THE SOFTWARE IS PROVIDED "AS IS", WITHOUT WARRANTY OF ANY KIND, EXPRESS OR
    IMPLIED, INCLUDING BUT NOT LIMITED TO THE WARRANTIES OF MERCHANTABILITY,
    FITNESS FOR A PARTICULAR PURPOSE AND NONINFRINGEMENT. IN NO EVENT SHALL THE
    AUTHORS OR COPYRIGHT HOLDERS BE LIABLE FOR ANY CLAIM, DAMAGES OR OTHER
    LIABILITY, WHETHER IN AN ACTION OF CONTRACT, TORT OR OTHERWISE, ARISING FROM,
    OUT OF OR IN CONNECTION WITH THE SOFTWARE OR THE USE OR OTHER DEALINGS IN THE
    SOFTWARE

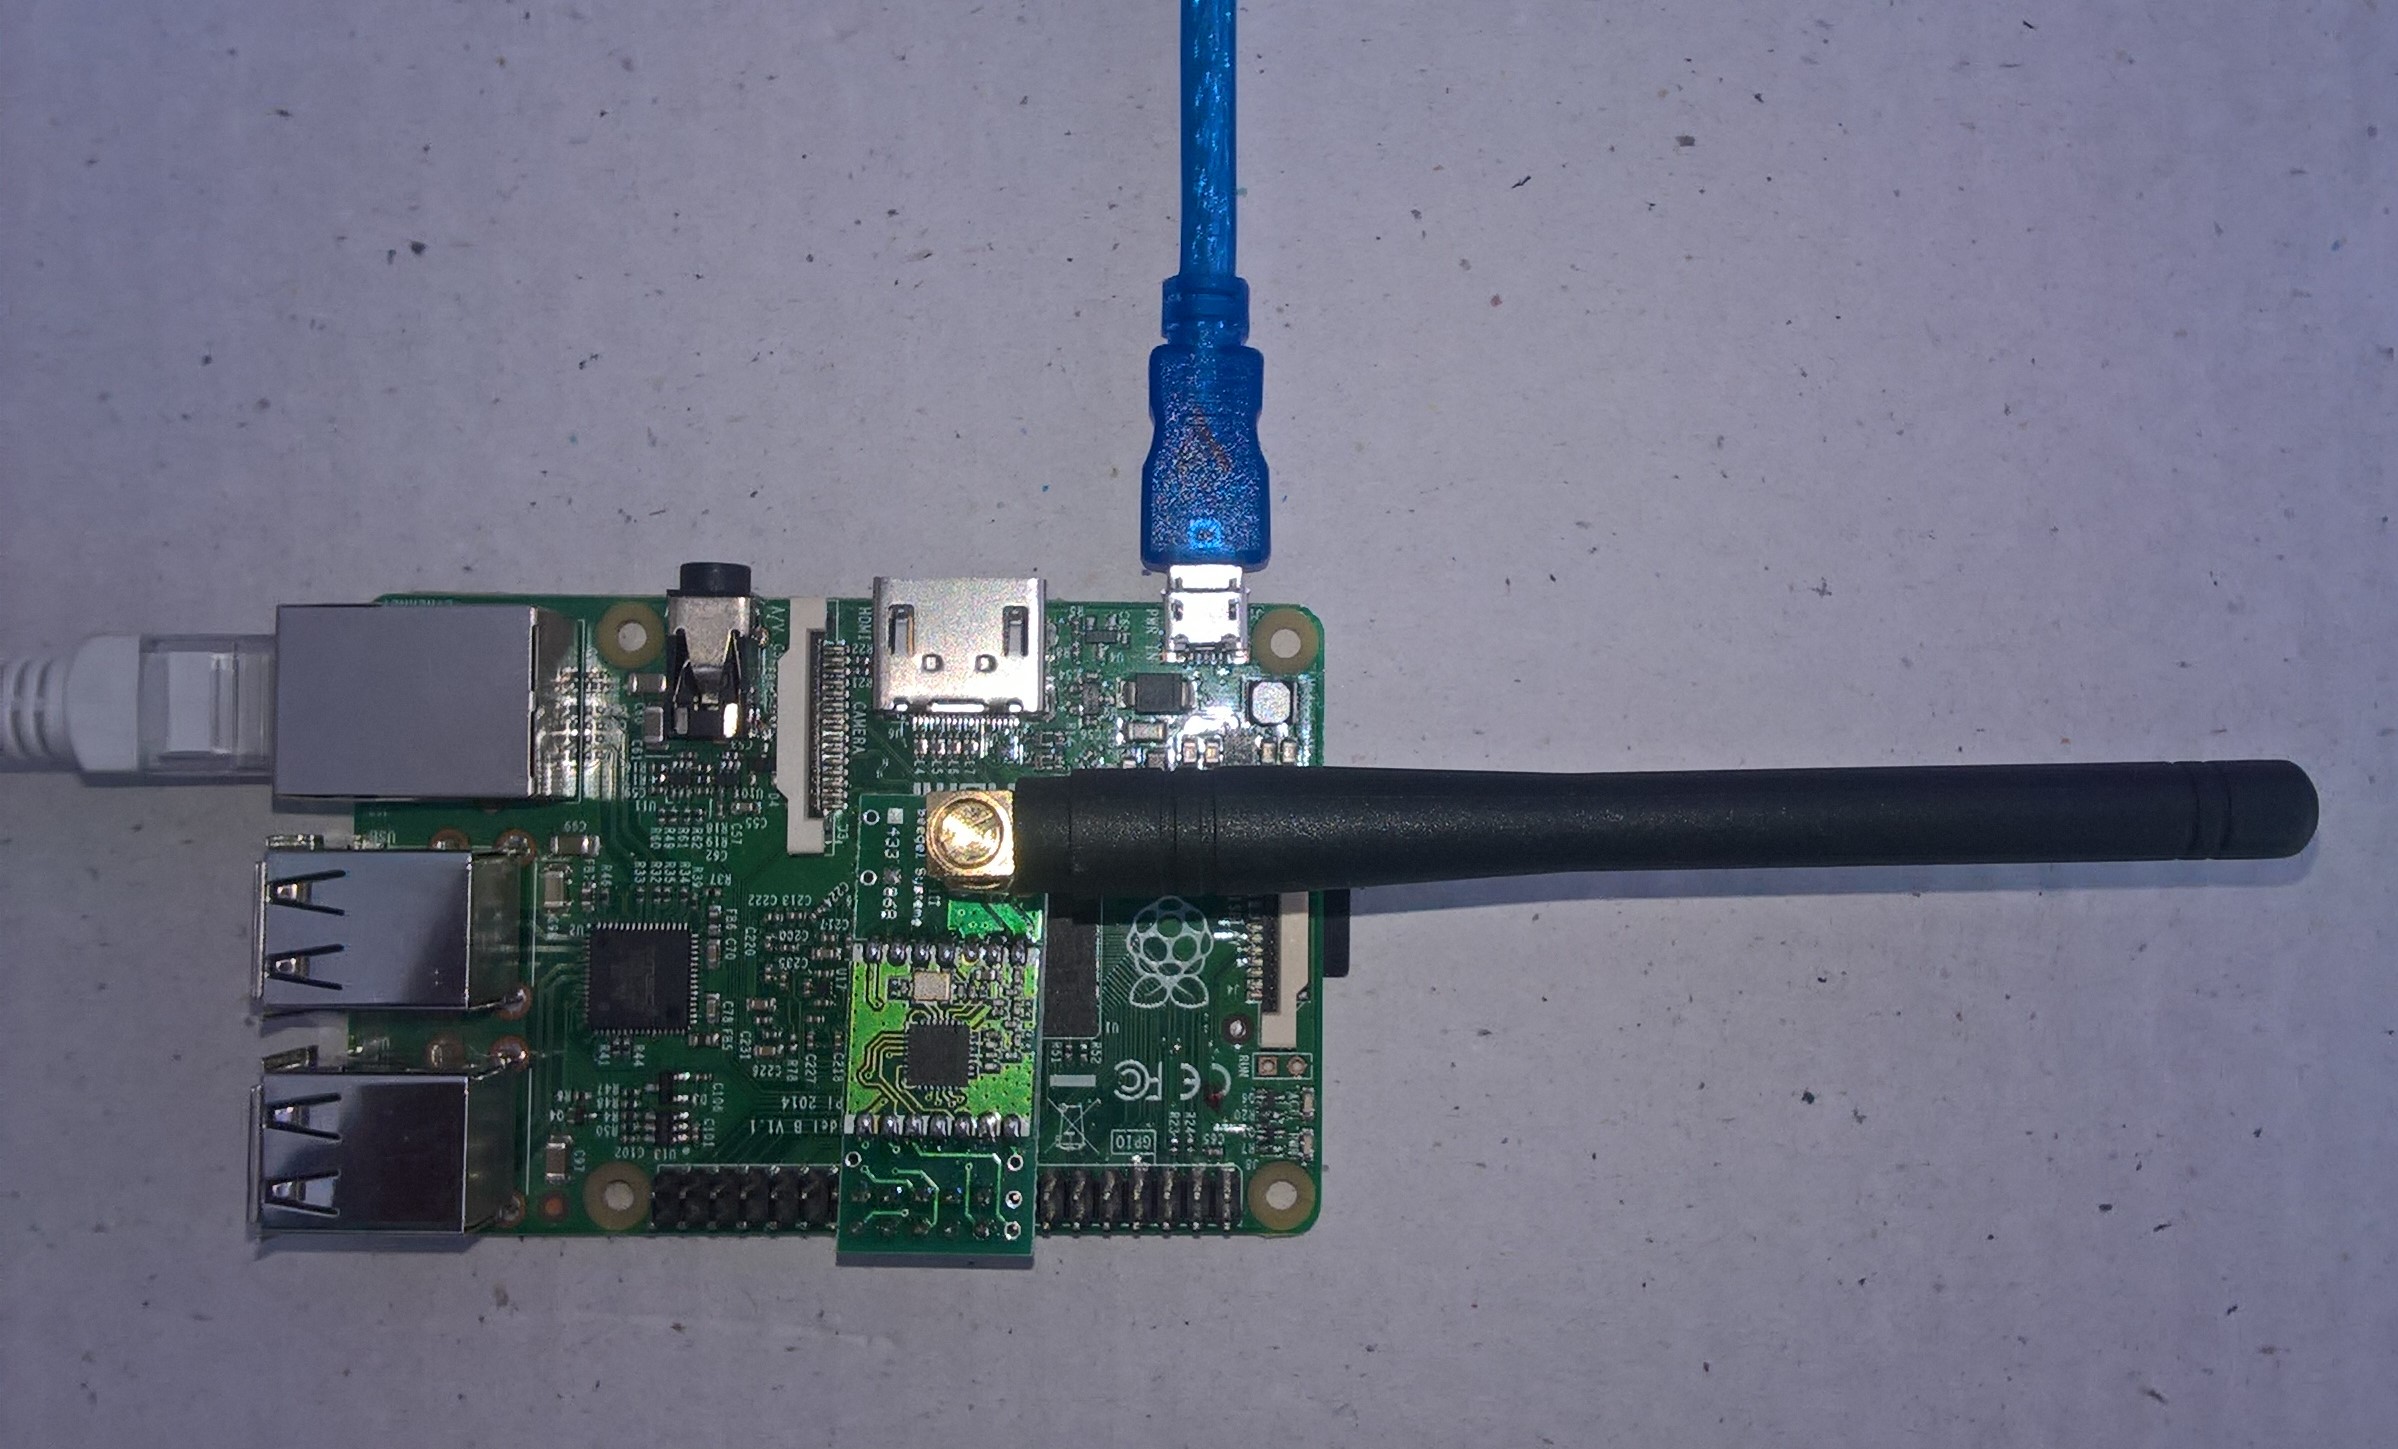
    The RaspyRFM is plugged into the Raspberry PI of pin 17-26.

    From the docs for the dual RFM69 mini 
    17 -> 3,3 V
    18 (GPIO 24) -> DIO1 bei Einzelmodul, DIO0 Slave bei Doppelmodul
    19 (MOSI) -> MOSI
    20 -> GND
    21 (MISO) ->MISO
    22 (GPIO 25) -> DIO0
    23 (SCK) -> SCK
    24 (CE0) -> NSS Master
    25 -> GND
    26 (CE1) -> DIO2 bei Einzelmodul, NSS Slave bei Doppelmodul
 */
namespace devMobile.IoT.Rfm69hcw.SeegelSpi
{
	using System;
	using System.Diagnostics;
	using System.Threading;
	using Windows.ApplicationModel.Background;
	using Windows.Devices.Spi;

	public sealed class StartupTask : IBackgroundTask
	{
		private const byte RegVersion = 0x10;

		public void Run(IBackgroundTaskInstance taskInstance)
		{
			SpiController spiController = SpiController.GetDefaultAsync().AsTask().GetAwaiter().GetResult();
			var settings = new SpiConnectionSettings(0)
			{
				ClockFrequency = 500000,
				Mode = SpiMode.Mode0,
			};

			SpiDevice Device = spiController.GetDevice(settings);

			while (true)
			{
				byte[] writeBuffer = new byte[] { RegVersion }; // RegVersion
				byte[] readBuffer = new byte[1];

				Device.TransferSequential(writeBuffer, readBuffer);

				byte registerValue = readBuffer[0];
				Debug.WriteLine("Register 0x{0:x2} - Value 0X{1:x2} - Bits {2}", RegVersion, registerValue, Convert.ToString(registerValue, 2).PadLeft(8, '0'));

				Thread.Sleep(10000);
			}
		}
	}
}


The Seegel hat uses chip select 0

Based on the datasheet the RegVersion (0x10) register the value (ox24) returned by both hats was correct.

'backgroundTaskHost.exe' (CoreCLR: CoreCLR_UWP_Domain): Loaded 'C:\Data\Programs\WindowsApps\Microsoft.NET.CoreFramework.Debug.2.2_2.2.27505.2_arm__8wekyb3d8bbwe\System.Threading.Thread.dll'. Skipped loading symbols. Module is optimized and the debugger option 'Just My Code' is enabled.
Register 0x10 - Value 0X24 - Bits 00100100

Next step is to dump all the registers of the HopeRF module

Grove Base Hat for Raspberry PI Zero Windows 10 IoT Core

During the week a package arrived from Seeedstudio with a Grove Base Hat for RPI Zero. So I have modified my Grove Base Hat for RPI Windows 10 IoT Core library to add support for the new shield.

Grove Base Hat for Raspberry PI Zero on Raspberry PI 3

The Raspberry PI Zero hat has a two less analog ports and a different device id so some conditional compile options were necessary

namespace devMobile.Windows10IoTCore.GroveBaseHatRPI
{
#if (!GROVE_BASE_HAT_RPI && !GROVE_BASE_HAT_RPI_ZERO)
#error Library must have at least one of GROVE_BASE_HAT_RPI or GROVE_BASE_HAT_RPI_ZERO defined
#endif

#if (GROVE_BASE_HAT_RPI && GROVE_BASE_HAT_RPI_ZERO)
#error Library must have at most one of GROVE_BASE_HAT_RPI or GROVE_BASE_HAT_RPI_ZERO defined
#endif

	public class AnalogPorts : IDisposable
	{
		private const int I2CAddress = 0x04;
		private const byte RegisterDeviceId = 0x0;
		private const byte RegisterVersion = 0x02;
		private const byte RegisterPowerSupplyVoltage = 0x29;
		private const byte RegisterRawBase = 0x10;
		private const byte RegisterVoltageBase = 0x20;
		private const byte RegisterValueBase = 0x30;
#if GROVE_BASE_HAT_RPI
		private const byte DeviceId = 0x0004;
#endif
#if GROVE_BASE_HAT_RPI_ZERO
		private const byte DeviceId = 0x0005;
#endif
		private I2cDevice Device= null;
		private bool Disposed = false;

		public enum AnalogPort
		{
			A0 = 0,
			A1 = 1,
			A2 = 2,
			A3 = 3,
			A4 = 4,
			A5 = 5,
#if GROVE_BASE_HAT_RPI
			A6 = 6,
			A7 = 7,
#endif
		};

The code updates have been “smoke” tested and I have updated the GitHub repository.

Windows 10 IoT Core Cognitive Services Computer Vision API

This application was inspired by one of teachers I work with wanting to check occupancy of different areas in the school library. I had been using the Computer Vision service to try and identify objects around my home and office which had been moderately successful but not terribly useful or accurate.

I added the Azure Cognitive Services Computer Vision API NuGet packages to my Visual Studio 2017 Windows IoT Core project.

Azure Cognitive Services Computer Vision API library

Then I initialised the Computer Vision API client

try
{
	this.computerVisionClient = new ComputerVisionClient(
			 new Microsoft.Azure.CognitiveServices.Vision.ComputerVision.ApiKeyServiceClientCredentials(this.azureCognitiveServicesSubscriptionKey),
			 new System.Net.Http.DelegatingHandler[] { })
	{
		Endpoint = this.azureCognitiveServicesEndpoint,
	};
}
catch (Exception ex)
{
	this.logging.LogMessage("Azure Cognitive Services Computer Vision client configuration failed " + ex.Message, LoggingLevel.Error);
	return;
}

Every time the digital input is strobed by the passive infra red motion detector an image is captured, then uploaded for processing, and finally results displayed. For this sample I’m looking for categories which indicate the image is of a group of people (The categories are configured in the appsettings file)

{
  "InterruptPinNumber": 24,
  "interruptTriggerOn": "RisingEdge",
  "DisplayPinNumber": 35,
  "AzureCognitiveServicesEndpoint": "https://australiaeast.api.cognitive.microsoft.com/",
  "AzureCognitiveServicesSubscriptionKey": "1234567890abcdefghijklmnopqrstuv",
  "ComputerVisionCategoryNames":"people_group,people_many",
  "LocalImageFilenameFormatLatest": "{0}.jpg",
  "LocalImageFilenameFormatHistoric": "{1:yyMMddHHmmss}.jpg",
  "DebounceTimeout": "00:00:30"
} 

If any of the specified categories are identified in the image I illuminate a Light Emitting Diode (LED) for 5 seconds, if an image is being processed or the minimum period between images has not passed the LED is illuminated for 5 milliseconds .

		private async void InterruptGpioPin_ValueChanged(GpioPin sender, GpioPinValueChangedEventArgs args)
		{
			DateTime currentTime = DateTime.UtcNow;
			Debug.WriteLine($"Digital Input Interrupt {sender.PinNumber} triggered {args.Edge}");

			if (args.Edge != this.interruptTriggerOn)
			{
				return;
			}

			// Check that enough time has passed for picture to be taken
			if ((currentTime - this.imageLastCapturedAtUtc) < this.debounceTimeout)
			{
				this.displayGpioPin.Write(GpioPinValue.High);
				this.displayOffTimer.Change(this.timerPeriodDetectIlluminated, this.timerPeriodInfinite);
				return;
			}

			this.imageLastCapturedAtUtc = currentTime;

			// Just incase - stop code being called while photo already in progress
			if (this.cameraBusy)
			{
				this.displayGpioPin.Write(GpioPinValue.High);
				this.displayOffTimer.Change(this.timerPeriodDetectIlluminated, this.timerPeriodInfinite);
				return;
			}

			this.cameraBusy = true;

			try
			{
				using (Windows.Storage.Streams.InMemoryRandomAccessStream captureStream = new Windows.Storage.Streams.InMemoryRandomAccessStream())
				{
					this.mediaCapture.CapturePhotoToStreamAsync(ImageEncodingProperties.CreateJpeg(), captureStream).AsTask().Wait();
					captureStream.FlushAsync().AsTask().Wait();
					captureStream.Seek(0);

					IStorageFile photoFile = await KnownFolders.PicturesLibrary.CreateFileAsync(ImageFilename, CreationCollisionOption.ReplaceExisting);
					ImageEncodingProperties imageProperties = ImageEncodingProperties.CreateJpeg();
					await this.mediaCapture.CapturePhotoToStorageFileAsync(imageProperties, photoFile);

					ImageAnalysis imageAnalysis = await this.computerVisionClient.AnalyzeImageInStreamAsync(captureStream.AsStreamForRead());

					Debug.WriteLine($"Tag count {imageAnalysis.Categories.Count}");

					if (imageAnalysis.Categories.Intersect(this.categoryList, new CategoryComparer()).Any())
					{
						this.displayGpioPin.Write(GpioPinValue.High);

						// Start the timer to turn the LED off
						this.displayOffTimer.Change(this.timerPeriodFaceIlluminated, this.timerPeriodInfinite);
					}

					LoggingFields imageInformation = new LoggingFields();

					imageInformation.AddDateTime("TakenAtUTC", currentTime);
					imageInformation.AddInt32("Pin", sender.PinNumber);
					Debug.WriteLine($"Categories:{imageAnalysis.Categories.Count}");
					imageInformation.AddInt32("Categories", imageAnalysis.Categories.Count);
					foreach (Category category in imageAnalysis.Categories)
					{
						Debug.WriteLine($" Category:{category.Name} {category.Score}");
						imageInformation.AddDouble($"Category:{category.Name}", category.Score);
					}

					this.logging.LogEvent("Captured image processed by Cognitive Services", imageInformation);
				}
			}
			catch (Exception ex)
			{
				this.logging.LogMessage("Camera photo or save failed " + ex.Message, LoggingLevel.Error);
			}
			finally
			{
				this.cameraBusy = false;
			}
		}

		private void TimerCallback(object state)
		{
			this.displayGpioPin.Write(GpioPinValue.Low);
		}

		internal class CategoryComparer : IEqualityComparer<Category>
		{
			public bool Equals(Category x, Category y)
			{
				if (string.Equals(x.Name, y.Name, StringComparison.OrdinalIgnoreCase))
				{
					return true;
				}

				return false;
			}

			public int GetHashCode(Category obj)
			{
				return obj.Name.GetHashCode();
			}
		}

I found that the Computer vision service was pretty good at categorising photos of images like this displayed on my second monitor as containing a group of people.

The debugging output of the application includes the different categories identified in the captured image.

Digital Input Interrupt 24 triggered RisingEdge
Digital Input Interrupt 24 triggered FallingEdge
'backgroundTaskHost.exe' (CoreCLR: CoreCLR_UWP_Domain): Loaded 'C:\Data\Programs\WindowsApps\Microsoft.NET.CoreFramework.Debug.2.2_2.2.27505.2_arm__8wekyb3d8bbwe\System.Diagnostics.DiagnosticSource.dll'. Skipped loading symbols. Module is optimized and the debugger option 'Just My Code' is enabled.
'backgroundTaskHost.exe' (CoreCLR: CoreCLR_UWP_Domain): Loaded 'C:\Data\Programs\WindowsApps\Microsoft.NET.CoreFramework.Debug.2.2_2.2.27505.2_arm__8wekyb3d8bbwe\System.Collections.NonGeneric.dll'. Skipped loading symbols. Module is optimized and the debugger option 'Just My Code' is enabled.
'backgroundTaskHost.exe' (CoreCLR: CoreCLR_UWP_Domain): Loaded 'C:\Data\Programs\WindowsApps\Microsoft.NET.CoreFramework.Debug.2.2_2.2.27505.2_arm__8wekyb3d8bbwe\System.Runtime.Serialization.Formatters.dll'. Skipped loading symbols. Module is optimized and the debugger option 'Just My Code' is enabled.
'backgroundTaskHost.exe' (CoreCLR: CoreCLR_UWP_Domain): Loaded 'C:\Data\Programs\WindowsApps\Microsoft.NET.CoreFramework.Debug.2.2_2.2.27505.2_arm__8wekyb3d8bbwe\System.Diagnostics.TraceSource.dll'. Skipped loading symbols. Module is optimized and the debugger option 'Just My Code' is enabled.
'backgroundTaskHost.exe' (CoreCLR: CoreCLR_UWP_Domain): Loaded 'C:\Data\Programs\WindowsApps\Microsoft.NET.CoreFramework.Debug.2.2_2.2.27505.2_arm__8wekyb3d8bbwe\System.Collections.Specialized.dll'. Skipped loading symbols. Module is optimized and the debugger option 'Just My Code' is enabled.
'backgroundTaskHost.exe' (CoreCLR: CoreCLR_UWP_Domain): Loaded 'C:\Data\Programs\WindowsApps\Microsoft.NET.CoreFramework.Debug.2.2_2.2.27505.2_arm__8wekyb3d8bbwe\System.Drawing.Primitives.dll'. Skipped loading symbols. Module is optimized and the debugger option 'Just My Code' is enabled.
'backgroundTaskHost.exe' (CoreCLR: CoreCLR_UWP_Domain): Loaded 'C:\Data\Programs\WindowsApps\Microsoft.NET.CoreFramework.Debug.2.2_2.2.27505.2_arm__8wekyb3d8bbwe\System.Runtime.Serialization.Primitives.dll'. Skipped loading symbols. Module is optimized and the debugger option 'Just My Code' is enabled.
'backgroundTaskHost.exe' (CoreCLR: CoreCLR_UWP_Domain): Loaded 'C:\Data\Programs\WindowsApps\Microsoft.NET.CoreFramework.Debug.2.2_2.2.27505.2_arm__8wekyb3d8bbwe\System.Data.Common.dll'. Skipped loading symbols. Module is optimized and the debugger option 'Just My Code' is enabled.
'backgroundTaskHost.exe' (CoreCLR: CoreCLR_UWP_Domain): Loaded 'C:\Data\Programs\WindowsApps\Microsoft.NET.CoreFramework.Debug.2.2_2.2.27505.2_arm__8wekyb3d8bbwe\System.Xml.ReaderWriter.dll'. Skipped loading symbols. Module is optimized and the debugger option 'Just My Code' is enabled.
'backgroundTaskHost.exe' (CoreCLR: CoreCLR_UWP_Domain): Loaded 'C:\Data\Programs\WindowsApps\Microsoft.NET.CoreFramework.Debug.2.2_2.2.27505.2_arm__8wekyb3d8bbwe\System.Private.Xml.dll'. Skipped loading symbols. Module is optimized and the debugger option 'Just My Code' is enabled.
'backgroundTaskHost.exe' (CoreCLR: CoreCLR_UWP_Domain): Loaded 'Anonymously Hosted DynamicMethods Assembly'. 
Tag count 1
Categories:1
 Category:people_group 0.8671875
The thread 0x634 has exited with code 0 (0x0).

I used an infrared motion sensor to trigger capture and processing of an image to simulate a application for detecting if there is a group of people in an area of the school library.

I’m going to run this application alongside one of my time-lapse applications to record a days worth of images and manually check the accuracy of the image categorisation. I think that camera location maybe important as well so I’ll try a selection of different USB cameras and locations.

Trial PIR triggered computer vision client

I also found the small PIR motion detector didn’t work very well in a larger space so I’m going to trial a configurable sensor and a repurposed burglar alarm sensor.

Windows 10 IoT Core Cognitive Services Face API

After building a series of Windows 10 IoT Core applications to capture images and store them

I figured some sample applications which used Azure Cognitive Services Vision Services to process captured images would be interesting.

This application was inspired by one of my students who has been looking at an Arduino based LoRa wireless connected sensor for monitoring Ultraviolet(UV) light levels and wanted to check that juniors at the school were wearing their hats on sunny days before going outside.

First I needed create a Cognitive Services instance and get the subscription key and endpoint.

Azure Cognitive Services Instance Creation

Then I added the Azure Cognitive Services Face API NuGet packages into my Visual Studio Windows IoT Core project

Azure Cognitive Services Vision Face API library

Then initialise the Face API client

try
{
	this.faceClient = new FaceClient(
			 new Microsoft.Azure.CognitiveServices.Vision.Face.ApiKeyServiceClientCredentials(this.azureCognitiveServicesSubscriptionKey),
											 new System.Net.Http.DelegatingHandler[] { })
	{
		Endpoint = this.azureCognitiveServicesEndpoint,
	};
}
catch (Exception ex)
{
	this.logging.LogMessage("Azure Cognitive Services Face Client configuration failed " + ex.Message, LoggingLevel.Error);
	return;
}

Then every time a digital input is strobed and image is captured, then uploaded for processing, and finally results displayed. The interrupt handler has code to stop re-entrancy and contactor bounce causing issues. I also requested that the Face service include age and gender attributes with associated confidence values.

If a face is found in the image I illuminate a Light Emitting Diode (LED) for 5 seconds, if an image is being processed or the minimum period between images has not passed the LED is illuminated for 5 milliseconds .

private async void InterruptGpioPin_ValueChanged(GpioPin sender, GpioPinValueChangedEventArgs args)
{
	DateTime currentTime = DateTime.UtcNow;
	Debug.WriteLine($"Digital Input Interrupt {sender.PinNumber} triggered {args.Edge}");

	if (args.Edge != this.interruptTriggerOn)
	{
		return;
	}

	// Check that enough time has passed for picture to be taken
	if ((currentTime - this.imageLastCapturedAtUtc) < this.debounceTimeout)
	{
		this.displayGpioPin.Write(GpioPinValue.High);
		this.displayOffTimer.Change(this.timerPeriodDetectIlluminated, this.timerPeriodInfinite);
		return;
	}

	this.imageLastCapturedAtUtc = currentTime;

	// Just incase - stop code being called while photo already in progress
	if (this.cameraBusy)
	{
		this.displayGpioPin.Write(GpioPinValue.High);
		this.displayOffTimer.Change(this.timerPeriodDetectIlluminated, this.timerPeriodInfinite);
		return;
	}

	this.cameraBusy = true;

	try
	{
		using (Windows.Storage.Streams.InMemoryRandomAccessStream captureStream = new Windows.Storage.Streams.InMemoryRandomAccessStream())
		{
			this.mediaCapture.CapturePhotoToStreamAsync(ImageEncodingProperties.CreateJpeg(), captureStream).AsTask().Wait();
			captureStream.FlushAsync().AsTask().Wait();
			captureStream.Seek(0);
			IStorageFile photoFile = await KnownFolders.PicturesLibrary.CreateFileAsync(ImageFilename, CreationCollisionOption.ReplaceExisting);
			ImageEncodingProperties imageProperties = ImageEncodingProperties.CreateJpeg();
			await this.mediaCapture.CapturePhotoToStorageFileAsync(imageProperties, photoFile);

			IList<FaceAttributeType> returnfaceAttributes = new List<FaceAttributeType>();
			returnfaceAttributes.Add(FaceAttributeType.Gender);
			returnfaceAttributes.Add(FaceAttributeType.Age);

			IList<DetectedFace> detectedFaces = await this.faceClient.Face.DetectWithStreamAsync(captureStream.AsStreamForRead(), returnFaceAttributes: returnfaceAttributes);

			Debug.WriteLine($"Count {detectedFaces.Count}");

			if (detectedFaces.Count > 0)
			{
				this.displayGpioPin.Write(GpioPinValue.High);

						// Start the timer to turn the LED off
				this.displayOffTimer.Change(this.timerPeriodFaceIlluminated, this.timerPeriodInfinite);
			}

			LoggingFields imageInformation = new LoggingFields();
			imageInformation.AddDateTime("TakenAtUTC", currentTime);
			imageInformation.AddInt32("Pin", sender.PinNumber);
			imageInformation.AddInt32("Faces", detectedFaces.Count);
			foreach (DetectedFace detectedFace in detectedFaces)
			{
				Debug.WriteLine("Face");
				if (detectedFace.FaceId.HasValue)
				{
					imageInformation.AddGuid("FaceId", detectedFace.FaceId.Value);
					Debug.WriteLine($" Id:{detectedFace.FaceId.Value}");
				}
				imageInformation.AddInt32("Left", detectedFace.FaceRectangle.Left);
				imageInformation.AddInt32("Width", detectedFace.FaceRectangle.Width);
				imageInformation.AddInt32("Top", detectedFace.FaceRectangle.Top);
				imageInformation.AddInt32("Height", detectedFace.FaceRectangle.Height);
				Debug.WriteLine($" L:{detectedFace.FaceRectangle.Left} W:{detectedFace.FaceRectangle.Width} T:{detectedFace.FaceRectangle.Top} H:{detectedFace.FaceRectangle.Height}");
				if (detectedFace.FaceAttributes != null)
				{
					if (detectedFace.FaceAttributes.Gender.HasValue)
					{
						imageInformation.AddString("Gender", detectedFace.FaceAttributes.Gender.Value.ToString());
						Debug.WriteLine($" Gender:{detectedFace.FaceAttributes.Gender.ToString()}");
					}

					if (detectedFace.FaceAttributes.Age.HasValue)
					{
						imageInformation.AddDouble("Age", detectedFace.FaceAttributes.Age.Value);
						Debug.WriteLine($" Age:{detectedFace.FaceAttributes.Age.Value.ToString("F1")}");
					}
				}
			}

			this.logging.LogEvent("Captured image processed by Cognitive Services", imageInformation);
		}
	}
	catch (Exception ex)
	{
		this.logging.LogMessage("Camera photo or save failed " + ex.Message, LoggingLevel.Error);
	}
	finally
	{
		this.cameraBusy = false;
	}
}

private void TimerCallback(object state)
{
	this.displayGpioPin.Write(GpioPinValue.Low);
}

This is the image uploaded to the Cognitive Services Vision Face API from my DragonBoard 410C

Which was a photo of this sample image displayed on my second monitor

The debugging output of the application includes the bounding box, gender, age and unique identifier of each detected face.

Digital Input Interrupt 24 triggered RisingEdge
Digital Input Interrupt 24 triggered FallingEdge
Count 13
Face
 Id:41ab8a38-180e-4b63-ab47-d502b8534467
 L:12 W:51 T:129 H:51
 Gender:Female
 Age:24.0
Face
 Id:554f7557-2b78-4392-9c73-5e51fedf0300
 L:115 W:48 T:146 H:48
 Gender:Female
 Age:19.0
Face
 Id:f67ae4cc-1129-46a8-8c5b-0e79f350cbaa
 L:547 W:46 T:162 H:46
 Gender:Female
 Age:56.0
Face
 Id:fad453fb-0923-4ae2-8c9d-73c9d89eaaf4
 L:585 W:45 T:116 H:45
 Gender:Female
 Age:25.0
Face
 Id:c2d2ca4e-faa6-49e8-8cd9-8d21abfc374c
 L:410 W:44 T:154 H:44
 Gender:Female
 Age:23.0
Face
 Id:6fb75edb-654c-47ff-baf0-847a31d2fd85
 L:70 W:44 T:57 H:44
 Gender:Male
 Age:37.0
Face
 Id:d6c97a9a-c49f-4d9c-8eac-eb2fbc03abc1
 L:469 W:44 T:122 H:44
 Gender:Female
 Age:38.0
Face
 Id:e193bf15-6d8c-4c30-adb5-4ca5fb0f0271
 L:206 W:44 T:117 H:44
 Gender:Male
 Age:33.0
Face
 Id:d1ba5a42-0475-4b65-afc8-0651439e1f1e
 L:293 W:44 T:74 H:44
 Gender:Male
 Age:59.0
Face
 Id:b6a7c551-bdad-4e38-8976-923b568d2721
 L:282 W:43 T:144 H:43
 Gender:Female
 Age:28.0
Face
 Id:8be87f6d-7350-4bc3-87f5-3415894b8fac
 L:513 W:42 T:78 H:42
 Gender:Male
 Age:36.0
Face
 Id:e73bd4d7-81a4-403c-aa73-1408ae1068c0
 L:163 W:36 T:94 H:36
 Gender:Female
 Age:44.0
Face
 Id:462a6948-a05e-4fea-918d-23d8289e0401
 L:407 W:36 T:73 H:36
 Gender:Male
 Age:27.0
The thread 0x8e0 has exited with code 0 (0x0).

I used a simple infrared proximity sensor trigger the image capture to simulate an application for monitoring the number of people in or people entering a room.

Infrared Proximity Sensor triggered Face API test client

Overall I found that with not a lot of code I could capture an image, upload it to Azure Cognitive Services Face API for processing and the algorithm would reasonably reliably detect faces and features.

Windows 10 IoT Core TPM SAS Token Expiry

This is for people who were searching for why the SAS token issued by the TPM on their Windows 10 IoT Core device is expiring much quicker than expected or might have noticed that something isn’t quite right with the “validity” period. (as at early May 2019). If you want to “follow along at home” the code I used is available on GitHub.

I found the SAS key was expiring in roughly 5 minutes and the validity period in the configuration didn’t appear to have any effect on how long the SAS token was valid.

10:04:16 Application started
...
10:04:27 SAS token needs renewing
10:04:30 SAS token renewed 
 10:04:30.984 AzureIoTHubClient SendEventAsync starting
 10:04:36.709 AzureIoTHubClient SendEventAsync starting
The thread 0x1464 has exited with code 0 (0x0).
 10:04:37.808 AzureIoTHubClient SendEventAsync finished
 10:04:37.808 AzureIoTHubClient SendEventAsync finished
The thread 0xb88 has exited with code 0 (0x0).
The thread 0x1208 has exited with code 0 (0x0).
The thread 0x448 has exited with code 0 (0x0).
The thread 0x540 has exited with code 0 (0x0).
 10:04:46.763 AzureIoTHubClient SendEventAsync starting
 10:04:47.051 AzureIoTHubClient SendEventAsync finished
The thread 0x10d8 has exited with code 0 (0x0).
The thread 0x6e0 has exited with code 0 (0x0).
The thread 0xf7c has exited with code 0 (0x0).
 10:04:56.808 AzureIoTHubClient SendEventAsync starting
 10:04:57.103 AzureIoTHubClient SendEventAsync finished
The thread 0xb8c has exited with code 0 (0x0).
The thread 0xc60 has exited with code 0 (0x0).
 10:05:06.784 AzureIoTHubClient SendEventAsync starting
 10:05:07.057 AzureIoTHubClient SendEventAsync finished
...
The thread 0x4f4 has exited with code 0 (0x0).
The thread 0xe10 has exited with code 0 (0x0).
The thread 0x3c8 has exited with code 0 (0x0).
 10:09:06.773 AzureIoTHubClient SendEventAsync starting
 10:09:07.044 AzureIoTHubClient SendEventAsync finished
The thread 0xf70 has exited with code 0 (0x0).
The thread 0x1214 has exited with code 0 (0x0).
 10:09:16.819 AzureIoTHubClient SendEventAsync starting
 10:09:17.104 AzureIoTHubClient SendEventAsync finished
The thread 0x1358 has exited with code 0 (0x0).
The thread 0x400 has exited with code 0 (0x0).
 10:09:26.802 AzureIoTHubClient SendEventAsync starting
 10:09:27.064 AzureIoTHubClient SendEventAsync finished
The thread 0x920 has exited with code 0 (0x0).
The thread 0x1684 has exited with code 0 (0x0).
The thread 0x4ec has exited with code 0 (0x0).
 10:09:36.759 AzureIoTHubClient SendEventAsync starting
'backgroundTaskHost.exe' (CoreCLR: CoreCLR_UWP_Domain): Loaded 'C:\Data\Programs\WindowsApps\Microsoft.NET.CoreFramework.Debug.2.2_2.2.27505.2_arm__8wekyb3d8bbwe\System.Net.Requests.dll'. Skipped loading symbols. Module is optimized and the debugger option 'Just My Code' is enabled.
'backgroundTaskHost.exe' (CoreCLR: CoreCLR_UWP_Domain): Loaded 'C:\Data\Programs\WindowsApps\Microsoft.NET.CoreFramework.Debug.2.2_2.2.27505.2_arm__8wekyb3d8bbwe\System.Net.WebSockets.dll'. Skipped loading symbols. Module is optimized and the debugger option 'Just My Code' is enabled.
Sending payload to AzureIoTHub failed:CONNECT failed: RefusedNotAuthorized

I went and looked at the NuGet package details and it seemed a bit old.

I have the RedGate Reflector plugin installed on my development box so I quickly disassembled the Microsoft.Devices.TPM assembly to see what was going on. The Reflector code is pretty readable and it wouldn’t take much “refactoring” to get it looking like “human” generated code.

public string GetSASToken(uint validity = 0xe10)
{
    string deviceId = this.GetDeviceId();
    string hostName = this.GetHostName();
    long num = (DateTime.get_Now().ToUniversalTime().ToFileTime() / 0x98_9680L) - 0x2_b610_9100L;
    string str3 = "";
    if ((hostName.Length > 0) && (deviceId.Length > 0))
    {
        object[] objArray1 = new object[] { hostName, "/devices/", deviceId, "\n", (long) num };
        byte[] bytes = new UTF8Encoding().GetBytes(string.Concat((object[]) objArray1));
        byte[] buffer2 = this.SignHmac(bytes);
        if (buffer2.Length != 0)
        {
            string str5 = this.AzureUrlEncode(Convert.ToBase64String(buffer2));
            object[] objArray2 = new object[] { "SharedAccessSignature sr=", hostName, "/devices/", deviceId, "&sig=", str5, "&se=", (long) num };
            str3 = string.Concat((object[]) objArray2);
        }
    }
    return str3;
}

The validity parameter appears to not used. Below is the current code from the Azure IoT CSharp SDK on GitHub repository and they are different, the validity is used.

public string GetSASToken(uint validity = 3600)
{
   const long WINDOWS_TICKS_PER_SEC = 10000000;
   const long EPOCH_DIFFERNECE = 11644473600;
   string deviceId = GetDeviceId();
   string hostName = GetHostName();
   long expirationTime = (DateTime.Now.ToUniversalTime().ToFileTime() / WINDOWS_TICKS_PER_SEC) - EPOCH_DIFFERNECE;
   expirationTime += validity;
   string sasToken = "";
   if ((hostName.Length > 0) && (deviceId.Length > 0))
   {
      // Encode the message to sign with the TPM
      UTF8Encoding utf8 = new UTF8Encoding();
      string tokenContent = hostName + "/devices/" + deviceId + "\n" + expirationTime;
      Byte[] encodedBytes = utf8.GetBytes(tokenContent);

      // Sign the message
      Byte[] hmac = SignHmac(encodedBytes);

      // if we got a signature foramt it
      if (hmac.Length > 0)
      {
         // Encode the output and assemble the connection string
         string hmacString = AzureUrlEncode(System.Convert.ToBase64String(hmac));
         sasToken = "SharedAccessSignature sr=" + hostName + "/devices/" + deviceId + "&sig=" + hmacString + "&se=" + expirationTime;
         }
   }
   return sasToken;
}

I went back and look at the Github history and it looks like a patch was applied after the NuGet packages were released in May 2016.

If you read from the TPM and get nothing make sure you’re using the right TPM slot number and have “System Management” checked in the capabilities tab of the application manifest.

I’m still not certain the validity is being applied correctly and will dig into in a future post.

Ubidots with MQTTnet

As I’m testing my Message Queue Telemetry Transport(MQTT) LoRa gateway I’m building a proof of concept(PoC) .Net core console application for each IoT platform I would like to support.

This PoC was to confirm that I could connect to the ubidots MQTT API then format the topics and payloads correctly. The ubidots screen designer has “variables” (both actual sensors & synthetic calculated ones) which present as topics so I built a client which could subscribe to these.

.Net Core V2 MQTTnet client

The MQTT broker, username, password, and client ID are command line options.

class Program
{
	private static IMqttClient mqttClient = null;
	private static IMqttClientOptions mqttOptions = null;
	private static string server;
	private static string username;
	private static string deviceLabel;

	static void Main(string[] args)
	{
		MqttFactory factory = new MqttFactory();
		mqttClient = factory.CreateMqttClient();
		bool heatPumpOn = false;

		if (args.Length != 3)
		{
			Console.WriteLine("[MQTT Server] [UserName] [Password] [ClientID]");
			Console.WriteLine("Press <enter> to exit");
			Console.ReadLine();
			return;
		}

		server = args[0];
		username = args[1];
		deviceLabel = args[2];

		Console.WriteLine($"MQTT Server:{server} Username:{username} DeviceLabel:{deviceLabel}");

		mqttOptions = new MqttClientOptionsBuilder()
			.WithTcpServer(server)
			.WithCredentials(username, "NotVerySecret")
			.WithClientId(deviceLabel)
			.WithTls()
			.Build();

		mqttClient.ApplicationMessageReceived += MqttClient_ApplicationMessageReceived;
		mqttClient.Disconnected += MqttClient_Disconnected;
		mqttClient.ConnectAsync(mqttOptions).Wait();

		// Setup a subscription for commands sent to client
		string commandTopic = $"/v1.6/devices/{deviceLabel}/officetemperaturedesired/lv";
		mqttClient.SubscribeAsync(commandTopic).GetAwaiter().GetResult();

		//// Ubidots formatted client state update topic
		string stateTopic = $"/v1.6/devices/{deviceLabel}";

		while (true)
		{
			string payloadText;
			double temperature = 22.0 + (DateTime.UtcNow.Millisecond / 1000.0);
			double humidity = 50 + (DateTime.UtcNow.Millisecond / 100.0);
			double speed = 10 + (DateTime.UtcNow.Millisecond / 100.0);
			Console.WriteLine($"Topic:{stateTopic} Temperature:{temperature:0.00} Humidity:{humidity:0} HeatPumpOn:{heatPumpOn}");

			// First attempt which worked
			//payloadText = @"{""OfficeTemperature"":22.5}";

			// Second attempt to work out data format with "real" values injected
			//payloadText = @"{ ""officetemperature"":"+ temperature.ToString("F2") + @",""officehumidity"":" + humidity.ToString("F0") + @"}";

			// Third attempt with Jobject which sort of worked but number serialisation was sub optimal
			JObject payloadJObject = new JObject(); 
			payloadJObject.Add("OfficeTemperature", temperature.ToString("F2"));
			payloadJObject.Add("OfficeHumidity", humidity.ToString("F0"));

			if (heatPumpOn)
			{
				payloadJObject.Add("HeatPumpOn", 1);
			}
			else
			{
				payloadJObject.Add("HeatPumpOn", 0);
			}
			heatPumpOn = !heatPumpOn;
			payloadText = JsonConvert.SerializeObject(payloadJObject);

			/*
			// Forth attempt with JOBject, timestamps and gps 
			JObject payloadJObject = new JObject();
			JObject context = new JObject();
			context.Add("lat", "-43.5309325");
			context.Add("lng", "172.637119");// Christchurch Cathederal
			//context.Add("timestamp", ((DateTimeOffset)(DateTime.UtcNow)).ToUnixTimeSeconds()); // This field is optional and can be commented out
			JObject position = new JObject();
			position.Add("context", context);
			position.Add("value", "0");
			payloadJObject.Add("postion", position);
			payloadText = JsonConvert.SerializeObject(payloadJObject);
			*/

			var message = new MqttApplicationMessageBuilder()
				.WithTopic(stateTopic)
				.WithPayload(payloadText)
				.WithQualityOfServiceLevel(global::MQTTnet.Protocol.MqttQualityOfServiceLevel.AtLeastOnce)
			//.WithExactlyOnceQoS()// With ubidots this caused the publish to hang
			.WithAtLeastOnceQoS()
			.WithRetainFlag() 
			.Build();

			Console.WriteLine("PublishAsync start");
			mqttClient.PublishAsync(message).Wait();
			Console.WriteLine("PublishAsync finish");

			Thread.Sleep(30100);
		}
	}

	private static void MqttClient_ApplicationMessageReceived(object sender, MqttApplicationMessageReceivedEventArgs e)
	{
		Console.WriteLine($"ClientId:{e.ClientId} Topic:{e.ApplicationMessage.Topic} Payload:{e.ApplicationMessage.ConvertPayloadToString()}");
	}

	private static async void MqttClient_Disconnected(object sender, MqttClientDisconnectedEventArgs e)
	{
		Debug.WriteLine("Disconnected");
		await Task.Delay(TimeSpan.FromSeconds(5));

		try
		{
			await mqttClient.ConnectAsync(mqttOptions);
		}
		catch (Exception ex)
		{
			Debug.WriteLine("Reconnect failed {0}", ex.Message);
		}
	}
}

For this PoC I used the MQTTnet package which is available via NuGet. It appeared to be reasonably well supported and has had recent updates.

Variable configuration with device location map

Overall the initial configuration went smoothly, I found the dragging of blocks onto the dashboard and configuring them worked as expected.

The configuration of a “synthetic” variable (converting a temperature to Fahrenheit for readers from the Unites States of America, Myanmar & Liberia ) took a couple of goes to get right.

I may have missed something (April 2019) but the lack of boolean datatype variables was a bit odd.

Synthetic (calculated) variable configuration

I put a slider control on my test dashboard, associated it with a variable and my client reliably received messages when the slider was moved.

Dashboard with slider for desired temperature

Overall the Ubidots experience was pretty good and I’m going to spend some more time working with the device, data, users configurations to see how well it works for a “real-world” project.

I found (April 2019) that to get MQTTS going I had to install a Ubidots provided certificate

MQTT with TLS guidance and certificate download link

When my .Net Core application didn’t work I tried one my MQTT debugging tools and they didn’t work either with the Ubitdots MQTT brokers. The Ubidots forum people were quite helpful, but making it not necessary to install a certificate or making it really obvious in the documentation that this was required would be a good thing.

Losant IoT with MQTTnet

As I’m testing my Message Queue Telemetry Transport(MQTT) LoRa gateway I’m building a proof of concept(PoC) .Net core console application for each IoT platform I would like to support.

This PoC was to confirm that I could connect to the Losant MQTT API then format the topics and payloads correctly. The Losant screen designer has “Blocks” which generate commands for devices so I extended the test client to see how well this worked.

The MQTT broker, username, password, and client ID are command line options.

class Program
{
	private static IMqttClient mqttClient = null;
	private static IMqttClientOptions mqttOptions = null;
	private static string server;
	private static string username;
	private static string password;
	private static string clientId;

	static void Main(string[] args)
	{
		MqttFactory factory = new MqttFactory();
		mqttClient = factory.CreateMqttClient();
		bool heatPumpOn = false;

		if (args.Length != 4)
		{
			Console.WriteLine("[MQTT Server] [UserName] [Password] [ClientID]");
			Console.WriteLine("Press <enter> to exit");
			Console.ReadLine();
		}

		server = args[0];
		username = args[1];
		password = args[2];
		clientId = args[3];

		Console.WriteLine($"MQTT Server:{server} Username:{username} ClientID:{clientId}");

		mqttOptions = new MqttClientOptionsBuilder()
			.WithTcpServer(server)
			.WithCredentials(username, password)
			.WithClientId(clientId)
			.WithTls()
			.Build();

		mqttClient.ApplicationMessageReceived += MqttClient_ApplicationMessageReceived;
		mqttClient.Disconnected += MqttClient_Disconnected;
		mqttClient.ConnectAsync(mqttOptions).Wait();

		// Setup a subscription for commands sent to client
		string commandTopic = $"losant/{clientId}/command";
		mqttClient.SubscribeAsync(commandTopic);

		// Losant formatted client state update topic
		string stateTopic = $"losant/{clientId}/state";

		while (true)
		{
			string payloadText;
			double temperature = 22.0 + +(DateTime.UtcNow.Millisecond / 1000.0);
			double humidity = 50 + +(DateTime.UtcNow.Millisecond / 1000.0);
			Console.WriteLine($"Topic:{stateTopic} Temperature:{temperature} Humidity:{humidity} HeatPumpOn:{heatPumpOn}");

			// First attempt which worked
			//payloadText = @"{""data"":{ ""OfficeTemperature"":22.5}}";

			// Second attempt to work out data format with "real" values injected
			payloadText = @"{""data"":{ ""OfficeTemperature"":"+ temperature.ToString("f1") + @",""OfficeHumidity"":" + humidity.ToString("F0") + @"}}";

			// Third attempt with Jobject which sort of worked but number serialisation is sub optimal
			//JObject payloadJObject = new JObject(); 
			//payloadJObject.Add("time", DateTime.UtcNow.ToString("u")); // This field is optional and can be commented out

			//JObject data = new JObject();
			//data.Add("OfficeTemperature", temperature.ToString("F1"));
			//data.Add("OfficeHumidity", humidity.ToString("F0"));

			//data.Add("HeatPumpOn", heatPumpOn);
			//heatPumpOn = !heatPumpOn;
			//payloadJObject.Add( "data", data);

			//payloadText = JsonConvert.SerializeObject(payloadJObject);

			// Forth attempt with JOBject and gps info https://docs.losant.com/devices/state/
			//JObject payloadJObject = new JObject(); 
			//payloadJObject.Add("time", DateTime.UtcNow.ToString("u")); // This field is optional and can be commented out
			//JObject data = new JObject();
			//data.Add("GPS", "-43.5309325, 172.637119"); // Christchurch Cathederal
			//payloadJObject.Add("data", data);
			//payloadText = JsonConvert.SerializeObject(payloadJObject);

			var message = new MqttApplicationMessageBuilder()
				.WithTopic(stateTopic)
				.WithPayload(payloadText)
				.WithQualityOfServiceLevel(global::MQTTnet.Protocol.MqttQualityOfServiceLevel.AtLeastOnce)
				//.WithExactlyOnceQoS() With Losant this caused the publish to hang
				.WithAtLeastOnceQoS()
				//.WithRetainFlag() Losant doesn't allow this flag
				.Build();

			Console.WriteLine("PublishAsync start");
				mqttClient.PublishAsync(message).Wait();
			Console.WriteLine("PublishAsync finish");

			Thread.Sleep(30100);
		}
	}

	private static void MqttClient_ApplicationMessageReceived(object sender, MqttApplicationMessageReceivedEventArgs e)
	{
		Console.WriteLine($"ClientId:{e.ClientId} Topic:{e.ApplicationMessage.Topic} Payload:{e.ApplicationMessage.ConvertPayloadToString()}");
	}

	private static async void MqttClient_Disconnected(object sender, MqttClientDisconnectedEventArgs e)
	{
		Debug.WriteLine("Disconnected");
		await Task.Delay(TimeSpan.FromSeconds(5));

		try
		{
			await mqttClient.ConnectAsync(mqttOptions);
		}
		catch (Exception ex)
		{
			Debug.WriteLine("Reconnect failed {0}", ex.Message);
		}
	}
}

For this PoC I used the MQTTnet package which is available via NuGet. It appeared to be reasonably well supported and has had recent updates.

Overall the initial configuration went really smoothly, I found the dragging of blocks onto the dashboard and configuring them worked well.

Losant device configuration screen with trace logging

Losant .Net Core V2 client uploading simulated sensor readings

The device log made bringing up a new device easy and the error messages displayed when I had badly formatted payloads were helpful (unlike many other packages I have used).

I put a button block on the overview screen, associated it with a command publication and my client reliably received messages when the button was pressed

Losant .Net Core V2 client processing command

Overall the Losant experience was pretty good and I’m going to spend some more time working with the application designer, devices recipes, webhooks, integrations and workflows etc. to see how well it works for a “real-world” project.

Adafruit MQTT with MQTTnet

Before building the Message Queue Telemetry Transport(MQTT) gateway I built a proof of concept(PoC) .Net core console application. This was to confirm that I could connect to the Adafruit.IO MQTT broker and format the topic (with and without group name) and payload correctly. The Adafruit IO MQTT documentation suggests an approach for naming topics which allows a bit more structure for feed names than the REST API.

The MQTT broker, username, API key, client ID, optional group name (to keep MQTT aligned with REST API terminology) and feed name are command line options.

class Program
{
	private static IMqttClient mqttClient = null;
	private static IMqttClientOptions mqttOptions = null;
	private static string server;
	private static string username;
	private static string password;
	private static string clientId;
	private static string groupname;
	private static string feedname;

	static void Main(string[] args)
	{
		MqttFactory factory = new MqttFactory();
		mqttClient = factory.CreateMqttClient();

		if ((args.Length != 5) && (args.Length != 6))
		{
			Console.WriteLine("[MQTT Server] [UserName] [Password] [ClientID] [GroupName] [FeedName]");
			Console.WriteLine("[MQTT Server] [UserName] [Password] [ClientID] [FeedName]");
			Console.WriteLine("Press <enter> to exit");
			Console.ReadLine();
			return;
		}

		server = args[0];
		username = args[1];
		password = args[2];
		clientId = args[3];
		if (args.Length == 5)
		{
			feedname = args[4].ToLower();
			Console.WriteLine($"MQTT Server:{server} Username:{username} ClientID:{clientId} Feedname:{feedname}");
		}

		if (args.Length == 6)
		{
			groupname = args[4].ToLower();
			feedname = args[5].ToLower();
			Console.WriteLine($"MQTT Server:{server} Username:{username} ClientID:{clientId} Groupname:{groupname} Feedname:{feedname}");
		}

		mqttOptions = new MqttClientOptionsBuilder()
			.WithTcpServer(server)
			.WithCredentials(username, password)
			.WithClientId(clientId)
			.WithTls()
			.Build();

		mqttClient.Disconnected += MqttClient_Disconnected;
		mqttClient.ConnectAsync(mqttOptions).Wait();

		// Adafruit.IO format for topics which are called feeds
		string topic = string.Empty;

		if (args.Length == 5)
		{
			topic = $"{args[1]}/feeds/{feedname}";
		}

		if (args.Length == 6)
		{
			topic = $"{args[1]}/feeds/{groupname}.{feedname}";
		}

		while (true)
		{
			string value = "22." + DateTime.UtcNow.Millisecond.ToString();
			Console.WriteLine($"Topic:{topic} Value:{value}");

			var message = new MqttApplicationMessageBuilder()
				.WithTopic(topic)
				.WithPayload(value)
				.WithQualityOfServiceLevel(MQTTnet.Protocol.MqttQualityOfServiceLevel.AtLeastOnce)
				.WithRetainFlag()
				.Build();

			Console.WriteLine("PublishAsync start");
			mqttClient.PublishAsync(message).Wait();
			Console.WriteLine("PublishAsync finish");

			Thread.Sleep(30100);
		}
	}

	private static async void MqttClient_Disconnected(object sender, MqttClientDisconnectedEventArgs e)
	{
		Debug.WriteLine("Disconnected");
		await Task.Delay(TimeSpan.FromSeconds(5));

		try
		{
			await mqttClient.ConnectAsync(mqttOptions);
		}
		catch (Exception ex)
		{
			Debug.WriteLine("Reconnect failed {0}", ex.Message);
		}
	}
}

For this PoC I used the MQTTnet package which is available via NuGet. It appeared to be reasonably well supported and has had recent updates.

Overall the process went pretty well, I found that looking at the topic names in the Adafruit IO feed setup screens helped a lot. A couple of times I was tripped up by mixed case in my text fields.

.Net Core 2 client with group name
Adafruit IO feed setup with group name
Console client without group name
Adafruit IO feed setup without group name

I am also going to try building some clients with the Eclipse Paho project .net client so I can compare a couple of different libraries.

MQTT LoRa Windows 10 IoT Core Field Gateway

After building platform specific gateways I have built an MQ Telemetry Transport(MQTT) Field Gateway. The application is a Windows IoT Core background task and uses the MQTTnet client. The first supported cloud Internet of Things (IoT) application API is the AdaFruit.IO MQTT interface.

This client implementation is not complete and currently only supports basic topic formatting (setup in the config.json file) and device to cloud (D2C messaging). The source code and a selection of prebuilt installers are available on GitHub.com.

Included with the field gateway application are number of console applications that I am using to debug connectivity with the different cloud platforms.

There also sample Arduino with Dragino LoRa Shield for Arduino, MakerFabs Maduino, Dragino LoRa Mini Dev, M2M Low power Node and Netduino with Elecrow LoRa RFM95 Shield etc. clients

AdaFruit.IO dashboard for Arduino Sensor Node
Arduino device with AM2302 temperature sensor

When the application is first started it creates a minimal configuration file which should be downloaded, the missing information filled out, then uploaded using the File explorer in the Windows device portal.

{
  "MQTTUserName": "",
  "MQTTPassword": "",
  "MqttTopicFormat": "{0}/feeds/{1}{2}",
  "MQTTClientID": "",
  "MQTTServer": "",
  "Address": "LoRaIoT2",
  "Frequency": 433000000.0
}

The application logs debugging information to the Windows 10 IoT Core ETW logging Microsoft-Windows-Diagnostics-LoggingChannel

The application currently only supports comma separated value(CSV) payloads. I am working on JavaScript Object Notation(JSON) and Low Power Payload(LPP) support.

Over time I will upload pre-built application packages to the gihub repo to make it easier to install. The installation process is exactly the same as my AdaFruit.IO and Azure IoT Hubs/Central field gateways.

Azure IOT Hub nRF24L01 Windows 10 IoT Core Field Gateway with BorosRF2

A couple of BorosRF2 Dual nRF24L01 Hats arrived earlier in the week. After some testing with my nRF24L01 Test application I have added compile-time configuration options for the two nRF24L01 sockets to my Azure IoT Hub nRF24L01 Field Gateway.

Boros RF2 with Dual nRF24L01 devices
public sealed class StartupTask : IBackgroundTask
{
   private const string ConfigurationFilename = "config.json";

   private const byte MessageHeaderPosition = 0;
   private const byte MessageHeaderLength = 1;

   // nRF24 Hardware interface configuration
#if CEECH_NRF24L01P_SHIELD
   private const byte RF24ModuleChipEnablePin = 25;
   private const byte RF24ModuleChipSelectPin = 0;
   private const byte RF24ModuleInterruptPin = 17;
#endif

#if BOROS_RF2_SHIELD_RADIO_0
   private const byte RF24ModuleChipEnablePin = 24;
   private const byte RF24ModuleChipSelectPin = 0;
   private const byte RF24ModuleInterruptPin = 27;
#endif

#if BOROS_RF2_SHIELD_RADIO_1
   private const byte RF24ModuleChipEnablePin = 25;
   private const byte RF24ModuleChipSelectPin = 1;
   private const byte RF24ModuleInterruptPin = 22;
#endif

private readonly LoggingChannel logging = new LoggingChannel("devMobile Azure IotHub nRF24L01 Field Gateway", null, new Guid("4bd2826e-54a1-4ba9-bf63-92b73ea1ac4a"));
private readonly RF24 rf24 = new RF24();

This version supports one nRF24L01 device socket active at a time.

Enabling both nRF24L01 device sockets broke outbound message routing in a prototype branch with cloud to device(C2D) messaging support. This functionality is part of an Over The Air(OTA) device provisioning implementation I’m working o.