Adafruit LoRa Radio Bonnet with OLED – RadioFruit

Today a package arrived from Adafruit which contained an Adafruit LoRa Radio Bonnet 868 or 915MHz with OLED RFM95W.

The shield has a small OLED screen and 3 buttons connected to General Purpose Input Output(GPIO) pins.

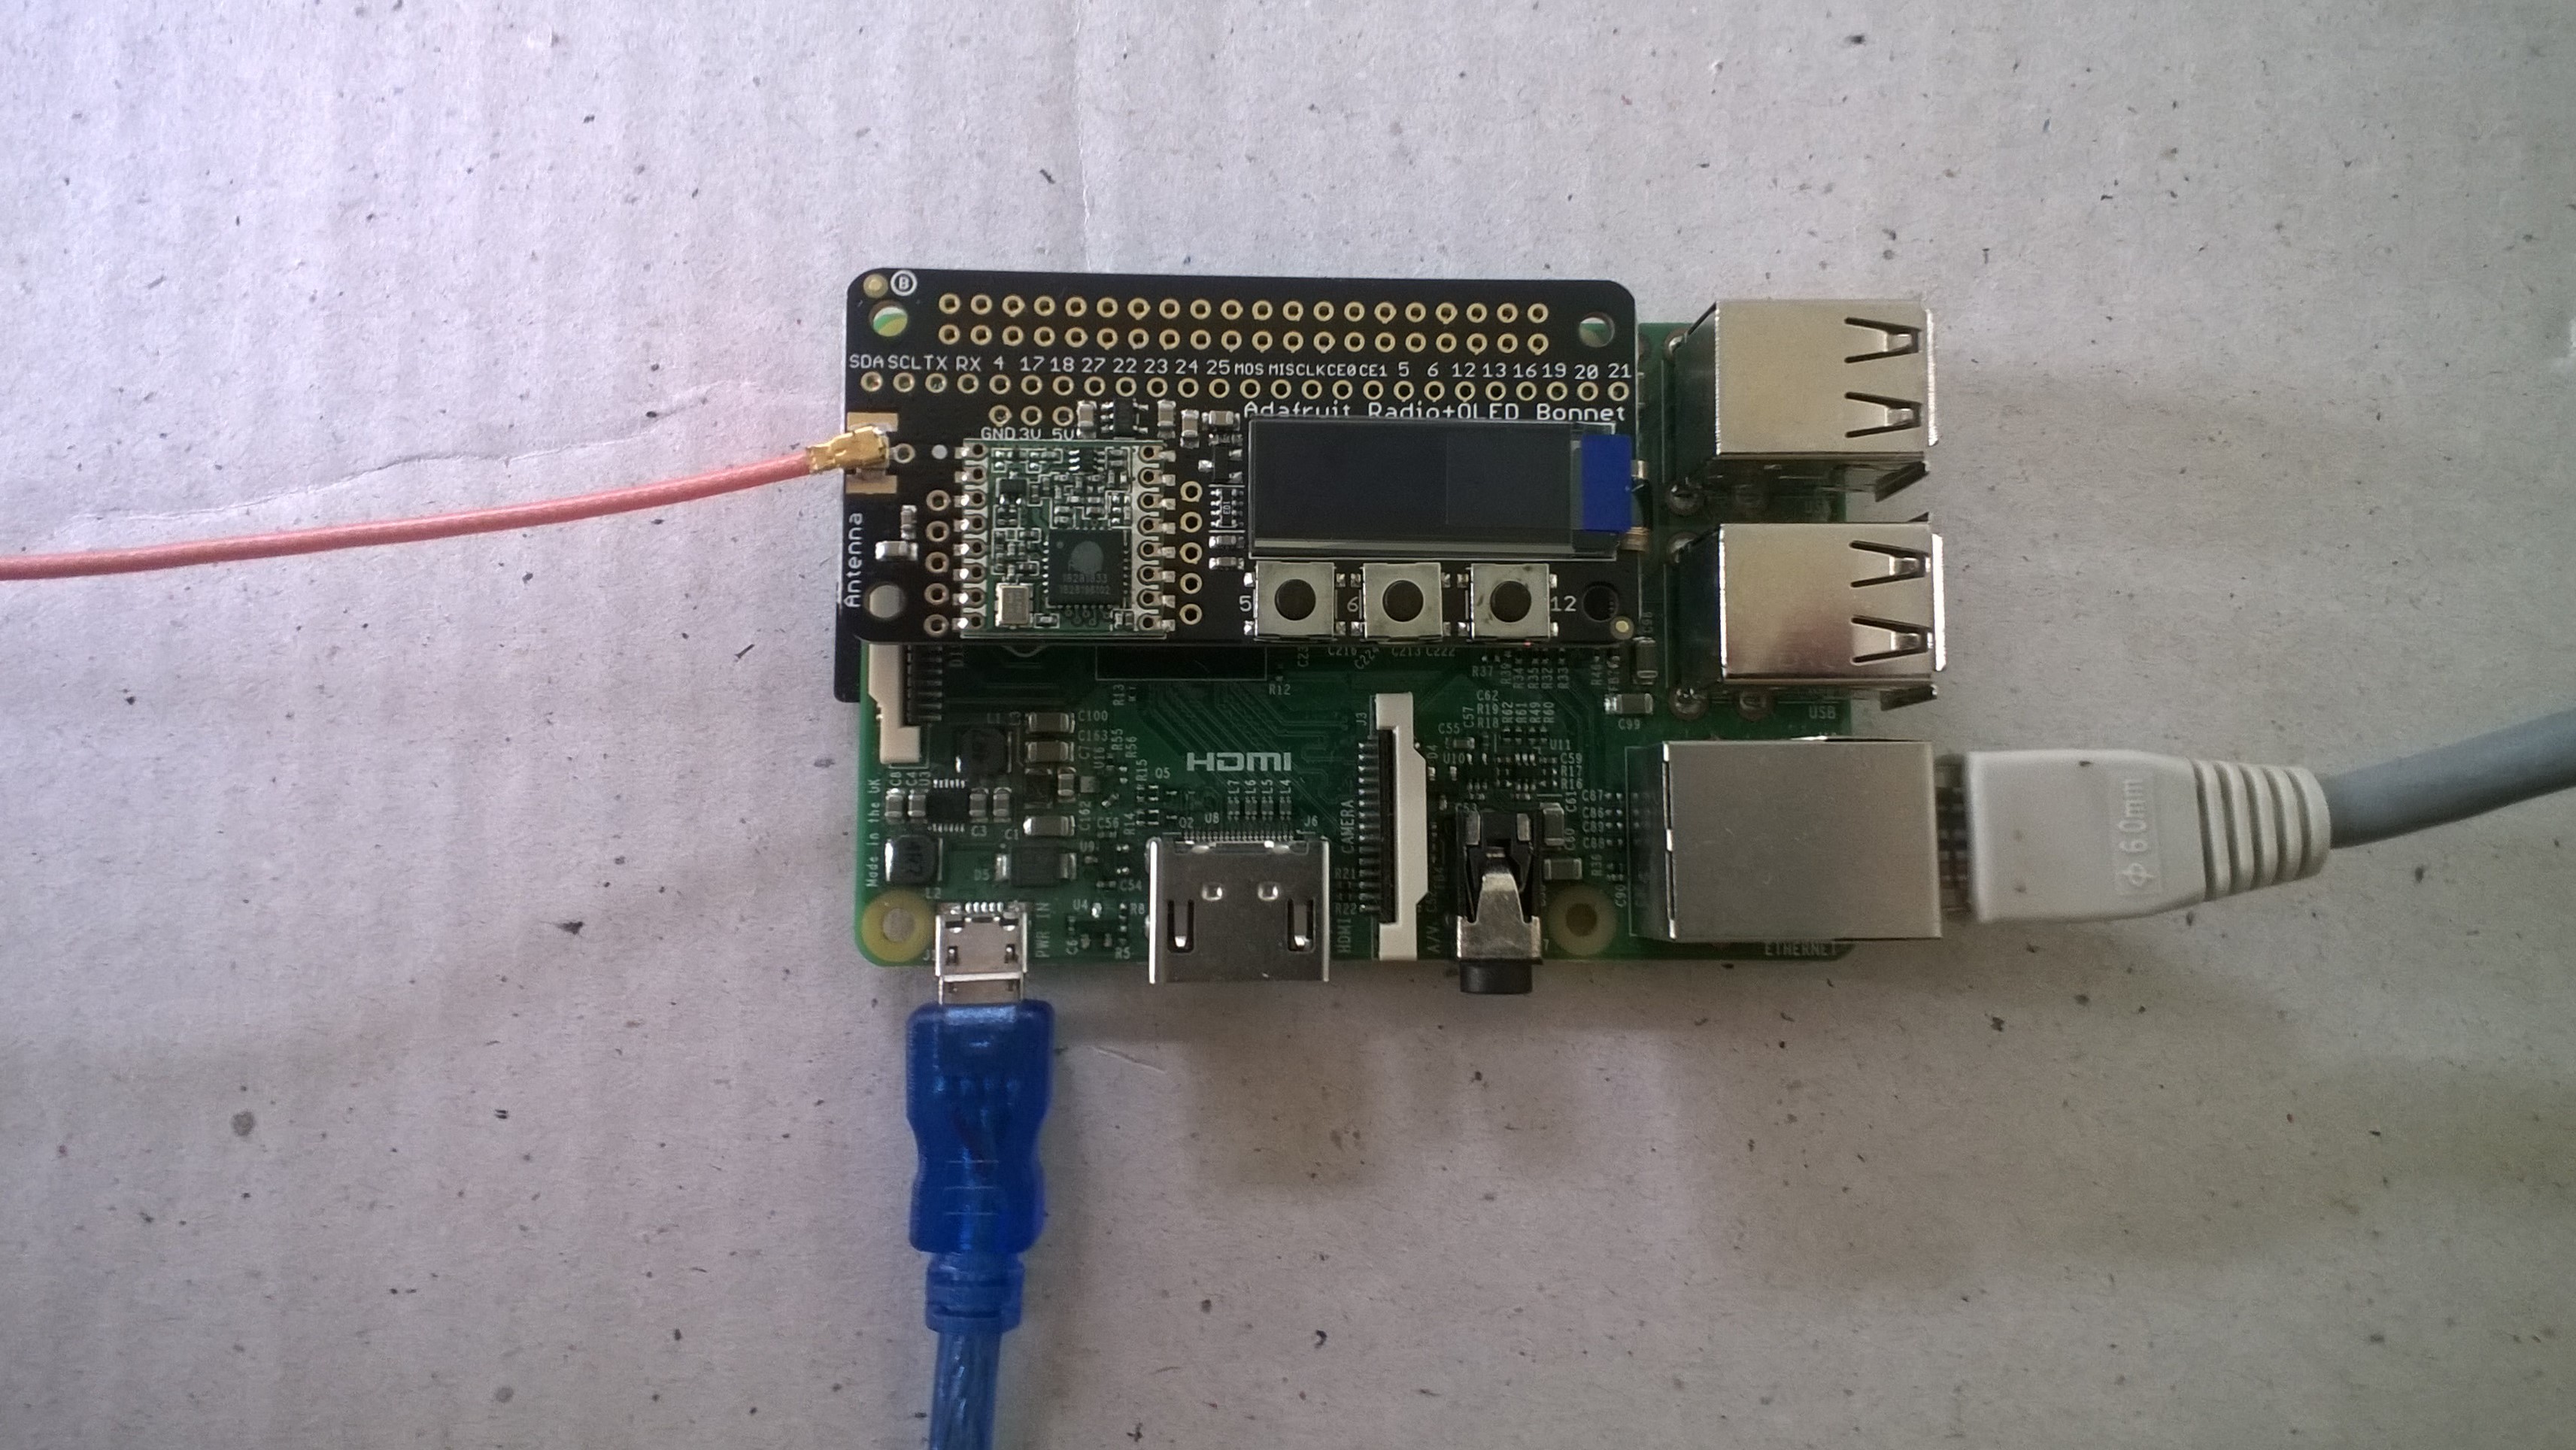
The first step was to check the pin assignments of the 3 buttons.

/*
    Copyright ® 2019 Feb devMobile Software, All Rights Reserved
 
    MIT License

    Permission is hereby granted, free of charge, to any person obtaining a copy
    of this software and associated documentation files (the "Software"), to deal
    in the Software without restriction, including without limitation the rights
    to use, copy, modify, merge, publish, distribute, sublicense, and/or sell
    copies of the Software, and to permit persons to whom the Software is
    furnished to do so, subject to the following conditions:

    The above copyright notice and this permission notice shall be included in all
    copies or substantial portions of the Software.

    THE SOFTWARE IS PROVIDED "AS IS", WITHOUT WARRANTY OF ANY KIND, EXPRESS OR
    IMPLIED, INCLUDING BUT NOT LIMITED TO THE WARRANTIES OF MERCHANTABILITY,
    FITNESS FOR A PARTICULAR PURPOSE AND NONINFRINGEMENT. IN NO EVENT SHALL THE
    AUTHORS OR COPYRIGHT HOLDERS BE LIABLE FOR ANY CLAIM, DAMAGES OR OTHER
    LIABILITY, WHETHER IN AN ACTION OF CONTRACT, TORT OR OTHERWISE, ARISING FROM,
    OUT OF OR IN CONNECTION WITH THE SOFTWARE OR THE USE OR OTHER DEALINGS IN THE
    SOFTWARE

	 Adafruit documentation page
	 https://learn.adafruit.com/adafruit-radio-bonnets/pinouts

    Button 1: GPIO 5 
    Button 2: GPIO 6
    Button 3: GPIO 12 

 */
namespace devMobile.IoT.Rfm9x.AdafruitButtons
{
	using System;
	using System.Diagnostics;
	using Windows.ApplicationModel.Background;
	using Windows.Devices.Gpio;

	public sealed class StartupTask : IBackgroundTask
    {
		private BackgroundTaskDeferral backgroundTaskDeferral = null;
		private GpioPin InterruptGpioPin1 = null;
		private GpioPin InterruptGpioPin2 = null;
		private GpioPin InterruptGpioPin3 = null;
		private const int InterruptPinNumber1 = 5;
		private const int InterruptPinNumber2 = 6;
		private const int InterruptPinNumber3 = 12;
		private readonly TimeSpan debounceTimeout = new TimeSpan(0, 0, 15);


		public void Run(IBackgroundTaskInstance taskInstance)
        {
			Debug.WriteLine("Application startup");

			try
			{
				GpioController gpioController = GpioController.GetDefault();

				InterruptGpioPin1 = gpioController.OpenPin(InterruptPinNumber1);
				InterruptGpioPin1.SetDriveMode(GpioPinDriveMode.InputPullUp);
				InterruptGpioPin1.ValueChanged += InterruptGpioPin_ValueChanged; ;

				InterruptGpioPin2 = gpioController.OpenPin(InterruptPinNumber2);
				InterruptGpioPin2.SetDriveMode(GpioPinDriveMode.InputPullUp);
				InterruptGpioPin2.ValueChanged += InterruptGpioPin_ValueChanged; ;

				InterruptGpioPin3 = gpioController.OpenPin(InterruptPinNumber3);
				InterruptGpioPin3.SetDriveMode(GpioPinDriveMode.InputPullUp);
				InterruptGpioPin3.ValueChanged += InterruptGpioPin_ValueChanged; ;

				Debug.WriteLine("Digital Input Interrupt configuration success");
			}
			catch (Exception ex)
			{
				Debug.WriteLine($"Digital Input Interrupt configuration failed " + ex.Message);
				return;
			}

			//enable task to continue running in background
			backgroundTaskDeferral = taskInstance.GetDeferral();
		}

		private void InterruptGpioPin_ValueChanged(GpioPin sender, GpioPinValueChangedEventArgs args)
		{
			Debug.WriteLine($"Digital Input Interrupt {sender.PinNumber} triggered {args.Edge}");
		}
	}
}

When I ran the application it produced the following output when I pressed the three buttons (left->right) which confirmed I had the correct GPIO pins configuration.

Application startup
'backgroundTaskHost.exe' (CoreCLR: CoreCLR_UWP_Domain): Loaded 'C:\Data\Programs\WindowsApps\Microsoft.NET.CoreFramework.Debug.2.2_2.2.27129.1_arm__8wekyb3d8bbwe\System.Runtime.WindowsRuntime.dll'. Skipped loading symbols. Module is optimized and the debugger option 'Just My Code' is enabled.
Digital Input Interrupt configuration success
Digital Input Interrupt 5 triggered FallingEdge
Digital Input Interrupt 5 triggered RisingEdge
Digital Input Interrupt 6 triggered FallingEdge
Digital Input Interrupt 6 triggered RisingEdge
Digital Input Interrupt 12 triggered FallingEdge
Digital Input Interrupt 12 triggered RisingEdge

The next step was to get the Serial Peripheral Interface (SPI) interface for the module working.

/*
    Copyright ® 2019 Feb devMobile Software, All Rights Reserved
 
    MIT License

    Permission is hereby granted, free of charge, to any person obtaining a copy
    of this software and associated documentation files (the "Software"), to deal
    in the Software without restriction, including without limitation the rights
    to use, copy, modify, merge, publish, distribute, sublicense, and/or sell
    copies of the Software, and to permit persons to whom the Software is
    furnished to do so, subject to the following conditions:

    The above copyright notice and this permission notice shall be included in all
    copies or substantial portions of the Software.

    THE SOFTWARE IS PROVIDED "AS IS", WITHOUT WARRANTY OF ANY KIND, EXPRESS OR
    IMPLIED, INCLUDING BUT NOT LIMITED TO THE WARRANTIES OF MERCHANTABILITY,
    FITNESS FOR A PARTICULAR PURPOSE AND NONINFRINGEMENT. IN NO EVENT SHALL THE
    AUTHORS OR COPYRIGHT HOLDERS BE LIABLE FOR ANY CLAIM, DAMAGES OR OTHER
    LIABILITY, WHETHER IN AN ACTION OF CONTRACT, TORT OR OTHERWISE, ARISING FROM,
    OUT OF OR IN CONNECTION WITH THE SOFTWARE OR THE USE OR OTHER DEALINGS IN THE
    SOFTWARE

	 Adafruit documentation page
	 https://learn.adafruit.com/adafruit-radio-bonnets/pinouts

	 CS : CE1
	 RST : GPIO25
	 IRQ : GPIO22 (DIO0)
	 Unused : GPIO23 (DIO1)
	 Unused : GPIO24 (DIO2)
 */
namespace devMobile.IoT.Rfm9x.AdafruitSPI
{
	using System;
	using System.Diagnostics;
	using System.Threading;
	using Windows.ApplicationModel.Background;
	using Windows.Devices.Spi;

	public sealed class StartupTask : IBackgroundTask
	{
		public void Run(IBackgroundTaskInstance taskInstance)
		{
			SpiController spiController = SpiController.GetDefaultAsync().AsTask().GetAwaiter().GetResult();
			var settings = new SpiConnectionSettings(1)
			{
				ClockFrequency = 500000,
				Mode = SpiMode.Mode0,   // From SemTech docs pg 80 CPOL=0, CPHA=0
			};

			SpiDevice Device = spiController.GetDevice(settings);

			while (true)
			{
				byte[] writeBuffer = new byte[] { 0x42 }; // RegVersion
				byte[] readBuffer = new byte[1];

				Device.TransferSequential(writeBuffer, readBuffer);

				byte registerValue = readBuffer[0];
				Debug.WriteLine("Register 0x{0:x2} - Value 0X{1:x2} - Bits {2}", 0x42, registerValue, Convert.ToString(registerValue, 2).PadLeft(8, '0'));

				Thread.Sleep(10000);
			}
		}
	}
}

The output confirm the code worked

'backgroundTaskHost.exe' (CoreCLR: CoreCLR_UWP_Domain): Loaded 'C:\Data\Programs\WindowsApps\Microsoft.NET.CoreFramework.Debug.2.2_2.2.27129.1_arm__8wekyb3d8bbwe\System.Threading.Thread.dll'. Skipped loading symbols. Module is optimized and the debugger option 'Just My Code' is enabled.
Register 0x42 - Value 0X12 - Bits 00010010

The next step is to build support for this shield into my RFM9X.IoTCore library and get the OLED working.

Adafruit.IO LoRa Field Gateway BCD Addressing

After some testing with more client devices, especially the Easy Sensors Arduino Nano radio shield RFM69/95 or NRF24L01+ I have decided to move to non text addresses for devices and the LoRa field gateway.

THIS IS A BREAKING CHANGE

The unique identifier provided by the SHA204A crypto and authentication chip on the EasySensors shield highlighted this issue. The Binary Coded Decimal(BCD) version of the 72 bit identifier was too long to fit in the from address.

My later Arduino based sample clients have some helper functions to populate the message header, add values, and prepare the message payload for reuse.

On the server side I have added code to log the build version and Raspbery PI shield type

// Log the Application build, shield information etc.
LoggingFields appllicationBuildInformation = new LoggingFields();
#if DRAGINO
   appllicationBuildInformation.AddString("Shield", "DraginoLoRaGPSHat");
#endif
…
#if UPUTRONICS_RPIPLUS_CS1
   appllicationBuildInformation.AddString("Shield", "UputronicsPiPlusLoRaExpansionBoardCS1");
#endif
appllicationBuildInformation.AddString("Timezone", TimeZoneSettings.CurrentTimeZoneDisplayName);
appllicationBuildInformation.AddString("OSVersion", Environment.OSVersion.VersionString);
appllicationBuildInformation.AddString("MachineName", Environment.MachineName);

// This is from the application manifest 
Package package = Package.Current;
PackageId packageId = package.Id;
PackageVersion version = packageId.Version;

appllicationBuildInformation.AddString("ApplicationVersion", string.Format($"{version.Major}.{version.Minor}.{version.Build}.{version.Revision}"));
this.loggingChannel.LogEvent("Application starting", appllicationBuildInformation, LoggingLevel.Information);

Then when the message payload is populated the from address byte array is converted to BCD

private async void Rfm9XDevice_OnReceive(object sender, Rfm9XDevice.OnDataReceivedEventArgs e)
{
   string addressBcdText;
   string messageBcdText;
   string messageText = "";
   char[] sensorReadingSeparator = new char[] { ',' };
   char[] sensorIdAndValueSeparator = new char[] { ' ' };

   addressBcdText = BitConverter.ToString(e.Address);

   messageBcdText = BitConverter.ToString(e.Data);
   try
   {
      messageText = UTF8Encoding.UTF8.GetString(e.Data);
   }
   catch (Exception)
   {
      this.loggingChannel.LogMessage("Failure converting payload to text", LoggingLevel.Error);
   return;
   }

#if DEBUG
    Debug.WriteLine(@"{0:HH:mm:ss}-RX From {1} PacketSnr {2:0.0} Packet RSSI {3}dBm RSSI {4}dBm = {5} byte message ""{6}""", DateTime.Now, addressBcdText, e.PacketSnr, e.PacketRssi, e.Rssi, e.Data.Length, messageText);
#endif
   LoggingFields messagePayload = new LoggingFields();
   messagePayload.AddInt32("AddressLength", e.Address.Length);
   messagePayload.AddString("Address-BCD", addressBcdText);
   messagePayload.AddInt32("Message-Length", e.Data.Length);
   messagePayload.AddString("Message-BCD", messageBcdText);
   messagePayload.AddString("Nessage-Unicode", messageText);
   messagePayload.AddDouble("Packet SNR", e.PacketSnr);
   messagePayload.AddInt32("Packet RSSI", e.PacketRssi);
   messagePayload.AddInt32("RSSI", e.Rssi);
   this.loggingChannel.LogEvent("Message Data", messagePayload, LoggingLevel.Verbose);

			
   // Check the address is not to short/long 
   if (e.Address.Length < AddressLengthMinimum)
   {
      this.loggingChannel.LogMessage("From address too short", LoggingLevel.Warning);
      return;
   }

   if (e.Address.Length > MessageLengthMaximum)
   {
      this.loggingChannel.LogMessage("From address too long", LoggingLevel.Warning);
      return;
   }

   // Check the payload is not too short/long 
   if (e.Data.Length < MessageLengthMinimum)
   {
      this.loggingChannel.LogMessage("Message too short to contain any data", LoggingLevel.Warning);
      return;
   }

   if (e.Data.Length > MessageLengthMaximum)
   {
      this.loggingChannel.LogMessage("Message too long to contain valid data", LoggingLevel.Warning);
      return;
   }

   // Adafruit IO is case sensitive & only does lower case ?
   string deviceId = addressBcdText.ToLower();

   // Chop up the CSV text payload
   string[] sensorReadings = messageText.Split(sensorReadingSeparator, StringSplitOptions.RemoveEmptyEntries);
   if (sensorReadings.Length == 0)
   {
      this.loggingChannel.LogMessage("Payload contains no sensor readings", LoggingLevel.Warning);
      return;
   }

   Group_feed_data groupFeedData = new Group_feed_data();

   LoggingFields sensorData = new LoggingFields();
   sensorData.AddString("DeviceID", deviceId);

   // Chop up each sensor reading into an ID & value
   foreach (string sensorReading in sensorReadings)
   {
      string[] sensorIdAndValue = sensorReading.Split(sensorIdAndValueSeparator, StringSplitOptions.RemoveEmptyEntries);

      // Check that there is an id & value
      if (sensorIdAndValue.Length != 2)
      {
         this.loggingChannel.LogMessage("Sensor reading invalid format", LoggingLevel.Warning);
         return;
      }

      string sensorId = sensorIdAndValue[0].ToLower();
      string value = sensorIdAndValue[1];

      // Construct the sensor ID from SensordeviceID & Value ID
      groupFeedData.Feeds.Add(new Anonymous2() { Key = string.Format("{0}{1}", deviceId, sensorId), Value = value });

      sensorData.AddString(sensorId, value);

      Debug.WriteLine(" Sensor {0}{1} Value {2}", deviceId, sensorId, value);
   }
   this.loggingChannel.LogEvent("Sensor readings", sensorData, LoggingLevel.Verbose);

   try
   {
      Debug.WriteLine(" CreateGroupDataAsync start");
      await this.adaFruitIOClient.CreateGroupDataAsync(this.applicationSettings.AdaFruitIOUserName,
this.applicationSettings.AdaFruitIOGroupName.ToLower(), groupFeedData);
      Debug.WriteLine(" CreateGroupDataAsync finish");
   }
   catch (Exception ex)
   {
      Debug.WriteLine(" CreateGroupDataAsync failed {0}", ex.Message);
				this.loggingChannel.LogMessage("CreateGroupDataAsync failed " + ex.Message, LoggingLevel.Error);
   }
}
AfaFruit.IO Data Display

This does mean longer field names but I usually copy n paste them from the Arduino serial monitor or the Event Tracing For Windows (ETW) logging.

AdaFruit.IO Field gateway ETW Logging

Adafruit Feather M0 RFM95 LoRa Radio Payload Addressing Client

This is a demo AdaFruit Feather Mo0 Radio with LoRa Radio Module client (based on one of the examples from Arduino-LoRa) that uploads telemetry data to my Windows 10 IoT Core on Raspberry PI field gateway proof of concept(PoC).

The Adafruit learn site had sample code based on the RadioHead library which was useful. This device supports 868MHz & 915Mz, there is are other Arduino 32u4 and 433MHz devices available.

Bill of materials (Prices Sep 2018)

  • Adafruit Feather M0 RFM95 LoRa Radio (433 or 900 MHz) USD34.95
  • Seeedstudio Temperature and Humidity Sensor Pro USD11.50
  • Seeedstudio 4 pin Male Jumper to Grove 4 pin Conversion Cable USD2.90

The code is pretty basic, it reads a value from the Seeedstudio temperature and humidity sensor, then packs the payload and sets the necessary RFM9X/SX127X LoRa module configuration, has no power conservation, advanced wireless configuration etc. I had to add an extra include from the dstrtof function

AdaFruitM0Feather

/*
  Adapted from LoRa Duplex communication with Sync Word

  Sends temperature & humidity data from Seeedstudio 

  https://www.seeedstudio.com/Grove-Temperature-Humidity-Sensor-High-Accuracy-Min-p-1921.html

  To my Windows 10 IoT Core RFM 9X library

  
RFM9X.IoTCore Payload Addressing
*/ #include #include #include #include const int csPin = 8; // LoRa radio chip select const int resetPin = 4; // LoRa radio reset const int irqPin = 3; // change for your board; must be a hardware interrupt pin // Field gateway configuration const char FieldGatewayAddress[] = "LoRaIoT1"; const float FieldGatewayFrequency = 915000000.0; const byte FieldGatewaySyncWord = 0x12 ; // Payload configuration const int PayloadSizeMaximum = 64 ; byte payload[PayloadSizeMaximum] = ""; const byte SensorReadingSeperator = ',' ; // Manual serial number configuration const char DeviceId[] = {"AdafruitM0"}; const int LoopSleepDelaySeconds = 10 ; void setup() { Serial.begin(9600); //while (!Serial); Serial.println("LoRa Setup"); // override the default CS, reset, and IRQ pins (optional) LoRa.setPins(csPin, resetPin, irqPin);// set CS, reset, IRQ pin if (!LoRa.begin(FieldGatewayFrequency)) { Serial.println("LoRa init failed. Check your connections."); while (true); } // Need to do this so field gateways pays attention to messages from this device LoRa.enableCrc(); LoRa.setSyncWord(FieldGatewaySyncWord); //LoRa.dumpRegisters(Serial); Serial.println("LoRa Setup done."); // Configure the Seeedstudio TH02 temperature & humidity sensor Serial.println("TH02 setup"); TH02.begin(); delay(100); Serial.println("TH02 Setup done"); Serial.println("Setup done"); } void loop() { int payloadLength = 0 ; float temperature ; float humidity ; Serial.println("Loop called"); memset(payload, 0, sizeof(payload)); // prepare the payload header with "To" Address length (top nibble) and "From" address length (bottom nibble) payload[0] = (strlen(FieldGatewayAddress) << 4) | strlen( DeviceId ) ; payloadLength += 1; // Copy the "To" address into payload memcpy(&payload[payloadLength], FieldGatewayAddress, strlen(FieldGatewayAddress)); payloadLength += strlen(FieldGatewayAddress) ; // Copy the "From" into payload memcpy(&payload[payloadLength], DeviceId, strlen(DeviceId)); payloadLength += strlen(DeviceId) ; // Read the temperature and humidity values then display nicely temperature = TH02.ReadTemperature(); humidity = TH02.ReadHumidity(); Serial.print("T:"); Serial.print( temperature, 1 ) ; Serial.print( "C" ) ; Serial.print(" H:"); Serial.print( humidity, 0 ) ; Serial.println( "%" ) ; // Copy the temperature into the payload payload[ payloadLength] = 't'; payloadLength += 1 ; payload[ payloadLength] = ' '; payloadLength += 1 ; payloadLength += strlen( dtostrf(temperature, -1, 1, (char*)&payload[payloadLength])); payload[ payloadLength] = SensorReadingSeperator; payloadLength += sizeof(SensorReadingSeperator) ; // Copy the humidity into the payload payload[ payloadLength] = 'h'; payloadLength += 1 ; payload[ payloadLength] = ' '; payloadLength += 1 ; payloadLength += strlen( dtostrf(humidity, -1, 0, (char *)&payload[payloadLength])); // display info about payload then send it (No ACK) with LoRa unlike nRF24L01 Serial.print( "RFM9X/SX127X Payload length:"); Serial.print( payloadLength ); Serial.println( " bytes" ); LoRa.beginPacket(); LoRa.write( payload, payloadLength ); LoRa.endPacket(); Serial.println("Loop done"); delay(LoopSleepDelaySeconds * 1000l); }

In the Arduino debug monitor the messages from the device looked like this

Loop done
Loop called
T:17.5C H:94%
RFM9X/SX127X Payload length:30 bytes
Loop done
Loop called
T:17.5C H:95%
RFM9X/SX127X Payload length:30 bytes
Loop done
Loop called
T:17.6C H:95%
RFM9X/SX127X Payload length:30 bytes
Loop done

In the debug output window the messages from the device looked like this

The thread 0xf9c has exited with code 0 (0x0).
The thread 0x8ac has exited with code 0 (0x0).
09:53:53-RX From AdafruitM0 PacketSnr 10.3 Packet RSSI -51dBm RSSI -103dBm = 11 byte message "t 17.8,h 93"
Sensor AdafruitM0t Value 17.8
Sensor AdafruitM0h Value 93
AzureIoTHubClient SendEventAsync start
AzureIoTHubClient SendEventAsync finish
The thread 0x704 has exited with code 0 (0x0).
The thread 0xad4 has exited with code 0 (0x0).
09:54:03-RX From AdafruitM0 PacketSnr 9.8 Packet RSSI -52dBm RSSI -101dBm = 11 byte message "t 17.8,h 93"
Sensor AdafruitM0t Value 17.8
Sensor AdafruitM0h Value 93
AzureIoTHubClient SendEventAsync start
AzureIoTHubClient SendEventAsync finish
The thread 0x1084 has exited with code 0 (0x0).
The thread 0xa2c has exited with code 0 (0x0).
09:54:14-RX From AdafruitM0 PacketSnr 9.8 Packet RSSI -54dBm RSSI -102dBm = 11 byte message "t 17.7,h 93"
Sensor AdafruitM0t Value 17.7
Sensor AdafruitM0h Value 93
AzureIoTHubClient SendEventAsync start
AzureIoTHubClient SendEventAsync finish
The thread 0x1720 has exited with code 0 (0x0).

10:00:06-RX From AdafruitM0 PacketSnr 9.3 Packet RSSI -52dBm RSSI -100dBm = 12 byte message "t 184.0,h 91"
Sensor AdafruitM0t Value 184.0
Sensor AdafruitM0h Value 91
AzureIoTHubClient SendEventAsync start
AzureIoTHubClient SendEventAsync finish
The thread 0x15d4 has exited with code 0 (0x0).
The thread 0x15f4 has exited with code 0 (0x0).
10:00:19-RX From AdafruitM0 PacketSnr 10.0 Packet RSSI -48dBm RSSI -102dBm = 12 byte message "t 180.9,h 94"
Sensor AdafruitM0t Value 180.9
Sensor AdafruitM0h Value 94
AzureIoTHubClient SendEventAsync start
AzureIoTHubClient SendEventAsync finish
The thread 0xabc has exited with code 0 (0x0).
The thread 0x2e4 has exited with code 0 (0x0).
10:00:29-RX From AdafruitM0 PacketSnr 9.8 Packet RSSI -49dBm RSSI -102dBm = 12 byte message "t -50.0,h 94"
Sensor AdafruitM0t Value -50.0
Sensor AdafruitM0h Value 94
AzureIoTHubClient SendEventAsync start
AzureIoTHubClient SendEventAsync finish
The thread 0x950 has exited with code 0 (0x0).
The thread 0x145c has exited with code 0 (0x0).
The thread 0x176c has exited with code 0 (0x0).
10:00:39-RX From AdafruitM0 PacketSnr 9.5 Packet RSSI -50dBm RSSI -102dBm = 11 byte message "t 17.5,h 94"
Sensor AdafruitM0t Value 17.5
Sensor AdafruitM0h Value 94
AzureIoTHubClient SendEventAsync start
AzureIoTHubClient SendEventAsync finish
The thread 0x165c has exited with code 0 (0x0).
The thread 0x6e8 has exited with code 0 (0x0).
10:00:49-RX From AdafruitM0 PacketSnr 9.8 Packet RSSI -59dBm RSSI -100dBm = 11 byte message "t 17.5,h 95"
Sensor AdafruitM0t Value 17.5
Sensor AdafruitM0h Value 95
AzureIoTHubClient SendEventAsync start
AzureIoTHubClient SendEventAsync finish
The thread 0x1334 has exited with code 0 (0x0).
The thread 0x14d0 has exited with code 0 (0x0).
10:00:59-RX From AdafruitM0 PacketSnr 9.5 Packet RSSI -66dBm RSSI -102dBm = 11 byte message "t 17.6,h 95"
Sensor AdafruitM0t Value 17.6
Sensor AdafruitM0h Value 95
AzureIoTHubClient SendEventAsync start
AzureIoTHubClient SendEventAsync finish

Then at my Azure IoT hub the data stream looked like this
AdaFruitM0LoRaFeatherIoTHub

To reduce power consumption I would disconnect/remove the light emitting diode(LED)

Azure Meetup Christchurch notes

For the people who came to my Azure meetup session this evening

Sources of sensors and development boards

http://www.adafruit.com
http://www.elecrow.com (watering kits)
http://www.ingenuitymicro.com (NZ based dev boards)
http://www.netduino.com (.NetMF development boards)
http://www.makerfabs.com
http://www.seeedstudio.com
http://www.tindie.com

nRF24Shields for RPI devices
http://www.tindie.com/products/ceech/new-raspberry-pi-to-nrf24l01-shield/

nRF24Shields for *duino devices in AU
embeddedcoolness.com

Raspberry PI Source in CHC
http://www.wavetech.co.nz

RFM69 & LoRa Modules
http://www.wisen.com.au

local sensor and device resellers quick turnaround
http://www.mindkits.co.nz
http://www.nicegear.co.nz

http://www.diyelectricskateboard.com

The watch development platform
http://www.hexiwear.com

http://www.gowifi.co.nz (Antennas & other wireless kit based in Rangiora)

my projects
http://www.hackster.io/KiwiBryn
io.adafruit.com/BrynHLewis/dashboards/home-environment

Wireless field gateway protocol V1

I’m going to build a number of nRF2L01P field gateways (Netduino Ethernet & Wifi running .NetMF, Raspberry PI running Windows 10 IoT Core, RedBearLab 3200  etc.), clients which run on a variety of hardware (Arduino, devDuino, Netduino, Seeeduino etc.) which, then upload data to a selection of IoT Cloud services (AdaFruit.IO, ThingSpeak, Microsoft IoT Central etc.)

The nRF24L01P is widely supported with messages up to 32 bytes long, low power consumption and 250kbps, 1Mbps and 2Mbps data rates.

The aim is to keep the protocol simple (telemetry only initially) to implement and debug as the client side code will be utilised by high school student projects.

The first byte of the message specifies the message type

0 = Echo

The message is displayed by the field gateway as text & hexadecimal.

1 = Device identifier + Comma separated values (CSV) payload

[0] – Set to 1

[1] – Device identifier length

[2]..[2+Device identifier length] – Unique device identifier bytes e.g. Mac address

[2+Device identifier length+1 ]..[31] – CSV payload e.g.  SensorID value, SensorID value

Overtime I will support more message types and wireless protocols.


AdaFruit IO basic Netduino HTTP client

I use Netduino devices for teaching and my students often build projects which need a cloud based service like AdaFruit.IO to capture, store and display their sensor data.

My Proof of Concept (PoC) which uses a slightly modified version of the AdaFruit.IO basic desktop HTTP client code has been running on several Netduino 2 Plus, Netduino 3 Ethernet and Netduino 3 Wifi devices for the last couple of days and looks pretty robust.

The Netduino 3 Wifi device also supports https for improved security and privacy. They also make great field gateways as they can run off solar/battery power.

N2PN3WDashBoard

The devices have been uploading temperature and humidity measurements from a Silicon labs Si7005 sensor. (Outside sensor suffering from sunstrike)

N3WifiTemperatureAndHumiditySensor

program.cs

*

Copyright ® 2017 December devMobile Software, All Rights Reserved

THIS CODE AND INFORMATION IS PROVIDED "AS IS" WITHOUT WARRANTY OF ANY
KIND, EITHER EXPRESSED OR IMPLIED, INCLUDING BUT NOT LIMITED TO THE
IMPLIED WARRANTIES OF MERCHANTABILITY AND/OR FITNESS FOR A PARTICULAR
PURPOSE.

http://www.devmobile.co.nz

*/
using System;
using System.Net;
using System.Threading;
using Microsoft.SPOT;
using Microsoft.SPOT.Hardware;
using Microsoft.SPOT.Net.NetworkInformation;
using SecretLabs.NETMF.Hardware.Netduino;
using devMobile.NetMF.Sensor;
using devMobile.IoT.NetMF;

namespace devMobile.IoT.AdaFruitIO.NetMF.Client
{
public class Program
{
private const string adaFruitIOApiBaseUrl = @"https://IO.adafruit.com/api/v2/";
private const string group = "netduino3";
private const string temperatureFeedKey = "t";
private const string humidityFeedKey = "h";
private const string adaFruitUserName = "YourUserName";
private const string adaFruitIOApiKey = "YourAPIKey";
private static readonly TimeSpan timerDueAfter = new TimeSpan(0, 0, 15);
private static readonly TimeSpan timerPeriod = new TimeSpan(0, 0, 30);
private static OutputPort led = new OutputPort(Pins.ONBOARD_LED, false);
private static SiliconLabsSI7005 sensor = new SiliconLabsSI7005();
private static AdaFruitIoClient adaFruitIoClient = new AdaFruitIoClient(adaFruitUserName, adaFruitIOApiKey, adaFruitIOApiBaseUrl);

public static void Main()
{
// Wait for Network address if DHCP
NetworkInterface networkInterface = NetworkInterface.GetAllNetworkInterfaces()[0];
if (networkInterface.IsDhcpEnabled)
{
Debug.Print(" Waiting for DHCP IP address");

while (NetworkInterface.GetAllNetworkInterfaces()[0].IPAddress == IPAddress.Any.ToString())
{
Debug.Print(" .");
led.Write(!led.Read());
Thread.Sleep(250);
}
led.Write(false);
}

// Display network config for debugging
Debug.Print("Network configuration");
Debug.Print(" Network interface type : " + networkInterface.NetworkInterfaceType.ToString());
Debug.Print(" MAC Address : " + BytesToHexString(networkInterface.PhysicalAddress));
Debug.Print(" DHCP enabled : " + networkInterface.IsDhcpEnabled.ToString());
Debug.Print(" Dynamic DNS enabled : " + networkInterface.IsDynamicDnsEnabled.ToString());
Debug.Print(" IP Address : " + networkInterface.IPAddress.ToString());
Debug.Print(" Subnet Mask : " + networkInterface.SubnetMask.ToString());
Debug.Print(" Gateway : " + networkInterface.GatewayAddress.ToString());

foreach (string dnsAddress in networkInterface.DnsAddresses)
{
Debug.Print(" DNS Server : " + dnsAddress.ToString());
}

Timer humidityAndtemperatureUpdates = new Timer(HumidityAndTemperatureTimerProc, null, timerDueAfter, timerPeriod);

Thread.Sleep(Timeout.Infinite);
}

static private void HumidityAndTemperatureTimerProc(object state)
{
led.Write(true);

try
{
double humidity = sensor.Humidity();

Debug.Print(" Humidity " + humidity.ToString("F0") + "%");
adaFruitIoClient.FeedUpdate(group, humidityFeedKey, humidity.ToString("F0"));
}
catch (Exception ex)
{
Debug.Print("Humidifty read+update failed " + ex.Message);

return;
}

try
{
double temperature = sensor.Temperature();

Debug.Print(" Temperature " + temperature.ToString("F1") + "°C");
adaFruitIoClient.FeedUpdate(group, temperatureFeedKey, temperature.ToString("F1"));
}
catch (Exception ex)
{
Debug.Print("Temperature read+update failed " + ex.Message);

return;
}

led.Write(false);
}

private static string BytesToHexString(byte[] bytes)
{
string hexString = string.Empty;

// Create a character array for hexidecimal conversion.
const string hexChars = "0123456789ABCDEF";

// Loop through the bytes.
for (byte b = 0; b < bytes.Length; b++)          {             if (b > 0)
hexString += "-";

// Grab the top 4 bits and append the hex equivalent to the return string.
hexString += hexChars[bytes[b] >> 4];

// Mask off the upper 4 bits to get the rest of it.
hexString += hexChars[bytes[b] & 0x0F];
}

return hexString;
}
}
}

AdaFruit.IO client.cs, handles feed groups and individual feeds

/*

Copyright ® 2017 December devMobile Software, All Rights Reserved

THIS CODE AND INFORMATION IS PROVIDED "AS IS" WITHOUT WARRANTY OF ANY
KIND, EITHER EXPRESSED OR IMPLIED, INCLUDING BUT NOT LIMITED TO THE
IMPLIED WARRANTIES OF MERCHANTABILITY AND/OR FITNESS FOR A PARTICULAR
PURPOSE.

http://www.devmobile.co.nz

*/
using System;
using System.IO;
using System.Net;
using System.Text;
using Microsoft.SPOT;

namespace devMobile.IoT.NetMF
{
public class AdaFruitIoClient
{
private const string apiBaseUrlDefault = @"http://IO.adafruit.com/api/v2/";
private string apiBaseUrl = "";
private string userName = "";
private string apiKey = "";
private int httpRequestTimeoutmSec;
private int httpRequestReadWriteTimeoutmSec;

public AdaFruitIoClient(string userName, string apiKey, string apiBaseUrl = apiBaseUrlDefault, int httpRequestTimeoutmSec = 2500, int httpRequestReadWriteTimeoutmSec = 5000)
{
this.apiBaseUrl = apiBaseUrl;
this.userName = userName;
this.apiKey = apiKey;
this.httpRequestReadWriteTimeoutmSec = httpRequestReadWriteTimeoutmSec;
this.httpRequestTimeoutmSec = httpRequestTimeoutmSec;
}

public void FeedUpdate(string group, string feedKey, string value)
{
string feedUrl;

if (group.Trim() == string.Empty)
{
feedUrl = apiBaseUrl + userName + @"/feeds/" + feedKey + @"/data";
}
else
{
feedUrl = apiBaseUrl + userName + @"/feeds/" + group.Trim() + "." + feedKey + @"/data";
}

HttpWebRequest request = (HttpWebRequest)WebRequest.Create(feedUrl);
{
string payload = @"{""value"": """ + value + @"""}";
byte[] buffer = Encoding.UTF8.GetBytes(payload);

DateTime httpRequestedStartedAtUtc = DateTime.UtcNow;

request.Method = "POST";
request.ContentLength = buffer.Length;
request.ContentType = @"application/json";
request.Headers.Add("X-AIO-Key", apiKey);
request.KeepAlive = false;
request.Timeout = this.httpRequestTimeoutmSec;
request.ReadWriteTimeout = this.httpRequestReadWriteTimeoutmSec;

using (Stream stream = request.GetRequestStream())
{
stream.Write(buffer, 0, buffer.Length);
}

using (var response = (HttpWebResponse)request.GetResponse())
{
Debug.Print(" Status: " + response.StatusCode + " : " + response.StatusDescription);
}

TimeSpan duration = DateTime.UtcNow - httpRequestedStartedAtUtc;
Debug.Print(" Duration: " + duration.ToString());
}
}
}
}

Bill of materials for PoC

AdaFruit IO basic desktop HTTP client

AdaFruit IO meets my basic criteria as it has support for HTTP/S clients (it also has an MQTT interface which I will look at in a future post) and the API is well documented.

My first Proof of Concept (PoC) was to build a desktop client which used the HttpWebRequest (for ease of porting to NetMF) classes to upload data.

The program uploaded one of three simulated values to AdaFruit.IO every 10 seconds.

I found the username, group, and feed keys to be case sensitive so pay close attention to the values displayed in the webby UI or copy n paste.

program.cs

 class Program
   {
      static void Main(string[] args)
      {
         string adaFruitIOApiBaseUrl = "https://IO.adafruit.com/api/v2/";
         string adaFruitIOUserName = "YourUserName"; // This is mixed case & case sensitive
         string adaFruitIOApiKey = "YourAPIKey";
         // The feed group and feed key are forced to lower case by UI
         const string feedGroup = "";
         //const string feedGroup = "devduinov2-dot-2";
         const string temperatureKey = "t";
         const double temperatureBase = 20.0;
         const double temperatureRange = 10.0;
         const string humidityKey = "h";
         const double humidityBase = 70.0;
         const double humidityRange = 20.0;
         const string batteryVoltageKey = "v";
         const double batteryVoltageBase = 3.00;
         const double batteryVoltageRange = -1.00;
         TimeSpan dataUpdateDelay = new TimeSpan(0, 0, 10);
         Random random = new Random();

         while (true)
         {
            double temperature = temperatureBase + random.NextDouble() * temperatureRange;
            Console.WriteLine("Temperature {0}°C", temperature.ToString("F1"));
            AdaFruitIoFeedUpdate(adaFruitIOApiBaseUrl, adaFruitIOUserName, adaFruitIOApiKey, feedGroup, temperatureKey, temperature.ToString("F1"));

            Thread.Sleep(dataUpdateDelay);

            double humidity = humidityBase + random.NextDouble() * humidityRange;
            Console.WriteLine("Humidity {0}%", humidity.ToString("F0"));
            AdaFruitIoFeedUpdate(adaFruitIOApiBaseUrl, adaFruitIOUserName, adaFruitIOApiKey, feedGroup, humidityKey, humidity.ToString("F0"));

            Thread.Sleep(dataUpdateDelay);

            double batteryVoltage = batteryVoltageBase + random.NextDouble() * batteryVoltageRange;
            Console.WriteLine("Battery voltage {0}V", batteryVoltage.ToString("F2"));
            AdaFruitIoFeedUpdate(adaFruitIOApiBaseUrl, adaFruitIOUserName, adaFruitIOApiKey, feedGroup, batteryVoltageKey, batteryVoltage.ToString("F2"));

            Thread.Sleep(dataUpdateDelay);
         }
      }

client.cs

      public void AdaFruitIoFeedUpdate(string apiBaseUrl, string userName, string apiKey, string group, string feedKey, string value, int httpRequestTimeoutmSec = 2500, int httpRequestReadWriteTimeoutmSec = 5000)
      {
         string feedUrl;

         if (group.Trim() == string.Empty)
         {
            feedUrl = apiBaseUrl + userName + @"/feeds/" + feedKey + @"/data";
         }
         else
         {
            feedUrl = apiBaseUrl + userName + @"/feeds/" + group.Trim() + "." + feedKey + @"/data";
         }

         Console.WriteLine(" Feed URL :{0}", feedUrl);

         try
         {
            HttpWebRequest request = (HttpWebRequest)WebRequest.Create(feedUrl);
            {
               string payload = @"{""value"": """ + value + @"""}";

               byte[] buffer = Encoding.UTF8.GetBytes(payload);

               DateTime httpRequestedStartedAtUtc = DateTime.UtcNow;

               request.Method = "POST";
               request.ContentLength = buffer.Length;
               request.ContentType = @"application/json";
               request.Headers.Add("X-AIO-Key", apiKey);
               request.KeepAlive = false;
               request.Timeout = httpRequestTimeoutmSec;
               request.ReadWriteTimeout = httpRequestReadWriteTimeoutmSec;

               using (Stream stream = request.GetRequestStream())
               {
                  stream.Write(buffer, 0, buffer.Length);
               }

               using (var response = (HttpWebResponse)request.GetResponse())
               {
                  Console.WriteLine(" Status: " + response.StatusCode + " : " + response.StatusDescription);
               }

               TimeSpan duration = DateTime.UtcNow - httpRequestedStartedAtUtc;
               Console.WriteLine(" Duration: " + duration.ToString());
            }
         }
         catch (Exception ex)
         {
            Console.WriteLine(ex.Message);
            throw;
         }
      }
   }

This approach seemed to work pretty reliably

DesktopHTTPRequest

Xively Personal is being retired

This is going to cause me a problem especially my Netduino based nRF24 Xively Field gateway which gets used in quite a few of my student projects. I’m looking for a replacement Internet of Things service which has http/s and/or mqtt, amqp support, C & C#  client libraries (which I can get to work on Windows 10 IoT Core & NetMF) would be a bonus.

From the Xively email

”After careful consideration, LogMeIn has made the decision to retire Xively Personal from its current line of products effective January 15, 2018 at 12:00PM ET . Please note that LogMeIn will continue to offer our Xively Enterprise edition – there is no change to that edition and we will continue to support that platform as part of our IoT business.

Retiring a product is never an easy decision, and we recognize it does introduce potential challenges to active users. So we want to make sure you have all the information you need to make as seamless a transition as possible.

Access to your account:
Your Xively Personal account will remain active until January 15th. Please note that devices will not be accessible via the Xively Personal service once it is retired.

Transferring your products to another IoT service:
Should you choose to switch to another service, there are essentially two options.

1) Migrate to Xively Enterprise: The latest Enterprise version of Xively is built on a more modern and reliable architecture, which brings the benefits of pre-built hardware integrations, identity and device management features, MQTT messaging, and best-in-class security, but it may require some reconfiguring of your current devices. We do offer a 30 day free trial of Xively Enterprise should you want to try it out for yourself.

2) Migrate to another free service: If your use is primarily for experimenting and personal projects, there are several free IoT platform options on the market, such as Adafruit, Thingspeak, or SparkFun.”

One of the suggestions – Sparkfun Phant has been retired

Some possible alternatives in no particular order (this list may grow)

AdaFruit.IO – The internet of things for everyone

Microsoft IoT Central – Enterprise-grade IoT SaaS

ThingSpeak – The open IoT platform with MATLAB analytics

Blynk – Democratizing the Internet of Things

Thinger.io platform

SenseIoT – Internet of Things Data Hosting Platform

Temboo – Tools for Digital Transformation

Carriots by Altair

Nearbus – An IoT Open Project

ubidots – An application Builder for the Internet of Things

Kii Cloud

Artik – End-to-end IoT Platform

goplusplatform – Connect your things with GO+

I’m initially looking for a platform which is the “least painful” transition from Xively.

nRF24 Windows 10 IoT Core reboot

My first live deployment of the nRF24L01 Windows 10 IoT Core field gateway is now scheduled for mid Q1 2018 so time for a reboot. After digging out my Raspbery PI 2/3 devices and the nRF24L01+ shield (with modifications detailed here) I have a basic plan with some milestones.

My aim is to be able to wirelessly acquire data from several dozen Arduino, devduino, seeeduino, and Netduino devices, Then, using a field gateway on a Raspberry PI running Windows 10 IoT Core upload it to Microsoft IoT Central

First bit of code – Bleepy a simple background application to test the piezo beeper on the RPI NRF24 Shield

namespace devmobile.IoTCore.Bleepy
{
   public sealed class StartupTask : IBackgroundTask
   {
      private BackgroundTaskDeferral deferral;
      private const int ledPinNumber = 4;
      private GpioPin ledGpioPin;
      private ThreadPoolTimer timer;

      public void Run(IBackgroundTaskInstance taskInstance)
      {
         var gpioController = GpioController.GetDefault();
         if (gpioController == null)
         {
            Debug.WriteLine("GpioController.GetDefault failed");
            return;
         }

         ledGpioPin = gpioController.OpenPin(ledPinNumber);
         if (ledGpioPin == null)
         {
            Debug.WriteLine("gpioController.OpenPin failed");
            return;
         }

         ledGpioPin.SetDriveMode(GpioPinDriveMode.Output);

         this.timer = ThreadPoolTimer.CreatePeriodicTimer(Timer_Tick, TimeSpan.FromMilliseconds(500));

         deferral = taskInstance.GetDeferral();

         Debug.WriteLine("Rum completed");
      }

      private void Timer_Tick(ThreadPoolTimer timer)
      {
         GpioPinValue currentPinValue = ledGpioPin.Read();

         if (currentPinValue == GpioPinValue.High)
         {
            ledGpioPin.Write(GpioPinValue.Low);
         }
         else
         {
            ledGpioPin.Write(GpioPinValue.High);
         }
      }
   }
}

Note the blob of blu tack over the piezo beeper to mute noise
nRF24ShieldMuted

nRF24L01 Raspberry PI Gateway Hardware

For those who came to my MS Ignite AU Intelligent Cloud booth session

Building Wireless Field Gateways

Connecting wireless sensor nodes to the cloud is not the mission it used to be, because the Azure team (and many OS projects) have developed tooling which can help hobbyist and professional developers build solutions. How could you build a home scale robust, reliable and secure solution with off the shelf kit without blowing the budget?

Sparkfun nRF24L01 module &Adafruit perma proto hat

NRF24L01 Raspberry PI DIY Gateway Hardware

BoM (all prices as at Feb 2016)

You will also need some short lengths of wire and a soldering iron.

For those who want an “off the shelf” solution (still requires a minor modification for interrupt support) I have used the Raspberry Pi to NRF24l01+ Shield USD9.90

2015-09-25t072754-447z-20150925_091942-855x570_q85_pad_rcrop

Instructions for modifications and software to follow.