RFM95/96/97/98 shield library Part1

Register Read

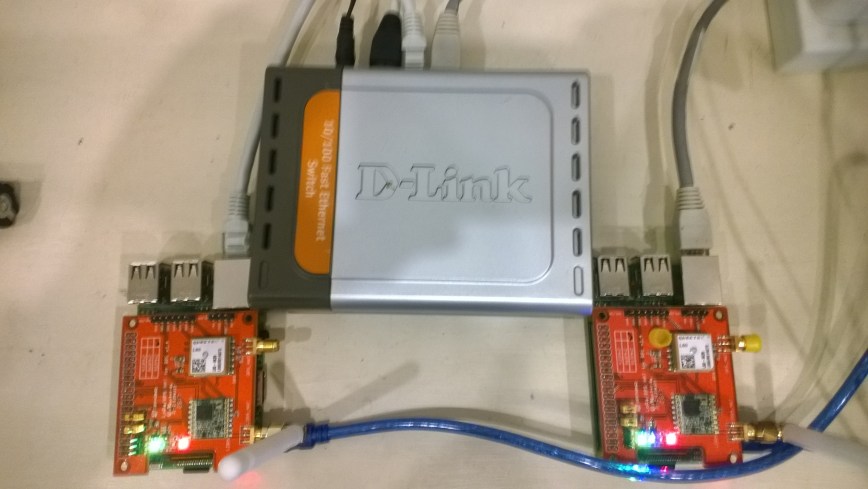
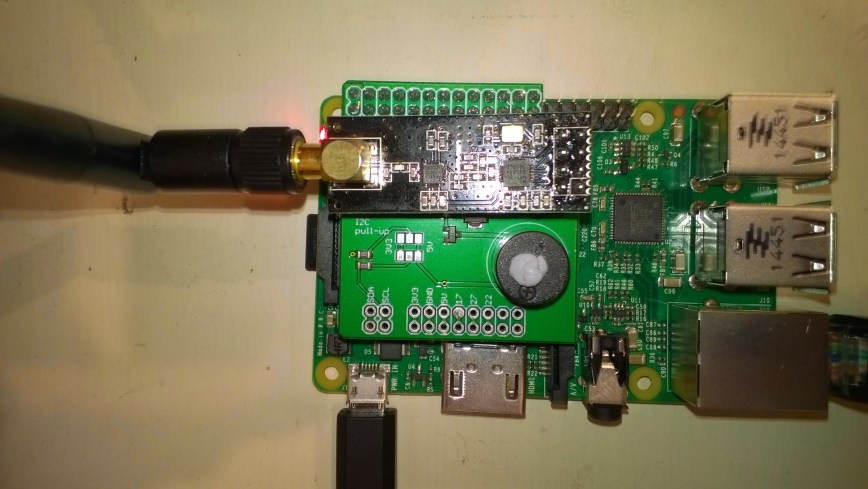
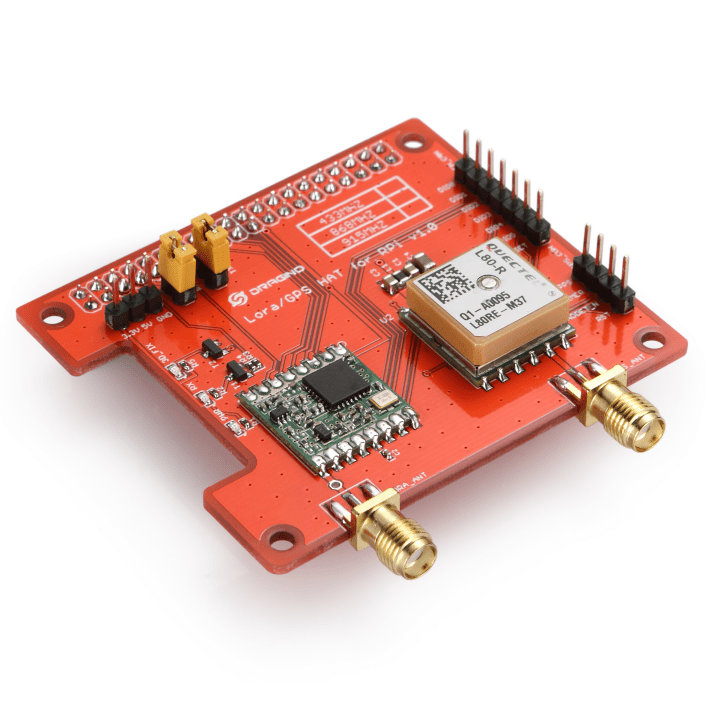
Over the last couple of weeks I have been working on a Windows 10 IoT Core C# library for my Dragino LoRa GPS hat for Raspberry PI. I initially started with the Dragino.LoRa library but after some experimentation and hacking I decided to write my own library (which is usually not a good idea).

DraginoLoraGPSHat

I wanted a lightweight LoRa only library (hopefully possible to backport to .NetMF) which didn’t try to hide how the Semtech 1276 chip functioned, and in the future could be configured to work with other vendors’ shields (dragino, electronictricks, elecrow, m2m).

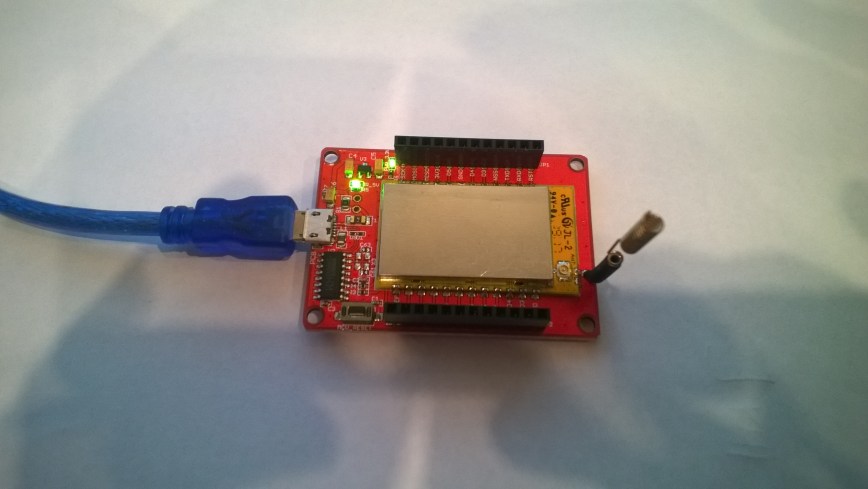
I’m also working on an RFM69 Raspberry PI shield based on an electronictricks PCB populated with a RFM69HCW so I figured the experience of building a library would be useful.

The first step was to build a basic universal windows platform (UWP) background task to confirm that I could reliably communicate with the shield over SPI bus by reading a single register value (RegVersion the silicon version specified in the vendor datasheet).

//---------------------------------------------------------------------------------
// Copyright (c) July 2018, devMobile Software
//
// Licensed under the Apache License, Version 2.0 (the "License");
// you may not use this file except in compliance with the License.
// You may obtain a copy of the License at
//
//     http://www.apache.org/licenses/LICENSE-2.0
//
// Unless required by applicable law or agreed to in writing, software
// distributed under the License is distributed on an "AS IS" BASIS,
// WITHOUT WARRANTIES OR CONDITIONS OF ANY KIND, either express or implied.
// See the License for the specific language governing permissions and
// limitations under the License.
//
//---------------------------------------------------------------------------------
namespace devMobile.IoT.Rfm9x.RegisterRead
{
   using System;
   using System.Diagnostics;
   using System.Threading.Tasks;
   using Windows.ApplicationModel.Background;
   using Windows.Devices.Gpio;
   using Windows.Devices.Spi;

   public sealed class StartupTask : IBackgroundTask
   {
      private const int ChipSelectLine = 25;
      private SpiDevice rfm9XLoraModem;

      public void Run(IBackgroundTaskInstance taskInstance)
      {
         // Have to setup the SPI bus with custom Chip Select line rather than std CE0/CE1
         SpiController spiController = SpiController.GetDefaultAsync().AsTask().GetAwaiter().GetResult();
         var settings = new SpiConnectionSettings(0)
         {
            ClockFrequency = 500000,
            Mode = SpiMode.Mode0,
         };

         GpioController gpioController = GpioController.GetDefault();
         GpioPin chipSelectGpioPin = gpioController.OpenPin(ChipSelectLine);
         chipSelectGpioPin.SetDriveMode(GpioPinDriveMode.Output);
         chipSelectGpioPin.Write(GpioPinValue.High);

         rfm9XLoraModem = spiController.GetDevice(settings);

         while (true)
         {
            byte[] writeBuffer = new byte[]{ 0x42 }; // RegVersion
            byte[] readBuffer = new byte[1];

            chipSelectGpioPin.Write(GpioPinValue.Low);
            rfm9XLoraModem.Write(writeBuffer);
            rfm9XLoraModem.Read(readBuffer);
            chipSelectGpioPin.Write(GpioPinValue.High);

            Debug.WriteLine("RegVersion {0:x2}", readBuffer[0]);

            Task.Delay(10000).Wait();
            }
         }
   }
}

The dragino shield has the chip select (also know as slave select) line connected to pin 25 rather than the usual CS0 (pin 24) & CS1 (pin 26) so it has to be manually strobed.

'backgroundTaskHost.exe' (CoreCLR: CoreCLR_UWP_Domain): Loaded 'C:\Data\Users\DefaultAccount\AppData\Local\DevelopmentFiles\RegisterRead-uwpVS.Debug_ARM.Bryn.Lewis\System.Diagnostics.Debug.dll'. Skipped loading symbols. Module is optimized and the debugger option 'Just My Code' is enabled.
RegVersion 12
RegVersion 12

Next step was to dump all the registers of the HopeRF module.

Windows 10 IoT Core LoRa library

I have a pair of Windows 10 IoT Core nRF24L01 field gateway projects, one for AdaFruit.IO and the other for Azure IoTHub (Including Azure IoT Central). I use these field gateways for small scale indoor and outdoor deployments.

For larger systems e.g a school campus I was looking for something with a bit more range (line of site + in building penetration) and clients with lower power consumption (suitable for long term battery or solar power).

Other makers had had success with RFM69(proprietary) and RFM9X (LoRA) based devices and shields/hats so I had a look at both technologies.

To kick things off I purchased

I then did some searching and downloaded two commonly used libraries

Initially I trialled the emmellsoft Windows 10 IoT Core Dragino.LoRa code on a couple of Raspberry PI devices.

RPIDraginoP2P

After updating the Windows 10 Min/Max versions, plus the NuGet packages and setting the processor type to ARM the code compiled, downloaded and ran which was a pretty good start.

I could see messages being transmitted and received by the two devices


Packet RSSI: -33, RSSI: -91, SNR: 8, Length: 5

Message Received: CRC OK, Rssi=-91, PacketRssi=-33, PacketSnr=8, Buffer:[55, ff, 00, aa, 01], 2018-07-30 09:27:48

Successfully sent in 110 milliseconds.

Packet RSSI: -15, RSSI: -100, SNR: 9.2, Length: 5

Message Received: CRC OK, Rssi=-100, PacketRssi=-15, PacketSnr=9.2, Buffer:[55, ff, 00, aa, 02], 2018-07-30 09:27:53

Successfully sent in 36 milliseconds.

Packet RSSI: -35, RSSI: -101, SNR: 9, Length: 5

Message Received: CRC OK, Rssi=-101, PacketRssi=-35, PacketSnr=9, Buffer:[55, ff, 00, aa, 03], 2018-07-30 09:27:58

Successfully sent in 36 milliseconds.

I added my first attempt at device configuration for New Zealand (based on EU settings) in Dragino.LoRa\Radio\TransceiverSettings.cs


public static readonly TransceiverSettings ANZ915 = new TransceiverSettings(

RadioModemKind.Lora,

915000000,

BandWidth.BandWidth_125_00_kHz,

SpreadingFactor.SF7,

CodingRate.FourOfFive,

8,

true,

false,

LoraSyncWord.Public);

The LoraSyncWord.Public would turn out to be a problem later!

Then I modified the sender and receiver sample application MainPage.xaml.cs files to reference my settings


private static TransceiverSettings GetRadioSettings()

{

// *********************************************************************************************

// #1/2. YOUR EDITING IS REQUIRED HERE!

//

// Choose transeiver settings:

// *********************************************************************************************

return TransceiverSettings.Standard.ANZ915;

}

I modified one of the RadioHead sample Arduino applications (centre frequency) and deployed it to a LoRa MiniDev device. I could see messages getting sent but they were not getting received by the RPI(s).

So I dumped the registers for the SX127X device in the HopeRF RFM95 module on both devices,

DraginoLoraMinDev

From the device on RPI Hat


SX1276/77/78/79 detected, starting.

1-85

2-1A

3-B

4-0

5-52

6-E4

7-C0

8-0

9-85

A-9

B-2B

C-23

D-0

E-80

F-0

10-0

11-0

12-0

13-0

14-0

15-0

16-0

17-0

18-4

19-0

1A-0

1B-42

1C-0

1D-72

1E-74

1F-9F

20-0

21-8

22-1

23-FF

24-0

25-0

26-4

27-0

28-0

29-0

2A-0

2B-0

2C-9

2D-50

2E-14

2F-45

30-55

31-C3

32-5

33-27

34-1C

35-A

36-3

37-A

38-42

39-34

The LoRa transceiver is initiated successfully.

I printed out the Radiohead and emmellsoft registers then manually compared them using the SX1276 datasheet for reference.

I found the 3 registers which contain the MSB, ISB and LSB for the centre frequency weren’t being calculated correctly (checked this by changing the frequency to 434MHz and comparing the register values to the worked example in the datasheet).

I manually “brute forced” the centre frequency registers in LoRaTransceiver.cs Init() and the RPI could then detect a signal but couldn’t decode the messages.

I went back to the Register dumps and found the SyncWord (odd name as it is a byte) were different. After updating the RPI settings the devices could exchange packets..


const double RH_RF95_FXOSC = 32000000.0;

const double RH_RF95_FSTEP = RH_RF95_FXOSC / 524288.0;

long frf = (long)(Settings.Frequency / RH_RF95_FSTEP);

byte[] bytes = BitConverter.GetBytes(frf);

byte[] x6 = { bytes[2] };

RegisterManager.WriteRegister(6, x6);

byte[] x7 = { bytes[1] };

RegisterManager.WriteRegister(7, x7);

byte[] x8 = { bytes[0] };

RegisterManager.WriteRegister(8, x8);

RegisterManager.Write(new LoraRegisterSyncWord(Settings.LoraSyncWord.Value));

This was not a long term solution, lots of code, and register setting changes with limited explanation…

Azure Meetup-Budget tank of 91 IoT

The premise of my Azure Meetup presentation was could you build an interesting project on a rainy weekend afternoon with a constrained budget (tank of 91 octane petrol) and minimal soldering .

Budget

Our family car is a VW Passat V6 4Motion which has a 62 Litre tank. The driver usually doesn’t usually stop to fill up until the fuel light has been on for a bit which helped.

PetrolReceipt

Based on the most recent receipt the budget was NZD132.

Where possible I purchased parts locally (the tech equivalent of food miles) or on special.

My bill of materials (prices as at 2018-06) was on budget.

The devDuino V2.2 and nRF24L01 module were USD26.20 approx. NZD37.50 (including freight) from elecrow.

Tradeoffs

I powered my Raspberry PI with a spare cellphone charger (make sure it can supply enough current to reliably power the device).

The devDuino V2.has an ATSHA204A which provides a guaranteed unique 72-bit serial number (makes it harder to screw up provisioning devices in the field).

I use a 32G MicroSD rather than a 16G MicroSD card as I have had issued with 16G cards getting corrupted by more recent upgrades (possibly running out of space?)

The Raspberry PI shield requires a simple modification to enable interrupt driven operation.

My sample devDuino V2.2 client uses an external temperature and humidity sensor, modifying this code to use the onboard temperature sensor an MCP9700 will be covered in another post.

The devDuino V2 is a little bit cheaper USD15.99 NZD37.31, has the same onboard temperature sensor as the V2.2 but no unique serial number chip.

The devDuino V4.0 has an onboard HTU21D temperature + humidity sensor but no unique serial number and the batteries are expensive.

The code and deployment instructions for the nRF24L01 field gateway applications for AdaFruit.IO and Azure IoT Hub/Azure IoT Central are available on hackster.IO.

RPiWithnRF24Plate

AdaFruit.IO has free and USD10.00/month options which work well for many hobbyist projects.

AdaFruitIO

Azure Meetup Christchurch notes

For the people who came to my Azure meetup session this evening

Sources of sensors and development boards

http://www.adafruit.com
http://www.elecrow.com (watering kits)
http://www.ingenuitymicro.com (NZ based dev boards)
http://www.netduino.com (.NetMF development boards)
http://www.makerfabs.com
http://www.seeedstudio.com
http://www.tindie.com

nRF24Shields for RPI devices
http://www.tindie.com/products/ceech/new-raspberry-pi-to-nrf24l01-shield/

nRF24Shields for *duino devices in AU
embeddedcoolness.com

Raspberry PI Source in CHC
http://www.wavetech.co.nz

RFM69 & LoRa Modules
http://www.wisen.com.au

local sensor and device resellers quick turnaround
http://www.mindkits.co.nz
http://www.nicegear.co.nz

http://www.diyelectricskateboard.com

The watch development platform
http://www.hexiwear.com

http://www.gowifi.co.nz (Antennas & other wireless kit based in Rangiora)

my projects
http://www.hackster.io/KiwiBryn
io.adafruit.com/BrynHLewis/dashboards/home-environment

Azure IoT Hub nRF24L01 Windows 10 IoT Core Field Gateway

This project is now live on Hackster.IO and github.com with sample *duino, Devduino and Netduino clients. While building the AdaFruit.IO field gateway, Azure IOT Hub field gateways and sample clients I changed the structure of the message payload and spent a bit of time removing non-core functionality and code.

The diagnostics logging code was refactored several times and after reading this reference on docs.Microsoft.com I settled on the published approach.

I considered using the built in Universal Windows Platform (UWP) application data class but this would have made configuration in the field hard for most of the targeted users school students & IT departments.

I have the application running at my house and it has proved pretty robust, last week I though it had crashed because the telemetry data stopped for about 20 minutes. I had a look at the Device portal and it was because Windows 10 IoT core had downloaded some updates, applied them and then rebooted automatically (as configured).

I put a socket on the Raspberry PI nRF24L01 Shield rather than soldering the module to the board so that I could compare the performance of the Low and High power modules. The antenna end of the high power module tends to droop so I put a small piece of plastic foam underneath to prop them up.

I had code to generate an empty JSON configuration but I removed that as it added complexity compared to putting a sample in the github repository.

I considered using a binary format (the nRF24L01 max message length is 32 bytes) but the code required to make it sufficiently flexible rapidly got out of hand and as most of my devices didn’t have a lot of sensors (battery/solar powered *duinos) and it wasn’t a major hassle to send another message so I removed it.

I need to tidy up the project and remove the unused Visual Assets and have a look at the automated update support.

Wireless field gateway protocol V2

I have now built a couple of nRF2L01P field gateways (for AdaFriut.IO & Azure IoT Hubs) which run as a background tasks on Windows 10 IoT Core on RaspberyPI). I have also written several clients which run on Arduino, devDuino, Netduino, and Seeeduino devices.

I have tried to keep the protocol simple (telemetry only) to deploy and it will be used in high school student projects in the next couple of weeks.

To make the payload smaller the first byte of the message now specifies the message type in the top nibble and the length of the device unique identifier in the bottom nibble.

0 = Echo

The message is displayed by the field gateway as text & hexadecimal.

1 = Device identifier + Comma separated values (CSV) payload

[0] – Set to 0001, XXXX   Device identifier length

[1]..[1+Device identifier length] – Unique device identifier bytes e.g. Mac address

[1+Device identifier length+1 ]..[31] – CSV payload e.g.  SensorID value, SensorID value


Wireless field gateway protocol V1

I’m going to build a number of nRF2L01P field gateways (Netduino Ethernet & Wifi running .NetMF, Raspberry PI running Windows 10 IoT Core, RedBearLab 3200  etc.), clients which run on a variety of hardware (Arduino, devDuino, Netduino, Seeeduino etc.) which, then upload data to a selection of IoT Cloud services (AdaFruit.IO, ThingSpeak, Microsoft IoT Central etc.)

The nRF24L01P is widely supported with messages up to 32 bytes long, low power consumption and 250kbps, 1Mbps and 2Mbps data rates.

The aim is to keep the protocol simple (telemetry only initially) to implement and debug as the client side code will be utilised by high school student projects.

The first byte of the message specifies the message type

0 = Echo

The message is displayed by the field gateway as text & hexadecimal.

1 = Device identifier + Comma separated values (CSV) payload

[0] – Set to 1

[1] – Device identifier length

[2]..[2+Device identifier length] – Unique device identifier bytes e.g. Mac address

[2+Device identifier length+1 ]..[31] – CSV payload e.g.  SensorID value, SensorID value

Overtime I will support more message types and wireless protocols.


Xively Personal is being retired

This is going to cause me a problem especially my Netduino based nRF24 Xively Field gateway which gets used in quite a few of my student projects. I’m looking for a replacement Internet of Things service which has http/s and/or mqtt, amqp support, C & C#  client libraries (which I can get to work on Windows 10 IoT Core & NetMF) would be a bonus.

From the Xively email

”After careful consideration, LogMeIn has made the decision to retire Xively Personal from its current line of products effective January 15, 2018 at 12:00PM ET . Please note that LogMeIn will continue to offer our Xively Enterprise edition – there is no change to that edition and we will continue to support that platform as part of our IoT business.

Retiring a product is never an easy decision, and we recognize it does introduce potential challenges to active users. So we want to make sure you have all the information you need to make as seamless a transition as possible.

Access to your account:
Your Xively Personal account will remain active until January 15th. Please note that devices will not be accessible via the Xively Personal service once it is retired.

Transferring your products to another IoT service:
Should you choose to switch to another service, there are essentially two options.

1) Migrate to Xively Enterprise: The latest Enterprise version of Xively is built on a more modern and reliable architecture, which brings the benefits of pre-built hardware integrations, identity and device management features, MQTT messaging, and best-in-class security, but it may require some reconfiguring of your current devices. We do offer a 30 day free trial of Xively Enterprise should you want to try it out for yourself.

2) Migrate to another free service: If your use is primarily for experimenting and personal projects, there are several free IoT platform options on the market, such as Adafruit, Thingspeak, or SparkFun.”

One of the suggestions – Sparkfun Phant has been retired

Some possible alternatives in no particular order (this list may grow)

AdaFruit.IO – The internet of things for everyone

Microsoft IoT Central – Enterprise-grade IoT SaaS

ThingSpeak – The open IoT platform with MATLAB analytics

Blynk – Democratizing the Internet of Things

Thinger.io platform

SenseIoT – Internet of Things Data Hosting Platform

Temboo – Tools for Digital Transformation

Carriots by Altair

Nearbus – An IoT Open Project

ubidots – An application Builder for the Internet of Things

Kii Cloud

Artik – End-to-end IoT Platform

goplusplatform – Connect your things with GO+

I’m initially looking for a platform which is the “least painful” transition from Xively.

nRF24 Windows 10 IoT Core Background Task

First step is to build a basic Windows 10 IoT Core background task which can receive and display messages sent from a variety of devices across an nRF24L01 wireless link.

If you create a new “Windows IoT Core” “Background Application” project then copy this code into StartupTasks.cs the namespace has to be changed in the C# file, project properties\library\Default namespace and “Package.appxmanifest”\declarations\Entry Point.

/*

Copyright ® 2017 December devMobile Software, All Rights Reserved

THIS CODE AND INFORMATION IS PROVIDED "AS IS" WITHOUT WARRANTY OF ANY
KIND, EITHER EXPRESSED OR IMPLIED, INCLUDING BUT NOT LIMITED TO THE
IMPLIED WARRANTIES OF MERCHANTABILITY AND/OR FITNESS FOR A PARTICULAR
PURPOSE.

http://www.devmobile.co.nz

*/
using System;
using System.Diagnostics;
using System.Text;
using Radios.RF24;
using Windows.ApplicationModel.Background;

namespace devmobile.IoTCore.nRF24BackgroundTask
{
    public sealed class StartupTask : IBackgroundTask
    {
      private const byte ChipEnablePin = 25;
      private const byte ChipSelectPin = 0;
      private const byte nRF24InterruptPin = 17;
      private const string BaseStationAddress = "Base1";
      private const byte nRF24Channel = 10;
      private RF24 Radio = new RF24();
      private BackgroundTaskDeferral deferral;

      public void Run(IBackgroundTaskInstance taskInstance)
        {
         Radio.OnDataReceived += Radio_OnDataReceived;
         Radio.OnTransmitFailed += Radio_OnTransmitFailed;
         Radio.OnTransmitSuccess += Radio_OnTransmitSuccess;

         Radio.Initialize(ChipEnablePin, ChipSelectPin, nRF24InterruptPin);
         Radio.Address = Encoding.UTF8.GetBytes(BaseStationAddress);
         Radio.Channel = nRF24Channel;
         Radio.PowerLevel = PowerLevel.High;
         Radio.DataRate = DataRate.DR250Kbps;
         Radio.IsEnabled = true;

         Debug.WriteLine("Address: " + Encoding.UTF8.GetString(Radio.Address));
         Debug.WriteLine("PA: " + Radio.PowerLevel);
         Debug.WriteLine("IsAutoAcknowledge: " + Radio.IsAutoAcknowledge);
         Debug.WriteLine("Channel: " + Radio.Channel);
         Debug.WriteLine("DataRate: " + Radio.DataRate);
         Debug.WriteLine("IsDynamicAcknowledge: " + Radio.IsDyanmicAcknowledge);
         Debug.WriteLine("IsDynamicPayload: " + Radio.IsDynamicPayload);
         Debug.WriteLine("IsEnabled: " + Radio.IsEnabled);
         Debug.WriteLine("Frequency: " + Radio.Frequency);
         Debug.WriteLine("IsInitialized: " + Radio.IsInitialized);
         Debug.WriteLine("IsPowered: " + Radio.IsPowered);

         deferral = taskInstance.GetDeferral();

         Debug.WriteLine("Run completed");
      }

      private void Radio_OnDataReceived(byte[] data)
      {
         // Display as Unicode
         string unicodeText = Encoding.UTF8.GetString(data);
         Debug.WriteLine("Unicode - Payload Length {0} Unicode Length {1} Unicode text {2}", data.Length, unicodeText.Length, unicodeText);

         // display as hex
         Debug.WriteLine("Hex - Length {0} Payload {1}", data.Length, BitConverter.ToString(data));
      }

      private void Radio_OnTransmitSuccess()
      {
         Debug.WriteLine("Transmit Succeeded!");
      }

      private void Radio_OnTransmitFailed()
      {
         Debug.WriteLine("Transmit Failed!");
      }
   }
}

This was displayed in the output window of Visual Studio

Address: Base1
PA: 15
IsAutoAcknowledge: True
Channel: 10
DataRate: DR250Kbps
IsDynamicAcknowledge: False
IsDynamicPayload: True
IsEnabled: True
Frequency: 2410
IsInitialized: True
IsPowered: True
Run completed

Interrupt Triggered: FallingEdge
Unicode – Payload Length 19 Unicode Length 19 Unicode text T  23.8,H  73,V 3.26
Hex – Length 19 Payload 54-20-32-33-2E-38-2C-48-20-20-37-33-2C-56-20-33-2E-32-36
Interrupt Triggered: RisingEdge

Note the odd formatting of the Temperature and humidity values which is due to the way dtostrf function in the Atmel AVR library works.

Also noticed the techfooninja nRF24 library has configurable output power level which I will try to retrofit onto the Gralin NetMF library.

Next, several simple Arduino, devDuino V2.2, Seeeduino V4.2 and Netduino 2/3 clients (plus possibly some others)

nRF24 Windows 10 IoT Core reboot

My first live deployment of the nRF24L01 Windows 10 IoT Core field gateway is now scheduled for mid Q1 2018 so time for a reboot. After digging out my Raspbery PI 2/3 devices and the nRF24L01+ shield (with modifications detailed here) I have a basic plan with some milestones.

My aim is to be able to wirelessly acquire data from several dozen Arduino, devduino, seeeduino, and Netduino devices, Then, using a field gateway on a Raspberry PI running Windows 10 IoT Core upload it to Microsoft IoT Central

First bit of code – Bleepy a simple background application to test the piezo beeper on the RPI NRF24 Shield

namespace devmobile.IoTCore.Bleepy
{
   public sealed class StartupTask : IBackgroundTask
   {
      private BackgroundTaskDeferral deferral;
      private const int ledPinNumber = 4;
      private GpioPin ledGpioPin;
      private ThreadPoolTimer timer;

      public void Run(IBackgroundTaskInstance taskInstance)
      {
         var gpioController = GpioController.GetDefault();
         if (gpioController == null)
         {
            Debug.WriteLine("GpioController.GetDefault failed");
            return;
         }

         ledGpioPin = gpioController.OpenPin(ledPinNumber);
         if (ledGpioPin == null)
         {
            Debug.WriteLine("gpioController.OpenPin failed");
            return;
         }

         ledGpioPin.SetDriveMode(GpioPinDriveMode.Output);

         this.timer = ThreadPoolTimer.CreatePeriodicTimer(Timer_Tick, TimeSpan.FromMilliseconds(500));

         deferral = taskInstance.GetDeferral();

         Debug.WriteLine("Rum completed");
      }

      private void Timer_Tick(ThreadPoolTimer timer)
      {
         GpioPinValue currentPinValue = ledGpioPin.Read();

         if (currentPinValue == GpioPinValue.High)
         {
            ledGpioPin.Write(GpioPinValue.Low);
         }
         else
         {
            ledGpioPin.Write(GpioPinValue.High);
         }
      }
   }
}

Note the blob of blu tack over the piezo beeper to mute noise
nRF24ShieldMuted