Building Cloud AI with AI-YoloSharp Object detection Azure HTTP Trigger function

Introduction

Using Copilot to generate the code to retrieve an image from a security camera and small applications for object detection, object classification, with YoloSharp also went surprisingly well. An Azure HTTP Trigger function is a bit more complex so I decided to do one next. I started with the Visual Studio 2022 generated code

using Microsoft.AspNetCore.Http;
using Microsoft.AspNetCore.Mvc;
using Microsoft.Azure.Functions.Worker;
using Microsoft.Extensions.Logging;

namespace YoloObjectDetectionFunction
{
    public class Function1
    {
        private readonly ILogger<Function1> _logger;

        public Function1(ILogger<Function1> logger)
        {
            _logger = logger;
        }

        [Function("Function1")]
        public IActionResult Run([HttpTrigger(AuthorizationLevel.Function, "get", "post")] HttpRequest req)
        {
            _logger.LogInformation("C# HTTP trigger function processed a request.");
            return new OkObjectResult("Welcome to Azure Functions!");
        }
    }
}

I then generated the first version of the code with Copilot desktop

The code looked “okay” but had lots of extra “usings”, used FunctionName vs Function attributes etc. so didn’t compile.

I think the “var yolo = new Yolo(modelPath)” comes from YoloDotNet by Niklas Swärd and “var detections = yolo.Predict(image)” is from YoloV8.Net by Samuel Stainback

using System.IO;
using System.Linq;
using System.Net;
using System.Net.Http;
using System.Threading.Tasks;
using Microsoft.AspNetCore.Mvc;
using Microsoft.Azure.WebJobs;
using Microsoft.Azure.WebJobs.Extensions.Http;
using Microsoft.Extensions.Logging;
using SixLabors.ImageSharp;
using SixLabors.ImageSharp.PixelFormats;
using SixLabors.ImageSharp.Processing;
using YoloSharp;
using YoloSharp.DataStructures;

public static class YoloObjectDetectionFunction
{
    private static readonly string modelPath = "path/to/your/yolo-model.onnx";

    [FunctionName("YoloObjectDetection")]
    public static async Task<IActionResult> Run(
        [HttpTrigger(AuthorizationLevel.Function, "post", Route = null)] HttpRequestMessage req,
        ILogger log)
    {
        log.LogInformation("Yolo Object Detection function processed a request.");

        // Read the image from the request
        byte[] imageBytes = await req.Content.ReadAsByteArrayAsync();
        using (Image<Rgba32> image = Image.Load<Rgba32>(imageBytes))
        {
            // Initialize YoloSharp
            using (var yolo = new Yolo(modelPath))
            {
                // Detect objects in the image
                var detections = yolo.Predict(image);

                // Process the detections
                foreach (var detection in detections)
                {
                    // Draw bounding boxes on the image
                    image.Mutate(ctx => ctx.DrawPolygon(Rgba32.Red, 2, detection.BoundingBox.ToPolygon()));
                }

                // Save the modified image to a memory stream
                using (var ms = new MemoryStream())
                {
                    image.SaveAsPng(ms);
                    ms.Seek(0, SeekOrigin.Begin);

                    // Return the modified image as a response
                    var result = new HttpResponseMessage(HttpStatusCode.OK)
                    {
                        Content = new StreamContent(ms)
                    };
                    result.Content.Headers.ContentType = new System.Net.Http.Headers.MediaTypeHeaderValue("image/png");
                    return new FileStreamResult(ms, "image/png");
                }
            }
        }
    }
}

I manually fixed all the issues in the code with a lot of assistance from Visual Studio 2022 Intellisense

using System.Net;

using Microsoft.AspNetCore.Mvc;
using Microsoft.Azure.Functions.Worker;
using Microsoft.Extensions.Logging;

using SixLabors.ImageSharp;
using SixLabors.ImageSharp.PixelFormats;
using SixLabors.ImageSharp.Processing;
using SixLabors.ImageSharp.Drawing.Processing;

//using YoloSharp;
//using YoloSharp.DataStructures;
using Compunet.YoloSharp;


public static class YoloObjectDetectionFunction
{
   //private static readonly string modelPath = "path/to/your/yolo-model.onnx";
   private static readonly string modelPath = "yolov8s.onnx";

   //[FunctionName("YoloObjectDetection")]
   [Function("YoloObjectDetection")]
   public static async Task<IActionResult> Run(
       [HttpTrigger(AuthorizationLevel.Function, "post", Route = null)] HttpRequestMessage req,
       ILogger log)
   {
      log.LogInformation("Yolo Object Detection function processed a request.");

      // Read the image from the request
      byte[] imageBytes = await req.Content.ReadAsByteArrayAsync();
      using (Image<Rgba32> image = Image.Load<Rgba32>(imageBytes))
      {
         // Initialize YoloSharp
         //using (var yolo = new Yolo(modelPath))
         using (var yolo = new YoloPredictor(modelPath))
         {
            // Detect objects in the image
            //var detections = yolo.Predict(image);
            var detections = yolo.Detect(image);

            // Process the detections
            foreach (var detection in detections)
            {
               // Draw bounding boxes on the image
               //image.Mutate(ctx => ctx.DrawPolygon(Rgba32.Red, 2, detection.BoundingBox.ToPolygon()));

               var rectangle = new PointF[] {new Point(detection.Bounds.Bottom, detection.Bounds.Left), new Point(detection.Bounds.Bottom, detection.Bounds.Right), new Point(detection.Bounds.Right, detection.Bounds.Top), new Point(detection.Bounds.Left, detection.Bounds.Top)};

               image.Mutate(ctx => ctx.DrawPolygon(Rgba32.ParseHex("FF0000"), 2, rectangle));
            }

            // Save the modified image to a memory stream
            using (var ms = new MemoryStream())
            {
               image.SaveAsPng(ms);
               ms.Seek(0, SeekOrigin.Begin);

               // Return the modified image as a response
               var result = new HttpResponseMessage(HttpStatusCode.OK)
               {
                  Content = new StreamContent(ms)
               };
               result.Content.Headers.ContentType = new System.Net.Http.Headers.MediaTypeHeaderValue("image/png");
               return new FileStreamResult(ms, "image/png");
            }
         }
      }
   }
}

When I posted an image to the function with Telerik Fiddler Classic it threw an exception, because the ILogger injected into the Run method was null.

I then asked Github Copilot to “Modify code so the ILogger is parameter of constructor”

using System.Net;

using Microsoft.AspNetCore.Mvc;
using Microsoft.Azure.Functions.Worker;
using Microsoft.Extensions.Logging;

using SixLabors.ImageSharp;
using SixLabors.ImageSharp.PixelFormats;
using SixLabors.ImageSharp.Processing;
using SixLabors.ImageSharp.Drawing.Processing;

//using YoloSharp;
//using YoloSharp.DataStructures;
using Compunet.YoloSharp;


//public static class YoloObjectDetectionFunction
public class YoloObjectDetectionFunction
{
   private static readonly ILogger _log;
   //private static readonly string modelPath = "path/to/your/yolo-model.onnx";
   private static readonly string modelPath = "yolov8s.onnx";

   public YoloObjectDetectionFunction(ILogger<YoloObjectDetectionFunction> log)
   {
      _log = log;
   }

   //[FunctionName("YoloObjectDetection")]
   [Function("YoloObjectDetection")]
   //public static async Task<IActionResult> Run( [HttpTrigger(AuthorizationLevel.Function, "post", Route = null)] HttpRequestMessage req, ILogger log)
   public static async Task<IActionResult> Run([HttpTrigger(AuthorizationLevel.Function, "post", Route = null)] HttpRequestMessage req)
   {
      _log.LogInformation("Yolo Object Detection function processed a request.");

      // Read the image from the request
      byte[] imageBytes = await req.Content.ReadAsByteArrayAsync();
      using (Image<Rgba32> image = Image.Load<Rgba32>(imageBytes))
      {
         // Initialize YoloSharp
         //using (var yolo = new Yolo(modelPath))
         using (var yolo = new YoloPredictor(modelPath))
         {
            // Detect objects in the image
            //var detections = yolo.Predict(image);
            var detections = yolo.Detect(image);

            // Process the detections
            foreach (var detection in detections)
            {
               // Draw bounding boxes on the image
               //image.Mutate(ctx => ctx.DrawPolygon(Rgba32.Red, 2, detection.BoundingBox.ToPolygon()));

               var rectangle = new PointF[] {new Point(detection.Bounds.Bottom, detection.Bounds.Left), new Point(detection.Bounds.Bottom, detection.Bounds.Right), new Point(detection.Bounds.Right, detection.Bounds.Top), new Point(detection.Bounds.Left, detection.Bounds.Top)};

               image.Mutate(ctx => ctx.DrawPolygon(Rgba32.ParseHex("FF0000"), 2, rectangle));
            }

            // Save the modified image to a memory stream
            using (var ms = new MemoryStream())
            {
               image.SaveAsPng(ms);
               ms.Seek(0, SeekOrigin.Begin);

               // Return the modified image as a response
               var result = new HttpResponseMessage(HttpStatusCode.OK)
               {
                  Content = new StreamContent(ms)
               };
               result.Content.Headers.ContentType = new System.Net.Http.Headers.MediaTypeHeaderValue("image/png");
               return new FileStreamResult(ms, "image/png");
            }
         }
      }
   }
}

When I posted an image to the function it threw an exception, because content of the HttpRequestMessage was null.

I then asked Github Copilot to “Modify the code so that the image is read from the form”

// Read the image from the form
var form = await req.ReadFormAsync();
var file = form.Files["image"];
if (file == null || file.Length == 0)
{
   return new BadRequestObjectResult("Image file is missing or empty.");
}

When I posted an image to the function it returned a 400 Bad Request Error.
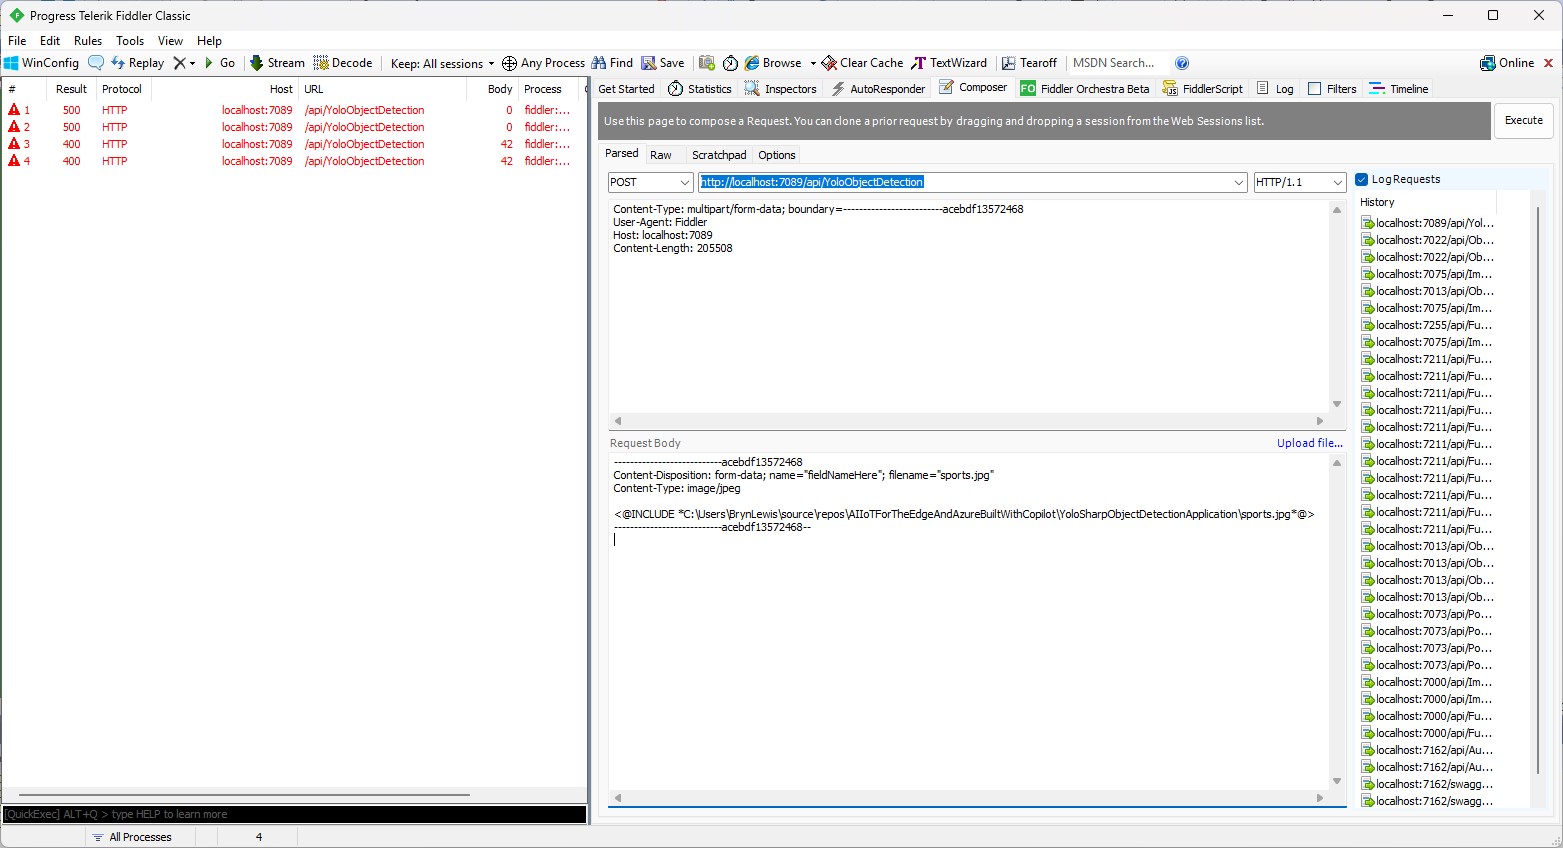
After inspecting the request I realized that the name field was wrong, as the generated code was looking for “image”

Content-Disposition: form-data; name=”image”; filename=”sports.jpg”

Then, when I posted an image to the function it returned a 500 error.
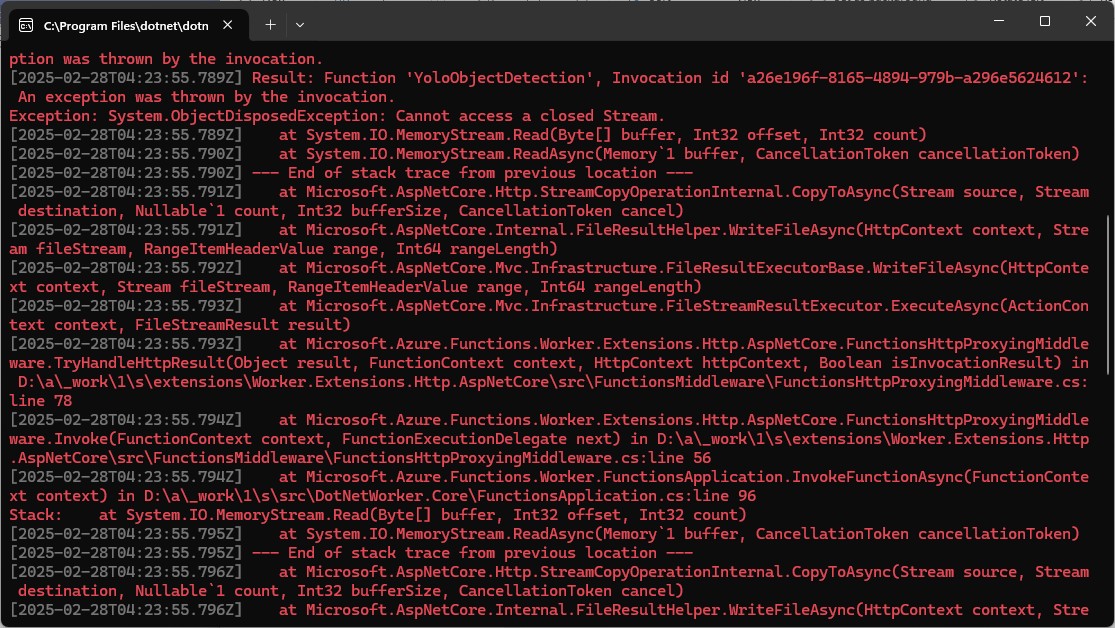
But, the FileStreamResult was failing so I modified the code to return a FileContentResult

using (var ms = new MemoryStream())
{
   image.SaveAsJpeg(ms);

   return new FileContentResult(ms.ToArray(), "image/jpg");
}

Then, when I posted an image to the function it succeeded
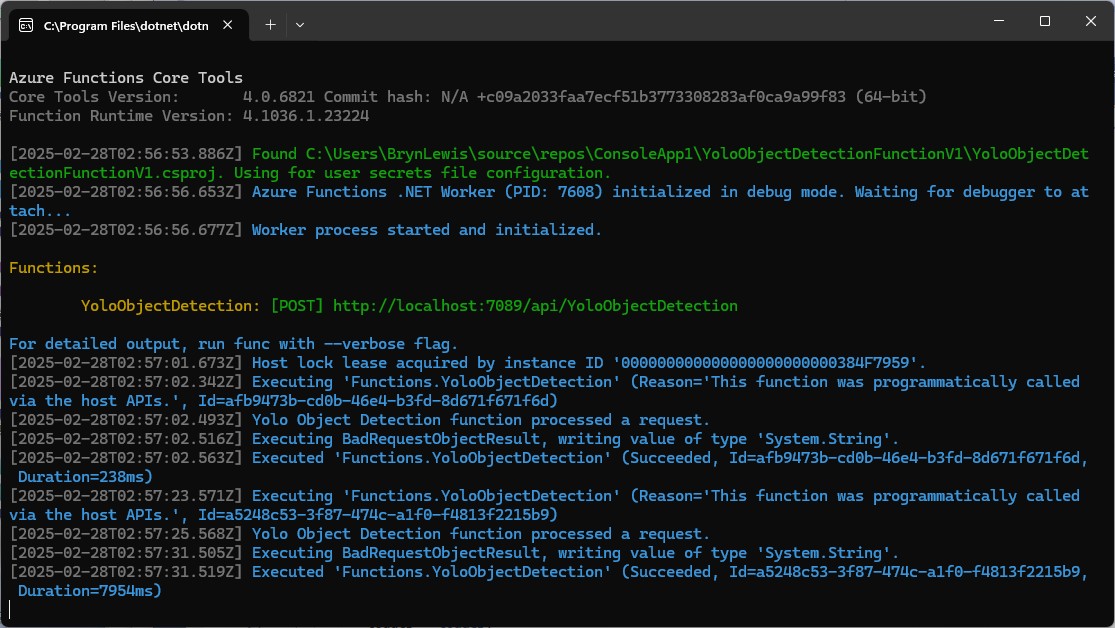
But, the bounding boxes around the detected objects were wrong.
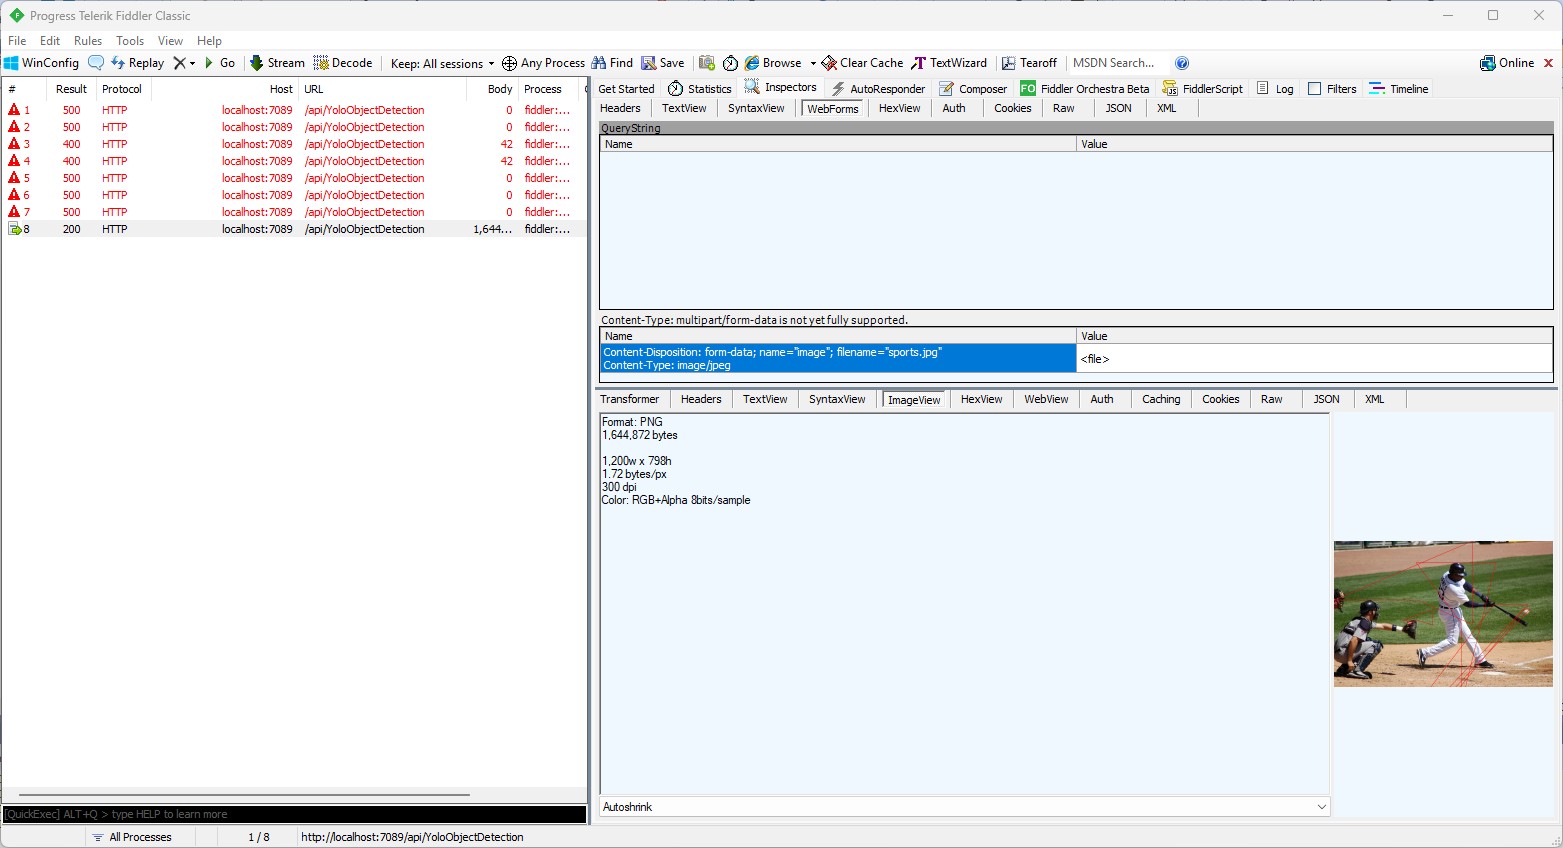
I then manually fixed up the polygon code so the lines for each bounding box were drawn in the correct order.

// Process the detections
foreach (var detection in detections)
{
   var rectangle = new PointF[] {
      new Point(detection.Bounds.Left, detection.Bounds.Bottom),
      new Point(detection.Bounds.Right, detection.Bounds.Bottom),
      new Point(detection.Bounds.Right, detection.Bounds.Top),
      new Point(detection.Bounds.Left, detection.Bounds.Top)
 };

Then, when I posted an image to the function it succeeded

The bounding boxes around the detected objects were correct.
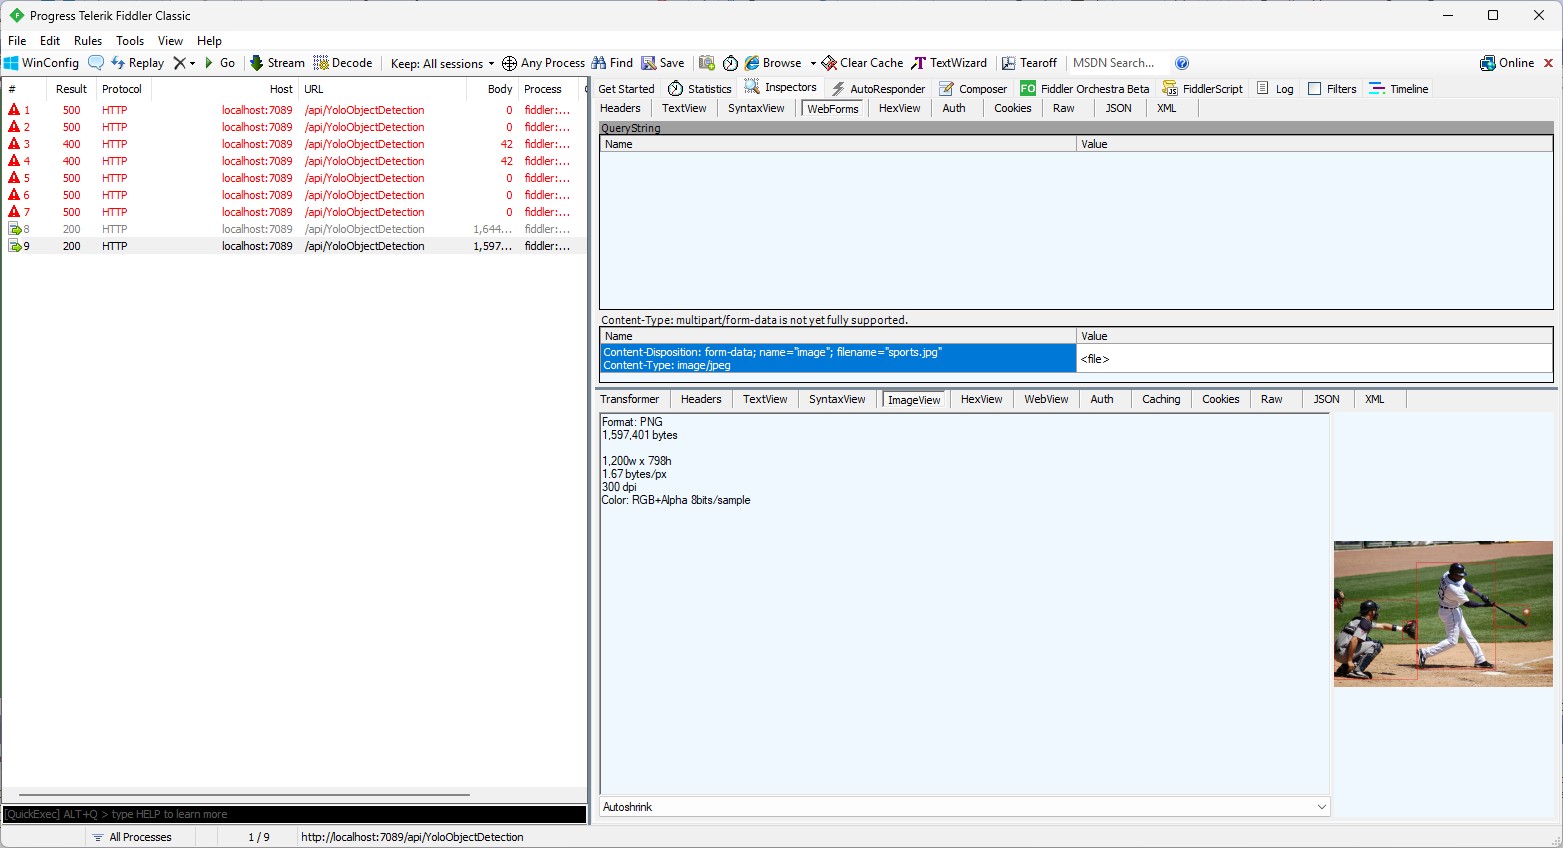
I then “refactored” the code, removing all the unused “using”s, removed any commented out code, changed ILogger to be initialised using a Primary Constructor etc.

using Microsoft.AspNetCore.Http;
using Microsoft.AspNetCore.Mvc;
using Microsoft.Azure.Functions.Worker;
using Microsoft.Extensions.Logging;

using SixLabors.ImageSharp;
using SixLabors.ImageSharp.PixelFormats;
using SixLabors.ImageSharp.Processing;
using SixLabors.ImageSharp.Drawing.Processing;

using Compunet.YoloSharp;

public class YoloObjectDetectionFunction(ILogger<YoloObjectDetectionFunction> log)
{
   private readonly ILogger<YoloObjectDetectionFunction> _log = log;
   private readonly string modelPath = "yolov8s.onnx";

   [Function("YoloObjectDetection")]
   public async Task<IActionResult> Run([HttpTrigger(AuthorizationLevel.Function, "post", Route = null)] HttpRequest req)
   {
      _log.LogInformation("Yolo Object Detection function processed a request.");

      // Read the image from the form
      var form = await req.ReadFormAsync();
      var file = form.Files["image"];
      if (file == null || file.Length == 0)
      {
         return new BadRequestObjectResult("Image file is missing or empty.");
      }

      using (var stream = file.OpenReadStream())
      using (Image<Rgba32> image = Image.Load<Rgba32>(stream))
      {
         // Initialize YoloSharp
         using (var yolo = new YoloPredictor(modelPath))
         {
            // Detect objects in the image
            var detections = yolo.Detect(image);

            // Process the detections
            foreach (var detection in detections)
            {
               var rectangle = new PointF[] {
                  new Point(detection.Bounds.Left, detection.Bounds.Bottom),
                  new Point(detection.Bounds.Right, detection.Bounds.Bottom),
                  new Point(detection.Bounds.Right, detection.Bounds.Top),
                  new Point(detection.Bounds.Left, detection.Bounds.Top)
               };

               image.Mutate(ctx => ctx.DrawPolygon(Rgba32.ParseHex("FF0000"), 2, rectangle));
            }

            // Save the modified image to a memory stream
            using (var ms = new MemoryStream())
            {
               image.SaveAsJpeg(ms);

              return new FileContentResult(ms.ToArray(), "image/jpg");
            }
         }
      }
   }
}

Summary

The initial code generated by Copilot was badly broken but with the assistance of Visual Studio 2022 Intellisense was fixed fairly quickly. The ILogger not being initialised, me using the “wrong” upload file name were easy to debug, but the FileContentResult exception was a bit more difficult.

It took me a quite a bit longer to write the function with Copilot desktop/Github Copilot than what it would have taken me normally. But, I think a lot of this was due to having to take screen shots, writing this blog post as I went, and having already written several Azure HTTP Trigger function for processing uploaded images.

The Copilot generated code in this post is not suitable for production

IoT and AI Building Edge AI with AI- YoloSharp Client

Introduction

Using Copilot to generate the code to retrieve an image from a security camera went surprisingly well so next step was something a bit more complex. For this post I have used Copilot prompts to generate code which uses Ultralytics YoloV8 and Compunet YoloSharp for object detection, object classification, pose estimation, and instance segmentation

using System;
using System.Drawing;
using YOLOSharp;

class Program
{
    static void Main(string[] args)
    {
        string modelPath = "path/to/yolov8.onnx"; // Replace with the path to your YOLOv8 model
        string imagePath = "path/to/image.jpg"; // Replace with the path to your image

        // Load the YOLOv8 model
        var yolo = new YOLO(modelPath);

        // Load the image from disk
        using (var image = Image.FromFile(imagePath))
        {
            // Run the YOLOv8 model on the image
            var results = yolo.Predict(image);

            // Display the results
            foreach (var result in results)
            {
                Console.WriteLine($"Label: {result.Label}, Confidence: {result.Confidence}, BoundingBox: {result.BoundingBox}");
            }
        }
    }
}
In this example:

Replace path/to/yolov8.onnx with the actual path to your YOLOv8 model file.

Replace path/to/image.jpg with the actual path to your image file.

This application loads the YOLOv8 model using YOLOSharp, loads an image from disk, runs the model on the image, and displays the results, including the label, confidence, and bounding box for each detected object.

Happy coding! 🚀

Copilot had “assumed” I meant object detection(reasonable) with YoloSharp and the code didn’t compile.

Object Detection

After some minor fixes and shifting the configuration to an appsettings file the application compiled.

using Compunet.YoloSharp;
using Microsoft.Extensions.Configuration;
using SixLabors.ImageSharp;

class Program
{
   static void Main(string[] args)
   {
      Model.ApplicationSettings applicationSettings;

      Console.WriteLine($"{DateTime.UtcNow:yy-MM-dd HH:mm:ss} 0.3.CameraHTTPClient starting");
#if RELEASE
       Console.WriteLine("RELEASE");
#else
      Console.WriteLine("DEBUG");
#endif
      // load the app settings into configuration
      var configuration = new ConfigurationBuilder()
           .AddJsonFile("appsettings.json", false, true)
      .Build();

      applicationSettings = configuration.GetSection("ApplicationSettings").Get<Model.ApplicationSettings>();

      // Load the YOLOv8 model
      var yolo = new YoloPredictor(applicationSettings.ModelPath);

      // Load the image from disk
      using (var image = Image.Load(applicationSettings.ImagePath))
      {
         // Run the YOLOv8 model on the image
         var results = yolo.Detect(image);

         // Display the results
         foreach (var result in results)
         {
            Console.WriteLine($"Label: {result.Name}, Confidence: {result.Confidence}, BoundingBox: {result.Bounds}");
         }
      }
   }
}

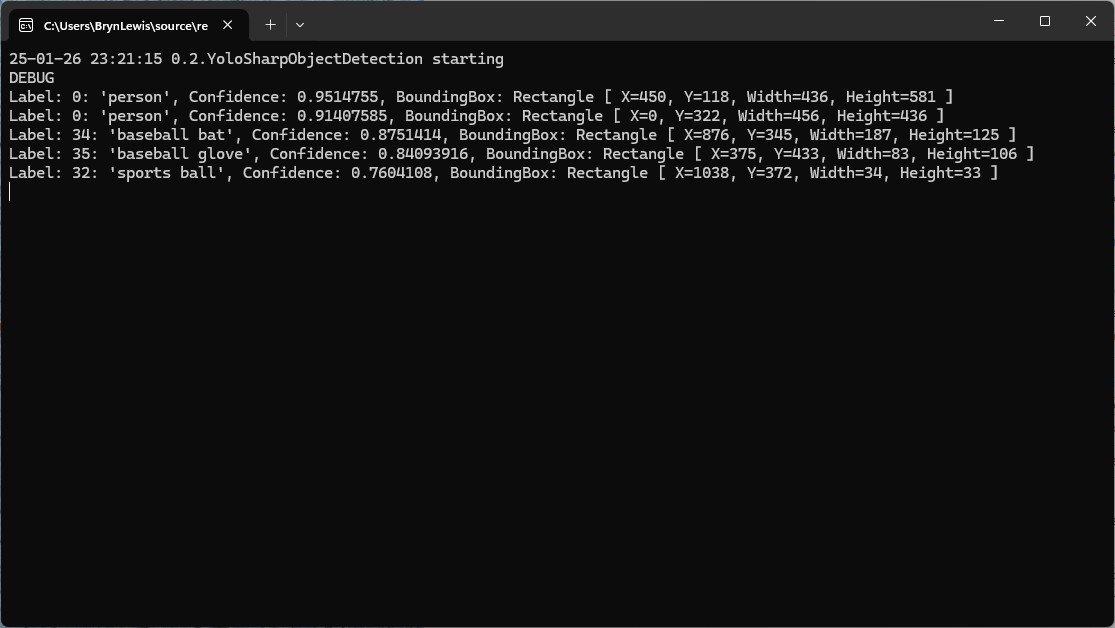
I tested the implementation with sample “sports” image from the YoloSharp Github repository

The console application output looked reasonable

I manually compared the output of the console application with the Ultralytics Hub model preview tab and the results looked close enough.

Pose

My Copilot prompt

please write a C# console application that uses Compunet YoloSharp to run a yolov8 pose model on an image loaded from disk
using Compunet.YoloSharp;
using Microsoft.Extensions.Configuration;
using SixLabors.ImageSharp;

class Program
{
   static void Main(string[] args)
   {
      Model.ApplicationSettings applicationSettings;

      Console.WriteLine($"{DateTime.UtcNow:yy-MM-dd HH:mm:ss} 0.3.CameraHTTPClient starting");
#if RELEASE
       Console.WriteLine("RELEASE");
#else
      Console.WriteLine("DEBUG");
#endif
      // load the app settings into configuration
      var configuration = new ConfigurationBuilder()
           .AddJsonFile("appsettings.json", false, true)
      .Build();

      applicationSettings = configuration.GetSection("ApplicationSettings").Get<Model.ApplicationSettings>();

      // Load the YOLOv8 pose model
      var yolo = new YoloPredictor(applicationSettings.ModelPath);

      // Load the image from disk
      using (var image = Image.Load(applicationSettings.ImagePath))
      {
         // Run the YOLOv8 pose model on the image
         var results = yolo.Pose(image);

         // Display the results
         foreach (var result in results)
         {
            Console.WriteLine($"Label: {result.Name.Name}, Confidence: {result.Confidence}, BoundingBox: {result.Bounds}");
            Console.WriteLine("Keypoints:");
            foreach (var keypoint in result)
            {
               Console.WriteLine($"  - {keypoint.Point}");
            }
         }
      }
   }
}

After some minor fixes and shifting the configuration to an appsettings file the application compiled. I tested the implementation with sample “sports” image from the YoloSharp Github repository

The console application output looked reasonable

I manually compared the output of the console application with the Ultralytics Hub model preview tab and the results were reasonable

Classification

My Copilot prompt

please write a C# console application that uses Compunet YoloSharp to run a yolov8 pose model on an image loaded from disk
using Compunet.YoloSharp;
using Microsoft.Extensions.Configuration;
using SixLabors.ImageSharp;

class Program
{
   static void Main(string[] args)
   {
      Model.ApplicationSettings applicationSettings;

      Console.WriteLine($"{DateTime.UtcNow:yy-MM-dd HH:mm:ss} 0.3.CameraHTTPClient starting");
#if RELEASE
       Console.WriteLine("RELEASE");
#else
      Console.WriteLine("DEBUG");
#endif

      // load the app settings into configuration
      var configuration = new ConfigurationBuilder()
           .AddJsonFile("appsettings.json", false, true)
      .Build();

      applicationSettings = configuration.GetSection("ApplicationSettings").Get<Model.ApplicationSettings>();

      // Load the YOLOv8 classification model
      var yolo = new YoloPredictor(applicationSettings.ModelPath);

      // Load the image from disk
      using (var image = Image.Load(applicationSettings.ImagePath))
      {
         // Run the YOLOv8 classification model on the image
         var results = yolo.Classify(image);

         // Display the results
         foreach (var result in results)
         {
             Console.WriteLine($"Label: {result.Name.Name}, Confidence: {result.Confidence}");
         }
      }
   }
}

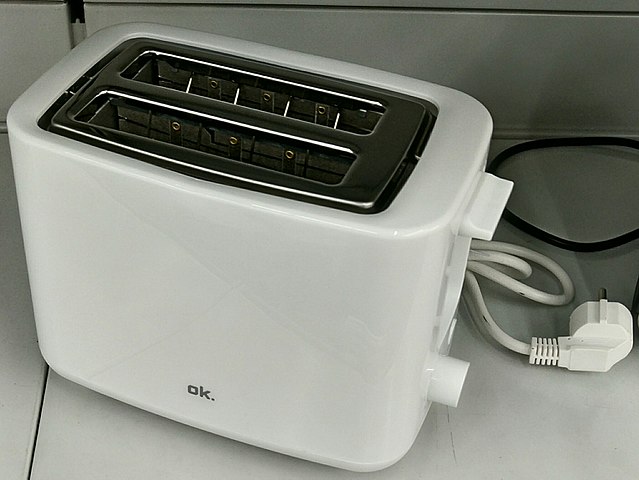
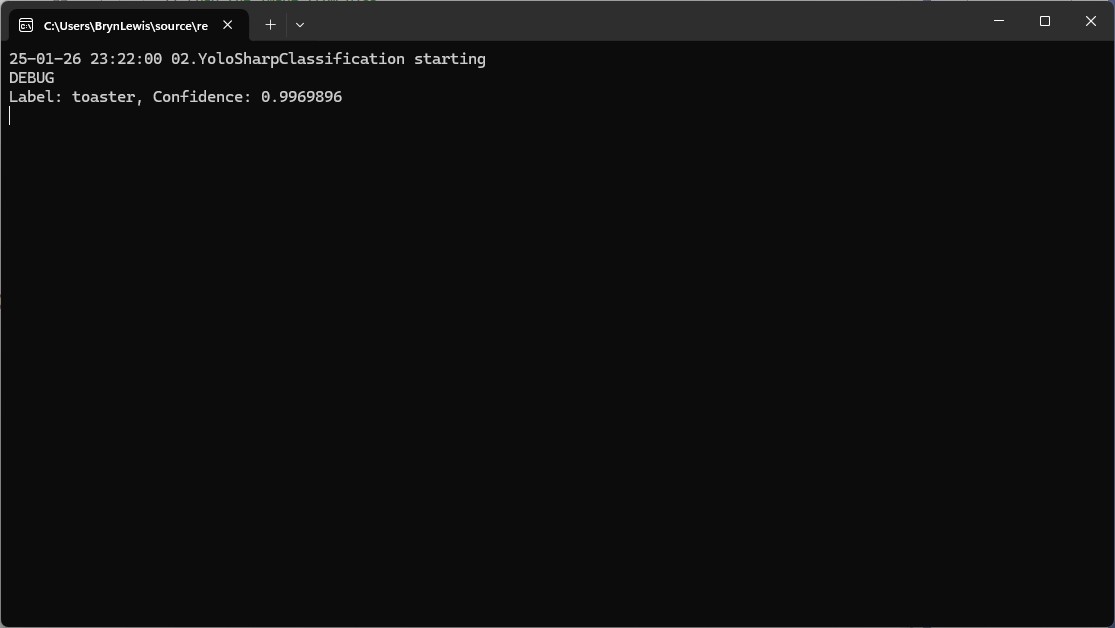
After some minor fixes and shifting the configuration to an appsettings file the application compiled. I tested the implementation with sample “toaster” image from the YoloSharp Github repository

The console application output looked reasonable

I’m pretty confident the input image was a toaster.

Summary

The Copilot prompts to generate code which uses Ultralytics YoloV8 and Compunet YoloSharp and may have produced better code with some “prompt engineering”. Using Visual Studio intellisense the generated code was easy to fix.

The Copilot generated code in this post is not suitable for production

IoT and AI Building Edge AI with AI- Introduction

Introduction

Recently, there have been mainstream media articles (Forbes, Wired-Video games , Wired-Copilot, BBC, The Guardian etc.), about how Artificial Intelligence (AI) could soon replace developers.

I have been using Github Copilot, mainly for “enhanced” Visual Studio IntelliSense, code snippets, and refactoring. I have also found Github Copilot generated code samples and more context aware searching of documentation really useful. Overall, the experience has been positive with limited hallucinations and my productivity has got better as my “prompt engineer” skills improved.

Initially, I started building “hobbyist” AI applications for the edge with an Azure Percept and for customer projects use Ultralytics Yolo, Azure Machine Learning, Azure Cognitive Services, ML.Net, Open Neural Network Exchange (ONNX), Nvidia Jeston Modules, Seeedstudio reComputer Industrial J3011 – Fanless Edge AI Devices etc.

After some discussion with my co-workers I decided to explore how much Github Copilot helped building a “non-trivial” computer vision Proof of Concept (PoC). In previous blog posts I have written about capturing still images from a Security Camera so figured that was a good place to start.

Even though I have been using Copilot for a while I still say please.

using System;
using System.IO;
using System.Net.Http;
using System.Threading.Tasks;

class Program
{
    static async Task Main(string[] args)
    {
        string cameraUrl = "http://your-security-camera-url/image.jpg"; // Replace with your security camera URL
        string savePath = "C:\\path\\to\\save\\image.jpg"; // Replace with the path where you want to save the image

        using (HttpClient client = new HttpClient())
        {
            try
            {
                HttpResponseMessage response = await client.GetAsync(cameraUrl);
                response.EnsureSuccessStatusCode();

                byte[] imageBytes = await response.Content.ReadAsByteArrayAsync();
                await File.WriteAllBytesAsync(savePath, imageBytes);

                Console.WriteLine("Image retrieved and saved successfully.");
            }
            catch (Exception ex)
            {
                Console.WriteLine($"An error occurred: {ex.Message}");
            }
        }
    }
}

The generated code compiled first time, looked “ok” and worked with some of my security cameras when the cameraurl and save path were modified

I then modified the code so “sensitive” information was not stored in code or configuration files.

//using System;
//using System.IO;
//using System.Net.Http;
//using System.Reflection;
//using System.Threading.Tasks;

using Microsoft.Extensions.Configuration;

class Program
{
   static async Task Main(string[] args)
   {
      //string cameraUrl = "http://your-security-camera-url/image.jpg"; // Replace with your security camera URL
      //string savePath = "C:\\path\\to\\save\\image.jpg"; // Replace with the path where you want to save the image
      Model.ApplicationSettings applicationSettings;

   Console.WriteLine($"{DateTime.UtcNow:yy-MM-dd HH:mm:ss} 0.2.CameraHTTPClient starting");
#if RELEASE
         Console.WriteLine("RELEASE");
#else
      Console.WriteLine("DEBUG");
#endif
      // load the app settings into configuration
      var configuration = new ConfigurationBuilder()
           .AddJsonFile("appsettings.json", false, true)
      .AddUserSecrets<Program>()
      .Build();

      applicationSettings = configuration.GetSection("ApplicationSettings").Get<Model.ApplicationSettings>();

      using (HttpClient client = new HttpClient())
      {
         try
         {
            HttpResponseMessage response = await client.GetAsync(applicationSettings.CameraUrl);
            response.EnsureSuccessStatusCode();

            byte[] imageBytes = await response.Content.ReadAsByteArrayAsync();
            await File.WriteAllBytesAsync(applicationSettings.SavePath, imageBytes);

            Console.WriteLine("Image retrieved and saved successfully.");
         }
         catch (Exception ex)
         {
            Console.WriteLine($"An error occurred: {ex.Message}");
         }
      }
   }
}

namespace Model
{
   public class ApplicationSettings
   {
      public string CameraUrl { get; set; } = "";

      public string SavePath { get; set; } = "Images";
   }
}

Several of my security cameras (e.g. HILook T250H) required client to authentication so I added NetworkCredential my Copilot prompt.

// please write c# console application that uses httpclient and an httpget to retrieve image from security camera with NetworkCredential security
//
// Sure! Here's a C# console application that uses HttpClient and HttpGet to retrieve an image from a security camera with NetworkCredential security: 
// In this example:
//
// Replace http://your-security-camera-url/image.jpg with the actual URL of your security camera's image.
//
// Replace C:\\path\\to\\save\\image.jpg with the path where you want to save the retrieved image.
//
// Replace your-username and your-password with your actual credentials.
//
// This application uses HttpClient with NetworkCredential to authenticate the request, retrieves the image as a byte array, and saves it to the specified path. If there's an error during the process, it will be caught and displayed in the console.
//
// Happy coding! 🚀
//using System;
//using System.IO;
using System.Net;
//using System.Net.Http;
//using System.Threading.Tasks;

using Microsoft.Extensions.Configuration;

class Program
{
   static async Task Main(string[] args)
   {
      //string cameraUrl = "http://your-security-camera-url/image.jpg"; // Replace with your security camera URL
      //string savePath = "C:\\path\\to\\save\\image.jpg"; // Replace with the path where you want to save the image
      //string username = "your-username"; // Replace with your username
      //string password = "your-password"; // Replace with your password
      Model.ApplicationSettings applicationSettings;

      Console.WriteLine($"{DateTime.UtcNow:yy-MM-dd HH:mm:ss} 0.3.CameraHTTPClient starting");
#if RELEASE
         Console.WriteLine("RELEASE");
#else
      Console.WriteLine("DEBUG");
#endif
      // load the app settings into configuration
      var configuration = new ConfigurationBuilder()
           .AddJsonFile("appsettings.json", false, true)
      .AddUserSecrets<Program>()
      .Build();

      applicationSettings = configuration.GetSection("ApplicationSettings").Get<Model.ApplicationSettings>();

      using (HttpClientHandler handler = new HttpClientHandler { Credentials = new NetworkCredential(applicationSettings.Username, applicationSettings.Password) })
      using (HttpClient client = new HttpClient(handler))
      {
         try
         {
            HttpResponseMessage response = await client.GetAsync(applicationSettings.CameraUrl);
            response.EnsureSuccessStatusCode();

            byte[] imageBytes = await response.Content.ReadAsByteArrayAsync();
            await File.WriteAllBytesAsync(applicationSettings.SavePath, imageBytes);

            Console.WriteLine("Image retrieved and saved successfully.");
         }
         catch (Exception ex)
         {
            Console.WriteLine($"An error occurred: {ex.Message}");
         }
      }
   }
}

namespace Model
{
   public class ApplicationSettings
   {
      public string CameraUrl { get; set; } = "";

      public string SavePath { get; set; } = "Images";

      public string Username { get; set; } = "";

      public string Password { get; set; } = "";
   }
}

My Visual Studio 2022 solution with a project for each Copilot generated sample.

Summary

The Copilot generated code for my three “trivial” PoC applications compiled and worked with minimal modifications.

The Copilot generated code in this post is not suitable for production
Timer, using, Garbage Collection & Await

Initially my Ultralytics YoloV8 based unicorn/not unicorn classification model test application would run overnight processing images retrieved from a Security Camera using an HTTP GET.

A unicorn with 86% confidence
Test Application DEBUG build

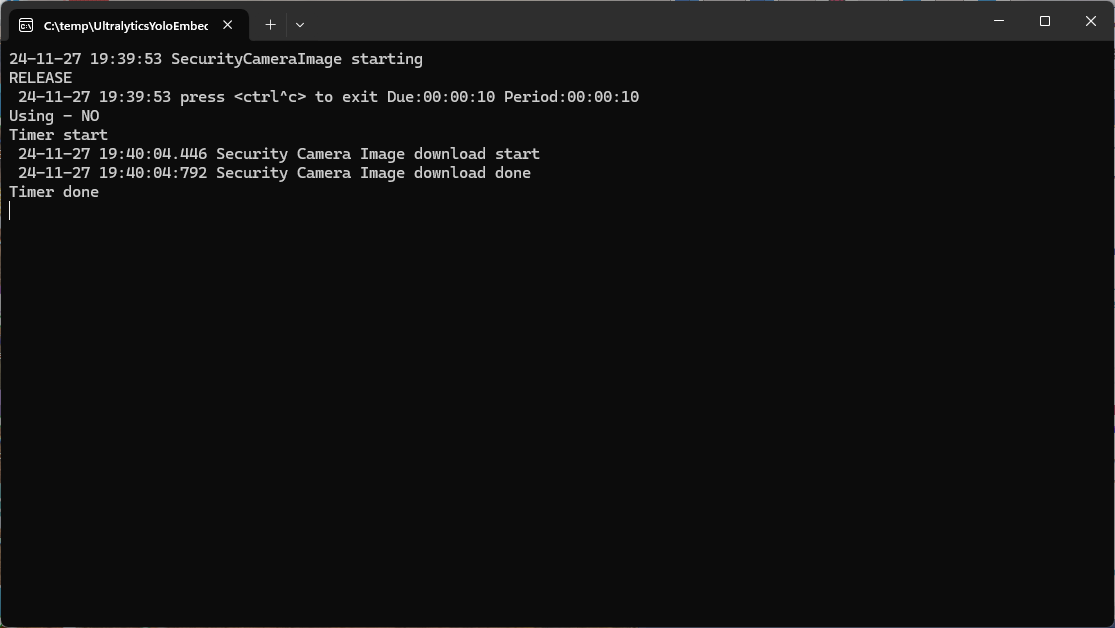
When I changed to a release build the System.Threading.Timer TimerCallback would only be called once

Test Application RELEASE build failure

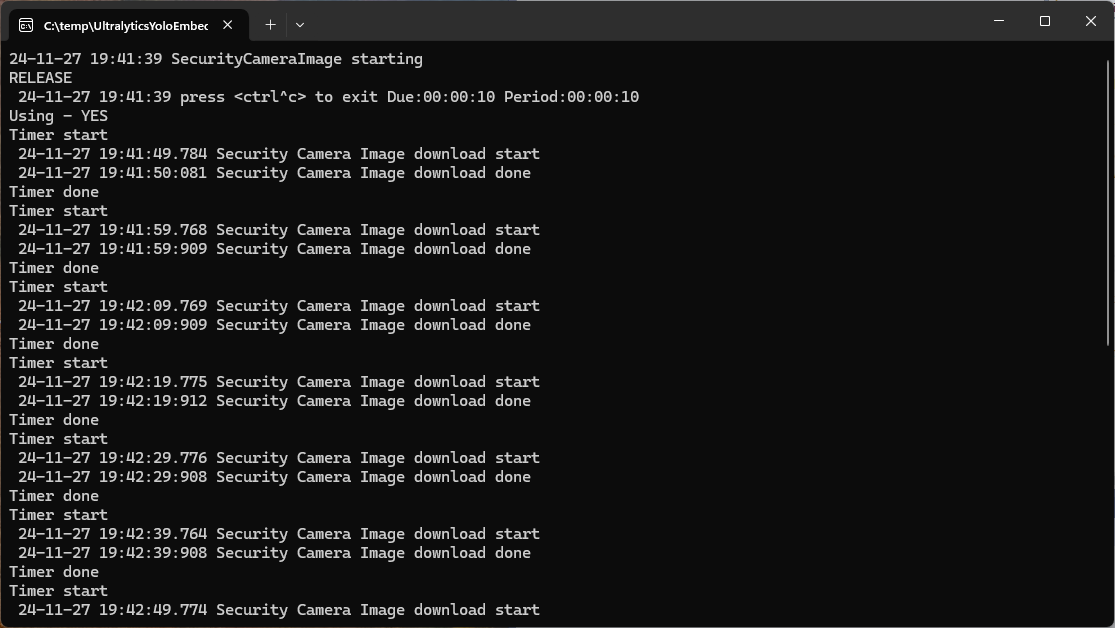
After some debugging I found that if I added a using statement the TimerCallback was called reliably.

static async Task Main()
{
   Console.WriteLine($"{DateTime.UtcNow:yy-MM-dd HH:mm:ss} SecurityCameraImage starting");
#if RELEASE
   Console.WriteLine("RELEASE");
#else
   Console.WriteLine("DEBUG");
#endif
   try
   {
      // load the app settings into configuration
      var configuration = new ConfigurationBuilder()
            .AddJsonFile("appsettings.json", false, true)
      .AddUserSecrets<Program>()
      .Build();

      _applicationSettings = configuration.GetSection("ApplicationSettings").Get<Model.ApplicationSettings>();

      Console.WriteLine($" {DateTime.UtcNow:yy-MM-dd HH:mm:ss} press <ctrl^c> to exit Due:{_applicationSettings.ImageTimerDue} Period:{_applicationSettings.ImageTimerPeriod}");

      NetworkCredential networkCredential = new(_applicationSettings.CameraUserName, _applicationSettings.CameraUserPassword);

      using (_httpClient = new HttpClient(new HttpClientHandler { PreAuthenticate = true, Credentials = networkCredential }))
      {
#if true
         Console.WriteLine("Using - NO");
         Timer imageUpdatetimer = new(ImageUpdateTimerCallback, null, _applicationSettings.ImageTimerDue, _applicationSettings.ImageTimerPeriod); // Debug only
#else
         Console.WriteLine("Using - YES");
         using Timer imageUpdatetimer = new(ImageUpdateTimerCallback,null, _applicationSettings.ImageTimerDue, _applicationSettings.ImageTimerPeriod); // Release works
#endif
         {
            try
            {
               await Task.Delay(Timeout.Infinite);
            }
            catch (TaskCanceledException)
            {
               Console.WriteLine($"{DateTime.UtcNow:yy-MM-dd HH:mm:ss} Application shutown requested");
            }
         }
      }
   }
   catch (Exception ex)
   {
      Console.WriteLine($"{DateTime.UtcNow:yy-MM-dd HH:mm:ss} Application shutown failure {ex.Message}", ex);
   }
}

private static async void ImageUpdateTimerCallback(object? state)
{
   Console.WriteLine("Timer start");

   // Just incase - stop code being called while photo already in progress
   if (_cameraBusy)
   {
      return;
   }
   _cameraBusy = true;

   try
   {
      Console.WriteLine($" {DateTime.UtcNow:yy-MM-dd HH:mm:ss.fff} Security Camera Image download start");

      using (Stream cameraStream = await _httpClient.GetStreamAsync(_applicationSettings.CameraUrl))
      using (FileStream fileStream = File.Open(_applicationSettings.ImageInputPath, FileMode.Create))
      {
         await cameraStream.CopyToAsync(fileStream);
      }

      Console.WriteLine($" {DateTime.UtcNow:yy-MM-dd HH:mm:ss:fff} Security Camera Image download done");
   }
   catch (Exception ex)
   {
      Console.WriteLine($"{DateTime.UtcNow:yy-MM-dd HH:mm:ss} Security camera image download failed {ex.Message}");
   }
   finally
   {
      _cameraBusy = false;
   }
   Console.WriteLine("Timer done");
}

I assume that in release build the code was “optimised” and the Garbage Collector(GC) was more aggressively freeing resources.

Test Application RELEASE Build running

.NET nanoFramework Adafruit PMSA003I Basic connectivity

This is a “throw away” .NET nanoFramework application for investigating how Adafruit PMSA003I Inter Integrated Circuit bus(I²C) connectivity works.

Adafruit PMSA003I Particulates Sensor

My test setup is a simple .NET nanoFramework console application running on an Adafruit FeatherS2- ESP32-S2.

Adafruit PMSA003I + Adafruit Feather ESP32 test rig

The PMSA0031 application has lots of magic numbers from the PMSA003I Module Datasheet and is just a tool for exploring how the sensor works.

public static void Main()
{
#if SPARKFUN_ESP32_THING_PLUS
    Configuration.SetPinFunction(Gpio.IO23, DeviceFunction.I2C1_DATA);
    Configuration.SetPinFunction(Gpio.IO22, DeviceFunction.I2C1_CLOCK);
#endif
#if ADAFRUIT_FEATHER_S2
    Configuration.SetPinFunction(Gpio.IO08, DeviceFunction.I2C1_DATA);
    Configuration.SetPinFunction(Gpio.IO09, DeviceFunction.I2C1_CLOCK);
#endif
    Thread.Sleep(1000);

    I2cConnectionSettings i2cConnectionSettings = new(1, 0x12, I2cBusSpeed.StandardMode);

    using (I2cDevice i2cDevice = I2cDevice.Create(i2cConnectionSettings))
    {
        {
            SpanByte writeBuffer = new byte[1];
            SpanByte readBuffer = new byte[1];

            writeBuffer[0] = 0x0;

            i2cDevice.WriteRead(writeBuffer, readBuffer);

            Console.WriteLine($"0x0 {readBuffer[0]:X2}");
        }

        while (true)
        {
            SpanByte writeBuffer = new byte[1];
            SpanByte readBuffer = new byte[32];

            writeBuffer[0] = 0x0;

            i2cDevice.WriteRead(writeBuffer, readBuffer);

            //Console.WriteLine(System.BitConverter.ToString(readBuffer.ToArray()));
            Console.WriteLine($"Length:{ReadInt16BigEndian(readBuffer.Slice(0x2, 2))}");

            if ((readBuffer[0] == 0x42) || (readBuffer[1] == 0x4d))
            {
                Console.WriteLine($"PM    1.0:{ReadInt16BigEndian(readBuffer.Slice(0x4, 2))}, 2.5:{ReadInt16BigEndian(readBuffer.Slice(0x6, 2))}, 10.0:{ReadInt16BigEndian(readBuffer.Slice(0x8, 2))} std");
                Console.WriteLine($"PM    1.0:{ReadInt16BigEndian(readBuffer.Slice(0x0A, 2))}, 2.5:{ReadInt16BigEndian(readBuffer.Slice(0x0C, 2))}, 10.0:{ReadInt16BigEndian(readBuffer.Slice(0x0E, 2))} env");
                Console.WriteLine($"µg/m3 0.3:{ReadInt16BigEndian(readBuffer.Slice(0x10, 2))}, 0.5:{ReadInt16BigEndian(readBuffer.Slice(0x12, 2))}, 1.0:{ReadInt16BigEndian(readBuffer.Slice(0x14, 2))}, 2.5:{ReadInt16BigEndian(readBuffer.Slice(0x16, 2))}, 5.0:{ReadInt16BigEndian(readBuffer.Slice(0x18, 2))}, 10.0:{ReadInt16BigEndian(readBuffer.Slice(0x1A, 2))}");

                // Don't need to display these values everytime
                //Console.WriteLine($"Version:{readBuffer[0x1c]}");
                //Console.WriteLine($"Error:{readBuffer[0x1d]}");
            }
            else
            {
                Console.WriteLine(".");
            }

            Thread.Sleep(5000);
        }
    }
}

private static ushort ReadInt16BigEndian(SpanByte source)
{
    if (source.Length != 2)
    {
        throw new ArgumentOutOfRangeException();
    }

    ushort result = (ushort)(source[0] << 8);

    return result |= source[1];
}

The unpacking of the value standard particulate, environmental particulate and particle count values is fairly repetitive, but I will fix it in the next version.

Visual Studio 2022 Debug Output

The checksum calculation isn’t great even a simple cyclic redundancy check(CRC) would be an improvement on summing the 28 bytes of the payload.

.NET nanoFramework Seeedstudio HM3301 library on Github

The source code of my .NET nanoFramework Seeedstudio Grove – Laser PM2.5 Dust Sensor HM3301 library is now available on GitHub. I have tested the library and sample application with Sparkfun Thing Plus and ST Micro STM32F7691 Discovery devices. (I can validate on more platform configurations if there is interest).

Important: make sure you setup the I2C pins especially on ESP32 Devices before creating the I2cDevice,

SHT20 +STM32F769 Discovery test rig

The .NET nanoFramework device libraries use a TryGet… pattern to retrieve sensor values, this library throws an exception if reading a sensor value fails. I’m not certain which approach is “better” as reading the Seeedstudio Grove – Laser PM2.5 Dust Sensor has never failed. The only time reading the “values” buffer failed was when I unplugged the device which I think is “exceptional”.

//---------------------------------------------------------------------------------
// Copyright (c) April 2023, devMobile Software
//
// Licensed under the Apache License, Version 2.0 (the "License");
// you may not use this file except in compliance with the License.
// You may obtain a copy of the License at
//
//     http://www.apache.org/licenses/LICENSE-2.0
//
// Unless required by applicable law or agreed to in writing, software
// distributed under the License is distributed on an "AS IS" BASIS,
// WITHOUT WARRANTIES OR CONDITIONS OF ANY KIND, either express or implied.
// See the License for the specific language governing permissions and
// limitations under the License.
//
// nanoff --target ST_STM32F769I_DISCOVERY --update 
// nanoff --platform ESP32 --serialport COM7 --update
//
//---------------------------------------------------------------------------------
#define ST_STM32F769I_DISCOVERY 
//#define  SPARKFUN_ESP32_THING_PLUS
namespace devMobile.IoT.Device.SeeedstudioHM3301
{
    using System;
    using System.Device.I2c;
    using System.Threading;

#if SPARKFUN_ESP32_THING_PLUS
    using nanoFramework.Hardware.Esp32;
#endif

    class Program
    {
        static void Main(string[] args)
        {
            const int busId = 1;

            Thread.Sleep(5000);

#if SPARKFUN_ESP32_THING_PLUS
            Configuration.SetPinFunction(Gpio.IO23, DeviceFunction.I2C1_DATA);
            Configuration.SetPinFunction(Gpio.IO22, DeviceFunction.I2C1_CLOCK);
#endif
            I2cConnectionSettings i2cConnectionSettings = new(busId, SeeedstudioHM3301.DefaultI2cAddress);

            using I2cDevice i2cDevice = I2cDevice.Create(i2cConnectionSettings);
            {
                using (SeeedstudioHM3301 seeedstudioHM3301 = new SeeedstudioHM3301(i2cDevice))
                {
                    while (true)
                    {
                        SeeedstudioHM3301.ParticulateMeasurements particulateMeasurements = seeedstudioHM3301.Read();

                        Console.WriteLine($"Standard PM1.0: {particulateMeasurements.Standard.PM1_0} ug/m3   PM2.5: {particulateMeasurements.Standard.PM2_5} ug/m3  PM10.0: {particulateMeasurements.Standard.PM10_0} ug/m3 ");
                        Console.WriteLine($"Atmospheric PM1.0: {particulateMeasurements.Atmospheric.PM1_0} ug/m3   PM2.5: {particulateMeasurements.Atmospheric.PM2_5} ug/m3  PM10.0: {particulateMeasurements.Standard.PM10_0} ug/m3");

                        // Always 0, checked payload so not a conversion issue. will check in Seeedstudio forums
                        // Console.WriteLine($"Count 0.3um: {particulateMeasurements.Count.Diameter0_3}/l 0.5um: {particulateMeasurements.Count.Diameter0_5} /l 1.0um : {particulateMeasurements.Count.Diameter1_0}/l 2.5um : {particulateMeasurements.Count.Diameter2_5}/l 5.0um : {particulateMeasurements.Count.Diameter5_0}/l 10.0um : {particulateMeasurements.Count.Diameter10_0}/l");

                        Thread.Sleep(new TimeSpan(0,1,0));
                    }
                }
            }
        }
    }
}

I’m going to soak test the library for a week to check that is working okay, then most probably refactor the code so it can be added to the nanoFramework IoT.Device Library repository.

.NET nanoFramework RAK11200 – Brownout Voltage Revisited

The voltage my test setup was calculating looked wrong, then I realised that the sample calculation in the RAK Wireless forums wasn’t applicable to my setup.

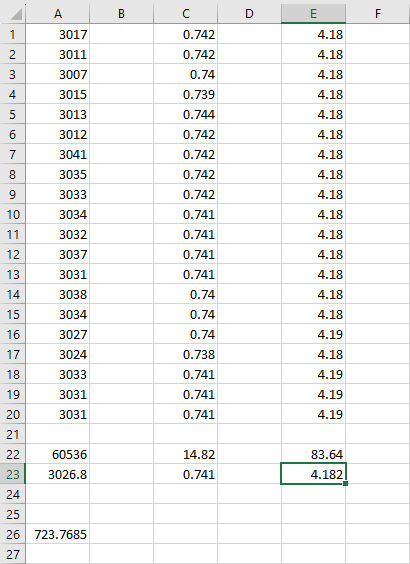
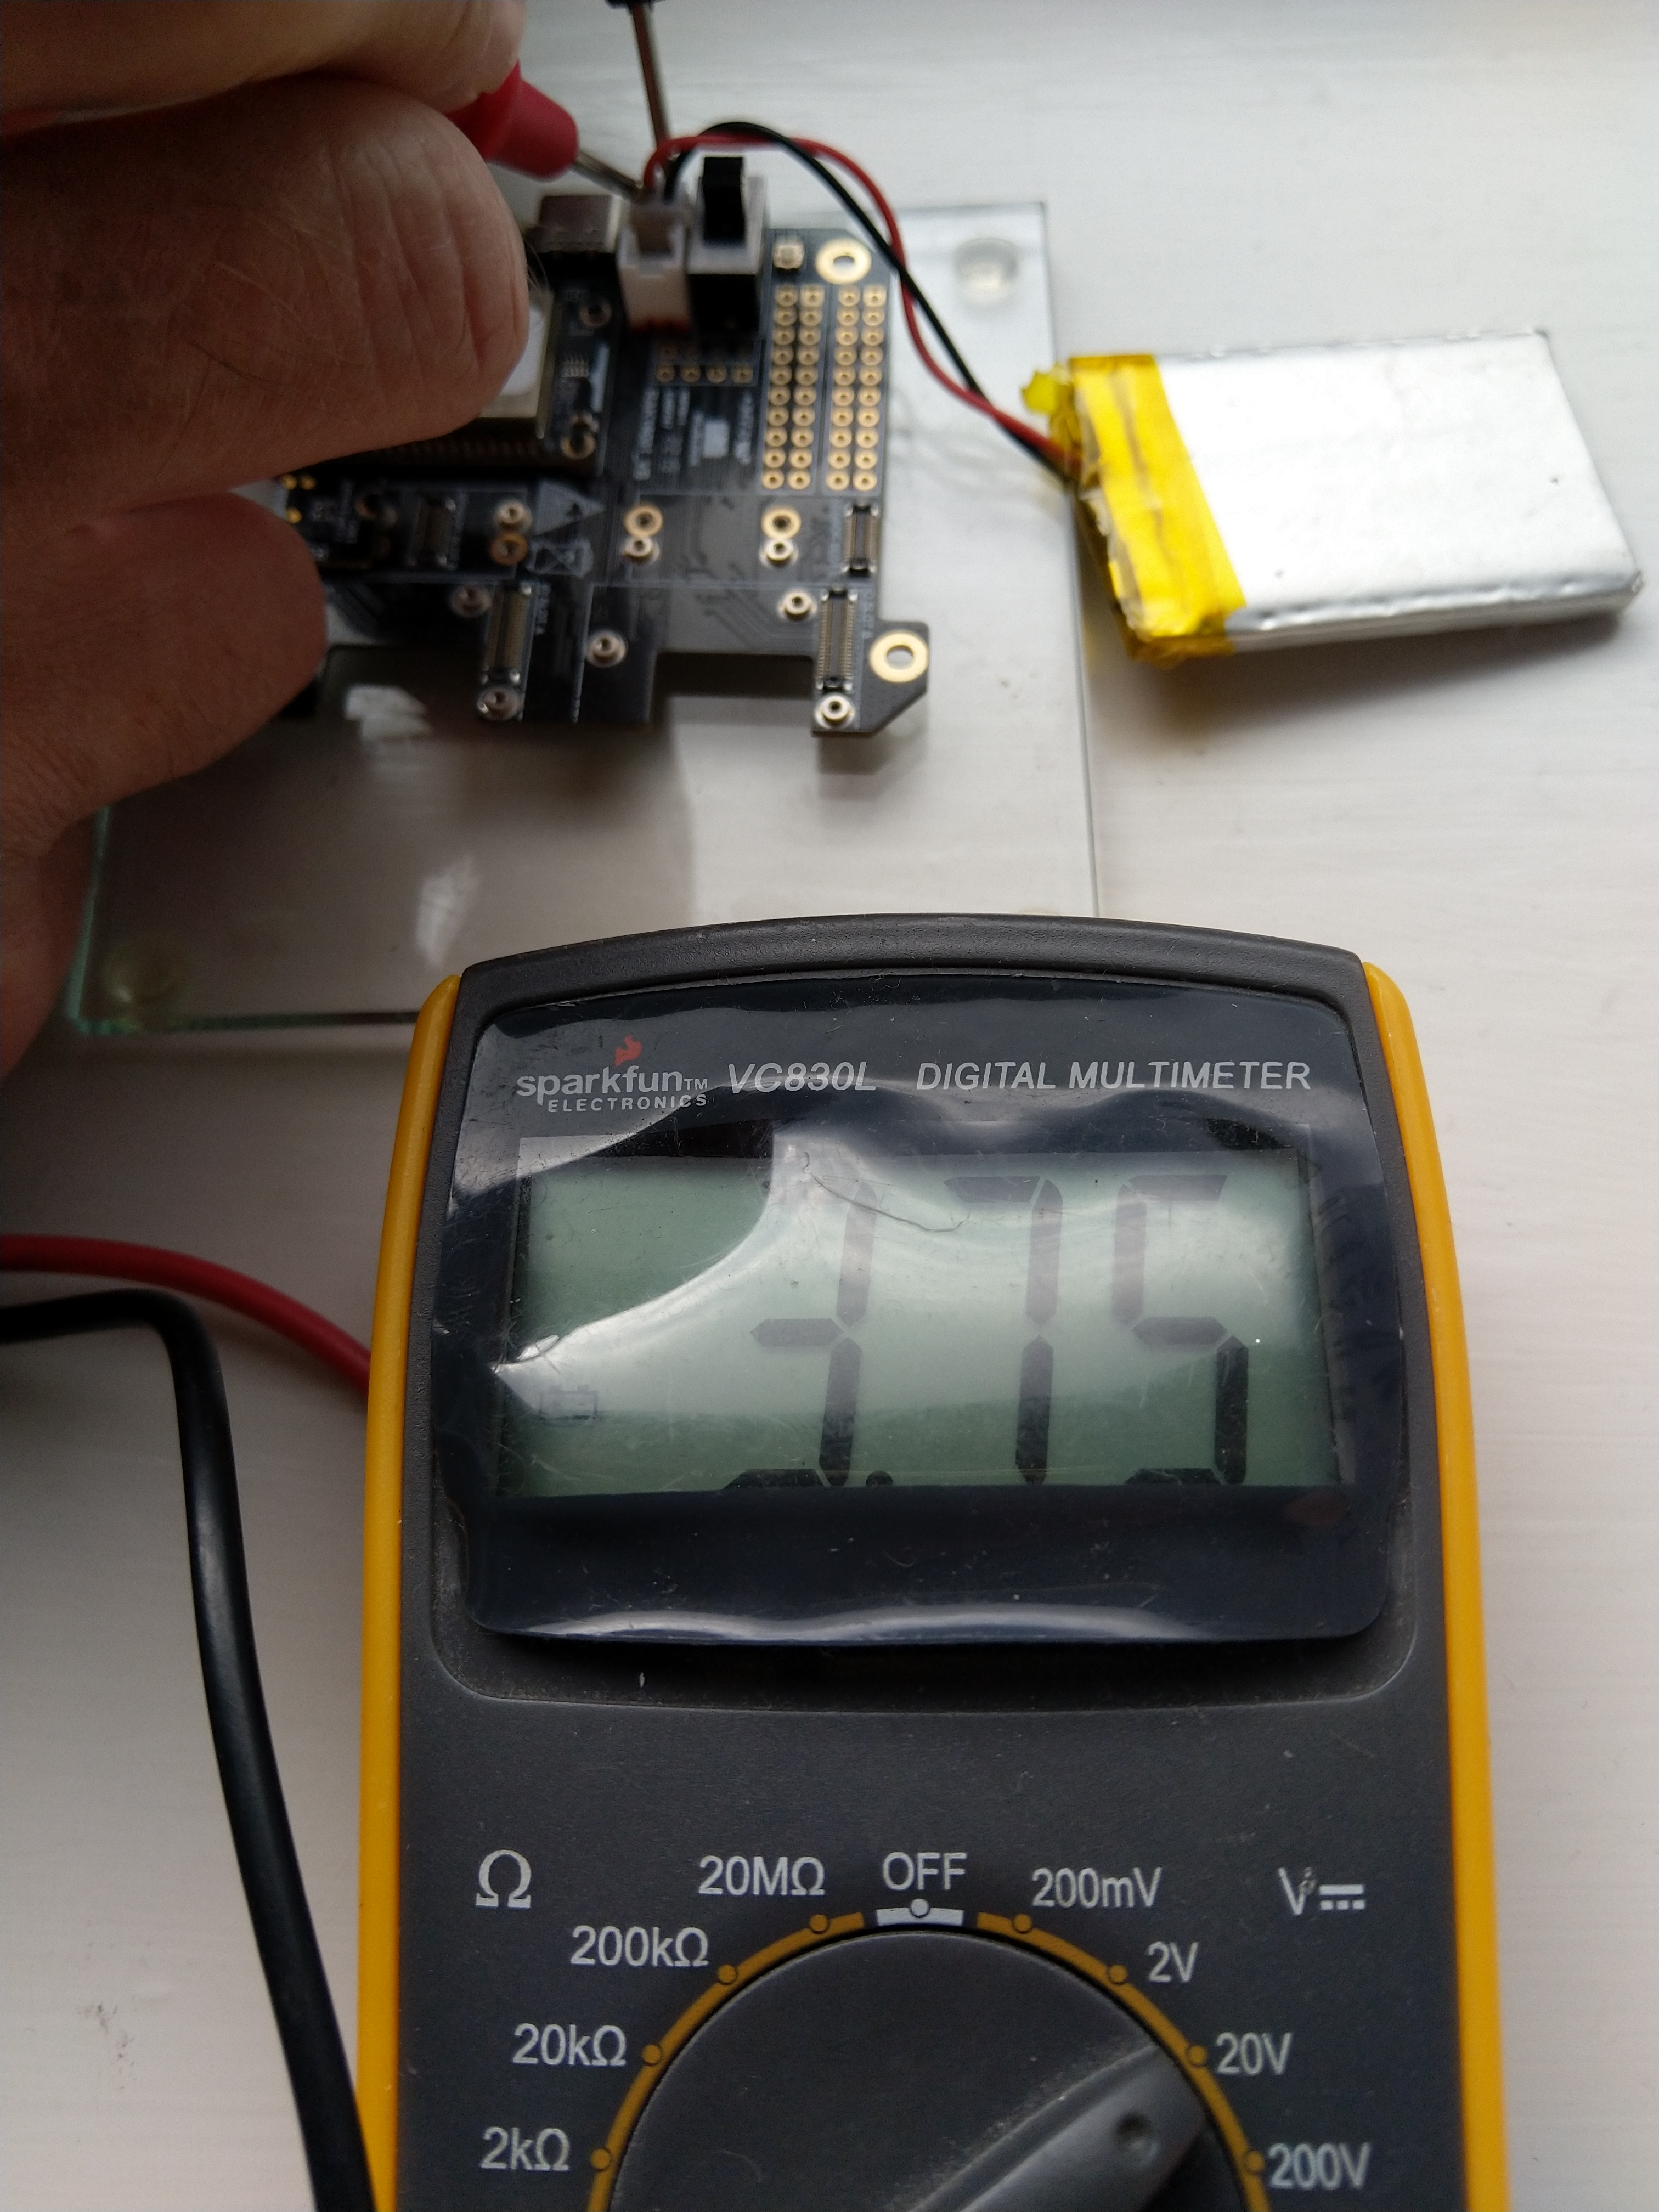
I reassembled my RAK11200 WisBlock WiFi Module, RAK19001 WisBlock Base Board, RAK1901 WisBlock Temperature and Humidity Sensor, 1200mAH Lithium Polymer (LiPo) battery, SKU920100 Solar Board test setup, put a new 9V battery (I had forgotten to turn it off last-time) in my multimeter then collected some data. A=ReadValue(), C= ReadRatio(), E= measured battery voltage.

Excel spreadsheet for calculating ratio

I updated the formula used to calculate the battery voltage and deployed the application

public static void Main()
{
    Debug.WriteLine($"{DateTime.UtcNow:HH:mm:ss} devMobile.IoT.RAK.Wisblock.AzureIoTHub.RAK11200.PowerSleep starting");

    Thread.Sleep(5000);

    try
    {
        double batteryVoltage;

        Configuration.SetPinFunction(Gpio.IO04, DeviceFunction.I2C1_DATA);
        Configuration.SetPinFunction(Gpio.IO05, DeviceFunction.I2C1_CLOCK);

        Debug.WriteLine($"{DateTime.UtcNow:HH:mm:ss} Battery voltage measurement");

        // Configure Analog input (AIN0) port then read the "battery charge"
        AdcController adcController = new AdcController();

        using (AdcChannel batteryVoltageAdcChannel = adcController.OpenChannel(AdcControllerChannel))
        {
            batteryVoltage = batteryVoltageAdcChannel.ReadValue() / 723.7685;

            Debug.WriteLine($" BatteryVoltage {batteryVoltage:F2}");

            if (batteryVoltage < Config.BatteryVoltageBrownOutThreshold)
            {
                Sleep.EnableWakeupByTimer(Config.FailureRetryInterval);
                Sleep.StartDeepSleep();
            }
        }
        catch (Exception ex)
        {
...    
}

To test the accuracy of the voltage calculation I am going to run my setup on the office windowsill for a week regularly measuring the voltage. Then, turn the solar panel over (so the battery is not getting charged) and monitor the battery discharging until the RAK11200 WisBlock WiFi Module won’t connect to the network.

.NET nanoFramework RAK11200 – Brownout Voltage

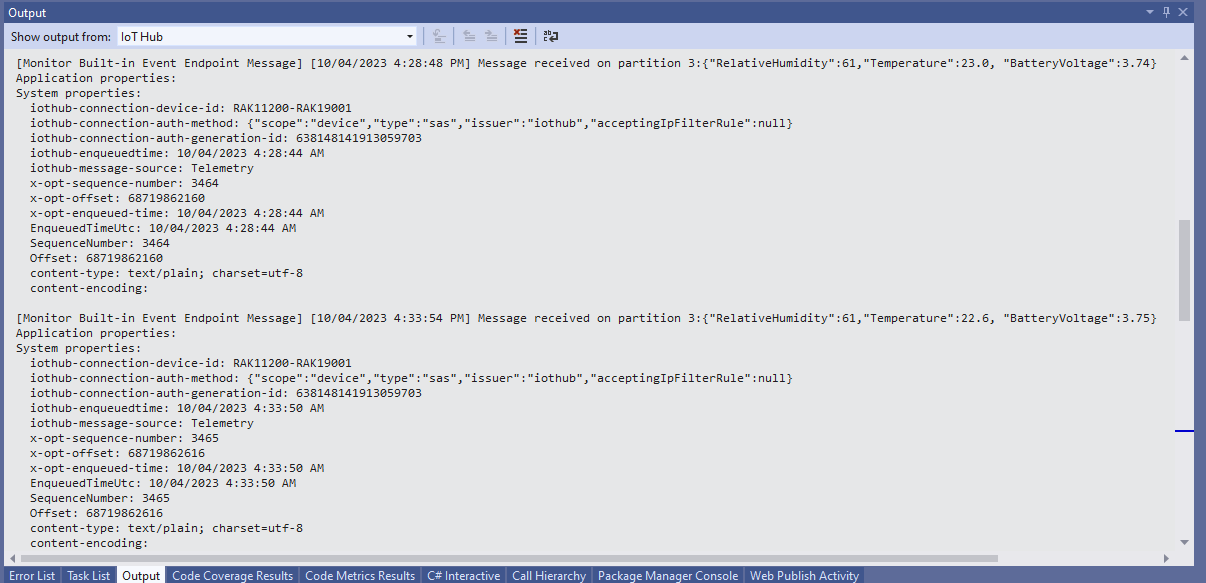
My test setup was a RAK11200 WisBlock WiFi Module, RAK19001 WisBlock Base Board, RAK1901 WisBlock Temperature and Humidity Sensor, 1200mAH Lithium Polymer (LiPo) battery and SKU920100 Solar Board. The test setup uploads temperature, humidity and battery voltage telemetry to an Azure IoT Hub every 5 minutes (short delay so battery life reduced).

The first step was to check that I could get a “battery voltage” value for the RAKWireless RAK11200 WisBlock WiFi Module on a RAK19001 WisBlock Base Board for managing “brownouts” and send to my Azure IoT Hub.

RAK19001 Power supply schematic

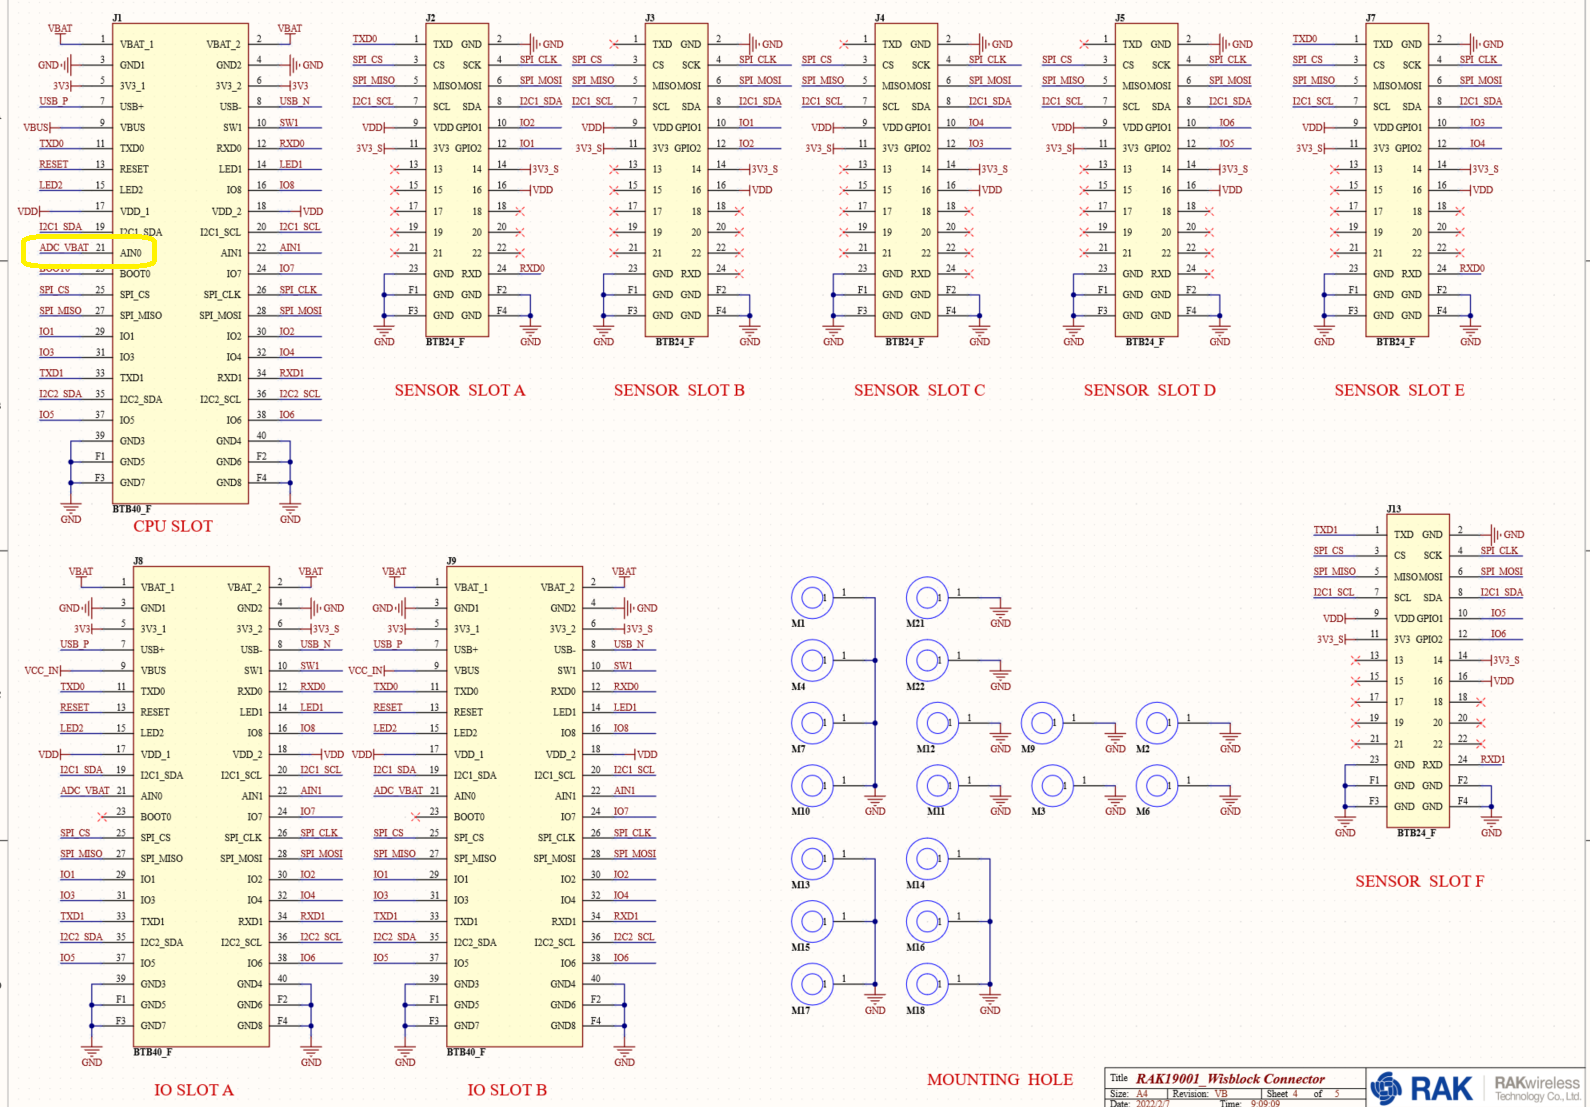
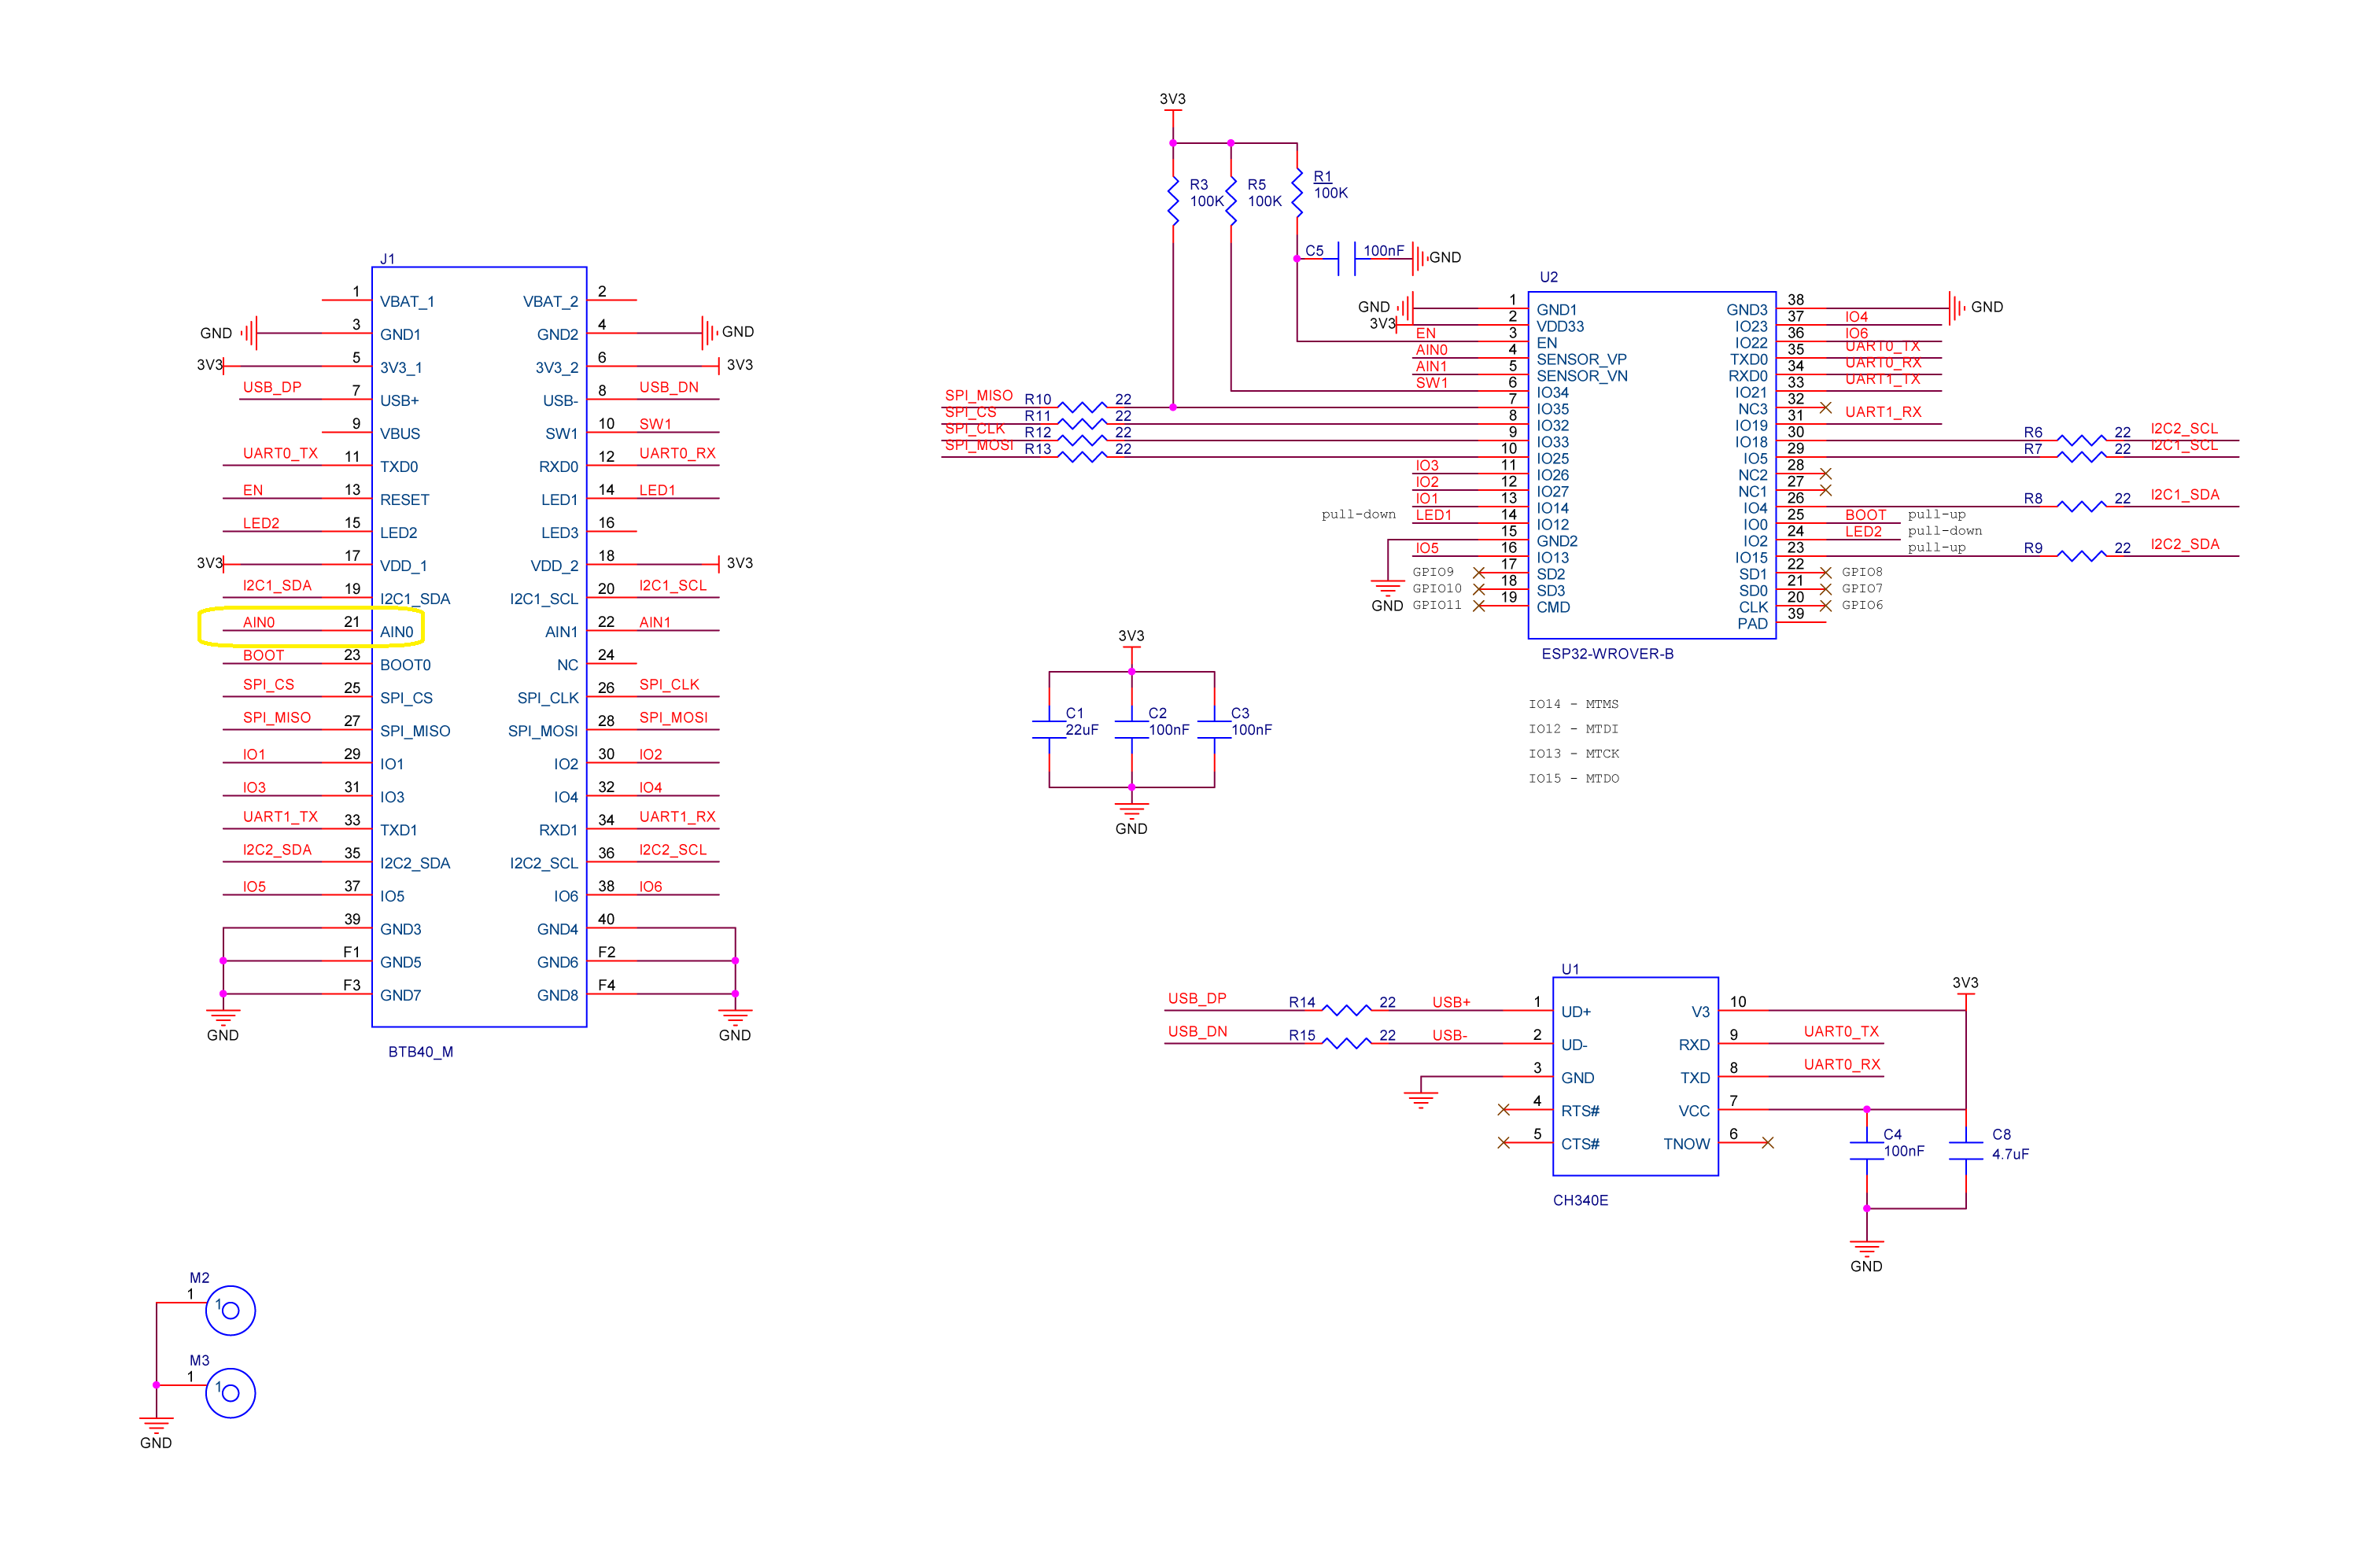
The RAK19001 WisBlock Base Board has a voltage divider (R4&R5 with output ADC_VBAT) which is connected to pin 21(AIN0) on the CPU slot connector.

RAK19001 connector schematic

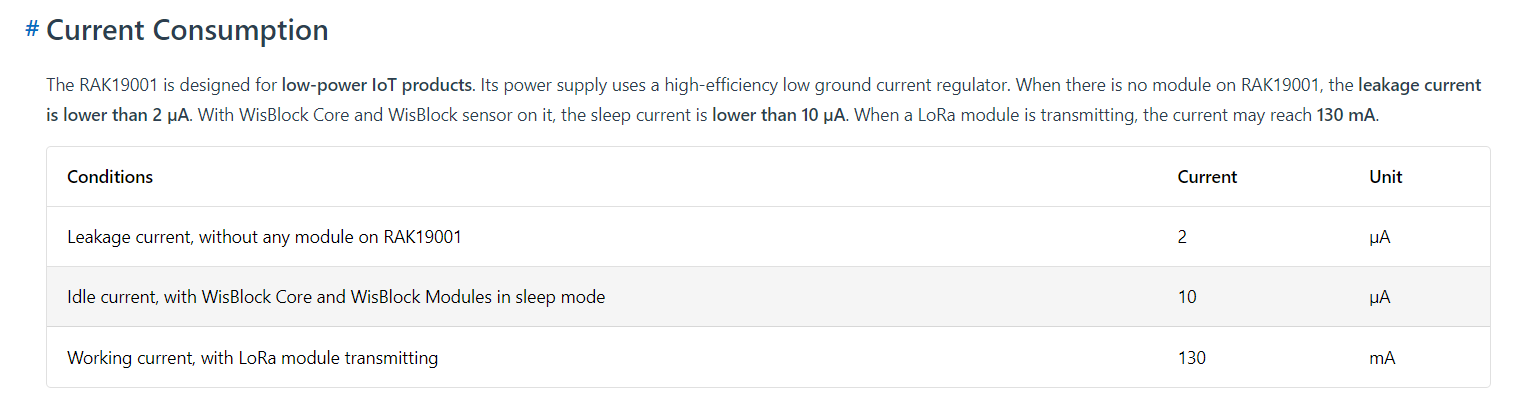
The RAK19001 WisBlock Base Board has quite a low leakage current so the majority of the power consumption should be the RAK11200 WisBlock WiFi Module.

RAK19001 leakage current from specifications

I used AdcController + AdcChannel to read AIN0 and modified the code using the formula (for a RAK4631 module) in the RAK Wireless forums to calculate the battery voltage. (UPDATE This calculation is not applicable to my scenario)

RAK11200 Schematic with battery voltage analog input highlighted

When “slept” the RAK11200 WisBlock WiFi Module power consumption is very low

RAK11200 low power current from specifications
public static void Main()
{
    Debug.WriteLine($"{DateTime.UtcNow:HH:mm:ss} devMobile.IoT.RAK.Wisblock.AzureIoTHub.RAK11200.PowerSleep starting");

    Thread.Sleep(5000); // This do debugger can attach consider removing in realease version

    try
    {
        double batteryVoltage;

        Configuration.SetPinFunction(Gpio.IO04, DeviceFunction.I2C1_DATA);
        Configuration.SetPinFunction(Gpio.IO05, DeviceFunction.I2C1_CLOCK);

        Debug.WriteLine($"{DateTime.UtcNow:HH:mm:ss} Battery voltage measurement");

        // Configure Analog input (AIN0) port then read the "battery charge"
        AdcController adcController = new AdcController();

        using (AdcChannel batteryVoltageAdcChannel = adcController.OpenChannel(AdcControllerChannel))
        {

            // https://forum.rakwireless.com/t/custom-li-ion-battery-voltage-calculation-in-rak4630/4401/7
            // When I checked with multimeter I had to increase 1.72 to 1.9
            batteryVoltage = batteryVoltageAdcChannel.ReadValue() * (3.0 / 4096) * 1.9;

            Debug.WriteLine($" BatteryVoltage {batteryVoltage:F2}");

            if (batteryVoltage < Config.BatteryVoltageBrownOutThreshold)
            {
                Sleep.EnableWakeupByTimer(Config.FailureRetryInterval);
                Sleep.StartDeepSleep();
            }
        }

        Debug.WriteLine($"{DateTime.UtcNow:HH:mm:ss} Wifi connecting");

        if (!WifiNetworkHelper.ConnectDhcp(Config.Ssid, Config.Password, requiresDateTime: true))
        {
            if (NetworkHelper.HelperException != null)
            {
                Debug.WriteLine($"{DateTime.UtcNow:HH:mm:ss} WifiNetworkHelper.ConnectDhcp failed {NetworkHelper.HelperException}");
            }

            Sleep.EnableWakeupByTimer(Config.FailureRetryInterval);
            Sleep.StartDeepSleep();
        }
        Debug.WriteLine($"{DateTime.UtcNow:HH:mm:ss} Wifi connected");

        // Configure the SHTC3 
        I2cConnectionSettings settings = new(I2cDeviceBusID, Shtc3.DefaultI2cAddress);

        string payload ;

        using (I2cDevice device = I2cDevice.Create(settings))
        using (Shtc3 shtc3 = new(device))
        {
            if (shtc3.TryGetTemperatureAndHumidity(out var temperature, out var relativeHumidity))
            {
                Debug.WriteLine($" Temperature {temperature.DegreesCelsius:F1}°C Humidity {relativeHumidity.Value:F0}% BatteryVoltage {batteryVoltage:F2}");

                payload = $"{{\"RelativeHumidity\":{relativeHumidity.Value:F0},\"Temperature\":{temperature.DegreesCelsius:F1}, \"BatteryVoltage\":{batteryVoltage:F2}}}";
            }
            else
            {
                Debug.WriteLine($" BatteryVoltage {batteryVoltage:F2}");

                payload = $"{{\"BatteryVoltage\":{batteryVoltage:F2}}}";
            }

#if SLEEP_SHT3C
            shtc3.Sleep();
#endif
        }

        // Configure the HttpClient uri, certificate, and authorization
        string uri = $"{Config.AzureIoTHubHostName}.azure-devices.net/devices/{Config.DeviceID}";

        HttpClient httpClient = new HttpClient()
        {
            SslProtocols = System.Net.Security.SslProtocols.Tls12,
            HttpsAuthentCert = new X509Certificate(Config.DigiCertBaltimoreCyberTrustRoot),
            BaseAddress = new Uri($"https://{uri}/messages/events?api-version=2020-03-13"),
        };
        httpClient.DefaultRequestHeaders.Add("Authorization", SasTokenGenerate(uri, Config.Key, DateTime.UtcNow.Add(Config.SasTokenRenewFor)));

        Debug.WriteLine($"{DateTime.UtcNow:HH:mm:ss} Azure IoT Hub device {Config.DeviceID} telemetry update start");

        HttpResponseMessage response = httpClient.Post("", new StringContent(payload));

        Debug.WriteLine($"{DateTime.UtcNow:HH:mm:ss} Response code:{response.StatusCode}");

        response.EnsureSuccessStatusCode();
    }
    catch (Exception ex)
    {
        Debug.WriteLine($"{DateTime.UtcNow:HH:mm:ss} Azure IoT Hub telemetry update failed:{ex.Message} {ex?.InnerException?.Message}");

        Sleep.EnableWakeupByTimer(Config.FailureRetryInterval);
        Sleep.StartDeepSleep();
    }

    Sleep.EnableWakeupByTimer(Config.TelemetryUploadInterval);
#if SLEEP_LIGHT
    Sleep.StartLightSleep();
#endif
#if SLEEP_DEEP
    Sleep.StartDeepSleep();
#endif
}

The nanoFramework.Hardware.Esp32.Sleep functionality supports LightSleep and DeepSleep states. The ESP32 device can be “woken up” by GPIO pin(s), Touch pad activity or by a Timer.

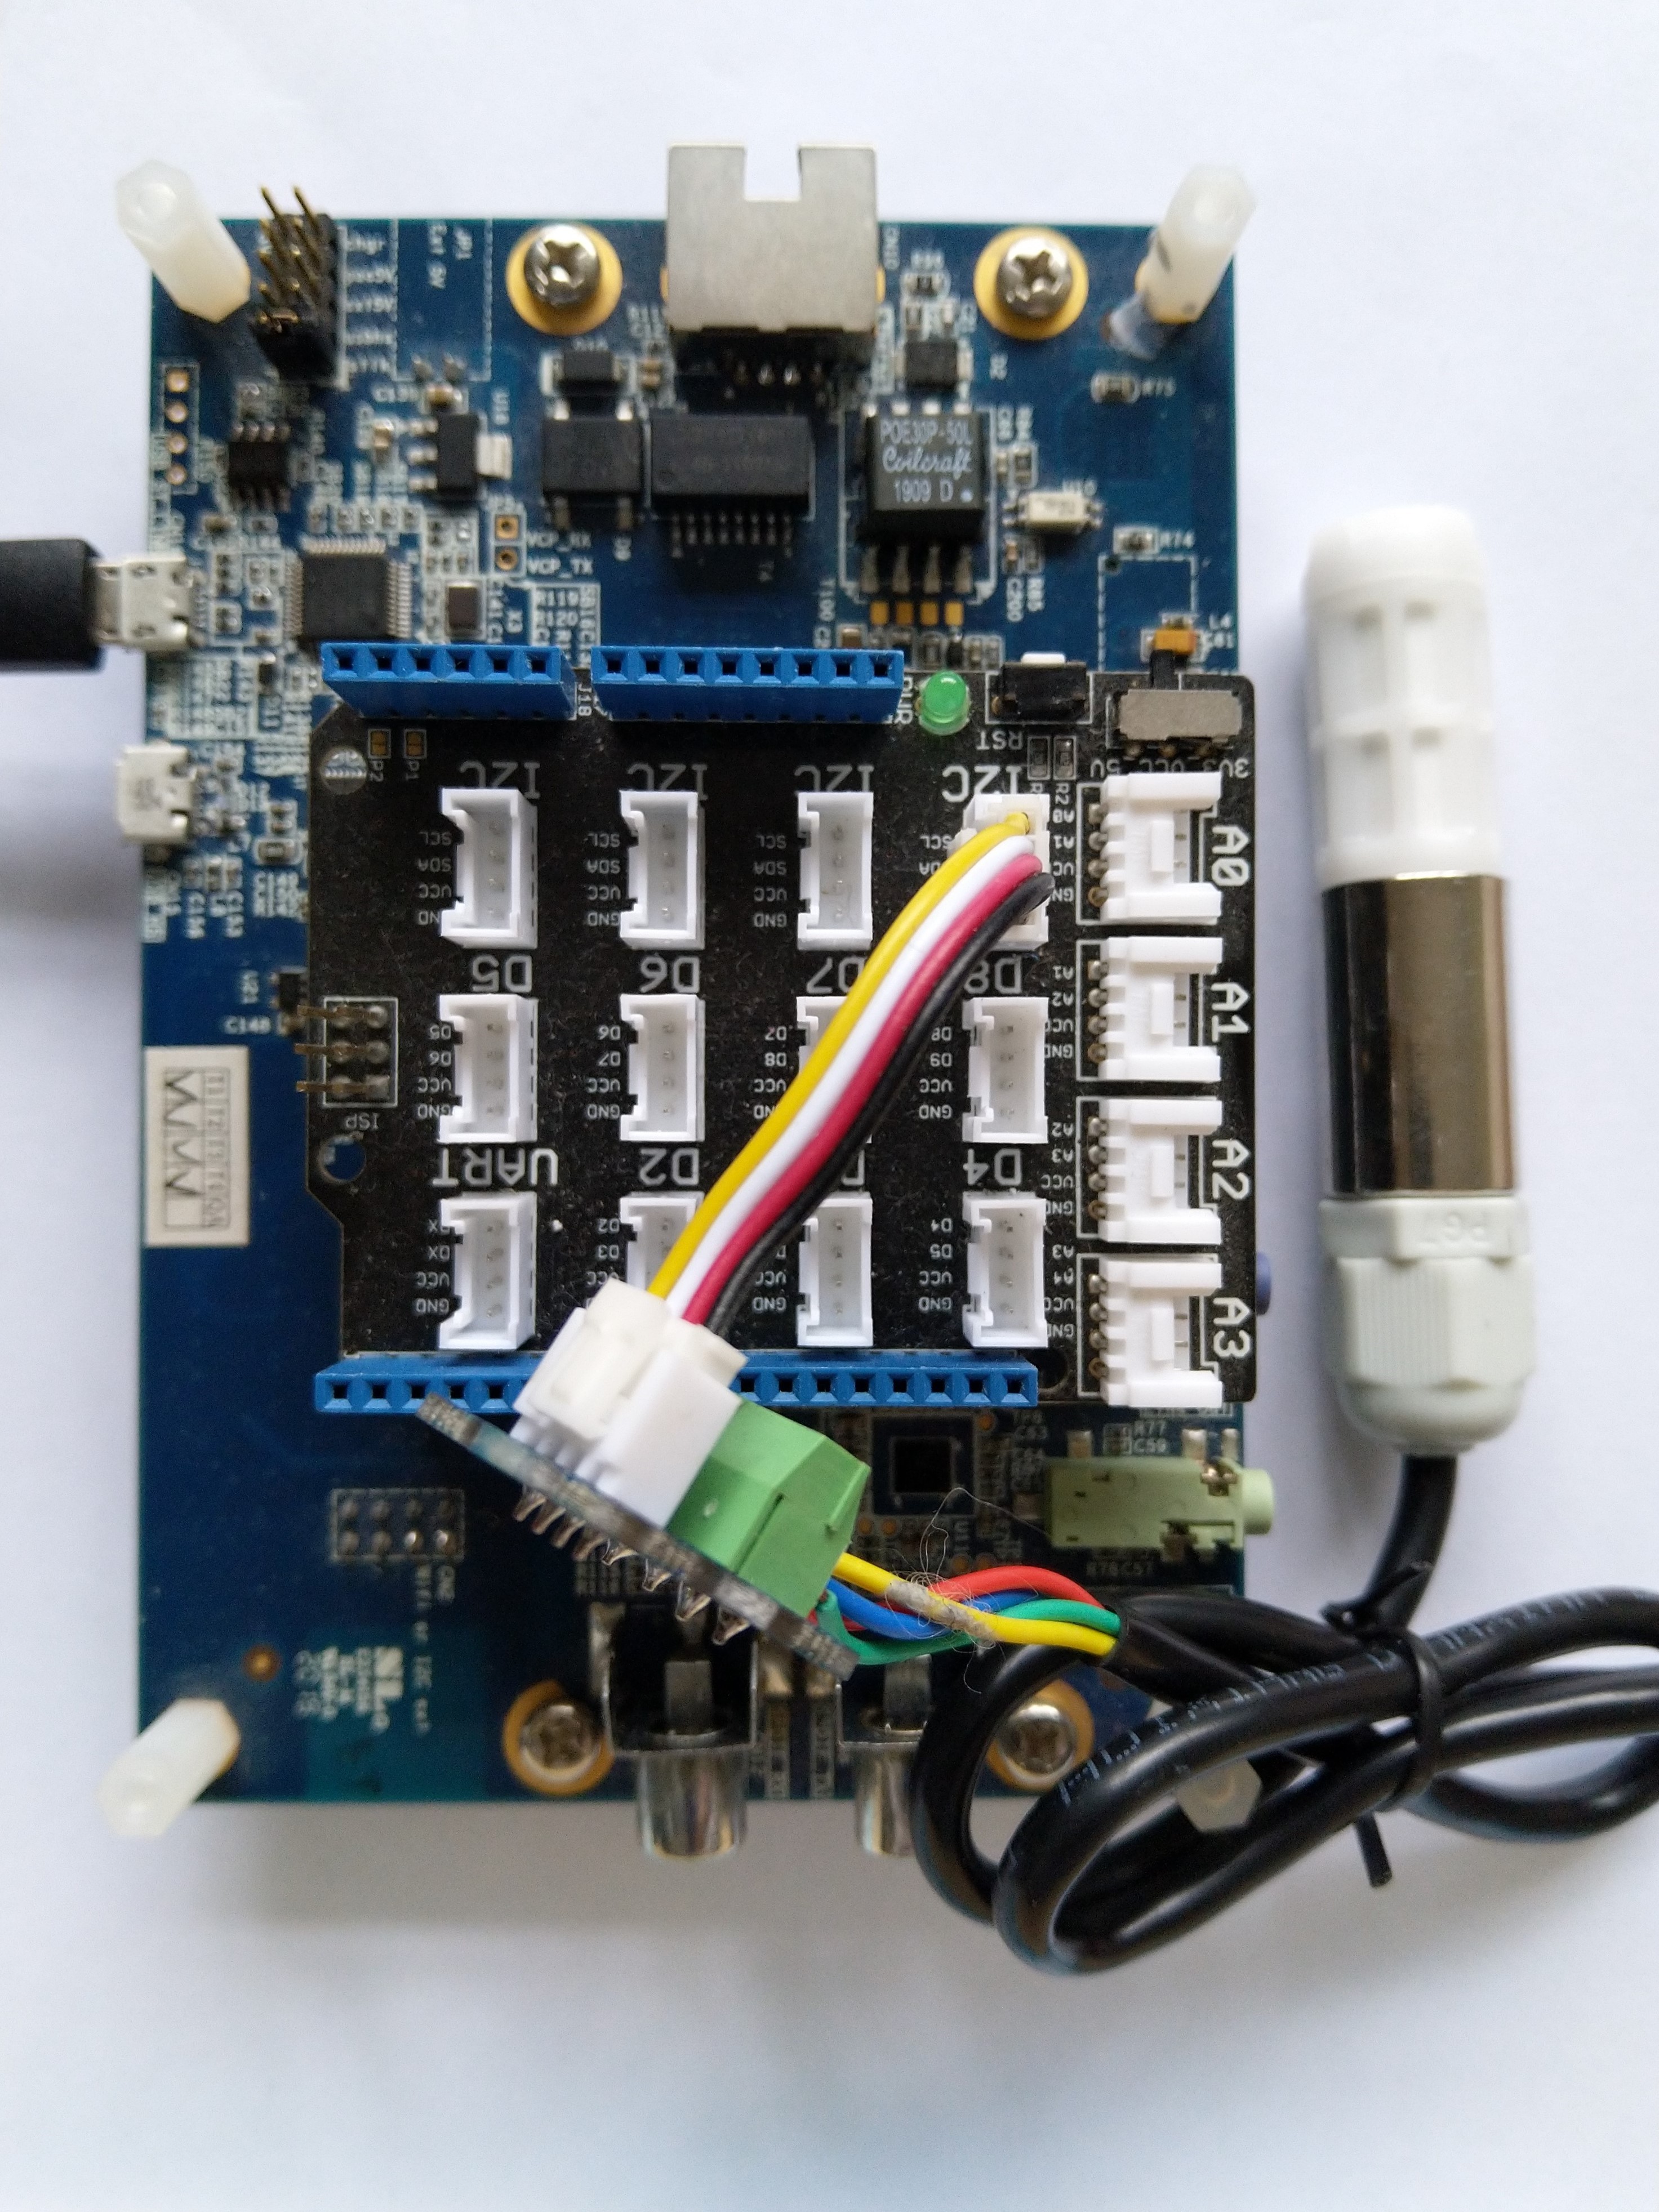
RAK11200+RAK19007+RAK1901+ LiPo battery test rig

After some “tinkering” I found the voltage calculation was surprisingly accurate (usually within 0.01V) for my RAK19001 and RAK19007 base boards.

When the battery voltage was close to its minimum working voltage of the ESP32 device it would reboot when the WifiNetworkHelper.ConnectDhcp method was called. This would quickly drain the battery flat even when the solar panel was trying to charge the battery.

Now, before trying to connect to the wireless network the battery voltage is checked and if too low (more experimentation required) the device goes into a deep sleep for a configurable period (more experimentation required). This is so the solar panel can charge the battery to a level where wireless connectivity will work.

.NET nanoFramework SHT20 library on Github

The full source code (just need to do readme) of my .NET nanoFramework Sensirion SHT20 temperature and humidity(Waterproof) library is now available on GitHub. I have tested the library and sample application with Sparkfun Thing Plus and ST Micro STM32F7691 Discovery devices. (I can validate on more platform configurations if there is interest).

Important: make sure you setup the I2C pins especially on ESP32 Devices before creating the I2cDevice,

SHT20 +STM32F769 Discovery test rig

The .NET nanoFramework device libraries use a TryGet… pattern to retrieve sensor value, this library throws an exception if reading a sensor value fails. I’m not certain which approach is “better” as reading Sensirion SHT20 temperature and humidity(Waterproof) has never failed The only time reading a value failed was when I unplugged the device which I think is “exceptional”.

//---------------------------------------------------------------------------------
// Copyright (c) March 2023, devMobile Software
//
// Licensed under the Apache License, Version 2.0 (the "License");
// you may not use this file except in compliance with the License.
// You may obtain a copy of the License at
//
//     http://www.apache.org/licenses/LICENSE-2.0
//
// Unless required by applicable law or agreed to in writing, software
// distributed under the License is distributed on an "AS IS" BASIS,
// WITHOUT WARRANTIES OR CONDITIONS OF ANY KIND, either express or implied.
// See the License for the specific language governing permissions and
// limitations under the License.
//
// nanoff --target ST_STM32F769I_DISCOVERY --update 
// nanoff --platform ESP32 --serialport COM7 --update
//
//---------------------------------------------------------------------------------
#define ST_STM32F769I_DISCOVERY 
//#define  SPARKFUN_ESP32_THING_PLUS
namespace devMobile.IoT.Device.Sht20
{
    using System;
    using System.Device.I2c;
    using System.Threading;

#if SPARKFUN_ESP32_THING_PLUS
    using nanoFramework.Hardware.Esp32;
#endif

    class Program
    {
        static void Main(string[] args)
        {
            const int busId = 1;

            Thread.Sleep(5000);

#if SPARKFUN_ESP32_THING_PLUS
            Configuration.SetPinFunction(Gpio.IO23, DeviceFunction.I2C1_DATA);
            Configuration.SetPinFunction(Gpio.IO22, DeviceFunction.I2C1_CLOCK);
#endif

            I2cConnectionSettings i2cConnectionSettings = new(busId, Sht20.DefaultI2cAddress);

            using I2cDevice i2cDevice = I2cDevice.Create(i2cConnectionSettings);
            {
                using (Sht20 sht20 = new Sht20(i2cDevice))
                {
                    sht20.Reset();

                    while (true)
                    {
                        double temperature = sht20.Temperature();
                        double humidity = sht20.Humidity();
#if HEATER_ON_OFF
					    sht20.HeaterOn();
					    Console.WriteLine($"{DateTime.Now:HH:mm:ss} HeaterOn:{sht20.IsHeaterOn()}");
#endif
                        Console.WriteLine($"{DateTime.UtcNow:HH:mm:ss} Temperature:{temperature:F1}°C Humidity:{humidity:F0}% HeaterOn:{sht20.IsHeaterOn()}");
#if HEATER_ON_OFF
					    sht20.HeaterOff();
					    Console.WriteLine($"{DateTime.Now:HH:mm:ss} HeaterOn:{sht20.IsHeaterOn()}");
#endif
                        Thread.Sleep(1000);
                    }
                }
            }
        }
    }
}

I’m going to soak test the library for a week to check that is working okay, then most probably refactor the code so it can be added to the nanoFramework IoT.Device Library repository.

.NET nanoFramework Seeedstudio HM3301 Basic connectivity

This is a “throw away” .NET nanoFramework application for investigating how Seeedstudio Grove HM3301 Inter Integrated Circuit bus(I²C) connectivity works.

Seeedstudio Grove HM3301 Sensor

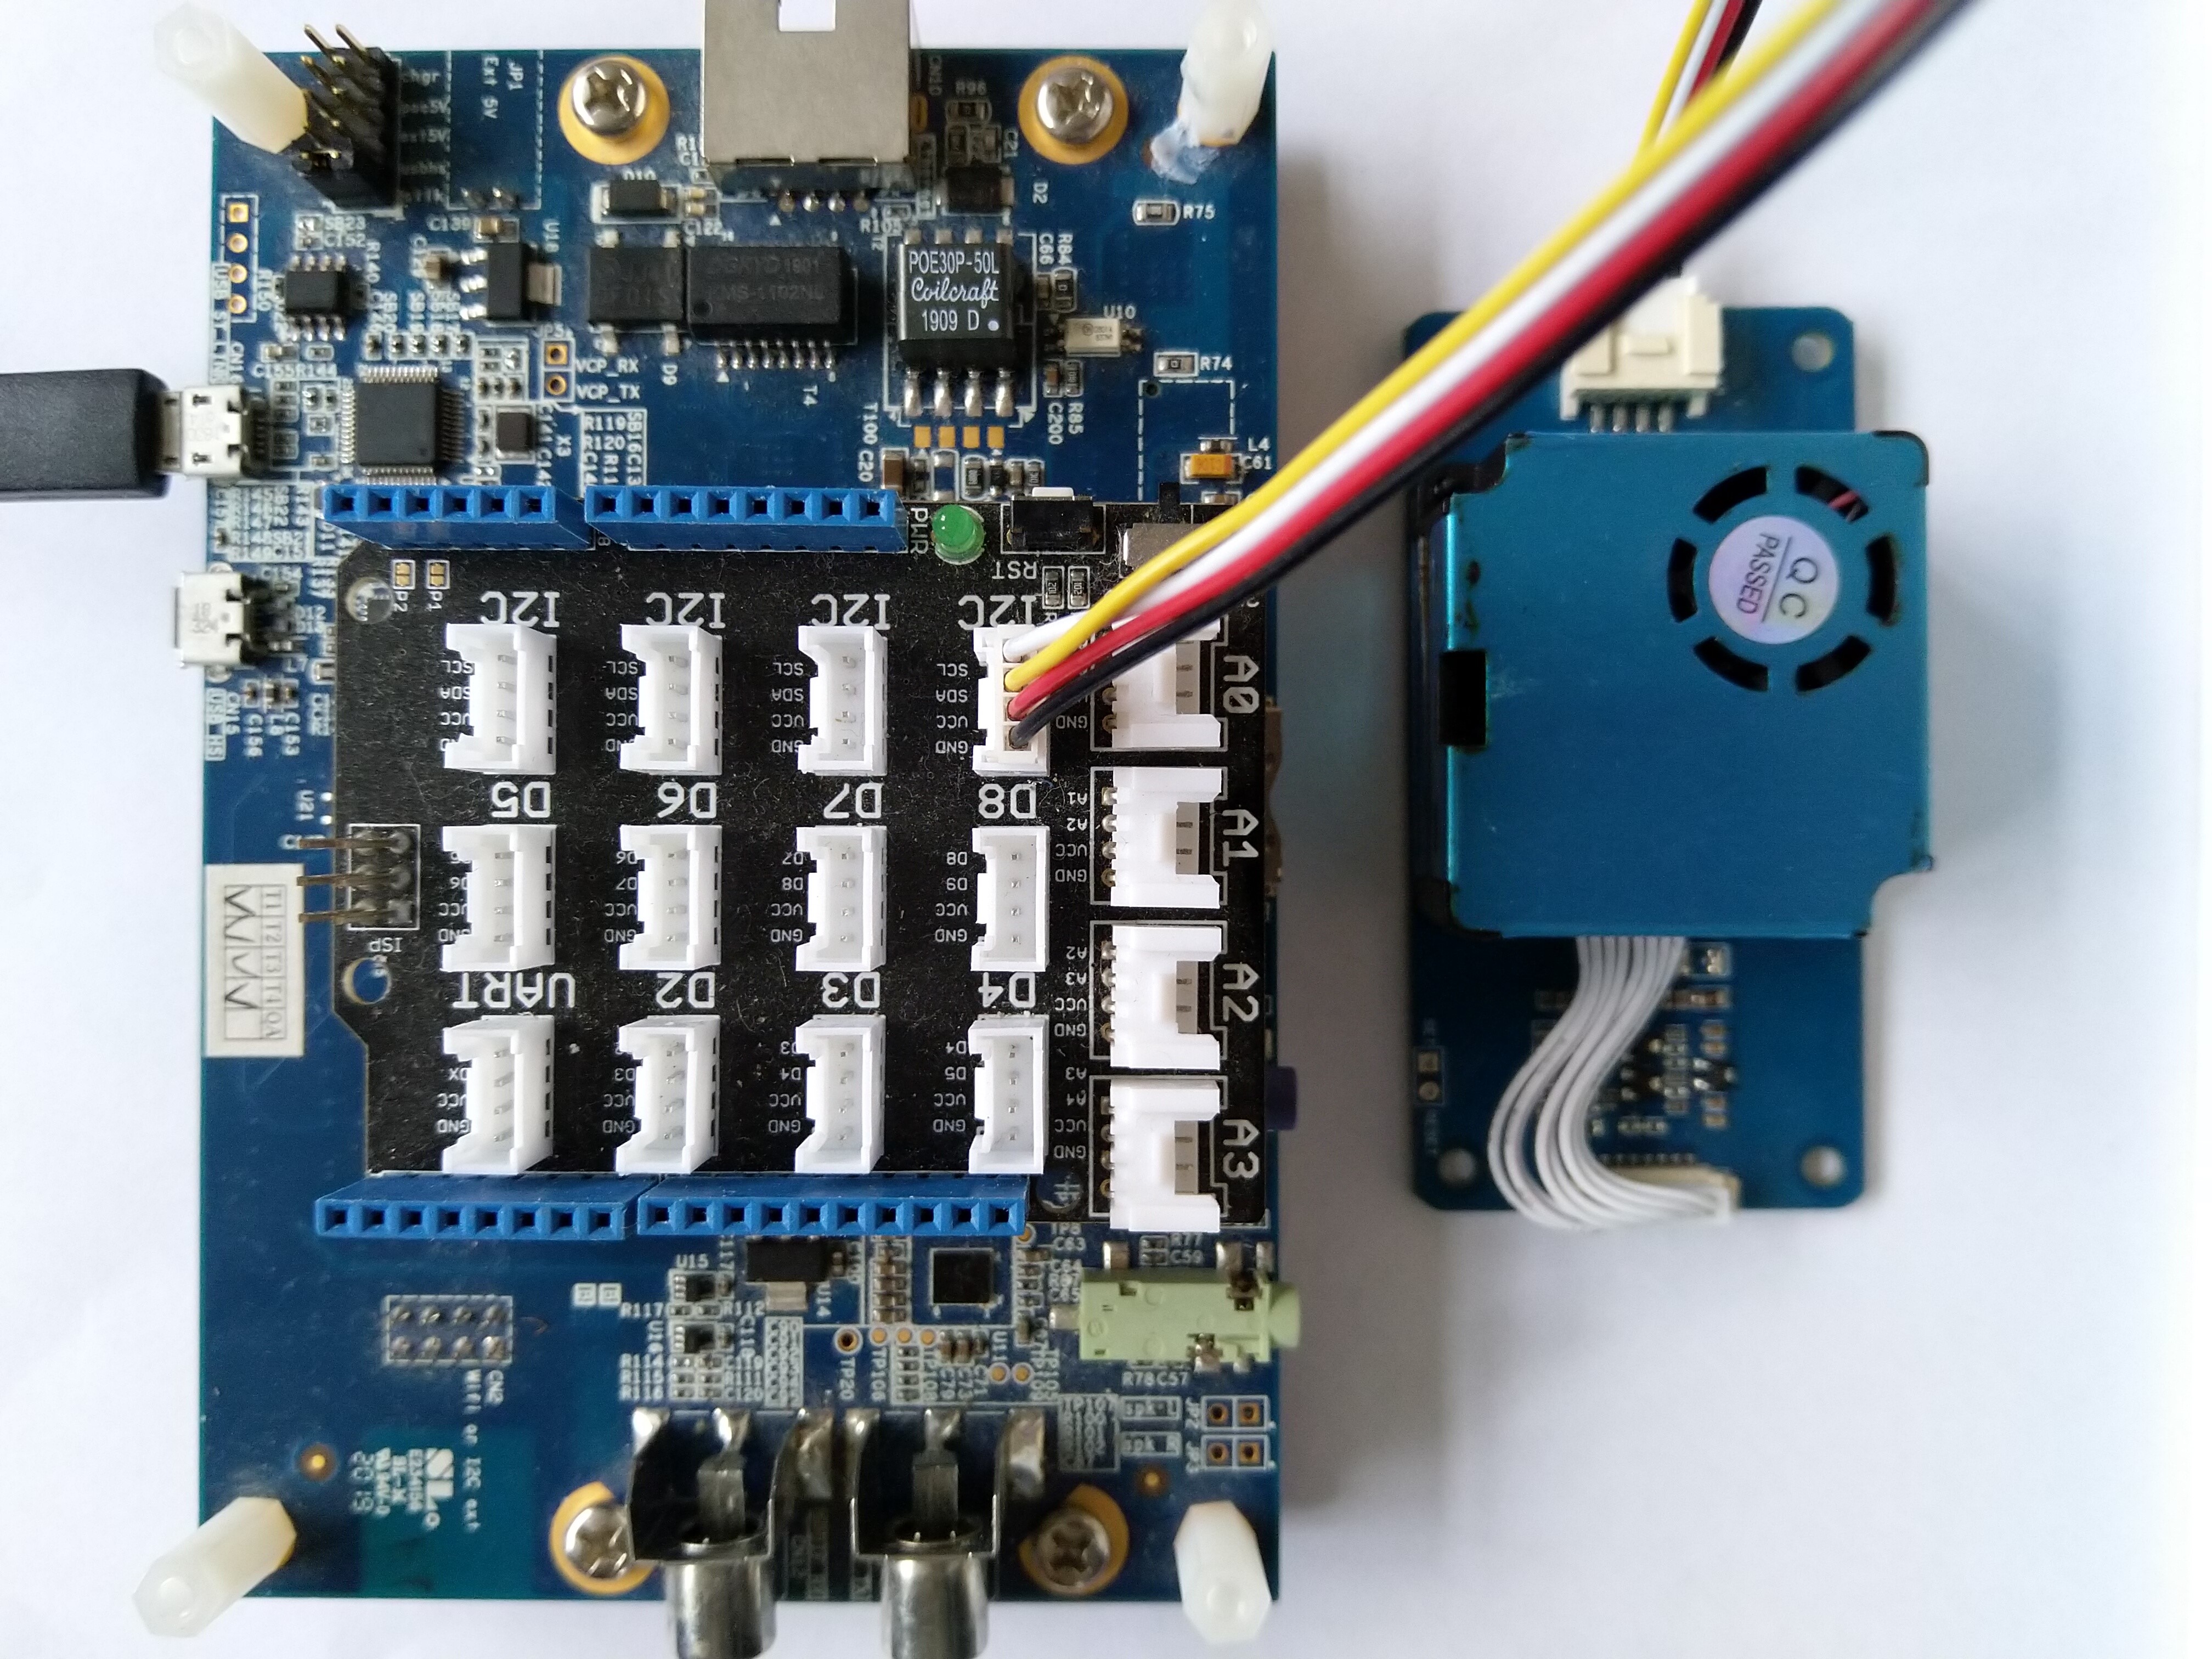
My test setup is a simple .NET nanoFramework console application running on an STM32F7691 Discovery board.

Seeedstudio Grove HM3301 + STM32F769 Discovery test rig

The HM3301I2C application has lots of magic numbers from the HM3301 datasheet and is just a tool for exploring how the sensor works.

public static void Main()
{
    I2cConnectionSettings i2cConnectionSettings = new(1, 0x40);

    // i2cDevice.Dispose
    I2cDevice i2cDevice = I2cDevice.Create(i2cConnectionSettings);

    while (true)
    {
        byte[] writeBuffer = new byte[1];
        byte[] readBuffer = new byte[29];

        writeBuffer[0] = 0x88;

        i2cDevice.WriteRead(writeBuffer, readBuffer);

        //i2cDevice.WriteByte(0x88);
        //i2cDevice.Read(readBuffer);

        ushort standardParticulatePm1 = (ushort)(readBuffer[4] << 8);
        standardParticulatePm1 |= readBuffer[5];

        ushort standardParticulatePm25 = (ushort)(readBuffer[6] << 8);
        standardParticulatePm25 |= readBuffer[7];

        ushort standardParticulatePm10 = (ushort)(readBuffer[8] << 8);
                standardParticulatePm10 |= readBuffer[9];

        Console.WriteLine($"{DateTime.UtcNow:HH:mm:ss} Standard particulate    PM 1.0: {standardParticulatePm1}  PM 2.5: {standardParticulatePm25}  PM 10.0: {standardParticulatePm10} ug/m3");

        ushort atmosphericPm1 = (ushort)(readBuffer[10] << 8);
        atmosphericPm1 |= readBuffer[11];

        ushort atmosphericPm25 = (ushort)(readBuffer[12] << 8);
        atmosphericPm25 |= readBuffer[13];

        ushort atmosphericPm10 = (ushort)(readBuffer[14] << 8);
        atmosphericPm10 |= readBuffer[15];

        Console.WriteLine($"{DateTime.UtcNow:HH:mm:ss} Atmospheric particulate PM 1.0: {atmosphericPm1:3}  PM 2.5: {atmosphericPm25}  PM 10.0: {atmosphericPm10} ug/m3");


        ushort particulateCountPm03 = (ushort)(readBuffer[16] << 8);
        particulateCountPm03 |= readBuffer[17];

        ushort particulateCountPm05 = (ushort)(readBuffer[18] << 8);
        particulateCountPm05 |= readBuffer[19];

        ushort particulateCountPm1 = (ushort)(readBuffer[20] << 8);
        particulateCountPm1 |= readBuffer[21];

        Console.WriteLine($"{DateTime.UtcNow:HH:mm:ss} Particulate count       PM 0.3: {particulateCountPm03:3}  PM 0.5: {particulateCountPm05}  PM 1.0: {particulateCountPm1} ug/m3");


        ushort particleCountPm25 = (ushort)(readBuffer[22] << 8);
        particleCountPm25 |= readBuffer[23];

        ushort particleCountPm5 = (ushort)(readBuffer[24] << 8);
        particleCountPm5 |= readBuffer[25];

        ushort particleCountPm10 = (ushort)(readBuffer[26] << 8);
        particleCountPm10 |= readBuffer[27];

        Console.WriteLine($"{DateTime.UtcNow:HH:mm:ss} Particle count/0.1L     PM 2.5: {particleCountPm25}  PM 5.0: {particleCountPm5}  PM 10.0: {particleCountPm10} particles/0.1L");


        byte checksum = 0;
        for (int i = 0; i < readBuffer.Length - 1; i++)
        {
            checksum += readBuffer[i];
        }
        Console.WriteLine($"{DateTime.UtcNow:HH:mm:ss} Checksum payload:{readBuffer[28]} calculated:{checksum}");
        Console.WriteLine("");

        Thread.Sleep(5000);
    }
}

The unpacking of the value standard particulate, particulate count and particle count values is fairly repetitive, but I will fix it in the next version.

Visual Studio 2022 Debug output

The checksum calculation isn’t great even a simple cyclic redundancy check(CRC) would be an improvement on summing the 28 bytes of the payload.