Xively Personal is being retired

This is going to cause me a problem especially my Netduino based nRF24 Xively Field gateway which gets used in quite a few of my student projects. I’m looking for a replacement Internet of Things service which has http/s and/or mqtt, amqp support, C & C#  client libraries (which I can get to work on Windows 10 IoT Core & NetMF) would be a bonus.

From the Xively email

”After careful consideration, LogMeIn has made the decision to retire Xively Personal from its current line of products effective January 15, 2018 at 12:00PM ET . Please note that LogMeIn will continue to offer our Xively Enterprise edition – there is no change to that edition and we will continue to support that platform as part of our IoT business.

Retiring a product is never an easy decision, and we recognize it does introduce potential challenges to active users. So we want to make sure you have all the information you need to make as seamless a transition as possible.

Access to your account:
Your Xively Personal account will remain active until January 15th. Please note that devices will not be accessible via the Xively Personal service once it is retired.

Transferring your products to another IoT service:
Should you choose to switch to another service, there are essentially two options.

1) Migrate to Xively Enterprise: The latest Enterprise version of Xively is built on a more modern and reliable architecture, which brings the benefits of pre-built hardware integrations, identity and device management features, MQTT messaging, and best-in-class security, but it may require some reconfiguring of your current devices. We do offer a 30 day free trial of Xively Enterprise should you want to try it out for yourself.

2) Migrate to another free service: If your use is primarily for experimenting and personal projects, there are several free IoT platform options on the market, such as Adafruit, Thingspeak, or SparkFun.”

One of the suggestions – Sparkfun Phant has been retired

Some possible alternatives in no particular order (this list may grow)

AdaFruit.IO – The internet of things for everyone

Microsoft IoT Central – Enterprise-grade IoT SaaS

ThingSpeak – The open IoT platform with MATLAB analytics

Blynk – Democratizing the Internet of Things

Thinger.io platform

SenseIoT – Internet of Things Data Hosting Platform

Temboo – Tools for Digital Transformation

Carriots by Altair

Nearbus – An IoT Open Project

ubidots – An application Builder for the Internet of Things

Kii Cloud

Artik – End-to-end IoT Platform

goplusplatform – Connect your things with GO+

I’m initially looking for a platform which is the “least painful” transition from Xively.
nRF24 Windows 10 IoT Core Background Task

First step is to build a basic Windows 10 IoT Core background task which can receive and display messages sent from a variety of devices across an nRF24L01 wireless link.

If you create a new “Windows IoT Core” “Background Application” project then copy this code into StartupTasks.cs the namespace has to be changed in the C# file, project properties\library\Default namespace and “Package.appxmanifest”\declarations\Entry Point.

/*

Copyright ® 2017 December devMobile Software, All Rights Reserved

THIS CODE AND INFORMATION IS PROVIDED "AS IS" WITHOUT WARRANTY OF ANY
KIND, EITHER EXPRESSED OR IMPLIED, INCLUDING BUT NOT LIMITED TO THE
IMPLIED WARRANTIES OF MERCHANTABILITY AND/OR FITNESS FOR A PARTICULAR
PURPOSE.

http://www.devmobile.co.nz

*/
using System;
using System.Diagnostics;
using System.Text;
using Radios.RF24;
using Windows.ApplicationModel.Background;

namespace devmobile.IoTCore.nRF24BackgroundTask
{
    public sealed class StartupTask : IBackgroundTask
    {
      private const byte ChipEnablePin = 25;
      private const byte ChipSelectPin = 0;
      private const byte nRF24InterruptPin = 17;
      private const string BaseStationAddress = "Base1";
      private const byte nRF24Channel = 10;
      private RF24 Radio = new RF24();
      private BackgroundTaskDeferral deferral;

      public void Run(IBackgroundTaskInstance taskInstance)
        {
         Radio.OnDataReceived += Radio_OnDataReceived;
         Radio.OnTransmitFailed += Radio_OnTransmitFailed;
         Radio.OnTransmitSuccess += Radio_OnTransmitSuccess;

         Radio.Initialize(ChipEnablePin, ChipSelectPin, nRF24InterruptPin);
         Radio.Address = Encoding.UTF8.GetBytes(BaseStationAddress);
         Radio.Channel = nRF24Channel;
         Radio.PowerLevel = PowerLevel.High;
         Radio.DataRate = DataRate.DR250Kbps;
         Radio.IsEnabled = true;

         Debug.WriteLine("Address: " + Encoding.UTF8.GetString(Radio.Address));
         Debug.WriteLine("PA: " + Radio.PowerLevel);
         Debug.WriteLine("IsAutoAcknowledge: " + Radio.IsAutoAcknowledge);
         Debug.WriteLine("Channel: " + Radio.Channel);
         Debug.WriteLine("DataRate: " + Radio.DataRate);
         Debug.WriteLine("IsDynamicAcknowledge: " + Radio.IsDyanmicAcknowledge);
         Debug.WriteLine("IsDynamicPayload: " + Radio.IsDynamicPayload);
         Debug.WriteLine("IsEnabled: " + Radio.IsEnabled);
         Debug.WriteLine("Frequency: " + Radio.Frequency);
         Debug.WriteLine("IsInitialized: " + Radio.IsInitialized);
         Debug.WriteLine("IsPowered: " + Radio.IsPowered);

         deferral = taskInstance.GetDeferral();

         Debug.WriteLine("Run completed");
      }

      private void Radio_OnDataReceived(byte[] data)
      {
         // Display as Unicode
         string unicodeText = Encoding.UTF8.GetString(data);
         Debug.WriteLine("Unicode - Payload Length {0} Unicode Length {1} Unicode text {2}", data.Length, unicodeText.Length, unicodeText);

         // display as hex
         Debug.WriteLine("Hex - Length {0} Payload {1}", data.Length, BitConverter.ToString(data));
      }

      private void Radio_OnTransmitSuccess()
      {
         Debug.WriteLine("Transmit Succeeded!");
      }

      private void Radio_OnTransmitFailed()
      {
         Debug.WriteLine("Transmit Failed!");
      }
   }
}

This was displayed in the output window of Visual Studio

Address: Base1
PA: 15
IsAutoAcknowledge: True
Channel: 10
DataRate: DR250Kbps
IsDynamicAcknowledge: False
IsDynamicPayload: True
IsEnabled: True
Frequency: 2410
IsInitialized: True
IsPowered: True
Run completed
…

Interrupt Triggered: FallingEdge
Unicode – Payload Length 19 Unicode Length 19 Unicode text T  23.8,H  73,V 3.26
Hex – Length 19 Payload 54-20-32-33-2E-38-2C-48-20-20-37-33-2C-56-20-33-2E-32-36
Interrupt Triggered: RisingEdge

Note the odd formatting of the Temperature and humidity values which is due to the way dtostrf function in the Atmel AVR library works.

Also noticed the techfooninja nRF24 library has configurable output power level which I will try to retrofit onto the Gralin NetMF library.

Next, several simple Arduino, devDuino V2.2, Seeeduino V4.2 and Netduino 2/3 clients (plus possibly some others)

nRF24 Windows 10 IoT Core reboot

My first live deployment of the nRF24L01 Windows 10 IoT Core field gateway is now scheduled for mid Q1 2018 so time for a reboot. After digging out my Raspbery PI 2/3 devices and the nRF24L01+ shield (with modifications detailed here) I have a basic plan with some milestones.

My aim is to be able to wirelessly acquire data from several dozen Arduino, devduino, seeeduino, and Netduino devices, Then, using a field gateway on a Raspberry PI running Windows 10 IoT Core upload it to Microsoft IoT Central

First bit of code – Bleepy a simple background application to test the piezo beeper on the RPI NRF24 Shield

namespace devmobile.IoTCore.Bleepy
{
   public sealed class StartupTask : IBackgroundTask
   {
      private BackgroundTaskDeferral deferral;
      private const int ledPinNumber = 4;
      private GpioPin ledGpioPin;
      private ThreadPoolTimer timer;

      public void Run(IBackgroundTaskInstance taskInstance)
      {
         var gpioController = GpioController.GetDefault();
         if (gpioController == null)
         {
            Debug.WriteLine("GpioController.GetDefault failed");
            return;
         }

         ledGpioPin = gpioController.OpenPin(ledPinNumber);
         if (ledGpioPin == null)
         {
            Debug.WriteLine("gpioController.OpenPin failed");
            return;
         }

         ledGpioPin.SetDriveMode(GpioPinDriveMode.Output);

         this.timer = ThreadPoolTimer.CreatePeriodicTimer(Timer_Tick, TimeSpan.FromMilliseconds(500));

         deferral = taskInstance.GetDeferral();

         Debug.WriteLine("Rum completed");
      }

      private void Timer_Tick(ThreadPoolTimer timer)
      {
         GpioPinValue currentPinValue = ledGpioPin.Read();

         if (currentPinValue == GpioPinValue.High)
         {
            ledGpioPin.Write(GpioPinValue.Low);
         }
         else
         {
            ledGpioPin.Write(GpioPinValue.High);
         }
      }
   }
}

Note the blob of blu tack over the piezo beeper to mute noise
nRF24ShieldMuted

.Net Core & WCF TransportWithMessageCredential

In one of my day jobs I look after a system which has been around since 2010 (Early adopter of Microsoft Azure, developement started on .Net 3.5). The product has a number of Windows Communication Foundation(WCF) services hosted in an Azure CloudService.

A client built with .Net Core wanted to be able to call one of the services which was implemented using wsHttpBinding and TransportWithMessageCredential and this proved a bit more painful than expected…

I first tried the Visual Studio 2017 Microsoft WCF Web Service Reference Provider fromt the WCF Core Team.

The “add connected service” extension dialog allowed me to select an endpoint

ConfigureWCFWebSeriveReference

But the code generation process failed

WCFWebServiceReferenceError.png

The error message wasn’t particularly helpful so I used the command line utility svcutil to generate client classes. Which I used to built a .net core client with and the associated .Net Core WCF NuGet packages.

The console application failed when I called the service with a “PlatformNotSupportedException”. After some searching I found that the .Net Core WCF libraries don’t support TransportWithMessageCredential (September 2017).

Some more searching lead to a StackOverflow article where an answer suggested using the SimpleSOAPClient NuGet package. I then created a new client using the generated classes as the basis for the ones used in my SimpleSOAPClient proof of concept(PoC)

[System.Diagnostics.DebuggerStepThroughAttribute()]
[System.CodeDom.Compiler.GeneratedCodeAttribute("System.ServiceModel", "4.0.0.0")]
[System.ServiceModel.MessageContractAttribute(WrapperName="Redeem", WrapperNamespace="http://qwertyuiop.com/services2011/08", IsWrapped=true)]
public partial class RedeemRequest
{
    [System.ServiceModel.MessageBodyMemberAttribute(Namespace="http://qwertyuiop.com/services2011/08", Order=1)]
    public string voucherCode;

    [System.ServiceModel.MessageBodyMemberAttribute(Namespace="http://qwertyuiop.com/services2011/08", Order=2)]
    public string merchantId;

    [System.ServiceModel.MessageBodyMemberAttribute(Namespace="http://qwertyuiop.com/services2011/08", Order=3)]
    public string merchantReference;

    [System.ServiceModel.MessageBodyMemberAttribute(Namespace="http://qwertyuiop.com/services2011/08", Order=4)]
    public string terminalId;

    public RedeemRequest()
    {
    }

    public RedeemRequest(string voucherCode, string merchantId, string merchantReference, string terminalId)
    {
        this.voucherCode = voucherCode;
        this.merchantId = merchantId;
        this.merchantReference = merchantReference;
        this.terminalId = terminalId;
    }
}

became

[XmlRoot("Redeem", Namespace = "http://qwertyuiop.com/services2011/08")]
public partial class RedeemRequest
{
   [XmlElement("voucherCode")]
   public string voucherCode;
   [XmlElement("transactionAmount")]
   public decimal transactionAmount;
   [XmlElement("merchantId")]
   public string merchantId;
   [XmlElement("merchantReference")]
   public string merchantReference;
   [XmlElement("terminalId")]
   public string terminalId;
}

This client failed with a SOAPAction related exception so I fired up Telerik Fiddler and found that the header was missing. When I manually added the header in the request composer (after dragging one of my failed requests onto the composer tab) it worked.

I had a look at the code in the SimpleSOAPClient repository to see how to add a custom HTTP Header to a request.

RedeemRequest redeemRequest = new RedeemRequest()
{
   merchantId = "......",
   merchantReference = "......",
   terminalId = "......",
   voucherCode = "......",
};

using (var client = SoapClient.Prepare())
{
   client.HttpClient.DefaultRequestHeaders.Add("SOAPAction", "http://qwertyuiop.com/services2011/08/IRedemptionProxyServiceV1/Redeem");
   var responseEnvelope = await client.SendAsync(
      "https://qwertyuiop.com/RedemptionProxy.svc",
      "https://qwertyuiop.com/services2011/08/IRedemptionProxyServiceV1/Redeem",
      SoapEnvelope.Prepare()
      .WithHeaders(KnownHeader.Oasis.Security.UsernameTokenAndPasswordText(".....", "......"))
      .Body(redeemRequest), ct);

      var response = responseEnvelope.Body<RedeemResponse>();

      Console.WriteLine("Redeem Result:{0}  Message:{1}", response.Result, response.messageText);
   }
}

After sorting out a few typos my request worked as expected. Only a couple of hours lost from my life, hopefully this post will help someone else.

nRF24 Windows 10 IoT Core Test Harness

After modifying the Raspbery PI nRF24L01 shields I built a single page single button Universal Windows Platforms(UWP) test harness (using the techfooninja RF24 library) to check everything was working as expected.

I used a couple of Netduinos and Raspbery PI devices to as test clients.

public sealed partial class MainPage : Page
{
   private const byte ChipEnablePin = 25;
   private const byte ChipSelectPin = 0;
   private const byte InterruptPin = 17;
   private const byte Channel = 10;
   private RF24 radio;

   public MainPage()
   {
      this.InitializeComponent();

      this.radio = new RF24();

      this.radio.OnDataReceived += this.Radio_OnDataReceived;
      this.radio.OnTransmitFailed += this.Radio_OnTransmitFailed;
      this.radio.OnTransmitSuccess += this.Radio_OnTransmitSuccess;

      this.radio.Initialize(ChipEnablePin, ChipSelectPin, InterruptPin);
      this.radio.Address = Encoding.UTF8.GetBytes("Base1");
      this.radio.Channel = Channel;
      this.radio.PowerLevel = PowerLevel.Low;
      this.radio.DataRate = DataRate.DR250Kbps;

      this.radio.IsEnabled = true;

      Debug.WriteLine("Address: " + Encoding.UTF8.GetString(this.radio.Address));
      Debug.WriteLine("Channel: " + this.radio.Channel);
      Debug.WriteLine("DataRate: " + this.radio.DataRate);
      Debug.WriteLine("PA: " + this.radio.PowerLevel);
      Debug.WriteLine("IsAutoAcknowledge: " + this.radio.IsAutoAcknowledge);
      Debug.WriteLine("IsDynamicAcknowledge: " + this.radio.IsDynamicAcknowledge);
      Debug.WriteLine("IsDynamicPayload: " + this.radio.IsDynamicPayload);
      Debug.WriteLine("IsEnabled: " + this.radio.IsEnabled);
      Debug.WriteLine("IsInitialized: " + this.radio.IsInitialized);
      Debug.WriteLine("IsPowered: " + this.radio.IsPowered);
   }

   private void Radio_OnDataReceived(byte[] data)
   {
     string dataUTF8 = Encoding.UTF8.GetString(data);

     Debug.WriteLine(string.Format("Received: {0}", dataUTF8));
   }

   private void buttonSend_Click(object sender, Windows.UI.Xaml.RoutedEventArgs e)
   {
      this.radio.SendTo(Encoding.UTF8.GetBytes("Duino"), Encoding.UTF8.GetBytes(DateTime.UtcNow.ToString("yy-MM-dd hh:mm:ss"))) ;
   }

   private void Radio_OnTransmitSuccess()
   {
      Debug.WriteLine("Radio_OnTransmitSuccess");
   }

   private void Radio_OnTransmitFailed()
   {
      Debug.WriteLine("Radio_OnTransmitFailed");
   }
}

Interrupt Triggered: FallingEdge
Data Sent!
Radio_OnTransmitSuccess
Interrupt Triggered: RisingEdge
Interrupt Triggered: FallingEdge
Received: 20.4 70.7
Interrupt Triggered: RisingEdge
Interrupt Triggered: FallingEdge
Data Sent!
Radio_OnTransmitSuccess
Interrupt Triggered: RisingEdge
Interrupt Triggered: FallingEdge
Received: 20.3 70.8
Interrupt Triggered: RisingEdge

The Raspberry PI could reliably receive and transmit messages.

nRF24 Windows 10 IoT Core Hardware

Taking my own advice I decided to purchase a couple of Raspberry Pi to NRF24L01 shields from Ceech a vendor on Tindie.

The nRF24L01 libraries for my .Net Micro framework and WIndows 10 IoT Core devices use an interrupt driver approach rather than polling status registers to see what is going on.

Like most Raspberry PI shields intended to be used with a *nix based operating system the interrupt pin was not connected to a General Purpose Input/Output (GPIO) pin.

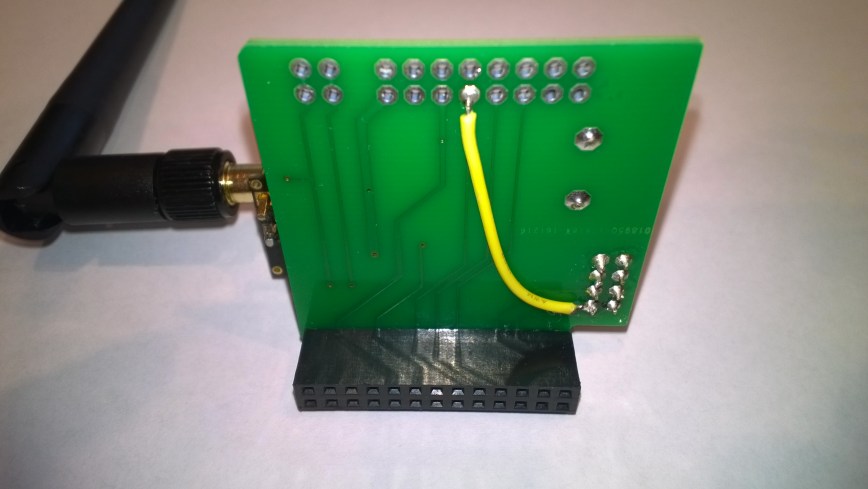
NRF24PiPlateModification

My first step was to add a jumper wire from the pin 8 on the nRF24L01 to GPIO pin 17 on Raspberry PI connector.

I then downloaded the techfooninja Radios.RF24 library for Windows IoT core and update the configuration to suit my modifcations. In the TestApp the modifications were limited to changing the interrupt pin from GPI 4 to GPO 17

private const byte IRQ_PIN = 4;

private const byte IRQ_PIN = 17;

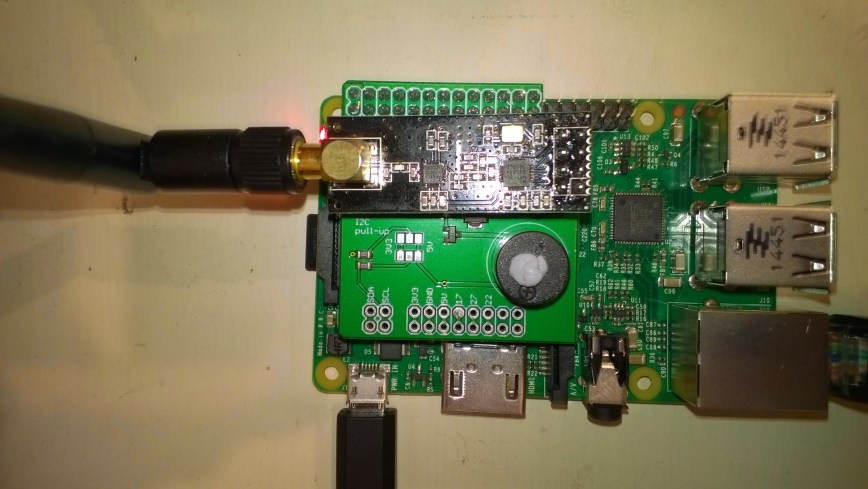
I used a socket for the nRF24L01 device so I can trial different devices, for a production system I would solder the device to the shield to improve reliability.

RPiWithnRF24Plate

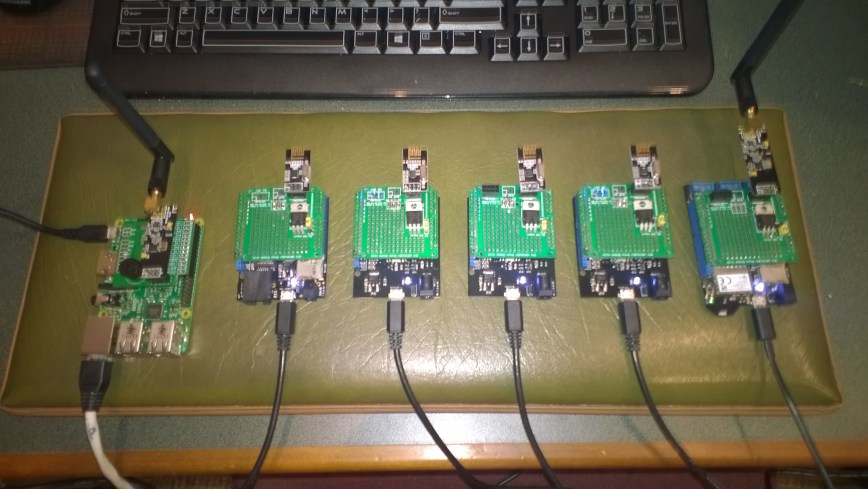
I then ran the my test application software in a stress test rig overnight to check for any reliability issues. The 5 x netduino devices were sending messages every 500mSec

RPIStressTester

nRF24L01 Raspberry PI Gateway Hardware

For those who came to my MS Ignite AU Intelligent Cloud booth session

Building Wireless Field Gateways

Connecting wireless sensor nodes to the cloud is not the mission it used to be, because the Azure team (and many OS projects) have developed tooling which can help hobbyist and professional developers build solutions. How could you build a home scale robust, reliable and secure solution with off the shelf kit without blowing the budget?

Sparkfun nRF24L01 module &Adafruit perma proto hat

NRF24L01 Raspberry PI DIY Gateway Hardware

BoM (all prices as at Feb 2016)

You will also need some short lengths of wire and a soldering iron.

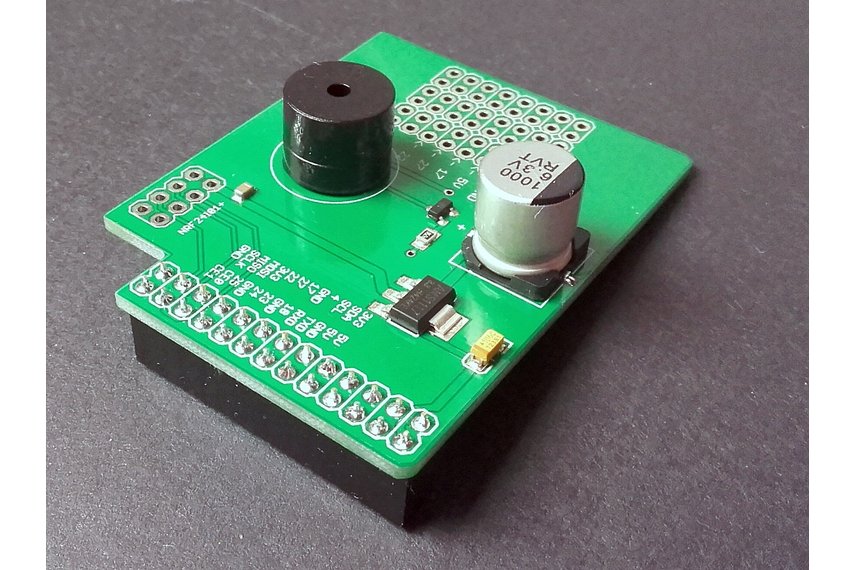
For those who want an “off the shelf” solution (still requires a minor modification for interrupt support) I have used the Raspberry Pi to NRF24l01+ Shield USD9.90

2015-09-25t072754-447z-20150925_091942-855x570_q85_pad_rcrop

Instructions for modifications and software to follow.

NetMF MP3 Player Part 3

Building on the file listing code from the previous post in the next class we built a basic multi threaded music player using an enhanced version of the Vs1053B driver based on the softelectrotech.and bluecone code.

The code uses five interrupt ports (I used 5 buttons on the 4 analog ports on the Seeedstudio V2 Base shield and D5 to make it easier to fit the Mp3 shield)

As the Vs1053 driver is now running asynchronously it fires an event when the current track has finished playing

   public class Program
   {
      static string[] MusicFiles;
      static Vs1053B player = new Vs1053B(Pins.GPIO_PIN_D2, Pins.GPIO_PIN_D6, Pins.GPIO_PIN_D7, Pins.GPIO_PIN_D8);
      static byte volume = 200;
      static int trackNumber = 1;
      static public string TrackFilename { get { return MusicFiles[trackNumber - 1]; } }

      public static void Main()
      {
         MusicFiles = Directory.GetFiles(@"\SD");

         foreach( string file in MusicFiles)
         {
            Debug.Print(file);
         }

         InterruptPort playPause = new InterruptPort(Pins.GPIO_PIN_D5, false, Port.ResistorMode.Disabled, Port.InterruptMode.InterruptEdgeLow);
         playPause.OnInterrupt += playPause_OnInterrupt;

         InterruptPort volumeUp = new InterruptPort(Pins.GPIO_PIN_A0, false, Port.ResistorMode.Disabled, Port.InterruptMode.InterruptEdgeLow);
         volumeUp.OnInterrupt += volumeUp_OnInterrupt;

         InterruptPort volumeDown = new InterruptPort(Pins.GPIO_PIN_A1, false, Port.ResistorMode.Disabled, Port.InterruptMode.InterruptEdgeLow);
         volumeDown.OnInterrupt += volumeDown_OnInterrupt;

         InterruptPort previousTrack = new InterruptPort(Pins.GPIO_PIN_A2, false, Port.ResistorMode.Disabled, Port.InterruptMode.InterruptEdgeLow);
         previousTrack.OnInterrupt += previousTrack_OnInterrupt;

         InterruptPort nextTrack = new InterruptPort(Pins.GPIO_PIN_A3, false, Port.ResistorMode.Disabled, Port.InterruptMode.InterruptEdgeLow);
         nextTrack.OnInterrupt += nextTrack_OnInterrupt;

         player.SetVolume(volume);
         player.Filename = TrackFilename;
         player.onMusicFinished += player_onMusicFinished;

         player.Play();

         Thread.Sleep(Timeout.Infinite);
      }

      static void player_onMusicFinished()
      {
         trackNumber += 1;

         if (trackNumber > MusicFiles.Length)
         {
            trackNumber = 1;
         }
         Debug.Print("player_onMusicFinished " + trackNumber + " of " + MusicFiles.Length);

         player.Filename = TrackFilename;
      }

      static void previousTrack_OnInterrupt(uint data1, uint data2, DateTime time)
      {
         trackNumber -= 1;

         if (trackNumber  MusicFiles.Length)
         {
            trackNumber = 1;
         }
         Debug.Print("nextTrack_OnInterrupt " + trackNumber + " of " + MusicFiles.Length);

         player.CancelPlayback();
         player.Filename = TrackFilename;
      }

      static void playPause_OnInterrupt(uint data1, uint data2, DateTime time)
      {
         Debug.Print("playPause_OnInterrupt ");
         if (player.IsPaused())
         {
            player.Resume();
         }
         else
         {
            player.Pause();
         }
      }

      static void volumeDown_OnInterrupt(uint data1, uint data2, DateTime time)
      {
         Debug.Print("volumeDown_OnInterrupt " + volume);
         if (volume > 0)
         {
            volume -= 1;
         }
         player.SetVolume(volume);
      }

      static void volumeUp_OnInterrupt(uint data1, uint data2, DateTime time)
      {
         Debug.Print("volumeUp_OnInterrupt " + volume);
         if (volume < 255)
         {
            volume += 1;
         }
         player.SetVolume(volume);
      }
   }

Next steps are to ignore contact bounce on the buttons and play MP3 files in a more consistent order
musicplayerv2

Netduino with Mp3 Shield and 5 button UI

Netduino Mp3 player with 5 button UI

NetMF MP3 Player Part 2

Building on the file listing code from the previous post in the next class we wrote the simplest possible NetMF code to play all of MP3 files on an SD Card. The Mp3 player shields I have all use a Vs1053B chip to decode the MP3 byte stream. This sample uses the driver code from softelectrotech.

public static void Main()
{
   Vs1053B player = new Vs1053B(Pins.GPIO_PIN_D2, Pins.GPIO_PIN_D6, Pins.GPIO_PIN_D7, Pins.GPIO_PIN_D8);
   string[] MusicFiles = Directory.GetFiles(@"\SD");
   player.SetVolume(180, 180);

   // Print a list of all the files on the SD card.
   foreach (string file in MusicFiles)
   {
      Debug.Print(file);
   }

   foreach (string file in MusicFiles)
   {
      Debug.Print("Play start " + file);

      player.Play(file, true);

      Debug.Print("Play finish " + file);
   }
}

Some of the students observed the order of the files was not what they were expecting. The order of the files appeared to depend on how they were copied to the memory card.

\SD\05 Sunday Bloody Sunday.mp3
\SD\06 Bad.mp3
\SD\07 Where the Streets Have No Name.mp3
\SD\08 I Will Follow.mp3
\SD\09 The Unforgettable Fire.mp3
\SD\10 Sweetest Thing [The Single Mix].mp3
\SD\11 Desire.mp3
\SD\12 When Love Comes to Town.mp3
\SD\13 Angel of Harlem.mp3
\SD\14 All I Want Is You.mp3
\SD\01 Pride (In the Name of Love).mp3
\SD\02 New Year's Day.mp3
\SD\03 With or Without You.mp3
\SD\04 I Still Haven't Found What I'm Looking For.mp3
Playback
Play start \SD\05 Sunday Bloody Sunday.mp3
Play finish \SD\05 Sunday Bloody Sunday.mp3
Play start \SD\06 Bad.mp3

All of the students observed that the tacks were being played synchronously which didn’t allow you to change the volume or interrupt the playback to pause the current track or change the track being played.

The next steps were to ensure the music files were sorted into a consistent order and that playback was not synchronous.

MusicPlayerSyncBasic code

NetMF MP3 Player Part 1

For one of my class projects the students build an NetMF MP3 player using a Netduino, MP3 shield, MicroSD card and some code. The first step is to learn about files, and directories by enumerating the contents of the MicroSD card.

public static void Main()
 {
    string[] musicFiles = Directory.GetFiles(@"\SD");

    foreach (string musicFile in musicFiles)
    {
       Debug.Print(musicFile);
    }
}

The NetMF implementation of GetFiles doesn’t support wildcards (unlike the full .Net Framework) so the list of files has to be manually filtered.

public static void Main()
{
   string[] musicFiles = Directory.GetFiles(@"\SD");

   foreach (string musicFile in musicFiles)
   {
      if (filePath.IndexOf(".mp3") != -1)
      {
         Debug.Print(musicFile);
      }
   }
}

The code above displayed
\SD\01 Pride (In the Name of Love).mp3
\SD\02 New Year’s Day.mp3
\SD\03 With or Without You.mp3
\SD\04 I Still Haven’t Found What I’m Looking For.mp3
\SD\05 Sunday Bloody Sunday.mp3
\SD\06 Bad.mp3
\SD\07 Where the Streets Have No Name.mp3
\SD\08 I Will Follow.mp3
\SD\09 The Unforgettable Fire.mp3
\SD\10 Sweetest Thing [The Single Mix].mp3
\SD\11 Desire.mp3
\SD\12 When Love Comes to Town.mp3
\SD\13 Angel of Harlem.mp3
\SD\14 All I Want Is You.mp3

For this project Directory.GetFiles was used (rather than Directory.EnumerateFiles) because the list files on the MicroSD will be used in other parts of the application.

The parsing and processing of file paths is important and can if done wrong can introduce hard to find issues(e.g. directory traversal attacks)

Debug.Print(musicFile .Substring( 0, musicFile.LastIndexOf(".mp3")));

Updating the code to use the built in System.IO.Path functionality

public static void Main()
{
   string[] MusicFiles = Directory.GetFiles(@"\SD");

   foreach (string musicFile in MusicFiles)
   {
      if (Path.GetExtension(musicFile) == ".mp3" )
      {
         Debug.Print(Path.GetFileNameWithoutExtension(musicFile));
      }
   }
}

The next step is to load and play the MP3 files using a provided library.