Random wanderings through Microsoft Azure esp. PaaS plumbing, the IoT bits, AI on Micro controllers, AI on Edge Devices, .NET nanoFramework, .NET Core on *nix and ML.NET+ONNX
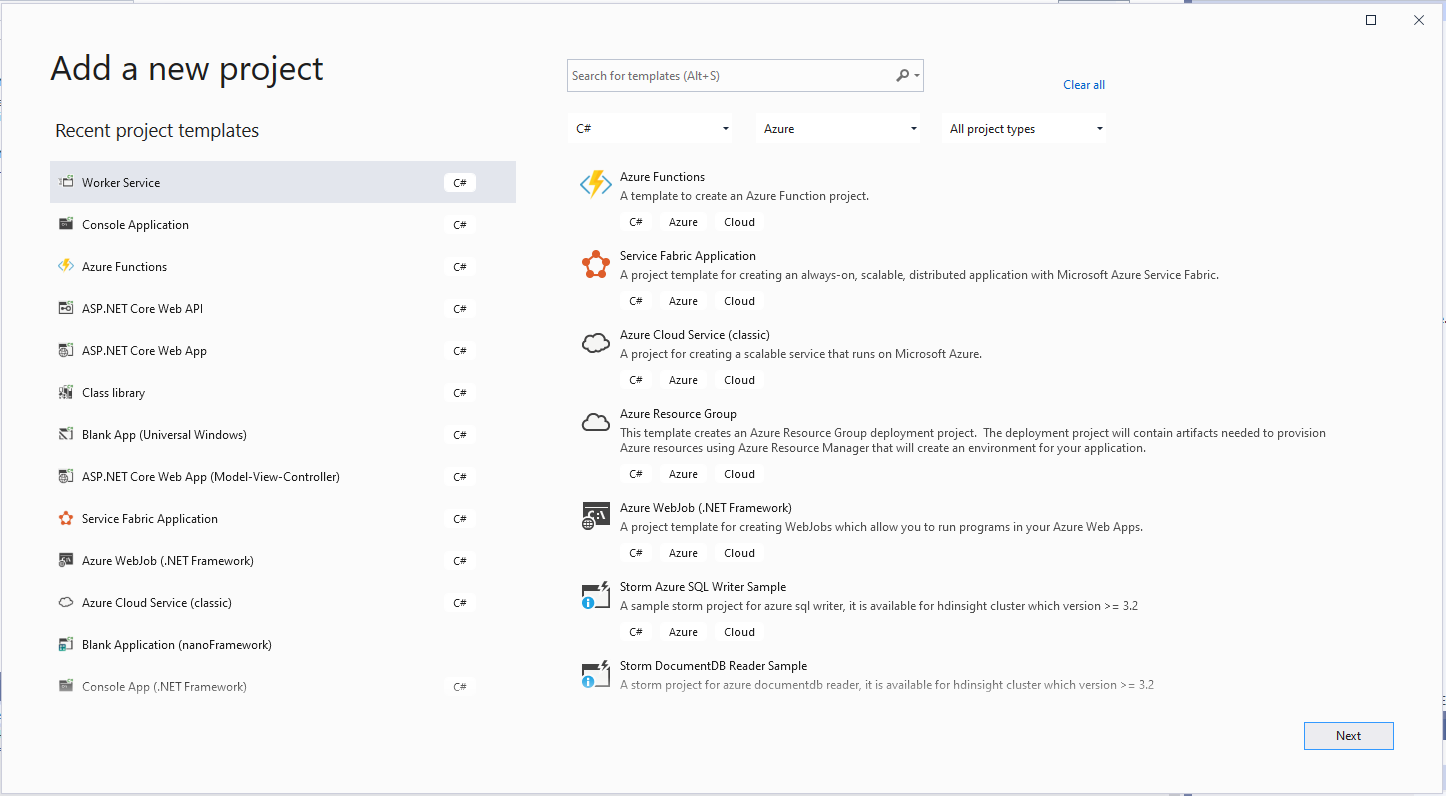
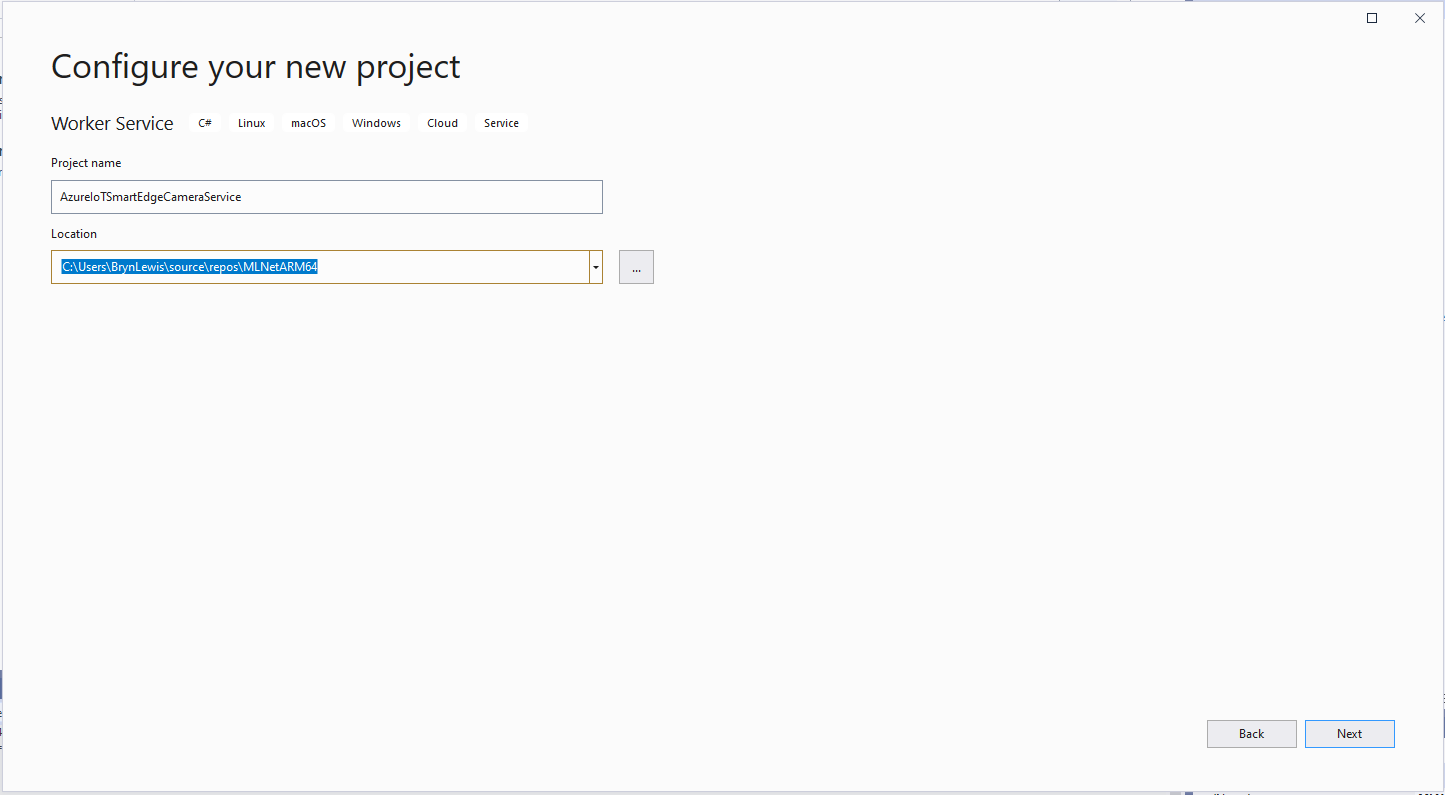
This is a “note to self” post about deploying a .NET CoreWorker Service to a Raspberry PI 4B 8G running Raspberry PI OS (Bullseye). After reading many posts, then a lot of trial and error this approach appeared to work reliably for my system configuration.(Though YMMV with other distros etc.)
using Microsoft.Extensions.DependencyInjection;
using Microsoft.Extensions.Hosting;

namespace devMobile.IoT.MachineLearning.AzureIoTSmartEdgeCameraService
{
	public class Program
	{
		public static void Main(string[] args)
		{
			CreateHostBuilder(args).Build().Run();
		}

		public static IHostBuilder CreateHostBuilder(string[] args) =>
			 Host.CreateDefaultBuilder(args)
					.UseSystemd()
				  .ConfigureServices((hostContext, services) =>
				  {
					  services.AddHostedService<Worker>();
				  });
	}
}
program.cs
using System;
using System.Threading;
using System.Threading.Tasks;

using Microsoft.Extensions.Hosting;
using Microsoft.Extensions.Logging;

namespace devMobile.IoT.MachineLearning.AzureIoTSmartEdgeCameraService
{
	public class Worker : BackgroundService
	{
		private readonly ILogger<Worker> _logger;

		public Worker(ILogger<Worker> logger)
		{
			_logger = logger;
		}

		protected override async Task ExecuteAsync(CancellationToken stoppingToken)
		{
			while (!stoppingToken.IsCancellationRequested)
			{
				_logger.LogInformation("Worker running at: {time}", DateTimeOffset.Now);

				await Task.Delay(1000, stoppingToken);
			}
		}
	}
}
Worker.cs
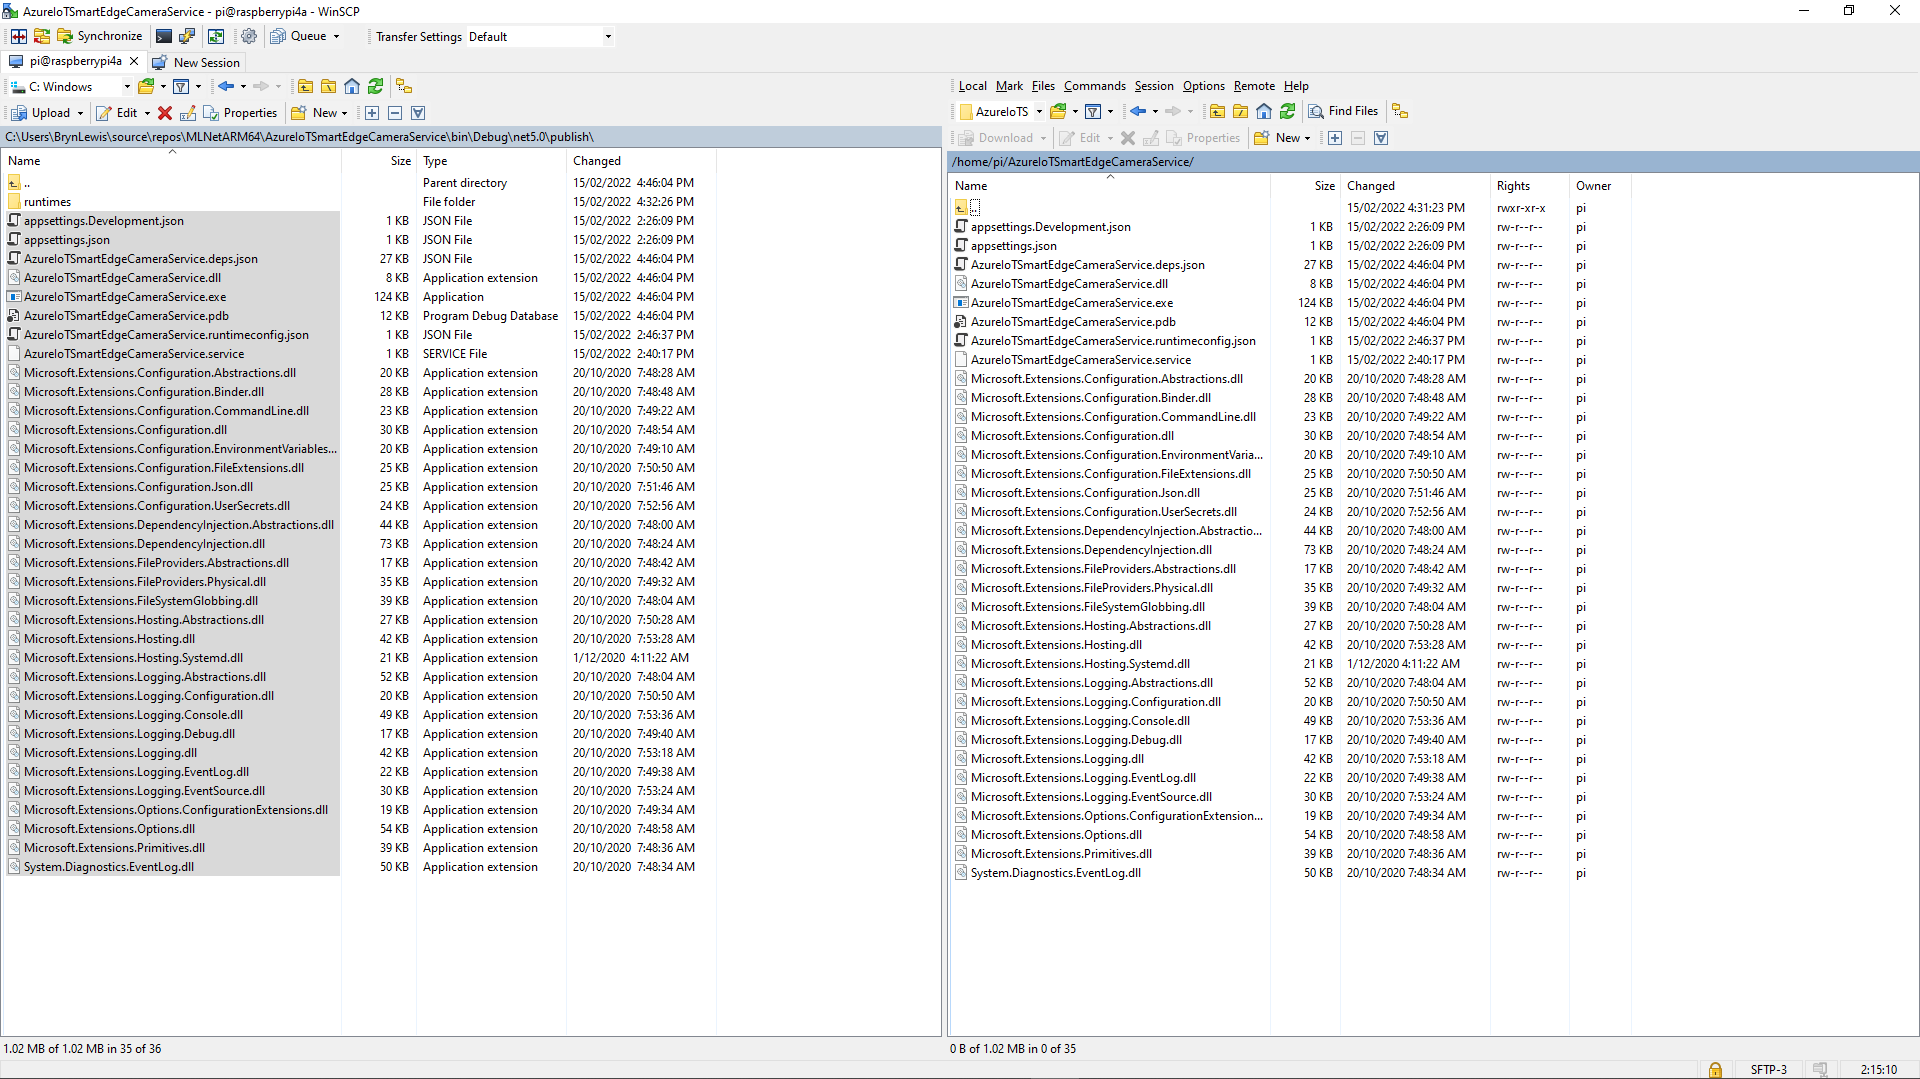
The first step was to create a new directory (AzureIoTSmartEdgeCameraService) on the device. In Visual Studio 2019 I “published” my application and copied the contents of the “publish” folder to the Raspberry PI with Winscp. (This intermediary folder was to avoid issues with the permissions of the /usr/sbin/ & etc/systemd/system folders)
Using Winscp to copy files to AzureIoTSmartEdgeCameraService folder on my device
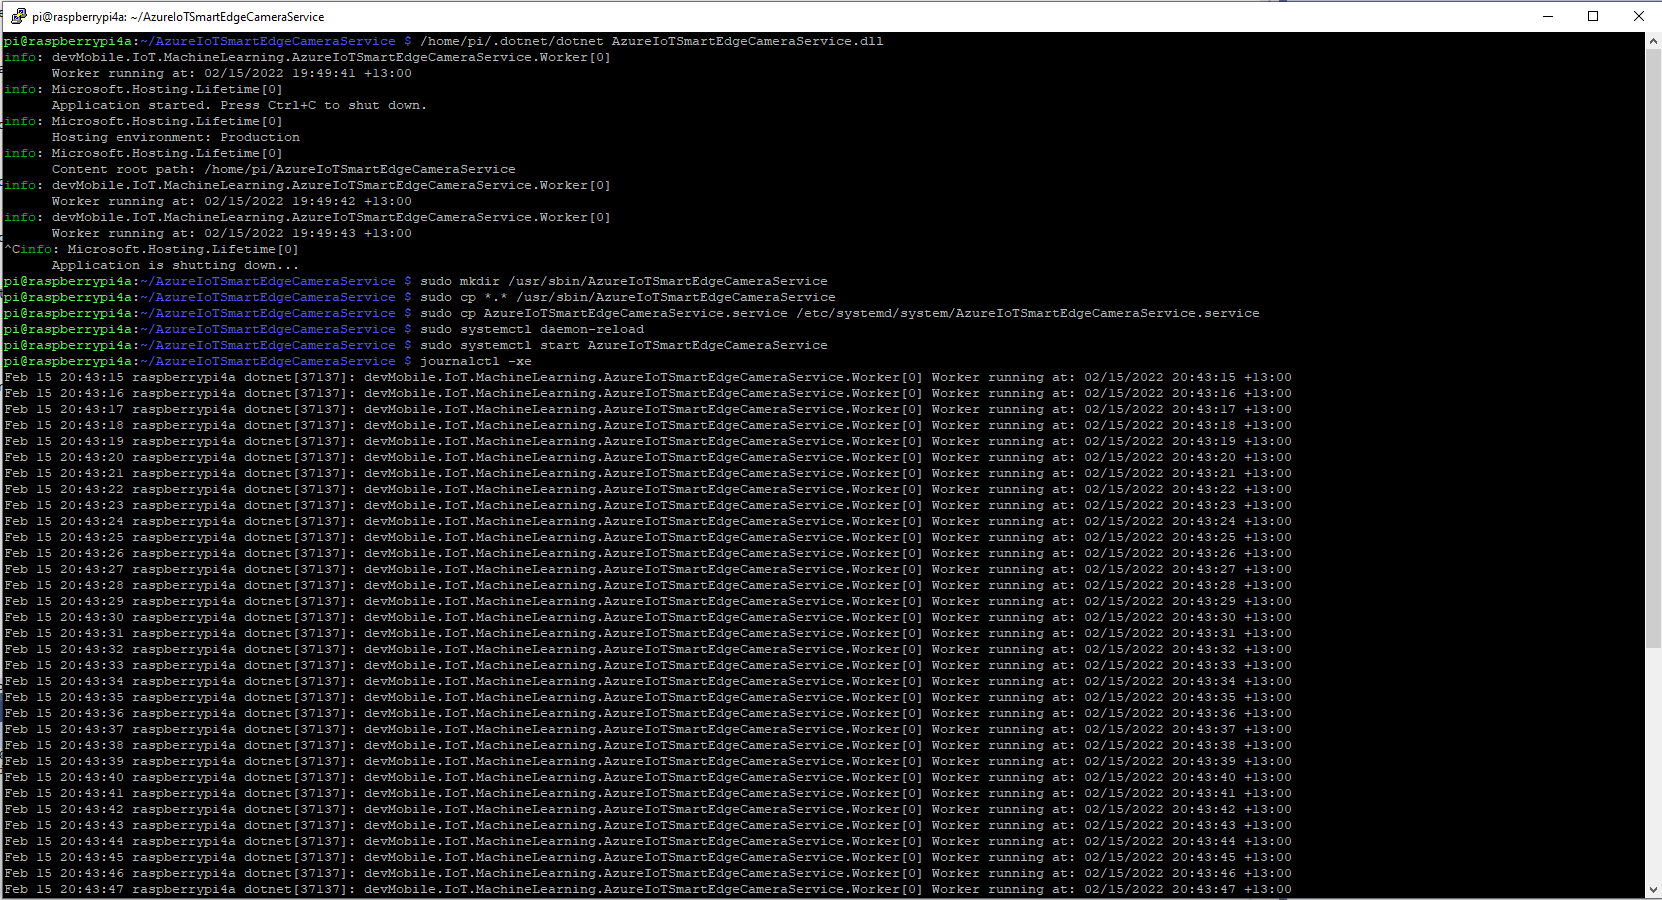
Install service

Test in application directory
	/home/pi/.dotnet/dotnet AzureIoTSmartEdgeCameraService.dll

Make service directory
	sudo mkdir /usr/sbin/AzureIoTSmartEdgeCameraService

Copy files to service directory
	sudo cp *.* /usr/sbin/AzureIoTSmartEdgeCameraService

Copy .service file to systemd folderclear
	sudo cp AzureIoTSmartEdgeCameraService.service /etc/systemd/system/AzureIoTSmartEdgeCameraService.service

Force reload of systemd configuration
	sudo systemctl daemon-reload

Start the Azure IoT SmartEdge Camera service
	sudo systemctl start AzureIoTSmartEdgeCameraService
Installing and starting the AzureIoTSmartEdgeCameraService
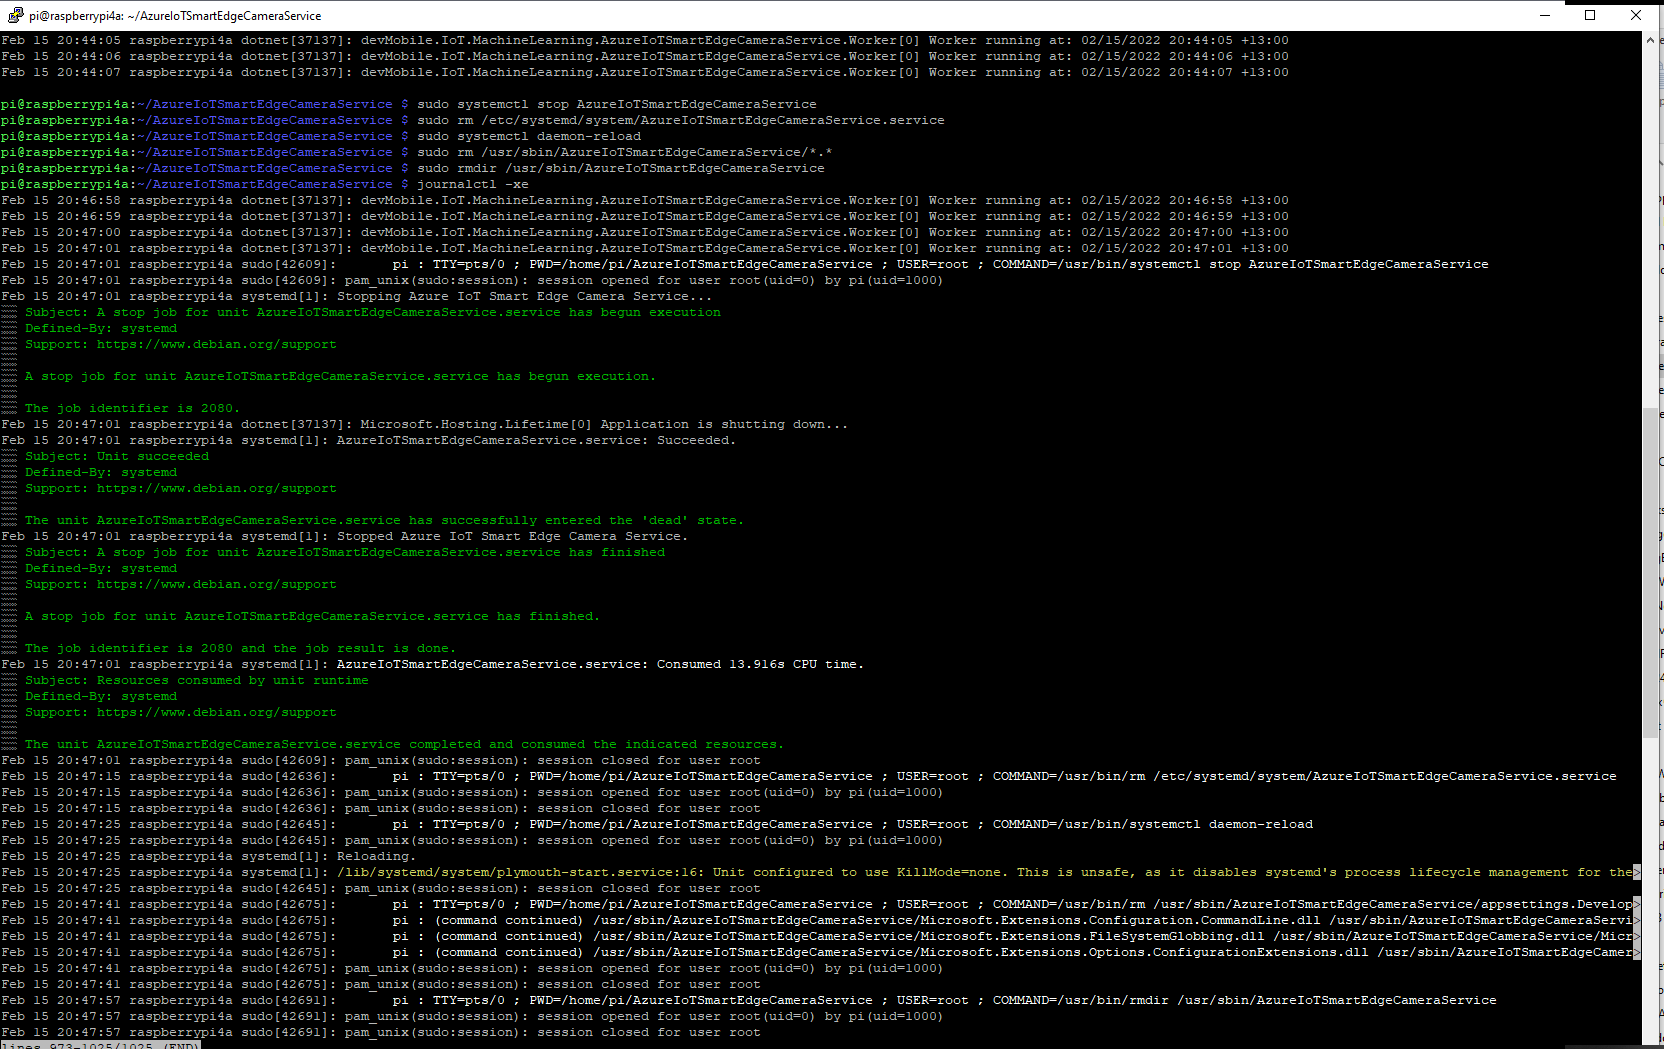
Uninstall service
	sudo systemctl stop AzureIoTSmartEdgeCameraService

	sudo rm /etc/systemd/system/AzureIoTSmartEdgeCameraService.service

	sudo systemctl daemon-reload

	sudo rm /usr/sbin/AzureIoTSmartEdgeCameraService/*.*

	sudo rmdir /usr/sbin/AzureIoTSmartEdgeCameraService

	See what is happening
	journalctl -xe
Stopping and removing the AzureIoTSmartEdgeCameraService
It took a lot of attempts to get a clean install then uninstall for the screen captures.
I started again, but kept the first section as it covers one of the simplest possible approaches to caching using the [ResponseCache] attribute and VaryByQueryKeys.
[HttpGet("Response")]
[ResponseCache(Duration = StockItemsListResponseCacheDuration)]
public async Task<ActionResult<IEnumerable<Model.StockItemListDtoV1>>> GetResponse()
{
	IEnumerable<Model.StockItemListDtoV1> response = null;

	logger.LogInformation("Response cache load");

	try
	{
		response = await dapper.QueryAsync<Model.StockItemListDtoV1>(sql: @"SELECT [StockItemID] as ""ID"", [StockItemName] as ""Name"", [RecommendedRetailPrice], [TaxRate] FROM [Warehouse].[StockItems]", commandType: CommandType.Text);
	}
	catch (SqlException ex)
	{
		logger.LogError(ex, "Retrieving list of StockItems");

		return this.StatusCode(StatusCodes.Status500InternalServerError);
	}

	return this.Ok(response);
}

[HttpGet("ResponseVarying")]
[ResponseCache(Duration = StockItemsListResponseCacheDuration, VaryByQueryKeys = new string[] { "id" })]
public async Task<ActionResult<Model.StockItemGetDtoV1>> Get([FromQuery(Name = "id"), Range(1, int.MaxValue, ErrorMessage = "Stock item id must greater than 0")] int id)
{
	Model.StockItemGetDtoV1 response = null;

	logger.LogInformation("Response cache varying load id:{0}", id);

	try
	{
		response = await dapper.QuerySingleOrDefaultAsync<Model.StockItemGetDtoV1>(sql: "[Warehouse].[StockItemsStockItemLookupV1]", param: new { stockItemId = id }, commandType: CommandType.StoredProcedure);
		if (response == default)
		{
			logger.LogInformation("StockItem:{0} not found", id);

			return this.NotFound($"StockItem:{id} not found");
		}
	}
	catch (SqlException ex)
	{
		logger.LogError(ex, "Looking up StockItem with Id:{0}", id);

		return this.StatusCode(StatusCodes.Status500InternalServerError);
	}

	return this.Ok(response);
}
All the browsers appeared to respect the cache control headers but Firefox was the only one which did not initiate a new request when I pressed return in the Uniform Resource Locator(URL) field.
[HttpGet("DapperMemory")]
public async Task<ActionResult<IEnumerable<Model.StockItemListDtoV1>>> GetDapper()
{
	List<Model.StockItemListDtoV1> response;

	logger.LogInformation("Dapper cache load");

	try
	{
		response = await dapper.QueryAsync<Model.StockItemListDtoV1>(
							sql: @"SELECT [StockItemID] as ""ID"", [StockItemName] as ""Name"", [RecommendedRetailPrice], [TaxRate] FROM [Warehouse].[StockItems]",
							commandType: CommandType.Text,
							enableCache: true,
							cacheExpire: TimeSpan.Parse(this.Configuration.GetValue<string>("DapperCachingDuration"))
					);

	}
	catch (SqlException ex)
	{
		logger.LogError(ex, "Retrieving list of StockItems");

		return this.StatusCode(StatusCodes.Status500InternalServerError);
	}

	return this.Ok(response);
}

[HttpGet("DapperMemoryVarying")]
public async Task<ActionResult<Model.StockItemGetDtoV1>> GetDapperVarying([FromQuery(Name = "id"), Range(1, int.MaxValue, ErrorMessage = "Stock item id must greater than 0")] int id)
{
	Model.StockItemGetDtoV1 response = null;

	logger.LogInformation("Dapper cache varying load id:{0}", id);

	try
	{
		response = await dapper.QuerySingleOrDefaultAsync<Model.StockItemGetDtoV1>(
					sql: "[Warehouse].[StockItemsStockItemLookupV1]",
					param: new { stockItemId = id },
					commandType: CommandType.StoredProcedure,
					cacheKey: $"StockItem:{id}",
					enableCache: true,
					cacheExpire: TimeSpan.Parse(this.Configuration.GetValue<string>("DapperCachingDuration"))
							);
		if (response == default)
		{
			logger.LogInformation("StockItem:{0} not found", id);

			return this.NotFound($"StockItem:{id} not found");
		}
	}
	catch (SqlException ex)
	{
		logger.LogError(ex, "Looking up StockItem with Id:{0}", id);

		return this.StatusCode(StatusCodes.Status500InternalServerError);
	}

	return this.Ok(response);
}
Both the Dapper.Extensions In-Memory and Redis cache reduced the number of database requests to the bare minimum. In a larger application the formatting of the cacheKey (cacheKey: “StockItems” & cacheKey: $”StockItem:{id}”) would be important to stop database query result collisions.
SQL Server Profiler displaying the list and single record requests.
Memurai running as a Windows Service on my development machine
When the Web API project was restarted the contents in-memory cache were lost. The Redis cache contents survive a restart and can be access from multiple clients.
The libcamera-jpeg program has a lot of command line parameters.
pi@raspberrypi4a:~ $ libcamera-jpeg --help
Valid options are:
  -h [ --help ] [=arg(=1)] (=0)         Print this help message
  --version [=arg(=1)] (=0)             Displays the build version number
  -v [ --verbose ] [=arg(=1)] (=0)      Output extra debug and diagnostics
  -c [ --config ] [=arg(=config.txt)]   Read the options from a file. If no filename is specified, default to
                                        config.txt. In case of duplicate options, the ones provided on the command line
                                        will be used. Note that the config file must only contain the long form
                                        options.
  --info-text arg (=#%frame (%fps fps) exp %exp ag %ag dg %dg)
                                        Sets the information string on the titlebar. Available values:
                                        %frame (frame number)
                                        %fps (framerate)
                                        %exp (shutter speed)
                                        %ag (analogue gain)
                                        %dg (digital gain)
                                        %rg (red colour gain)
                                        %bg (blue colour gain)
                                        %focus (focus FoM value)
                                        %aelock (AE locked status)
  --width arg (=0)                      Set the output image width (0 = use default value)
  --height arg (=0)                     Set the output image height (0 = use default value)
  -t [ --timeout ] arg (=5000)          Time (in ms) for which program runs
  -o [ --output ] arg                   Set the output file name
  --post-process-file arg               Set the file name for configuring the post-processing
  --rawfull [=arg(=1)] (=0)             Force use of full resolution raw frames
  -n [ --nopreview ] [=arg(=1)] (=0)    Do not show a preview window
  -p [ --preview ] arg (=0,0,0,0)       Set the preview window dimensions, given as x,y,width,height e.g. 0,0,640,480
  -f [ --fullscreen ] [=arg(=1)] (=0)   Use a fullscreen preview window
  --qt-preview [=arg(=1)] (=0)          Use Qt-based preview window (WARNING: causes heavy CPU load, fullscreen not
                                        supported)
  --hflip [=arg(=1)] (=0)               Request a horizontal flip transform
  --vflip [=arg(=1)] (=0)               Request a vertical flip transform
  --rotation arg (=0)                   Request an image rotation, 0 or 180
  --roi arg (=0,0,0,0)                  Set region of interest (digital zoom) e.g. 0.25,0.25,0.5,0.5
  --shutter arg (=0)                    Set a fixed shutter speed
  --analoggain arg (=0)                 Set a fixed gain value (synonym for 'gain' option)
  --gain arg                            Set a fixed gain value
  --metering arg (=centre)              Set the metering mode (centre, spot, average, custom)
  --exposure arg (=normal)              Set the exposure mode (normal, sport)
  --ev arg (=0)                         Set the EV exposure compensation, where 0 = no change
  --awb arg (=auto)                     Set the AWB mode (auto, incandescent, tungsten, fluorescent, indoor, daylight,
                                        cloudy, custom)
  --awbgains arg (=0,0)                 Set explict red and blue gains (disable the automatic AWB algorithm)
  --flush [=arg(=1)] (=0)               Flush output data as soon as possible
  --wrap arg (=0)                       When writing multiple output files, reset the counter when it reaches this
                                        number
  --brightness arg (=0)                 Adjust the brightness of the output images, in the range -1.0 to 1.0
  --contrast arg (=1)                   Adjust the contrast of the output image, where 1.0 = normal contrast
  --saturation arg (=1)                 Adjust the colour saturation of the output, where 1.0 = normal and 0.0 =
                                        greyscale
  --sharpness arg (=1)                  Adjust the sharpness of the output image, where 1.0 = normal sharpening
  --framerate arg (=30)                 Set the fixed framerate for preview and video modes
  --denoise arg (=auto)                 Sets the Denoise operating mode: auto, off, cdn_off, cdn_fast, cdn_hq
  --viewfinder-width arg (=0)           Width of viewfinder frames from the camera (distinct from the preview window
                                        size
  --viewfinder-height arg (=0)          Height of viewfinder frames from the camera (distinct from the preview window
                                        size)
  --tuning-file arg (=-)                Name of camera tuning file to use, omit this option for libcamera default
                                        behaviour
  --lores-width arg (=0)                Width of low resolution frames (use 0 to omit low resolution stream
  --lores-height arg (=0)               Height of low resolution frames (use 0 to omit low resolution stream
  -q [ --quality ] arg (=93)            Set the JPEG quality parameter
  -x [ --exif ] arg                     Add these extra EXIF tags to the output file
  --timelapse arg (=0)                  Time interval (in ms) between timelapse captures
  --framestart arg (=0)                 Initial frame counter value for timelapse captures
  --datetime [=arg(=1)] (=0)            Use date format for output file names
  --timestamp [=arg(=1)] (=0)           Use system timestamps for output file names
  --restart arg (=0)                    Set JPEG restart interval
  -k [ --keypress ] [=arg(=1)] (=0)     Perform capture when ENTER pressed
  -s [ --signal ] [=arg(=1)] (=0)       Perform capture when signal received
  --thumb arg (=320:240:70)             Set thumbnail parameters as width:height:quality
  -e [ --encoding ] arg (=jpg)          Set the desired output encoding, either jpg, png, rgb, bmp or yuv420
  -r [ --raw ] [=arg(=1)] (=0)          Also save raw file in DNG format
  --latest arg                          Create a symbolic link with this name to most recent saved file
  --immediate [=arg(=1)] (=0)           Perform first capture immediately, with no preview phase
pi@raspberrypi4a:~ $
My libcamera-jpeg application is run “headless” so I tried turning off the image preview functionality.
When I ran libcamera-jpeg in a console windows or my application this didn’t appear to make any noticeable difference.
libcamera-jpeg run from the command line with –nopreview
libcamera-jpeg run by my application with –nopreview
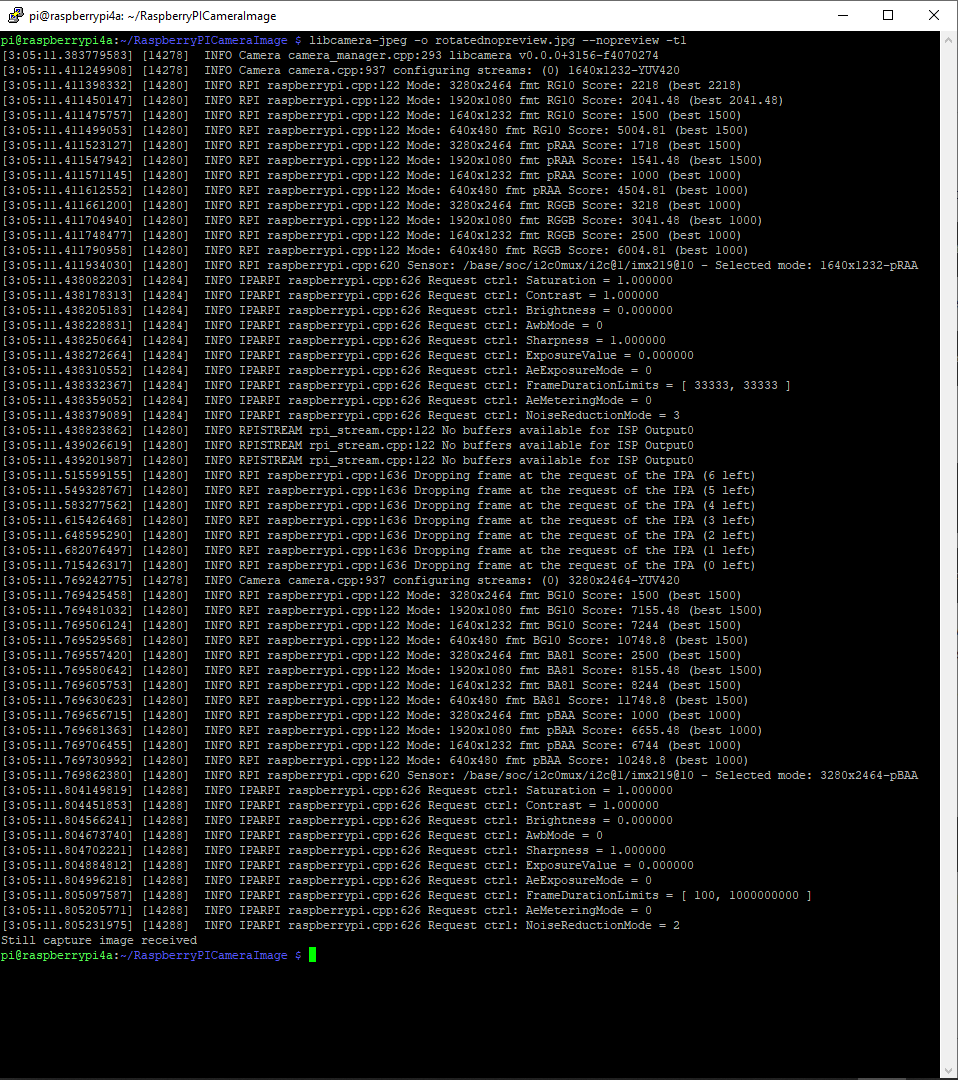
I then had another look at the libcamera-jpeg command line parameters to see if any looked useful for reducing the time that it took to take a save an image and this one caught my attention.
I had assumed the delay was related to how long the preview window was displayed.
libcamera-jpeg run from the command line with –nopreview –t1
I modified the application (V5) then ran it from the command line and the time reduced to less than a second.
private static void ImageUpdateTimerCallback(object state)
{
	try
	{
		Console.WriteLine($"{DateTime.UtcNow:yy-MM-dd HH:mm:ss} Image update start");

		// Just incase - stop code being called while photo already in progress
		if (_cameraBusy)
		{
			return;
		}

		Console.WriteLine($" {DateTime.UtcNow:yy-MM-dd HH:mm:ss} Image capture start");

		using (Process process = new Process())
		{
			process.StartInfo.FileName = @"libcamera-jpeg";
			// V1 it works
			//process.StartInfo.Arguments = $"-o {_applicationSettings.ImageFilenameLocal}";
			// V3a Image right way up
			//process.StartInfo.Arguments = $"-o {_applicationSettings.ImageFilenameLocal} --vflip --hflip";
			// V3b Image right way up
			//process.StartInfo.Arguments = $"-o {_applicationSettings.ImageFilenameLocal} --rotation 180";
			// V4 Image no preview
			//process.StartInfo.Arguments = $"-o {_applicationSettings.ImageFilenameLocal} --rotation 180 --nopreview";
			// V5 Image no preview, no timeout
			process.StartInfo.Arguments = $"-o {_applicationSettings.ImageFilenameLocal} --nopreview -t1 --rotation 180";
			//process.StartInfo.RedirectStandardOutput = true;
			// V2 No diagnostics
			process.StartInfo.RedirectStandardError = true;
			//process.StartInfo.UseShellExecute = false;
			//process.StartInfo.CreateNoWindow = true;

			process.Start();

			if (!process.WaitForExit(10000) || (process.ExitCode != 0))
			{
				Console.WriteLine($"{DateTime.UtcNow:yy-MM-dd HH:mm:ss} Image update failure {process.ExitCode}");
			}
		}

		Console.WriteLine($" {DateTime.UtcNow:yy-MM-dd HH:mm:ss} Image capture done");
	}
	catch (Exception ex)
	{
		Console.WriteLine($"{DateTime.UtcNow:yy-MM-dd HH:mm:ss} Image update error {ex.Message}");
	}
	finally
	{
		_cameraBusy = false;
	}
}
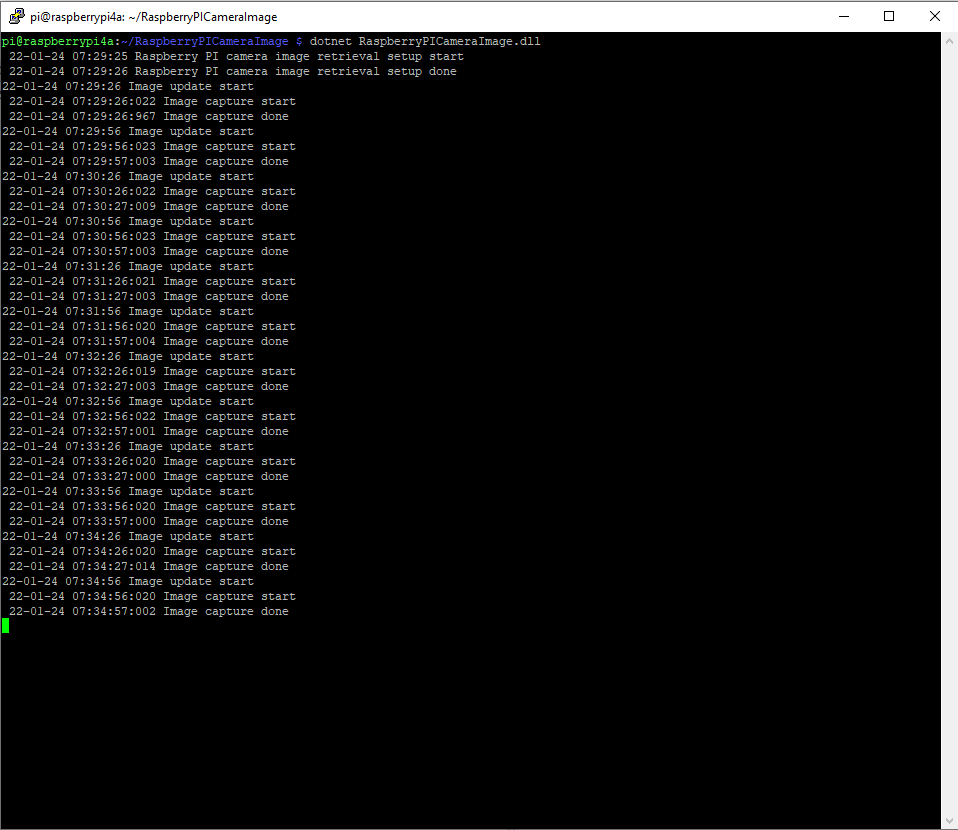
libcamera-jpeg run by my application with –nopreview -t1
The image capture process now takes less that a second which is much better (but not a lot less than retrieving an image from one of my security cameras).
I wanted one of my ML.Net demos to use the Raspberry PI Camera rather than a security camera (so it was more portable) but it took a bit more work than I expected.
Version 1 used Process.Start to launch the libcamera-jpeg application with a command line to store an image to the local file system.
libcamera-jpeg -o latest.jpg
libcamera-jpeg with diagnostic information displayed
There was a lot of diagnostic information which I didn’t want displayed so after reading many stackoverflow posts (lots of different approaches none of which worked in my scenario), then some trial and error I found that I only had to enable RedirectStandardError.
libcamera-jpeg without diagnostic information displayed
At this point there was a lot less noise but the image was upside down.
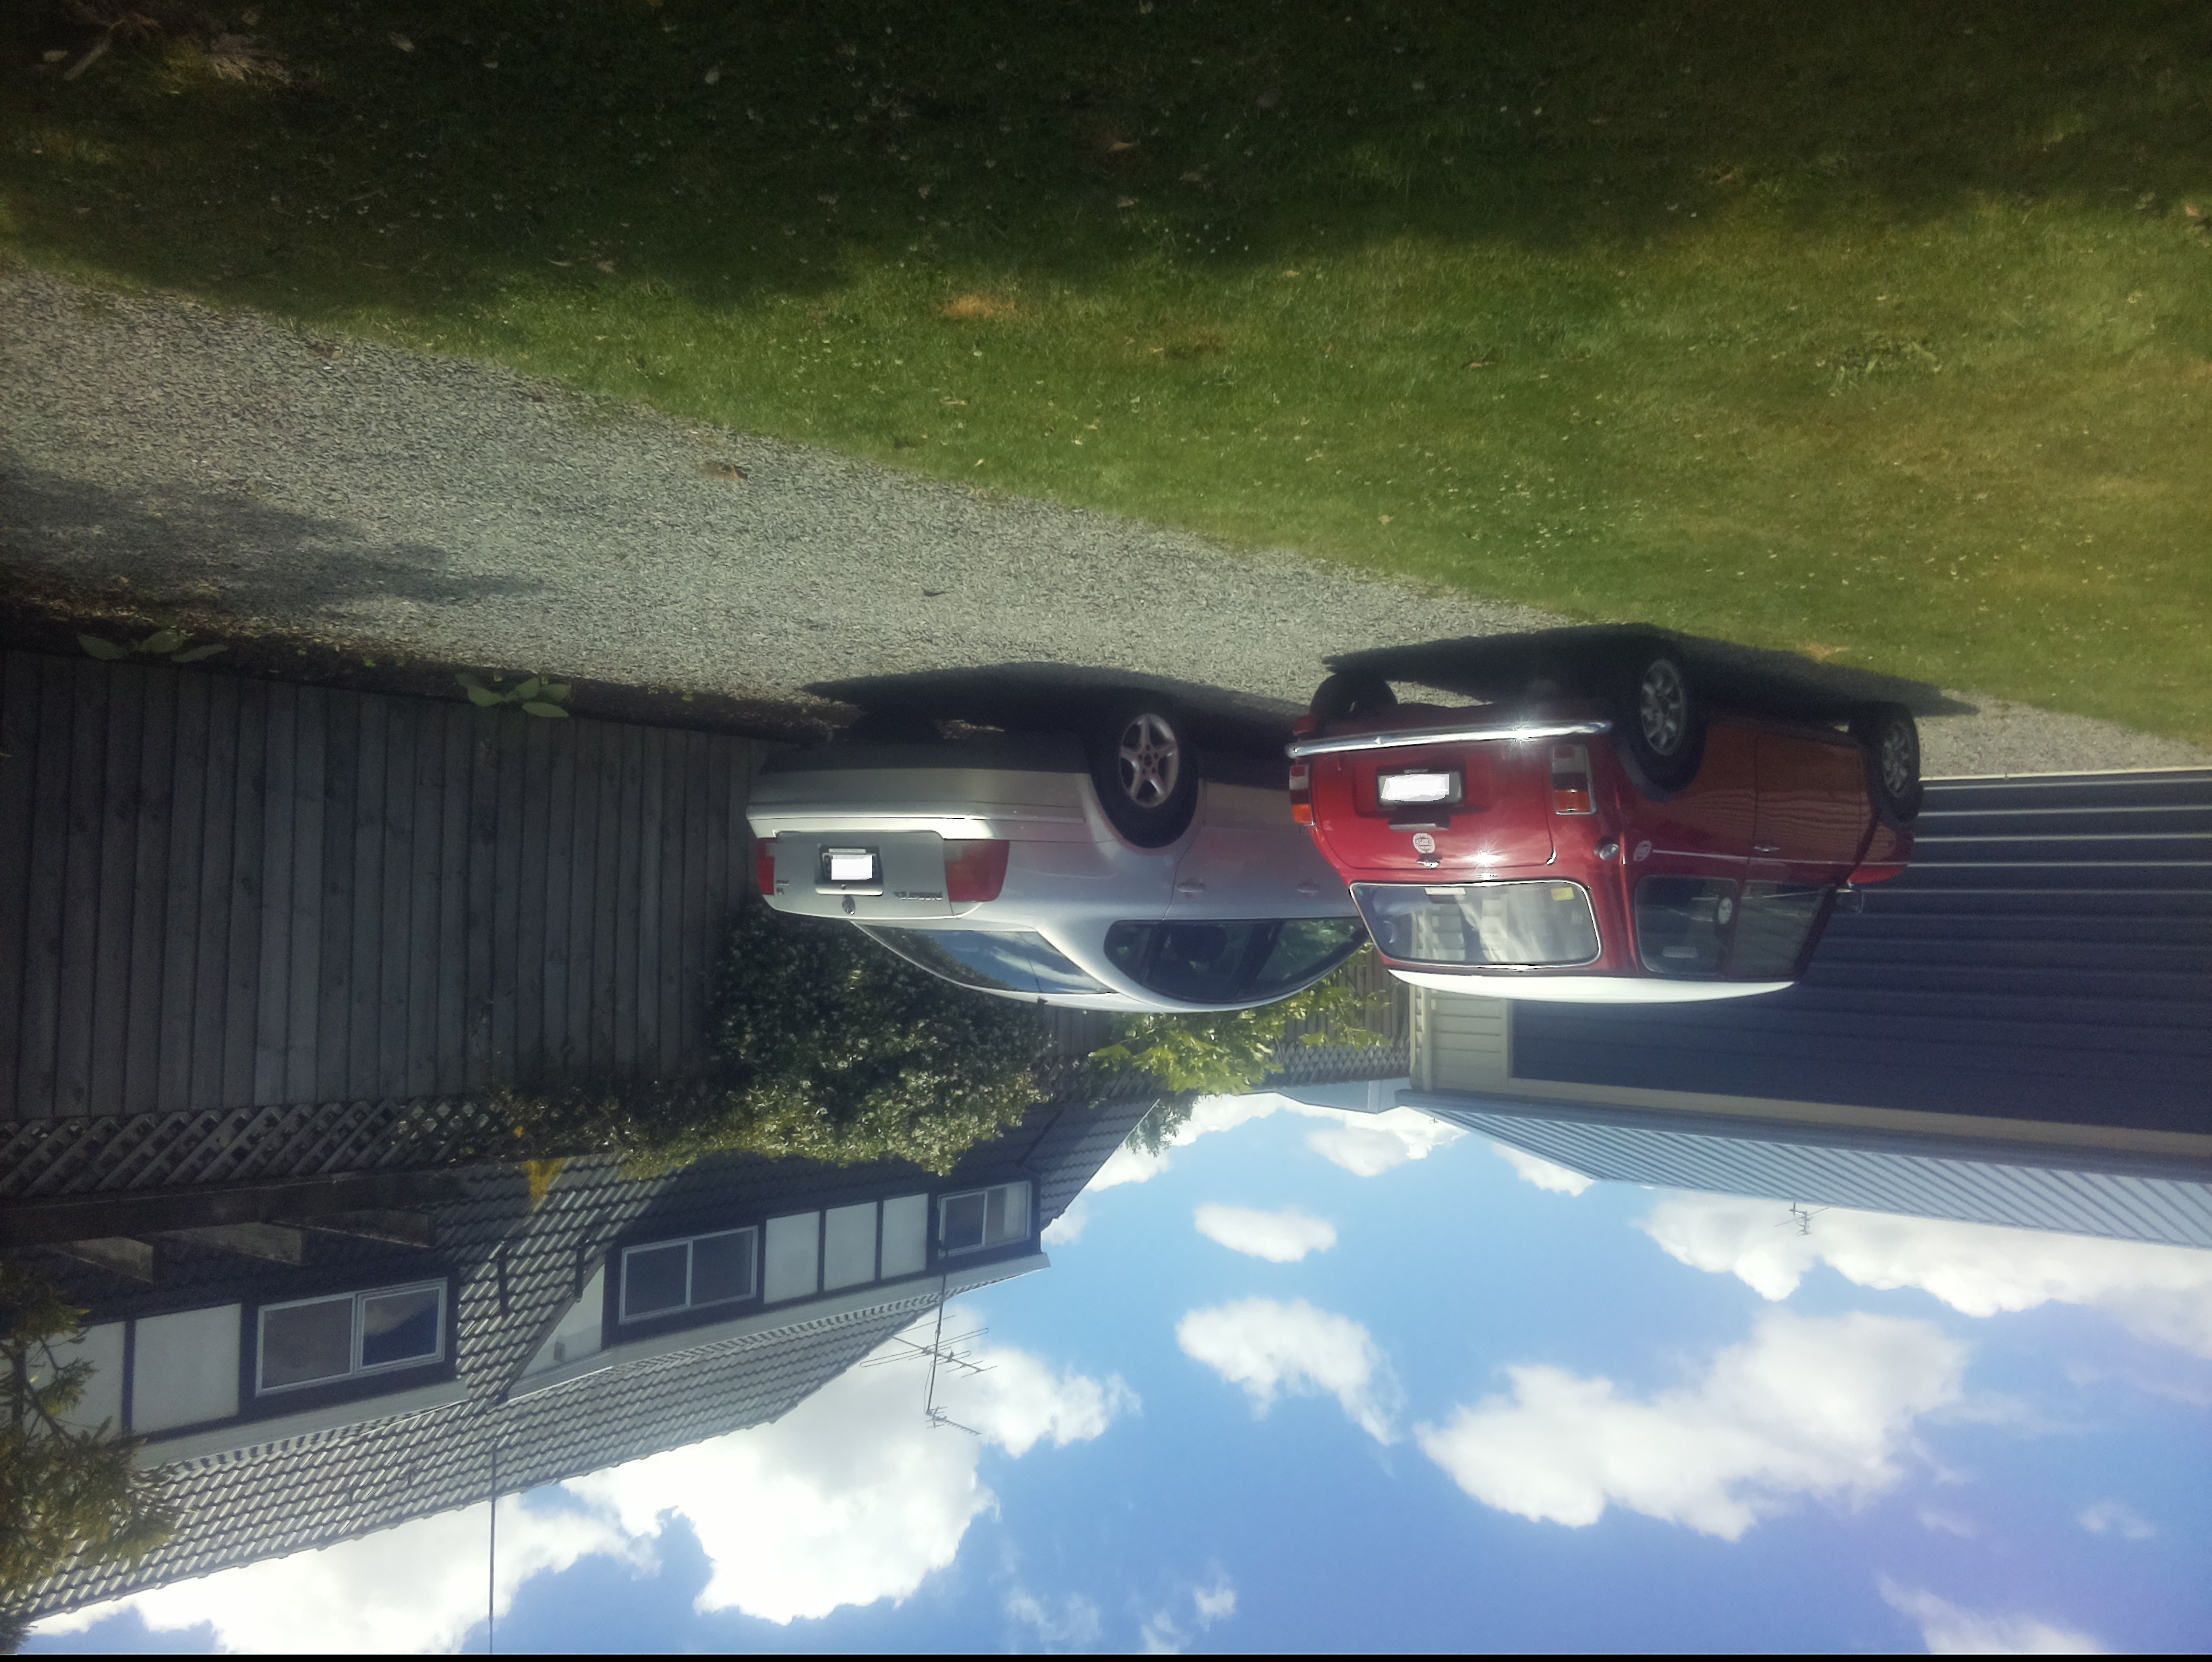
Inverted picture of my 30th anniversary Mini Cooper in the backyard
I then added a vertical flip to the command line parameters
libcamera-jpeg -o latest.jpg --vflip
My 30th anniversary Mini Cooper in the backyard
The image was backwards so I added a horizontal flip to the commandline parameters
libcamera-jpeg -o latest.jpg --vflip --hflip
or
libcamera-jpeg -o latest.jpg --rotation 180
My 30th anniversary Mini Cooper in the backyard with the correct orientation
The libcamera code is in a Timer callback so I added the _cameraBusy boolean flag to stop reentrancy problems.
private static void ImageUpdateTimerCallback(object state)
{
	try
	{
		Console.WriteLine($"{DateTime.UtcNow:yy-MM-dd HH:mm:ss} Image update start");

		// Just incase - stop code being called while photo already in progress
		if (_cameraBusy)
		{
			return;
		}

		Console.WriteLine($" {DateTime.UtcNow:yy-MM-dd HH:mm:ss} Image capture start");

		using (Process process = new Process())
		{
			process.StartInfo.FileName = @"libcamera-jpeg";
			// V1 it works
			//process.StartInfo.Arguments = $"-o {_applicationSettings.ImageFilenameLocal}";
			// V3 Image right way up
			//process.StartInfo.Arguments = $"-o {_applicationSettings.ImageFilenameLocal} --vflip";
			// V3 Image right way round
			process.StartInfo.Arguments = $"-o {_applicationSettings.ImageFilenameLocal} --vflip --hflip";
			//process.StartInfo.RedirectStandardOutput = true;
			// V2 No diagnostics
			process.StartInfo.RedirectStandardError = true;
			//process.StartInfo.UseShellExecute = false;
			//process.StartInfo.CreateNoWindow = true;

			process.Start();

			if (!process.WaitForExit(10000) || (process.ExitCode != 0))
			{
				Console.WriteLine($"{DateTime.UtcNow:yy-MM-dd HH:mm:ss} Image update failure {process.ExitCode}");
			}
		}

		Console.WriteLine($" {DateTime.UtcNow:yy-MM-dd HH:mm:ss} Image capture done");
	}
	catch (Exception ex)
	{
		Console.WriteLine($"{DateTime.UtcNow:yy-MM-dd HH:mm:ss} Image update error {ex.Message}");
	}
	finally
	{
		_cameraBusy = false;
	}
}
This was the simplest way I could get an image onto the local file system without lots of dependencies on third party libraries. The image capture process takes about 5 seconds which a bit longer than I was expecting.
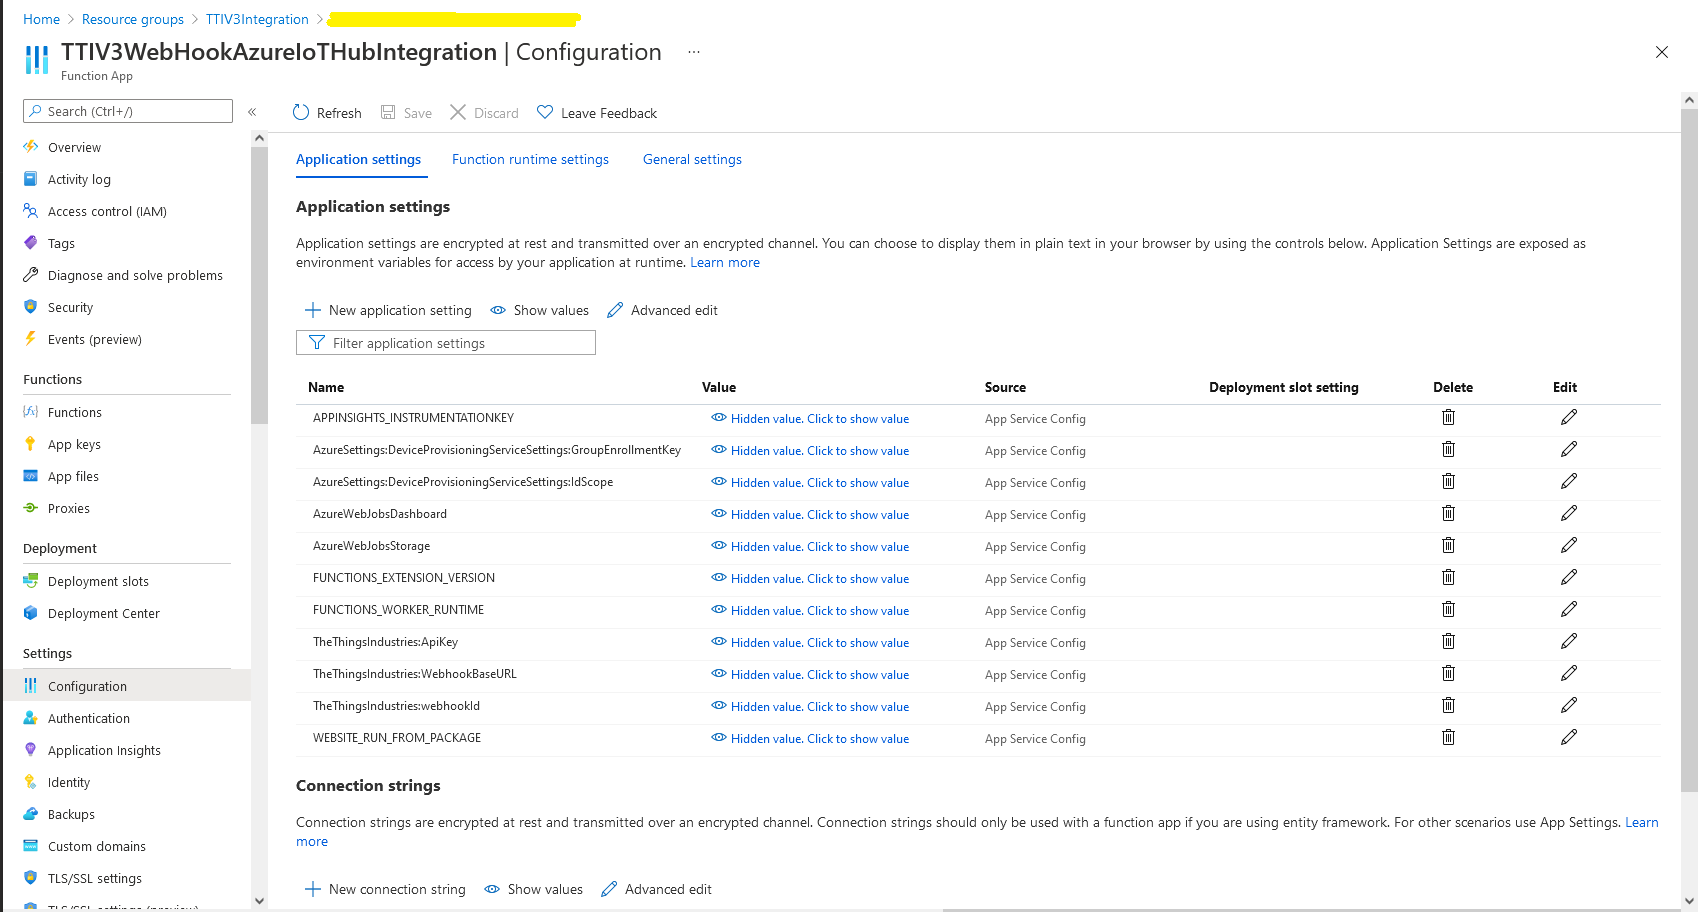
In the Azure Portal I configured the DPS ID Scope (AzureSettings:DeviceProvisioningServiceSettings:IdScope) and the Group Enrollment Key(AzureSettings:DeviceProvisioningServiceSettings:GroupEnrollmentKey) then saved the configuration which restarted the AppService.
Azure Portal AppService configration
The first time a device sent an uplink message the cache query fails and the RegisterAsync method of the ProvisioningDeviceClient is called to get a device connection string.
	logger.LogInformation("Uplink-ApplicationID:{0} DeviceID:{1} Port:{2} Payload Raw:{3}", applicationId, deviceId, port, payload.UplinkMessage.PayloadRaw);

	if (!_DeviceClients.TryGetValue(deviceId, out DeviceClient deviceClient))
	{
		logger.LogInformation("Uplink-Unknown device for ApplicationID:{0} DeviceID:{1}", applicationId, deviceId);

		// Check that only one of Azure Connection string or DPS is configured
		if (string.IsNullOrEmpty(_azureSettings.IoTHubConnectionString) && (_azureSettings.DeviceProvisioningServiceSettings == null))
		{
			logger.LogError("Uplink-Neither Azure IoT Hub connection string or Device Provisioning Service configured");

			return req.CreateResponse(HttpStatusCode.UnprocessableEntity);
		}

		// Check that only one of Azure Connection string or DPS is configured
		if (!string.IsNullOrEmpty(_azureSettings.IoTHubConnectionString) && (_azureSettings.DeviceProvisioningServiceSettings != null))
		{
			logger.LogError("Uplink-Both Azure IoT Hub connection string and Device Provisioning Service configured");

			return req.CreateResponse(HttpStatusCode.UnprocessableEntity);
		}

		// User Azure IoT Connection string if configured and Device Provisioning Service isn't
		if (!string.IsNullOrEmpty(_azureSettings.IoTHubConnectionString))
		{
			deviceClient = DeviceClient.CreateFromConnectionString(_azureSettings.IoTHubConnectionString, deviceId, transportSettings);

			try
			{
				await deviceClient.OpenAsync();
			}
			catch (DeviceNotFoundException)
			{
				logger.LogWarning("Uplink-Unknown DeviceID:{0}", deviceId);

				return req.CreateResponse(HttpStatusCode.NotFound);
			}
		}

		// Azure IoT Hub Device provisioning service if configured
		if (_azureSettings.DeviceProvisioningServiceSettings != null)
		{
			string deviceKey;

			if ( string.IsNullOrEmpty(_azureSettings.DeviceProvisioningServiceSettings.IdScope) || string.IsNullOrEmpty(_azureSettings.DeviceProvisioningServiceSettings.GroupEnrollmentKey))
			{
				logger.LogError("Uplink-Device Provisioning Service requires ID Scope and Group Enrollment Key configured");

				return req.CreateResponse(HttpStatusCode.UnprocessableEntity);
			}

			using (var hmac = new HMACSHA256(Convert.FromBase64String(_azureSettings.DeviceProvisioningServiceSettings.GroupEnrollmentKey)))
			{
				deviceKey = Convert.ToBase64String(hmac.ComputeHash(Encoding.UTF8.GetBytes(deviceId)));
			}

			using (var securityProvider = new SecurityProviderSymmetricKey(deviceId, deviceKey, null))
			{
				using (var transport = new ProvisioningTransportHandlerAmqp(TransportFallbackType.TcpOnly))
				{
					ProvisioningDeviceClient provClient = ProvisioningDeviceClient.Create(
						Constants.AzureDpsGlobalDeviceEndpoint,
						_azureSettings.DeviceProvisioningServiceSettings.IdScope,
						securityProvider,
						transport);

					DeviceRegistrationResult result = await provClient.RegisterAsync();

					if (result.Status != ProvisioningRegistrationStatusType.Assigned)
					{
						_logger.LogError("Config-DeviceID:{0} Status:{1} RegisterAsync failed ", deviceId, result.Status);

						return req.CreateResponse(HttpStatusCode.FailedDependency);
					}

					IAuthenticationMethod authentication = new DeviceAuthenticationWithRegistrySymmetricKey(result.DeviceId, (securityProvider as SecurityProviderSymmetricKey).GetPrimaryKey());

					deviceClient = DeviceClient.Create(result.AssignedHub, authentication, transportSettings);

					await deviceClient.OpenAsync();
				}
			}
		}

		if (!_DeviceClients.TryAdd(deviceId, deviceClient))
		{
			logger.LogWarning("Uplink-TryAdd failed for ApplicationID:{0} DeviceID:{1}", applicationId, deviceId);

			return req.CreateResponse(HttpStatusCode.Conflict);
		}

		Models.AzureIoTHubReceiveMessageHandlerContext context = new Models.AzureIoTHubReceiveMessageHandlerContext()
		{
			DeviceId = deviceId,
			ApplicationId = applicationId,
			WebhookId = _theThingsIndustriesSettings.WebhookId,
			WebhookBaseURL = _theThingsIndustriesSettings.WebhookBaseURL,
			ApiKey = _theThingsIndustriesSettings.ApiKey
		};

		await deviceClient.SetReceiveMessageHandlerAsync(AzureIoTHubClientReceiveMessageHandler, context);

		await deviceClient.SetMethodDefaultHandlerAsync(AzureIoTHubClientDefaultMethodHandler, context);
	}

	JObject telemetryEvent = new JObject
	{
		{ "ApplicationID", applicationId },
		{ "DeviceID", deviceId },
		{ "Port", port },
		{ "Simulated", payload.Simulated },
		{ "ReceivedAtUtc", payload.UplinkMessage.ReceivedAtUtc.ToString("s", CultureInfo.InvariantCulture) },
		{ "PayloadRaw", payload.UplinkMessage.PayloadRaw }
	};

	// If the payload has been decoded by payload formatter, put it in the message body.
	if (payload.UplinkMessage.PayloadDecoded != null)
	{
		telemetryEvent.Add("PayloadDecoded", payload.UplinkMessage.PayloadDecoded);
	}

	// Send the message to Azure IoT Hub
	using (Message ioTHubmessage = new Message(Encoding.ASCII.GetBytes(JsonConvert.SerializeObject(telemetryEvent))))
	{
		// Ensure the displayed time is the acquired time rather than the uploaded time.
		ioTHubmessage.Properties.Add("iothub-creation-time-utc", payload.UplinkMessage.ReceivedAtUtc.ToString("s", CultureInfo.InvariantCulture));
		ioTHubmessage.Properties.Add("ApplicationId", applicationId);
		ioTHubmessage.Properties.Add("DeviceEUI", payload.EndDeviceIds.DeviceEui);
		ioTHubmessage.Properties.Add("DeviceId", deviceId);
		ioTHubmessage.Properties.Add("port", port.ToString());
		ioTHubmessage.Properties.Add("Simulated", payload.Simulated.ToString());

		await deviceClient.SendEventAsync(ioTHubmessage);

		logger.LogInformation("Uplink-DeviceID:{0} SendEventAsync success", payload.EndDeviceIds.DeviceId);
	}
}
catch (Exception ex)
{
	logger.LogError(ex, "Uplink-Message processing failed");

	return req.CreateResponse(HttpStatusCode.InternalServerError);
}
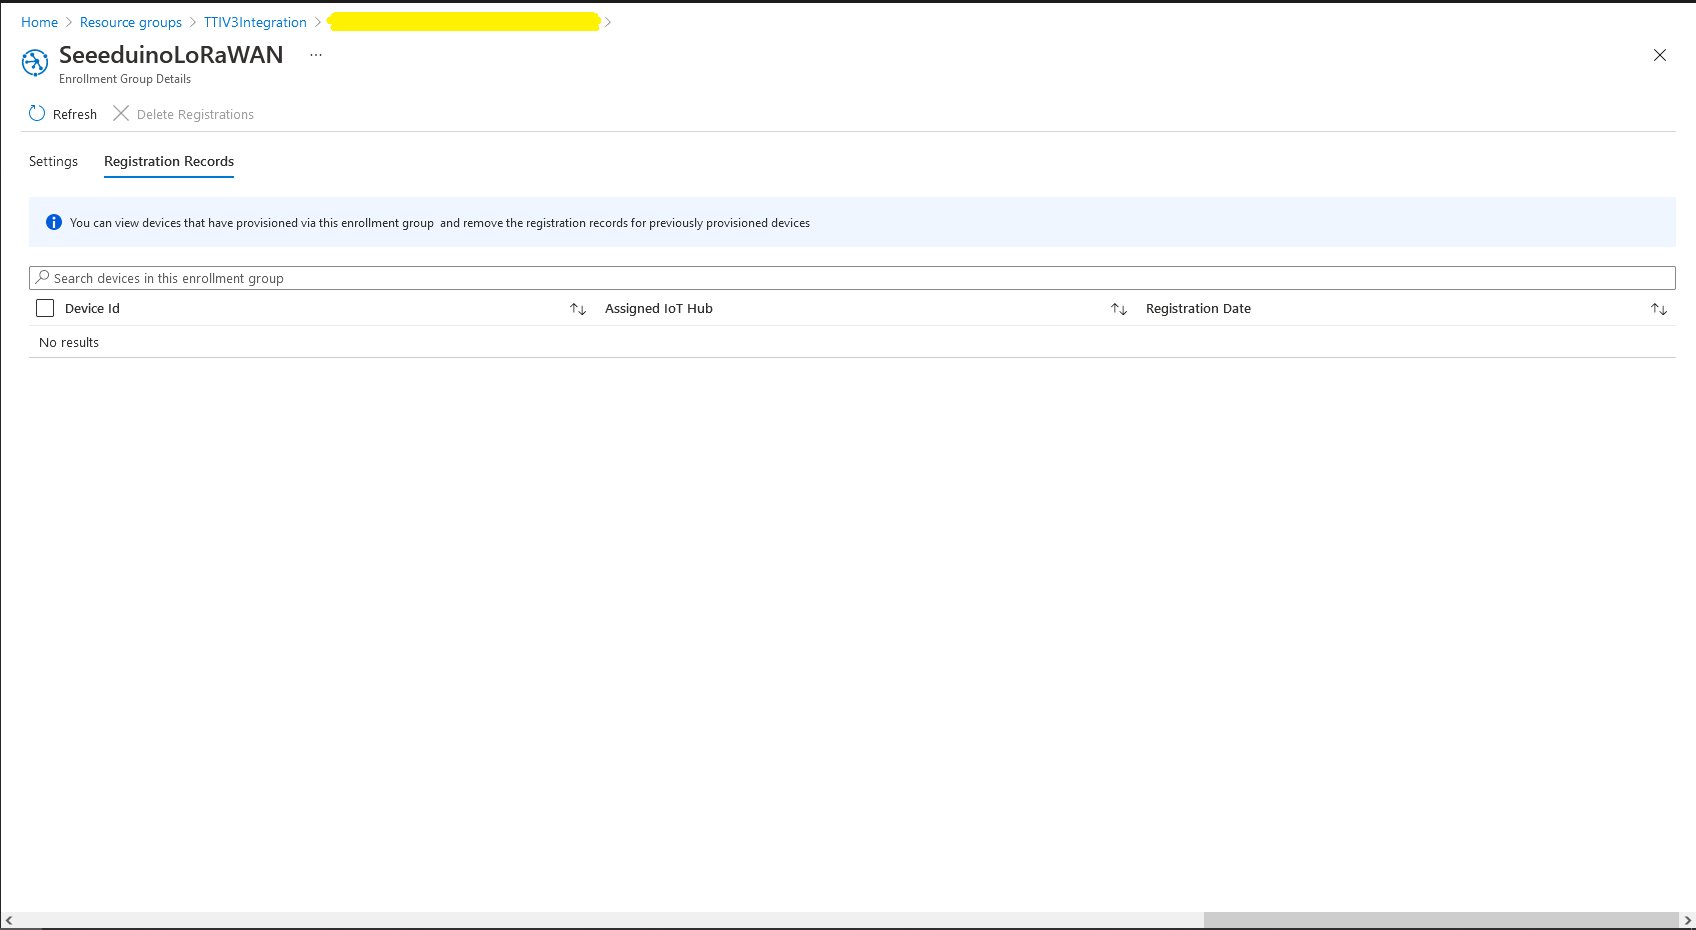
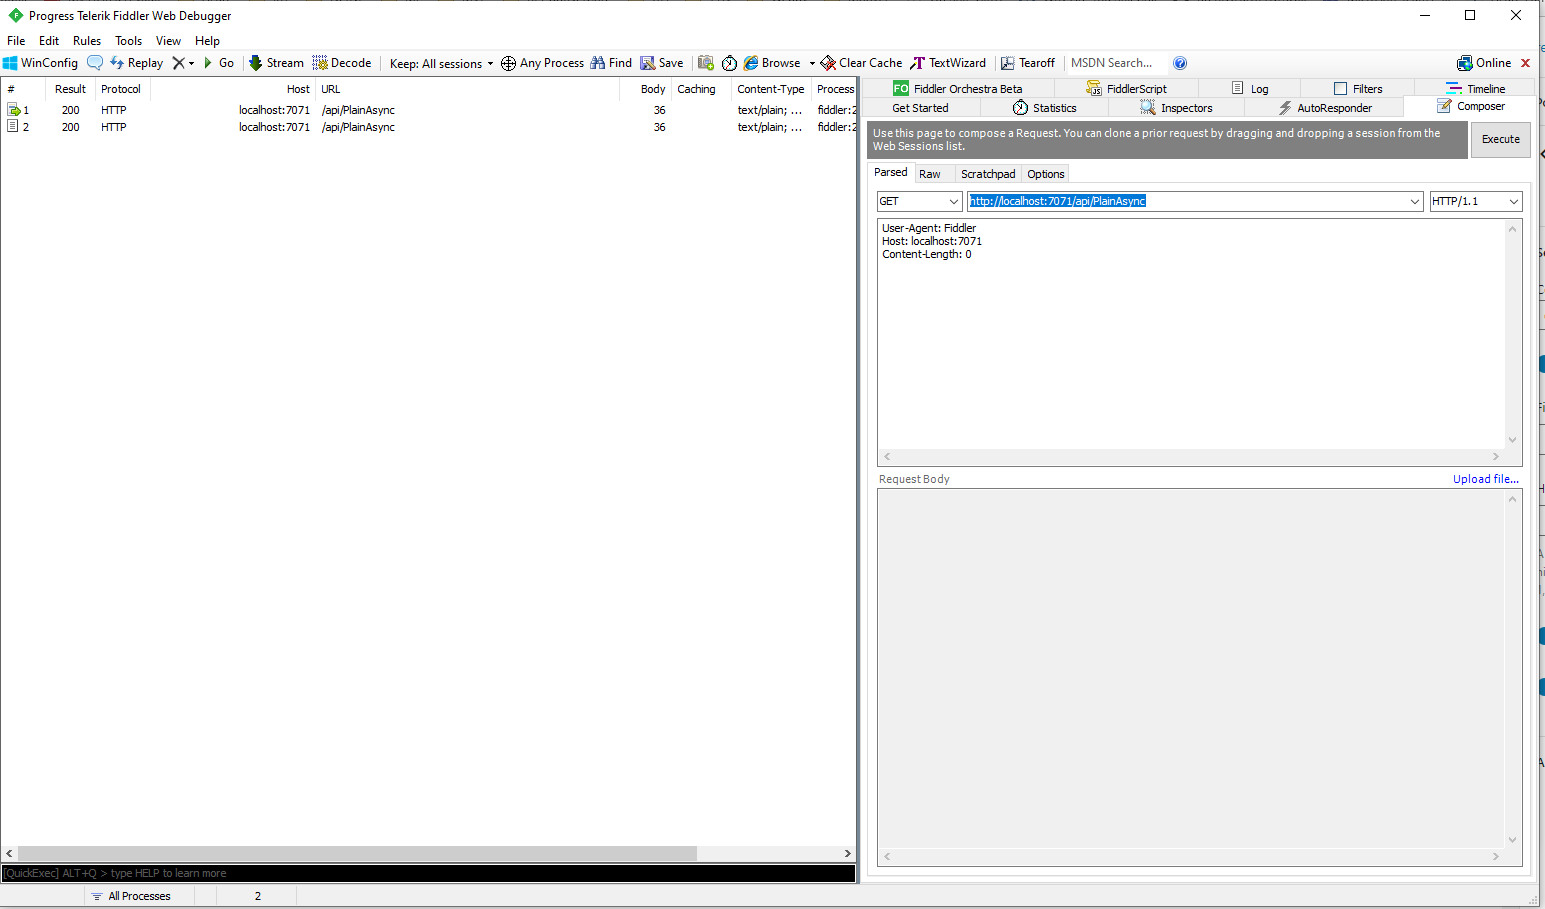
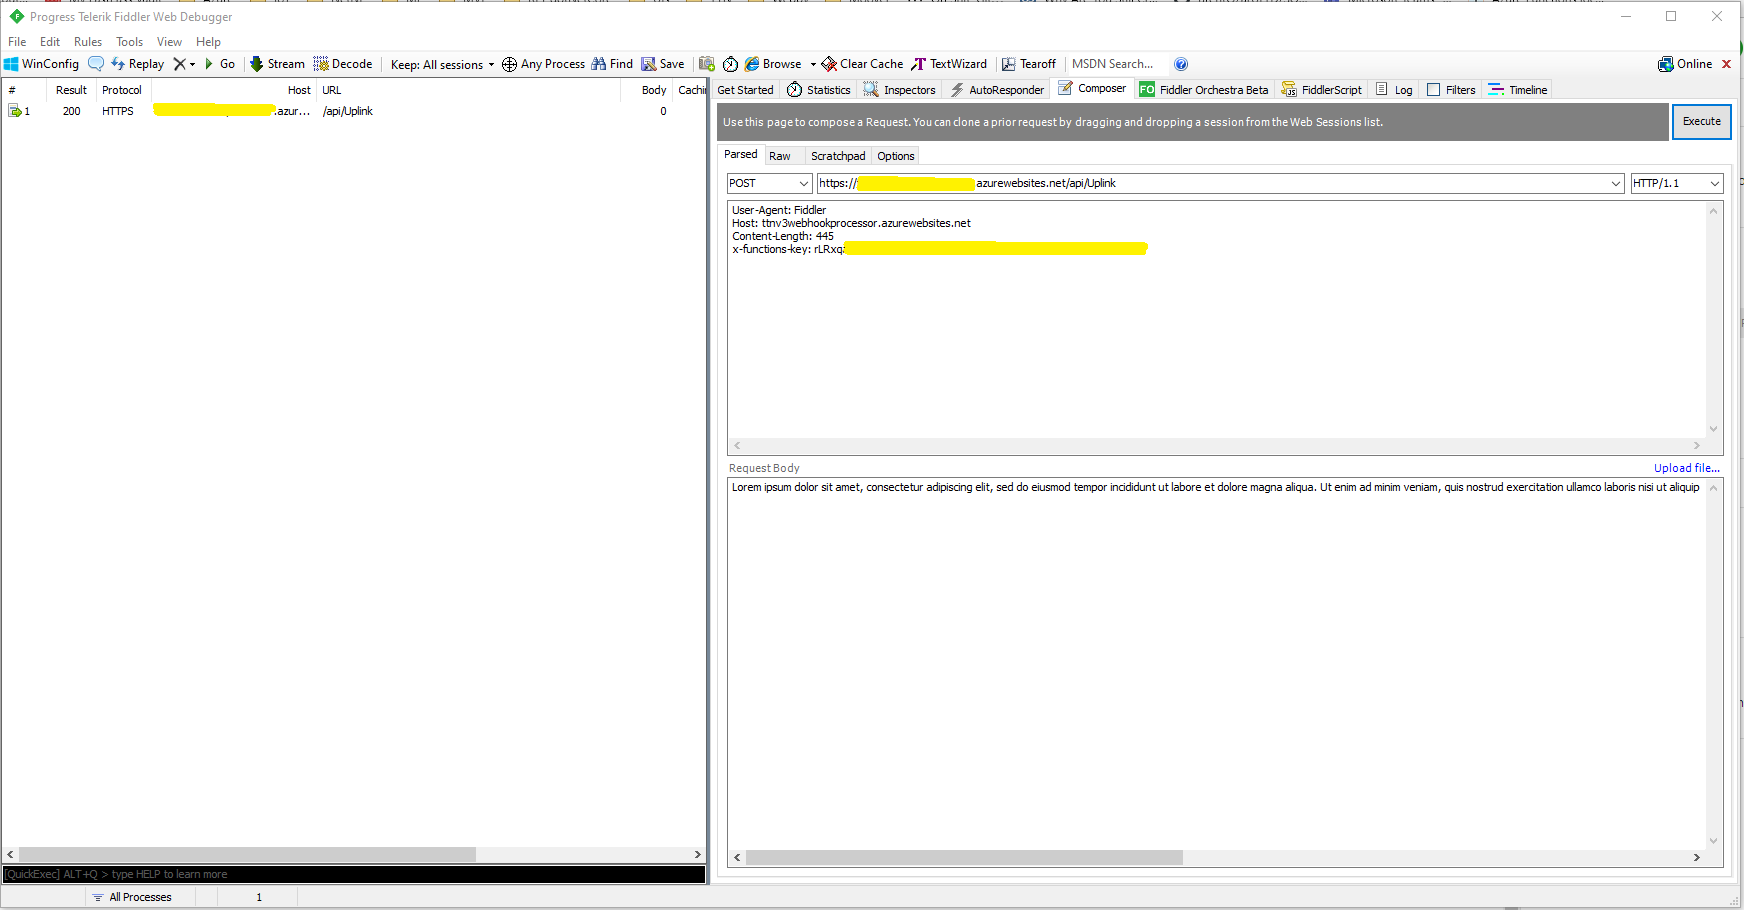
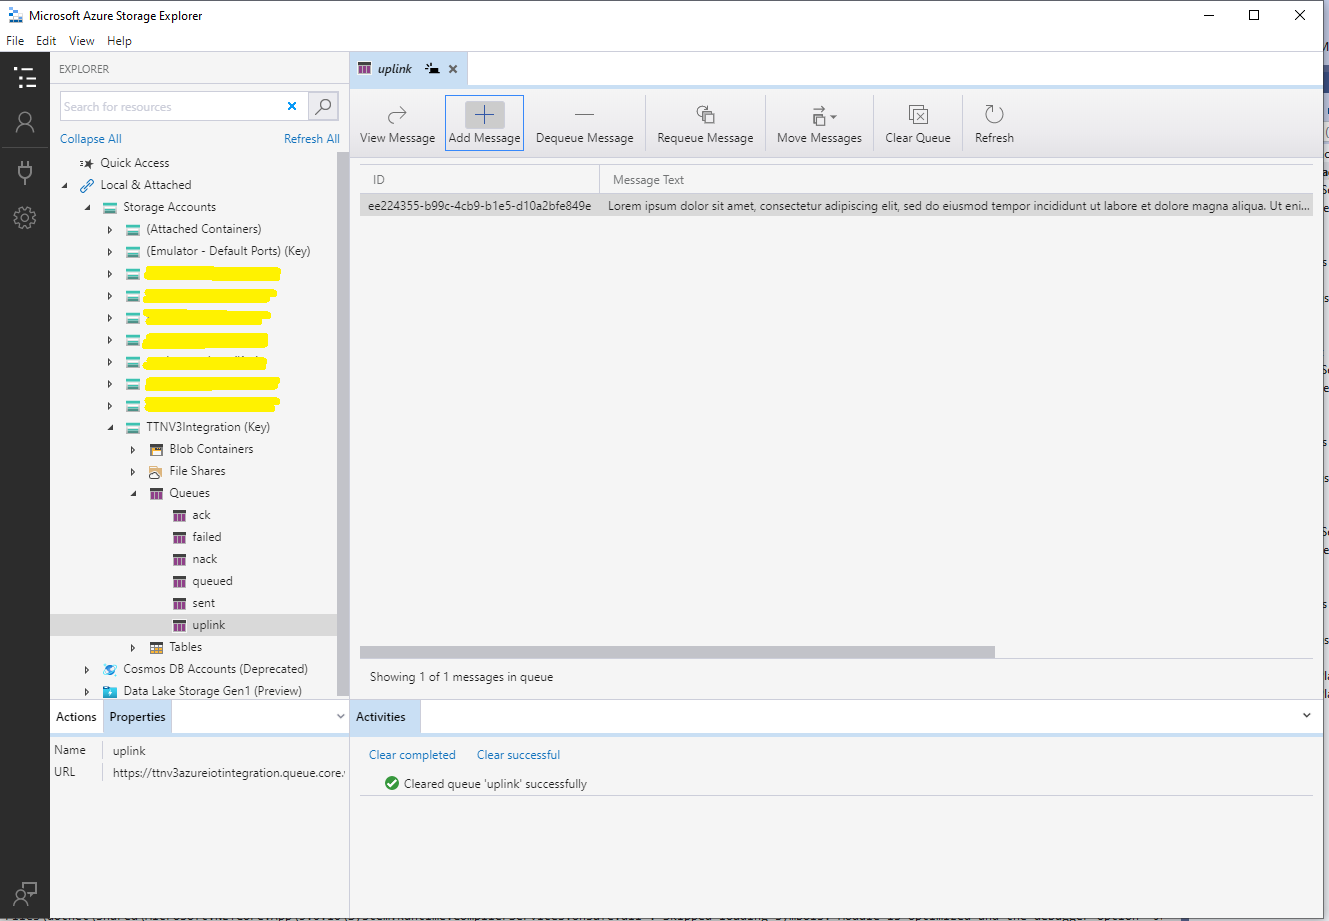
I used Telerik Fiddler and some sample payloads copied from my Azure Storage Queue sample to simulate many devices and the registrations were spread across my five Azure IoT Hubs.
DPS Device Registrations tab showing distribution of LoRaWAN Devices
I need to review the HTTP Error codes returned for different errors and ensure failures are handled robustly.
In this version a downlink message can be sent to a device only after an uplink message. I’m looking at adding an Azure Function which initiates a connection to the configured Azure IoT Hub for the specified device to mitigate with this issue.
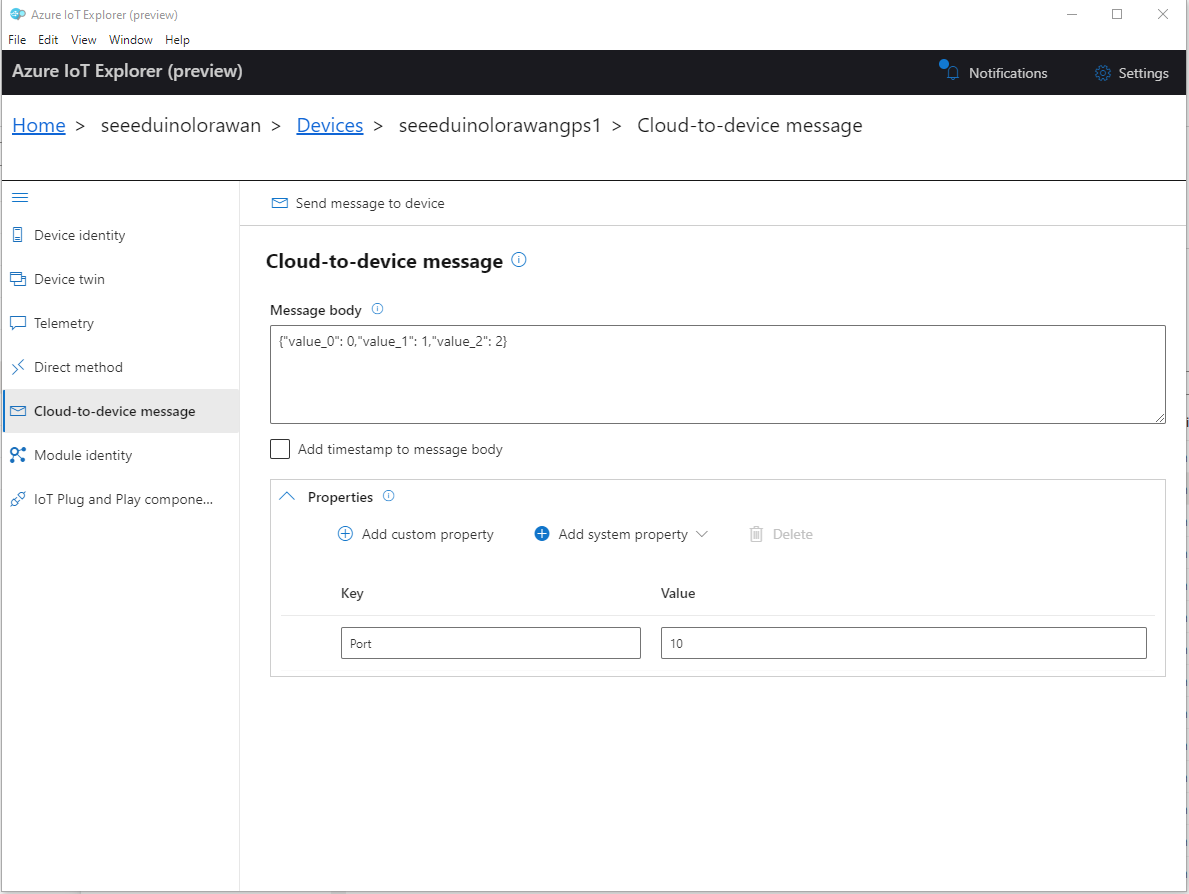
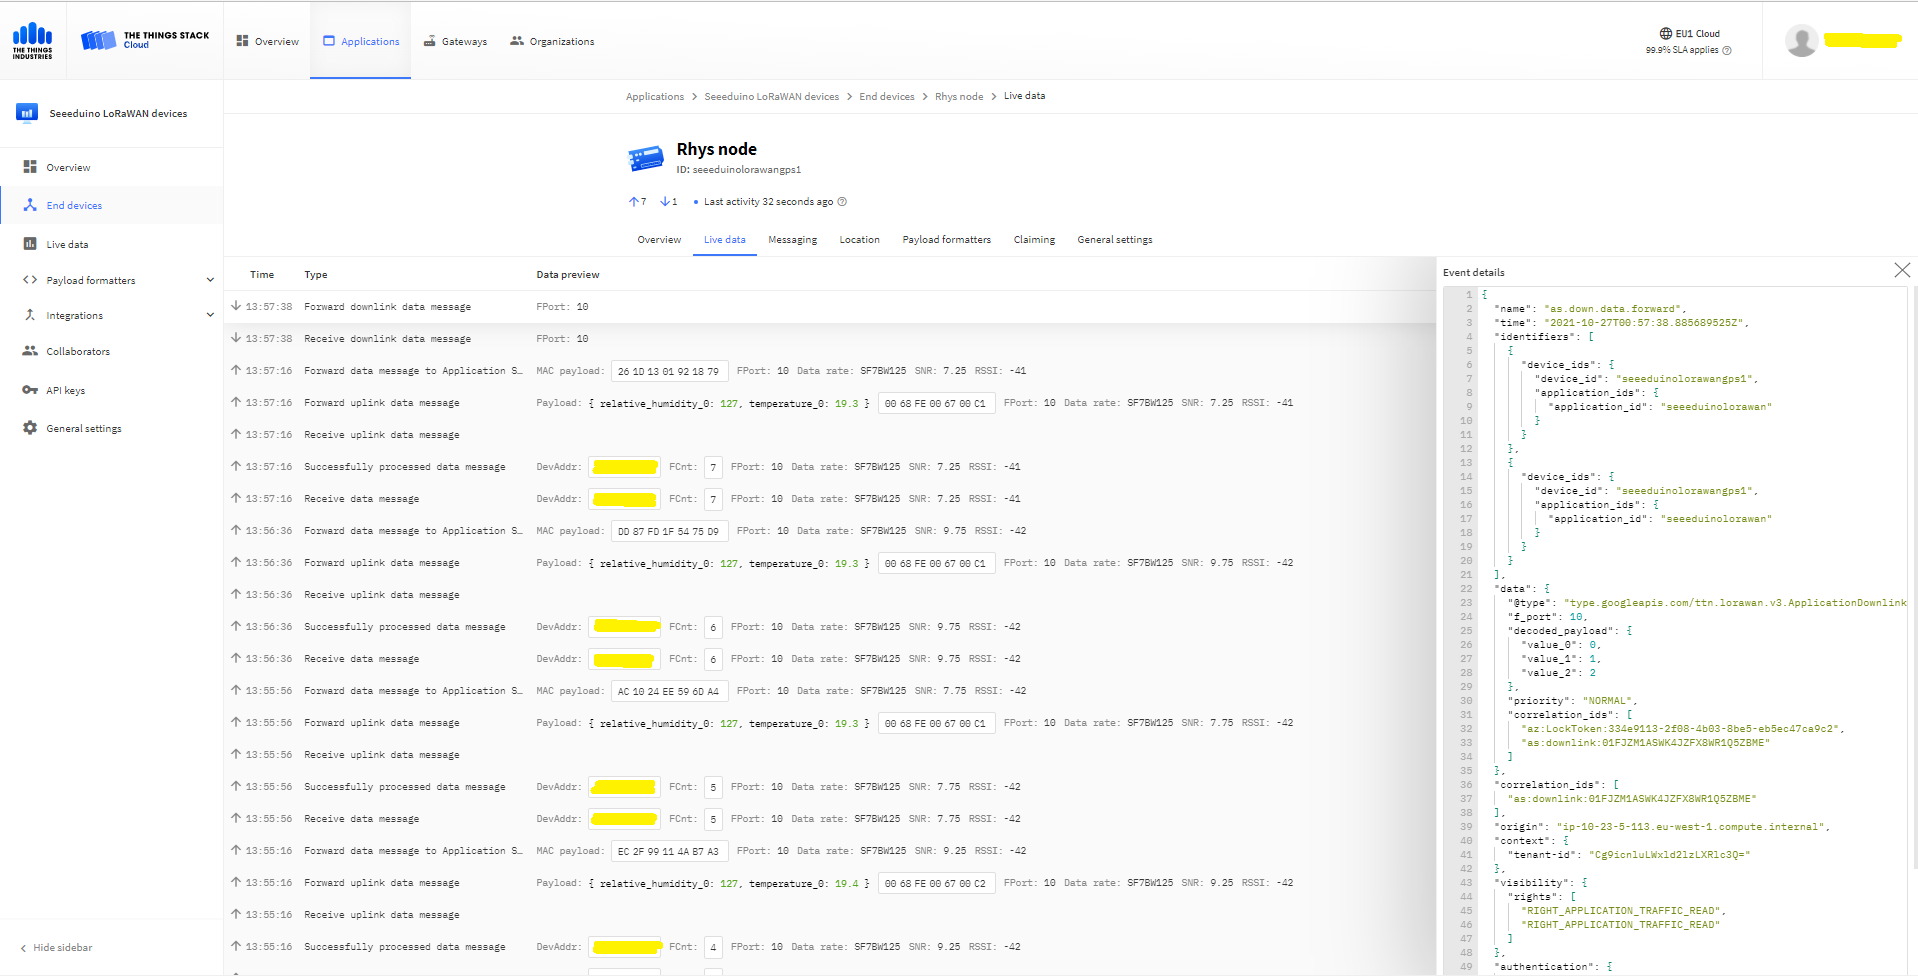
To send a TTN downlink message to a device the minimum required info is the LoRaWAN port number (specified in a Custom Property on the Azure IoT Hub cloud to device message), the device Id (from uplink message payload, which has been validated by a successful Azure IoT Hub connection) web hook id, web hook base URL, and an API Key (The Web Hook parameters are stored in the Connector configuration).
After some experimentation in previous TTN Connectors I found the synchronous nature of DirectMethods didn’t work well with LoRAWAN “irregular” connectivity so currently they are ignored.
public partial class Integration
{
	private async Task AzureIoTHubClientReceiveMessageHandler(Message message, object userContext)
	{
		try
		{
			Models.AzureIoTHubReceiveMessageHandlerContext receiveMessageHandlerContext = (Models.AzureIoTHubReceiveMessageHandlerContext)userContext;

			if (!_DeviceClients.TryGetValue(receiveMessageHandlerContext.DeviceId, out DeviceClient deviceClient))
			{
				_logger.LogWarning("Downlink-DeviceID:{0} unknown", receiveMessageHandlerContext.DeviceId);
				return;
			}

			using (message)
			{
				string payloadText = Encoding.UTF8.GetString(message.GetBytes()).Trim();

				if (!AzureDownlinkMessage.PortTryGet(message.Properties, out byte port))
				{
					_logger.LogWarning("Downlink-Port property is invalid");

					await deviceClient.RejectAsync(message);
					return;
				}

				// Split over multiple lines in an attempt to improve readability. In this scenario a valid JSON string should start/end with {/} for an object or [/] for an array
				if ((payloadText.StartsWith("{") && payloadText.EndsWith("}"))
														||
					((payloadText.StartsWith("[") && payloadText.EndsWith("]"))))
				{
					try
					{
						downlink.PayloadDecoded = JToken.Parse(payloadText);
					}
					catch (JsonReaderException)
					{
						downlink.PayloadRaw = payloadText;
					}
				}
				else
				{
					downlink.PayloadRaw = payloadText;
				}

				_logger.LogInformation("Downlink-IoT Hub DeviceID:{0} MessageID:{1} LockToken :{2} Port{3}",
					receiveMessageHandlerContext.DeviceId,
					message.MessageId,
		            message.LockToken,
					downlink.Port);

				Models.DownlinkPayload Payload = new Models.DownlinkPayload()
				{
					Downlinks = new List<Models.Downlink>()
					{
						downlink
					}
				};

				string url = $"{receiveMessageHandlerContext.WebhookBaseURL}/{receiveMessageHandlerContext.ApplicationId}/webhooks/{receiveMessageHandlerContext.WebhookId}/devices/{receiveMessageHandlerContext.DeviceId}/down/replace");

				using (var client = new WebClient())
				{
					client.Headers.Add("Authorization", $"Bearer {receiveMessageHandlerContext.ApiKey}");

					client.UploadString(new Uri(url), JsonConvert.SerializeObject(Payload));
				}

				_logger.LogInformation("Downlink-DeviceID:{0} LockToken:{1} success", receiveMessageHandlerContext.DeviceId, message.LockToken);
			}
		}
		catch (Exception ex)
		{
			_logger.LogError(ex, "Downlink-ReceiveMessge processing failed");
		}
	}
}
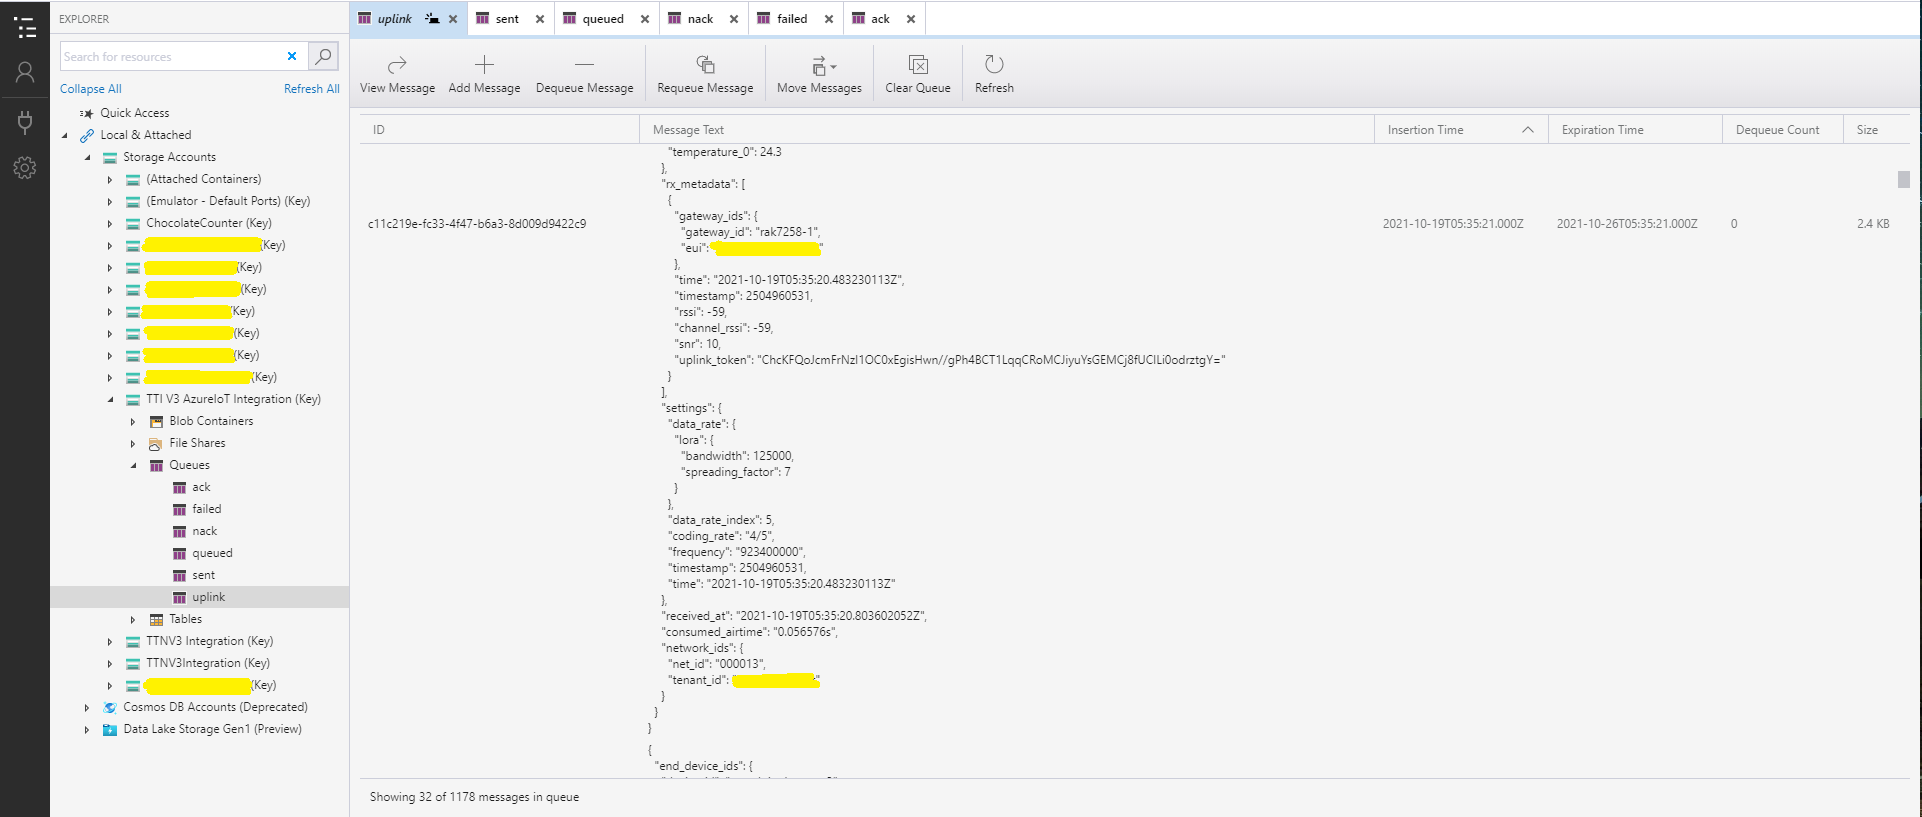
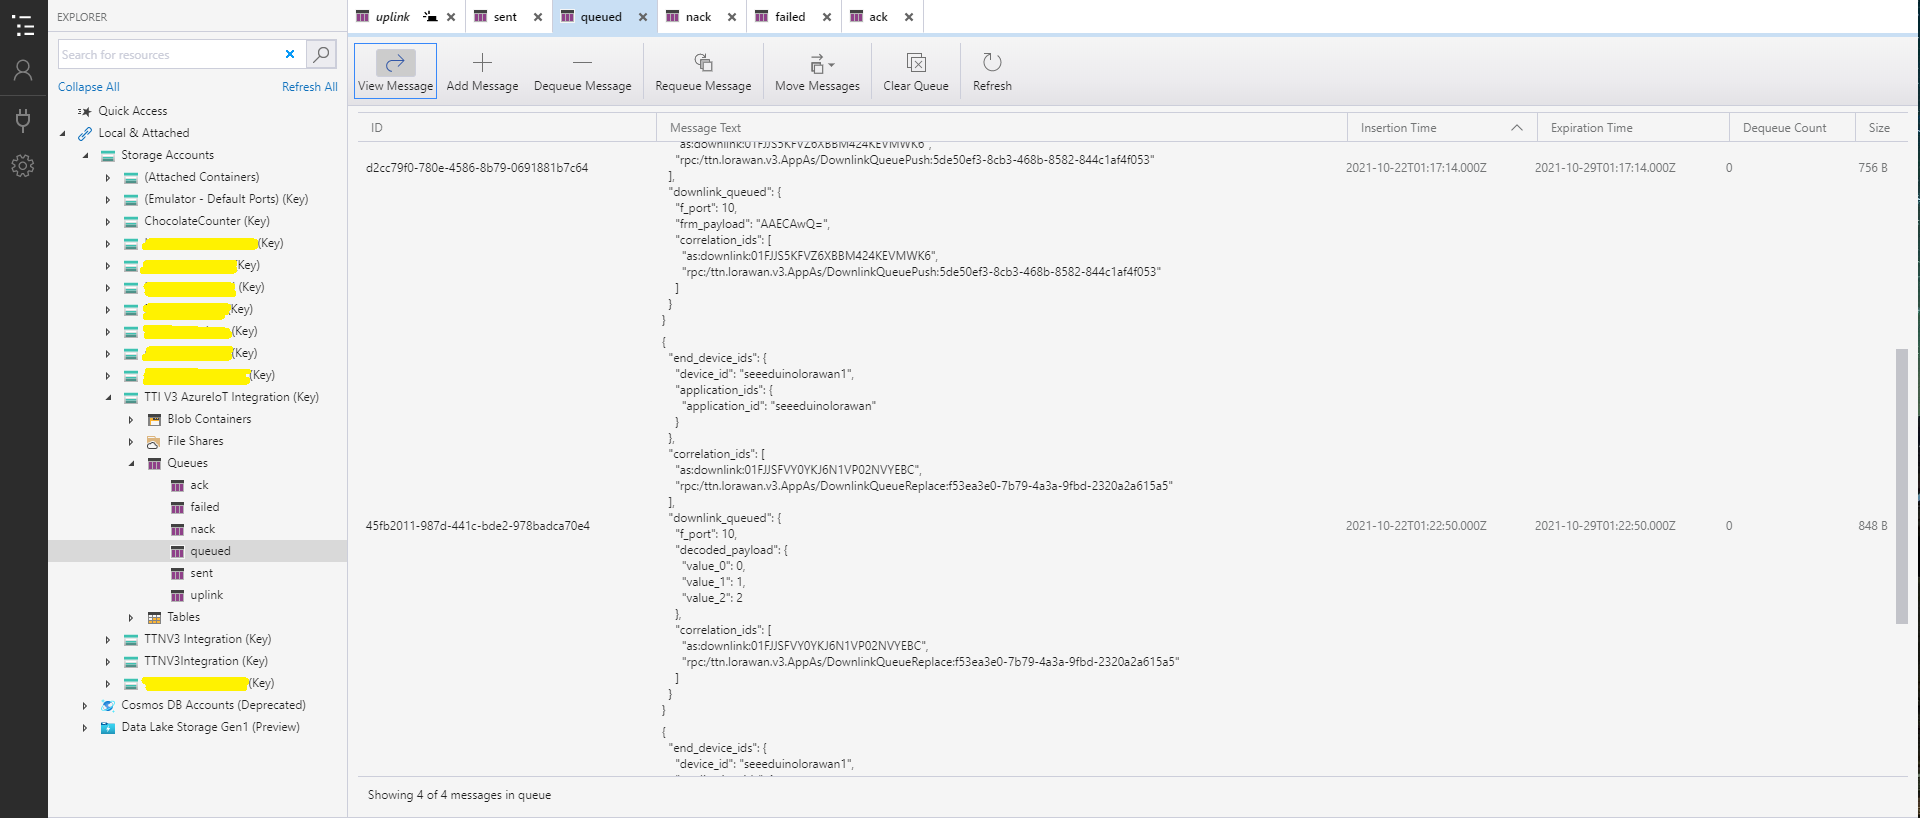
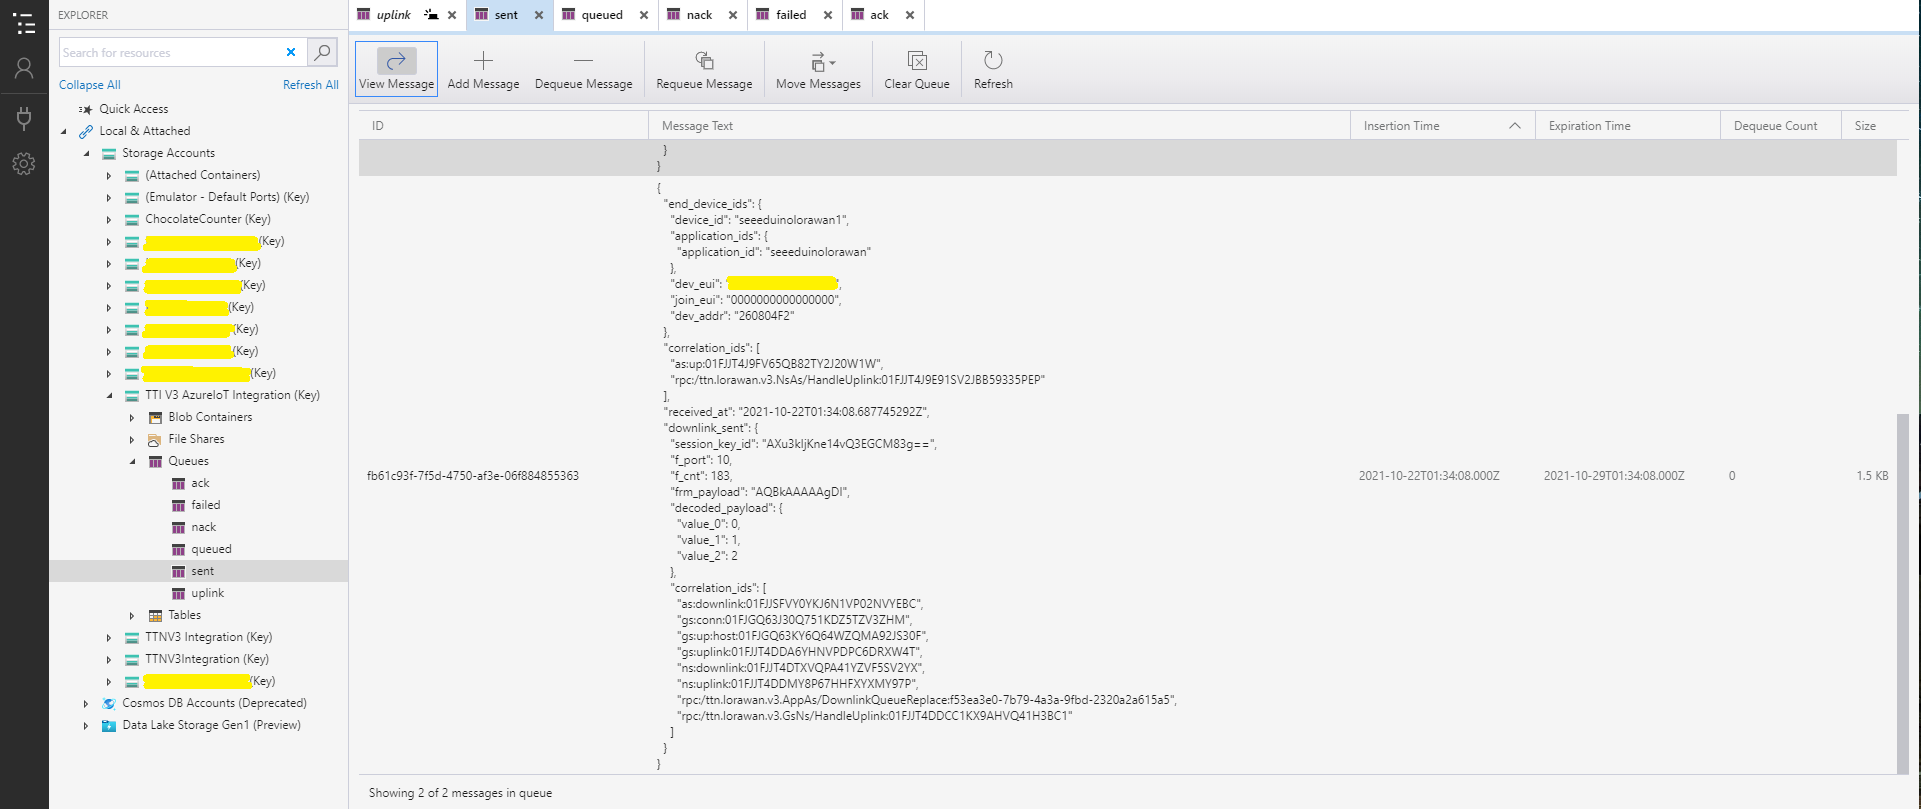
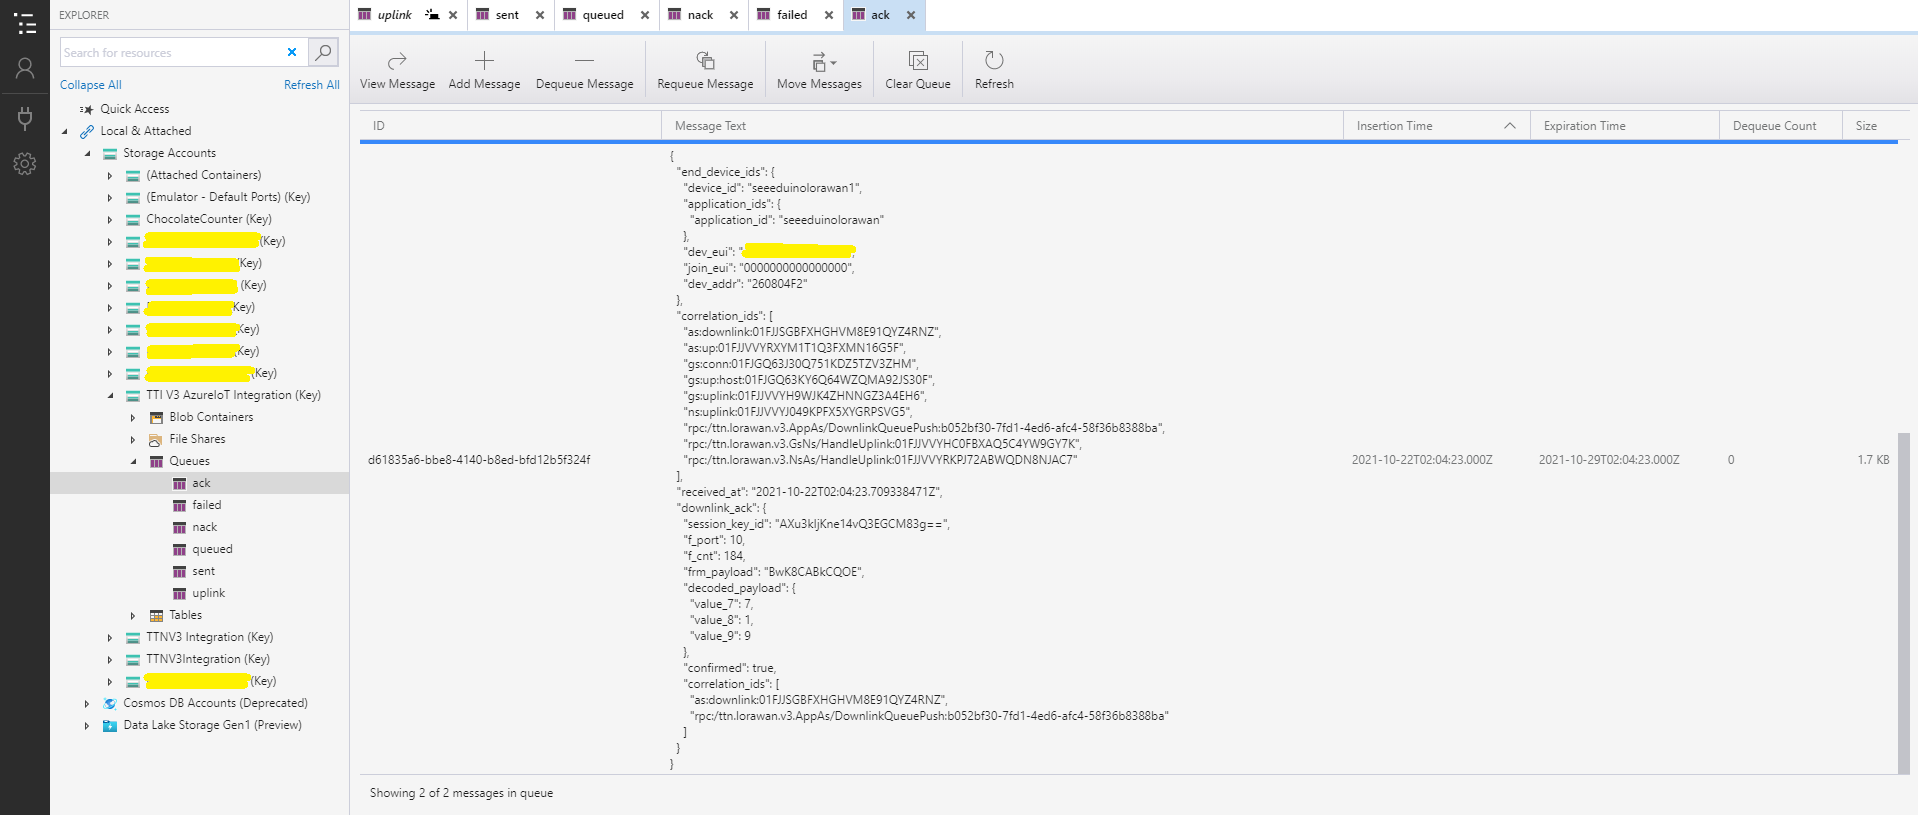
After some experimentation I realised that I had forgotten that the order of message processing was important e.g. a TTI Queued message should be processed before the associated Ack. This could (and did happen) because I had a queue for each message type and in addition the Azure Queue Storage trigger binding would use parallel execution to process backlogs of messages. My approach caused issues with both intra and inter queue message ordering
I have included sample application in the Github repository to show how to use the library
namespace devMobile.IoT.NetCore.Sensirion
{
	using System;
	using System.Device.I2c;
	using System.Threading;

	class Program
	{
		static void Main(string[] args)
		{
			// bus id on the raspberry pi 3
			const int busId = 1;

			I2cConnectionSettings i2cConnectionSettings = new(busId, Sht20.DefaultI2cAddress);

			using I2cDevice i2cDevice = I2cDevice.Create(i2cConnectionSettings);

			using (Sht20 sht20 = new Sht20(i2cDevice))
			{
				sht20.Reset();

				while (true)
				{
					double temperature = sht20.Temperature();
					double humidity = sht20.Humidity();

#if HEATER_ON_OFF
					sht20.HeaterOn();
					Console.WriteLine($"{DateTime.Now:HH:mm:ss} HeaterOn:{sht20.IsHeaterOn()}");
#endif
					Console.WriteLine($"{DateTime.Now:HH:mm:ss} Temperature:{temperature:F1}°C Humidity:{humidity:F0}% HeaterOn:{sht20.IsHeaterOn()}");
#if HEATER_ON_OFF
					sht20.HeaterOff();
					Console.WriteLine($"{DateTime.Now:HH:mm:ss} HeaterOn:{sht20.IsHeaterOn()}");
#endif

					Thread.Sleep(1000);
				}
			}
		}
	}
}
The Sensiron SHT20 has a heater which is intended to be used for functionality diagnosis – relative humidity drops upon rising temperature. The heater consumes about 5.5mW and provides a temperature increase of about 0.5 – 1.5°C.
Beware when the device is soft reset the heater bit is not cleared.
I have included sample application to show how to use the library
namespace devMobile.IoT.NetCore.GroveBaseHat
{
	using System;
	using System.Device.I2c;
	using System.Threading;

	class Program
	{
		static void Main(string[] args)
		{
			// bus id on the raspberry pi 3
			const int busId = 1;

			I2cConnectionSettings i2cConnectionSettings = new(busId, AnalogPorts.DefaultI2cAddress);

			using (I2cDevice i2cDevice = I2cDevice.Create(i2cConnectionSettings))
			using (AnalogPorts AnalogPorts = new AnalogPorts(i2cDevice))
			{
				Console.WriteLine($"{DateTime.Now:HH:mm:SS} Version:{AnalogPorts.Version()}");
				Console.WriteLine();

				double powerSupplyVoltage = AnalogPorts.PowerSupplyVoltage();
				Console.WriteLine($"{DateTime.Now:HH:mm:SS} Power Supply Voltage:{powerSupplyVoltage:F2}v");

				while (true)
				{
					double value = AnalogPorts.Read(AnalogPorts.AnalogPort.A0);
					double rawValue = AnalogPorts.ReadRaw(AnalogPorts.AnalogPort.A0);
					double voltageValue = AnalogPorts.ReadVoltage(AnalogPorts.AnalogPort.A0);

					Console.WriteLine($"{DateTime.Now:HH:mm:SS} Value:{value:F2} Raw:{rawValue:F2} Voltage:{voltageValue:F2}v");
					Console.WriteLine();

					Thread.Sleep(1000);
				}
			}
		}
	}
}
The GROVE_BASE_HAT_RPI and GROVE_BASE_HAT_RPI_ZERO are used to specify the number of available analog ports.