Moteino M0 Payload Addressing client

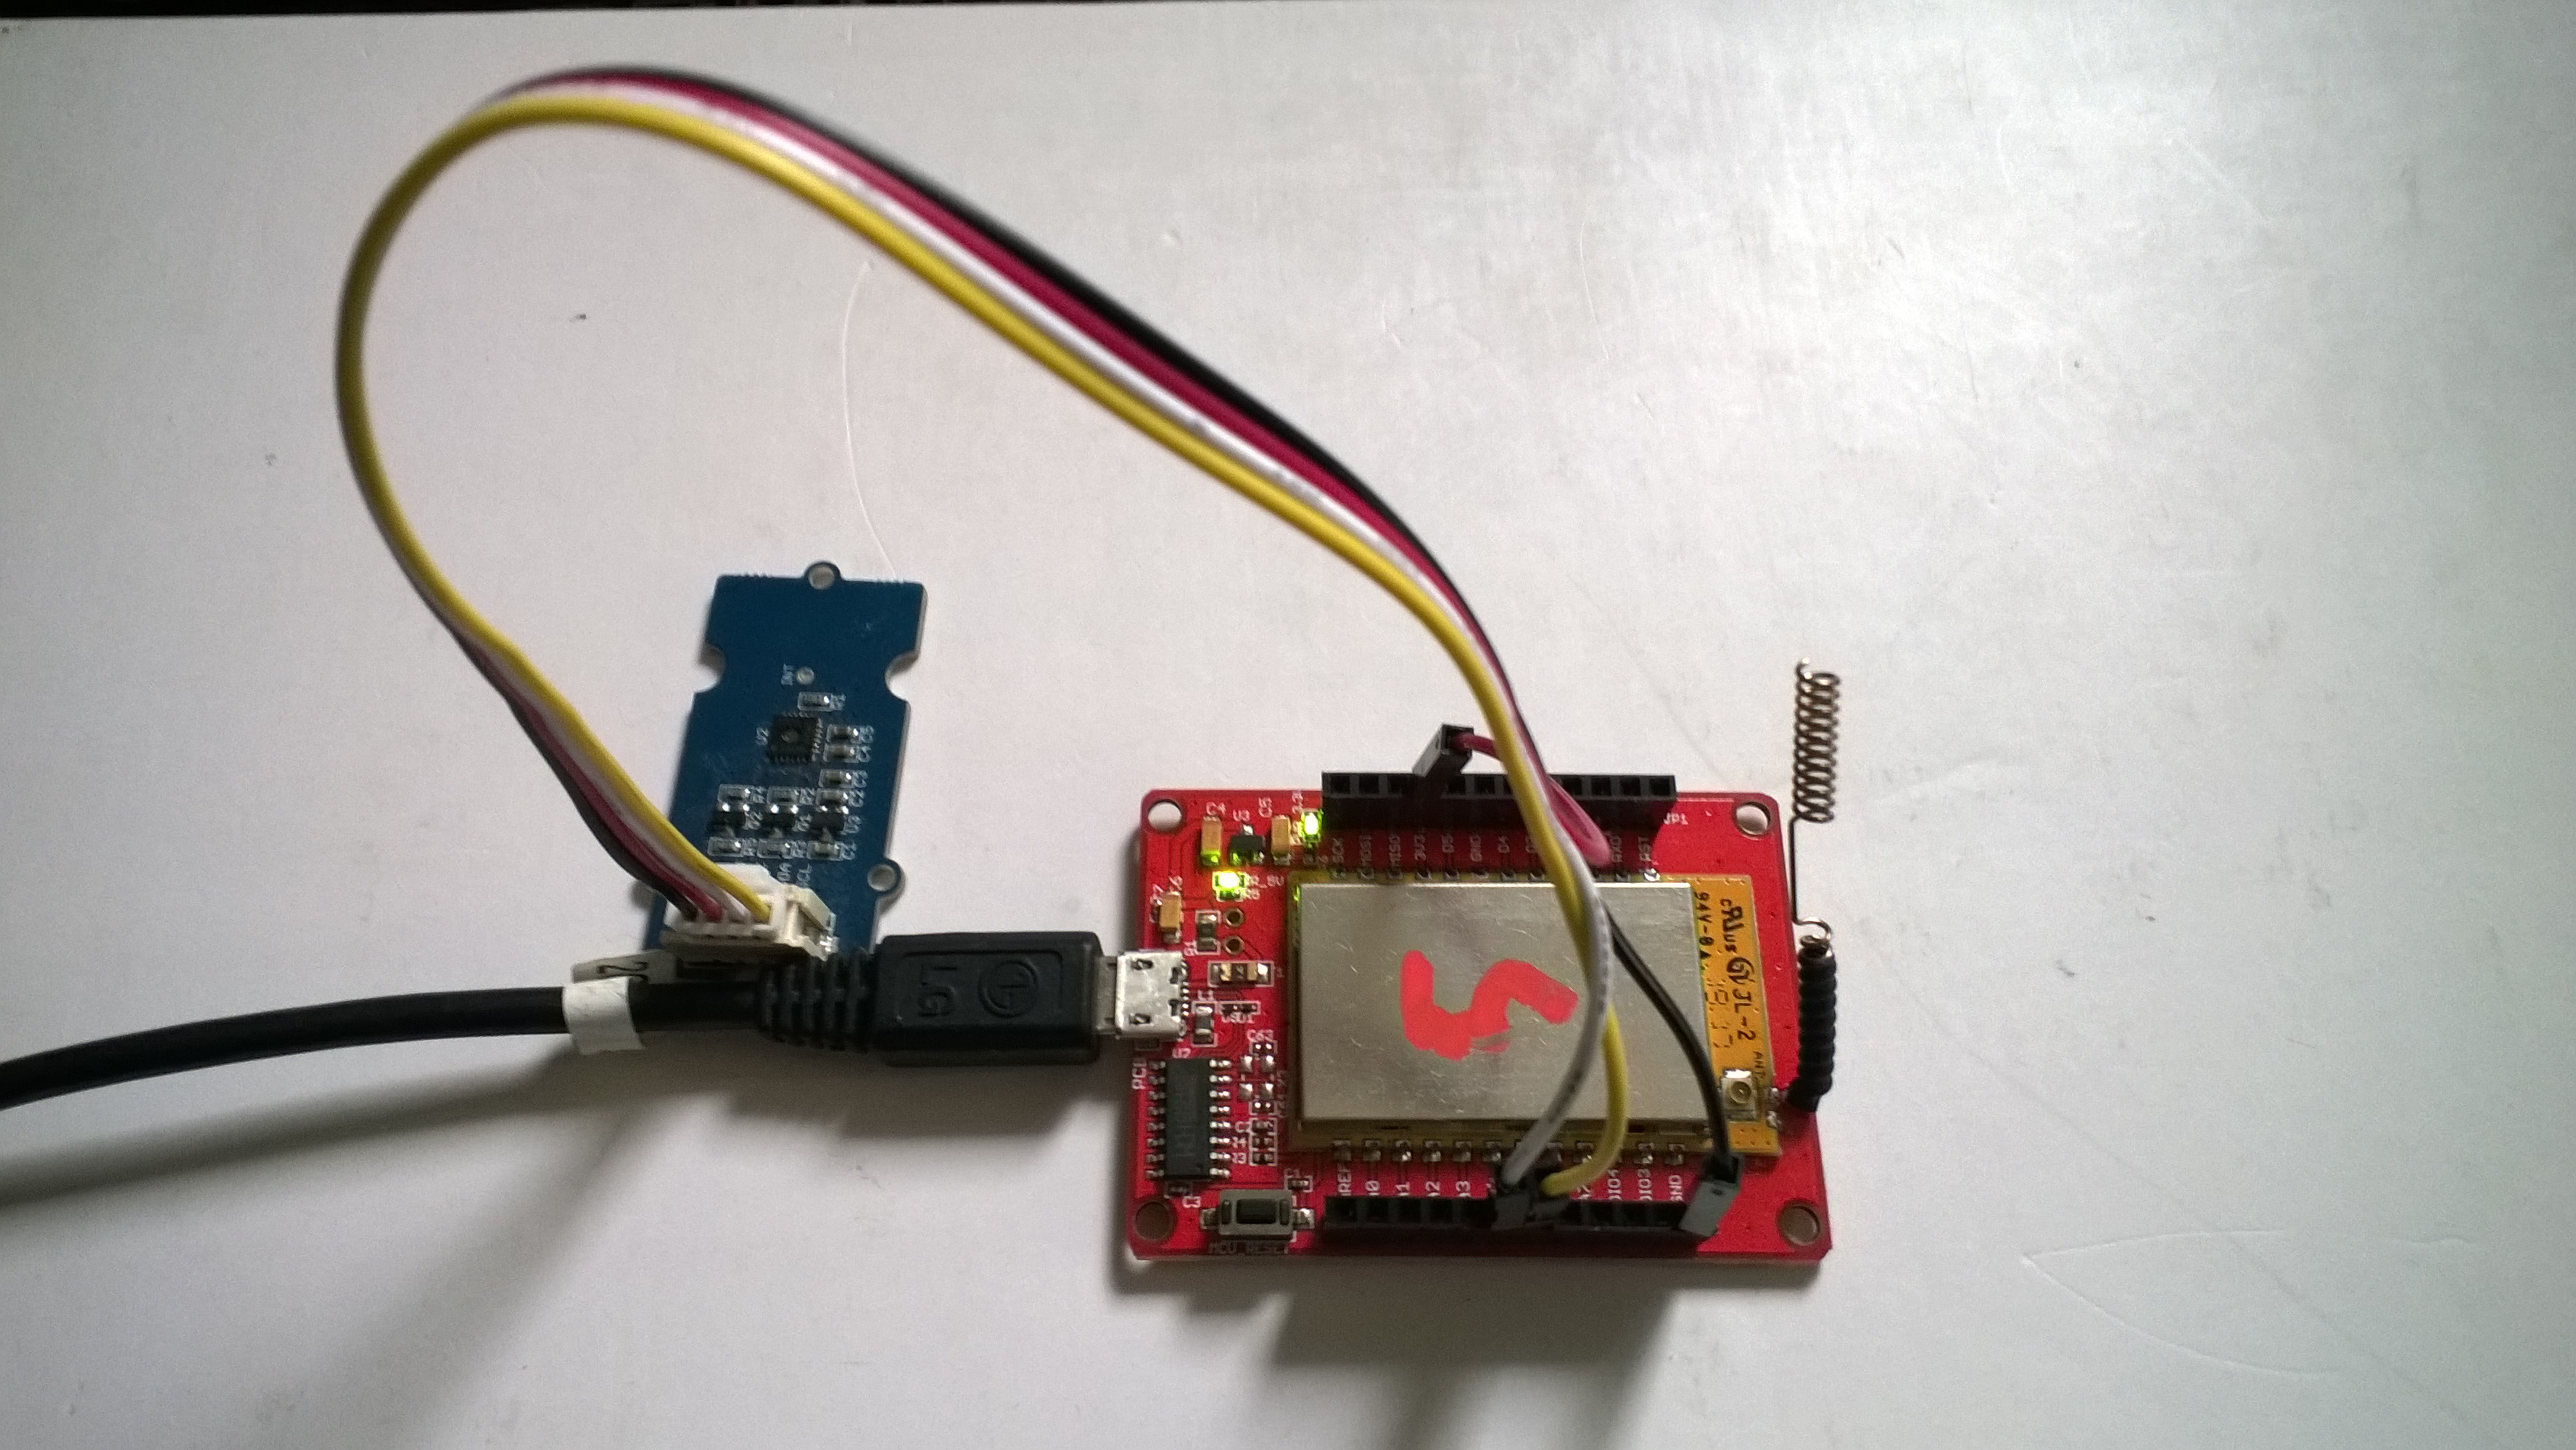
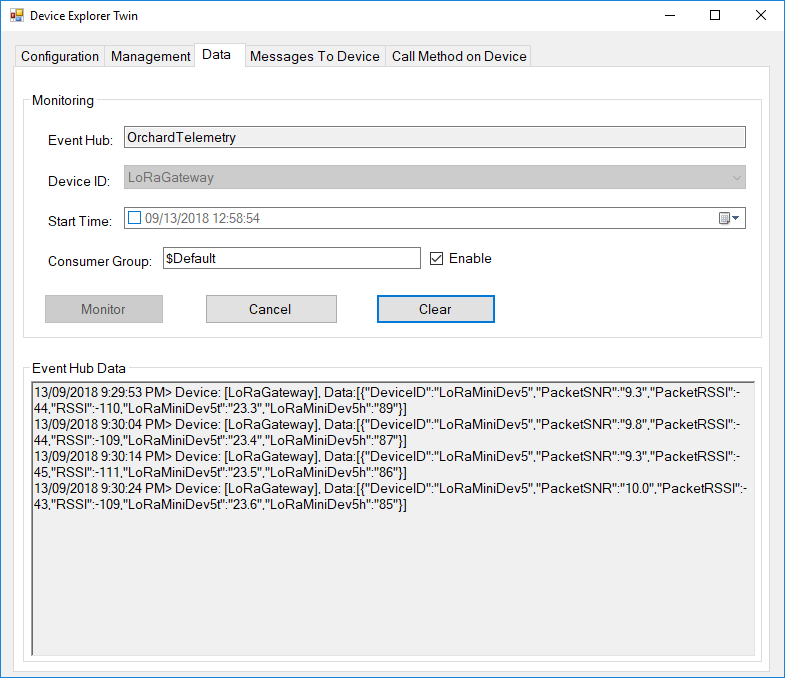
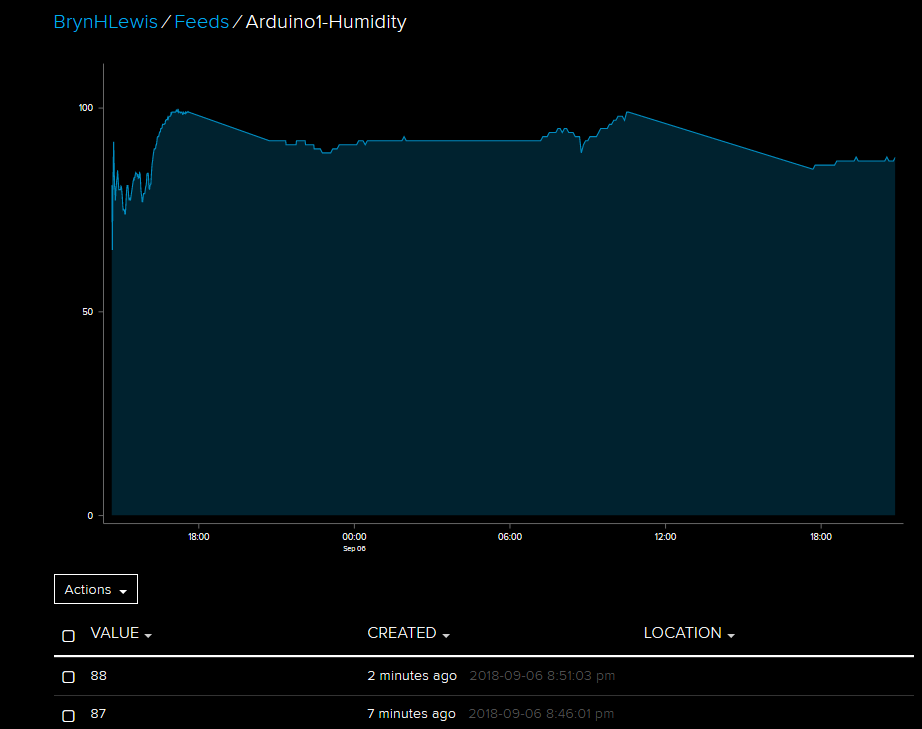
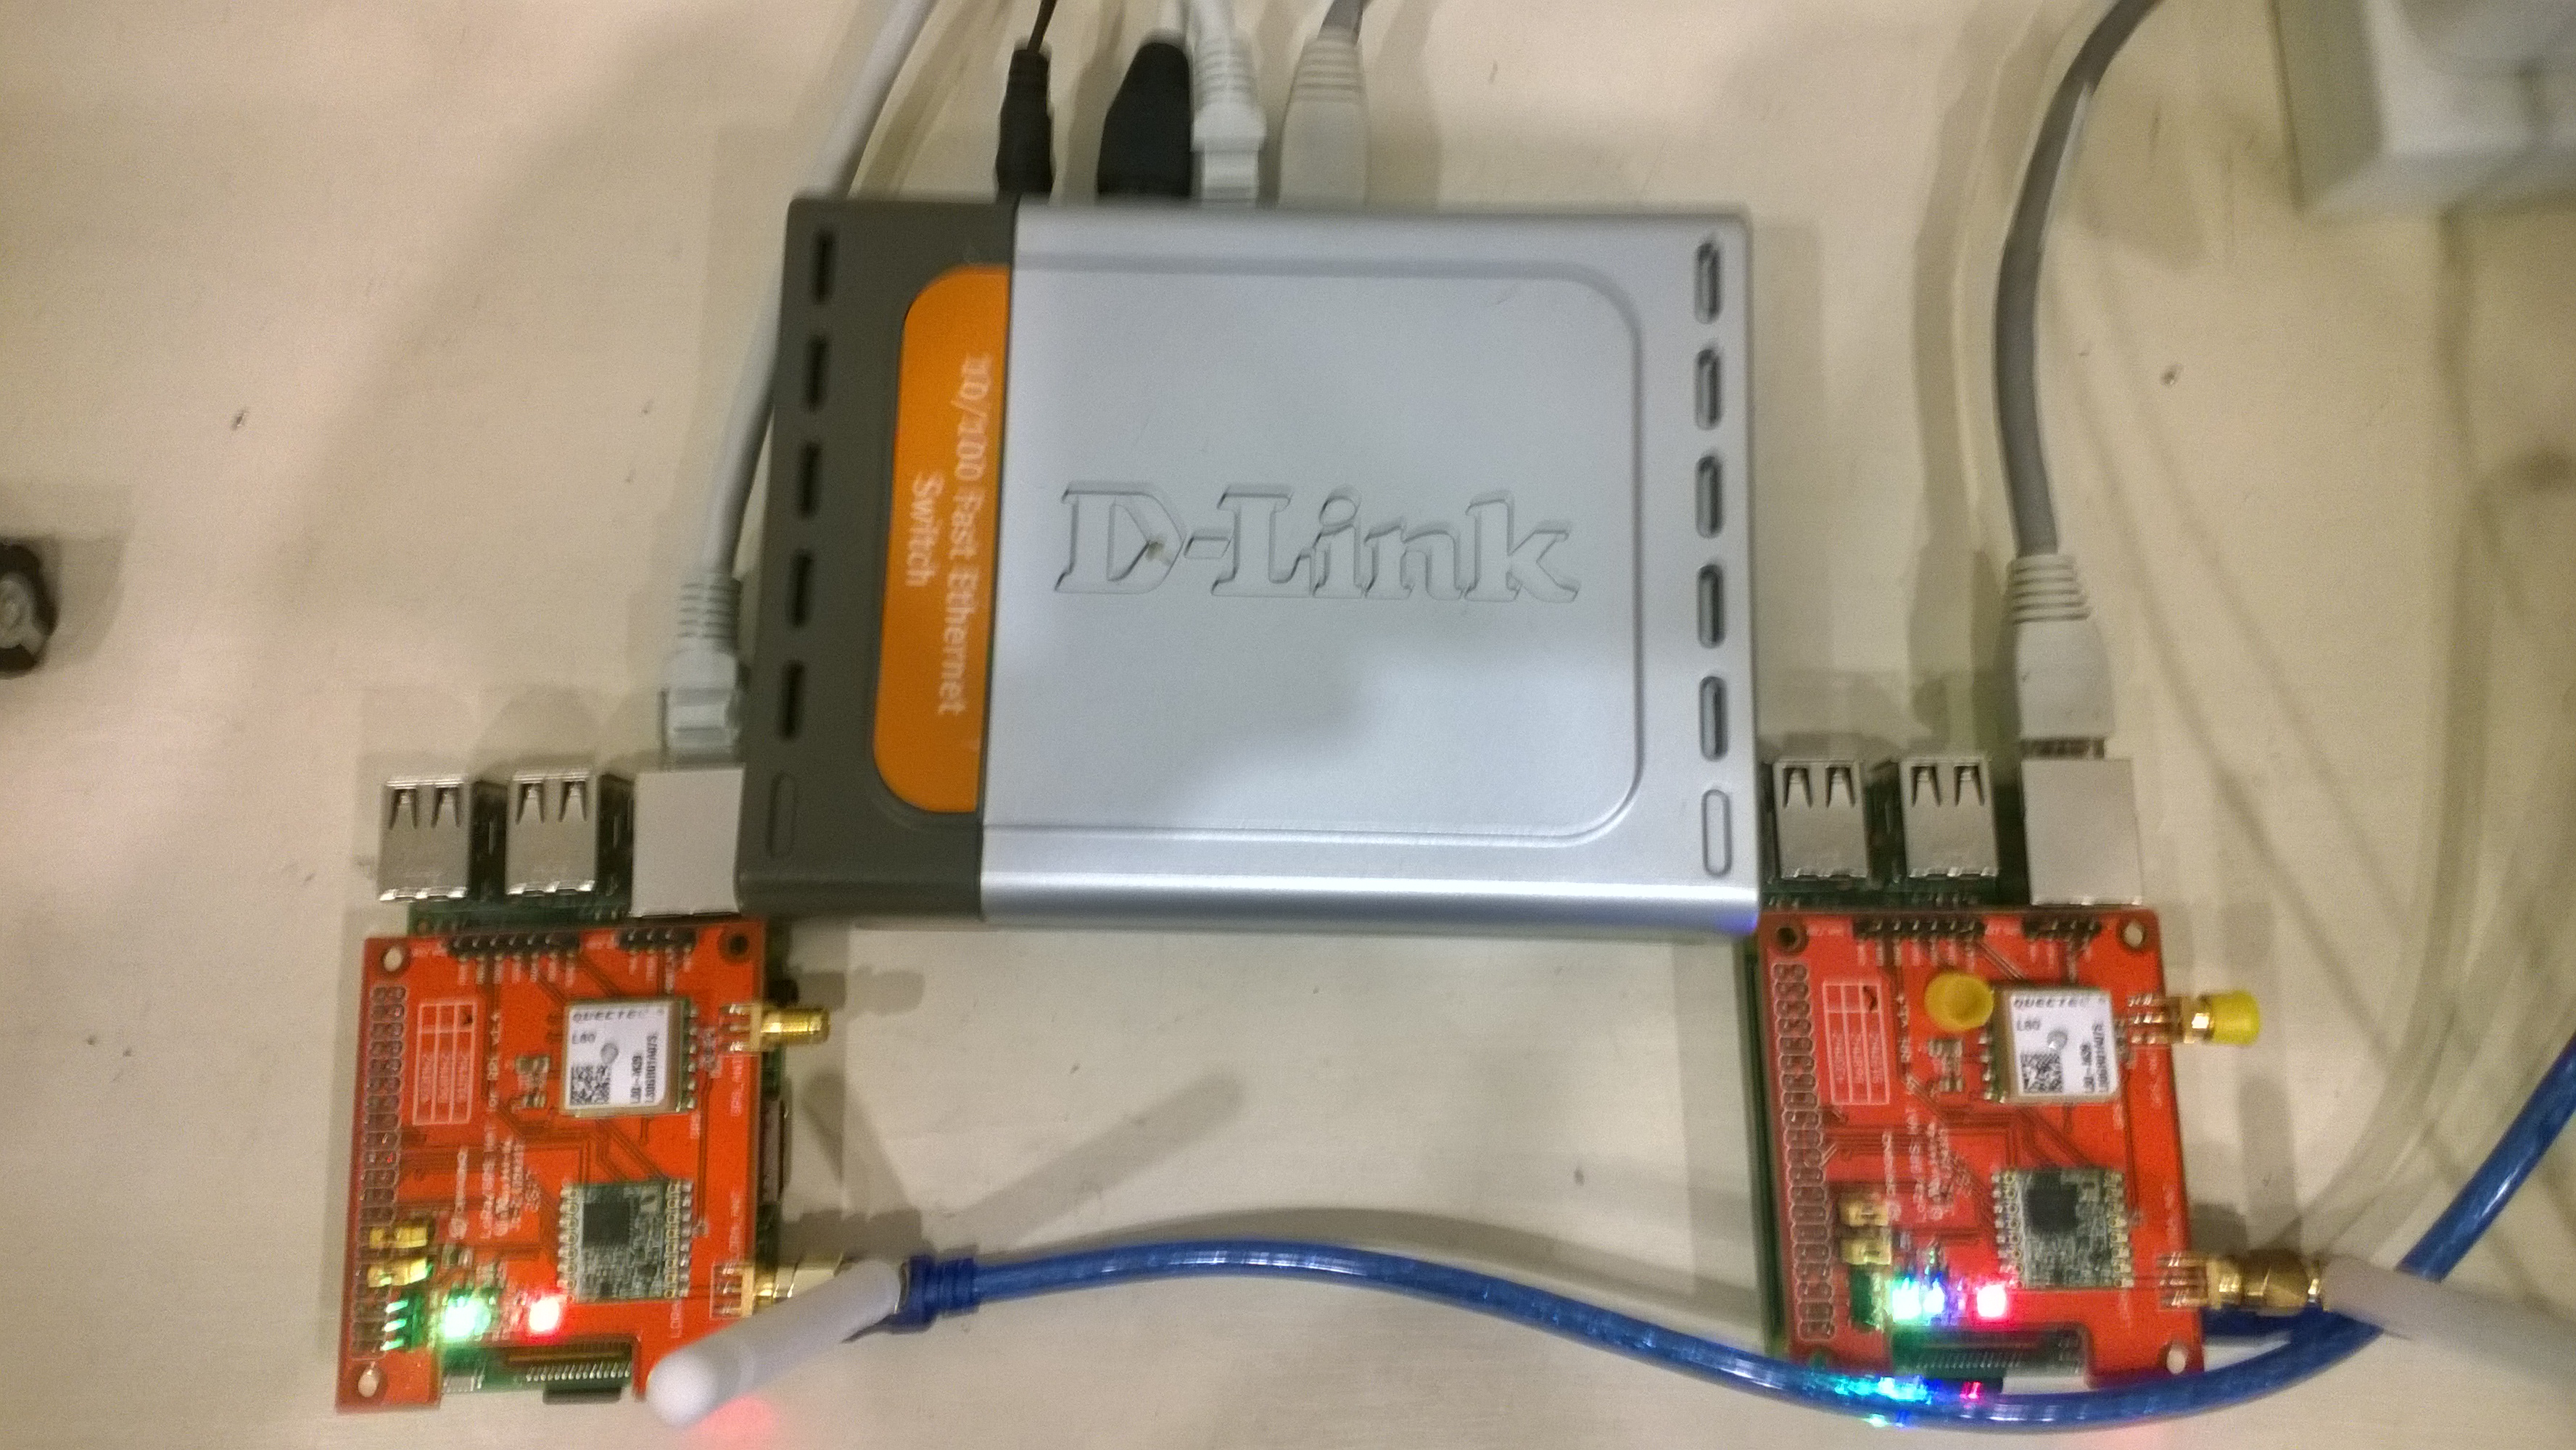
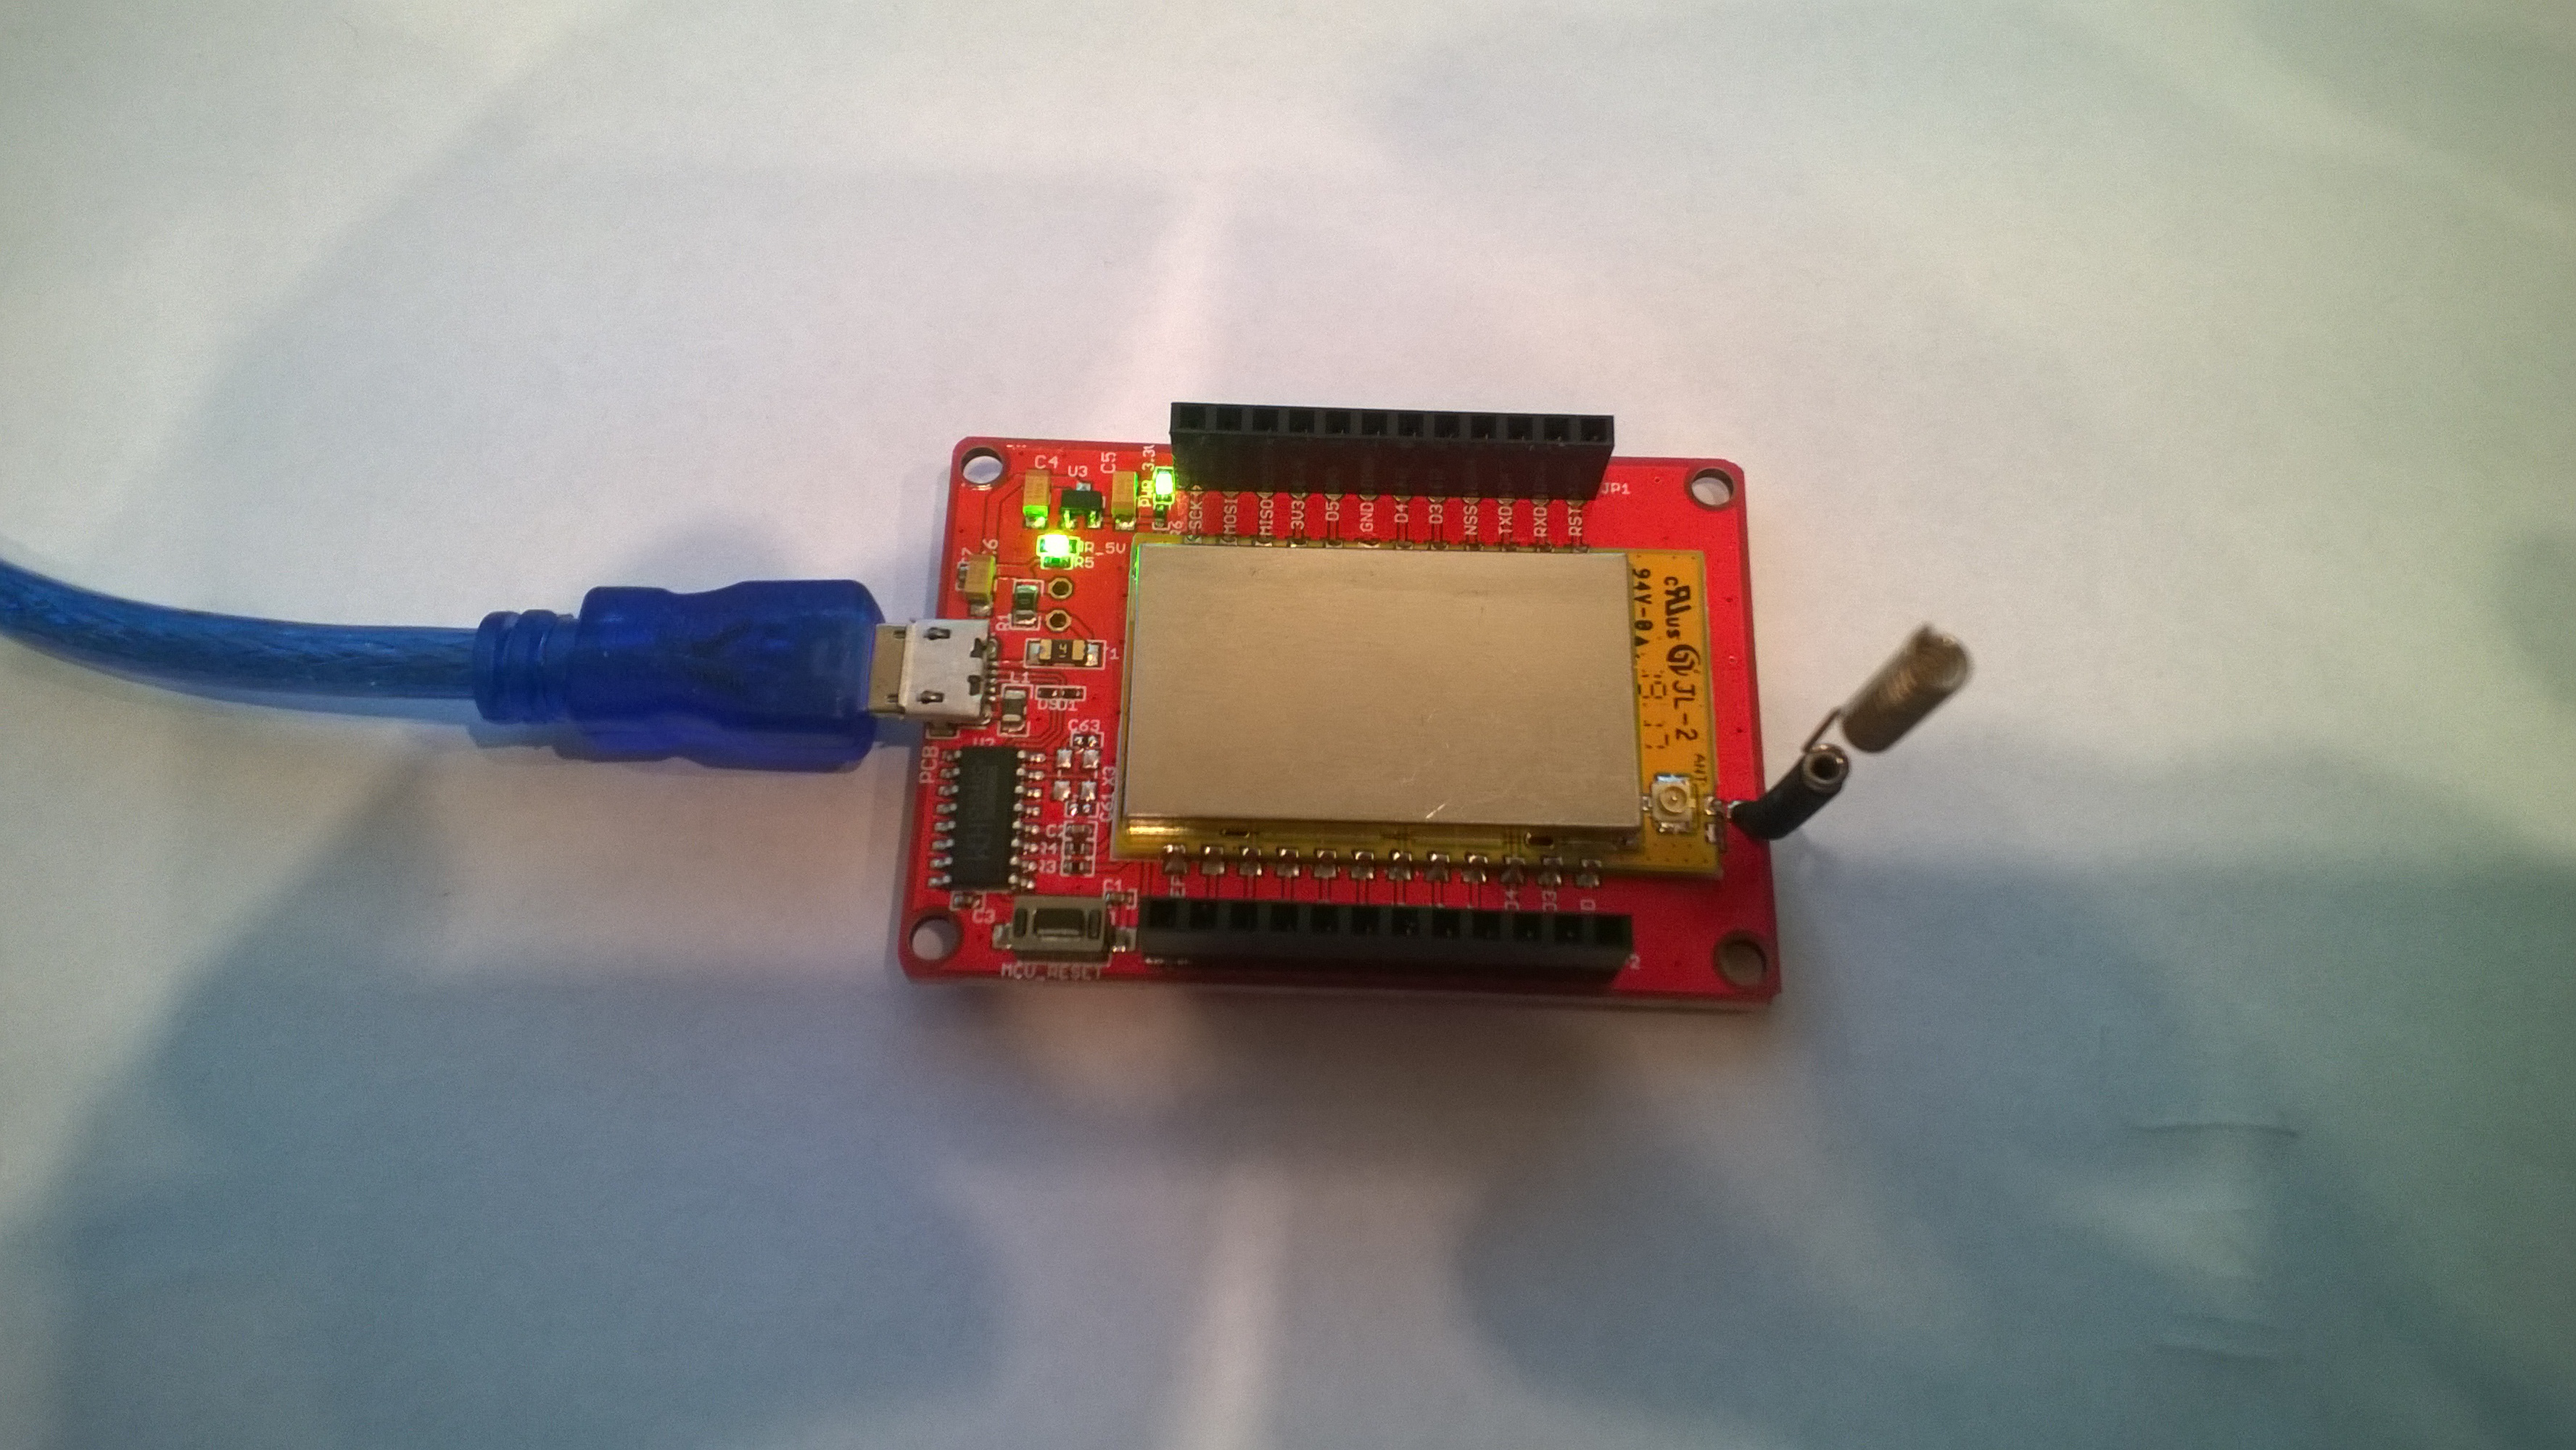
Last week a package arrived from LowPowerLab with some Moteino0 devices and accessories . With this gear I have built yet another client for my Azure IoT Hub and AdaFruit.IOLoRa Field Gateways.

It took me a while longer that usual to get the Motenio working as the sketch setup call appeared to hang in DEBUG builds.

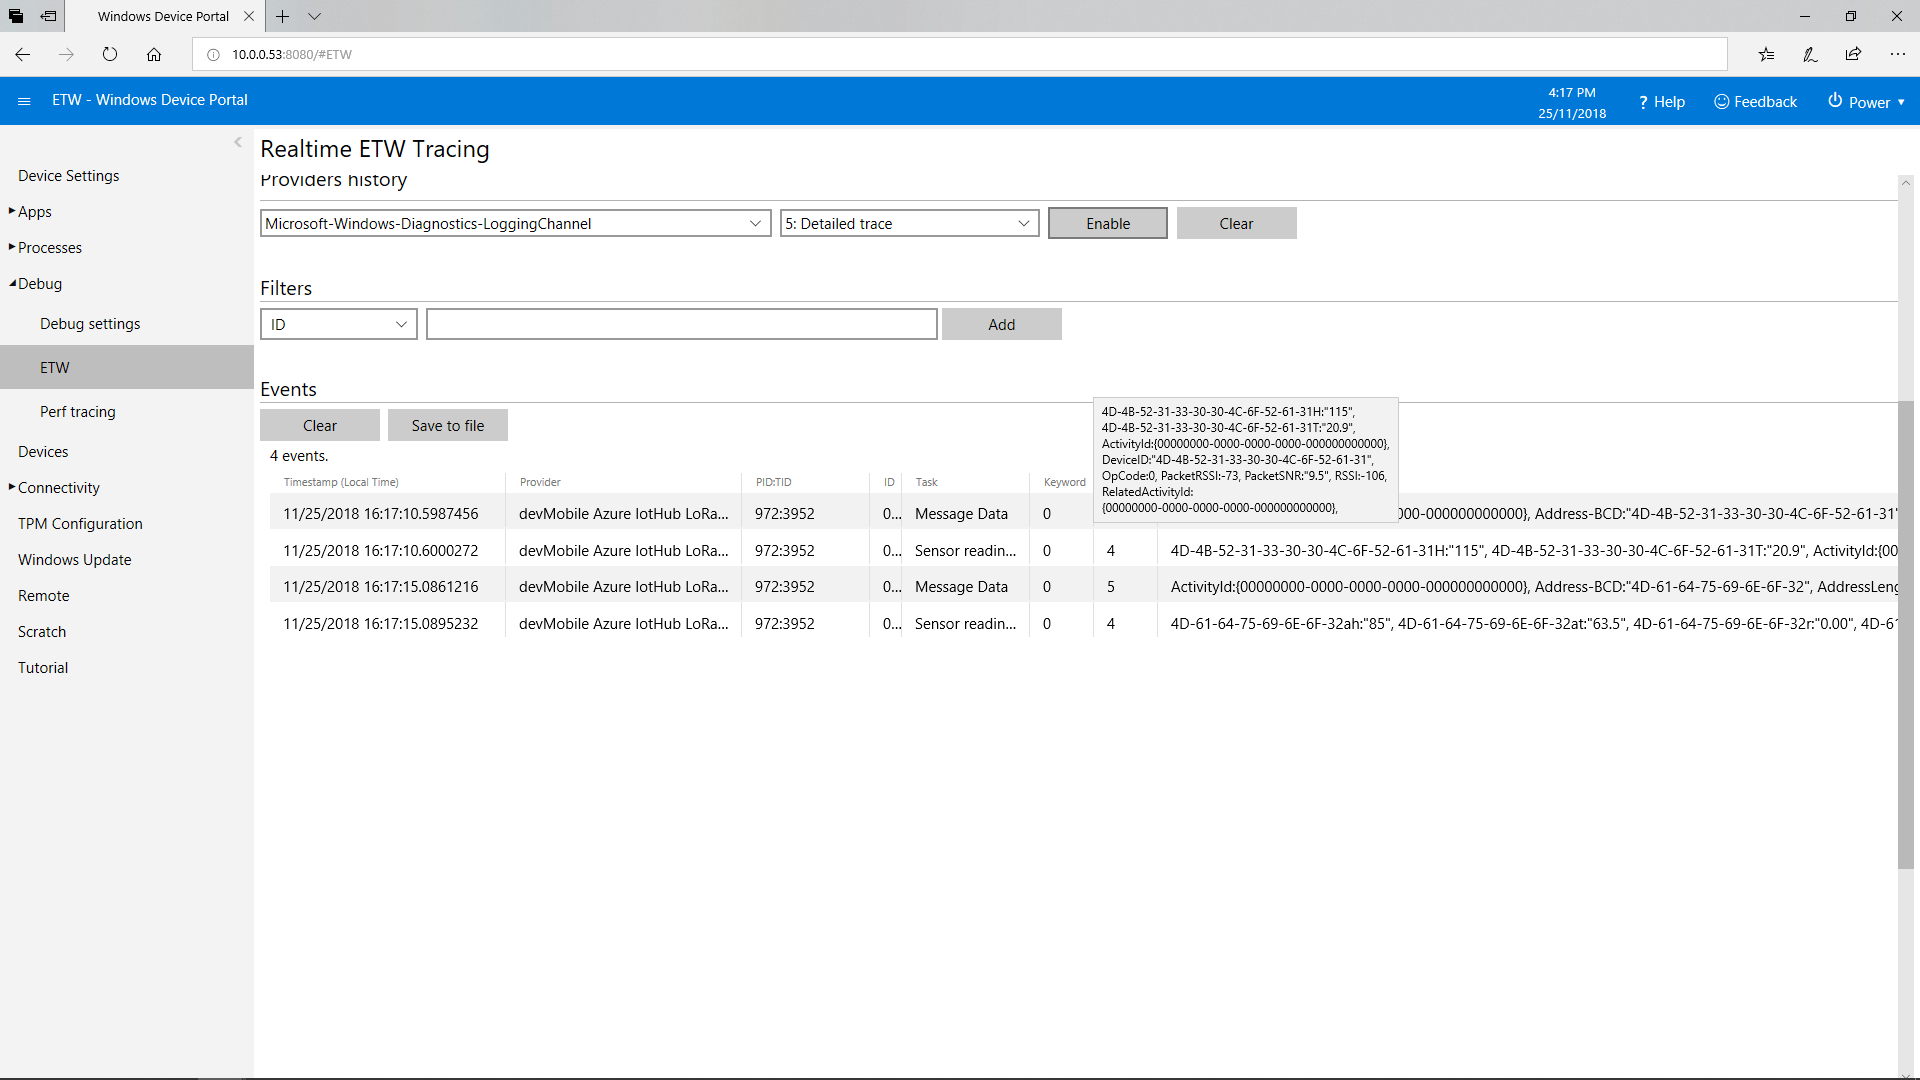
After staring at the code for a while I noticed that I hadn’t changed LoRa.dumpRegisters method parameter from Serial to SerialUSB. A couple of hours lost due to a dumb typo by me.

Now that the device is running well, I’ll look at reducing power consumption and splitting the the payload packing code into a library.

/*
  Copyright ® 2018 November devMobile Software, All Rights Reserved

  THIS CODE AND INFORMATION IS PROVIDED "AS IS" WITHOUT WARRANTY OF ANY
  KIND, EITHER EXPRESSED OR IMPLIED, INCLUDING BUT NOT LIMITED TO THE
  IMPLIED WARRANTIES OF MERCHANTABILITY AND/OR FITNESS FOR A PARTICULAR
  PURPOSE.

  You can do what you want with this code, acknowledgment would be nice.

  http://www.devmobile.co.nz

*/
#include <stdlib.h>
#include <avr/dtostrf.h>
#include <LoRa.h>
#include <TH02_dev.h>

//#define DEBUG
//#define DEBUG_TELEMETRY
//#define DEBUG_LORA

// LoRa field gateway configuration (these settings must match your field gateway)
const char FieldGatewayAddress[] = {"LoRaIoT1"};
const char DeviceAddress[] = {"Moteino01"};
const float FieldGatewayFrequency =  915000000.0;
const byte FieldGatewaySyncWord = 0x12 ;

// Payload configuration
const int ChipSelectPin = A2;
const int InterruptPin = 9;
const int ResetPin = -1;

// LoRa radio payload configuration
const byte SensorIdValueSeperator = ' ' ;
const byte SensorReadingSeperator = ',' ;
const int LoopSleepDelaySeconds = 10 ;

const byte PayloadSizeMaximum = 64 ;
byte payload[PayloadSizeMaximum];
byte payloadLength = 0 ;


void setup()
{
  SerialUSB.begin(9600);
#ifdef DEBUG
  while (!SerialUSB);
#endif
  SerialUSB.println("Setup called");

  SerialUSB.println("LoRa setup start");
  
  // override the default chip select and reset pins
  LoRa.setPins( ChipSelectPin, ResetPin, InterruptPin ); 
  if (!LoRa.begin(FieldGatewayFrequency))
  {
    SerialUSB.println("LoRa begin failed");
    while (true); // Drop into endless loop requiring restart
  }

  // Need to do this so field gateways pays attention to messsages from this device
  LoRa.enableCrc();
  LoRa.setSyncWord(FieldGatewaySyncWord);

#ifdef DEBUG_LORA
  LoRa.dumpRegisters(USBSerial);
#endif
  SerialUSB.println("LoRa Setup done.");

  // Configure the Seeedstudio TH02 temperature & humidity sensor
  SerialUSB.println("TH02 setup start");
  TH02.begin();
  delay(100);
  SerialUSB.println("TH02 setup done");

  PayloadHeader((byte*)FieldGatewayAddress,strlen(FieldGatewayAddress), (byte*)DeviceAddress, strlen(DeviceAddress));

  SerialUSB.println("Setup done");
  SerialUSB.println();
}


void loop()
{
  float temperature ;
  float humidity ;

  SerialUSB.println("Loop called");

  PayloadReset();

  // Read the temperature & humidity & battery voltage values then display nicely
  temperature = TH02.ReadTemperature();
  SerialUSB.print("T:");
  SerialUSB.print( temperature, 1 ) ;
  SerialUSB.println( "C " ) ;

  PayloadAdd( "T", temperature, 1);

  humidity = TH02.ReadHumidity();
  SerialUSB.print("H:");
  SerialUSB.print( humidity, 0 ) ;
  SerialUSB.println( "% " ) ;

  PayloadAdd( "H", humidity, 0) ;

#ifdef DEBUG_TELEMETRY
  SerialUSB.println();
  SerialUSB.print( "RFM9X/SX127X Payload length:");
  SerialUSB.print( payloadLength );
  SerialUSB.println( " bytes" );
#endif

  LoRa.beginPacket();
  LoRa.write( payload, payloadLength );
  LoRa.endPacket();

  SerialUSB.println("Loop done");
  SerialUSB.println();
  delay(LoopSleepDelaySeconds * 1000l);
}


void PayloadHeader( byte *to, byte toAddressLength, byte *from, byte fromAddressLength)
{
  byte addressesLength = toAddressLength + fromAddressLength ;

#ifdef DEBUG_TELEMETRY
  SerialUSB.println("PayloadHeader- ");
  SerialUSB.print( "To Address len:");
  SerialUSB.print( toAddressLength );
  SerialUSB.print( " From Address len:");
  SerialUSB.print( fromAddressLength );
  SerialUSB.print( " Addresses length:");
  SerialUSB.print( addressesLength );
  SerialUSB.println( );
#endif

  payloadLength = 0 ;

  // prepare the payload header with "To" Address length (top nibble) and "From" address length (bottom nibble)
  payload[payloadLength] = (toAddressLength << 4) | fromAddressLength ;
  payloadLength += 1;

  // Copy the "To" address into payload
  memcpy(&payload[payloadLength], to, toAddressLength);
  payloadLength += toAddressLength ;

  // Copy the "From" into payload
  memcpy(&payload[payloadLength], from, fromAddressLength);
  payloadLength += fromAddressLength ;
}


void PayloadAdd( const char *sensorId, float value, byte decimalPlaces)
{
  byte sensorIdLength = strlen( sensorId ) ;

#ifdef DEBUG_TELEMETRY
  SerialUSB.println("PayloadAdd-float ");
  SerialUSB.print( "SensorId:");
  SerialUSB.print( sensorId );
  SerialUSB.print( " sensorIdLen:");
  SerialUSB.print( sensorIdLength );
  SerialUSB.print( " Value:");
  SerialUSB.print( value, decimalPlaces );
  SerialUSB.print( " payloadLength:");
  SerialUSB.print( payloadLength);
#endif

  memcpy( &payload[payloadLength], sensorId,  sensorIdLength) ;
  payloadLength += sensorIdLength ;
  payload[ payloadLength] = SensorIdValueSeperator;
  payloadLength += 1 ;
  payloadLength += strlen( dtostrf(value, -1, decimalPlaces, (char *)&payload[payloadLength]));
  payload[ payloadLength] = SensorReadingSeperator;
  payloadLength += 1 ;
  
#ifdef DEBUG_TELEMETRY
  SerialUSB.print( " payloadLength:");
  SerialUSB.print( payloadLength);
  SerialUSB.println( );
#endif
}


void PayloadAdd( const char *sensorId, int value )
{
  byte sensorIdLength = strlen( sensorId ) ;

#ifdef DEBUG_TELEMETRY
  SerialUSB.println("PayloadAdd-int ");
  SerialUSB.print( "SensorId:");
  SerialUSB.print( sensorId );
  SerialUSB.print( " sensorIdLen:");
  SerialUSB.print( sensorIdLength );
  SerialUSB.print( " Value:");
  SerialUSB.print( value );
  SerialUSB.print( " payloadLength:");
  SerialUSB.print( payloadLength);
#endif  

  memcpy( &payload[payloadLength], sensorId,  sensorIdLength) ;
  payloadLength += sensorIdLength ;
  payload[ payloadLength] = SensorIdValueSeperator;
  payloadLength += 1 ;
  payloadLength += strlen( itoa( value,(char *)&payload[payloadLength],10));
  payload[ payloadLength] = SensorReadingSeperator;
  payloadLength += 1 ;
  
#ifdef DEBUG_TELEMETRY
  SerialUSB.print( " payloadLength:");
  SerialUSB.print( payloadLength);
  SerialUSB.println( );
#endif
}


void PayloadAdd( const char *sensorId, unsigned int value )
{
  byte sensorIdLength = strlen( sensorId ) ;

#ifdef DEBUG_TELEMETRY
  SerialUSB.println("PayloadAdd-unsigned int ");
  SerialUSB.print( "SensorId:");
  SerialUSB.print( sensorId );
  SerialUSB.print( " sensorIdLen:");
  SerialUSB.print( sensorIdLength );
  SerialUSB.print( " Value:");
  SerialUSB.print( value );
  SerialUSB.print( " payloadLength:");
  SerialUSB.print( payloadLength);
#endif  

  memcpy( &payload[payloadLength], sensorId,  sensorIdLength) ;
  payloadLength += sensorIdLength ;
  payload[ payloadLength] = SensorIdValueSeperator;
  payloadLength += 1 ;
  payloadLength += strlen( utoa( value,(char *)&payload[payloadLength],10));
  payload[ payloadLength] = SensorReadingSeperator;
  payloadLength += 1 ;

#ifdef DEBUG_TELEMETRY
  SerialUSB.print( " payloadLength:");
  SerialUSB.print( payloadLength);
  SerialUSB.println( );
#endif
}


void PayloadReset()
{
  byte fromAddressLength = payload[0] & 0xf ;
  byte toAddressLength = payload[0] >> 4 ;
  byte addressesLength = toAddressLength + fromAddressLength ;

  payloadLength = addressesLength + 1;

#ifdef DEBUG_TELEMETRY
  SerialUSB.println("PayloadReset- ");
  SerialUSB.print( "To Address len:");
  SerialUSB.print( toAddressLength );
  SerialUSB.print( " From Address len:");
  SerialUSB.print( fromAddressLength );
  SerialUSB.print( " Addresses length:");
  SerialUSB.print( addressesLength );
  SerialUSB.println( );
#endif
}
Azure IoT Central

Bill of materials (prices as at November 2018)

  • Moteino M0 USD34.95
  • Seeedstudio Temperature and Humidity Sensor Pro USD11.50
  • Seeedstudio 4 pin Male Jumper to Grove 4 pin Conversion Cable USD2.90

Arduino MKR1300 WAN Payload Addressing client

Last week a package arrived from SeeedStudio with some Arduino devices and Grove shields. With this gear I have built yet another client for my Azure IoT Hub and AdaFruit.IO  LoRa Field Gateways.

For my application I directly access the on-board Semtech SX127X chip by passing the Murata CMWX1ZZABZ functionality. To do this I (November 2018) I had to upgrade the device firmware using the Arduino updater.

Arduino MKR1300 WAN device with Grove Shield & patch antenna

The application is a modified version of my Arduino code with additional debugging support and payload formatting functionality.

/*
  Copyright ® 2018 November devMobile Software, All Rights Reserved

  THIS CODE AND INFORMATION IS PROVIDED "AS IS" WITHOUT WARRANTY OF ANY
  KIND, EITHER EXPRESSED OR IMPLIED, INCLUDING BUT NOT LIMITED TO THE
  IMPLIED WARRANTIES OF MERCHANTABILITY AND/OR FITNESS FOR A PARTICULAR
  PURPOSE.

  You can do what you want with this code, acknowledgment would be nice.

  http://www.devmobile.co.nz

*/
#include <stdlib.h>
#include <avr/dtostrf.h>
#include <LoRa.h>
#include <TH02_dev.h>

#define DEBUG
//#define DEBUG_TELEMETRY
//#define DEBUG_LORA

// LoRa field gateway configuration (these settings must match your field gateway)
const char FieldGatewayAddress[] = {"LoRaIoT1"};
const char DeviceAddress[] = {"MKR1300LoRa1"};
const float FieldGatewayFrequency =  915000000.0;
const byte FieldGatewaySyncWord = 0x12 ;

// Payload configuration
const int InterruptPin = LORA_IRQ_DUMB;
const int ChipSelectPin = 6;
const int ResetPin = 1;

// LoRa radio payload configuration
const byte SensorIdValueSeperator = ' ' ;
const byte SensorReadingSeperator = ',' ;
const int LoopSleepDelaySeconds = 60 ;

const byte PayloadSizeMaximum = 64 ;
byte payload[PayloadSizeMaximum];
byte payloadLength = 0 ;


void setup()
{
  Serial.begin(9600);
#ifdef DEBUG
  while (!Serial);
#endif
  Serial.println("Setup called");

  Serial.println("LoRa setup start");
  
  // override the default chip select and reset pins
  LoRa.setPins(InterruptPin, ChipSelectPin, ResetPin); 
  if (!LoRa.begin(FieldGatewayFrequency))
  {
    Serial.println("LoRa begin failed");
    while (true); // Drop into endless loop requiring restart
  }

  // Need to do this so field gateways pays attention to messsages from this device
  LoRa.enableCrc();
  LoRa.setSyncWord(FieldGatewaySyncWord);

#ifdef DEBUG_LORA
  LoRa.dumpRegisters(Serial);
#endif
  Serial.println("LoRa Setup done.");

  // Configure the Seeedstudio TH02 temperature & humidity sensor
  Serial.println("TH02 setup start");
  TH02.begin();
  delay(100);
  Serial.println("TH02 setup done");

  PayloadHeader((byte*)FieldGatewayAddress,strlen(FieldGatewayAddress), (byte*)DeviceAddress, strlen(DeviceAddress));

  Serial.println("Setup done");
  Serial.println();
}


void loop()
{
  float temperature ;
  float humidity ;

  Serial.println("Loop called");

  PayloadReset();

  // Read the temperature & humidity & battery voltage values then display nicely
  temperature = TH02.ReadTemperature();
  Serial.print("T:");
  Serial.print( temperature, 1 ) ;
  Serial.println( "C " ) ;

  PayloadAdd( "T", temperature, 1);

  humidity = TH02.ReadHumidity();
  Serial.print("H:");
  Serial.print( humidity, 0 ) ;
  Serial.println( "% " ) ;

  PayloadAdd( "H", humidity, 0) ;

#ifdef DEBUG_TELEMETRY
  Serial.println();
  Serial.print( "RFM9X/SX127X Payload length:");
  Serial.print( payloadLength );
  Serial.println( " bytes" );
#endif

  LoRa.beginPacket();
  LoRa.write( payload, payloadLength );
  LoRa.endPacket();

  Serial.println("Loop done");
  Serial.println();
  delay(LoopSleepDelaySeconds * 1000l);
}


void PayloadHeader( byte *to, byte toAddressLength, byte *from, byte fromAddressLength)
{
  byte addressesLength = toAddressLength + fromAddressLength ;

#ifdef DEBUG_TELEMETRY
  Serial.println("PayloadHeader- ");
  Serial.print( "To Address len:");
  Serial.print( toAddressLength );
  Serial.print( " From Address len:");
  Serial.print( fromAddressLength );
  Serial.print( " Addresses length:");
  Serial.print( addressesLength );
  Serial.println( );
#endif

  payloadLength = 0 ;

  // prepare the payload header with "To" Address length (top nibble) and "From" address length (bottom nibble)
  payload[payloadLength] = (toAddressLength << 4) | fromAddressLength ;
  payloadLength += 1;

  // Copy the "To" address into payload
  memcpy(&payload[payloadLength], to, toAddressLength);
  payloadLength += toAddressLength ;

  // Copy the "From" into payload
  memcpy(&payload[payloadLength], from, fromAddressLength);
  payloadLength += fromAddressLength ;
}


void PayloadAdd( char *sensorId, float value, byte decimalPlaces)
{
  byte sensorIdLength = strlen( sensorId ) ;

#ifdef DEBUG_TELEMETRY
  Serial.println("PayloadAdd-float ");
  Serial.print( "SensorId:");
  Serial.print( sensorId );
  Serial.print( " sensorIdLen:");
  Serial.print( sensorIdLength );
  Serial.print( " Value:");
  Serial.print( value, decimalPlaces );
  Serial.print( " payloadLength:");
  Serial.print( payloadLength);
#endif

  memcpy( &payload[payloadLength], sensorId,  sensorIdLength) ;
  payloadLength += sensorIdLength ;
  payload[ payloadLength] = SensorIdValueSeperator;
  payloadLength += 1 ;
  payloadLength += strlen( dtostrf(value, -1, decimalPlaces, (char *)&payload[payloadLength]));
  payload[ payloadLength] = SensorReadingSeperator;
  payloadLength += 1 ;
  
#ifdef DEBUG_TELEMETRY
  Serial.print( " payloadLength:");
  Serial.print( payloadLength);
  Serial.println( );
#endif
}


void PayloadAdd( char *sensorId, int value )
{
  byte sensorIdLength = strlen( sensorId ) ;

#ifdef DEBUG_TELEMETRY
  Serial.println("PayloadAdd-int ");
  Serial.print( "SensorId:");
  Serial.print( sensorId );
  Serial.print( " sensorIdLen:");
  Serial.print( sensorIdLength );
  Serial.print( " Value:");
  Serial.print( value );
  Serial.print( " payloadLength:");
  Serial.print( payloadLength);
#endif  

  memcpy( &payload[payloadLength], sensorId,  sensorIdLength) ;
  payloadLength += sensorIdLength ;
  payload[ payloadLength] = SensorIdValueSeperator;
  payloadLength += 1 ;
  payloadLength += strlen( itoa( value,(char *)&payload[payloadLength],10));
  payload[ payloadLength] = SensorReadingSeperator;
  payloadLength += 1 ;
  
#ifdef DEBUG_TELEMETRY
  Serial.print( " payloadLength:");
  Serial.print( payloadLength);
  Serial.println( );
#endif
}


void PayloadAdd( char *sensorId, unsigned int value )
{
  byte sensorIdLength = strlen( sensorId ) ;

#ifdef DEBUG_TELEMETRY
  Serial.println("PayloadAdd-unsigned int ");
  Serial.print( "SensorId:");
  Serial.print( sensorId );
  Serial.print( " sensorIdLen:");
  Serial.print( sensorIdLength );
  Serial.print( " Value:");
  Serial.print( value );
  Serial.print( " payloadLength:");
  Serial.print( payloadLength);
#endif  

  memcpy( &payload[payloadLength], sensorId,  sensorIdLength) ;
  payloadLength += sensorIdLength ;
  payload[ payloadLength] = SensorIdValueSeperator;
  payloadLength += 1 ;
  payloadLength += strlen( utoa( value,(char *)&payload[payloadLength],10));
  payload[ payloadLength] = SensorReadingSeperator;
  payloadLength += 1 ;

#ifdef DEBUG_TELEMETRY
  Serial.print( " payloadLength:");
  Serial.print( payloadLength);
  Serial.println( );
#endif
}


void PayloadReset()
{
  byte fromAddressLength = payload[0] & 0xf ;
  byte toAddressLength = payload[0] >> 4 ;
  byte addressesLength = toAddressLength + fromAddressLength ;

  payloadLength = addressesLength + 1;

#ifdef DEBUG_TELEMETRY
  Serial.println("PayloadReset- ");
  Serial.print( "To Address len:");
  Serial.print( toAddressLength );
  Serial.print( " From Address len:");
  Serial.print( fromAddressLength );
  Serial.print( " Addresses length:");
  Serial.print( addressesLength );
  Serial.println( );
#endif
}

After updating the firmware configuring the data to display in Azure IoT Central (or AdaFruit.IO) took minimal time.

Arduino MKR 1300 Data in Azure IoT Central

Bill of materials (Prices as at Nov 2018)

  • Arduino MKR WAN 1300 USD39.80
  • Arduino MKR Connection Carrier (Grove Compatible) USD22.80
  • Grove Temperature & Humidity Sensor USD11.50

So far the battery life is looking pretty good considering all I have done is used Delay to stop the loop method for 60 seconds.

Next steps are to see if I can retrieve a unique identifier from the Murata firmware and improve battery life by hibernating the processor etc.

Azure IoT Hubs LoRa Field Gateway BCD Addressing

After some testing with more client devices, especially the Easy Sensors Arduino Nano radio shield RFM69/95 or NRF24L01+ I have decided to move to non text addresses for devices and the LoRa field gateway.

THIS IS A BREAKING CHANGE

The unique identifier provided by the SHA204A crypto and authentication chip on the EasySensors shield highlighted this issue. The Binary Coded Decimal(BCD) version of the 72 bit identifier was too long to fit in the from address.

My Arduino MKR1300 sample code has some helper functions to populate the message header, add values, and prepare the message payload for reuse.

On the server side I have added code to log the build version and Raspbery PI shield type

// Log the Application build, shield information etc.
LoggingFields appllicationBuildInformation = new LoggingFields();

#if DRAGINO
   appllicationBuildInformation.AddString("Shield", "DraginoLoRaGPSHat");
#endif

...

#if UPUTRONICS_RPIPLUS_CS1
   appllicationBuildInformation.AddString("Shield", "UputronicsPiPlusLoRaExpansionBoardCS1");
#endif
appllicationBuildInformation.AddString("Timezone", TimeZoneSettings.CurrentTimeZoneDisplayName);
appllicationBuildInformation.AddString("OSVersion", Environment.OSVersion.VersionString);
appllicationBuildInformation.AddString("MachineName", Environment.MachineName);

// This is from the application manifest 
Package package = Package.Current;
PackageId packageId = package.Id;
PackageVersion version = packageId.Version;

appllicationBuildInformation.AddString("ApplicationVersion", string.Format($"{version.Major}.{version.Minor}.{version.Build}.{version.Revision}"));
this.logging.LogEvent("Application starting", appllicationBuildInformation, LoggingLevel.Information);

Then when the message payload is populated the from address byte array is converted to BCD

private async void Rfm9XDevice_OnReceive(object sender, Rfm9XDevice.OnDataReceivedEventArgs e)
{
   string addressBcdText;
   string messageBcdText;
   string messageText = "";
   char[] sensorReadingSeparators = new char[] { ',' };
   char[] sensorIdAndValueSeparators = new char[] { ' ' };

   addressBcdText = BitConverter.ToString(e.Address);
   messageBcdText = BitConverter.ToString(e.Data);
   try
   {
      messageText = UTF8Encoding.UTF8.GetString(e.Data);
   }
   catch (Exception)
   {
      this.logging.LogMessage("Failure converting payload to text", 
   LoggingLevel.Error);
      return;
   }


#if DEBUG
   Debug.WriteLine(@"{0:HH:mm:ss}-RX From {1} PacketSnr {2:0.0} Packet 
   RSSI {3}dBm RSSI {4}dBm = {5} byte message ""{6}""", DateTime.Now, 
   messageBcdText, e.PacketSnr, e.PacketRssi, e.Rssi, e.Data.Length, 
   messageText);
#endif
   LoggingFields messagePayload = new LoggingFields();
   messagePayload.AddInt32("AddressLength", e.Address.Length);
   messagePayload.AddString("Address-BCD", addressBcdText);
   messagePayload.AddInt32("Message-Length", e.Data.Length);
   messagePayload.AddString("Message-BCD", messageBcdText);
   messagePayload.AddString("Message-Unicode", messageText);
   messagePayload.AddDouble("Packet SNR", e.PacketSnr);
   messagePayload.AddInt32("Packet RSSI", e.PacketRssi);
   messagePayload.AddInt32("RSSI", e.Rssi);
   this.logging.LogEvent("Message Data", messagePayload, LoggingLevel.Verbose);

//...

   JObject telemetryDataPoint = new JObject(); // This could be simplified but for field gateway will use this style
   LoggingFields sensorData = new LoggingFields();

   telemetryDataPoint.Add("DeviceID", addressBcdText);
   sensorData.AddString("DeviceID", addressBcdText);
   telemetryDataPoint.Add("PacketSNR", e.PacketSnr.ToString("F1"));
   sensorData.AddString("PacketSNR", e.PacketSnr.ToString("F1"));
   telemetryDataPoint.Add("PacketRSSI", e.PacketRssi);
   sensorData.AddInt32("PacketRSSI", e.PacketRssi);
   telemetryDataPoint.Add("RSSI", e.Rssi);
   sensorData.AddInt32("RSSI", e.Rssi);

   //Chop up each sensor read into an ID & value
   foreach (string sensorReading in sensorReadings)
   {
      string[] sensorIdAndValue = sensorReading.Split(sensorIdAndValueSeparators, StringSplitOptions.RemoveEmptyEntries);

      // Check that there is an id & value
      if (sensorIdAndValue.Length != 2)
      {
         this.logging.LogMessage("Sensor reading invalid format", LoggingLevel.Warning);
         return;
      }

      string sensorId = sensorIdAndValue[0];
      string value = sensorIdAndValue[1];

      try
      {
         if (this.applicationSettings.SensorIDIsDeviceIDSensorID)
         {
            // Construct the sensor ID from SensordeviceID & Value ID
            telemetryDataPoint.Add(string.Format("{0}{1}", addressBcdText, sensorId), value);

            sensorData.AddString(string.Format("{0}{1}", addressBcdText, sensorId), value);
            Debug.WriteLine(" Sensor {0}{1} Value {2}", addressBcdText, sensorId, value);
         }
         else
         {
            telemetryDataPoint.Add(sensorId, value);
            sensorData.AddString(sensorId, value);
            Debug.WriteLine(" Device {0} Sensor {1} Value {2}", addressBcdText, sensorId, value);
         }
      }
      catch (Exception ex)
      {
         this.logging.LogMessage("Sensor reading invalid JSON format " + ex.Message, LoggingLevel.Warning);
         return;
      }
   }

  this.logging.LogEvent("Sensor readings", sensorData, LoggingLevel.Information);

   try
   {
      using (Message message = new Message(Encoding.ASCII.GetBytes(JsonConvert.SerializeObject(telemetryDataPoint))))
      {
         Debug.WriteLine(" AzureIoTHubClient SendEventAsync start");
         await this.azureIoTHubClient.SendEventAsync(message);
         Debug.WriteLine(" AzureIoTHubClient SendEventAsync finish");
      }
   }
   catch (Exception ex)
   {
      this.logging.LogMessage("AzureIoTHubClient SendEventAsync failed " + ex.Message, LoggingLevel.Error);
   }
}

This does mean longer field names but I usually copy n paste them from the Arduino serial monitor of the Event Tracing For Windows (ETW) logging.

Azure IoT Hub LoRa Field Gateway ETW Logging

Easy Sensors Arduino Nano Radio Shield RFM69/95 Payload Addressing client

After not much project work for a while some new RFM9X devices arrived from EasySensors in Belarus.

This sample client built with an Arduino Nano clone and an Arduino Nano radio shield RFM69/95 or NRF24L01+.

I used the shield’s onboard SHA204A crypto and authentication chip, a Seeedstudio Temperature & Humidity sensor and uploaded the data to Azure IoT Central (Will also work with my AdaFruit.IO LoRa field gateway).

/*
  Copyright ® 2018 November devMobile Software, All Rights Reserved

  THIS CODE AND INFORMATION IS PROVIDED "AS IS" WITHOUT WARRANTY OF ANY
  KIND, EITHER EXPRESSED OR IMPLIED, INCLUDING BUT NOT LIMITED TO THE
  IMPLIED WARRANTIES OF MERCHANTABILITY AND/OR FITNESS FOR A PARTICULAR
  PURPOSE.

  You can do what you want with this code, acknowledgment would be nice.

  http://www.devmobile.co.nz

*/
#include <stdlib.h>
#include <LoRa.h>
#include <sha204_library.h>
#include <TH02_dev.h>

//#define DEBUG
//#define DEBUG_TELEMETRY
//#define DEBUG_LORA

// LoRa field gateway configuration (these settings must match your field gateway)
const char FieldGatewayAddress[] = {"LoRaIoT1"};
const float FieldGatewayFrequency =  915000000.0;
const byte FieldGatewaySyncWord = 0x12 ;

// Payload configuration
const int ChipSelectPin = 10;
const int ResetPin = 9;

// LoRa radio payload configuration
const byte SensorIdValueSeperator = ' ' ;
const byte SensorReadingSeperator = ',' ;
const int LoopSleepDelaySeconds = 60 ;

// ATSHA204 secure authentication, validation with crypto and hashing (currently only using for unique serial number)
const byte Atsha204Port = A3;
atsha204Class sha204(Atsha204Port);
const byte DeviceSerialNumberLength = 9 ;
byte deviceSerialNumber[DeviceSerialNumberLength] = {""};

const byte PayloadSizeMaximum = 64 ;
byte payload[PayloadSizeMaximum];
byte payloadLength = 0 ;


void setup()
{
  Serial.begin(9600);

#if DEBUG
  while (!Serial);
#endif
 
  Serial.println("Setup called");

  Serial.print("Field gateway:");
  Serial.print( FieldGatewayAddress ) ;
  Serial.print(" Frequency:");
  Serial.print( FieldGatewayFrequency,0 ) ;
  Serial.print("MHz SyncWord:");
  Serial.print( FieldGatewaySyncWord ) ;
  Serial.println();
  
   // Retrieve the serial number then display it nicely
  if(sha204.getSerialNumber(deviceSerialNumber))
  {
    Serial.println("sha204.getSerialNumber failed");
    while (true); // Drop into endless loop requiring restart
  }

  Serial.print("SNo:");
  for (int i = 0; i < sizeof( deviceSerialNumber) ; i++)
  {
    // Add a leading zero
    if ( deviceSerialNumber[i] < 16)
    {
      Serial.print("0");
    }
    Serial.print(deviceSerialNumber[i], HEX);
    Serial.print(" ");
  }
  Serial.println();

  Serial.println("LoRa setup start");

  // override the default chip select and reset pins
  LoRa.setPins(ChipSelectPin, ResetPin);
  if (!LoRa.begin(FieldGatewayFrequency))
  {
    Serial.println("LoRa begin failed");
    while (true); // Drop into endless loop requiring restart
  }

  // Need to do this so field gateway pays attention to messsages from this device
  LoRa.enableCrc();
  LoRa.setSyncWord(FieldGatewaySyncWord);

#ifdef DEBUG_LORA
  LoRa.dumpRegisters(Serial);
#endif
  Serial.println("LoRa Setup done.");

  // Configure the Seeedstudio TH02 temperature & humidity sensor
  Serial.println("TH02 setup start");
  TH02.begin();
  delay(100);
  Serial.println("TH02 setup done");

  PayloadHeader(FieldGatewayAddress,strlen(FieldGatewayAddress), deviceSerialNumber, DeviceSerialNumberLength);

  Serial.println("Setup done");
  Serial.println();
}


void loop()
{
  float temperature ;
  float humidity ;

  Serial.println("Loop called");

  PayloadReset();

  // Read the temperature & humidity values then display nicely
  temperature = TH02.ReadTemperature();
  Serial.print("T:");
  Serial.print(temperature, 1) ;
  Serial.println("C ") ;

  PayloadAdd( "T", temperature, 1);

  humidity = TH02.ReadHumidity();
  Serial.print("H:" );
  Serial.print(humidity, 0) ;
  Serial.println("% ") ;

  PayloadAdd( "H", humidity, 0) ;

#ifdef DEBUG_TELEMETRY
  Serial.println();
  Serial.print("RFM9X/SX127X Payload length:");
  Serial.print(payloadLength);
  Serial.println(" bytes");
#endif

  LoRa.beginPacket();
  LoRa.write(payload, payloadLength);
  LoRa.endPacket();

  Serial.println("Loop done");
  Serial.println();
  delay(LoopSleepDelaySeconds * 1000l);
}


void PayloadHeader(byte *to, byte toAddressLength, byte *from, byte fromAddressLength)
{
  byte addressesLength = toAddressLength + fromAddressLength ;

  payloadLength = 0 ;

  // prepare the payload header with "To" Address length (top nibble) and "From" address length (bottom nibble)
  
  payload[payloadLength] = (toAddressLength << 4) | fromAddressLength ;
  payloadLength += 1;

  // Copy the "To" address into payload
  memcpy(&payload[payloadLength], to, toAddressLength);
  payloadLength += toAddressLength ;

  // Copy the "From" into payload
  memcpy(&payload[payloadLength], from, fromAddressLength);
  payloadLength += fromAddressLength ;
}


void PayloadAdd( char *sensorId, float value, byte decimalPlaces)
{
  byte sensorIdLength = strlen( sensorId ) ;

  memcpy( &payload[payloadLength], sensorId,  sensorIdLength) ;
  payloadLength += sensorIdLength ;
  payload[ payloadLength] = SensorIdValueSeperator;
  payloadLength += 1 ;
  payloadLength += strlen( dtostrf(value, -1, decimalPlaces, (char *)&payload[payloadLength]));
  payload[ payloadLength] = SensorReadingSeperator;
  payloadLength += 1 ;
  
#ifdef DEBUG_TELEMETRY
  Serial.print("PayloadAdd float-payloadLength:");
  Serial.print( payloadLength);
  Serial.println( );
#endif
}


void PayloadAdd( char *sensorId, int value )
{
  byte sensorIdLength = strlen(sensorId) ;

  memcpy(&payload[payloadLength], sensorId,  sensorIdLength) ;
  payloadLength += sensorIdLength ;
  payload[ payloadLength] = SensorIdValueSeperator;
  payloadLength += 1 ;
  payloadLength += strlen(itoa( value,(char *)&payload[payloadLength],10));
  payload[ payloadLength] = SensorReadingSeperator;
  payloadLength += 1 ;
  
#ifdef DEBUG_TELEMETRY
  Serial.print("PayloadAdd int-payloadLength:" );
  Serial.print(payloadLength);
  Serial.println( );
#endif
}


void PayloadAdd( char *sensorId, unsigned int value )
{
  byte sensorIdLength = strlen(sensorId) ;

  memcpy(&payload[payloadLength], sensorId,  sensorIdLength) ;
  payloadLength += sensorIdLength ;
  payload[ payloadLength] = SensorIdValueSeperator;
  payloadLength += 1 ;
  payloadLength += strlen(utoa( value,(char *)&payload[payloadLength],10));
  payload[ payloadLength] = SensorReadingSeperator;
  payloadLength += 1 ;

#ifdef DEBUG_TELEMETRY
  Serial.print("PayloadAdd uint-payloadLength:");
  Serial.print(payloadLength);
  Serial.println( );
#endif
}


void PayloadReset()
{
  byte fromAddressLength = payload[0] & 0xf ;
  byte toAddressLength = payload[0] >> 4 ;
  
  payloadLength = toAddressLength + fromAddressLength + 1;
}

Arduino monitor output

ArduinoNanoEasySensorsRF95ShieldArduinoLogging

Prototype hardware

ArduinoNanoEasySensorsRF95ShieldHardware

Bill of materials (prices as at November 2018)

  • Arduino Nano clone USD4.70
  • Easy Sensors Arduino Nano Radio Shield for RFM95 USD16
  • Seeedstudio Temperature and Humidity Sensor Pro USD11.50
  • Seeedstudio 4 pin Male Jumper to Grove 4 pin Conversion Cable USD2.90

Azure IoT Central temperature and humidity display.

ArduinoNanoEasySensorsRF95ShieldAzureIoTCentral

Easy Sensors Wireless field gateway Arduino Nano client

After not much development on my nrf24L01 AdaFruit.IO and Azure IOT Hub field gateways for a while some new nRF24L01 devices arrived in the post last week.

This sample client is an Arduino Nano clone with an Arduino Nano radio shield for NRF24L01+.

I use the shield’s onboard SHA204A crypto and authentication chip, and a Seeedstudio Temperature & Humidity sensor with the data uploaded to adafruit.io.

/*
  Copyright ® 2018 September devMobile Software, All Rights Reserved

  THIS CODE AND INFORMATION IS PROVIDED "AS IS" WITHOUT WARRANTY OF ANY
  KIND, EITHER EXPRESSED OR IMPLIED, INCLUDING BUT NOT LIMITED TO THE
  IMPLIED WARRANTIES OF MERCHANTABILITY AND/OR FITNESS FOR A PARTICULAR
  PURPOSE.

  You can do what you want with this code, acknowledgment would be nice.

  http://www.devmobile.co.nz

*/
#include &lt;RF24.h&gt;
#include &lt;sha204_library.h&gt;
#include &lt;TH02_dev.h&gt;

// RF24 radio( ChipeEnable , ChipSelect )
RF24 radio(9, 10);
const byte FieldGatewayChannel = 15 ;
const byte FieldGatewayAddress[] = {"Base1"};
const rf24_datarate_e RadioDataRate = RF24_250KBPS;
const rf24_pa_dbm_e RadioPALevel = RF24_PA_HIGH;

// Payload configuration
const int PayloadSizeMaximum = 32 ;
char payload[PayloadSizeMaximum] = "";
const byte DeviceIdPlusCsvSensorReadings = 1 ;
const byte SensorReadingSeperator = ',' ;

// ATSHA204 secure authentication, validation with crypto and hashing (only using for unique serial number)
atsha204Class sha204(A3);
const int DeviceSerialNumberLength = 9 ;
uint8_t deviceSerialNumber[DeviceSerialNumberLength] = {""};
const int LoopSleepDelaySeconds = 10 ;

void setup()
{
  Serial.begin(9600);
  Serial.println("Setup called");

  // Retrieve the serial number then display it nicely
  sha204.getSerialNumber(deviceSerialNumber);

  Serial.print("SNo:");
  for (int i = 0; i &lt; sizeof( deviceSerialNumber) ; i++)
  {
    // Add a leading zero
    if ( deviceSerialNumber[i] &lt; 16)
    {
      Serial.print("0");
    }
    Serial.print(deviceSerialNumber[i], HEX);
    Serial.print(" ");
  }

  Serial.println();

  // Configure the Seeedstudio TH02 temperature &amp; humidity sensor
  Serial.println("TH02 setup");
  TH02.begin();
  delay(100);

  // Configure the nRF24 module
  Serial.println("nRF24 setup");
  radio.begin();
  radio.setChannel(FieldGatewayChannel);
  radio.openWritingPipe(FieldGatewayAddress);
  radio.setDataRate(RadioDataRate) ;
  radio.setPALevel(RadioPALevel);
  radio.enableDynamicPayloads();

  Serial.println("Setup done");
}

void loop()
{
  int payloadLength = 0 ;
  float temperature ;
  float humidity ;

  Serial.println("Loop called");
  memset( payload, 0, sizeof( payload));

  // prepare the payload header with PayloadMessageType (top nibble) and DeviceID length (bottom nibble)
  payload[0] = (DeviceIdPlusCsvSensorReadings &lt;&lt; 4) | sizeof(deviceSerialNumber) ;
  payloadLength += 1;

  // Copy the device serial number into the payload
  memcpy( &amp;payload[payloadLength], deviceSerialNumber, sizeof( deviceSerialNumber));
  payloadLength += sizeof( deviceSerialNumber) ;

  // Read the temperature, humidity &amp; battery voltage values then display nicely
  temperature = TH02.ReadTemperature();
  Serial.print("T:");
  Serial.print( temperature, 1 ) ;
  Serial.print( "C" ) ;

  humidity = TH02.ReadHumidity();
  Serial.print(" H:");
  Serial.print( humidity, 0 ) ;
  Serial.println( "%" ) ;

  // Copy the temperature into the payload
  payload[ payloadLength] = 't';
  payloadLength += 1 ;
  dtostrf(temperature, 6, 1, &amp;payload[payloadLength]);
  payloadLength += 6;

  payload[ payloadLength] = ',';
  payloadLength += 1 ;

  // Copy the humidity into the payload
  payload[ payloadLength] = 'h';
  payloadLength += 1 ;
  dtostrf(humidity, 4, 0, &amp;payload[payloadLength]);
  payloadLength += 4;

  // Powerup the nRF24 chipset then send the payload to base station
  Serial.print( "Payload length:");
  Serial.println( payloadLength );

  Serial.println( "nRF24 write" ) ;
  boolean result = radio.write(payload, payloadLength);
  if (result)
    Serial.println("Write Ok...");
  else
    Serial.println("Write failed.");

  Serial.println("Loop done");
  delay(LoopSleepDelaySeconds * 1000l);
}

Arduino monitor output

NanoArduinoNrf24

Prototype hardware

ArduinoNanonRF24

Bill of materials (prices as at Sep 2018)

  • Arduino Nano clone USD4.70
  • Easy Sensors Arduino Nano Radio Shield for nRF24L01 USD13
  • Seeedstudio Temperature and Humidity Sensor Pro USD11.50
  • Seeedstudio 4 pin Male Jumper to Grove 4 pin Conversion Cable USD2.90

Adafruit.IO temperature display when I moved the sensor outside.

NanoNrf24

Dragino LoRaMiniDev Payload Addressing Client

This is a demo Dragino LoRa Mini Dev featuring LoRa® technology client (based on one of the examples from Arduino-LoRa) that uploads telemetry data to my AdaFruit.IO and Azure IoT Hubs Windows 10 IoT Core on Raspberry PI proof of concept (PoC) field gateways.

LoRaMiniDevTH02

Bill of materials (Prices Sep 2018)

  • Draguino LoRa MiniDev USD23
  • Seeedstudio Temperature&Humidity Sensor USD11.50 NZD20
  • 4 pin Male Jumper to Grove 4 pin Conversion Cable USD2.90

The code is pretty basic, it shows how to pack the payload and set the necessary RFM9X/SX127X LoRa module configuration, has no power conservation, advanced wireless configuration etc.

The Grove 4 pin Male Jumper to Grove 4 pin Conversion Cable was a quick & convenient way to get the I2C Grove temperature and humidity sensor connected up.

/*
Adapted from LoRa Duplex communication with Sync Word

Sends temperature & humidity data from Seeedstudio

https://www.seeedstudio.com/Grove-Temperature-Humidity-Sensor-High-Accuracy-Min-p-1921.html

To my Windows 10 IoT Core RFM 9X library

https://blog.devmobile.co.nz/2018/09/03/rfm9x-iotcore-payload-addressing/

*/
#include
#include
#include
const int csPin = 10;          // LoRa radio chip select
const int resetPin = 9;       // LoRa radio reset
const int irqPin = 2;         // change for your board; must be a hardware interrupt pin

// Field gateway configuration
const byte FieldGatewayAddress[] = "LoRaIoT1";
const float FieldGatewayFrequency =  915000000.0;
//const float FieldGatewayFrequency =  433000000.0;
const byte FieldGatewaySyncWord = 0x12 ;

// Payload configuration
const int PayloadSizeMaximum = 64 ;
char payload[PayloadSizeMaximum] = "";
const byte SensorReadingSeperator = ',' ;

// Manual serial number configuration
char DeviceId[] = {"LoRaMiniDev5"};

const int LoopSleepDelaySeconds = 10 ;

void setup() {
Serial.begin(9600);
while (!Serial);

Serial.print("LoRa Setup-");
Serial.println( DeviceId ) ;

// override the default CS, reset, and IRQ pins (optional)
LoRa.setPins(csPin, resetPin, irqPin);// set CS, reset, IRQ pin

if (!LoRa.begin(FieldGatewayFrequency))
{
Serial.println("LoRa init failed. Check your connections.");
while (true);
}

// Need to do this so field gateways pays attention to messsages from this device
LoRa.enableCrc();
LoRa.setSyncWord(FieldGatewaySyncWord);

//LoRa.dumpRegisters(Serial);
Serial.println("LoRa Setup done.");

// Configure the Seeedstudio TH02 temperature & humidity sensor
Serial.println("TH02 setup");
TH02.begin();
delay(100);
Serial.println("TH02 Setup done");

Serial.println("Setup done");
}

void loop()
{
int payloadLength = 0 ;
float temperature ;
float humidity ;

Serial.println("Loop called");
memset(payload, 0, sizeof(payload));

// prepare the payload header with "To" Address length (top nibble) and "From" address length (bottom nibble)
payload[0] = (strlen(FieldGatewayAddress)<<4) | strlen( DeviceId ) ;
payloadLength += 1;

// Copy the "To" address into payload
memcpy(&payload[payloadLength], FieldGatewayAddress, strlen(FieldGatewayAddress));
payloadLength += strlen(FieldGatewayAddress) ;

// Copy the "From" into payload
memcpy(&payload[payloadLength], DeviceId, strlen(DeviceId));
payloadLength += strlen(DeviceId) ;

// Read the temperature and humidity values then display nicely
temperature = TH02.ReadTemperature();
humidity = TH02.ReadHumidity();

Serial.print("T:");
Serial.print( temperature, 1 ) ;
Serial.print( "C" ) ;

Serial.print(" H:");
Serial.print( humidity, 0 ) ;
Serial.println( "%" ) ;

// Copy the temperature into the payload
payload[ payloadLength] = 't';
payloadLength += 1 ;
payload[ payloadLength] = ' ';
payloadLength += 1 ;
payloadLength += strlen( dtostrf(temperature, -1, 1, &payload[payloadLength]));
payload[ payloadLength] = SensorReadingSeperator;
payloadLength += sizeof(SensorReadingSeperator) ;

// Copy the humidity into the payload
payload[ payloadLength] = 'h';
payloadLength += 1 ;
payload[ payloadLength] = ' ';
payloadLength += 1 ;
payloadLength += strlen( dtostrf(humidity, -1, 0, &payload[payloadLength]));

// display info about payload then send it (No ACK) with LoRa unlike nRF24L01
Serial.print( "RFM9X/SX127X Payload length:");
Serial.print( payloadLength );
Serial.println( " bytes" );

LoRa.beginPacket();
LoRa.write( payload, payloadLength );
LoRa.endPacket();

Serial.println("Loop done");

delay(LoopSleepDelaySeconds * 1000l);
}

In the debug output window the messages from the device looked like this

09:53:05-RX From LoRaMiniDev5 PacketSnr 9.3 Packet RSSI -65dBm RSSI -109dBm = 11 byte message "t 16.8,h 98"
Sensor LoRaMiniDev5t Value 16.8
Sensor LoRaMiniDev5h Value 98
AzureIoTHubClient SendEventAsync start
AzureIoTHubClient SendEventAsync finish
The thread 0xba0 has exited with code 0 (0x0).
The thread 0xb24 has exited with code 0 (0x0).
09:53:15-RX From LoRaMiniDev5 PacketSnr 9.3 Packet RSSI -65dBm RSSI -108dBm = 11 byte message "t 16.7,h 98"
Sensor LoRaMiniDev5t Value 16.7
Sensor LoRaMiniDev5h Value 98
AzureIoTHubClient SendEventAsync start
AzureIoTHubClient SendEventAsync finish
The thread 0x76c has exited with code 0 (0x0).
The thread 0x91c has exited with code 0 (0x0).

Then in my Azure IoT Hub monitoring software
DraginoLoraMinDevEventHub
The dragino LoRa Mini Dev with an external antenna connector would be a good indoor data acquisition node for student project when powered by a 2nd hand cellphone charger.

Azure IoT Hubs LoRa Windows 10 IoT Core Field Gateway

This project is now live on github.com, sample Arduino with Dragino LoRa Shield for Arduino, MakerFabs Maduino, Dragino LoRa Mini Dev, M2M Low power Node and Netduino with Elecrow LoRa RFM95 Shield clients uploaded in the next couple of days.

AzureIOTHubExplorerScreenGrab20180912

The bare minimum configuration is

{
  "AzureIoTHubDeviceConnectionString": "HostName=qwertyuiop.azure-devices.net;DeviceId=LoRaGateway;SharedAccessKey=1234567890qwertyuiop987654321qwertyuiop1234g=",
  "AzureIoTHubTransportType": "Amqp",
  "SensorIDIsDeviceIDSensorID": true,
  "Address": "LoRaIoT1",
  "Frequency": 915000000.0
}

So far battery life and wireless communications range for the Arduino clients is looking pretty good. CRC presence checking and validation is turned so have a look at one of the sample clients.

ArduinoUnoR3DraginoLoRa
It took a bit longer than expected as upgrading to the latest version (v1.18.0 as at 12 Sep 2018) of Microsoft.Azure.Devices.Client (from 1.6.3) broke my field gateway with timeouts and exceptions.

I’ll be doing some more testing over the next couple of weeks so it is a work in progress.

AdaFruit.IO LoRa Windows 10 IoT Core Field Gateway

This project is now live on github.com, sample Arduino with Dragino LoRa Shield for Arduino, MakerFabs Maduino, Dragino LoRa Mini Dev, M2M Low power Node and Netduino with Elecrow LoRa RFM95 Shield clients uploaded in the next couple of days.

AdaFruit.IO.LoRaScreenShot
While building this AdaFruit.IO LoRa field gateway, and sample clients I revisited my RFM9XLoRa-Net library a couple of times adding functionality and renaming constants to make it more consistent. I made many of the default values public so they could be used in the field gateway config file.
The bare minimum configuration is

{
“AdaFruitIOUserName”: “——“,
“AdaFruitIOApiKey”: “——“,
“AdaFruitIOGroupName”: “——”
“Address”: “——“,
“Frequency”: 915000000.0
}

So far battery life and wireless communications range for the Arduino clients is looking pretty good.

ArduinoUnoR3DraginoLoRa

Windows 10 IoT Core LoRa library

I have a pair of Windows 10 IoT Core nRF24L01 field gateway projects, one for AdaFruit.IO and the other for Azure IoTHub (Including Azure IoT Central). I use these field gateways for small scale indoor and outdoor deployments.

For larger systems e.g a school campus I was looking for something with a bit more range (line of site + in building penetration) and clients with lower power consumption (suitable for long term battery or solar power).

Other makers had had success with RFM69(proprietary) and RFM9X (LoRA) based devices and shields/hats so I had a look at both technologies.

To kick things off I purchased

I then did some searching and downloaded two commonly used libraries

Initially I trialled the emmellsoft Windows 10 IoT Core Dragino.LoRa code on a couple of Raspberry PI devices.

RPIDraginoP2P

After updating the Windows 10 Min/Max versions, plus the NuGet packages and setting the processor type to ARM the code compiled, downloaded and ran which was a pretty good start.

I could see messages being transmitted and received by the two devices


Packet RSSI: -33, RSSI: -91, SNR: 8, Length: 5

Message Received: CRC OK, Rssi=-91, PacketRssi=-33, PacketSnr=8, Buffer:[55, ff, 00, aa, 01], 2018-07-30 09:27:48

Successfully sent in 110 milliseconds.

Packet RSSI: -15, RSSI: -100, SNR: 9.2, Length: 5

Message Received: CRC OK, Rssi=-100, PacketRssi=-15, PacketSnr=9.2, Buffer:[55, ff, 00, aa, 02], 2018-07-30 09:27:53

Successfully sent in 36 milliseconds.

Packet RSSI: -35, RSSI: -101, SNR: 9, Length: 5

Message Received: CRC OK, Rssi=-101, PacketRssi=-35, PacketSnr=9, Buffer:[55, ff, 00, aa, 03], 2018-07-30 09:27:58

Successfully sent in 36 milliseconds.

I added my first attempt at device configuration for New Zealand (based on EU settings) in Dragino.LoRa\Radio\TransceiverSettings.cs


public static readonly TransceiverSettings ANZ915 = new TransceiverSettings(

RadioModemKind.Lora,

915000000,

BandWidth.BandWidth_125_00_kHz,

SpreadingFactor.SF7,

CodingRate.FourOfFive,

8,

true,

false,

LoraSyncWord.Public);

The LoraSyncWord.Public would turn out to be a problem later!

Then I modified the sender and receiver sample application MainPage.xaml.cs files to reference my settings


private static TransceiverSettings GetRadioSettings()

{

// *********************************************************************************************

// #1/2. YOUR EDITING IS REQUIRED HERE!

//

// Choose transeiver settings:

// *********************************************************************************************

return TransceiverSettings.Standard.ANZ915;

}

I modified one of the RadioHead sample Arduino applications (centre frequency) and deployed it to a LoRa MiniDev device. I could see messages getting sent but they were not getting received by the RPI(s).

So I dumped the registers for the SX127X device in the HopeRF RFM95 module on both devices,

DraginoLoraMinDev

From the device on RPI Hat


SX1276/77/78/79 detected, starting.

1-85

2-1A

3-B

4-0

5-52

6-E4

7-C0

8-0

9-85

A-9

B-2B

C-23

D-0

E-80

F-0

10-0

11-0

12-0

13-0

14-0

15-0

16-0

17-0

18-4

19-0

1A-0

1B-42

1C-0

1D-72

1E-74

1F-9F

20-0

21-8

22-1

23-FF

24-0

25-0

26-4

27-0

28-0

29-0

2A-0

2B-0

2C-9

2D-50

2E-14

2F-45

30-55

31-C3

32-5

33-27

34-1C

35-A

36-3

37-A

38-42

39-34

The LoRa transceiver is initiated successfully.

I printed out the Radiohead and emmellsoft registers then manually compared them using the SX1276 datasheet for reference.

I found the 3 registers which contain the MSB, ISB and LSB for the centre frequency weren’t being calculated correctly (checked this by changing the frequency to 434MHz and comparing the register values to the worked example in the datasheet).

I manually “brute forced” the centre frequency registers in LoRaTransceiver.cs Init() and the RPI could then detect a signal but couldn’t decode the messages.

I went back to the Register dumps and found the SyncWord (odd name as it is a byte) were different. After updating the RPI settings the devices could exchange packets..


const double RH_RF95_FXOSC = 32000000.0;

const double RH_RF95_FSTEP = RH_RF95_FXOSC / 524288.0;

long frf = (long)(Settings.Frequency / RH_RF95_FSTEP);

byte[] bytes = BitConverter.GetBytes(frf);

byte[] x6 = { bytes[2] };

RegisterManager.WriteRegister(6, x6);

byte[] x7 = { bytes[1] };

RegisterManager.WriteRegister(7, x7);

byte[] x8 = { bytes[0] };

RegisterManager.WriteRegister(8, x8);

RegisterManager.Write(new LoraRegisterSyncWord(Settings.LoraSyncWord.Value));

This was not a long term solution, lots of code, and register setting changes with limited explanation…

Azure Meetup-Budget tank of 91 IoT

The premise of my Azure Meetup presentation was could you build an interesting project on a rainy weekend afternoon with a constrained budget (tank of 91 octane petrol) and minimal soldering .

Budget

Our family car is a VW Passat V6 4Motion which has a 62 Litre tank. The driver usually doesn’t usually stop to fill up until the fuel light has been on for a bit which helped.

PetrolReceipt

Based on the most recent receipt the budget was NZD132.

Where possible I purchased parts locally (the tech equivalent of food miles) or on special.

My bill of materials (prices as at 2018-06) was on budget.

The devDuino V2.2 and nRF24L01 module were USD26.20 approx. NZD37.50 (including freight) from elecrow.

Tradeoffs

I powered my Raspberry PI with a spare cellphone charger (make sure it can supply enough current to reliably power the device).

The devDuino V2.has an ATSHA204A which provides a guaranteed unique 72-bit serial number (makes it harder to screw up provisioning devices in the field).

I use a 32G MicroSD rather than a 16G MicroSD card as I have had issued with 16G cards getting corrupted by more recent upgrades (possibly running out of space?)

The Raspberry PI shield requires a simple modification to enable interrupt driven operation.

My sample devDuino V2.2 client uses an external temperature and humidity sensor, modifying this code to use the onboard temperature sensor an MCP9700 will be covered in another post.

The devDuino V2 is a little bit cheaper USD15.99 NZD37.31, has the same onboard temperature sensor as the V2.2 but no unique serial number chip.

The devDuino V4.0 has an onboard HTU21D temperature + humidity sensor but no unique serial number and the batteries are expensive.

The code and deployment instructions for the nRF24L01 field gateway applications for AdaFruit.IO and Azure IoT Hub/Azure IoT Central are available on hackster.IO.

RPiWithnRF24Plate

AdaFruit.IO has free and USD10.00/month options which work well for many hobbyist projects.

AdaFruitIO