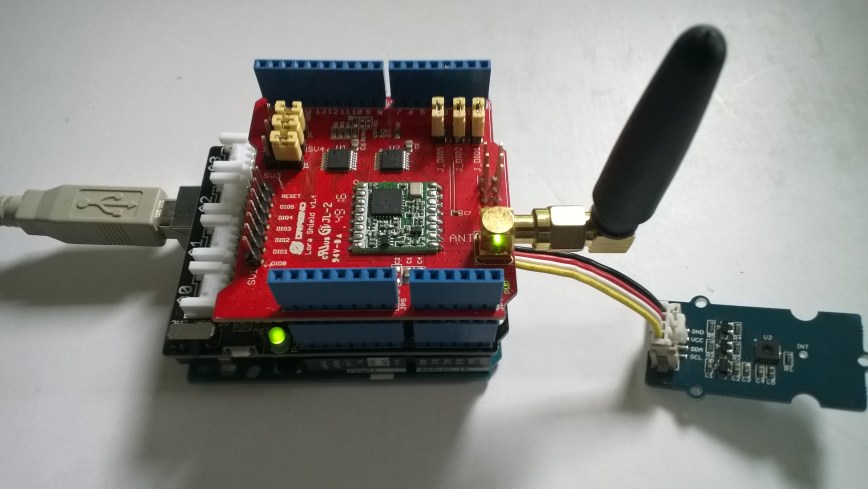
This is a demo Arduino client (based on one of the examples from Arduino-LoRa) that uploads telemetry data to my Windows 10 IoT Core on Raspberry PI field gateway proof of concept(PoC).
Bill of materials (Prices Sep 2018)
- Arduino Uno R3 USD24.95 NZD54.00
- Seeedstudio Base shield V2 USD8.90 NZD14.00
- Seeedstudio Temperature&Humidity Sensor USD11.50 NZD20
- 5CM 4 Pin buckled cable USD1.90 NZD34.75
- Dragino LoRa shield USD21.00
The code is pretty basic, it shows how to pack the payload and set the necessary RFM9X/SX127X LoRa module configuration, has no power conservation, advanced wireless configuration etc.
/*
  Adapted from LoRa Duplex communication with Sync Word

  Sends temperature & humidity data from Seeedstudio

  https://www.seeedstudio.com/Grove-Temperature-Humidity-Sensor-High-Accuracy-Min-p-1921.html

  To my Windows 10 IoT Core RFM 9X library

  https://blog.devmobile.co.nz/2018/09/03/rfm9x-iotcore-payload-addressing/

*/
#include
#include
#include
const int csPin = 10;          // LoRa radio chip select
const int resetPin = 9;       // LoRa radio reset
const int irqPin = 2;         // change for your board; must be a hardware interrupt pin

// Field gateway configuration
const byte FieldGatewayAddress[] = "LoRaIoT1";
const float FieldGatewayFrequency =  915000000.0;
const byte FieldGatewaySyncWord = 0x12 ;

// Payload configuration
const int PayloadSizeMaximum = 64 ;
char payload[PayloadSizeMaximum] = "";
const byte SensorReadingSeperator = ',' ;

// Manual serial number configuration
char DeviceId[] = {"Arduino1"};

const int LoopSleepDelaySeconds = 60;

void setup() {
  Serial.begin(9600);
  while (!Serial);

  Serial.println("LoRa Setup");

  // override the default CS, reset, and IRQ pins (optional)
  LoRa.setPins(csPin, resetPin, irqPin);// set CS, reset, IRQ pin

  if (!LoRa.begin(FieldGatewayFrequency))
  {
    Serial.println("LoRa init failed. Check your connections.");
    while (true);
  }

  // Need to do this so field gateways pays attention to messsages from this device
  LoRa.enableCrc();
  LoRa.setSyncWord(FieldGatewaySyncWord);

  //LoRa.dumpRegisters(Serial);
  Serial.println("LoRa Setup done.");

  // Configure the Seeedstudio TH02 temperature & humidity sensor
  Serial.println("TH02 setup");
  TH02.begin();
  delay(100);
  Serial.println("TH02 Setup done");

  Serial.println("Setup done");
}

void loop()
{
  int payloadLength = 0 ;
  float temperature ;
  float humidity ;

  Serial.println("Loop called");
  memset(payload, 0, sizeof(payload));

  // prepare the payload header with "To" Address length (top nibble) and "From" address length (bottom nibble)
  payload[0] = (strlen(FieldGatewayAddress) << 4) | strlen( DeviceId ) ;
  payloadLength += 1;

  // Copy the "To" address into payload
  memcpy(&payload[payloadLength], FieldGatewayAddress, strlen(FieldGatewayAddress));
  payloadLength += strlen(FieldGatewayAddress) ;

  // Copy the "From" into payload
  memcpy(&payload[payloadLength], DeviceId, strlen(DeviceId));
  payloadLength += strlen(DeviceId) ;

  // Read the temperature and humidity values then display nicely
  temperature = TH02.ReadTemperature();
  humidity = TH02.ReadHumidity();

  Serial.print("T:");
  Serial.print( temperature, 1 ) ;
  Serial.print( "C" ) ;

  Serial.print(" H:");
  Serial.print( humidity, 0 ) ;
  Serial.println( "%" ) ;

  // Copy the temperature into the payload
  payload[ payloadLength] = 't';
  payloadLength += 1 ;
  payload[ payloadLength] = ' ';
  payloadLength += 1 ;
  payloadLength += strlen( dtostrf(temperature, -1, 1, &payload[payloadLength]));
  payload[ payloadLength] = SensorReadingSeperator;
  payloadLength += sizeof(SensorReadingSeperator) ;

  // Copy the humidity into the payload
  payload[ payloadLength] = 'h';
  payloadLength += 1 ;
  payload[ payloadLength] = ' ';
  payloadLength += 1 ;
  payloadLength += strlen( dtostrf(humidity, -1, 0, &payload[payloadLength]));

  // display info about payload then send it (No ACK) with LoRa unlike nRF24L01
  Serial.print( "RFM9X/SX127X Payload length:");
  Serial.print( payloadLength );
  Serial.println( " bytes" );

  LoRa.beginPacket();
  LoRa.write( payload, payloadLength );
  LoRa.endPacket();

  Serial.println("Loop done");

  delay(LoopSleepDelaySeconds * 1000l);
}
In the debug output window the messages from the device looked like this
Register 0x40 – Value 0X00 – Bits 00000000
Register 0x41 – Value 0X00 – Bits 00000000
Register 0x42 – Value 0X12 – Bits 00010010
…
19:15:21-RX From Arduino1 PacketSnr 9.3 Packet RSSI -49dBm RSSI -105dBm = 11 byte message "t 18.8,h 91"
…
19:15:30-TX 25 byte message Hello from LoRaIoT1 ! 255
19:15:30-TX Done
19:15:31-RX From Arduino1 PacketSnr 9.3 Packet RSSI -49dBm RSSI -103dBm = 11 byte message "t 18.8,h 91"
…
19:15:41-RX From Arduino1 PacketSnr 9.3 Packet RSSI -48dBm RSSI -106dBm = 11 byte message "t 18.8,h 91"
There must be a nicer way of building the payload, a topic for a future post maybe.

Pingback: Arduino MKR1300 WAN Payload Addressing client | devMobile's blog