Random wanderings through Microsoft Azure esp. PaaS plumbing, the IoT bits, AI on Micro controllers, AI on Edge Devices, .NET nanoFramework, .NET Core on *nix and ML.NET+ONNX
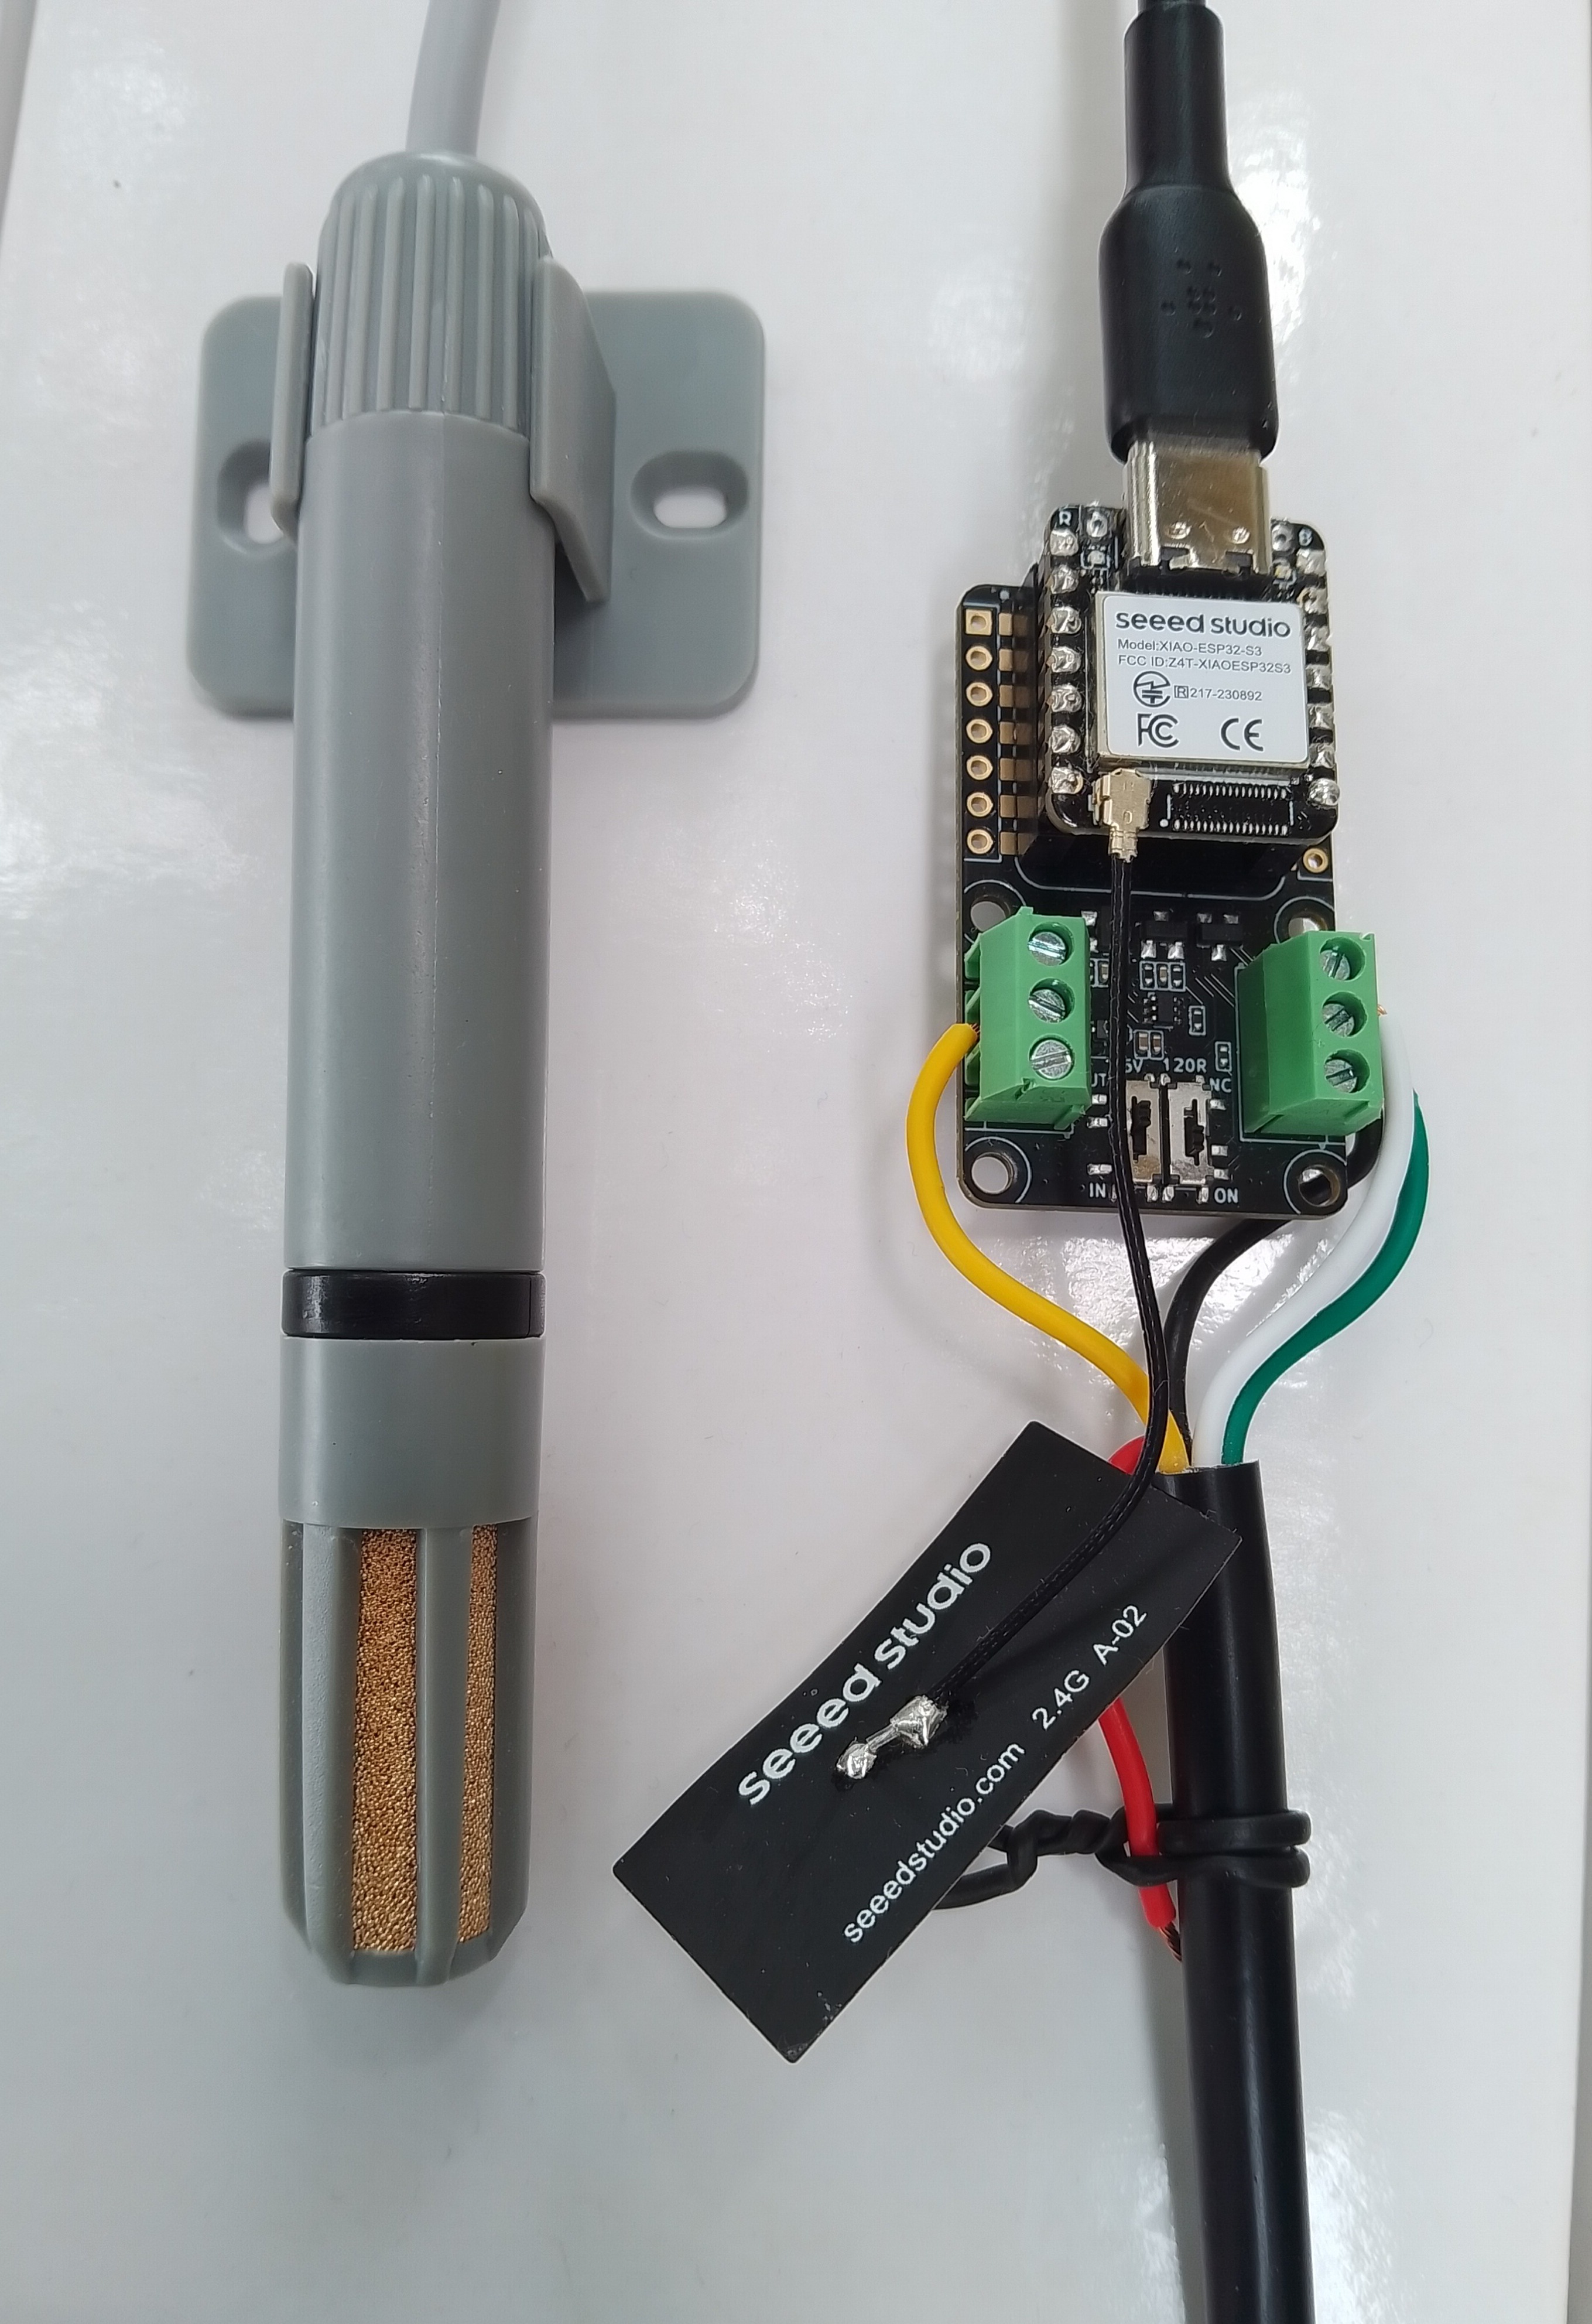
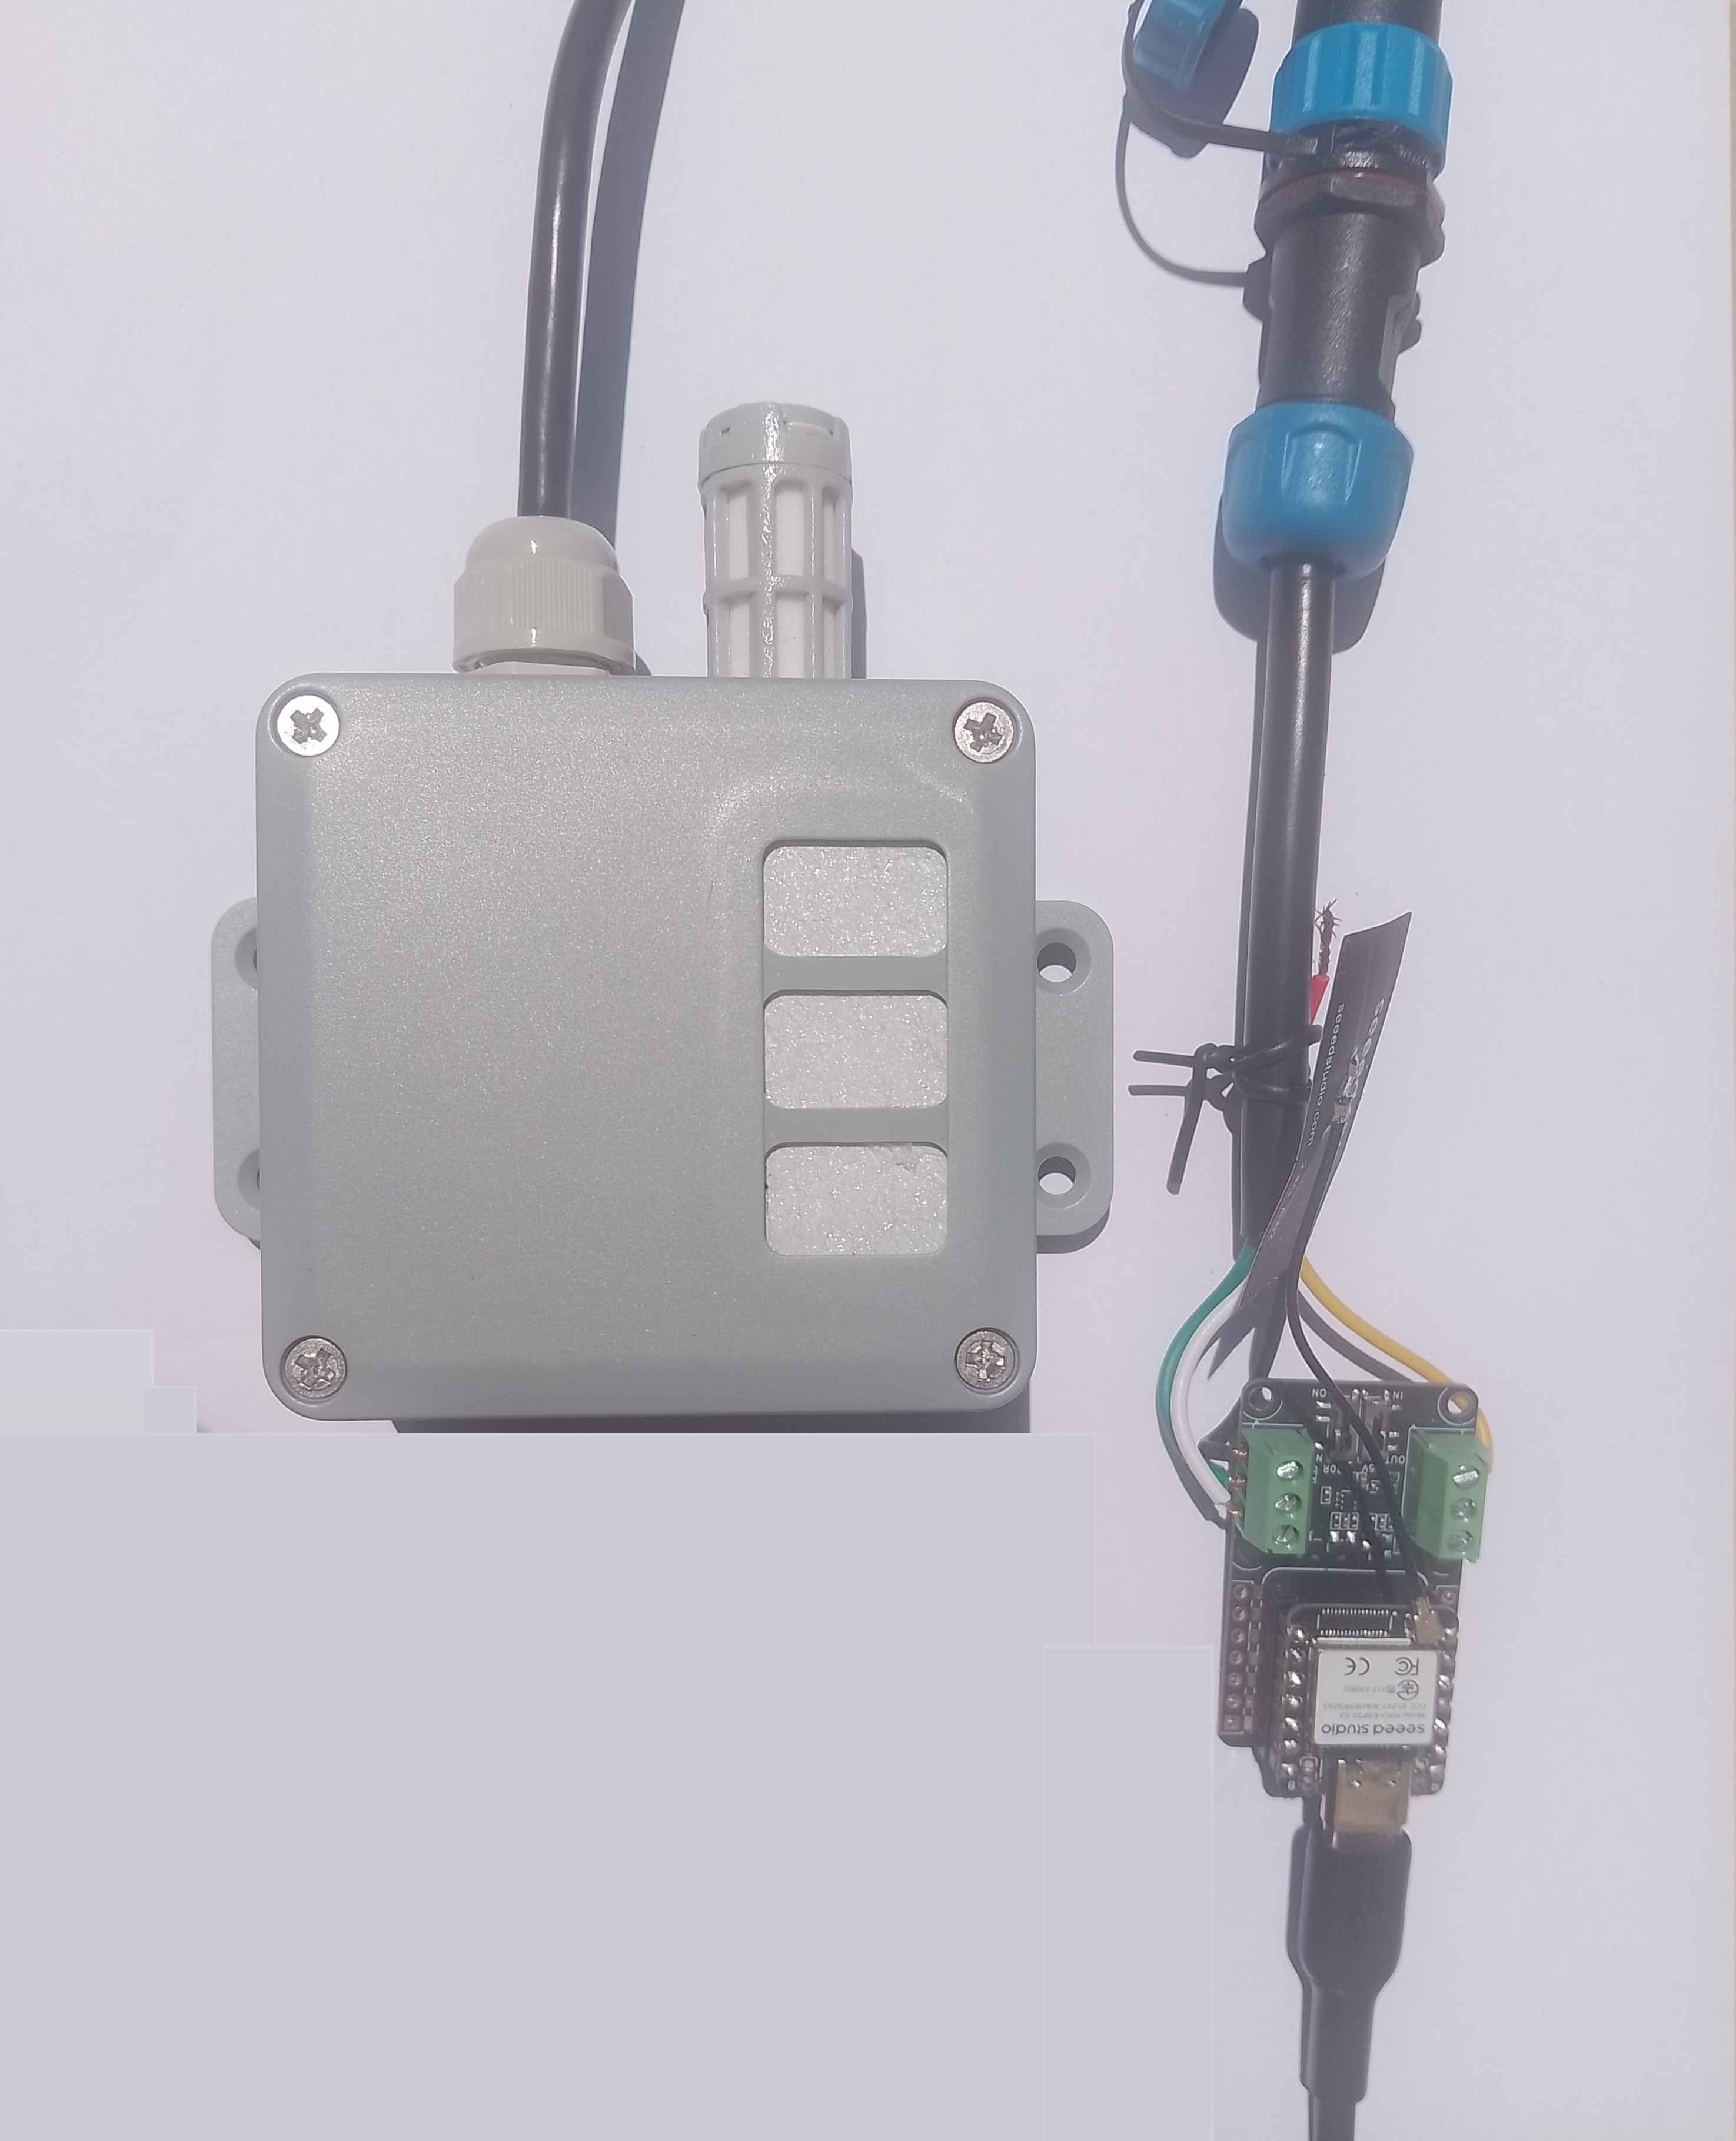
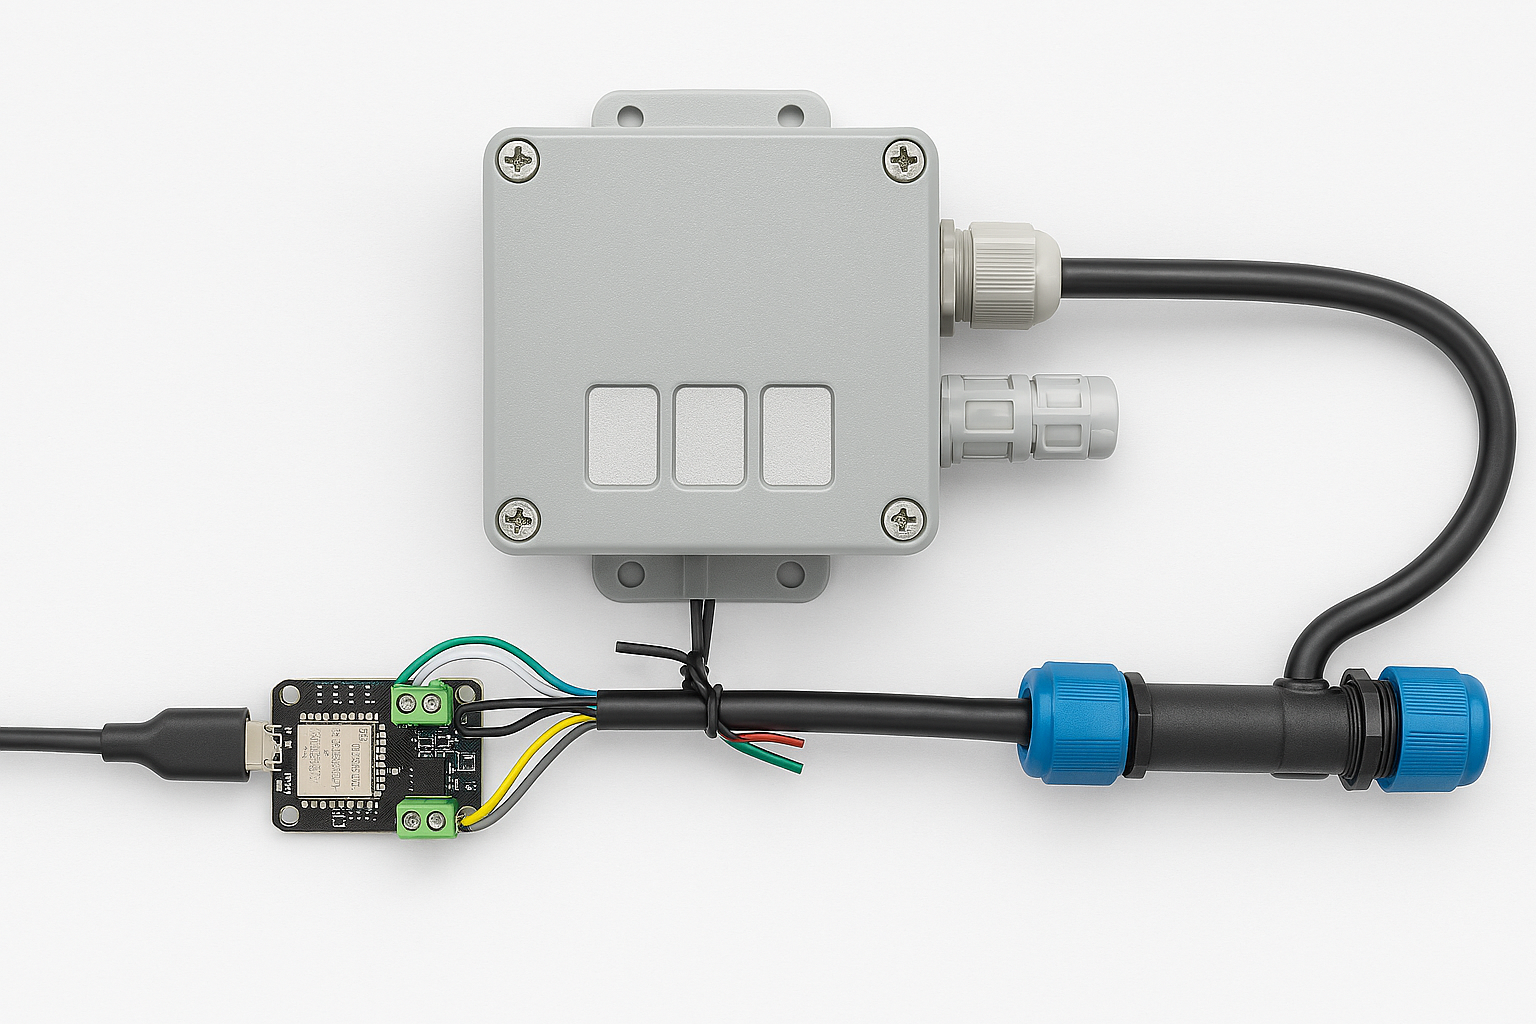
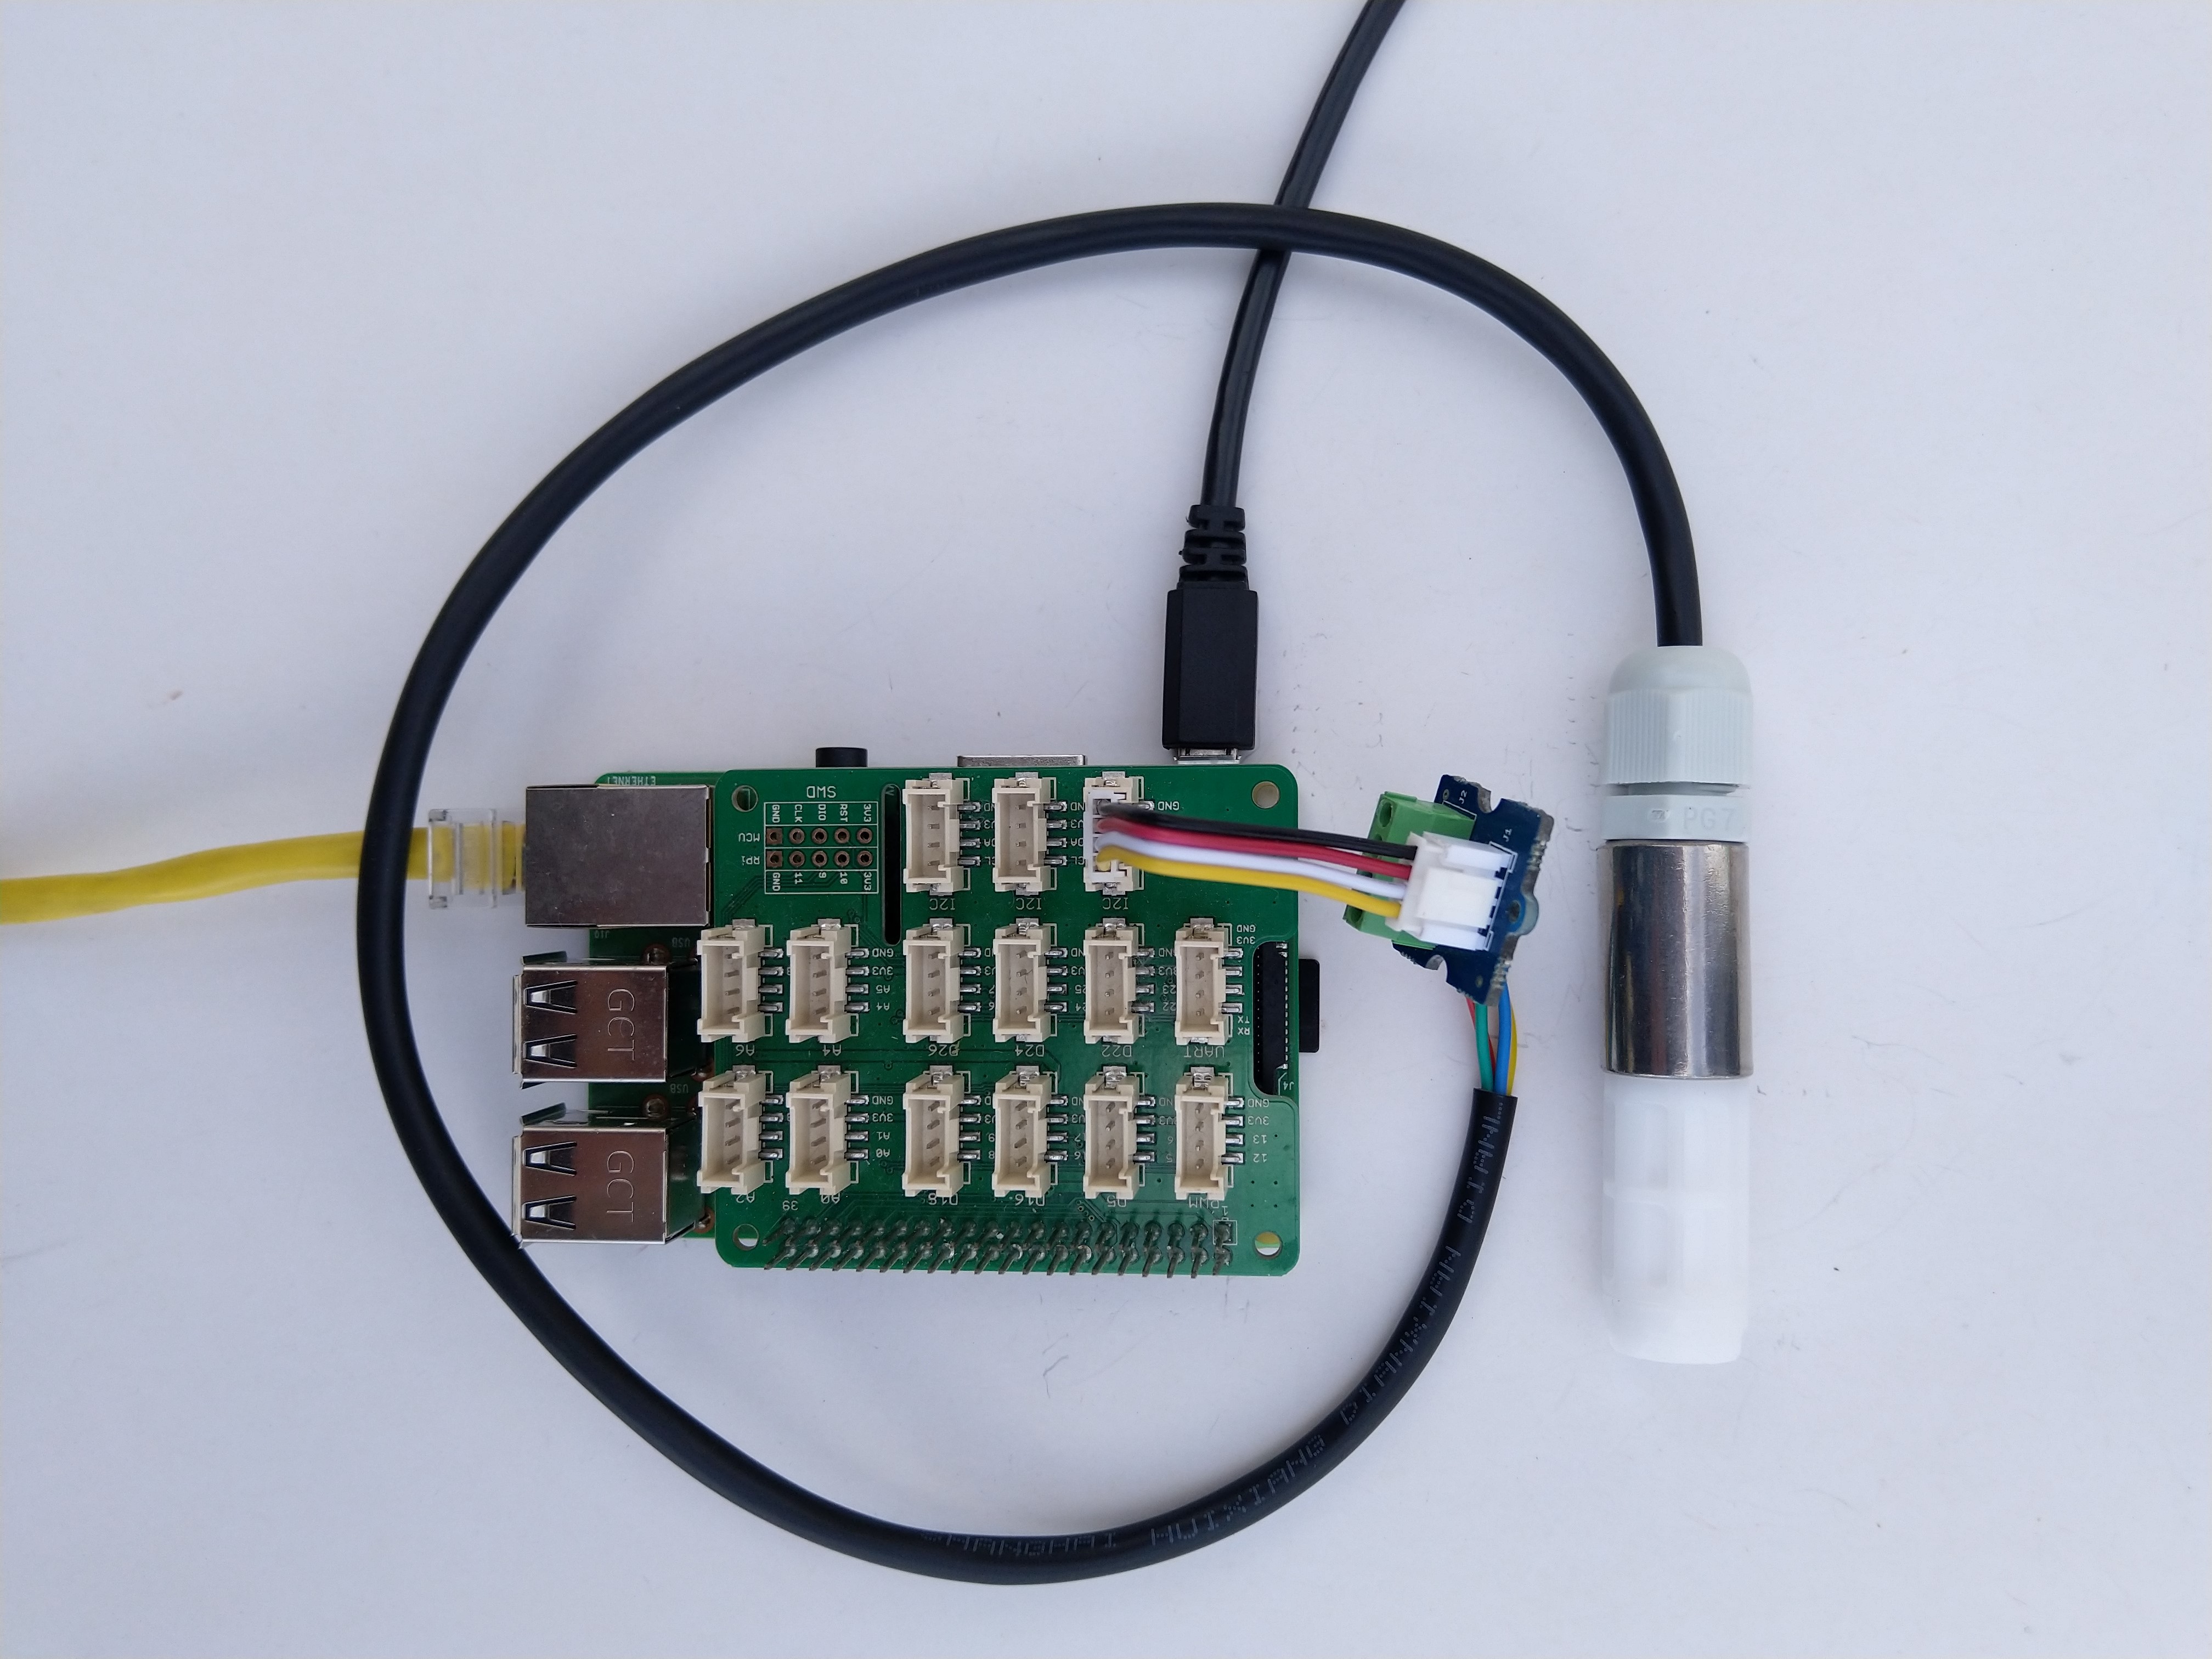
This sensor has an operating voltage of 3.6-30V/DC so it can be powered by the 5V output of a RS485 Breakout Board for Seeed Studio XIAO (SKU 113991354). The red wire is for powering the breakout and device with a 12V power supply so was tied back so it didn’t touch any of the other electronics.
HardwareSerial RS485Serial(1);
ModbusMaster node;

// -----------------------------
// RS485 Pin Assignments (Corrected)
// -----------------------------
const int RS485_RX = 6;  // UART1 RX
const int RS485_TX = 5;  // UART1 TX
const int RS485_EN = D2;

// Sensor/Modbus parameters (from datasheet)
#define MODBUS_SLAVE_ID 0x2A
#define REG_TEMPERATURE 0x0000
#define REG_HUMIDITY 0x0001
#define REG_DEWPOINT 0x0002

// Forward declarations for ModbusMaster callbacks
void preTransmission();
void postTransmission();

void setup() {
  Serial.begin(9600);
  delay(5000);

  Serial.println("ModbusMaster: Seeed SKU101990882 starting");

  // Wait for the hardware serial to be ready
  while (!Serial)
    ;
  Serial.println("Serial done");

  pinMode(RS485_EN, OUTPUT);
  digitalWrite(RS485_EN, LOW);  // Start in RX mode

  // Datasheet: 9600 baud, 8N1
  RS485Serial.begin(9600, SERIAL_8N1, RS485_RX, RS485_TX);
  while (!RS485Serial)
    ;
  Serial.println("RS485 done");

  // Tie ModbusMaster to the UART we just configured
  node.begin(MODBUS_SLAVE_ID, RS485Serial);

  // Register callbacks for half-duplex direction control
  node.preTransmission(preTransmission);
  node.postTransmission(postTransmission);
}
...
void loop() {
  float temperature;
  uint16_t humidity;
  uint16_t dewPoint;

  uint8_t result = node.readInputRegisters(0x0000, 3);

  if (result == node.ku8MBSuccess) {
    // --- Read Temperature ---
    uint16_t rawTemperature = node.getResponseBuffer(REG_TEMPERATURE);
    temperature = (int16_t)rawTemperature / 100.0;

    // --- Read Humidity ---
    humidity = node.getResponseBuffer(REG_HUMIDITY);
    humidity = humidity / 100;

    // --- Read DewPoint ---
    dewPoint = node.getResponseBuffer(REG_DEWPOINT);
    dewPoint = dewPoint / 100;

    Serial.printf("Temperature: %.1f°C Humidity: %u%%RH Dewpoint: %u°C\n", temperature, humidity, dewPoint);
  } else {
    Serial.printf("Modbus error: %d\n", result);
  }

  delay(60000);
}
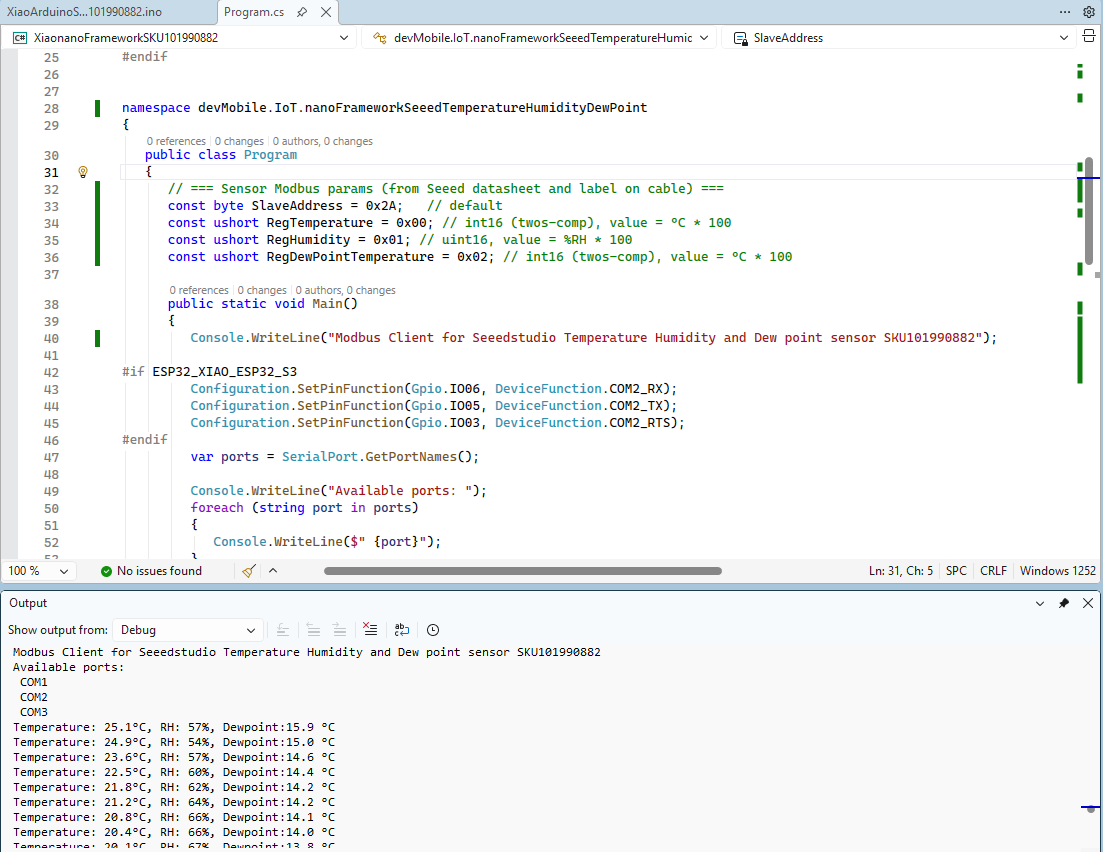
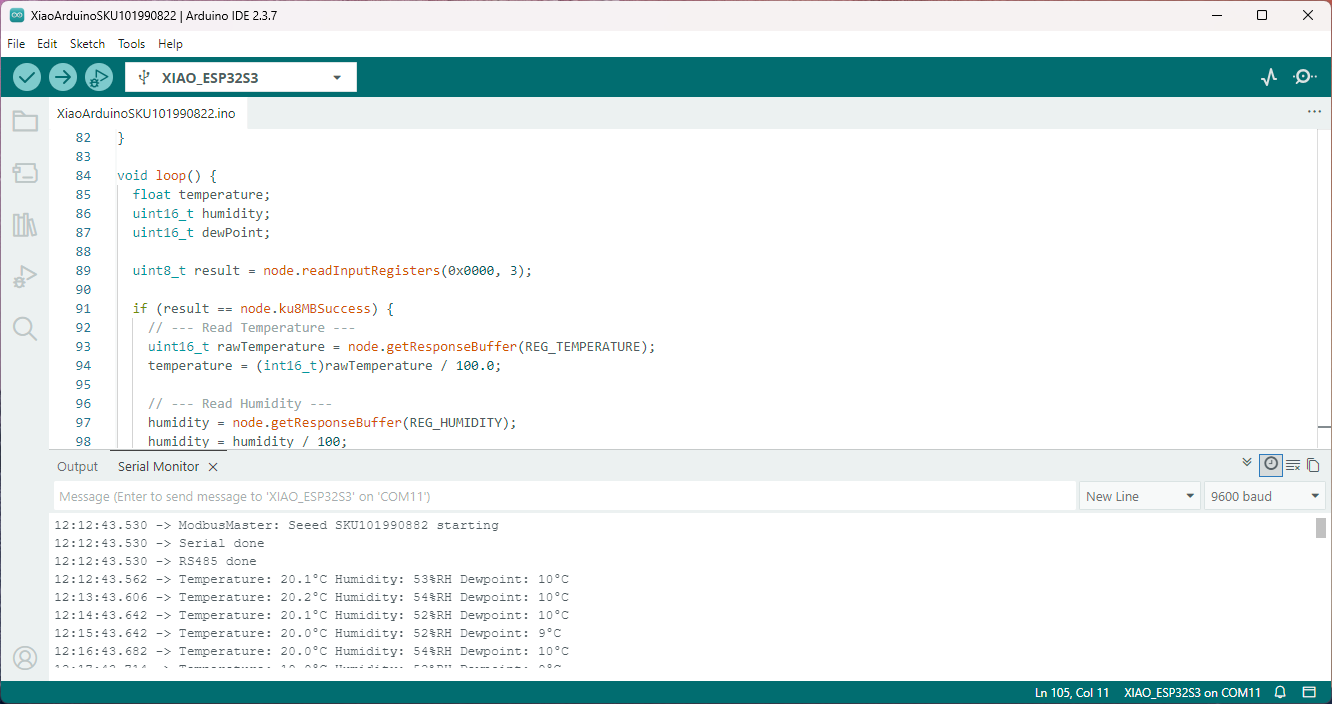
The Arduino ModbusMaster based application worked first time I forgot to scale the dewpoint.
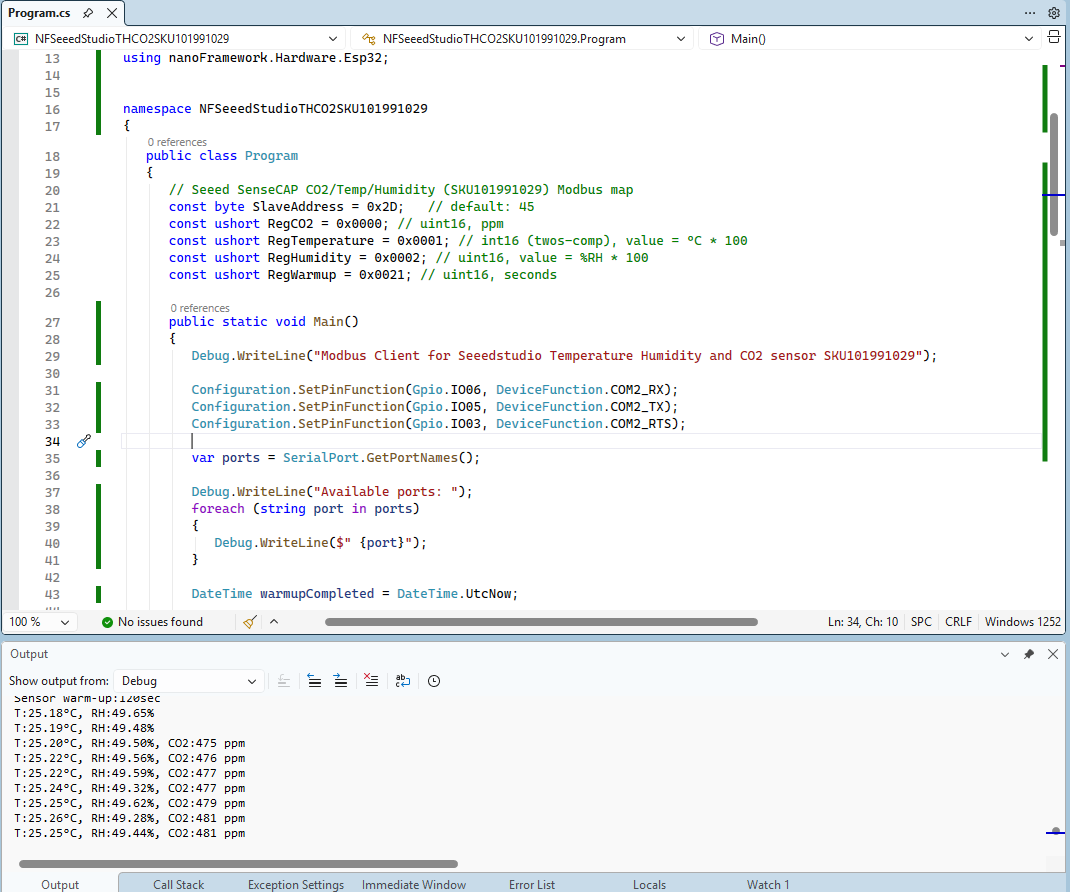
Important: make sure you setup the I2C pins especially on ESP32 Devices before creating the I2cDevice,
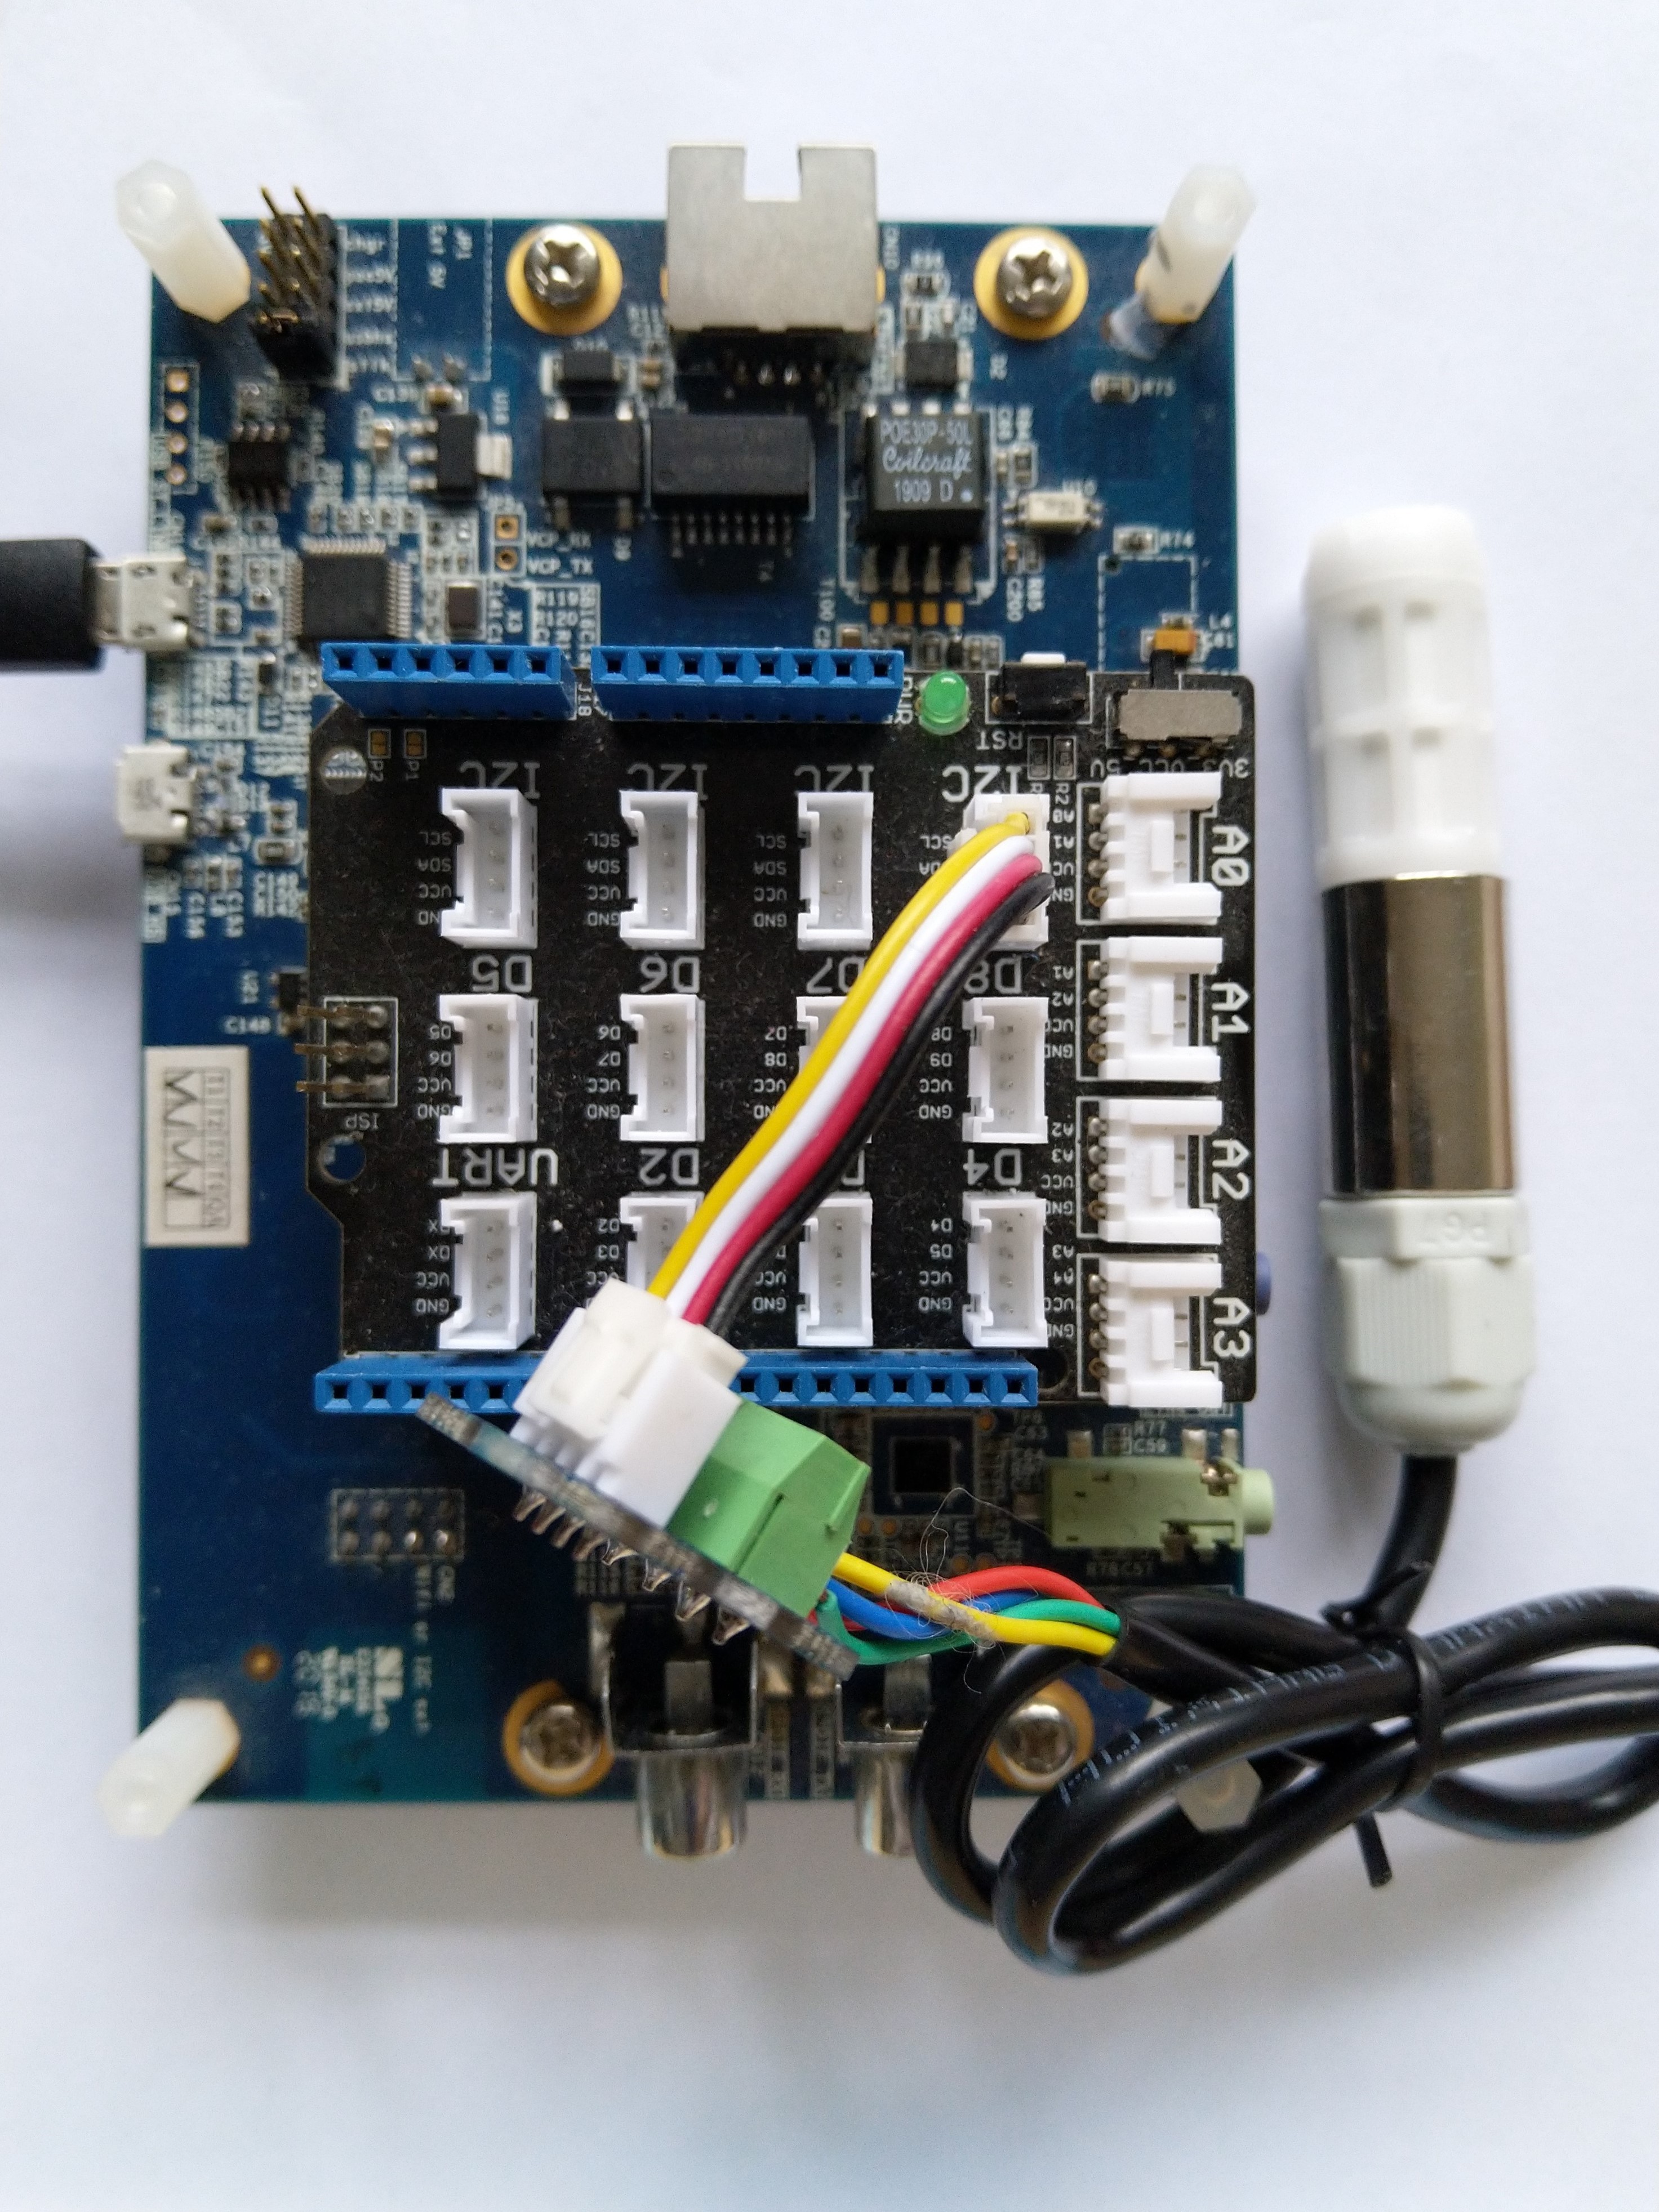
SHT20 +STM32F769 Discovery test rig
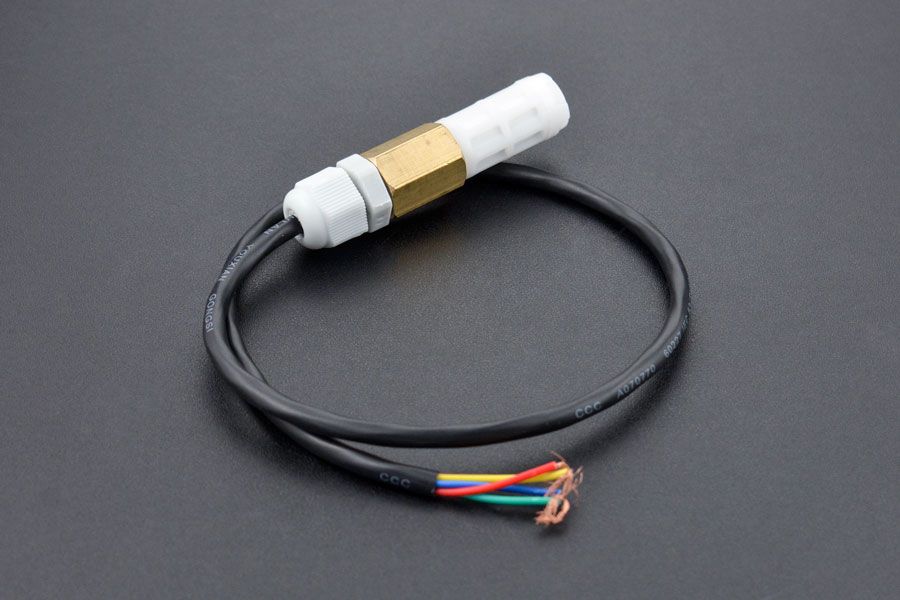
The .NET nanoFramework device libraries use a TryGet… pattern to retrieve sensor value, this library throws an exception if reading a sensor value fails. I’m not certain which approach is “better” as reading Sensirion SHT20 temperature and humidity(Waterproof) has never failed The only time reading a value failed was when I unplugged the device which I think is “exceptional”.
//---------------------------------------------------------------------------------
// Copyright (c) March 2023, devMobile Software
//
// Licensed under the Apache License, Version 2.0 (the "License");
// you may not use this file except in compliance with the License.
// You may obtain a copy of the License at
//
//     http://www.apache.org/licenses/LICENSE-2.0
//
// Unless required by applicable law or agreed to in writing, software
// distributed under the License is distributed on an "AS IS" BASIS,
// WITHOUT WARRANTIES OR CONDITIONS OF ANY KIND, either express or implied.
// See the License for the specific language governing permissions and
// limitations under the License.
//
// nanoff --target ST_STM32F769I_DISCOVERY --update
// nanoff --platform ESP32 --serialport COM7 --update
//
//---------------------------------------------------------------------------------
#define ST_STM32F769I_DISCOVERY
//#define  SPARKFUN_ESP32_THING_PLUS
namespace devMobile.IoT.Device.Sht20
{
    using System;
    using System.Device.I2c;
    using System.Threading;

#if SPARKFUN_ESP32_THING_PLUS
    using nanoFramework.Hardware.Esp32;
#endif

    class Program
    {
        static void Main(string[] args)
        {
            const int busId = 1;

            Thread.Sleep(5000);

#if SPARKFUN_ESP32_THING_PLUS
            Configuration.SetPinFunction(Gpio.IO23, DeviceFunction.I2C1_DATA);
            Configuration.SetPinFunction(Gpio.IO22, DeviceFunction.I2C1_CLOCK);
#endif

            I2cConnectionSettings i2cConnectionSettings = new(busId, Sht20.DefaultI2cAddress);

            using I2cDevice i2cDevice = I2cDevice.Create(i2cConnectionSettings);
            {
                using (Sht20 sht20 = new Sht20(i2cDevice))
                {
                    sht20.Reset();

                    while (true)
                    {
                        double temperature = sht20.Temperature();
                        double humidity = sht20.Humidity();
#if HEATER_ON_OFF
					    sht20.HeaterOn();
					    Console.WriteLine($"{DateTime.Now:HH:mm:ss} HeaterOn:{sht20.IsHeaterOn()}");
#endif
                        Console.WriteLine($"{DateTime.UtcNow:HH:mm:ss} Temperature:{temperature:F1}°C Humidity:{humidity:F0}% HeaterOn:{sht20.IsHeaterOn()}");
#if HEATER_ON_OFF
					    sht20.HeaterOff();
					    Console.WriteLine($"{DateTime.Now:HH:mm:ss} HeaterOn:{sht20.IsHeaterOn()}");
#endif
                        Thread.Sleep(1000);
                    }
                }
            }
        }
    }
}
I’m going to soak test the library for a week to check that is working okay, then most probably refactor the code so it can be added to the nanoFramework IoT.Device Library repository.
The SH20DeviceI2C application has lots of magic numbers from the SHT20 datasheet and was just a tool for exploring how the sensor works.
 public static void Main()
{
    I2cConnectionSettings i2cConnectionSettings = new(1, 0x40);

    // i2cDevice.Dispose in final program
    I2cDevice i2cDevice = I2cDevice.Create(i2cConnectionSettings);

    while (true)
    {
        byte[] readBuffer = new byte[3] { 0, 0, 0 };

        // First temperature
        i2cDevice.WriteByte(0xF3);

        //Thread.Sleep(50); // no go -46.8
        //Thread.Sleep(60);
        Thread.Sleep(70);
        //Thread.Sleep(90);
        //Thread.Sleep(110);

        i2cDevice.Read(readBuffer);

        ushort temperatureRaw = (ushort)(readBuffer[0] << 8);
        temperatureRaw += readBuffer[1];

        //Debug.WriteLine($"Raw {temperatureRaw}");

        double temperature = temperatureRaw * (175.72 / 65536.0) - 46.85;

        // Then read the Humidity
        i2cDevice.WriteByte(0xF5);

        //Thread.Sleep(50);
        //Thread.Sleep(60);
        Thread.Sleep(70);
        //Thread.Sleep(90);
        //Thread.Sleep(110);

        i2cDevice.Read(readBuffer);

        ushort humidityRaw = (ushort)(readBuffer[0] << 8);
        humidityRaw += readBuffer[1];

        //Debug.WriteLine($"Raw {humidityRaw}");

        double humidity = humidityRaw * (125.0 / 65536.0) - 6.0;

        //Console.WriteLine($"{DateTime.UtcNow:HH:mm:ss} Temperature:{temperature:F1}°C");
        //Console.WriteLine($"{DateTime.UtcNow:HH:mm:ss} Humidity:{humidity:F0}%");
        Console.WriteLine($"{DateTime.UtcNow:HH:mm:ss} Temperature:{temperature:F1}°C Humidity:{humidity:F0}%");

        Thread.Sleep(1000);
    }
}
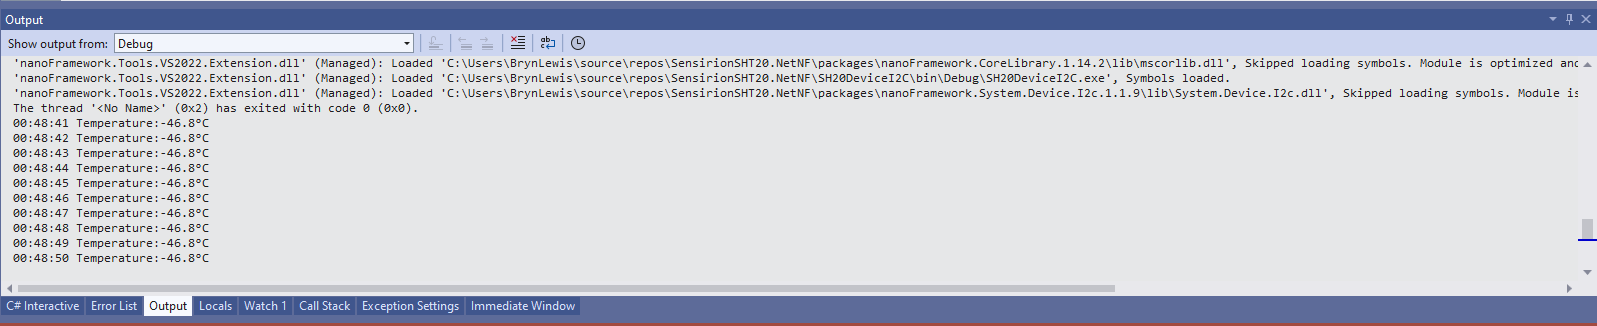
While tinkering with the sensor I found that having a short delay between initiating the temperature reading (TemperatureNoHold = 0xF3 was used so as not to hang up the I2C bus) and reading the value was important.
Temperature value without Thread.Sleep
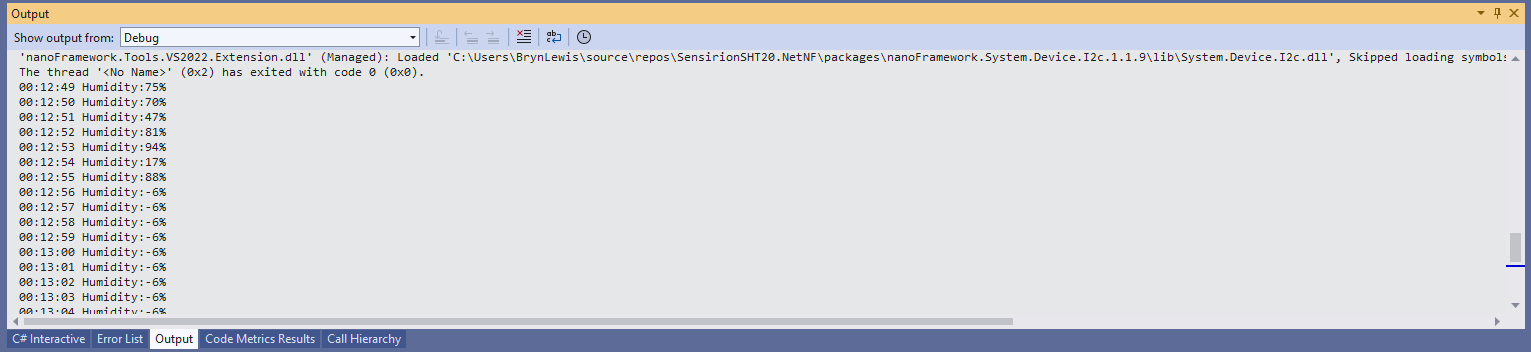
When I ran the application without a Thread.Sleep(70) the temperature and/or humidity the values were incorrect and sometimes quite random.
Temperature value with Thread.Sleep(70)
Humidity value without Thread.Sleep
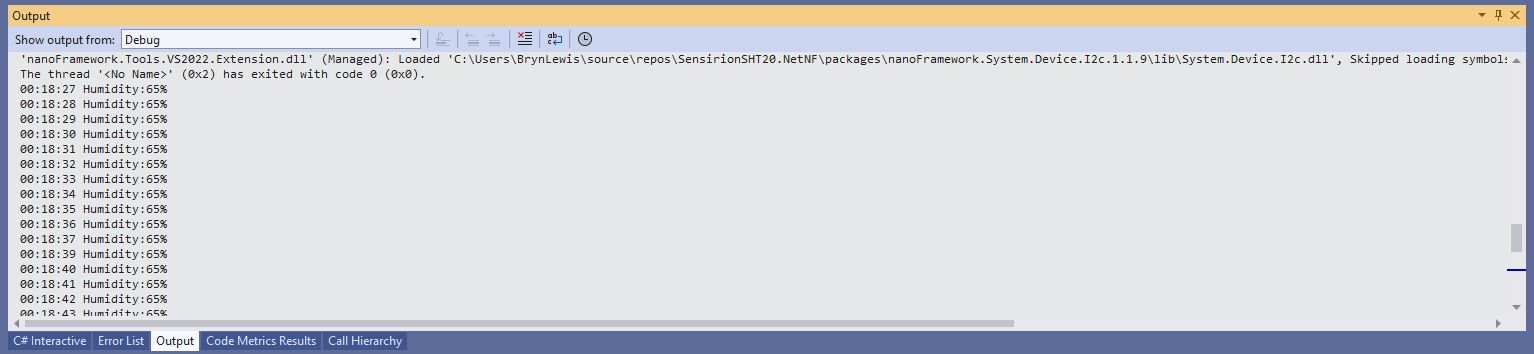
Humidity value with Thread.Sleep(70)
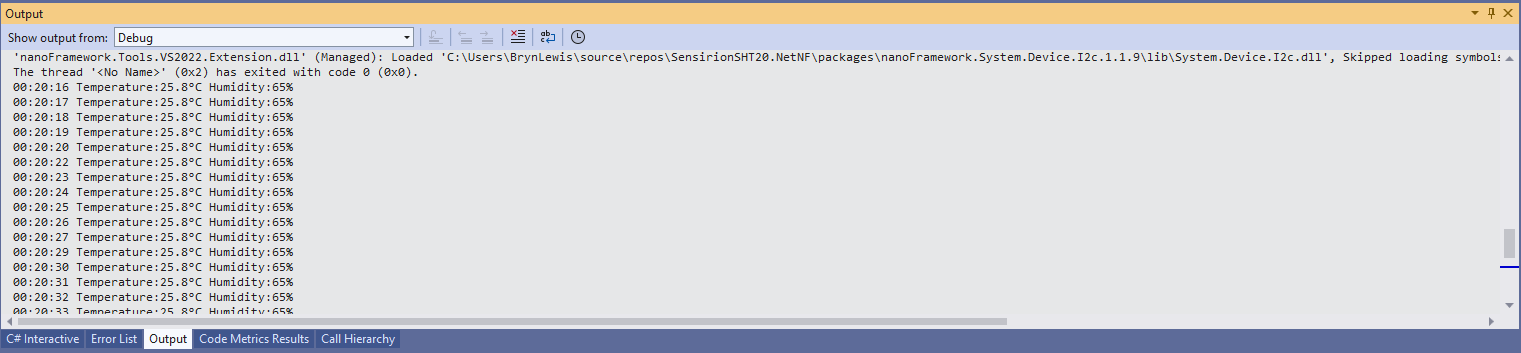
Temperature and Humidity values with Thread.Sleep(70)
I’m going to soak test the library for a week to check that is working okay, then refactor the code so it can be added to the nanoFramework IoT.Device Library repository.
I have included sample application in the Github repository to show how to use the library
namespace devMobile.IoT.NetCore.Sensirion
{
	using System;
	using System.Device.I2c;
	using System.Threading;

	class Program
	{
		static void Main(string[] args)
		{
			// bus id on the raspberry pi 3
			const int busId = 1;

			I2cConnectionSettings i2cConnectionSettings = new(busId, Sht20.DefaultI2cAddress);

			using I2cDevice i2cDevice = I2cDevice.Create(i2cConnectionSettings);

			using (Sht20 sht20 = new Sht20(i2cDevice))
			{
				sht20.Reset();

				while (true)
				{
					double temperature = sht20.Temperature();
					double humidity = sht20.Humidity();

#if HEATER_ON_OFF
					sht20.HeaterOn();
					Console.WriteLine($"{DateTime.Now:HH:mm:ss} HeaterOn:{sht20.IsHeaterOn()}");
#endif
					Console.WriteLine($"{DateTime.Now:HH:mm:ss} Temperature:{temperature:F1}°C Humidity:{humidity:F0}% HeaterOn:{sht20.IsHeaterOn()}");
#if HEATER_ON_OFF
					sht20.HeaterOff();
					Console.WriteLine($"{DateTime.Now:HH:mm:ss} HeaterOn:{sht20.IsHeaterOn()}");
#endif

					Thread.Sleep(1000);
				}
			}
		}
	}
}
The Sensiron SHT20 has a heater which is intended to be used for functionality diagnosis – relative humidity drops upon rising temperature. The heater consumes about 5.5mW and provides a temperature increase of about 0.5 – 1.5°C.
Beware when the device is soft reset the heater bit is not cleared.
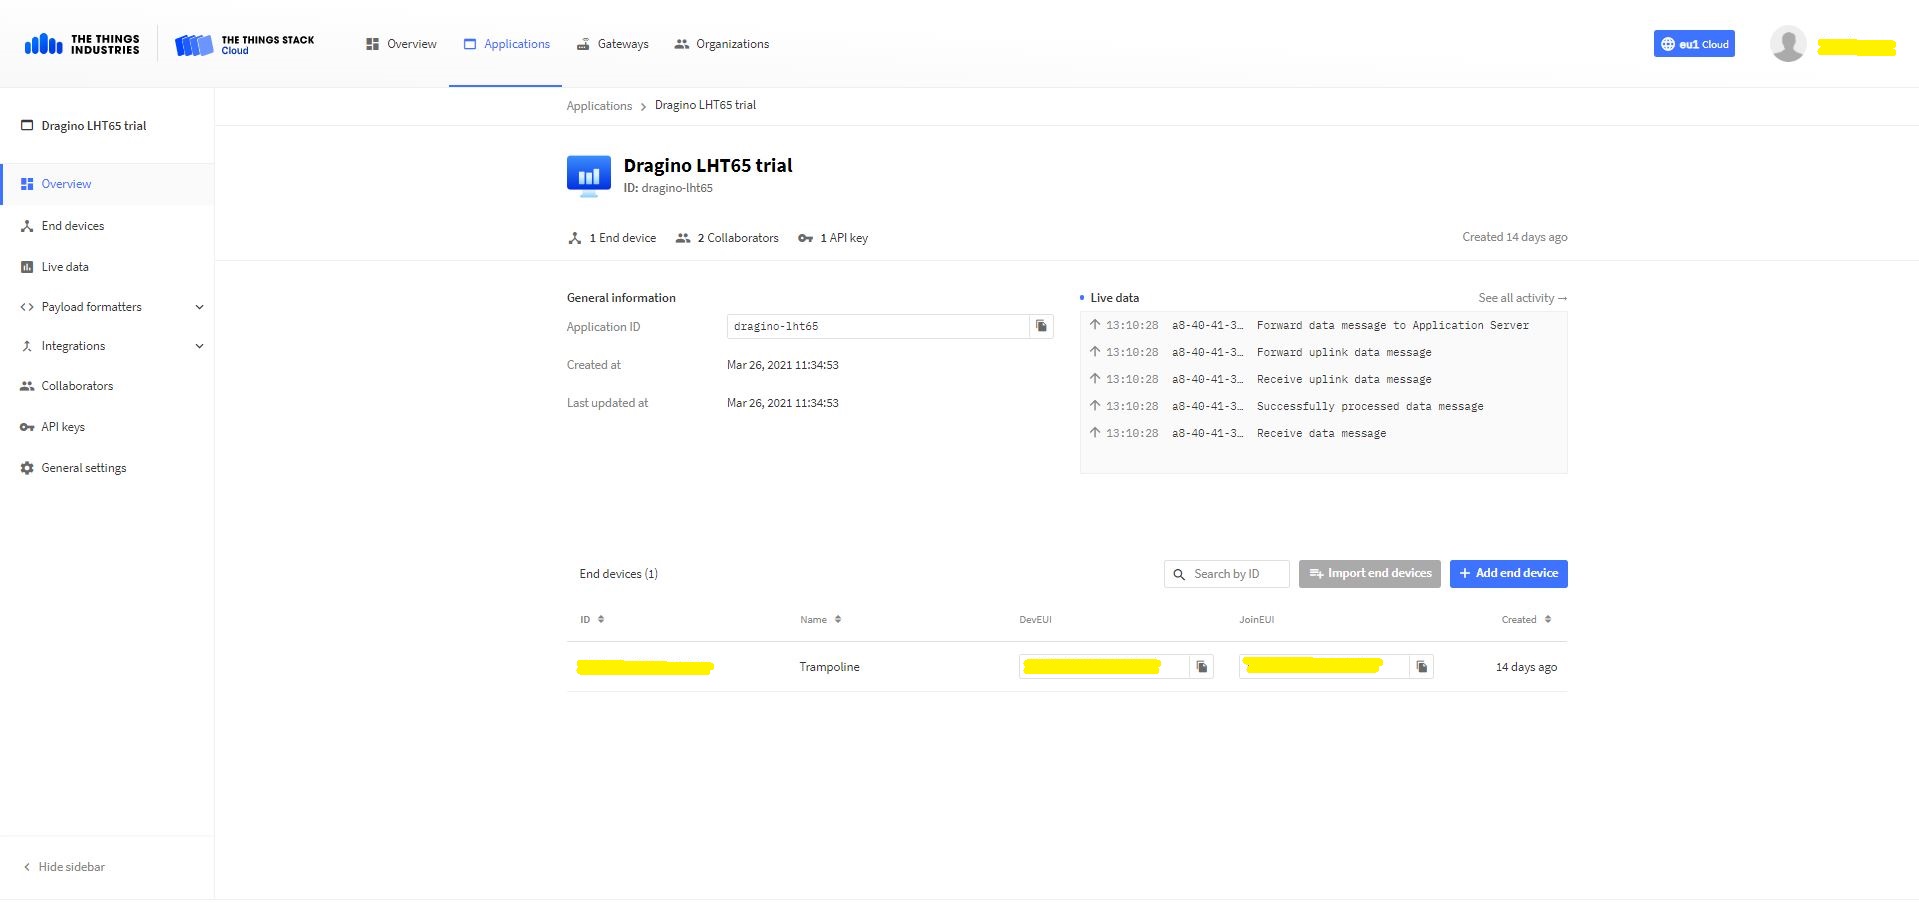
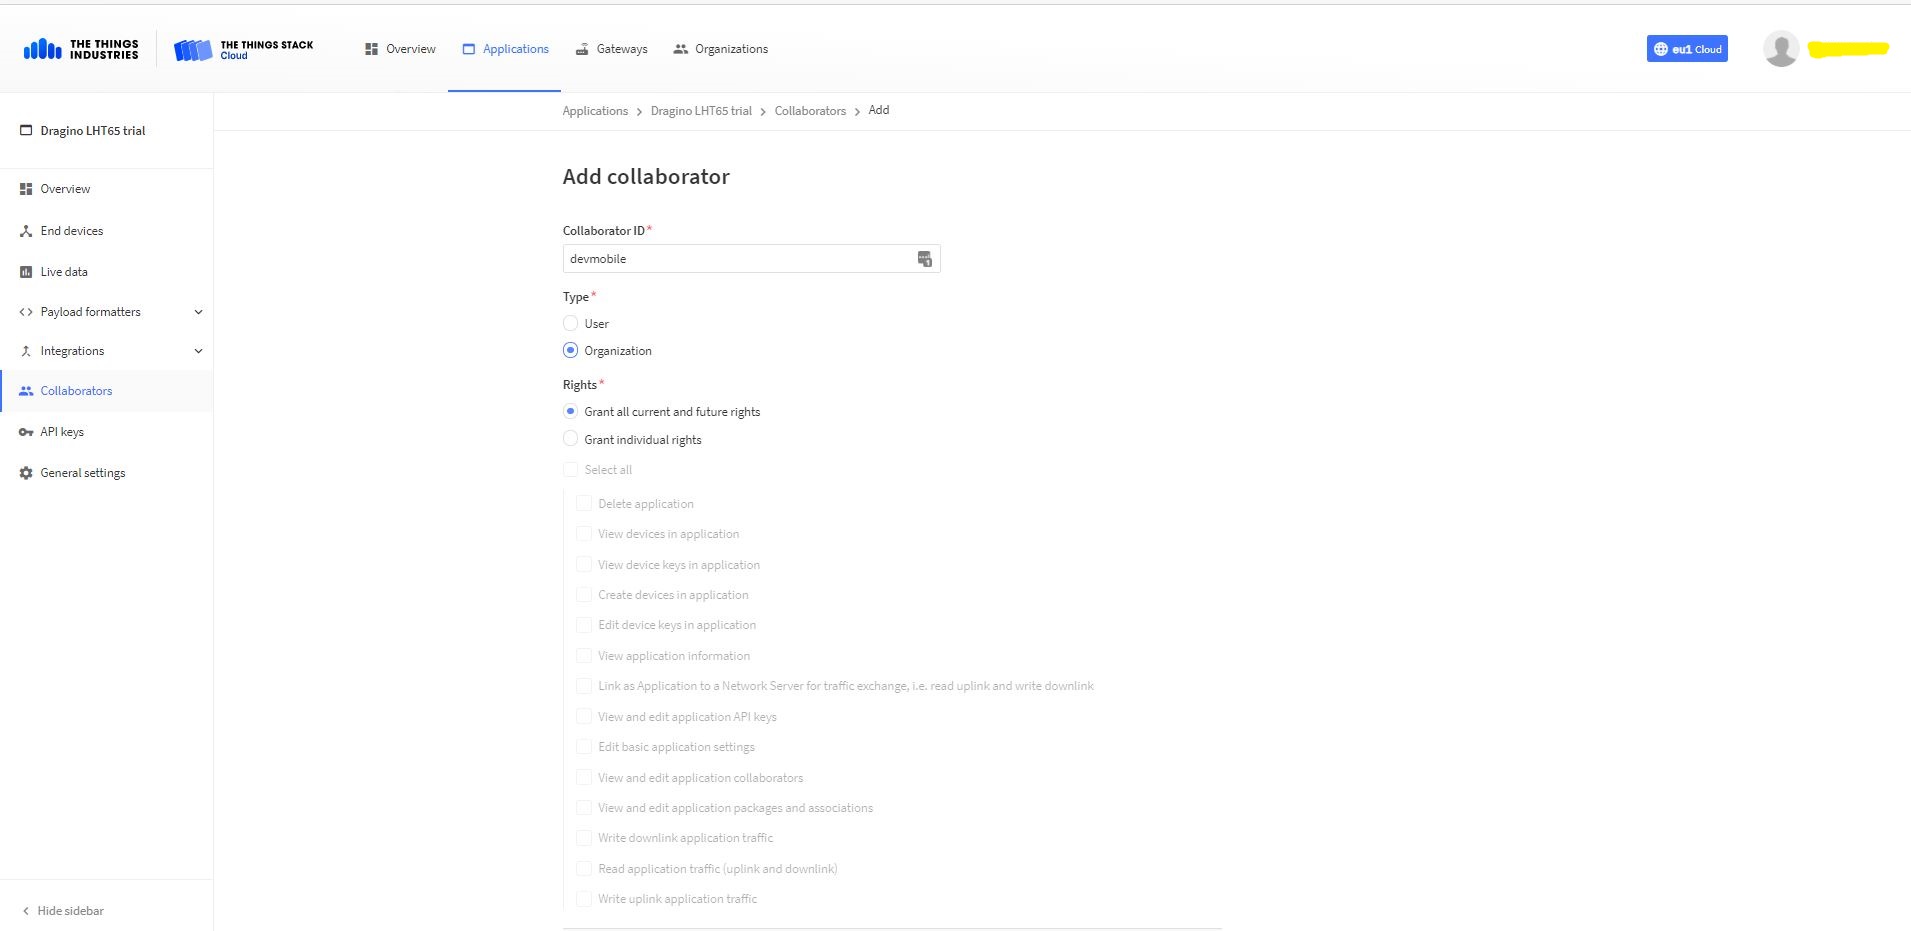
Adding devMobile as a collaborator on the new application
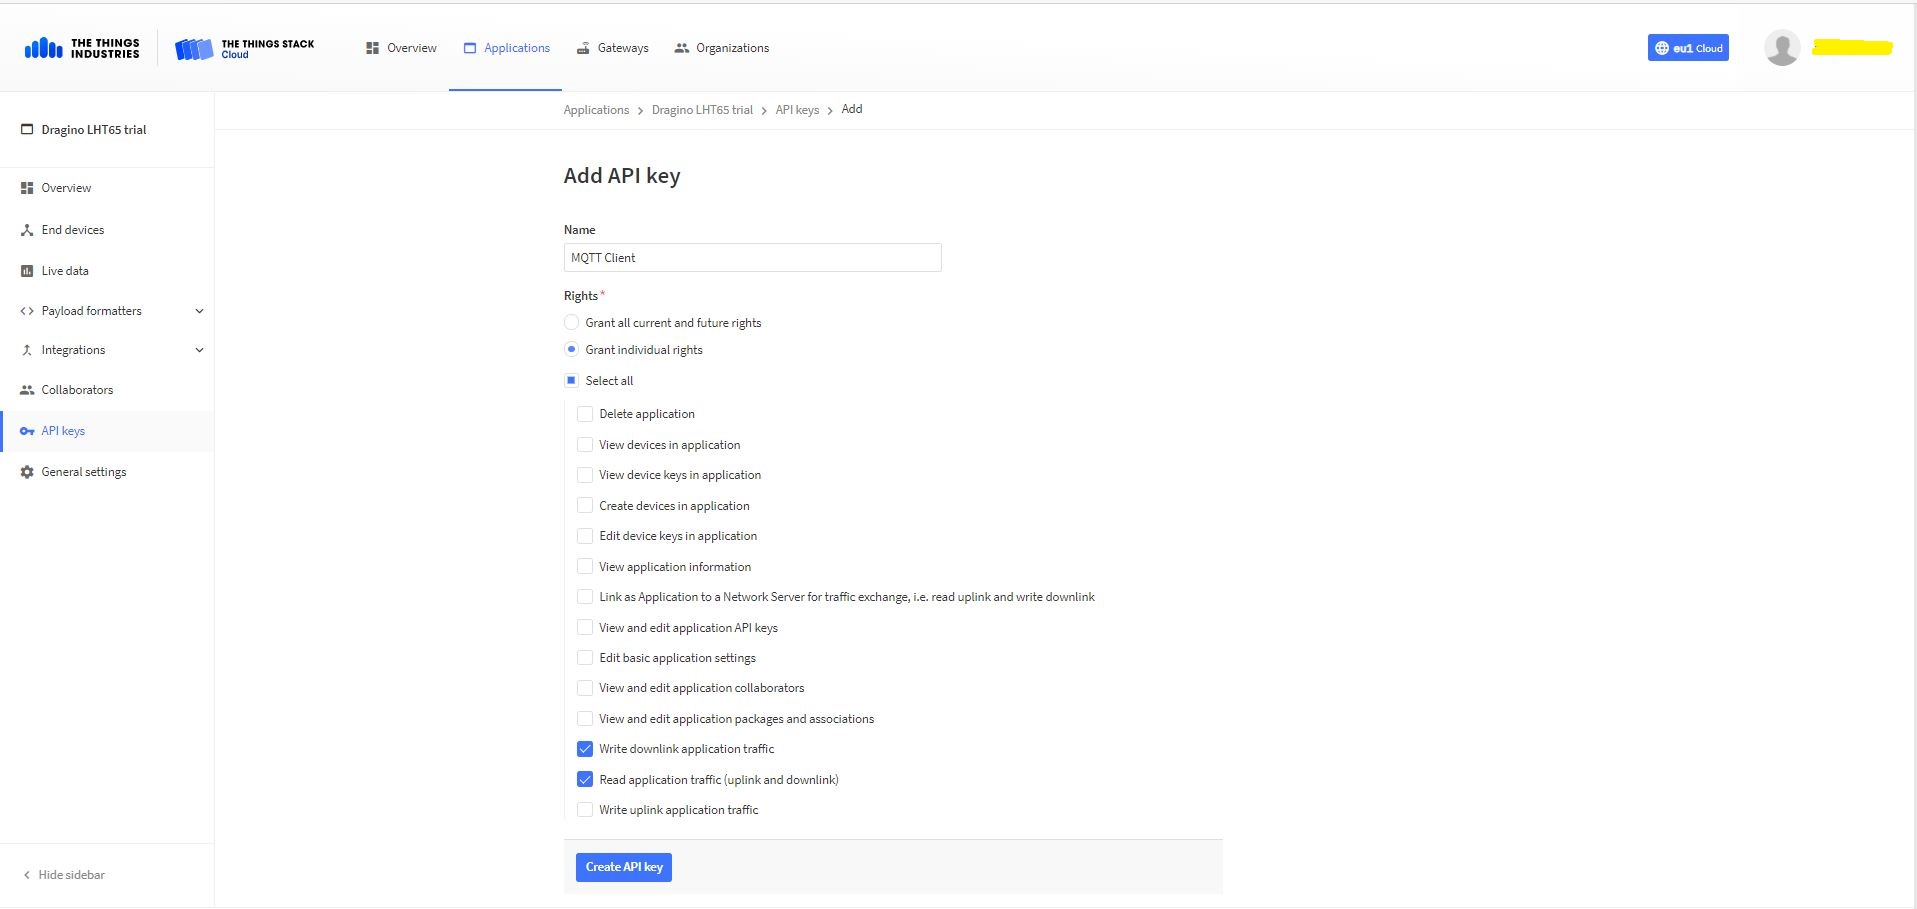
TTI Application API Key configuration
The new Application API Key used by the MQTTnetmanaged client only needs to have write downlink and read uplink traffic enabled.
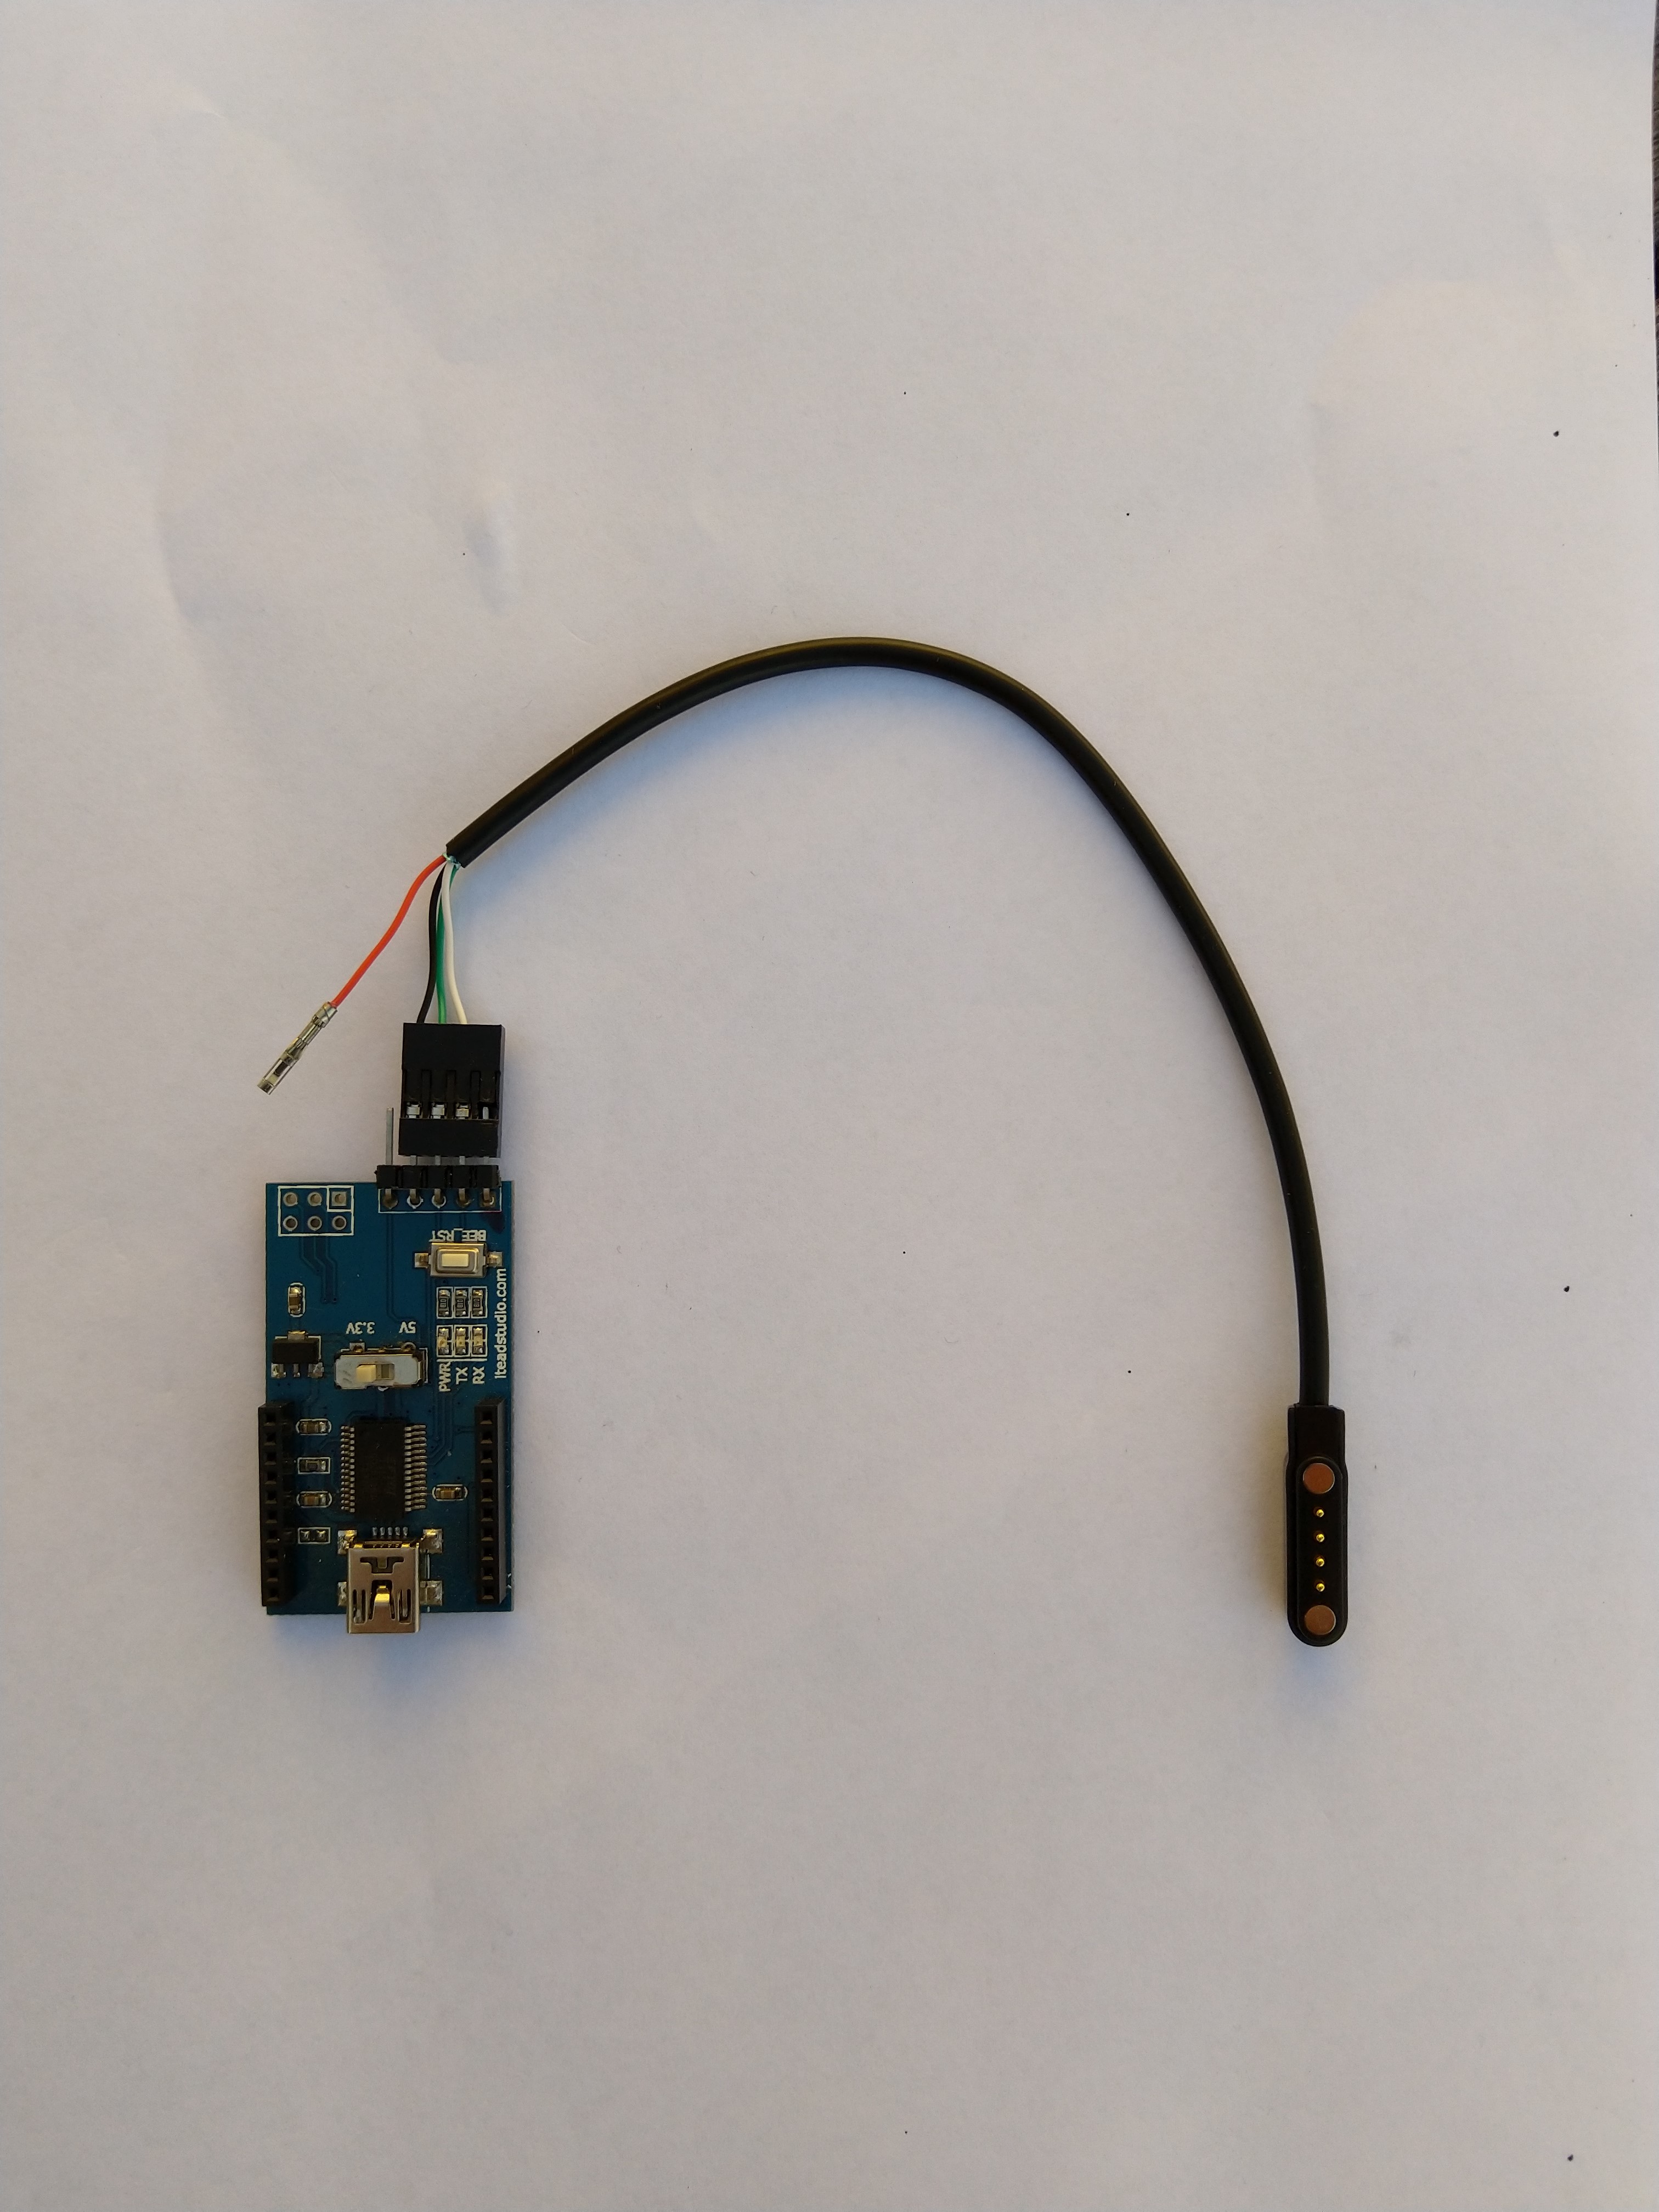
FTDI Adapter and modified LHT64 cable
So I could reliably connect to my LHT65 devices to configure them I modified a programming cable so I could use it with a spare FTDI adaptor without jumper wires. Todo this I used a small jewelers screwdriver to “pop” out the VCC cable and move the transmit data line.
After entering the device password and checking the firmware version I used the AT+CFG command to display the device settings
AT+CFG: Print all configurations

[334428]***** UpLinkCounter= 0 *****
[334430]TX on freq 923200000 Hz at DR 2
[334804]txDone
[339807]RX on freq 923200000 Hz at DR 2
[339868]rxTimeOut
[340807]RX on freq 923200000 Hz at DR 2
[340868]rxTimeOut

Correct Password

Stop Tx events,Please wait for all configurations to print
Printf all config...
AT+DEUI=a8 .. .. .. .. .. .. d6
AT+DADDR=01......D6

AT+APPKEY=9d .. .. .. .. .. .. .. .. .. .. .. .. .. .. 2e
AT+NWKSKEY=f6 .. .. .. .. .. .. .. .. .. .. .. .. .. .. 69
AT+APPSKEY=4c 35 .. .. .. .. .. .. .. .. .. .. .. .. .. 3d
AT+APPEUI=a0 .. .. .. .. .. .. 00
AT+ADR=1
AT+TXP=0
AT+DR=0
AT+DCS=0
AT+PNM=1
AT+RX2FQ=923200000
AT+RX2DR=2
AT+RX1DL=1000
AT+RX2DL=2000
AT+JN1DL=5000
AT+JN2DL=6000
AT+NJM=1
AT+NWKID=00 00 00 00
AT+FCU=0
AT+FCD=0
AT+CLASS=A
AT+NJS=0
AT+RECVB=0:
AT+RECV=0:
AT+VER=v1.7 AS923

AT+CFM=0
AT+CFS=0
AT+SNR=0
AT+RSSI=0
AT+TDC=1200000
AT+PORT=2
AT+PWORD=123456
AT+CHS=0
AT+DATE=21/3/26 07:49:15
AT+SLEEP=0
AT+EXT=4,2
AT+RTP=20
AT+BAT=3120
AT+WMOD=0
AT+ARTEMP=-40,125
AT+CITEMP=1
Start Tx events OK


[399287]***** UpLinkCounter= 0 *****

[399289]TX on freq 923400000 Hz at DR 2

[399663]txDone

[404666]RX on freq 923400000 Hz at DR 2

[404726]rxTimeOut

[405666]RX on freq 923200000 Hz at DR 2

[405726]rxTimeOut
The Dragino LHT65 uses the DeviceEUI as the DeviceID which meant I had todo more redaction in my TTI/TTN and Azure Application Insights screen captures. The rules around the re-use of EndDevice ID were a pain in the arse(PITA) in my development focused tenant.
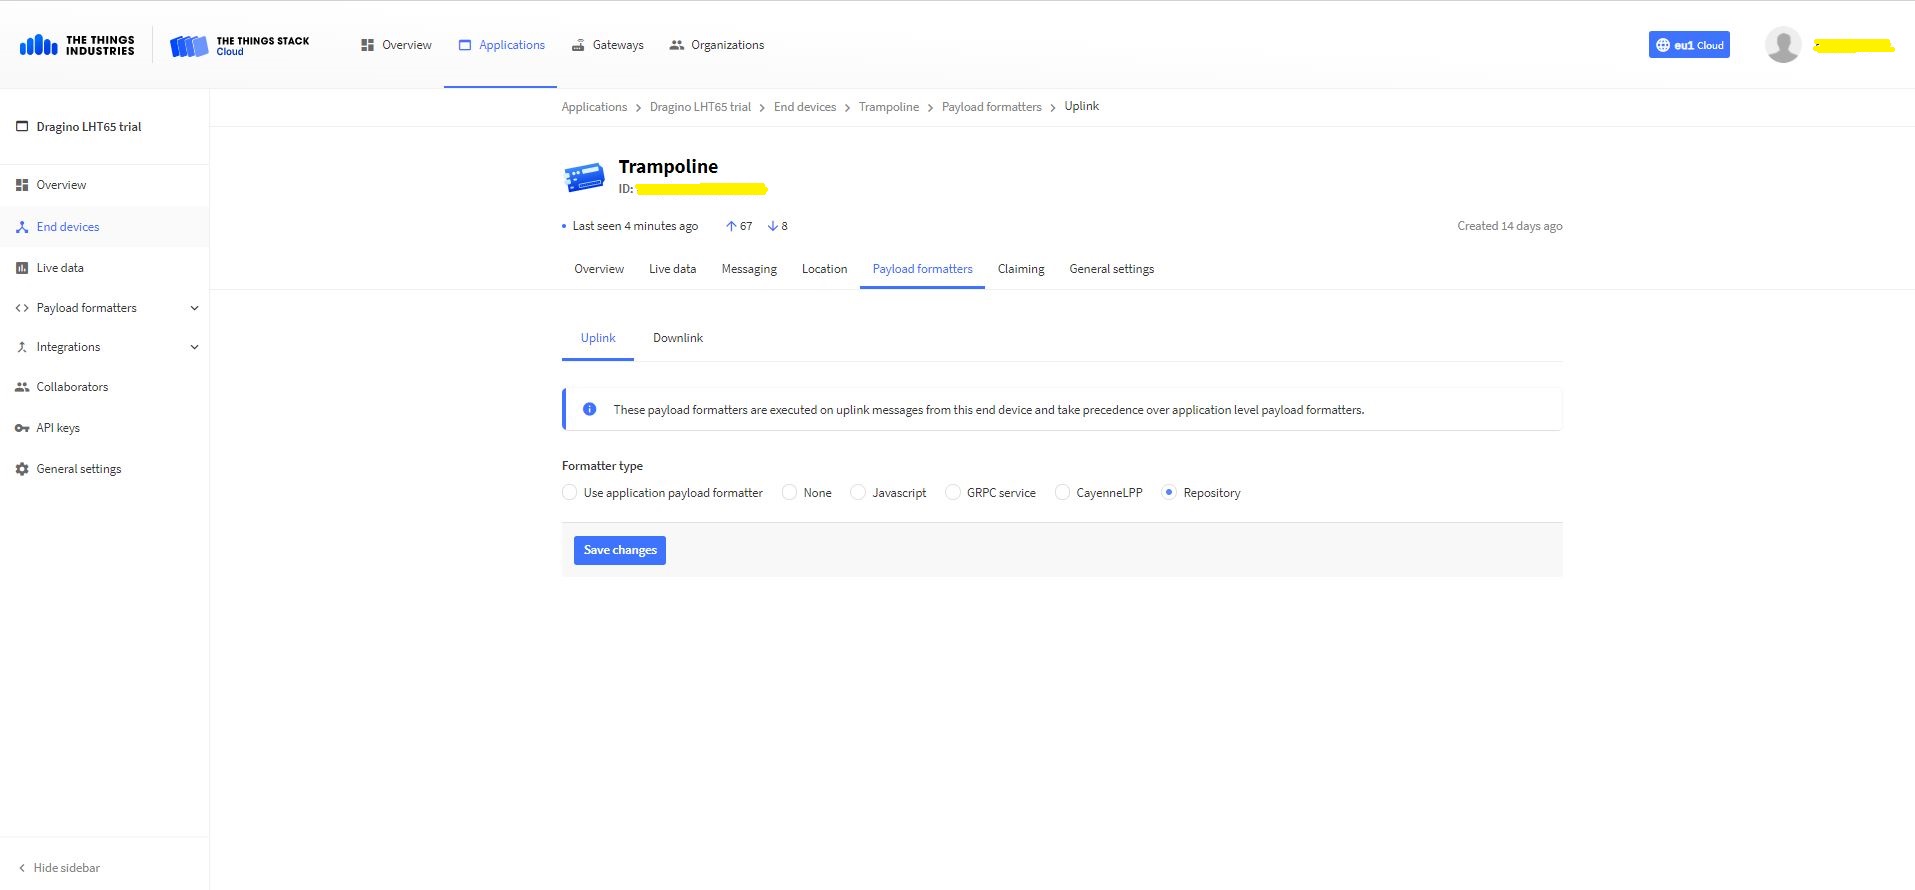
Dragino LHT 65 Device uplink payload formatter
The connector supports both uplink and downlink messages with JSON encoded payloads. The Dragino LHT65 has a vendor supplied formatter which is automatically configured when an EndDevice is created. The EndDevice formatter configuration can also be overridden at the Application level in the app.settings.json file.
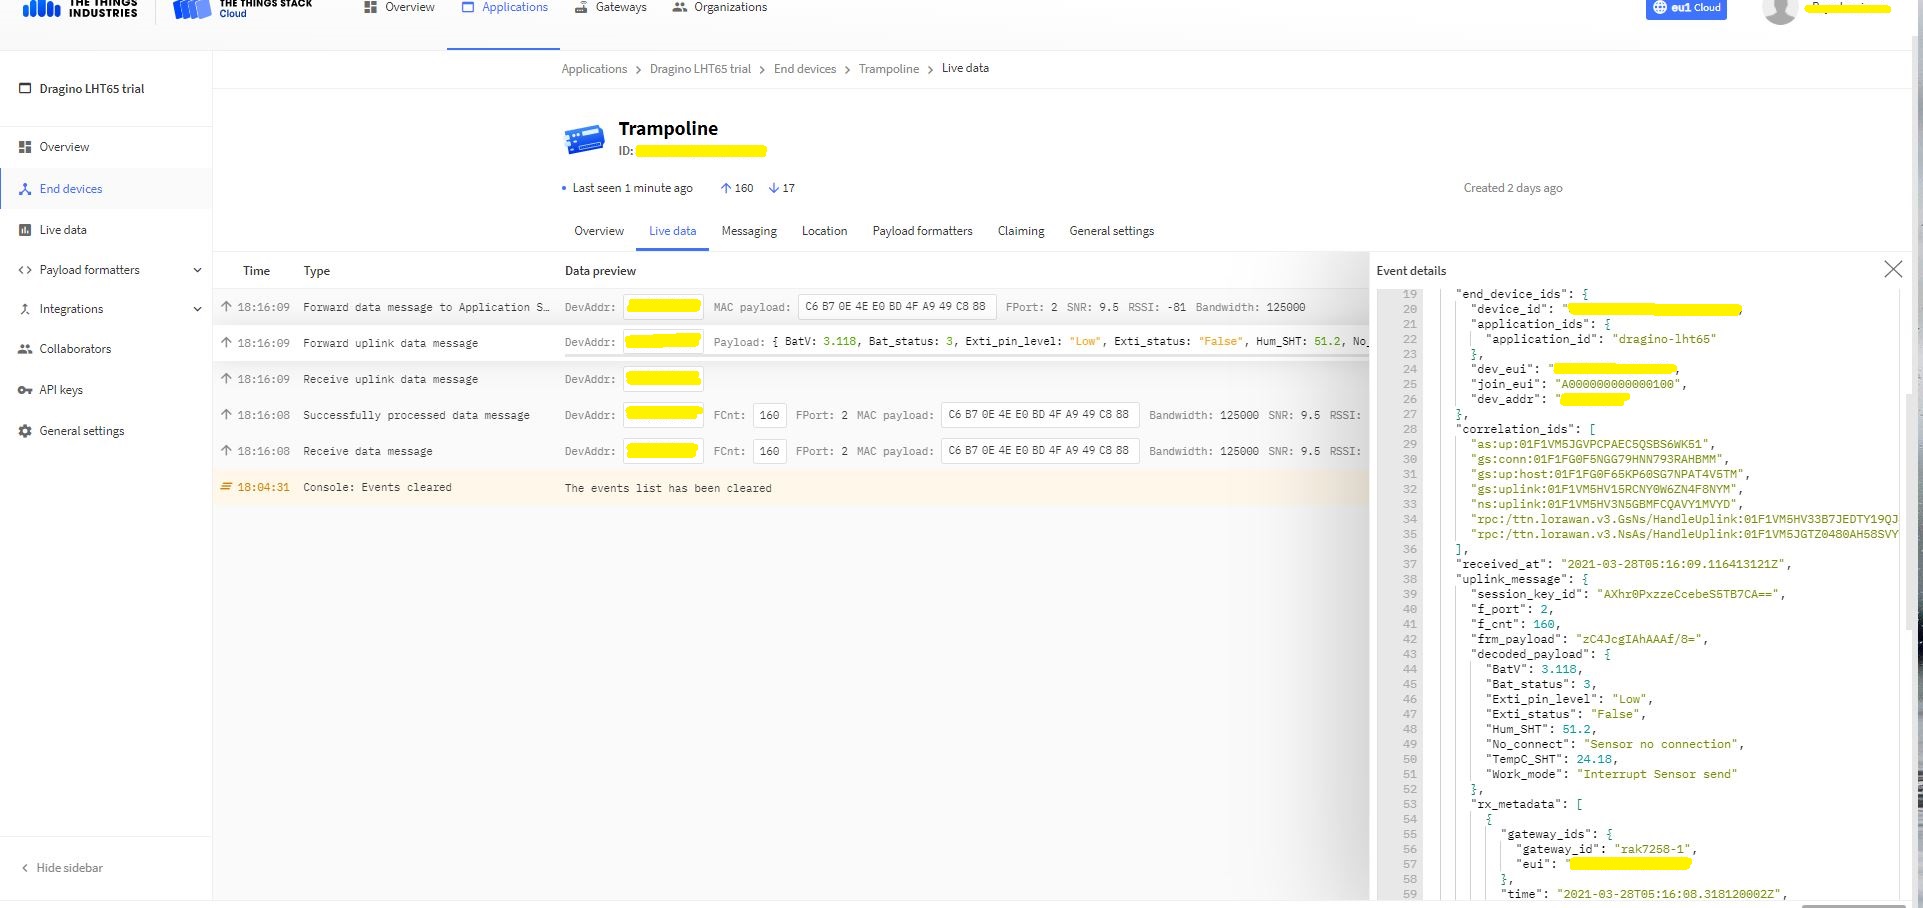
Device Live Data Uplink Data Payload
Once an EndDevice is configured in TTI/TTN I usually use the “Live data Uplink Payload” to work out the decoded payload JSON property names and data types.
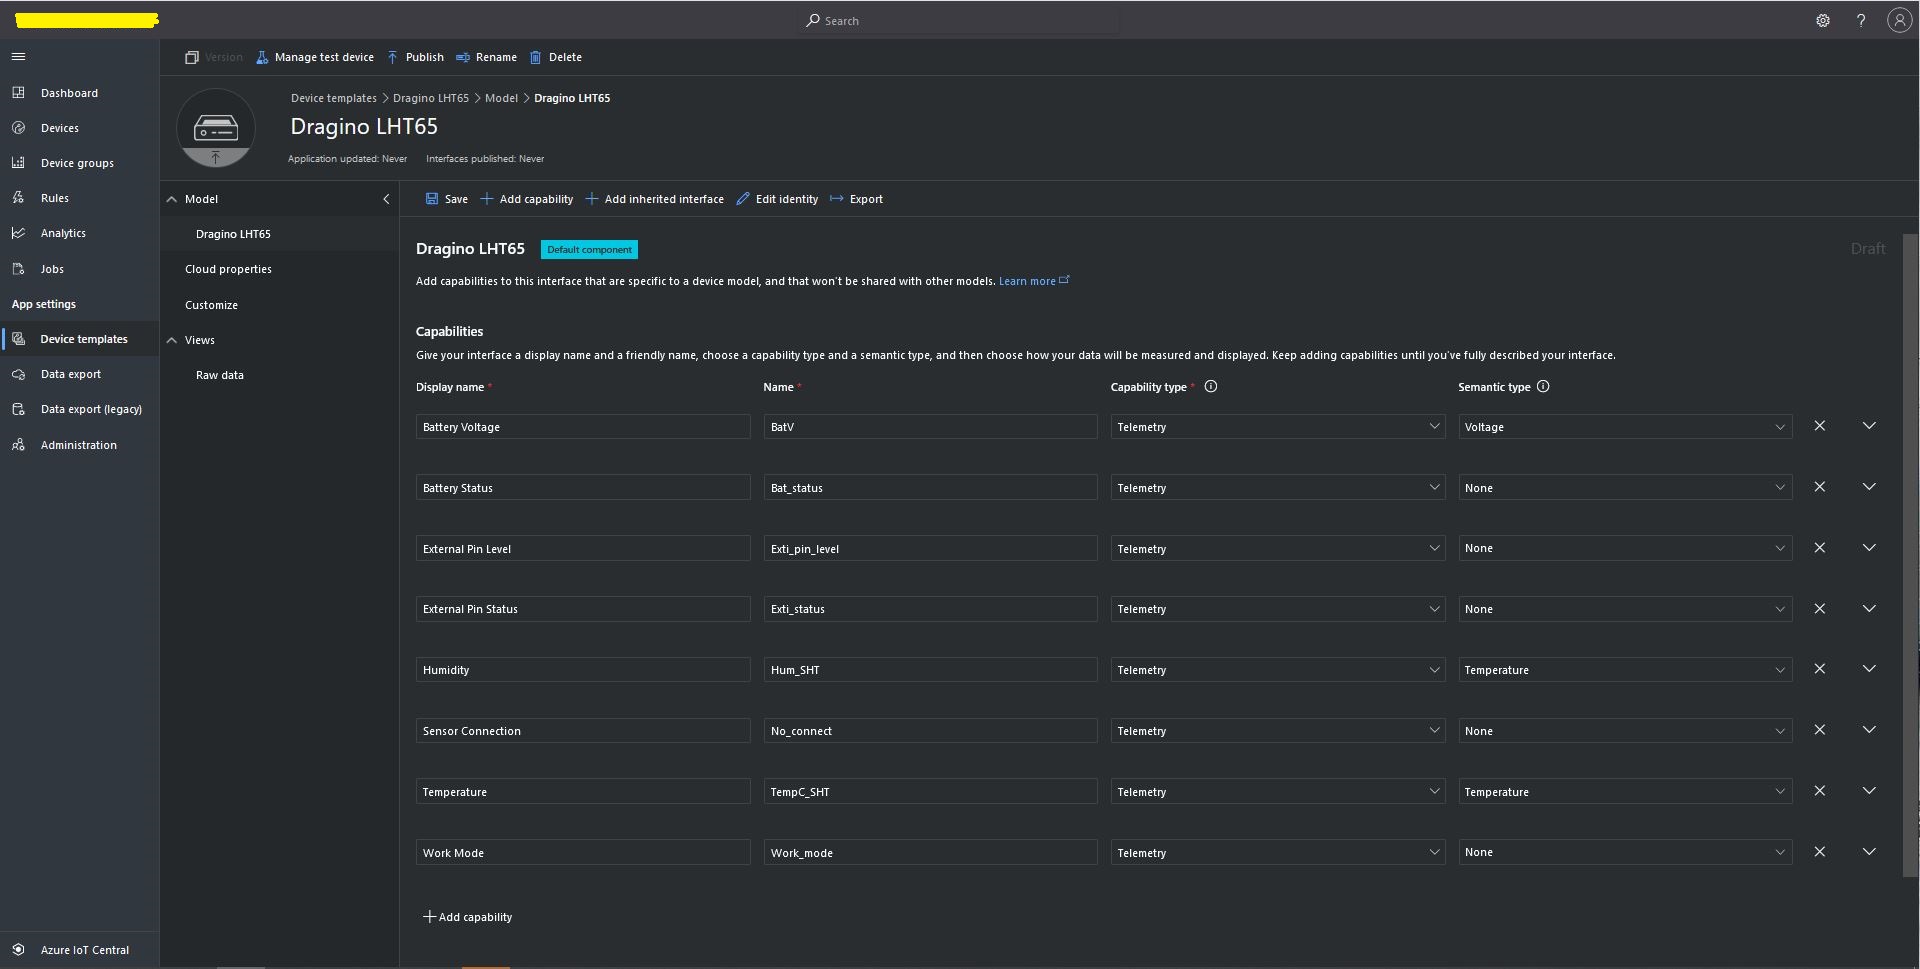
LHT65 Uplink only Azure IoT Central Device Template
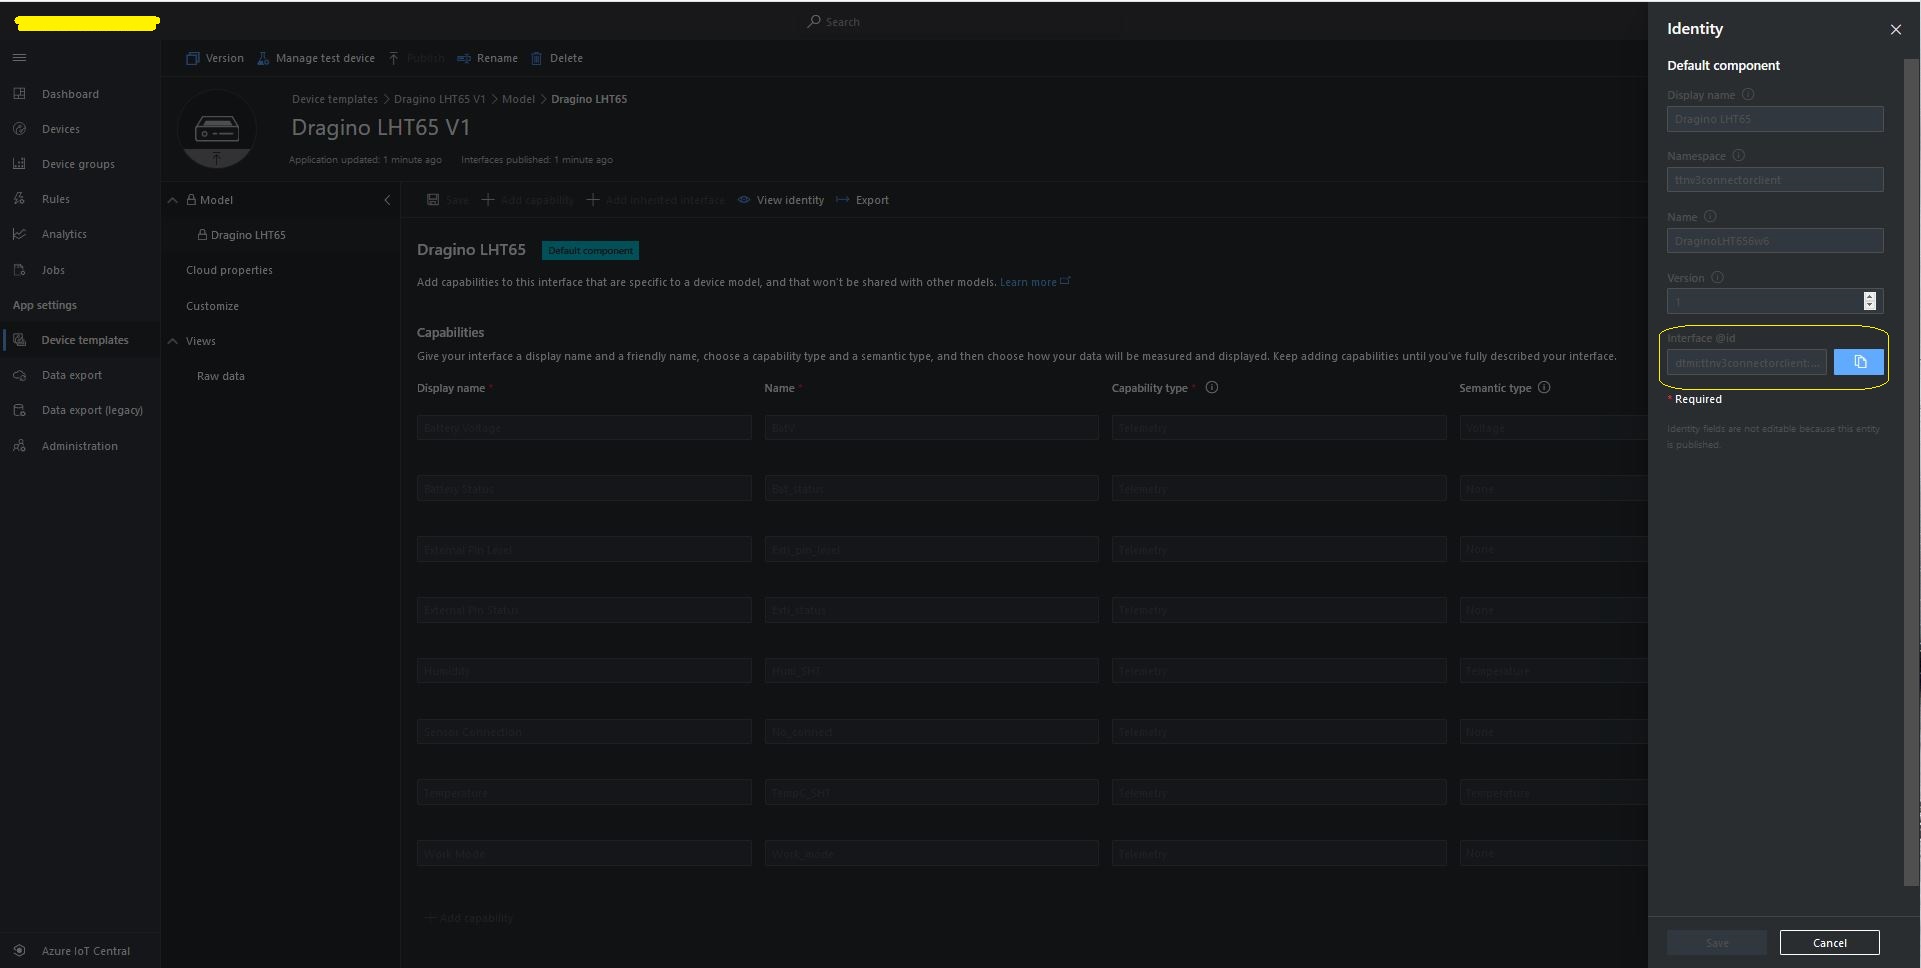
LHT65 Device Template View Identity
For Azure IoT Central “automagic” provisioning the DTDLModelId has to be copied from the Azure IoT Central Template into the TTI/TTN EndDevice or app.settings.json file application configuration.
LHT65 Device Template copy DTDL @ID
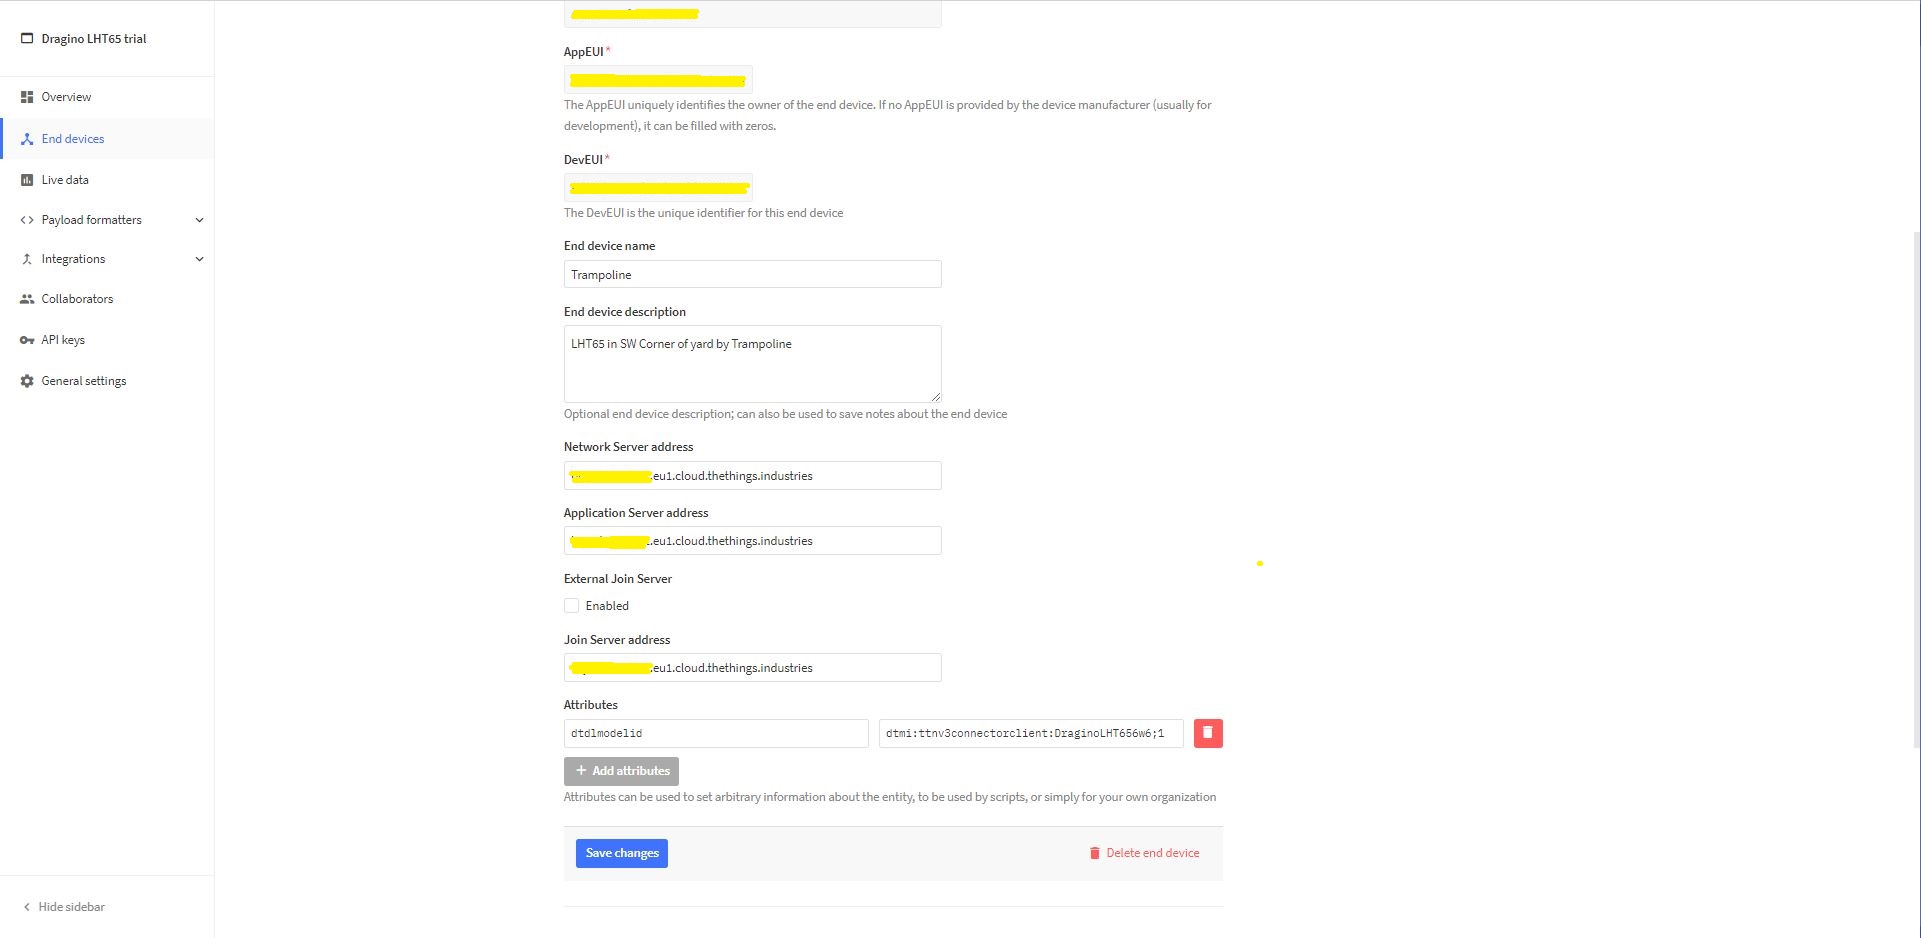
TTI EndDevice configuring the DTDLV2 @ID at the device level
Configuring the DTDLV2 @ID at the TTI application level in the app.settings.json file
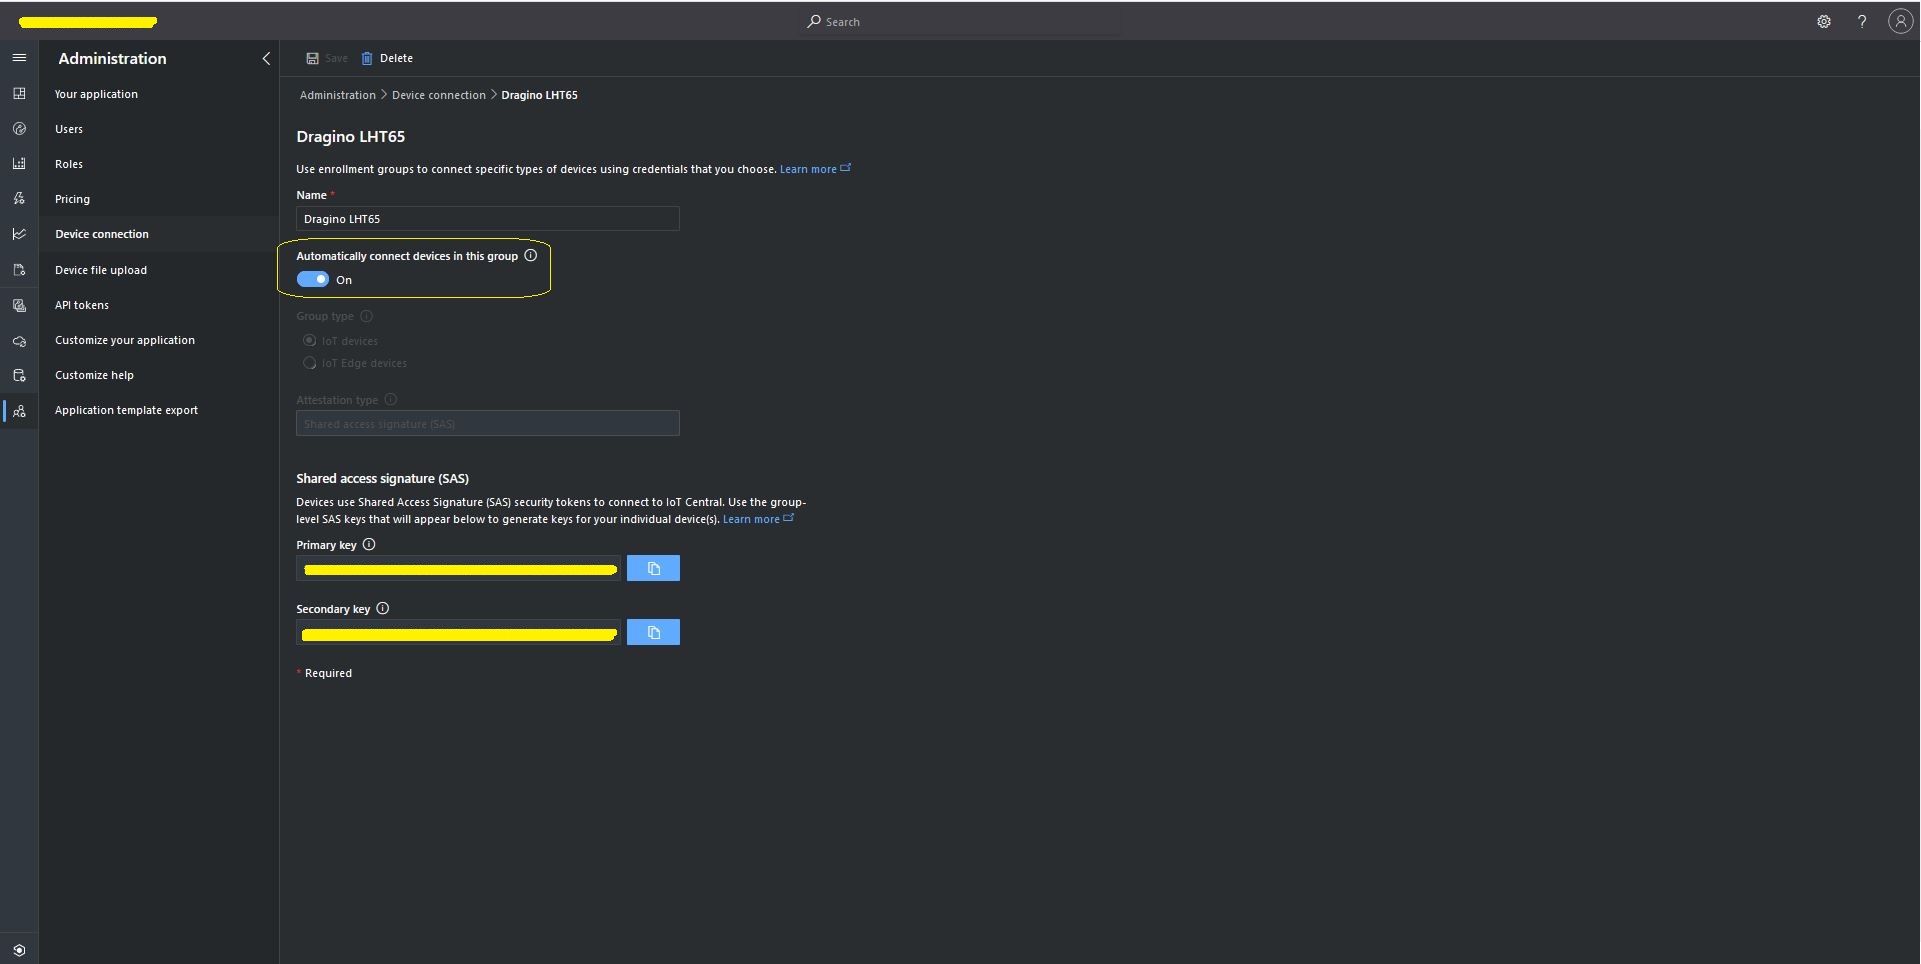
The Azure Device Provisioning Service(DPS) is configured at the TTI application level in the app.settings.json file. The IDScope and one of the Primary or Secondary Shared Access Signature(SAS) keys should be copied into DeviceProvisioningServiceSettings of an Application in the app.settings.json file. I usually set the “Automatically connect devices in this group” flag as part of the “automagic” provisioning process.
Azure IoT Central Group Enrollment Key
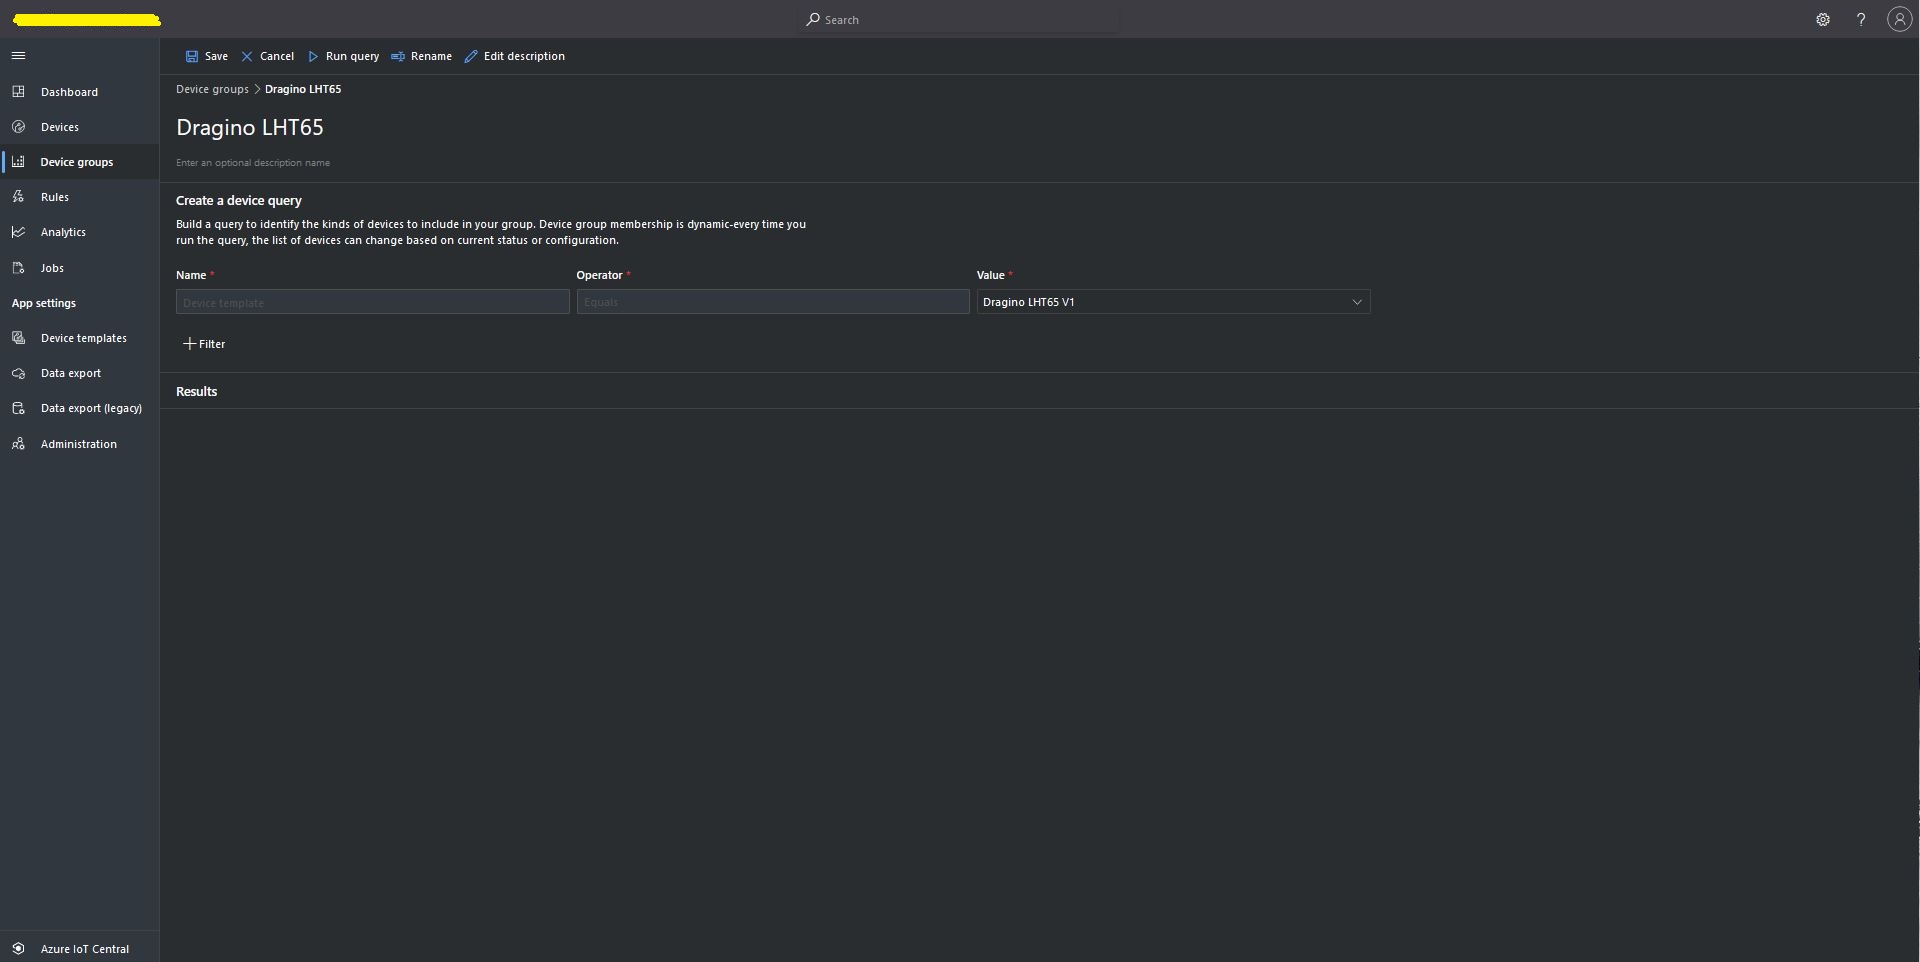
Then device templates need to be mapped to an Enrollment Group then Device Group.
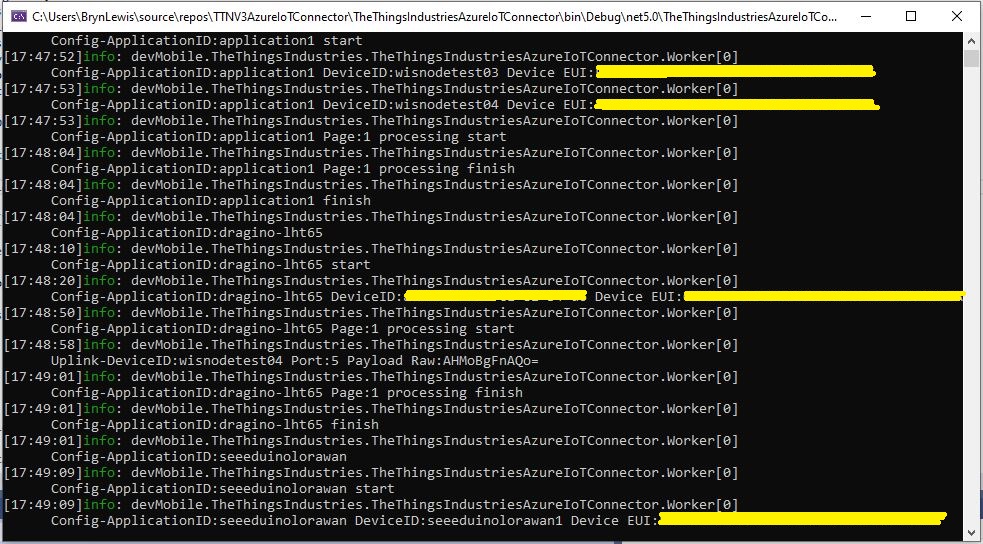
For testing the connector application can be run locally with diagnostic information displayed in the application console window as it “automagically’ provisions devices and uploads telemetry data.
Connector application Diagnostics
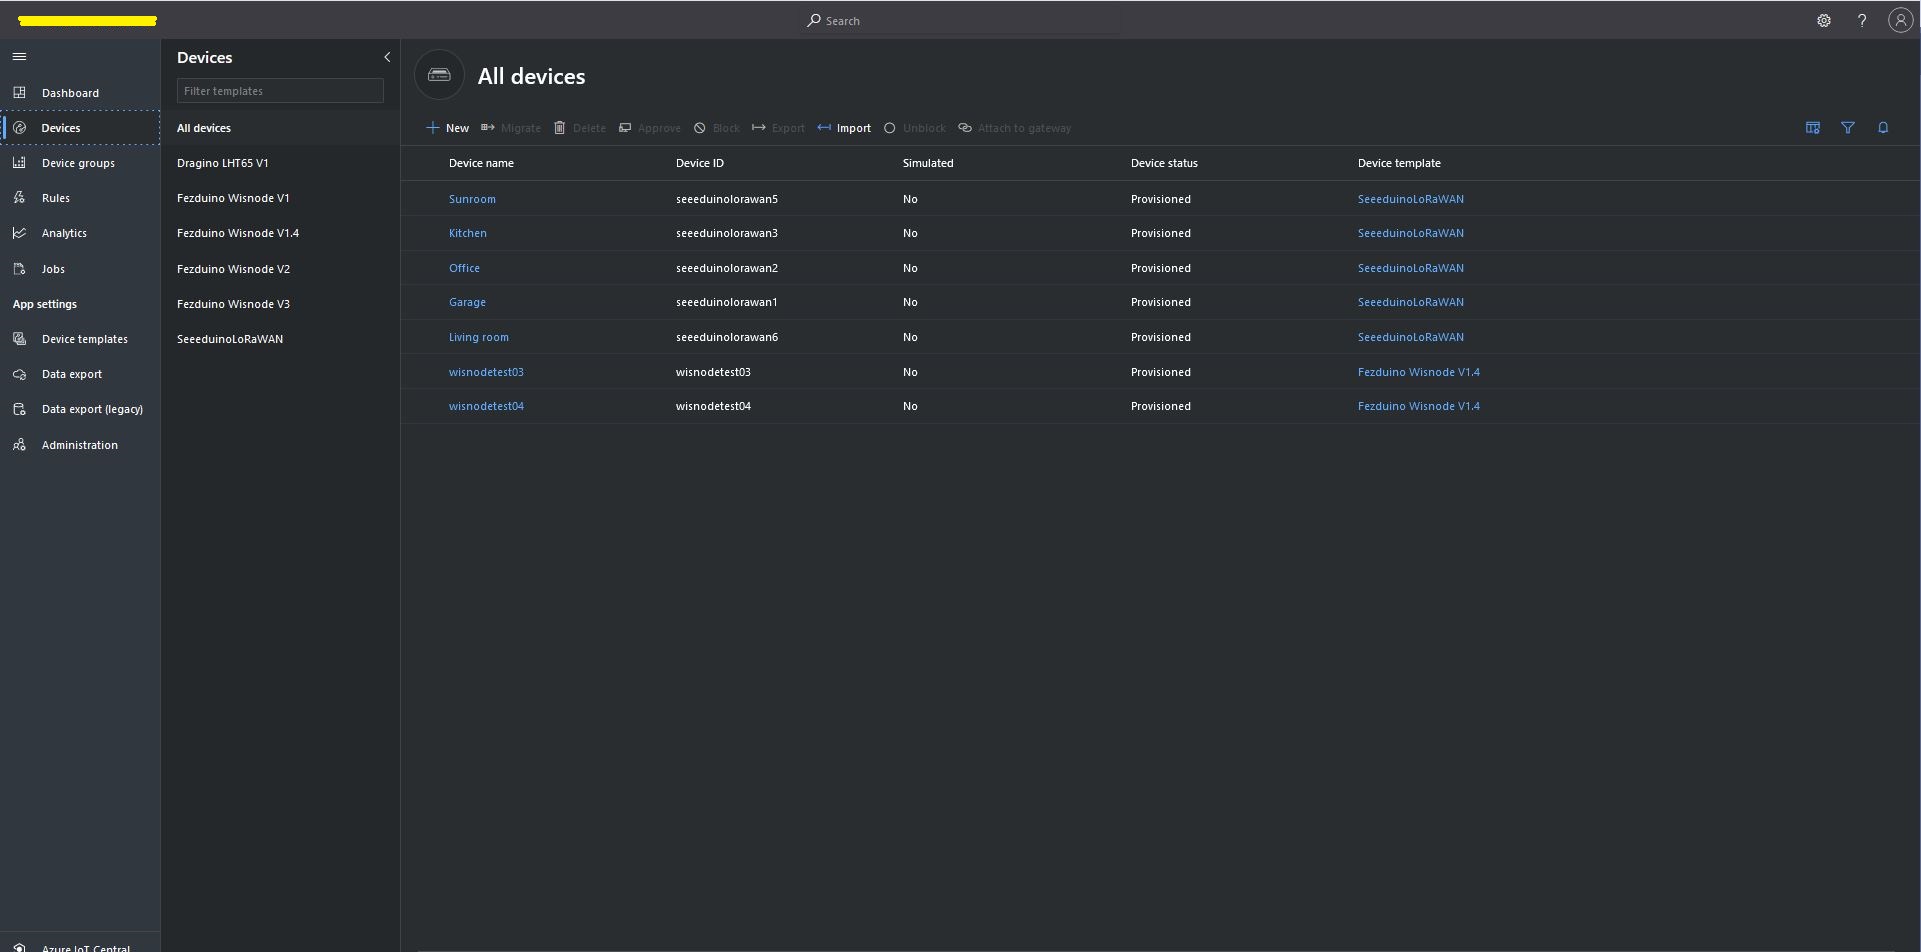
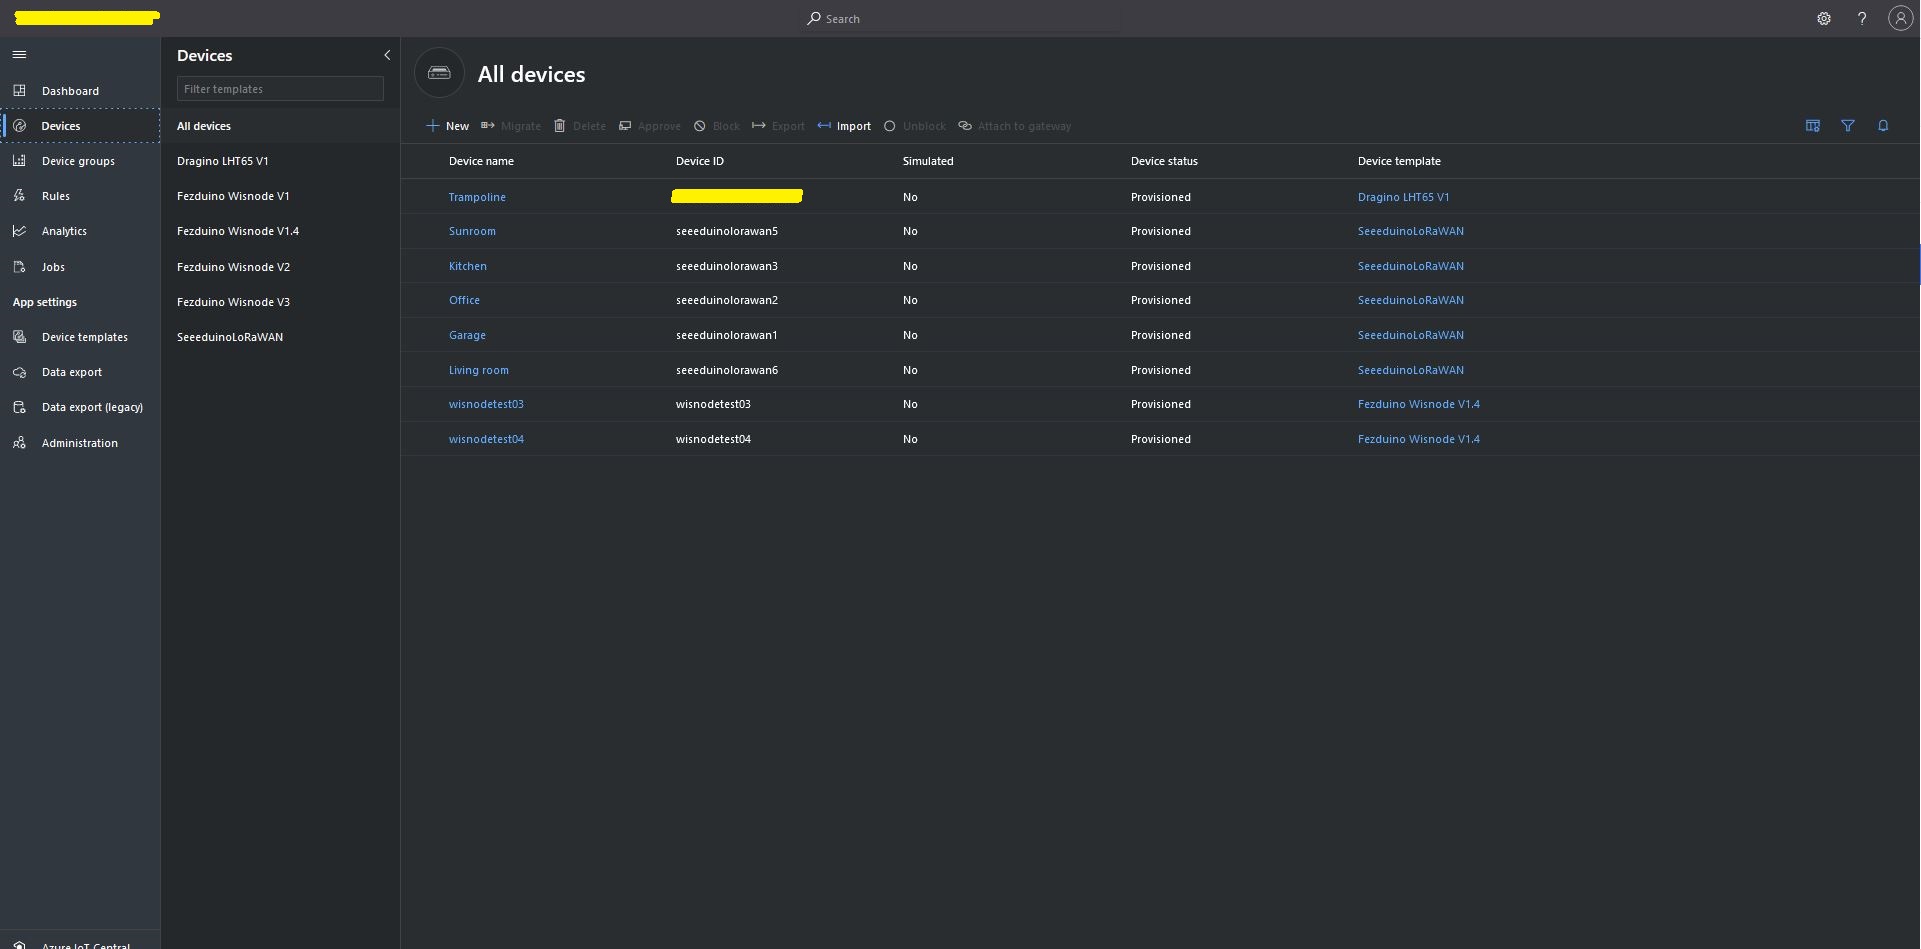
Azure IoT Central Device list before my LHT65 device is “automagically” provisioned
Azure IoT Central Device list after my LHT65 device is “automagically” provisioned
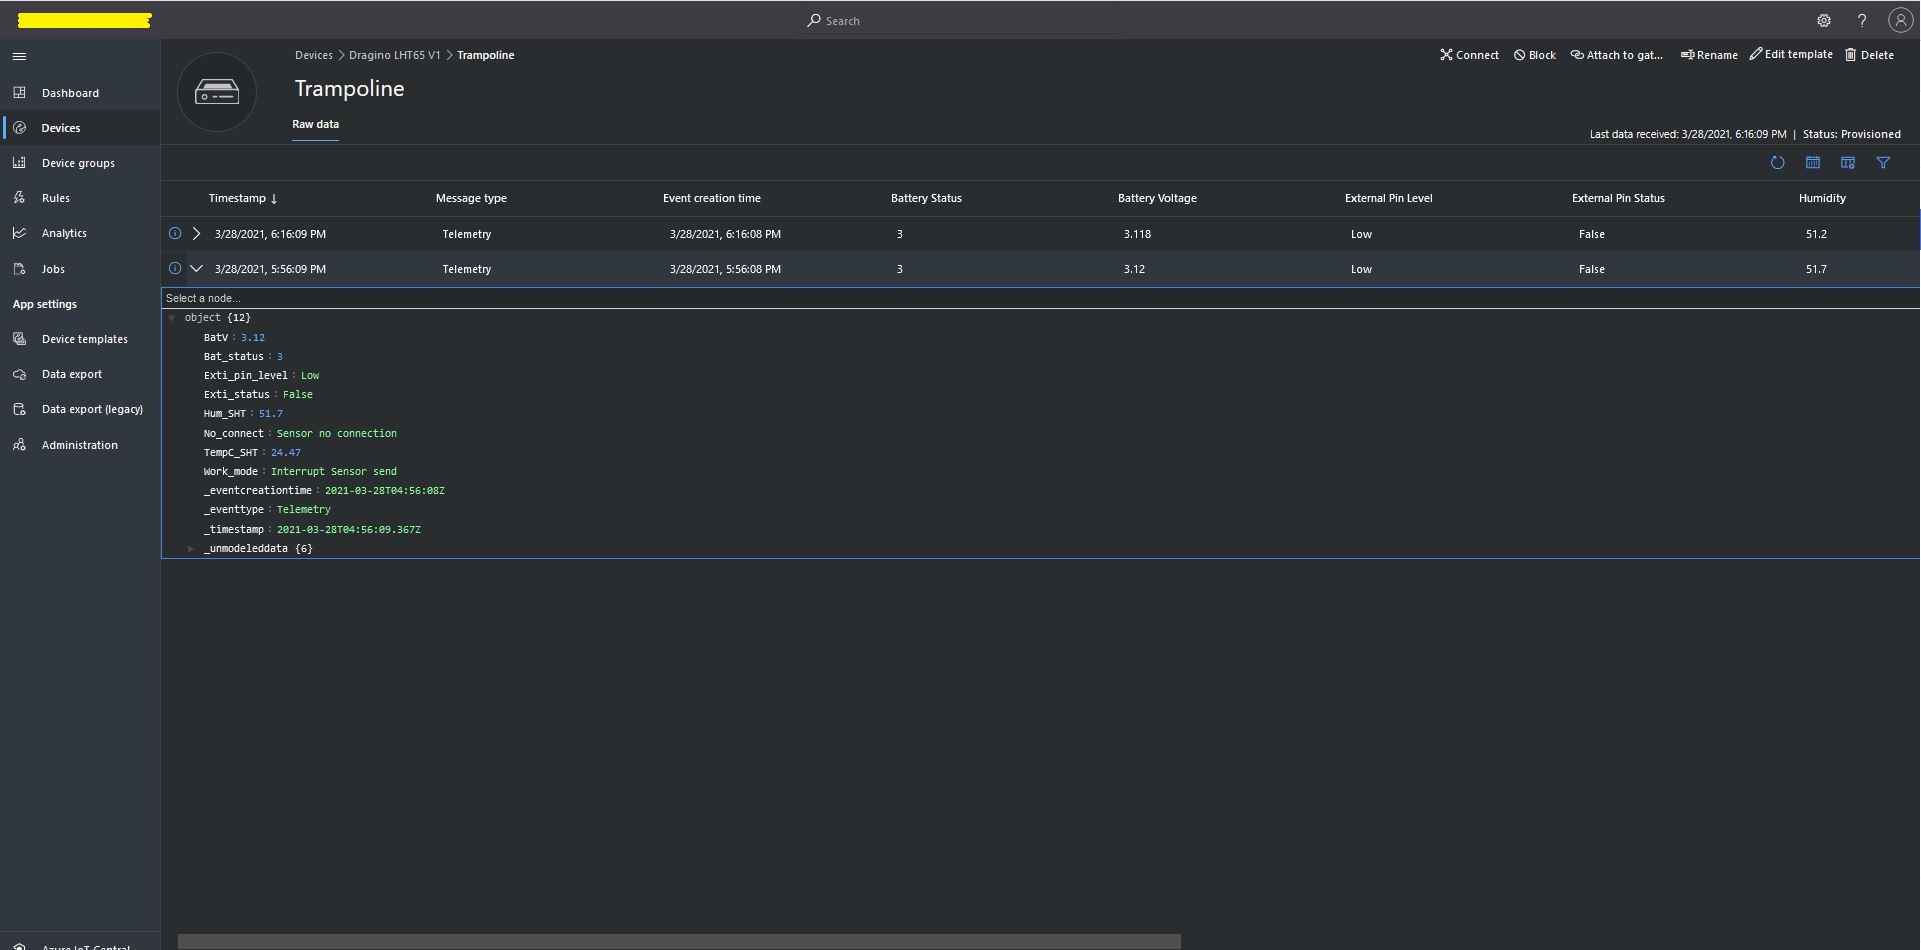
One a device has been provisioned I check on the raw data display that all the fields I configured have been mapped correctly.
Azure IoT Central raw data display
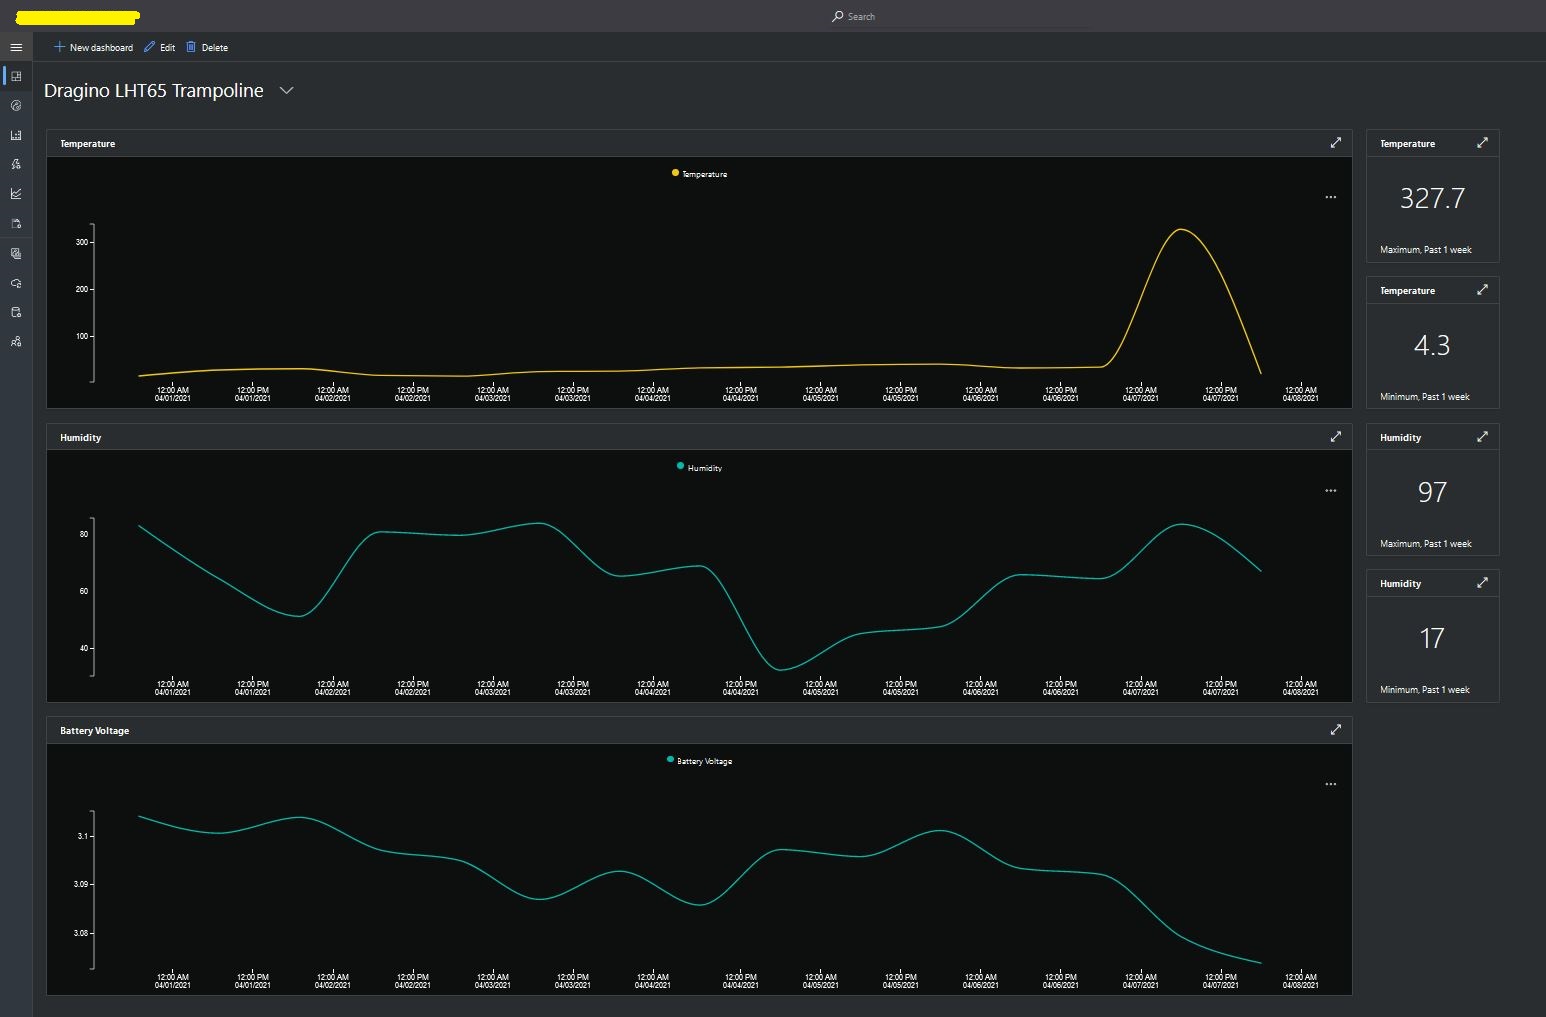
I then created a dashboard to display the telemetry data from the LHT65 sensors.
Azure IoT Central dashboard displaying LHT65 temperature, humidity and battery voltage graphs.
The dashboard also has a few KPI displays which highlighted an issue which occurs a couple of times a month with the LHT65 onboard temperature sensor values (327.7°). I have connected Dragino technical support and have also been unable to find a way to remove the current an/or filter out future aberrant values.
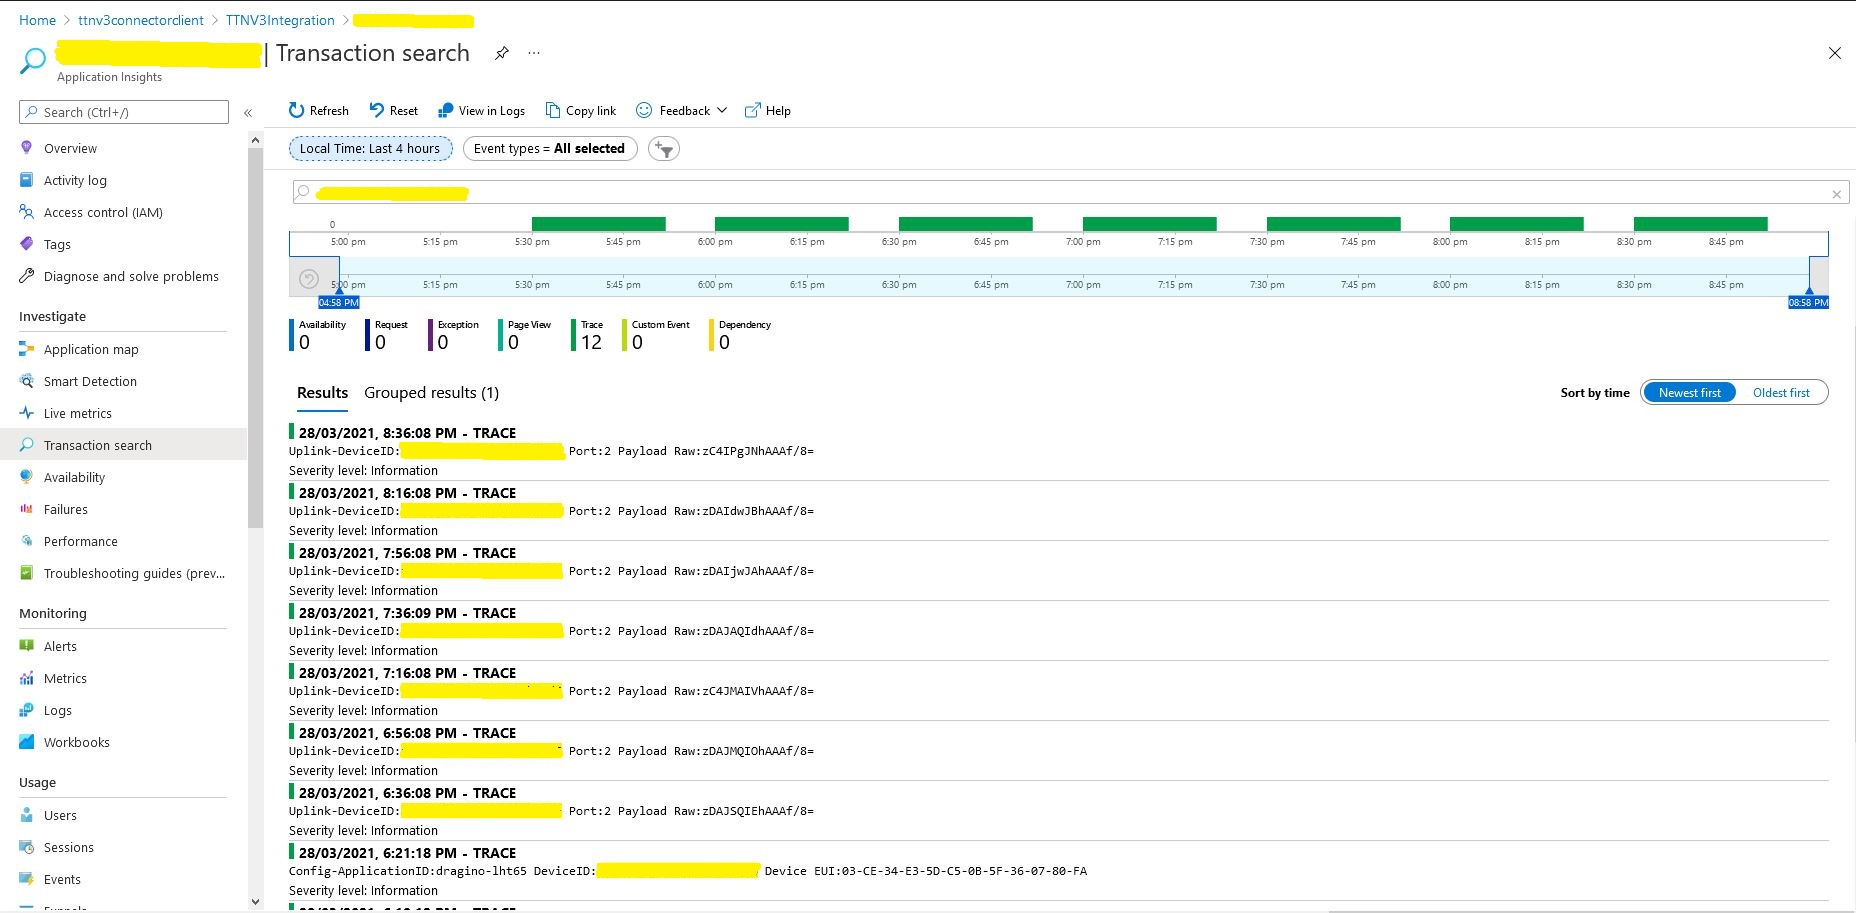
Azure Application Insights logging
I also noticed that the formatting of the DeviceEUI values in the Application Insights logging was incorrect after trying to search for one of my Seeedstudio LoRaWAN device with its DeviceEUI.
//---------------------------------------------------------------------------------
// Copyright (c) January 2020, devMobile Software
//
// Licensed under the Apache License, Version 2.0 (the "License");
// you may not use this file except in compliance with the License.
// You may obtain a copy of the License at
//
//     http://www.apache.org/licenses/LICENSE-2.0
//
// Unless required by applicable law or agreed to in writing, software
// distributed under the License is distributed on an "AS IS" BASIS,
// WITHOUT WARRANTIES OR CONDITIONS OF ANY KIND, either express or implied.
// See the License for the specific language governing permissions and
// limitations under the License.
//
//---------------------------------------------------------------------------------
namespace devMobile.IoT.FieldGateway.Client
{
   using System;
   using System.Text;
   using System.Threading;

   using devMobile.IoT.Rfm9x;

   using Meadow;
   using Meadow.Devices;
   using Meadow.Foundation.Leds;
   using Meadow.Foundation.Sensors.Atmospheric;
   using Meadow.Hardware;
   using Meadow.Peripherals.Leds;

   public class MeadowClient : App<F7Micro, MeadowClient>
   {
      private const double Frequency = 915000000.0;
      private readonly byte[] fieldGatewayAddress = Encoding.UTF8.GetBytes("LoRaIoT1");
      private readonly byte[] deviceAddress = Encoding.UTF8.GetBytes("Meadow");
      private readonly Rfm9XDevice rfm9XDevice;
      private readonly TimeSpan periodTime = new TimeSpan(0, 0, 60);
      private readonly Sht31D sensor;
      private readonly ILed Led;

      public MeadowClient()
      {
         Led = new Led(Device, Device.Pins.OnboardLedGreen);

         try
         {
            sensor = new Sht31D(Device.CreateI2cBus());

            ISpiBus spiBus = Device.CreateSpiBus(500);

            rfm9XDevice = new Rfm9XDevice(Device, spiBus, Device.Pins.D09, Device.Pins.D10, Device.Pins.D12);

            rfm9XDevice.Initialise(Frequency, paBoost: true, rxPayloadCrcOn: true);
#if DEBUG
            rfm9XDevice.RegisterDump();
#endif
            rfm9XDevice.OnReceive += Rfm9XDevice_OnReceive;
            rfm9XDevice.Receive(deviceAddress);
            rfm9XDevice.OnTransmit += Rfm9XDevice_OnTransmit;
         }
         catch (Exception ex)
         {
            Console.WriteLine(ex.Message);
         }

         while (true)
         {
            sensor.Update();

            Console.WriteLine($"{DateTime.UtcNow:HH:mm:ss}-TX T:{sensor.Temperature:0.0}C H:{sensor.Humidity:0}%");

            string payload = $"t {sensor.Temperature:0.0},h {sensor.Humidity:0}";

            Led.IsOn = true;

            rfm9XDevice.Send(fieldGatewayAddress, Encoding.UTF8.GetBytes(payload));

            Thread.Sleep(periodTime);
         }
      }

      private void Rfm9XDevice_OnReceive(object sender, Rfm9XDevice.OnDataReceivedEventArgs e)
      {
         try
         {
            string addressText = UTF8Encoding.UTF8.GetString(e.Address);
            string addressHex = BitConverter.ToString(e.Address);
            string messageText = UTF8Encoding.UTF8.GetString(e.Data);

            Console.WriteLine($"{DateTime.UtcNow:HH:mm:ss}-RX PacketSnr {e.PacketSnr:0.0} Packet RSSI {e.PacketRssi}dBm RSSI {e.Rssi}dBm = {e.Data.Length} byte message {messageText}");
         }
         catch (Exception ex)
         {
            Console.WriteLine(ex.Message);
         }
      }

      private void Rfm9XDevice_OnTransmit(object sender, Rfm9XDevice.OnDataTransmitedEventArgs e)
      {
         Led.IsOn = false;

         Console.WriteLine("{0:HH:mm:ss}-TX Done", DateTime.Now);
      }
   }
}
The Meadow platform is a work in progress (Jan 2020) so I haven’t put any effort into minimising power consumption but will revisit this in a future post.
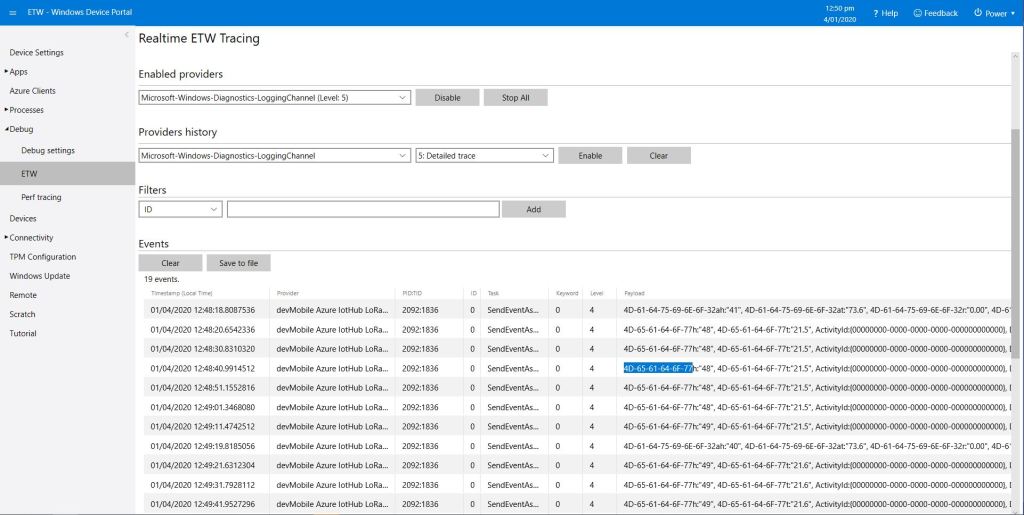
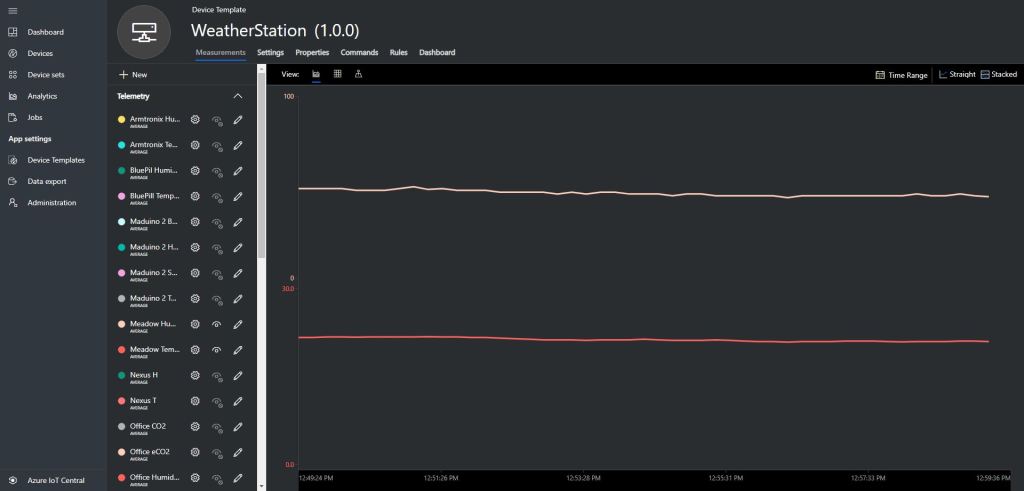
Meadow device with Seeedstudio SHT31 temperature & humidity sensorMeadow sensor data in Field Gateway ETW loggingMeadow Sensor data in Azure IoT Central
Grove – 4 pin Female Jumper to Grove 4 pin Conversion Cable USD3.90
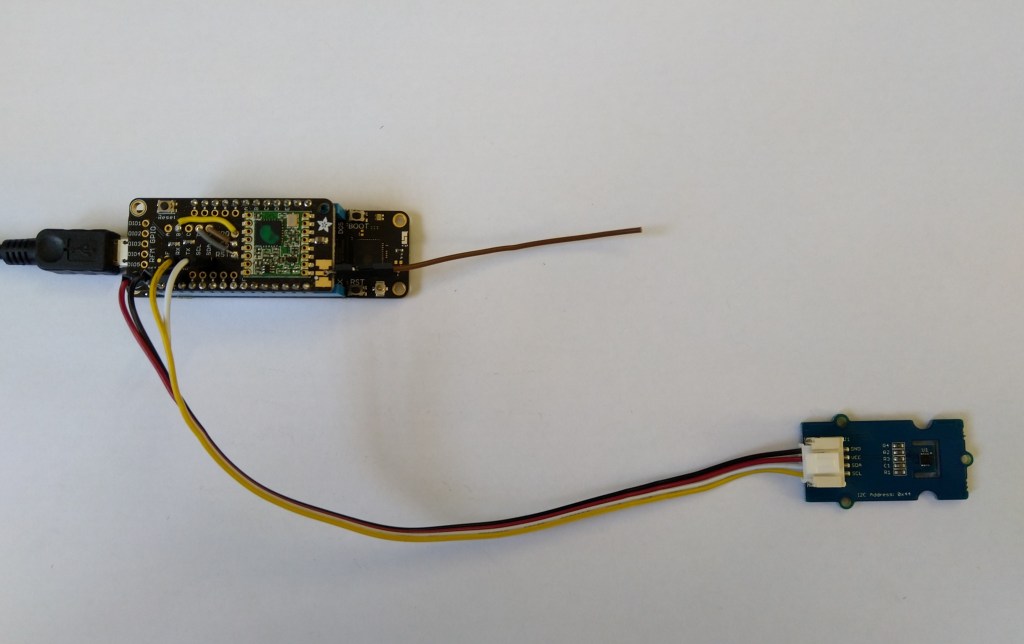
Armtronix device with Seeedstudio temperature & humidity sensor
I used a modified version of my Arduino client code which worked after I got the pins sorted and the female jumper sockets in the right order.
/*
  Copyright ® 2019 December devMobile Software, All Rights Reserved

  THIS CODE AND INFORMATION IS PROVIDED "AS IS" WITHOUT WARRANTY OF ANY
  KIND, EITHER EXPRESSED OR IMPLIED, INCLUDING BUT NOT LIMITED TO THE
  IMPLIED WARRANTIES OF MERCHANTABILITY AND/OR FITNESS FOR A PARTICULAR
  PURPOSE.

  You can do what you want with this code, acknowledgment would be nice.

  http://www.devmobile.co.nz

*/
#include <stdlib.h>
#include <LoRa.h>
#include <TH02_dev.h>

//#define DEBUG
//#define DEBUG_TELEMETRY
//#define DEBUG_LORA

// LoRa field gateway configuration (these settings must match your field gateway)
const char FieldGatewayAddress[] = {"LoRaIoT1"};
const char DeviceAddress[] = {"ArmTronix01"};
const float FieldGatewayFrequency =  915000000.0;
const byte FieldGatewaySyncWord = 0x12 ;

// Payload configuration
const int ChipSelectPin = PA4;
const int InterruptPin = PA11;
const int ResetPin = PC13;

// LoRa radio payload configuration
const byte SensorIdValueSeperator = ' ' ;
const byte SensorReadingSeperator = ',' ;
const int LoopSleepDelaySeconds = 30 ;

const byte PayloadSizeMaximum = 64 ;
byte payload[PayloadSizeMaximum];
byte payloadLength = 0 ;


void setup()
{
  Serial.begin(9600);
#ifdef DEBUG
  while (!Serial);
#endif
  Serial.println("Setup called");

  Serial.println("LoRa setup start");

  // override the default chip select and reset pins
  LoRa.setPins(ChipSelectPin, ResetPin, InterruptPin);
  if (!LoRa.begin(FieldGatewayFrequency))
  {
    Serial.println("LoRa begin failed");
    while (true); // Drop into endless loop requiring restart
  }

  // Need to do this so field gateways pays attention to messsages from this device
  LoRa.enableCrc();
  LoRa.setSyncWord(FieldGatewaySyncWord);

#ifdef DEBUG_LORA
  LoRa.dumpRegisters(Serial);
#endif
  Serial.println("LoRa Setup done.");

  // Configure the Seeedstudio TH02 temperature & humidity sensor
  Serial.println("TH02 setup start");
  TH02.begin();
  delay(100);
  Serial.println("TH02 setup done");

  PayloadHeader((byte*)FieldGatewayAddress,strlen(FieldGatewayAddress), (byte*)DeviceAddress, strlen(DeviceAddress));

  Serial.println("Setup done");
  Serial.println();
}


void loop()
{
  float temperature ;
  float humidity ;

  Serial.println("Loop called");

  PayloadReset();

  // Read the temperature & humidity & battery voltage values then display nicely
  temperature = TH02.ReadTemperature();
  Serial.print("T:");
  Serial.print( temperature, 1 ) ;
  Serial.println( "C " ) ;

  PayloadAdd( "T", temperature, 1);

  humidity = TH02.ReadHumidity();
  Serial.print("H:");
  Serial.print( humidity, 0 ) ;
  Serial.println( "% " ) ;

  PayloadAdd( "H", humidity, 0) ;

#ifdef DEBUG_TELEMETRY
  Serial.print( "RFM9X/SX127X Payload len:");
  Serial.print( payloadLength );
  Serial.println( " bytes" );
#endif

  LoRa.beginPacket();
  LoRa.write( payload, payloadLength );
  LoRa.endPacket();

  Serial.println("Loop done");
  Serial.println();
  delay(LoopSleepDelaySeconds * 1000l);
}


void PayloadHeader( byte *to, byte toAddressLength, byte *from, byte fromAddressLength)
{
  byte addressesLength = toAddressLength + fromAddressLength ;

#ifdef DEBUG_TELEMETRY
  Serial.print("PayloadHeader- ");
  Serial.print( "To len:");
  Serial.print( toAddressLength );
  Serial.print( " From len:");
  Serial.print( fromAddressLength );
  Serial.print( " Header len:");
  Serial.print( addressesLength );
  Serial.println( );
#endif

  payloadLength = 0 ;

  // prepare the payload header with "To" Address length (top nibble) and "From" address length (bottom nibble)
  payload[payloadLength] = (toAddressLength << 4) | fromAddressLength ;
  payloadLength += 1;

  // Copy the "To" address into payload
  memcpy(&payload[payloadLength], to, toAddressLength);
  payloadLength += toAddressLength ;

  // Copy the "From" into payload
  memcpy(&payload[payloadLength], from, fromAddressLength);
  payloadLength += fromAddressLength ;
}


void PayloadAdd( const char *sensorId, float value, byte decimalPlaces)
{
  byte sensorIdLength = strlen( sensorId ) ;

#ifdef DEBUG_TELEMETRY
  Serial.print("PayloadAdd-float ");
  Serial.print( "SensorId:");
  Serial.print( sensorId );
  Serial.print( " Len:");
  Serial.print( sensorIdLength );
  Serial.print( " Value:");
  Serial.print( value, decimalPlaces );
  Serial.print( " payloadLen:");
  Serial.print( payloadLength);
#endif

  memcpy( &payload[payloadLength], sensorId,  sensorIdLength) ;
  payloadLength += sensorIdLength ;
  payload[ payloadLength] = SensorIdValueSeperator;
  payloadLength += 1 ;
  payloadLength += strlen( dtostrf(value, -1, decimalPlaces, (char *)&payload[payloadLength]));
  payload[ payloadLength] = SensorReadingSeperator;
  payloadLength += 1 ;

#ifdef DEBUG_TELEMETRY
  Serial.print( " payloadLen:");
  Serial.println( payloadLength);
#endif
}


void PayloadAdd( const char *sensorId, int value )
{
  byte sensorIdLength = strlen( sensorId ) ;

#ifdef DEBUG_TELEMETRY
  Serial.print("PayloadAdd-int ");
  Serial.print( "SensorId:");
  Serial.print( sensorId );
  Serial.print( " Len:");
  Serial.print( sensorIdLength );
  Serial.print( " Value:");
  Serial.print( value );
  Serial.print( " payloadLen:");
  Serial.print( payloadLength);
#endif

  memcpy( &payload[payloadLength], sensorId,  sensorIdLength) ;
  payloadLength += sensorIdLength ;
  payload[ payloadLength] = SensorIdValueSeperator;
  payloadLength += 1 ;
  payloadLength += strlen( itoa( value,(char *)&payload[payloadLength],10));
  payload[ payloadLength] = SensorReadingSeperator;
  payloadLength += 1 ;

#ifdef DEBUG_TELEMETRY
  Serial.print( " payloadLen:");
  Serial.println( payloadLength);
#endif
}


void PayloadAdd( const char *sensorId, unsigned int value )
{
  byte sensorIdLength = strlen( sensorId ) ;

#ifdef DEBUG_TELEMETRY
  Serial.print("PayloadAdd-unsigned int ");
  Serial.print( "SensorId:");
  Serial.print( sensorId );
  Serial.print( " Len:");
  Serial.print( sensorIdLength );
  Serial.print( " Value:");
  Serial.print( value );
  Serial.print( " payloadLen:");
  Serial.print( payloadLength);
#endif

  memcpy( &payload[payloadLength], sensorId,  sensorIdLength) ;
  payloadLength += sensorIdLength ;
  payload[ payloadLength] = SensorIdValueSeperator;
  payloadLength += 1 ;
  payloadLength += strlen( utoa( value,(char *)&payload[payloadLength],10));
  payload[ payloadLength] = SensorReadingSeperator;
  payloadLength += 1 ;

#ifdef DEBUG_TELEMETRY
  Serial.print( " payloadLen:");
  Serial.println( payloadLength);
#endif
}


void PayloadReset()
{
  byte fromAddressLength = payload[0] & 0xf ;
  byte toAddressLength = payload[0] >> 4 ;
  byte addressesLength = toAddressLength + fromAddressLength ;

  payloadLength = addressesLength + 1;

#ifdef DEBUG_TELEMETRY
  Serial.print("PayloadReset- ");
  Serial.print( "To len:");
  Serial.print( toAddressLength );
  Serial.print( " From len:");
  Serial.print( fromAddressLength );
  Serial.print( " Header len:");
  Serial.println( addressesLength );
#endif
}
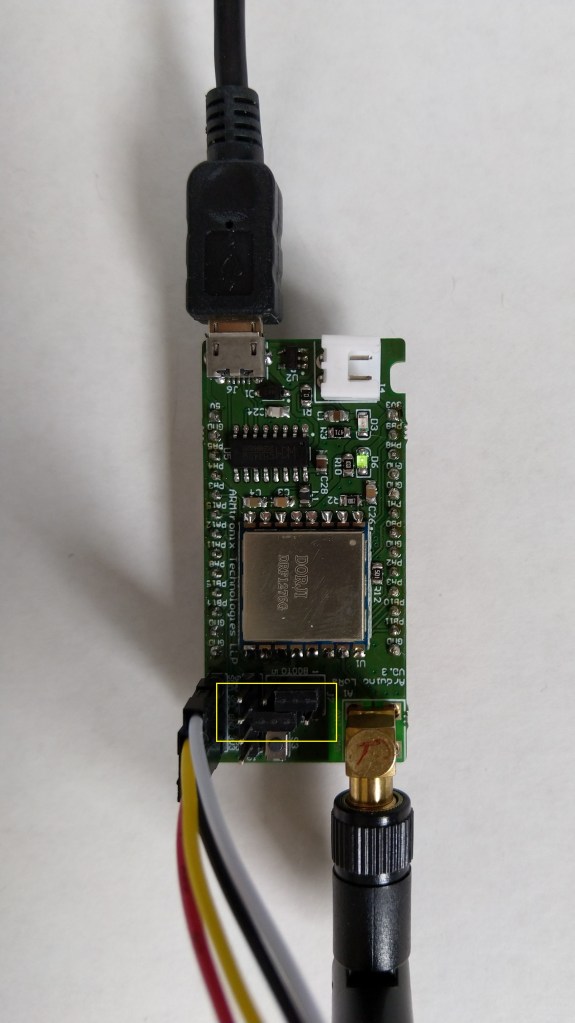
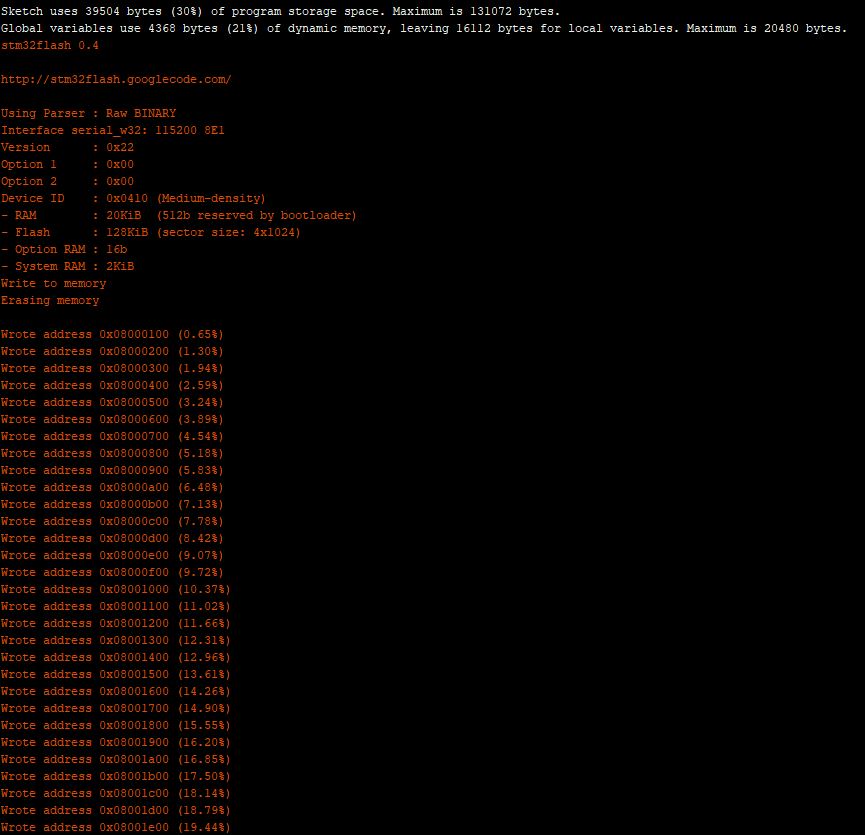
To get the application to download I had to configure the board in the Arduino IDE
Then change the jumpers
Initially I had some problems deploying my software because I hadn’t followed the instructions (the wiki everyone referred to appeared to be offline) and run the installation batch file (New dev machine since my previous maple based project).
I configured the device to upload to my Azure IoT Hub/Azure IoT Central gateway and it has been running reliably for a couple of days.
Azure IoT Central temperature and humidity values
Initially I had some configuration problems but I contacted Armtronix support and they promptly provided a couple of updated links for product and device documentation.