Azure IoT Hub SAS Tokens revisited

A long time ago I wrote a post about uploading telemetry data to an Azure Event Hub from a Netduino 3 Wifi using HTTPS. To send messages to the EventHub I had to create a valid SAS Token which took a surprising amount of effort because of the reduced text encoding/decoding and cryptographic functionality available in .NET Micro Framework v4.3 (NetMF)

// Create a SAS token for a specified scope. SAS tokens are described in http://msdn.microsoft.com/en-us/library/windowsazure/dn170477.aspx.
private static string CreateSasToken(string uri, string keyName, string key)
{
   // Set token lifetime to 20 minutes. When supplying a device with a token, you might want to use a longer expiration time.
   uint tokenExpirationTime = GetExpiry(20 * 60);
 
   string stringToSign = HttpUtility.UrlEncode(uri) + "\n" + tokenExpirationTime;
 
   var hmac = SHA.computeHMAC_SHA256(Encoding.UTF8.GetBytes(key), Encoding.UTF8.GetBytes(stringToSign));
   string signature = Convert.ToBase64String(hmac);
 
   signature = Base64NetMf42ToRfc4648(signature);
 
   string token = "SharedAccessSignature sr=" + HttpUtility.UrlEncode(uri) + "&sig=" + HttpUtility.UrlEncode(signature) + "&se=" + tokenExpirationTime.ToString() + "&skn=" + keyName;
 
   return token;
}
 
private static string Base64NetMf42ToRfc4648(string base64netMf)
{
   var base64Rfc = string.Empty;
 
   for (var i = 0; i < base64netMf.Length; i++)
   {
      if (base64netMf[i] == '!')
      {
         base64Rfc += '+';
      }
      else if (base64netMf[i] == '*')
      {
         base64Rfc += '/';
      }
      else
      {
         base64Rfc += base64netMf[i];
      }
   }
   return base64Rfc;
}
 
static uint GetExpiry(uint tokenLifetimeInSeconds)
{
   const long ticksPerSecond = 1000000000 / 100; // 1 tick = 100 nano seconds
 
   DateTime origin = new DateTime(1970, 1, 1, 0, 0, 0, 0);
   TimeSpan diff = DateTime.Now.ToUniversalTime() - origin;
 
   return ((uint)(diff.Ticks / ticksPerSecond)) + tokenLifetimeInSeconds;
}

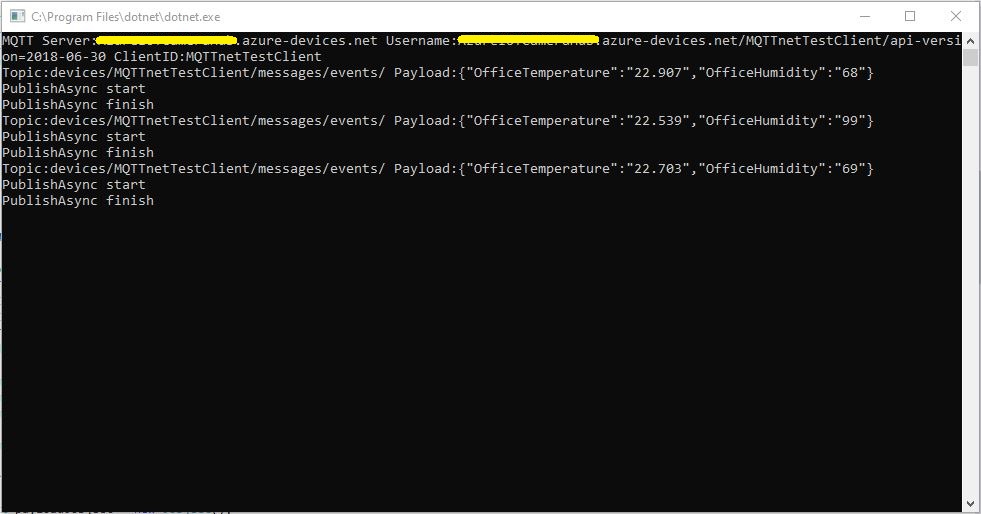
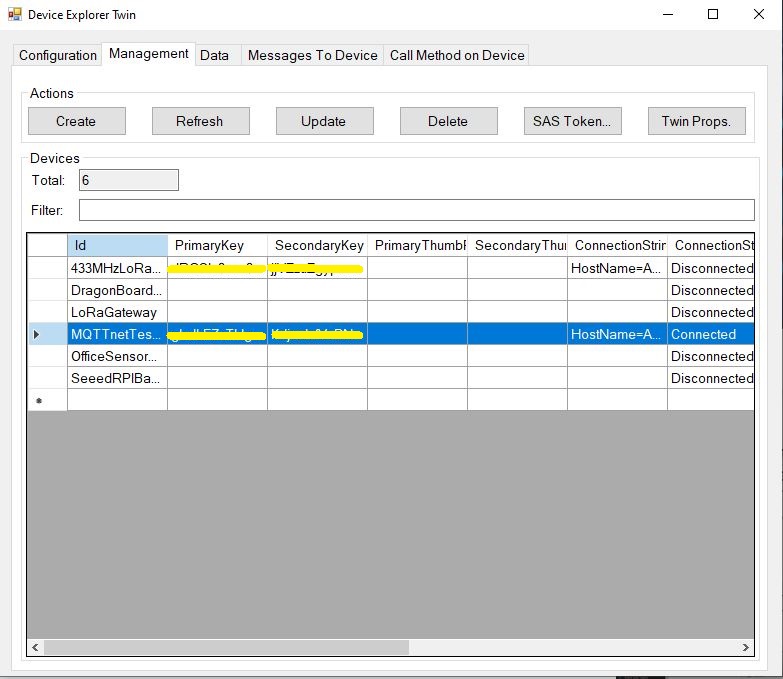
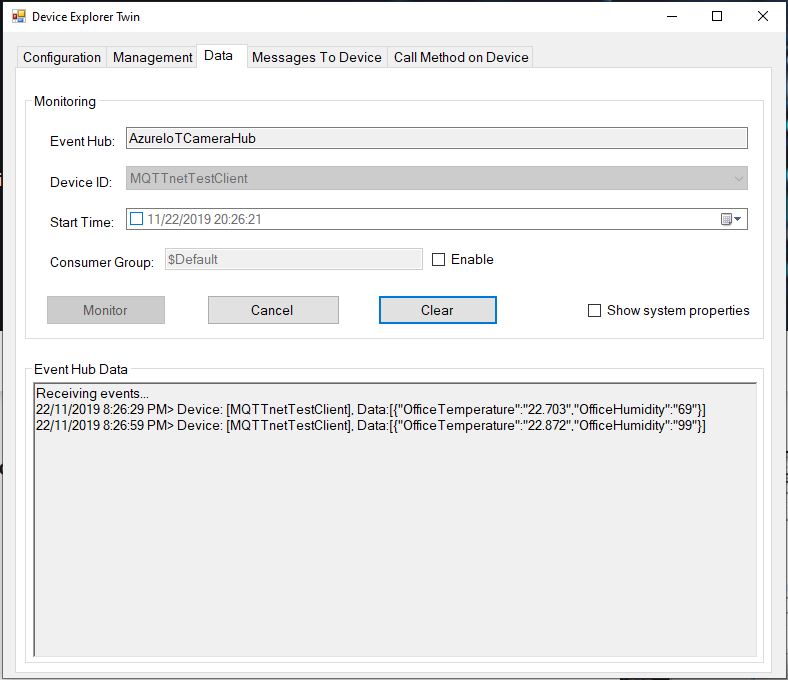
Initially for testing my Azure MQTT Test Client I manually generated the SAS tokens using Azure Device Explorer but figured it would be better if the application generated them.

An initial search lead to this article about how to generate a SAS token for an Azure Event Hub in multiple languages. For my first attempt I “copied and paste” the code sample for C# (I also wasn’t certain what to put in the KeyName parameter) and it didn’t work.

private static string createToken(string resourceUri, string keyName, string key)
{
    TimeSpan sinceEpoch = DateTime.UtcNow - new DateTime(1970, 1, 1);
    var week = 60 * 60 * 24 * 7;
    var expiry = Convert.ToString((int)sinceEpoch.TotalSeconds + week);
    string stringToSign = HttpUtility.UrlEncode(resourceUri) + "\n" + expiry;
    HMACSHA256 hmac = new HMACSHA256(Encoding.UTF8.GetBytes(key));
    var signature = Convert.ToBase64String(hmac.ComputeHash(Encoding.UTF8.GetBytes(stringToSign)));
    var sasToken = String.Format(CultureInfo.InvariantCulture, "SharedAccessSignature sr={0}&sig={1}&se={2}&skn={3}", HttpUtility.UrlEncode(resourceUri), HttpUtility.UrlEncode(signature), expiry, keyName);
    return sasToken;
}

By comparing the Device Explorer and C# generated SAS keys I worked out the keyName parameter was unnecessary so I removed.

private static string createToken(string resourceUri, string key)
{
    TimeSpan sinceEpoch = DateTime.UtcNow - new DateTime(1970, 1, 1);
    var week = 60 * 60 * 24 * 7;
    var expiry = Convert.ToString((int)sinceEpoch.TotalSeconds + week);
    string stringToSign = HttpUtility.UrlEncode(resourceUri) + "\n" + expiry;
    HMACSHA256 hmac = new HMACSHA256(Encoding.UTF8.GetBytes(key));
    var signature = Convert.ToBase64String(hmac.ComputeHash(Encoding.UTF8.GetBytes(stringToSign)));
    var sasToken = String.Format(CultureInfo.InvariantCulture, "SharedAccessSignature sr={0}&sig={1}&se={2}", HttpUtility.UrlEncode(resourceUri), HttpUtility.UrlEncode(signature), expiry);
    return sasToken;
}

The shared SAS token now looked closer to what I was expecting but the MQTTNet ConnectAsync was failing with an authentication exception. After looking at the Device Explorer SAS Key code, my .NetMF implementation and the code for the IoT Hub SDK I noticed the encoding for the HMAC Key was different. Encoding.UTF8.GetBytes vs. Convert.FromBase64String.

 private static string createToken(string resourceUri,string key, TimeSpan ttl)
      {
         TimeSpan afterEpoch = DateTime.UtcNow.Add( ttl ) - new DateTime(1970, 1, 1);

         string expiry = afterEpoch.TotalSeconds.ToString("F0");
         string stringToSign = HttpUtility.UrlEncode(resourceUri) + "\n" + expiry;
         HMACSHA256 hmac = new HMACSHA256(Convert.FromBase64String(key));
         string signature = Convert.ToBase64String(hmac.ComputeHash(Encoding.UTF8.GetBytes(stringToSign)));
         return  String.Format(CultureInfo.InvariantCulture, "SharedAccessSignature sr={0}&sig={1}&se={2}", HttpUtility.UrlEncode(resourceUri), HttpUtility.UrlEncode(signature), expiry);
      }

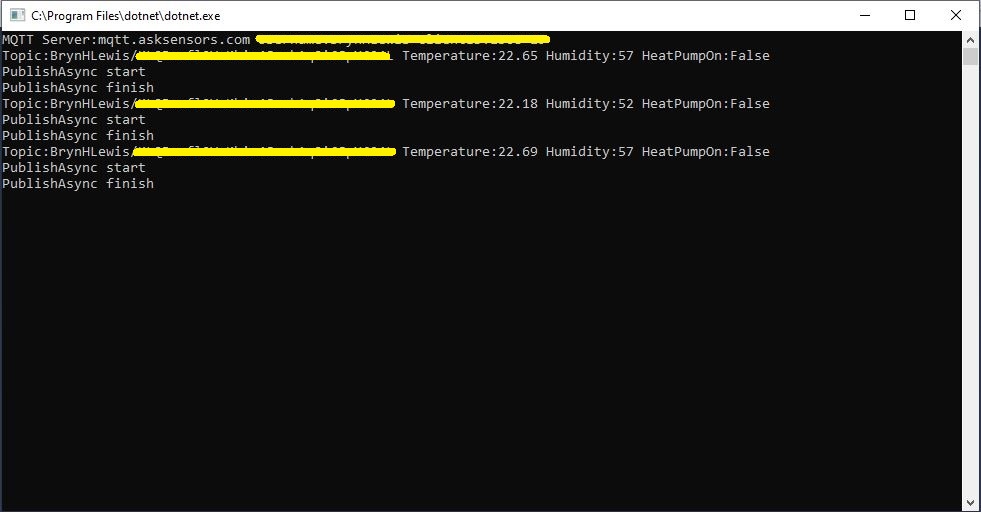
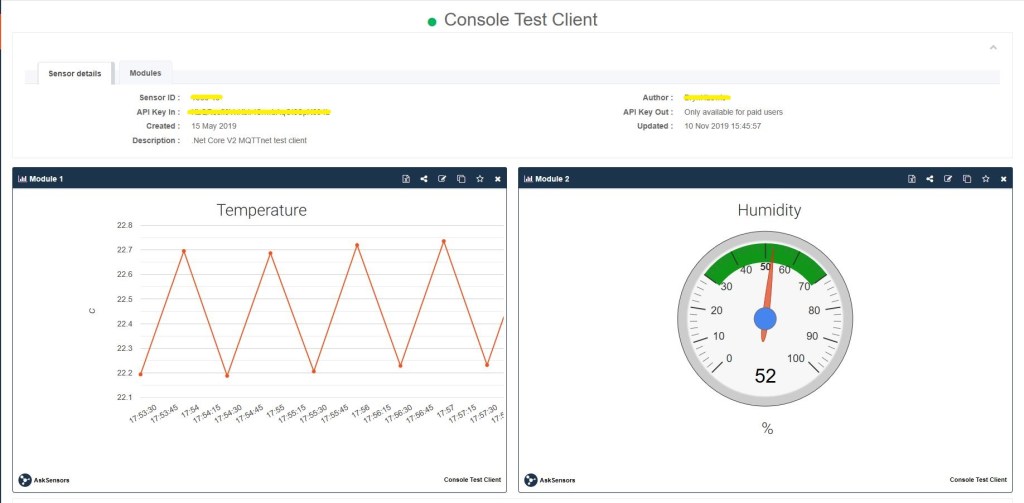
This approach appears to work reliably in my test harness.

MQTTnet client with new SAS Key Generator

User beware DIY Crypto often ends badly

Azure IoT Hub with MQTTnet

As I’m testing my Message Queue Telemetry Transport(MQTT) LoRa gateway I’m building a proof of concept(PoC) .Net core console application for each IoT platform I would like to support.

This PoC was to confirm that my device could connect to the Microsoft Azure IoT Hub MQTT API then format topics and payloads correctly.

Azure IoT Hub MQTT Console Client

I had tried with a couple of different MQTT libraries from micro controllers and embedded devices without success. With the benefit of hindsight (plus this article) I think I had the SAS key format wrong.

The Azure IoT Hub MQTT broker requires only a server name (fully resolved CName), device ID and SAS Key.

   class Program
   {
      private static IMqttClient mqttClient = null;
      private static IMqttClientOptions mqttOptions = null;
      private static string server;
      private static string username;
      private static string password;
      private static string clientId;
      private static string topicD2C;
      private static string topicC2D;

      static void Main(string[] args)
      {
         MqttFactory factory = new MqttFactory();
         mqttClient = factory.CreateMqttClient();

         if (args.Length != 3)
         {
            Console.WriteLine("[AzureIoTHubHostName] [deviceID] [SASKey]");
            Console.WriteLine("Press <enter> to exit");
            Console.ReadLine();
            return;
         }

         server = args[0];
         clientId = args[1];
         sasKey= args[2];

         username = $"{server}/{clientId}/api-version=2018-06-30";
         topicD2C = $"devices/{clientId}/messages/events/";
         topicC2D = $"devices/{clientId}/messages/devicebound/#";

         Console.WriteLine($"MQTT Server:{server} Username:{username} ClientID:{clientId}");

         mqttOptions = new MqttClientOptionsBuilder()
            .WithTcpServer(server, 8883)
            .WithCredentials(username, sasKey)
            .WithClientId(clientId)
            .WithTls()
            .Build();

         mqttClient.UseDisconnectedHandler(new MqttClientDisconnectedHandlerDelegate(e => MqttClient_Disconnected(e)));
         mqttClient.UseApplicationMessageReceivedHandler(new MqttApplicationMessageReceivedHandlerDelegate(e => MqttClient_ApplicationMessageReceived(e)));
         mqttClient.ConnectAsync(mqttOptions).Wait();

         mqttClient.SubscribeAsync(topicC2D, MQTTnet.Protocol.MqttQualityOfServiceLevel.AtLeastOnce).GetAwaiter().GetResult();

         while (true)
         {
            JObject payloadJObject = new JObject();

            payloadJObject.Add("OfficeTemperature", "22." + DateTime.UtcNow.Millisecond.ToString());
            payloadJObject.Add("OfficeHumidity", (DateTime.UtcNow.Second + 40).ToString());

            string payload = JsonConvert.SerializeObject(payloadJObject);
            Console.WriteLine($"Topic:{topicD2C} Payload:{payload}");

            var message = new MqttApplicationMessageBuilder()
               .WithTopic(topicD2C)
               .WithPayload(payload)
               .WithAtLeastOnceQoS()
            .Build();

            Console.WriteLine("PublishAsync start");
            mqttClient.PublishAsync(message).Wait();
            Console.WriteLine("PublishAsync finish");

            Thread.Sleep(30100);
         }
      }

      private static void MqttClient_ApplicationMessageReceived(MqttApplicationMessageReceivedEventArgs e)
      {
         Console.WriteLine($"ClientId:{e.ClientId} Topic:{e.ApplicationMessage.Topic} Payload:{e.ApplicationMessage.ConvertPayloadToString()}");
      }

      private static async void MqttClient_Disconnected(MqttClientDisconnectedEventArgs e)
      {
         Debug.WriteLine("Disconnected");
         await Task.Delay(TimeSpan.FromSeconds(5));

         try
         {
            await mqttClient.ConnectAsync(mqttOptions);
         }
         catch (Exception ex)
         {
            Debug.WriteLine("Reconnect failed {0}", ex.Message);
         }
      }
   }

Overall the initial configuration went smoothly after I figured out the required Quality of Service (QoS) settings, and the SAS Key format.

Using the approach described in the Microsoft documentation I manually generated the SAS Key.(In my Netduino samples I have code for generating a SAS Key in my HTTPS Azure IoT Hub Client)

Azure Device Explorer Device Management
Azure Device Explorer SAS Key Generator

Once I had the configuration correct I could see telemetry from the device and send it messages.

Azure Device Explorer Data View

In a future post I will upload data to the Azure IoT Central for display. Then explore using a “module” attached to a device which maybe useful for my field gateway.

Thingspeak with MQTTnet

As I’m testing my Message Queue Telemetry Transport(MQTT) LoRa gateway I’m building a proof of concept(PoC) .Net core console application for each IoT platform I would like to support.

This PoC was to confirm that I could connect to the Thingspeak MQTT API then format topics and payloads correctly.

MQTT Console Client

The Thingspeak MQTT broker, username, password, and client ID, Channel, writeAPIKey, ClientID, channelData, are the minimum command line options required. The channelSubscribe, readAPIkey and field are optional.

   class Program
   {
      private static IMqttClient mqttClient = null;
      private static IMqttClientOptions mqttOptions = null;
      private static string server;
      private static string username;
      private static string password;
      private static string writeApiKey;
      private static string clientId;
      private static string channelData;
      private static string channelSubscribe;
      private static string readApiKey;
      private static string field;

      static void Main(string[] args)
      {
         MqttFactory factory = new MqttFactory();
         mqttClient = factory.CreateMqttClient();

         if ((args.Length != 6) && (args.Length != 8) && (args.Length != 9))
         {
            Console.WriteLine("[MQTT Server] [UserName] [Password] [WriteAPIKey] [ClientID] [Channel]");
            Console.WriteLine("[MQTT Server] [UserName] [Password] [WriteAPIKey] [ClientID] [Channel] [channelSubscribe] [ReadApiKey]");
            Console.WriteLine("[MQTT Server] [UserName] [Password] [WriteAPIKey] [ClientID] [Channel] [channelSubscribe] [ReadApiKey] [Field]");
            Console.WriteLine("Press <enter> to exit");
            Console.ReadLine();
            return;
         }

         server = args[0];
         username = args[1];
         password = args[2];
         writeApiKey = args[3];
         clientId = args[4];
         channelData = args[5];

         if (args.Length == 6)
         {
            Console.WriteLine($"MQTT Server:{server} Username:{username} ClientID:{clientId} ChannelData:{channelData}");
         }

         if (args.Length == 8)
         {
            channelSubscribe = args[6];
            readApiKey = args[7];
            Console.WriteLine($"MQTT Server:{server} Username:{username} ClientID:{clientId} ChannelData:{channelData} ChannelSubscribe:{channelSubscribe}");
         }

         if (args.Length == 9)
         {
            channelSubscribe = args[6];
            readApiKey = args[7];
            field = args[8];
            Console.WriteLine($"MQTT Server:{server} Username:{username} ClientID:{clientId} ChannelData:{channelData} ChannelSubscribe:{channelSubscribe} Field:{field}");
         }

         mqttOptions = new MqttClientOptionsBuilder()
            .WithTcpServer(server)
            .WithCredentials(username, password)
            .WithClientId(clientId)
            .WithTls()
            .Build();

         mqttClient.ConnectAsync(mqttOptions).Wait();

         if (args.Length == 8)
         {
            string topic = $"channels/{channelSubscribe}/subscribe/fields/+/{readApiKey}";
            
            Console.WriteLine($"Subscribe Topic:{topic}");

            mqttClient.SubscribeAsync(topic, MQTTnet.Protocol.MqttQualityOfServiceLevel.AtMostOnce).Wait(); 
            mqttClient.UseApplicationMessageReceivedHandler(new MqttApplicationMessageReceivedHandlerDelegate(e => MqttClient_ApplicationMessageReceived(e)));
         }
         if (args.Length == 9)
         {
            string topic = $"channels/{channelSubscribe}/subscribe/fields/{field}/{readApiKey}";

            Console.WriteLine($"Subscribe Topic:{topic}");

            mqttClient.SubscribeAsync(topic, MQTTnet.Protocol.MqttQualityOfServiceLevel.AtMostOnce).Wait();
            mqttClient.UseApplicationMessageReceivedHandler(new MqttApplicationMessageReceivedHandlerDelegate(e => MqttClient_ApplicationMessageReceived(e)));
         }

         mqttClient.UseDisconnectedHandler(new MqttClientDisconnectedHandlerDelegate(e => MqttClient_Disconnected(e)));

         string topicTemperatureData = $"channels/{channelData}/publish/{writeApiKey}";

         Console.WriteLine();

         while (true)
         {
            string value = "field1=22." + DateTime.UtcNow.Millisecond.ToString() + "&field2=60." + DateTime.UtcNow.Millisecond.ToString();
            Console.WriteLine($"Publish Topic {topicTemperatureData}  Value {value}");

            var message = new MqttApplicationMessageBuilder()
               .WithTopic(topicTemperatureData)
               .WithPayload(value)
               .WithQualityOfServiceLevel(MQTTnet.Protocol.MqttQualityOfServiceLevel.AtMostOnce)
//               .WithRetainFlag()
            .Build();

            Console.WriteLine("PublishAsync start");
            mqttClient.PublishAsync(message).Wait();
            Console.WriteLine("PublishAsync finish");
            Console.WriteLine();

            Thread.Sleep(30100);
         }
      }

      private static void MqttClient_ApplicationMessageReceived(MqttApplicationMessageReceivedEventArgs e)
      {
         Console.WriteLine($"ApplicationMessageReceived ClientId:{e.ClientId} Topic:{e.ApplicationMessage.Topic} Qos:{e.ApplicationMessage.QualityOfServiceLevel} Payload:{e.ApplicationMessage.ConvertPayloadToString()}");
         Console.WriteLine();
      }

      private static async void MqttClient_Disconnected(MqttClientDisconnectedEventArgs e)
      {
         Debug.WriteLine("Disconnected");
         await Task.Delay(TimeSpan.FromSeconds(5));

         try
         {
            await mqttClient.ConnectAsync(mqttOptions);
         }
         catch (Exception ex)
         {
            Debug.WriteLine("Reconnect failed {0}", ex.Message);
         }
      }
   }
Channel configuration

The ThingSpeak channel setup has many attributes (link to an external site, link to a GitHub repository, fields for elevation, latitude, longitude etc. ) but only 8 data fields which seems a bit limiting (some of my sensor nodes report more than 8 values).

Dashboard

The Thingspeak dashboard configuration was fairly simple, though the maximum of eight sequentially numbered of inputs (Fields) might require some mapping code.

Overall the initial configuration went smoothly after I figured out the required Quality of Service (QoS) settings, retain flag usage and the different APIKeys on the publish vs. subscribe topics.

I have not explored the advanced analysis enabled by the tight integration with MATLAB which could be quite an advantage for applications requiring that sort of functionality.

ubidots MQTT LoRa Field Gateway

Back in April I started working on an MQTT LoRa Field gateway which was going to support a selection of different Software as a service(SaaS) Internet of Things(IoT) platforms.

After a long pause in development I have a working ubidots client and have 3 proof of concept (PoC) integrations for Adafruit.IO, AskSensors, and Losant. I am also working on Azure IoT Hub, Azure IoT Central. The first iteration is focused on Device to Cloud (D2C) messaging in the next iteration I will add Cloud to Device where viable(C2D).

My applications use a lightweight, easy to implemented protocol which is intended for hobbyist and educational use rather than commercial applications (I have been working on a more secure version as yet another side project)

I have a number of sample Arduino with Dragino LoRa Shield for Arduino, MakerFabs Maduino, Dragino LoRa Mini Dev, M2M Low power Node and Netduino with Elecrow LoRa RFM95 Shield etc. clients. These work with both my platform specific (Adafruit.IO, Azure IoT Central) gateways and protocol specific field gateways.

Ubidots dashboard

When the application is first started it creates a minimal configuration file which should be downloaded, the missing information filled out, then uploaded using the File explorer in the Windows device portal.

{
  "MQTTUserName": "Ubidots generated usname here",
  "MQTTPassword": "NotVerySecure",
  "MQTTClientID": "MQTTLoRaGateway",
  "MQTTServer": "industrial.api.ubidots.com",
  "Address": "LoRaIoT1",
  "Frequency": 915000000.0,
  "MessageHandlerAssembly": "Mqtt.IoTCore.FieldGateway.LoRa.Ubidots",
  "PlatformSpecificConfiguration": ""
}

The application logs debugging information to the Windows 10 IoT Core ETW logging Microsoft-Windows-Diagnostics-LoggingChannel

MQTT LoRa Field Gateway with ubidots plugin generated telemetry
ubidots device management
ubidot managment

The message handler uploads all values in an inbound messages in one MQTT message using the ubidots MQTT message format

async void IMessageHandler.Rfm9XOnReceive(object sender, Rfm9XDevice.OnDataReceivedEventArgs e)
{
	LoggingFields processReceiveLoggingFields = new LoggingFields();
	JObject telemetryDataPoint = new JObject();
	char[] sensorReadingSeparators = { ',' };
	char[] sensorIdAndValueSeparators = { ' ' };

	processReceiveLoggingFields.AddString("PacketSNR", e.PacketSnr.ToString("F1"));
	processReceiveLoggingFields.AddInt32("PacketRSSI", e.PacketRssi);
	processReceiveLoggingFields.AddInt32("RSSI", e.Rssi);

	string addressBcdText = BitConverter.ToString(e.Address);
	processReceiveLoggingFields.AddInt32("DeviceAddressLength", e.Address.Length);
	processReceiveLoggingFields.AddString("DeviceAddressBCD", addressBcdText);

	string messageText;
	try
	{
		messageText = UTF8Encoding.UTF8.GetString(e.Data);
		processReceiveLoggingFields.AddString("MessageText", messageText);
	}
	catch (Exception ex)
	{
		processReceiveLoggingFields.AddString("Exception", ex.ToString());
		this.Logging.LogEvent("PayloadProcess failure converting payload to text", processReceiveLoggingFields, LoggingLevel.Warning);
		return;
	}

	// Chop up the CSV text
	string[] sensorReadings = messageText.Split(sensorReadingSeparators, StringSplitOptions.RemoveEmptyEntries);
	if (sensorReadings.Length < 1)
	{
		this.Logging.LogEvent("PayloadProcess payload contains no sensor readings", processReceiveLoggingFields, LoggingLevel.Warning);
		return;
	}

	// Chop up each sensor read into an ID & value
	foreach (string sensorReading in sensorReadings)
	{
		string[] sensorIdAndValue = sensorReading.Split(sensorIdAndValueSeparators, StringSplitOptions.RemoveEmptyEntries);
		// Check that there is an id & value
		if (sensorIdAndValue.Length != 2)
		{
			this.Logging.LogEvent("PayloadProcess payload invalid format", processReceiveLoggingFields, LoggingLevel.Warning);
			return;
		}

		string sensorId = sensorIdAndValue[0];
		string value = sensorIdAndValue[1];

		telemetryDataPoint.Add(addressBcdText + sensorId, Convert.ToDouble(value));
	}
	processReceiveLoggingFields.AddString("MQTTClientId", MqttClient.Options.ClientId);

	string stateTopic = string.Format(stateTopicFormat, MqttClient.Options.ClientId);

	try
	{
		var message = new MqttApplicationMessageBuilder()
			.WithTopic(stateTopic)
			.WithPayload(JsonConvert.SerializeObject(telemetryDataPoint))
			.WithAtLeastOnceQoS()
			.Build();
		Debug.WriteLine(" {0:HH:mm:ss} MQTT Client PublishAsync start", DateTime.UtcNow);
		await MqttClient.PublishAsync(message);
		Debug.WriteLine(" {0:HH:mm:ss} MQTT Client PublishAsync finish", DateTime.UtcNow);

		this.Logging.LogEvent("PublishAsync Ubidots payload", processReceiveLoggingFields, LoggingLevel.Information);
	}
	catch (Exception ex)
	{
		processReceiveLoggingFields.AddString("Exception", ex.ToString());
		this.Logging.LogEvent("PublishAsync Ubidots payload", processReceiveLoggingFields, LoggingLevel.Error);
	}
}

The “automagic” provisioning of feeds does make setting up small scale systems easier, though I’m not certain how well it would scale.

Some of the fields weren’t obviously editable e.g.”ÄPI Label” in device configuration which I only discovered by clicking on them..

The limitations of the free account meant I couldn’t evaluate ubidots in much depth but what was available appeared to be robust and reliable (Nov 2019).

Adafruit.IO MQTT LoRa Field Gateway

Back in April I started working on an MQTT LoRa Field gateway which was going to support a selection of different Software as a service(SaaS) Internet of Things(IoT) platforms.

After a long pause in development I have a working AdaFruit.IO client and have 3 proof of concept (PoC) integrations for AskSensors, Losant and Ubidots. I am also working on Azure IoT Hub, Azure IoT Central clients. The first iteration is focused on Device to Cloud (D2C) messaging in the next iteration I will add Cloud to Device where viable(C2D).

My applications use a lightweight, easy to implemented protocol which is intended for hobbyist and educational use rather than commercial applications (I have been working on a more secure version as yet another side project)

I have a number of sample Arduino with Dragino LoRa Shield for Arduino, MakerFabs Maduino, Dragino LoRa Mini Dev, M2M Low power Node and Netduino with Elecrow LoRa RFM95 Shield etc. clients. These work with both my platform specific (Adafruit.IO, Azure IoT Central) gateways and protocol specific field gateways.

Maduino client dashboard

When the application is first started it creates a minimal configuration file which should be downloaded, the missing information filled out, then uploaded using the File explorer in the Windows device portal.

{
  "MQTTUserName": "AdaFruitIO user",
  "MQTTPassword": "AIO Key",
  "MQTTClientID": "MQTTLoRaGateway",
  "MQTTServer": "io.adafruit.com",
  "Address": "LoRaIoT1",
  "Frequency": 915000000.0,
  "MessageHandlerAssembly": "Mqtt.IoTCore.FieldGateway.LoRa.Adafruit",
  "PlatformSpecificConfiguration": "mqttloragateway"
}

The application logs debugging information to the Windows 10 IoT Core ETW logging Microsoft-Windows-Diagnostics-LoggingChannel

MQTT LoRa Gateway with Adafruit.IO plug-in

The SaaS platform specific interface has gained an additional parameter for platform specific configuration.

namespace devMobile.Mqtt.IoTCore.FieldGateway
{
	using System;
	using Windows.Foundation.Diagnostics;

	using devMobile.IoT.Rfm9x;
	using MQTTnet;
	using MQTTnet.Client;

	public interface IMessageHandler
	{
		void Initialise(LoggingChannel logging, IMqttClient mqttClient, Rfm9XDevice rfm9XDevice,string platformSpecificConfiguration);

		void Rfm9XOnReceive(object sender, Rfm9XDevice.OnDataReceivedEventArgs e);

		void MqttApplicationMessageReceived(object sender, MqttApplicationMessageReceivedEventArgs e);

		void Rfm9xOnTransmit(object sender, Rfm9XDevice.OnDataTransmitedEventArgs e);
	}
}

This is used for the AdaFruit.IO GroupName so Adafruit.IO feed values are not all in a single group.

public class MessageHandler : IMessageHandler
	{
		private LoggingChannel Logging { get; set; }
		private IMqttClient MqttClient { get; set; }
		private Rfm9XDevice Rfm9XDevice { get; set; }
      private string PlatformSpecificConfiguration { get; set; }


      void IMessageHandler.Initialise(LoggingChannel logging, IMqttClient mqttClient, Rfm9XDevice rfm9XDevice, string platformSpecificConfiguration)
		{
			LoggingFields processInitialiseLoggingFields = new LoggingFields();

			this.Logging = logging;
			this.MqttClient = mqttClient;
			this.Rfm9XDevice = rfm9XDevice;
			this.PlatformSpecificConfiguration = platformSpecificConfiguration;
		}

		async void IMessageHandler.Rfm9XOnReceive(object sender, Rfm9XDevice.OnDataReceivedEventArgs e)
		{
			LoggingFields processReceiveLoggingFields = new LoggingFields();

			processReceiveLoggingFields.AddString("PacketSNR", e.PacketSnr.ToString("F1"));
			processReceiveLoggingFields.AddInt32("PacketRSSI", e.PacketRssi);
			processReceiveLoggingFields.AddInt32("RSSI", e.Rssi);

			string addressBcdText = BitConverter.ToString(e.Address);
			processReceiveLoggingFields.AddInt32("DeviceAddressLength", e.Address.Length);
			processReceiveLoggingFields.AddString("DeviceAddressBCD", addressBcdText);

			string payloadBcdText = BitConverter.ToString(e.Data);
			processReceiveLoggingFields.AddInt32("PayloadLength", e.Data.Length);
			processReceiveLoggingFields.AddString("DeviceAddressBCD", payloadBcdText);

			this.Logging.LogEvent("Rfm9XOnReceive", processReceiveLoggingFields, LoggingLevel.Information);
		}

		void IMessageHandler.MqttApplicationMessageReceived(object sender, MqttApplicationMessageReceivedEventArgs e)
		{
			LoggingFields processReceiveLoggingFields = new LoggingFields();

			processReceiveLoggingFields.AddString("ClientId", e.ClientId);
#if DEBUG
			processReceiveLoggingFields.AddString("Payload", e.ApplicationMessage.ConvertPayloadToString());
#endif
			processReceiveLoggingFields.AddString("QualityOfServiceLevel", e.ApplicationMessage.QualityOfServiceLevel.ToString());
			processReceiveLoggingFields.AddBoolean("Retain", e.ApplicationMessage.Retain);
			processReceiveLoggingFields.AddString("Topic", e.ApplicationMessage.Topic);

			this.Logging.LogEvent("MqttApplicationMessageReceived topic not processed", processReceiveLoggingFields, LoggingLevel.Error);
		}

		void IMessageHandler.Rfm9xOnTransmit(object sender, Rfm9XDevice.OnDataTransmitedEventArgs e)
		{
			this.Logging.LogMessage("Rfm9xOnTransmit", LoggingLevel.Information);
		}
	}
Adafruit.IO Group for a single field gateway
Group Setup

The message handler uploads all values in an inbound messages in one MQTT message using the AdaFruit.IO Group Feed format.

      async void IMessageHandler.Rfm9XOnReceive(object sender, Rfm9XDevice.OnDataReceivedEventArgs e)
      {
         LoggingFields processReceiveLoggingFields = new LoggingFields();
         char[] sensorReadingSeparators = { ',' };
         char[] sensorIdAndValueSeparators = { ' ' };

         processReceiveLoggingFields.AddString("PacketSNR", e.PacketSnr.ToString("F1"));
         processReceiveLoggingFields.AddInt32("PacketRSSI", e.PacketRssi);
         processReceiveLoggingFields.AddInt32("RSSI", e.Rssi);

         string addressBcdText = BitConverter.ToString(e.Address);
         processReceiveLoggingFields.AddInt32("DeviceAddressLength", e.Address.Length);
         processReceiveLoggingFields.AddString("DeviceAddressBCD", addressBcdText);

         string messageText;
         try
         {
            messageText = UTF8Encoding.UTF8.GetString(e.Data);
            processReceiveLoggingFields.AddString("MessageText", messageText);
         }
         catch (Exception ex)
         {
            processReceiveLoggingFields.AddString("Exception", ex.ToString());
            this.Logging.LogEvent("PayloadProcess failure converting payload to text", processReceiveLoggingFields, LoggingLevel.Warning);
            return;
         }

         // Chop up the CSV text
         string[] sensorReadings = messageText.Split(sensorReadingSeparators, StringSplitOptions.RemoveEmptyEntries);
         if (sensorReadings.Length < 1)
         {
            this.Logging.LogEvent("PayloadProcess payload contains no sensor readings", processReceiveLoggingFields, LoggingLevel.Warning);
            return;
         }

         JObject payloadJObject = new JObject();

         JObject feeds = new JObject();

         // Chop up each sensor read into an ID & value
         foreach (string sensorReading in sensorReadings)
         {
            string[] sensorIdAndValue = sensorReading.Split(sensorIdAndValueSeparators, StringSplitOptions.RemoveEmptyEntries);

            // Check that there is an id & value
            if (sensorIdAndValue.Length != 2)
            {
               this.Logging.LogEvent("PayloadProcess payload invalid format", processReceiveLoggingFields, LoggingLevel.Warning);
               return;
            }

            string sensorId = string.Concat(addressBcdText, sensorIdAndValue[0]);
            string value = sensorIdAndValue[1];

            feeds.Add(sensorId.ToLower(), value);
         }
         payloadJObject.Add("feeds", feeds);

         string topic = $"{MqttClient.Options.Credentials.Username}/groups/{PlatformSpecificConfiguration}";

         try
         {
            var message = new MqttApplicationMessageBuilder()
               .WithTopic(topic)
               .WithPayload(JsonConvert.SerializeObject(payloadJObject))
               .WithAtLeastOnceQoS()
               .Build();
            Debug.WriteLine(" {0:HH:mm:ss} MQTT Client PublishAsync start", DateTime.UtcNow);
            await MqttClient.PublishAsync(message);
            Debug.WriteLine(" {0:HH:mm:ss} MQTT Client PublishAsync finish", DateTime.UtcNow);

            this.Logging.LogEvent("PublishAsync Adafruit payload", processReceiveLoggingFields, LoggingLevel.Information);
         }
         catch (Exception ex)
         {
            processReceiveLoggingFields.AddString("Exception", ex.ToString());
            this.Logging.LogEvent("PublishAsync Adafruit payload", processReceiveLoggingFields, LoggingLevel.Error);
         }
      }

The casing of User names (Must match exactly) and Group/Feed names (must be lower case) tripped me up yet again. The “automagic” provisioning of feeds does make setting up small scale systems easier, though I’m not certain how well it would scale.

Adafruit MQTT Cloud to Device Messaging

After getting MQ Telemetry Transport (MQTT) Device to Cloud (D2C) messaging working for AdaFruit.IO I have also got Cloud to Device (C2D) messaging working as well.

The MQTT broker, username, API key, client ID, optional group name (to keep MQTT aligned with REST API terminology), command topic and feed name are command line options.

The Adafruit IO MQTT documentation suggests an approach for naming topics which allows a bit more structure for feed (D2C and C2D) names than the REST API (which only does D2C).

class Program
{
	private static IMqttClient mqttClient = null;
	private static IMqttClientOptions mqttOptions = null;
	private static string server;
	private static string username;
	private static string password;
	private static string clientId;
	private static string commandTopic;
	private static string groupname;
	private static string feedname;

	static void Main(string[] args)
	{
		MqttFactory factory = new MqttFactory();
		mqttClient = factory.CreateMqttClient();

		if ((args.Length != 6) && (args.Length != 7))
		{
			Console.WriteLine("[MQTT Server] [UserName] [Password] [ClientID] [CommandTopic] [GroupName] [FeedName]");
			Console.WriteLine("[MQTT Server] [UserName] [Password] [ClientID] [CommandTopic] [FeedName]");
			Console.WriteLine("Press <enter> to exit");
			Console.ReadLine();
			return;
		}

		server = args[0];
		username = args[1];
		password = args[2];
		clientId = args[3];
		commandTopic = args[4];
		if (args.Length == 6)
		{
			feedname = args[5].ToLower();
			Console.WriteLine($"MQTT Server:{server} Username:{username} ClientID:{clientId} CommandTopic:{commandTopic} Feedname:{feedname}");
		}

		if (args.Length == 7)
		{
			groupname = args[5].ToLower();
			feedname = args[6].ToLower();
			Console.WriteLine($"MQTT Server:{server} Username:{username} ClientID:{clientId} CommandTopic:{commandTopic} Groupname:{groupname} Feedname:{feedname}");
		}

		mqttOptions = new MqttClientOptionsBuilder()
			.WithTcpServer(server)
			.WithCredentials(username, password)
			.WithClientId(clientId)
			.WithTls()
			.Build();

		mqttClient.Disconnected += MqttClient_Disconnected;
		mqttClient.ConnectAsync(mqttOptions).Wait();
		mqttClient.ApplicationMessageReceived += MqttClient_ApplicationMessageReceived;

		// Adafruit.IO format for topics which are called feeds
		string topic = string.Empty;

		if (args.Length == 6)
		{
			topic = $"{username}/feeds/{feedname}";				
		}

		if (args.Length == 7)
		{
			topic = $"{username}/feeds/{groupname}.{feedname}";
		}

		mqttClient.SubscribeAsync(commandTopic, MQTTnet.Protocol.MqttQualityOfServiceLevel.AtLeastOnce).GetAwaiter().GetResult();

		while (true)
		{
			string value = "22." + DateTime.UtcNow.Millisecond.ToString();
			Console.WriteLine($"Topic:{topic} Value:{value}");

			var message = new MqttApplicationMessageBuilder()
				.WithTopic(topic)
				.WithPayload(value)
				.WithQualityOfServiceLevel(MQTTnet.Protocol.MqttQualityOfServiceLevel.AtLeastOnce)
			.WithRetainFlag()
			.Build();

			Console.WriteLine("PublishAsync start");
			mqttClient.PublishAsync(message).Wait();
			Console.WriteLine("PublishAsync finish");

			Thread.Sleep(30100);
		}
	}

	private static void MqttClient_ApplicationMessageReceived(object sender, MqttApplicationMessageReceivedEventArgs e)
	{
		Console.WriteLine($"ClientId:{e.ClientId} Topic:{e.ApplicationMessage.Topic} Payload:{e.ApplicationMessage.ConvertPayloadToString()}");
	}

	private static async void MqttClient_Disconnected(object sender, MqttClientDisconnectedEventArgs e)
	{
		Debug.WriteLine("Disconnected");
		await Task.Delay(TimeSpan.FromSeconds(5));

		try
		{
			await mqttClient.ConnectAsync(mqttOptions);
		}
		catch (Exception ex)
		{
			Debug.WriteLine("Reconnect failed {0}", ex.Message);
		}
	}
}

I configured a slider on the dashboard for my home called “setpoint” (yet again I was tripped up “automatically” camel casing the name because I’m a C# developer) which my MQTT client subscribed to.

AdaFruit.IO Home monitoring dashboard
setpoint feed configuration

After figuring out the format of the command topic I found that when the slider was moved the MQTT client subscription event fired reliably.

AdaFruit Client showing the setpoint value change notifications

Overall the process went pretty well, though the manual configuration of the subscriptions to AdaFruit.IO feeds could become a bit of a problem at scale.

Ask Sensors with MQTTnet

After a 6 month pause I’m back working on my Message Queue Telemetry Transport(MQTT) LoRa gateway.

As I’m testing my Message Queue Telemetry Transport(MQTT) LoRa gateway I’m building a proof of concept(PoC) .Net core console application for each IoT platform I would like to support.

This PoC was to confirm that I could connect to the Ask Sensors MQTT API then format topics and payloads correctly.

Console test application

The MQTT broker, username, password, and client ID are command line options.

class Program
{
	private static IMqttClient mqttClient = null;
	private static IMqttClientOptions mqttOptions = null;
	private static string server;
	private static string username;
	private static string apiKey;
	private static string clientID;

	static void Main(string[] args)
	{
		MqttFactory factory = new MqttFactory();
		mqttClient = factory.CreateMqttClient();
		bool heatPumpOn = false;

		if (args.Length != 4)
		{
			Console.WriteLine("[MQTT Server] [UserName] [APIKey] [ClientID]");
			Console.WriteLine("Press <enter> to exit");
			Console.ReadLine();
			return;
		}

		server = args[0];
		username = args[1];
		apiKey = args[2];
		clientID = args[3];

		Console.WriteLine($"MQTT Server:{server} Username:{username} ClientID:{clientID}");

		mqttOptions = new MqttClientOptionsBuilder()
			.WithTcpServer(server)
			.WithCredentials(username, "")
			.WithClientId(clientID)
			//.WithTls() // This is a bit of a worry
			.Build();

		mqttClient.ApplicationMessageReceived += MqttClient_ApplicationMessageReceived;
		mqttClient.Disconnected += MqttClient_Disconnected;
		mqttClient.ConnectAsync(mqttOptions).Wait();

		// AskSensors formatted client state update topic
		string stateTopic = $"{username}/{apiKey}";

		while (true)
		{
			string payloadText;
			double temperature = 22.0 + (DateTime.UtcNow.Millisecond / 1000.0);
			double humidity = 50 + (DateTime.UtcNow.Millisecond / 100.0);
			double speed = 10 + (DateTime.UtcNow.Millisecond / 100.0);
			Console.WriteLine($"Topic:{stateTopic} Temperature:{temperature:0.00} Humidity:{humidity:0} HeatPumpOn:{heatPumpOn}");

			// First JSON attempt didn't work
			payloadText = @"{""Humidity"":55}";

            // Second attempt worked
            payloadText = $"module1=22";

            // Third attempt with "real" values injected
            payloadText = $"module1={temperature}&m2={humidity}";

            var message = new MqttApplicationMessageBuilder()
					.WithTopic(stateTopic)
					.WithPayload(payloadText)
					.WithQualityOfServiceLevel(global::MQTTnet.Protocol.MqttQualityOfServiceLevel.AtLeastOnce)
				   .WithExactlyOnceQoS()
				   //.WithAtLeastOnceQoS()
				   //.WithRetainFlag()
				   .Build();

				Console.WriteLine("PublishAsync start");
				mqttClient.PublishAsync(message).Wait();
				Console.WriteLine("PublishAsync finish");

				Thread.Sleep(30100);
			}
		}

	private static async void MqttClient_Disconnected(object sender, MqttClientDisconnectedEventArgs e)
	{
		Debug.WriteLine("Disconnected");
		await Task.Delay(TimeSpan.FromSeconds(5));

		try
		{
			await mqttClient.ConnectAsync(mqttOptions);
		}
		catch (Exception ex)
		{
			Debug.WriteLine("Reconnect failed {0}", ex.Message);
		}
	}

The Ask Sensors screen designer has 8 different types of Graph (line, bar, scatter, gauge, table, binary. digital, map)

Ask sensors dashboard configuration was fairly simple, though sequential numbering of inputs (modules) might require some mapping code.

Overall the initial configuration went smoothly after I figured out the payload format (not JSON), though the functionality (of a free subscription) did appear to be quite limited.

Since I first started building my MQTT gateway there have been several breaking updates to the MQTTNet API which so I will have to refresh all the applications in my solution.

iwanders/plainRFM69 revisited

After problems with interleaved interrupt handling in my Windows 10 IoT Core client I figured the AutoMode used by the plainRFM69 library might be worth investigation. My first Arduino client was based on the plainRFM69 library but had Interoperability issues.

For this attempt I also started with the minimal sample and modified the code to send and receive text messages.

/*
    Copyright (c) 2014, Ivor Wanders, Bryn Lewis 2019
    MIT License, see the LICENSE.md file in the root folder.
*/

#include <SPI.h>
#include <plainRFM69.h>

// slave select pin.
#define SLAVE_SELECT_PIN 10

// connected to the reset pin of the RFM69.
#define RESET_PIN 9

// tie this pin down on the receiver.
#define SENDER_DETECT_PIN A0

const uint8_t tx_buffer[] = "ABCDEFGHIJKLMNOPQRSTURWXYZ1234567890";
//const uint8_t tx_buffer[] = "abcdefghijklmnopqrstuvwxyz1234567890";
uint8_t rx_buffer[sizeof(tx_buffer)] = "";

plainRFM69 rfm = plainRFM69(SLAVE_SELECT_PIN);


void sender() {

  uint32_t start_time = millis();

  uint32_t counter = 1; // the counter which we are going to send.

  while (true) {
    rfm.poll(); // run poll as often as possible.

    if (!rfm.canSend()) {
      continue; // sending is not possible, already sending.
    }

    if ((millis() - start_time) > 1000) { // every 500 ms.
      start_time = millis();

      // be a little bit verbose.
      Serial.print("Send:"); Serial.println(counter);

      // send the number of bytes equal to that set with setPacketLength.
      // read those bytes from memory where counter starts.
      rfm.sendVariable(tx_buffer, counter);

      counter++; // increase the counter.

      if ( counter > strlen(tx_buffer))
      {
        counter = 1;
      }
    }
  }
}

void receiver() {
  uint32_t counter = 0; // to count the messages.

  while (true) {

    rfm.poll(); // poll as often as possible.

    while (rfm.available())
    {
      uint8_t len = rfm.read(rx_buffer); // read the packet into the new_counter.

      // print verbose output.
      Serial.print("Packet Len:");
      Serial.print( len );
      Serial.print(" : ");
      Serial.println((char*)rx_buffer);
    }
  }
}

void setup() {
  Serial.begin(9600);
  SPI.begin();

  bareRFM69::reset(RESET_PIN); // sent the RFM69 a hard-reset.

  //rfm.setRecommended(); // set recommended paramters in RFM69.
  rfm.setPacketType(true, false); // set the used packet type.

  rfm.setBufferSize(2);   // set the internal buffer size.
  rfm.setPacketLength(sizeof(rx_buffer)); // set the packet length.

  rfm.setFrequency((uint32_t)909560000); // set the frequency.

  rfm.setLNA(RFM69_LNA_IMP_200OHM, RFM69_LNA_GAIN_AGC_LOOP);

  // p71, 3 preamble bytes.
  rfm.setPreambleSize(16);

  // p71, 4 bytes sync of 0x01, only start listening when sync is matched.
  //uint8_t syncthing[] = {0xaa, 0x2d, 0xd4};
  uint8_t syncthing[] = {0xd4, 0x2d, 0xaa};
  rfm.setSyncConfig(true, false, sizeof(syncthing), 0);
  rfm.setSyncValue(&syncthing, sizeof(syncthing));

  rfm.dumpRegisters(Serial);

  // baudrate is default, 4800 bps now.

  rfm.receive();
  // set it to receiving mode.

  pinMode(SENDER_DETECT_PIN, INPUT_PULLUP);
  delay(5);
}

void loop() {
  if (digitalRead(SENDER_DETECT_PIN) == LOW) {
    Serial.println("Going Receiver!");
    receiver();
    // this function never returns and contains an infinite loop.
  } else {
    Serial.println("Going sender!");
    sender();
    // idem.
  }
}

I took the list register values and loaded them into a Excel spreadsheet alongside the values from my Windows 10 IoT Core application

17:35:03.044 -> 0x0: 0x0
17:35:03.078 -> 0x1: 0x4
17:35:03.078 -> 0x2: 0x0
17:35:03.078 -> 0x3: 0x1A
17:35:03.112 -> 0x4: 0xB
17:35:03.112 -> 0x5: 0x0
17:35:03.112 -> 0x6: 0x52
17:35:03.146 -> 0x7: 0xE3
17:35:03.146 -> 0x8: 0x63
17:35:03.146 -> 0x9: 0xD7
17:35:03.180 -> 0xA: 0x41
17:35:03.180 -> 0xB: 0x40
17:35:03.180 -> 0xC: 0x2
17:35:03.215 -> 0xD: 0x92
17:35:03.215 -> 0xE: 0xF5
17:35:03.249 -> 0xF: 0x20
17:35:03.249 -> 0x10: 0x24
17:35:03.249 -> 0x11: 0x9F
17:35:03.282 -> 0x12: 0x9
17:35:03.282 -> 0x13: 0x1A
17:35:03.282 -> 0x14: 0x40
17:35:03.317 -> 0x15: 0xB0
17:35:03.317 -> 0x16: 0x7B
17:35:03.317 -> 0x17: 0x9B
17:35:03.317 -> 0x18: 0x88
17:35:03.351 -> 0x19: 0x86
17:35:03.351 -> 0x1A: 0x8A
17:35:03.384 -> 0x1B: 0x40
17:35:03.384 -> 0x1C: 0x80
17:35:03.384 -> 0x1D: 0x6
17:35:03.418 -> 0x1E: 0x10
17:35:03.418 -> 0x1F: 0x0
17:35:03.452 -> 0x20: 0x0
17:35:03.452 -> 0x21: 0x0
17:35:03.452 -> 0x22: 0x0
17:35:03.487 -> 0x23: 0x2
17:35:03.487 -> 0x24: 0xFF
17:35:03.487 -> 0x25: 0x0
17:35:03.521 -> 0x26: 0x5
17:35:03.521 -> 0x27: 0x80
17:35:03.521 -> 0x28: 0x0
17:35:03.556 -> 0x29: 0xFF
17:35:03.556 -> 0x2A: 0x0
17:35:03.556 -> 0x2B: 0x0
17:35:03.556 -> 0x2C: 0x0
17:35:03.590 -> 0x2D: 0x10
17:35:03.590 -> 0x2E: 0x90
17:35:03.624 -> 0x2F: 0xAA
17:35:03.624 -> 0x30: 0x2D
17:35:03.624 -> 0x31: 0xD4
17:35:03.659 -> 0x32: 0x0
17:35:03.659 -> 0x33: 0x0
17:35:03.659 -> 0x34: 0x0
17:35:03.693 -> 0x35: 0x0
17:35:03.693 -> 0x36: 0x0
17:35:03.728 -> 0x37: 0xD0
17:35:03.728 -> 0x38: 0x25
17:35:03.728 -> 0x39: 0x0
17:35:03.761 -> 0x3A: 0x0
17:35:03.761 -> 0x3B: 0x0
17:35:03.761 -> 0x3C: 0x1
17:35:03.795 -> 0x3D: 0x0
17:35:03.795 -> Going sender!
17:35:04.725 -> Send:1

Arduino RFM69HCW Client in receive mode

First thing I noticed was the order of the three sync byes (Registers 0x2F, 0x30, 0x31) was reversed. I then modified the run method in the Windows 10 code so the registers settings on both devices matched. (I removed the PlainRFM69 SetRecommended call so as many of the default options as possible were used).

public void Run(IBackgroundTaskInstance taskInstance)
{
	byte[] syncValues = { 0xAA, 0x2D, 0xD4 };
	byte[] aesKeyValues = { 0x0, 0x01, 0x02, 0x03, 0x04, 0x05, 0x06, 0x07, 0x08, 0x09, 0x0A, 0x0B, 0x0C, 0x0D, 0X0E, 0X0F };

	try
	{
		rfm69Device.Initialise(Rfm69HcwDevice.RegOpModeMode.StandBy
										,frequency: 909560000.0 
										,dio0Mapping: Rfm69HcwDevice.Dio0Mapping.ReceiveCrcOk
										,preambleSize: 16												
										,syncValues: syncValues
										,packetFormat: Rfm69HcwDevice.RegPacketConfig1PacketFormat.VariableLength
										,packetDcFree: Rfm69HcwDevice.RegPacketConfig1DcFree.Whitening
										,autoRestartRx: false
										//,addressNode: 0x22
										//,addressbroadcast: 0x99
										//,aesKey: aesKeyValues
										);

		rfm69Device.OnReceive += Rfm69Device_OnReceive;
		rfm69Device.OnTransmit += Rfm69Device_OnTransmit;

		rfm69Device.RegisterDump();
		rfm69Device.SetMode(Rfm69HcwDevice.RegOpModeMode.Receive);


		while (true)
		{
			if (true)
			{
				string message = $"hello world {Environment.MachineName} {DateTime.Now:hh-mm-ss}";

				byte[] messageBuffer = UTF8Encoding.UTF8.GetBytes(message);

				Debug.WriteLine("{0:HH:mm:ss.fff} Send-{1}", DateTime.Now, message);
				//rfm69Device.SendMessage( 0x11, messageBuffer);
				rfm69Device.SendMessage(messageBuffer);

				Debug.WriteLine("{0:HH:mm:ss.fff} Send-Done", DateTime.Now);

				Task.Delay(5000).Wait();
			}
			else
			{
				Debug.Write(".");
				Task.Delay(1000).Wait();
			}
		}
	}
	catch (Exception ex)
	{
		Debug.WriteLine(ex.Message);
	}
}

I also found an error with the declaration of the RegPacketConfig1DcFree enumeration (Whitening = 0b0100000 vs. Whitening = 0b01000000) which wouldn’t have helped.

public enum RegPacketConfig1DcFree : byte
{
	None = 0b00000000,
	Manchester = 0b00100000,
	Whitening = 0b01000000,
	Reserved = 0b01100000,
}
const RegPacketConfig1DcFree RegPacketConfig1DcFreeDefault = RegPacketConfig1DcFree.None;

I could then reliably sent messages to and receive messages from my Arduino Nano Radio Shield RFM69/95 device

Register 0x4c - Value 0X00 - Bits 00000000
Register 0x4d - Value 0X00 - Bits 00000000
...
17:55:53.559 Received 1 byte message A CRC Ok True
.17:55:54.441 Received 2 byte message AB CRC Ok True
.17:55:55.444 Received 3 byte message ABC CRC Ok True
.17:55:56.447 Received 4 byte message ABCD CRC Ok True
.17:55:57.449 Received 5 byte message ABCDE CRC Ok True
.17:55:58.453 Received 6 byte message ABCDEF CRC Ok True
The thread 0x578 has exited with code 0 (0x0).
.17:55:59.622 Received 7 byte message ABCDEFG CRC Ok True
.17:56:00.457 Received 8 byte message ABCDEFGH CRC Ok True
.17:56:01.460 Received 9 byte message ABCDEFGHI CRC Ok True
.17:56:02.463 Received 10 byte message ABCDEFGHIJ CRC Ok True
..17:56:03.955 Received 11 byte message ABCDEFGHIJK CRC Ok True
17:56:04.583 Received 12 byte message ABCDEFGHIJKL CRC Ok True

I did some investigation into that the plainRMF69 code and found the ReadMultiple and WriteMuliple methods reverse the byte order

void bareRFM69::writeMultiple(uint8_t reg, void* data, uint8_t len){
    SPI.beginTransaction(SPISettings(10000000, MSBFIRST, SPI_MODE0));  // gain control of SPI bus
    this->chipSelect(true); // assert chip select
    SPI.transfer(RFM69_WRITE_REG_MASK | (reg & RFM69_READ_REG_MASK)); 
    uint8_t* r = reinterpret_cast<uint8_t*>(data);
    for (uint8_t i=0; i < len ; i++){
        SPI.transfer(r[len - i - 1]);
    }
    this->chipSelect(false);// deassert chip select
    SPI.endTransaction();    // release the SPI bus
}

void bareRFM69::readMultiple(uint8_t reg, void* data, uint8_t len){
    SPI.beginTransaction(SPISettings(10000000, MSBFIRST, SPI_MODE0));  // gain control of SPI bus
    this->chipSelect(true); // assert chip select
    
    SPI.transfer((reg % RFM69_READ_REG_MASK));
    uint8_t* r = reinterpret_cast<uint8_t*>(data);
    for (uint8_t i=0; i < len ; i++){
        r[len - i - 1] = SPI.transfer(0);
    }
    this->chipSelect(false);// deassert chip select
    SPI.endTransaction();    // release the SPI bus
}

I won’t be able to use interrupt AutoMode clients with the EasySensors shields as the DIO2 pin is not connected but on the AdaFruit RFM69HCW Radio Bonnet 433MHz or 915MHz it is connected to GPIO24.

Grove-VOC and eCO2 Gas Sensor (SGP30)

In preparation for a project to monitor the fumes (initially Volatile Organic Compounds) levels around the 3D Printers and Laser Cutters in a school makerspace I purchased a Grove -VOC and eCO2 Gas Sensor (SGP30) for evaluation.

Seeeduino Nano easySensors shield and Grove VOC & eCO2 Sensor

Seeeduino Nano devices have a single on-board I2C socket which meant I didn’t need a Grove Shield for Arduino Nano which reduced the size and cost of the sensor node.

I downloaded the sample code from the Seeedstudio wiki and modified my Easy Sensors Arduino Nano Radio Shield RFM69/95 Payload Addressing client to use the sensor.

My first attempt failed with an issues accessing an Analog port to read the serial number from the Microchip ATSHA204 security chip. After looking at the Seeed SGP30 library source code (based on Sensiron samples) I think the my Nano device was running out of memory. I then searched for other Arduino compatible SGP30 libraries and rebuilt he application with the one from Sparkfun,

/*
  Copyright ® 2019 August devMobile Software, All Rights Reserved

  THIS CODE AND INFORMATION IS PROVIDED "AS IS" WITHOUT WARRANTY OF ANY
  KIND, EITHER EXPRESSED OR IMPLIED, INCLUDING BUT NOT LIMITED TO THE
  IMPLIED WARRANTIES OF MERCHANTABILITY AND/OR FITNESS FOR A PARTICULAR
  PURPOSE.

  You can do what you want with this code, acknowledgment would be nice.
  http://www.devmobile.co.nz

  Seeedstudio Grove - VOC and eCO2 Gas Sensor (SGP30)
  https://www.seeedstudio.com/Grove-VOC-and-eCO2-Gas-Sensor-SGP30-p-3071.html

  Seeeduino Nano 
  https://www.seeedstudio.com/Seeeduino-Nano-p-4111.html
  
  Polycarbonate enclosure approx 3.5" x 4.5"
    2 x Cable glands
    1 x Grommet to seal SMA antenna connector
    3M command adhesive strips to hold battery & device in place
   
*/
#include <stdlib.h>
#include "SparkFun_SGP30_Arduino_Library.h" 
#include <LoRa.h>
#include <sha204_library.h>

//#define DEBUG
//#define DEBUG_TELEMETRY
//#define DEBUG_LORA
#define DEBUG_VOC_AND_CO2

#define UNITS_VOC "ppb"
#define UNITS_CO2 "ppm"

// LoRa field gateway configuration (these settings must match your field gateway)
const byte DeviceAddressMaximumLength = 15 ;
const char FieldGatewayAddress[] = {"LoRaIoT1"};
const float FieldGatewayFrequency =  915000000.0;
const byte FieldGatewaySyncWord = 0x12 ;

// Payload configuration
const int ChipSelectPin = 10;
const int ResetPin = 9;
const int InterruptPin = 2;

// LoRa radio payload configuration
const byte SensorIdValueSeperator = ' ' ;
const byte SensorReadingSeperator = ',' ;
const unsigned long SensorUploadDelay = 60000;

// ATSHA204 secure authentication, validation with crypto and hashing (currently only using for unique serial number)
const byte Atsha204Port = A3;
atsha204Class sha204(Atsha204Port);
const byte DeviceSerialNumberLength = 9 ;
byte deviceSerialNumber[DeviceSerialNumberLength] = {""};

SGP30 mySensor; //create an object of the SGP30 class

const byte PayloadSizeMaximum = 64 ;
byte payload[PayloadSizeMaximum];
byte payloadLength = 0 ;


void setup()
{
  Serial.begin(9600);

#ifdef DEBUG
  while (!Serial);
#endif
 
  Serial.println("Setup called");

  Serial.print("Field gateway:");
  Serial.print(FieldGatewayAddress ) ;
  Serial.print(" Frequency:");
  Serial.print( FieldGatewayFrequency,0 ) ;
  Serial.print("MHz SyncWord:");
  Serial.print( FieldGatewaySyncWord ) ;
  Serial.println();
  
   // Retrieve the serial number then display it nicely
  if(sha204.getSerialNumber(deviceSerialNumber))
  {
    Serial.println("sha204.getSerialNumber failed");
    while (true); // Drop into endless loop requiring restart
  }

  Serial.print("SNo:");
  DisplayHex( deviceSerialNumber, DeviceSerialNumberLength);
  Serial.println();

  Serial.println("LoRa setup start");

  // override the default chip select and reset pins
  LoRa.setPins(ChipSelectPin, ResetPin, InterruptPin);
  if (!LoRa.begin(FieldGatewayFrequency))
  {
    Serial.println("LoRa begin failed");
    while (true); // Drop into endless loop requiring restart
  }

  // Need to do this so field gateway pays attention to messsages from this device
  LoRa.enableCrc();
  LoRa.setSyncWord(FieldGatewaySyncWord);

#ifdef DEBUG_LORA
  LoRa.dumpRegisters(Serial);
#endif
  Serial.println("LoRa Setup done.");

  // Configure the DF Robot SHT20, temperature & humidity sensor
  Serial.println("SGP30 setup start");  
  Wire.begin();
  if(mySensor.begin() == false)
  {
    Serial.println("SQP-30 initialisation failed");
    while (true); // Drop into endless loop requiring restart
  }
  mySensor.initAirQuality();
  delay(1000);  
  Serial.println("SGP30 setup done");

  PayloadHeader((byte *)FieldGatewayAddress,strlen(FieldGatewayAddress), deviceSerialNumber, DeviceSerialNumberLength);

  Serial.println("Setup done");
  Serial.println();
}


void loop()
{
  unsigned long currentMilliseconds = millis();  

  Serial.println("Loop called");

  mySensor.measureAirQuality();

  PayloadReset();  

  PayloadAdd( "v", mySensor.TVOC, false);
     
  PayloadAdd( "c", mySensor.CO2, false);
  
  #ifdef DEBUG_VOC_AND_CO2  
    Serial.print("VoC:");
    Serial.print( mySensor.TVOC ) ;
    Serial.print( UNITS_VOC ) ;
    Serial.print(" Co2:");
    Serial.print( mySensor.CO2 ) ;
    Serial.println( UNITS_CO2 ) ;
  #endif

  #ifdef DEBUG_TELEMETRY
    Serial.println();
    Serial.print("RFM9X/SX127X Payload length:");
    Serial.print(payloadLength);
    Serial.println(" bytes");
  #endif

  LoRa.beginPacket();
  LoRa.write(payload, payloadLength);
  LoRa.endPacket();

  Serial.println("Loop done");
  Serial.println();

  delay(SensorUploadDelay - (millis() - currentMilliseconds ));
}


void PayloadHeader( const byte *to, byte toAddressLength, const byte *from, byte fromAddressLength)
{
  byte addressesLength = toAddressLength + fromAddressLength ;

  payloadLength = 0 ;

  // prepare the payload header with "To" Address length (top nibble) and "From" address length (bottom nibble)
  
  payload[payloadLength] = (toAddressLength << 4) | fromAddressLength ;
  payloadLength += 1;

  // Copy the "To" address into payload
  memcpy(&payload[payloadLength], to, toAddressLength);
  payloadLength += toAddressLength ;

  // Copy the "From" into payload
  memcpy(&payload[payloadLength], from, fromAddressLength);
  payloadLength += fromAddressLength ;
}


void PayloadAdd( const char *sensorId, float value, byte decimalPlaces, bool last)
{
  byte sensorIdLength = strlen( sensorId ) ;

  memcpy( &payload[payloadLength], sensorId,  sensorIdLength) ;
  payloadLength += sensorIdLength ;
  payload[ payloadLength] = SensorIdValueSeperator;
  payloadLength += 1 ;
  payloadLength += strlen( dtostrf(value, -1, decimalPlaces, (char *)&payload[payloadLength]));
  if (!last)
  {
    payload[ payloadLength] = SensorReadingSeperator;
    payloadLength += 1 ;
  }
  
#ifdef DEBUG_TELEMETRY
  Serial.print("PayloadAdd float-payloadLength:");
  Serial.print( payloadLength);
  Serial.println( );
#endif
}


void PayloadAdd( char *sensorId, int value, bool last )
{
  byte sensorIdLength = strlen(sensorId) ;

  memcpy(&payload[payloadLength], sensorId,  sensorIdLength) ;
  payloadLength += sensorIdLength ;
  payload[ payloadLength] = SensorIdValueSeperator;
  payloadLength += 1 ;
  payloadLength += strlen(itoa( value,(char *)&payload[payloadLength],10));
  if (!last)
  {
    payload[ payloadLength] = SensorReadingSeperator;
    payloadLength += 1 ;
  }
  
#ifdef DEBUG_TELEMETRY
  Serial.print("PayloadAdd int-payloadLength:" );
  Serial.print(payloadLength);
  Serial.println( );
#endif
}


void PayloadAdd( char *sensorId, unsigned int value, bool last )
{
  byte sensorIdLength = strlen(sensorId) ;

  memcpy(&payload[payloadLength], sensorId,  sensorIdLength) ;
  payloadLength += sensorIdLength ;
  payload[ payloadLength] = SensorIdValueSeperator;
  payloadLength += 1 ;
  payloadLength += strlen(utoa( value,(char *)&payload[payloadLength],10));
  if (!last)
  {
    payload[ payloadLength] = SensorReadingSeperator;
    payloadLength += 1 ;
  }
  
#ifdef DEBUG_TELEMETRY
  Serial.print("PayloadAdd uint-payloadLength:");
  Serial.print(payloadLength);
  Serial.println( );
#endif
}


void PayloadReset()
{
  byte fromAddressLength = payload[0] & 0xf ;
  byte toAddressLength = payload[0] >> 4 ;
  
  payloadLength = toAddressLength + fromAddressLength + 1;
}


void DisplayHex( byte *byteArray, byte length) 
{
  for (int i = 0; i < length ; i++)
  {
    // Add a leading zero
    if ( byteArray[i] < 16)
    {
      Serial.print("0");
    }
    Serial.print(byteArray[i], HEX);
    if ( i < (length-1)) // Don't put a - after last digit
    {
      Serial.print("-");
    }
  }
}    

The code is available on GitHub.

11:32:52.947 -> Setup called
11:32:52.947 -> Field gateway:LoRaIoT1 Frequency:915000000MHz SyncWord:18
11:32:53.085 -> SNo:01-23-21-61-D6-D1-F5-86-EE
11:32:53.118 -> LoRa setup start
11:32:53.118 -> LoRa Setup done.
11:32:53.153 -> SGP30 setup start
11:32:54.083 -> SGP30 setup done
11:32:54.117 -> Setup done
11:32:54.117 -> 
11:32:54.117 -> Loop called
11:32:54.152 -> VoC:0ppb Co2:400ppm
11:32:54.187 -> Loop done
11:32:54.187 -> 
11:33:54.092 -> Loop called
11:33:54.127 -> VoC:0ppb Co2:400ppm
11:33:54.195 -> Loop done
11:33:54.195 -> 
11:34:54.098 -> Loop called
11:34:54.133 -> VoC:17ppb Co2:425ppm
11:34:54.201 -> Loop done
11:34:54.201 -> 
11:35:54.109 -> Loop called
11:35:54.142 -> VoC:11ppb Co2:421ppm
11:35:54.210 -> Loop done
11:35:54.210 -> 
11:36:54.109 -> Loop called
11:36:54.143 -> VoC:3ppb Co2:409ppm
11:36:54.212 -> Loop done
11:36:54.212 -> 
11:37:54.135 -> Loop called
11:37:54.135 -> VoC:12ppb Co2:400ppm
11:37:54.204 -> Loop done
11:37:54.204 -> 
11:38:54.126 -> Loop called
11:38:54.161 -> VoC:11ppb Co2:439ppm
11:38:54.231 -> Loop done

To configure the device in Azure IoT Central (similar process for Adafruit.IO, working on support for losant, and ubidots) I copied the SNo: from the Arduino development tool logging window and appended c for the CO2 parts per million (ppm), v for VOC parts per billion (ppb) unique serial number from the ATSHA204A chip. (N.B. pay attention to the case of the field names they are case sensitive)

Azure IoT Central configuration

Overall the performance of the VoC sensor data is looking pretty positive, the eCO2 readings need some further investigation as they track the VOC levels. The large spike in the graph below is me putting an open vivid marker on my desk near the sensor.

eCO2 and VOC levels in my office for a day

Bill of materials (prices as at August 2019)

  • Seeeduino Nano USD6.90
  • Grove – VOC and eCO2 Gas Sensor (SGP30) USD15.90
  • EasySensors Arduino Nano radio shield RFM95 USD15.00

DF Robot Temperature & Humidity Sensor(SHT20) trial

In preparation for a project to build weather stations to place at a couple of local schools I purchased a DF Robot SHT20 Temperature & Humidity Sensor for evaluation.

Seeeduino Nano, EasySensors Shield & DF Robot Sensor test rig

The Seeeduino Nano devices I’m testing have a single on-board I2C socket which meant I didn’t need a Grove Shield for Arduino Nano which reduced the size and cost of the sensor node.

To test my setup I installed the DFRobot Arduino SHT20 library and downloaded a demo application to my device.

I started with my Easy Sensors Arduino Nano Radio Shield RFM69/95 Payload Addressing client and modified it to use the SHT20 sensor.

/*
  Copyright ® 2019 August devMobile Software, All Rights Reserved

  THIS CODE AND INFORMATION IS PROVIDED "AS IS" WITHOUT WARRANTY OF ANY
  KIND, EITHER EXPRESSED OR IMPLIED, INCLUDING BUT NOT LIMITED TO THE
  IMPLIED WARRANTIES OF MERCHANTABILITY AND/OR FITNESS FOR A PARTICULAR
  PURPOSE.

  You can do what you want with this code, acknowledgment would be nice.
  http://www.devmobile.co.nz

  DF Robot SHT20 Temperature & Humidity sensor   https://www.dfrobot.com/wiki/index.php/SHT20_I2C_Temperature_%26_Humidity_Sensor_(Waterproof_Probe)_SKU:_SEN0227  

  Seeeduino Nano 
  https://www.seeedstudio.com/Seeeduino-Nano-p-4111.html
  
  Polycarbonate enclosure approx 3.5" x 4.5"
    2 x Cable glands
    1 x ufl to SMA connector
    3M command adhesive strips to hold battery & device in place
   
*/
#include <stdlib.h>
#include <DFRobot_SHT20.h>
#include <LoRa.h>
#include <sha204_library.h>

//#define DEBUG
//#define DEBUG_TELEMETRY
//#define DEBUG_LORA
//#define DEBUG_TEMPERATURE_AND_HUMIDITY

#define UNITS_HUMIDITY "%"
#define UNITS_TEMPERATURE "°c"

// LoRa field gateway configuration (these settings must match your field gateway)
const byte DeviceAddressMaximumLength = 15 ;
const char FieldGatewayAddress[] = {"LoRaIoT1"};
const float FieldGatewayFrequency =  915000000.0;
const byte FieldGatewaySyncWord = 0x12 ;

// Payload configuration
const int ChipSelectPin = 10;
const int ResetPin = 9;
const int InterruptPin = 2;

// LoRa radio payload configuration
const byte SensorIdValueSeperator = ' ' ;
const byte SensorReadingSeperator = ',' ;
const unsigned long SensorUploadDelay = 60000;

// ATSHA204 secure authentication, validation with crypto and hashing (currently only using for unique serial number)
const byte Atsha204Port = A3;
atsha204Class sha204(Atsha204Port);
const byte DeviceSerialNumberLength = 9 ;
byte deviceSerialNumber[DeviceSerialNumberLength] = {""};

// SHT20 Air temperature and humidity sensor
DFRobot_SHT20 sht20;

const byte PayloadSizeMaximum = 64 ;
byte payload[PayloadSizeMaximum];
byte payloadLength = 0 ;


void setup()
{
  Serial.begin(9600);

#ifdef DEBUG
  while (!Serial);
#endif
 
  Serial.println("Setup called");

  Serial.print("Field gateway:");
  Serial.print(FieldGatewayAddress ) ;
  Serial.print(" Frequency:");
  Serial.print( FieldGatewayFrequency,0 ) ;
  Serial.print("MHz SyncWord:");
  Serial.print( FieldGatewaySyncWord ) ;
  Serial.println();
  
   // Retrieve the serial number then display it nicely
  if(sha204.getSerialNumber(deviceSerialNumber))
  {
    Serial.println("sha204.getSerialNumber failed");
    while (true); // Drop into endless loop requiring restart
  }

  Serial.print("SNo:");
  DisplayHex( deviceSerialNumber, DeviceSerialNumberLength);
  Serial.println();

  Serial.println("LoRa setup start");

  // override the default chip select and reset pins
  LoRa.setPins(ChipSelectPin, ResetPin, InterruptPin);
  if (!LoRa.begin(FieldGatewayFrequency))
  {
    Serial.println("LoRa begin failed");
    while (true); // Drop into endless loop requiring restart
  }

  // Need to do this so field gateway pays attention to messsages from this device
  LoRa.enableCrc();
  LoRa.setSyncWord(FieldGatewaySyncWord);

#ifdef DEBUG_LORA
  LoRa.dumpRegisters(Serial);
#endif
  Serial.println("LoRa Setup done.");

  // Configure the DF Robot SHT20, temperature & humidity sensor
  Serial.println("SHT20 setup start");  
  sht20.initSHT20();
  delay(100);
  sht20.checkSHT20();    
  Serial.println("SHT20 setup done");

  PayloadHeader((byte *)FieldGatewayAddress,strlen(FieldGatewayAddress), deviceSerialNumber, DeviceSerialNumberLength);

  Serial.println("Setup done");
  Serial.println();
}


void loop()
{
  unsigned long currentMilliseconds = millis();  
  float temperature ;
  float humidity ;

  Serial.println("Loop called");

  PayloadReset();  

  humidity = sht20.readHumidity();          
  PayloadAdd( "h", humidity, 0, false);

  temperature = sht20.readTemperature();               
  PayloadAdd( "t", temperature, 1, false);
  
  #ifdef DEBUG_TEMPERATURE_AND_HUMIDITY  
    Serial.print("H:");
    Serial.print( humidity, 0 ) ;
    Serial.print( UNITS_HUMIDITY ) ;
    Serial.print("T:");
    Serial.print( temperature, 1 ) ;
    Serial.println( UNITS_TEMPERATURE ) ;
  #endif

  #ifdef DEBUG_TELEMETRY
    Serial.println();
    Serial.print("RFM9X/SX127X Payload length:");
    Serial.print(payloadLength);
    Serial.println(" bytes");
  #endif

  LoRa.beginPacket();
  LoRa.write(payload, payloadLength);
  LoRa.endPacket();

  Serial.println("Loop done");
  Serial.println();

  delay(SensorUploadDelay - (millis() - currentMilliseconds ));
}


void PayloadHeader( const byte *to, byte toAddressLength, const byte *from, byte fromAddressLength)
{
  byte addressesLength = toAddressLength + fromAddressLength ;

  payloadLength = 0 ;

  // prepare the payload header with "To" Address length (top nibble) and "From" address length (bottom nibble)
  
  payload[payloadLength] = (toAddressLength << 4) | fromAddressLength ;
  payloadLength += 1;

  // Copy the "To" address into payload
  memcpy(&payload[payloadLength], to, toAddressLength);
  payloadLength += toAddressLength ;

  // Copy the "From" into payload
  memcpy(&payload[payloadLength], from, fromAddressLength);
  payloadLength += fromAddressLength ;
}


void PayloadAdd( const char *sensorId, float value, byte decimalPlaces, bool last)
{
  byte sensorIdLength = strlen( sensorId ) ;

  memcpy( &payload[payloadLength], sensorId,  sensorIdLength) ;
  payloadLength += sensorIdLength ;
  payload[ payloadLength] = SensorIdValueSeperator;
  payloadLength += 1 ;
  payloadLength += strlen( dtostrf(value, -1, decimalPlaces, (char *)&payload[payloadLength]));
  if (!last)
  {
    payload[ payloadLength] = SensorReadingSeperator;
    payloadLength += 1 ;
  }
  
#ifdef DEBUG_TELEMETRY
  Serial.print("PayloadAdd float-payloadLength:");
  Serial.print( payloadLength);
  Serial.println( );
#endif
}


void PayloadAdd( char *sensorId, int value, bool last )
{
  byte sensorIdLength = strlen(sensorId) ;

  memcpy(&payload[payloadLength], sensorId,  sensorIdLength) ;
  payloadLength += sensorIdLength ;
  payload[ payloadLength] = SensorIdValueSeperator;
  payloadLength += 1 ;
  payloadLength += strlen(itoa( value,(char *)&payload[payloadLength],10));
  if (!last)
  {
    payload[ payloadLength] = SensorReadingSeperator;
    payloadLength += 1 ;
  }
  
#ifdef DEBUG_TELEMETRY
  Serial.print("PayloadAdd int-payloadLength:" );
  Serial.print(payloadLength);
  Serial.println( );
#endif
}


void PayloadAdd( char *sensorId, unsigned int value, bool last )
{
  byte sensorIdLength = strlen(sensorId) ;

  memcpy(&payload[payloadLength], sensorId,  sensorIdLength) ;
  payloadLength += sensorIdLength ;
  payload[ payloadLength] = SensorIdValueSeperator;
  payloadLength += 1 ;
  payloadLength += strlen(utoa( value,(char *)&payload[payloadLength],10));
  if (!last)
  {
    payload[ payloadLength] = SensorReadingSeperator;
    payloadLength += 1 ;
  }
  
#ifdef DEBUG_TELEMETRY
  Serial.print("PayloadAdd uint-payloadLength:");
  Serial.print(payloadLength);
  Serial.println( );
#endif
}


void PayloadReset()
{
  byte fromAddressLength = payload[0] & 0xf ;
  byte toAddressLength = payload[0] >> 4 ;
  
  payloadLength = toAddressLength + fromAddressLength + 1;
}


void DisplayHex( byte *byteArray, byte length) 
{
  for (int i = 0; i < length ; i++)
  {
    // Add a leading zero
    if ( byteArray[i] < 16)
    {
      Serial.print("0");
    }
    Serial.print(byteArray[i], HEX);
    if ( i < (length-1)) // Don't put a - after last digit
    {
      Serial.print("-");
    }
  }
}    

The code is available on GitHub.

20:52:09.656 -> Setup called
20:52:09.690 -> Field gateway:LoRaIoT1 Frequency:915000000MHz SyncWord:18
20:52:09.794 -> SNo:01-23-21-61-D6-D1-F5-86-EE
20:52:09.828 -> LoRa setup start
20:52:09.828 -> LoRa Setup done.
20:52:09.862 -> SHT20 setup start
20:52:09.932 -> End of battery: no
20:52:09.932 -> Heater enabled: no
20:52:09.965 -> Disable OTP reload: yes
20:52:09.999 -> SHT20 setup done
20:52:09.999 -> Setup done
20:52:09.999 -> 
20:52:09.999 -> Loop called
20:52:10.067 -> H:60%T:20.0°c
20:52:10.136 -> Loop done
20:52:10.136 -> 
20:53:09.915 -> Loop called
20:53:10.019 -> H:61%T:20.5°c
20:53:10.088 -> Loop done
20:53:10.088 -> 

To configure the device in Azure IoT Central (similar process for Adafruit.IO, working on support for losant,and ubidots I copied the SNo: from the Arduino development tool logging window and appended p10 for PM 1 value, p25 for PM2.5 value and p100 for PM10 value to the unique serial number from the ATSHA204A chip. (N.B. pay attention to the case of the field names they are case sensitive)

When I moved the sensor indoors it appeared to take a while to warm up and after a while the metal body still felt cold. The sensor element is surrounded by quite a bit of protective packaging for outdoors use and I that would have a bit more thermal inertia the than the lightweight indoor enclosure.

It would be good to run the sensor alongside a calibrated temperature & humidity sensor to see how accurate and responsive it is.

Bill of materials (prices as at August 2019)

  • Seeeduino Nano USD6.90
  • Grove Screw Terminal USD2.90
  • DF Robot SHT20 I2C Temperature & Humidity Sensor USD22.50
  • EasySensors Arduino Nano radio shield RFM95 USD15.00