.NET Core 5 Raspberry PI GPIO Interrupts

To port my Windows 10 IoT Core nRF24L01, SX123X. and SX127X LoRa libraries to .Net Core 5 I wanted to see if there were any differences in the way interrupts were handled by the dotnet/iot libraries. The initial versions of the code will being running on a Raspberry PI but I will also look at other supported Single Board Computers(SBCs).

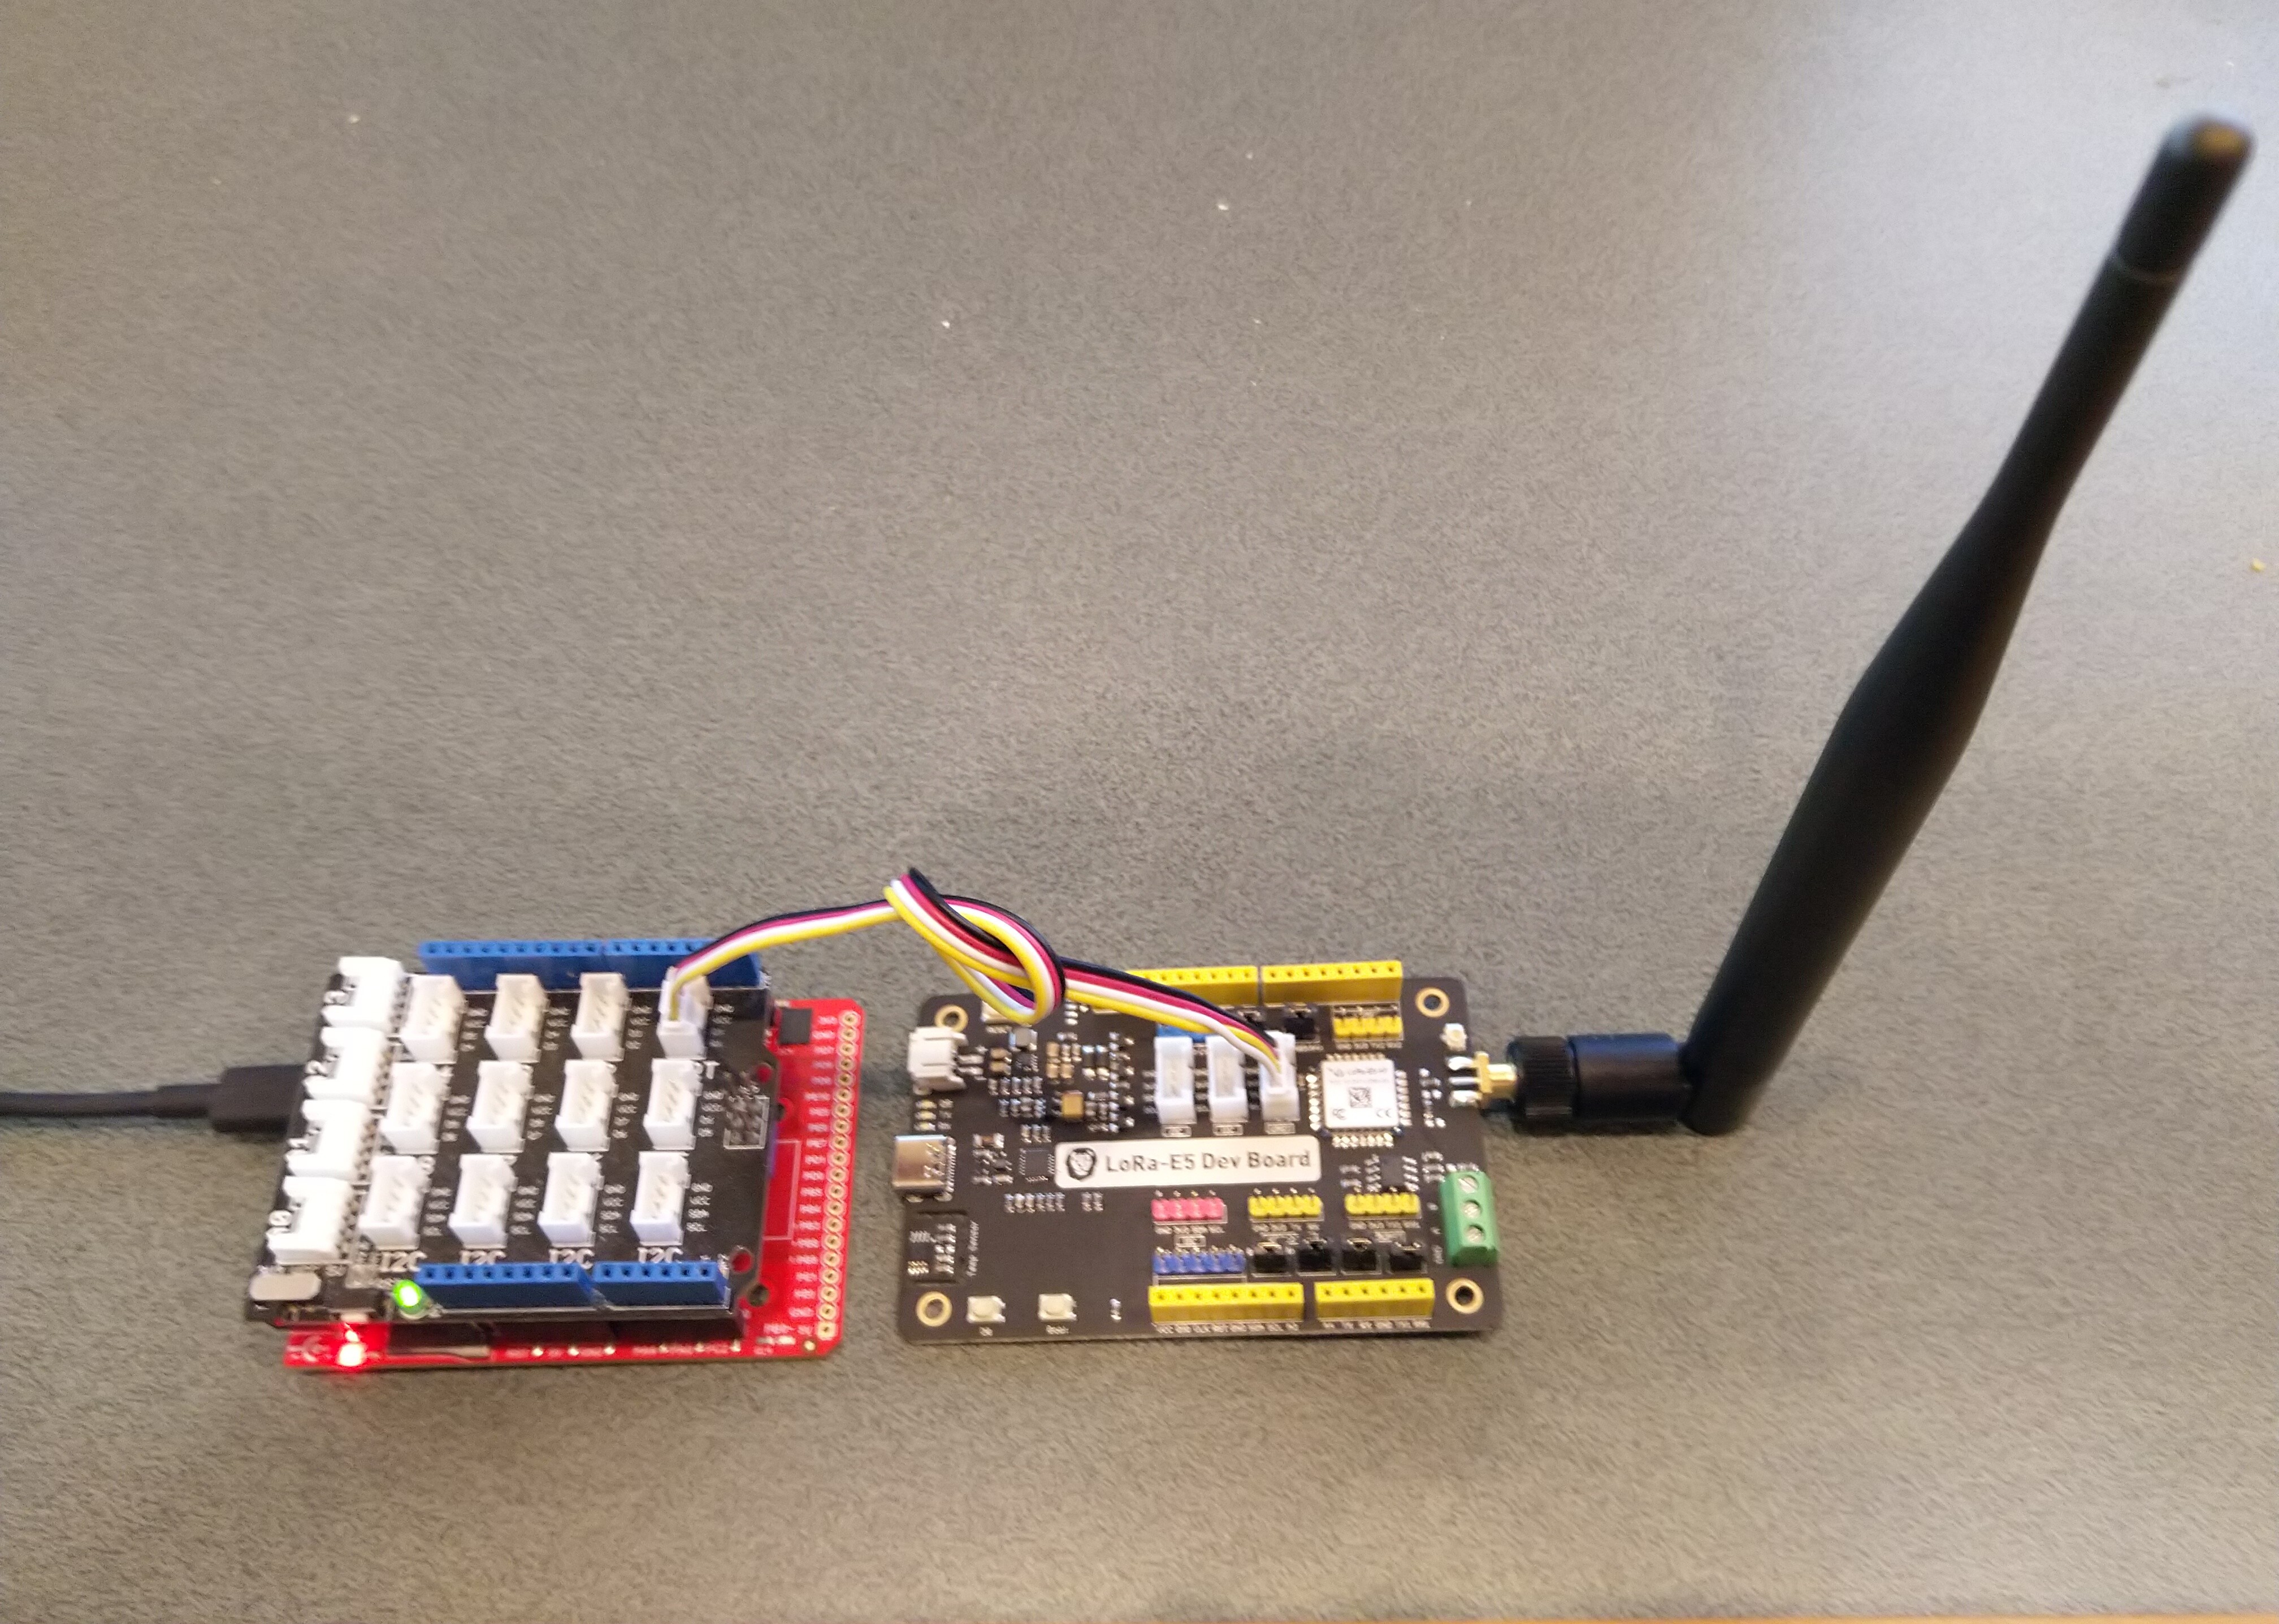
My test-rig was a RaspberryPI 3B with a Grove Base Hat for Raspberry PI (left over from a proof of concept project), a couple of Grove Universal 4 pin 5CM cables, a Grove LED pack, and a Grove Button.

Raspberry PI test rig with Grove Base pHat, button & LED

There were some syntax differences but nothing to major

using System;
using System.Device.Gpio;
using System.Diagnostics;
using System.Threading;

namespace devMobile.NetCore.GPIOInterrupts
{
	class Program
	{
		private const int ButtonPinNumber = 5;
		private const int LedPinNumber = 16;
		private static GpioController gpiocontroller;

		static void Main(string[] args)
		{
			try
			{
				gpiocontroller = new GpioController(PinNumberingScheme.Logical);

				gpiocontroller.OpenPin(ButtonPinNumber, PinMode.InputPullDown);
				gpiocontroller.OpenPin(LedPinNumber, PinMode.Output);

				gpiocontroller.RegisterCallbackForPinValueChangedEvent(ButtonPinNumber, PinEventTypes.Rising, PinChangeEventHandler);

				Console.WriteLine($"Main thread:{Thread.CurrentThread.ManagedThreadId}");

				while (true)
				{
					Console.WriteLine($"Doing stuff");
					Thread.Sleep(1000);
				}
			}
			catch (Exception ex)
			{
				Console.WriteLine(ex.Message);
			}
		}

		private static void PinChangeEventHandler(object sender, PinValueChangedEventArgs pinValueChangedEventArgs)
		{
			Debug.Write($"Interrupt Thread:{Thread.CurrentThread.ManagedThreadId}");

			if (pinValueChangedEventArgs.ChangeType == PinEventTypes.Rising)
			{
				if (gpiocontroller.Read(LedPinNumber) == PinValue.Low)
				{
					gpiocontroller.Write(LedPinNumber, PinValue.High);
				}
				else
				{
					gpiocontroller.Write(LedPinNumber, PinValue.Low);
				}
			}
		}
	}
}

I included code to display the Thread.CurrentThread.ManagedThreadId to see if the callback was running on a different thread.

-------------------------------------------------------------------
You may only use the Microsoft .NET Core Debugger (vsdbg) with
Visual Studio Code, Visual Studio or Visual Studio for Mac software
to help you develop and test your applications.
-------------------------------------------------------------------
...
Loaded '/usr/lib/dotnet/shared/Microsoft.NETCore.App/5.0.4/Microsoft.Win32.Primitives.dll'. Skipped loading symbols. Module is optimized and the debugger option 'Just My Code' is enabled.
Main thread:1
Doing stuff
Doing stuff
Doing stuff
Doing stuff
Doing stuff
Interrupt Thread:6Doing stuff
Doing stuff
Doing stuff
Interrupt Thread:6Doing stuff
Doing stuff
Interrupt Thread:6Doing stuff
Doing stuff
Doing stuff
Doing stuff
Doing stuff
Doing stuff
The program 'dotnet' has exited with code 0 (0x0).

The ManagedThreadId for the main loop(1) was different to the callback(6) which needs some further investigation.

.NET Core 5 Raspberry PI GPIO

Next to my desk I have a stack of Raspberry PI’s and with the release of .Net Core 5 for Windows, Macintosh and Linux I decided to have another look at porting some of my nRF24L01, LoRa, and LoRaWAN libraries to .Net Core.

There are blog posts (like Deploying and Debugging Raspberry Pi .NET Applications using VS Code) about installing .Net core on a Raspberry PI, using Visual Studio Code to write an application, then deploying and debugging it over SSH which were interesting but there were a lot of steps so the likelihood me screwing up was high.

I have been using Visual Studio for C# and VB.Net code since .Net was first released (I wrote my first C# applications with Visual Studio 6) so when I stumbled across RaspberryDebugger it was time to unbox a Raspberry PI 3B and see what happened.

All coding demos start with Hello world

using System;
using System.Diagnostics;
using System.Threading;

namespace devMobile.NetCore.ConsoleApp
{
	class Program
	{
		static void Main(string[] args)
		{
			while (true)
			{
				Console.WriteLine($"{DateTime.UtcNow:HH:mm:ss} Hello World!");

				Thread.Sleep(1000);
			}
		}
	}
}

The RaspberryDebugger is really simple to install, and “frictionless” to use. The developers have put a lot of effort into making it easy to deploy and debug a .Net Core application running on a Raspberry PI with Visual Studio. All I had to do was search for, then download and install their Visual Studio Extension(VSIX).

Visual Studio Manage Extensions search

Then configure the connection information for the devices I wanted to use.

Visual Studio Options menu for RaspberryDebugger

On my main development system I was using multiple Raspberry PI devices so it was great to be able to pre-configure several devices.

RaspberryDebugger device(s) configuration)

I had connected to each device with PuTTY to check that connectivity was sorted.

RaspberryDebugger devices configuration device configuration

After typing in my “Hello world” application I had to select the device I wanted to use

Project menu RaspberryDebugger option
RaspberryDebugger device selection

Then I pressed F5 and it worked! It’s very unusual for things to work first time so I was stunned. The application was “automagically” downloaded and run in the debugger on the device.

-------------------------------------------------------------------
You may only use the Microsoft .NET Core Debugger (vsdbg) with
Visual Studio Code, Visual Studio or Visual Studio for Mac software
to help you develop and test your applications.
-------------------------------------------------------------------
Loaded '/usr/lib/dotnet/shared/Microsoft.NETCore.App/5.0.4/System.Private.CoreLib.dll'. Skipped loading symbols. Module is optimized and the debugger option 'Just My Code' is enabled.
Loaded '/home/pi/vsdbg/ConsoleApp/ConsoleApp.dll'. Symbols loaded.
Loaded '/usr/lib/dotnet/shared/Microsoft.NETCore.App/5.0.4/System.Runtime.dll'. Skipped loading symbols. Module is optimized and the debugger option 'Just My Code' is enabled.
Loaded '/usr/lib/dotnet/shared/Microsoft.NETCore.App/5.0.4/System.Console.dll'. Skipped loading symbols. Module is optimized and the debugger option 'Just My Code' is enabled.
Loaded '/usr/lib/dotnet/shared/Microsoft.NETCore.App/5.0.4/System.Threading.Thread.dll'. Skipped loading symbols. Module is optimized and the debugger option 'Just My Code' is enabled.
Loaded '/usr/lib/dotnet/shared/Microsoft.NETCore.App/5.0.4/System.Threading.dll'. Skipped loading symbols. Module is optimized and the debugger option 'Just My Code' is enabled.
Loaded '/usr/lib/dotnet/shared/Microsoft.NETCore.App/5.0.4/System.Text.Encoding.Extensions.dll'. Skipped loading symbols. Module is optimized and the debugger option 'Just My Code' is enabled.
Loaded '/usr/lib/dotnet/shared/Microsoft.NETCore.App/5.0.4/Microsoft.Win32.Primitives.dll'. Skipped loading symbols. Module is optimized and the debugger option 'Just My Code' is enabled.
05:50:37 Hello World!
05:50:39 Hello World!
05:50:40 Hello World!
05:50:41 Hello World!
05:50:42 Hello World!
05:50:43 Hello World!
...

Once the basics were sorted I wanted to check out the General Purpose Input & Output(GPIO) support implemented in the dotnet/iot libraries. My test-rig was a RaspberryPI 3B with a Grove Base Hat for Raspberry PI (left over from a Windows 10 IoT Core proof of concept project), a couple of Grove Universal 4 pin 5CM cables, a Grove LED pack, and a Grove Button.

Raspberry PI test rig with Grove Base pHat, button & LED
using System;
using System.Device.Gpio;
using System.Diagnostics;
using System.Threading;

namespace devMobile.NetCore.ConsoleGPIO1
{
	class Program
	{
		const int ButtonPinNumber = 5;
		const int LedPinNumber = 16;

		static void Main(string[] args)
		{
			try
			{
				GpioController controller = new GpioController(PinNumberingScheme.Logical);

				controller.OpenPin(ButtonPinNumber, PinMode.InputPullUp);
				controller.OpenPin(LedPinNumber, PinMode.Output);

				while (true)
				{
					if (controller.Read(ButtonPinNumber) == PinValue.High)
					{
						if (controller.Read(LedPinNumber) == PinValue.Low)
						{
							controller.Write(LedPinNumber, PinValue.High);
						}
						else
						{
							controller.Write(LedPinNumber, PinValue.Low);
						}
					}
					Thread.Sleep(100);
				}
			}
			catch (Exception ex)
			{
				Console.WriteLine(ex.Message);
			}
		}
	}
}

After starting the application, when I pressed the button the Grove LED flashed with a 100mSec duty cycle.

The RaspberryDebugger extension is a joy to use and I’m going to figure out how I can donate some money to the developers.

nanoFramework Seeed LoRa-E5 LoRaWAN library Part2

Nasty OTAA connect

After getting basic connectivity for my Seeedstudio LoRa-E5 Development Kit and STM32F691DISCOVERY test rig working I wanted to see if I could get the device connected to The Things Industries(TTI).

My Over the Air Activation (OTAA) implementation is very “nasty” as it is assumed that there are no timeouts or failures and it only sends one BCD message “01020304”.

   public class Program
   {
      private const string SerialPortId = "COM6";

      private const string AppKey = "................................";
      private const string AppEui = "................";

      private const byte MessagePort = 15;

      //private const string Payload = "48656c6c6f204c6f526157414e"; // Hello LoRaWAN
      private const string Payload = "01020304"; // AQIDBA==
      //private const string Payload = "04030201"; // BAMCAQ==

   public static void Main()
   {
      SerialDevice serialDevice;
      uint bytesWritten;
      uint txByteCount;
      uint bytesRead;

      Debug.WriteLine("devMobile.IoT.SeeedLoRaE5.NetworkJoinOTAA starting");

      Debug.WriteLine($"Ports available: {Windows.Devices.SerialCommunication.SerialDevice.GetDeviceSelector()}");

      try
      {
         serialDevice = SerialDevice.FromId(SerialPortId);

         // set parameters
         serialDevice.BaudRate = 9600;
         serialDevice.Parity = SerialParity.None;
         serialDevice.StopBits = SerialStopBitCount.One;
         serialDevice.Handshake = SerialHandshake.None;
         serialDevice.DataBits = 8;

         serialDevice.ReadTimeout = new TimeSpan(0, 0, 5);
         serialDevice.WriteTimeout = new TimeSpan(0, 0, 4);

         DataWriter outputDataWriter = new DataWriter(serialDevice.OutputStream);
         DataReader inputDataReader = new DataReader(serialDevice.InputStream);

         // set a watch char to be notified when it's available in the input stream
         serialDevice.WatchChar = '\n';

         // clear out the RX buffer
         bytesRead = inputDataReader.Load(128);
         while (bytesRead > 0)
         {
            string response = inputDataReader.ReadString(bytesRead);
            Debug.WriteLine($"RX :{response}");

            bytesRead = inputDataReader.Load(128);
         }

         // Set the Region to AS923
         bytesWritten = outputDataWriter.WriteString("AT+DR=AS923\r\n");
         Debug.WriteLine($"TX: region {outputDataWriter.UnstoredBufferLength} bytes to output stream.");
         txByteCount = outputDataWriter.Store();
         Debug.WriteLine($"TX: {txByteCount} bytes via {serialDevice.PortName}");

         // Read the response
         bytesRead = inputDataReader.Load(128);
         if (bytesRead > 0)
         {
            String response = inputDataReader.ReadString(bytesRead);
            Debug.WriteLine($"RX :{response}");
         }

         // Set the Join mode
         bytesWritten = outputDataWriter.WriteString("AT+MODE=LWOTAA\r\n");
         Debug.WriteLine($"TX: mode {outputDataWriter.UnstoredBufferLength} bytes to output stream.");
         txByteCount = outputDataWriter.Store();
         Debug.WriteLine($"TX: {txByteCount} bytes via {serialDevice.PortName}");

         // Read the response
         bytesRead = inputDataReader.Load(128);
         if (bytesRead > 0)
         {
            string response = inputDataReader.ReadString(bytesRead);
            Debug.WriteLine($"RX :{response}");
         }

         // Set the appEUI
         bytesWritten = outputDataWriter.WriteString($"AT+ID=AppEui,\"{AppEui}\"\r\n");
         Debug.WriteLine($"TX: AppEui {outputDataWriter.UnstoredBufferLength} bytes to output stream.");
         txByteCount = outputDataWriter.Store();
         Debug.WriteLine($"TX: {txByteCount} bytes via {serialDevice.PortName}");

         // Read the response
         bytesRead = inputDataReader.Load(128);
         if (bytesRead > 0)
         {
            String response = inputDataReader.ReadString(bytesRead);
            Debug.WriteLine($"RX :{response}");
         }

         // Set the appKey
         bytesWritten = outputDataWriter.WriteString($"AT+KEY=APPKEY,{AppKey}\r\n");
         Debug.WriteLine($"TX: AppKey {outputDataWriter.UnstoredBufferLength} bytes to output stream.");
         txByteCount = outputDataWriter.Store();
         Debug.WriteLine($"TX: {txByteCount} bytes via {serialDevice.PortName}");

         // Read the response
         bytesRead = inputDataReader.Load(128);
         if (bytesRead > 0)
         {
            String response = inputDataReader.ReadString(bytesRead);
            Debug.WriteLine($"RX :{response}");
         }

         // Set the port number
         bytesWritten = outputDataWriter.WriteString($"AT+PORT={MessagePort}\r\n");
         Debug.WriteLine($"TX: port {outputDataWriter.UnstoredBufferLength} bytes to output stream.");
         txByteCount = outputDataWriter.Store();
         Debug.WriteLine($"TX: {txByteCount} bytes via {serialDevice.PortName}");

         // Read the response
         bytesRead = inputDataReader.Load(128);
         if (bytesRead > 0)
         {
            String response = inputDataReader.ReadString(bytesRead);
            Debug.WriteLine($"RX :{response}");
         }

         // Join the network
         bytesWritten = outputDataWriter.WriteString("AT+JOIN\r\n");
         Debug.WriteLine($"TX: join {outputDataWriter.UnstoredBufferLength} bytes to output stream.");
         txByteCount = outputDataWriter.Store();
         Debug.WriteLine($"TX: {txByteCount} bytes via {serialDevice.PortName}");

         // Read the response, need loop as multi line response
         bytesRead = inputDataReader.Load(128);
         while (bytesRead > 0)
         {
            String response = inputDataReader.ReadString(bytesRead);
            Debug.WriteLine($"RX :{response}");

            bytesRead = inputDataReader.Load(128);
         }

         while (true)
         {
            bytesWritten = outputDataWriter.WriteString($"AT+MSGHEX=\"{Payload}\"\r\n");
            Debug.WriteLine($"TX: send {outputDataWriter.UnstoredBufferLength} bytes to output stream.");

            txByteCount = outputDataWriter.Store();
            Debug.WriteLine($"TX: {txByteCount} bytes via {serialDevice.PortName}");

            // Read the response, need loop as multi line response
            bytesRead = inputDataReader.Load(128);
            while (bytesRead > 0)
            {
               String response = inputDataReader.ReadString(bytesRead);
               Debug.WriteLine($"RX :{response}");

               bytesRead = inputDataReader.Load(128);
            }

            Thread.Sleep(300000);
         }
      }
      catch (Exception ex)
      {
         Debug.WriteLine(ex.Message);
      }
}

The code is not suitable for production but it confirmed my software and hardware configuration worked.

The thread '<No Name>' (0x2) has exited with code 0 (0x0).
devMobile.IoT.SeeedE5.NetworkJoinOTAA starting
TX: DR 13 bytes
RX :+DR: AS923

TX: MODE 16 bytes
RX :+MODE: LWOTAA

TX: ID=AppEui 40 bytes
RX :+ID: AppEui, ..:..:.:.:.:.:.:.

TX: KEY=APPKEY 48 bytes
RX :+KEY: APPKEY ................................

TX: PORT 11 bytes
RX :+PORT: 1

TX: JOIN 9 bytes
RX :+JOIN: Start
+JOIN: NORMAL
+JOIN: Network joined
+JOIN: NetID 000013 DevAddr ..:..:..:..
+JOIN: Done

TX: MSGHEX 22 bytes
RX :+MSGHEX: Start
+MSGHEX: FPENDING
+MSGHEX: RXWIN1, RSSI -41, SNR 9.0
+MSGHEX: Done

TX: MSGHEX 22 bytes
RX :+MSGHEX: Start
+MSGHEX: Done

In the Visual Studio 2019 debug output I could see messages getting sent and then after a short delay they were visible in the TTI console.

Seeed E5 LoRaWAN dev Kit connecting in The Things Industries Device Live data tab

TinyCLR OS V2 Seeed LoRa-E5 LoRaWAN library Part5

Receive of two parts

After getting basic connectivity for my Seeedstudio LoRa-E5 Development Kit and Fezduino test rig working I started to build a general purpose library for GHI Electronics TinyCLR powered devices.

The code wasn’t very robust so when I sent messages from The Things Network (TTN) EndDevice messaging tab my first implementation didn’t work.

In the Visual Studio 2019 Debug output window

The thread '<No Name>' (0x2) has exited with code 0 (0x0).
devMobile.IoT.SeeedE5.NetworkJoinOTAA starting
TX: DR 13 bytes
RX :+DR: AS923

TX: MODE 16 bytes
RX :+MODE: LWOTAA

TX: ID=AppEui 40 bytes
RX :+ID: AppEui, 00:00:00:00:00:00:00:00

TX: KEY=APPKEY 48 bytes
RX :+KEY: APPKEY 12345678901234567890123456789012

TX: PORT 11 bytes
RX :+PORT: 1

TX: JOIN 9 bytes
RX :+JOIN: Start
+JOIN: NORMAL
+JOIN: Network joined
+JOIN: NetID 000013 DevAddr 00:00:00:00
+JOIN: Done

TX: MSGHEX 22 bytes
RX :+MSGHEX: Start
+MSGHEX: FPENDING
+MSGHEX: RXWIN1, RSSI -31, SNR 8.0
+MSGHEX: Done

TX: MSGHEX 22 bytes
RX :+MSGHEX: Start
+MSGHEX: PORT: 10; RX: "0102030405"
+MSGHEX: RXWIN1, RSSI -31, SNR 15.0
+MSGHEX: Done

TX: MSGHEX 22 bytes
RX :+MSGHEX: Start
+MSGHEX: FPENDING
+MSGHEX: PORT: 20; RX: "0504030201"
+MSGHEX: RXWIN1, RSSI -31, SNR 14.0
+MSGHEX: Done

TX: MSGHEX 22 bytes
RX :+MSGHEX: Start
+MSGHEX: Done

After going back and looking at the module documentation and the diagnostic output I realised that the downlink message and confirmation were sent in two responses.

The first (optional) part of the response had the port number and message payload

+MSGHEX: PORT: 20; RX: "0504030201"

The second had the signal strength information

+MSGHEX: RXWIN1, RSSI -31, SNR 14.0

I had to add some code to the SerialDevice_DataReceived method for assembling the two responses. It would be good if the Seeedstudio LoRa-E5 only used one response. (Sample below based on RAK811)

at+send=lora:1:5A00
OK
at+recv=1,-105,-12,0

at+send=lora:1:5A00
OK
at+recv=0,-105,-12,8,00010203

The other LoRa-E5 implementation detail which frustrated me was the inclusion of labels for values e.g. PORT, RSSI, SNR etc.

 +MSGHEX: RXWIN1, RSSI -31, SNR 14.0 

It would be simpler if the first parameter was the receive window, the second Received Signal Strength Indication(RSSI) and third Signal to Noise Ratio(SNR) etc..

The inconsistent use of separators also made unpacking messages more complex (esp. ‘;’ vs ‘:’ which was hard to see)

+MSGHEX: PORT: 20; RX: “0504030201” uses ‘:’ + ‘;’ + ‘”” + ‘ ‘

+MSGHEX: RXWIN1, RSSI -31, SNR 14.0 uses ‘:’ + ‘,’ + ‘ ‘

Now that I have a proof of concept library I need to functionality and soak test it.

TinyCLR OS V2 Seeed LoRa-E5 LoRaWAN library Part4

Failure is an option

After getting basic connectivity for my Seeedstudio LoRa-E5 Development Kit and Fezduino test rig working I started to build a general purpose library for GHI Electronics TinyCLR powered devices.

The code currently isn’t very robust so when I accidentally used an invalid region, then AppEUI the responses weren’t consistent. When the region configuration failed the response was +DR: ERROR(-1) which maps to “Parameters is invalid” and when the Join failed the response was “+JOIN: Join failed”.

// Set the Region to AS923
txByteCount = serialDevice.Write(UTF8Encoding.UTF8.GetBytes("AT+DR=AS924\r\n"));
Debug.WriteLine($"TX: DR {txByteCount} bytes");
Thread.Sleep(500);

//Read the response
rxByteCount = serialDevice.BytesToRead;
if (rxByteCount > 0)
{
   byte[] rxBuffer = new byte[rxByteCount];
   serialDevice.Read(rxBuffer);
   Debug.WriteLine($"RX :{UTF8Encoding.UTF8.GetString(rxBuffer)}");
}

In the Visual Studio 2019 Debug output window

The thread '<No Name>' (0x2) has exited with code 0 (0x0).
devMobile.IoT.SeeedE5.NetworkJoinOTAA starting
TX: DR 13 bytes
RX :+DR: ERROR(-1)

When I tried an invalid AppEui and the AT+JOIN failed the error message was “+JOIN: Join failed”

In the Visual Studio 2019 Debug output window

devMobile.IoT.SeeedE5.NetworkJoinOTAA starting
TX: DR 13 bytes
RX :+DR: AS923

TX: MODE 16 bytes
RX :+MODE: LWOTAA

TX: ID=AppEui 40 bytes
RX :+ID: AppEui, 00:00:00:00:00:00:00:00

TX: KEY=APPKEY 48 bytes
RX :+KEY: APPKEY 01234567890123456789012345678901

TX: PORT 11 bytes
RX :+PORT: 1

TX: JOIN 9 bytes
RX :+JOIN: Start
+JOIN: NORMAL
+JOIN: Join failed
+JOIN: Done

I had to add some code to the SerialDevice_DataReceived method for handling the “+JOIN: Join failed” case. It would be good if the Seeedstudio LoRa-E5 reported errors in a consistent way for all commands, without the ERROR(..) marker.

TinyCLR OS V2 Seeed LoRa-E5 LoRaWAN library Part3

DevAddr, DevEui and AppEui Oddness

After getting basic connectivity for my Seeedstudio LoRa-E5 Development Kit and Fezduino test rig working I wanted to build a general purpose library for GHI Electronics TinyCLR powered devices.

The code currently isn’t very robust but this caught my attention…

devMobile.IoT.SeeedE5.NetworkJoinOTAA starting
TX: DR 13 bytes
RX :+DR: AS923

TX: MODE 16 bytes
RX :+MODE: LWOTAA

TX: ID=AppEui 40 bytes
RX :+ID: AppEui, 00:00:00:00:00:00:00:00

TX: KEY=APPKEY 48 bytes
RX :+KEY: APPKEY 0123456789ABCDEFGHIJKLMOPQRSTRU 

TX: PORT 11 bytes
RX :+PORT: 1

TX: JOIN 9 bytes
RX :+JOIN: Start
+JOIN: NORMAL
+JOIN: Network joined
+JOIN: NetID 000013 DevAddr 00:01:02:03
+JOIN: Done

In my code I validate the values returned by commands

AT+ID=AppEui, “0000000000000”

AT+ID=APPEUI, “00 00 00 00 00 00 00 00”

Response to either of the above commands

+ID: AppEui, 00:00:00:00:00:00:00:00

It just seem a bit odd that to set the AppEUI (similar for the DevEUI and DevAddr) there are two possible formats available, neither of which is the format returned.

This was unlike the RAK811 module where most commands just return OK when they are successful.

at+set_config=lora:app_eui:0000000000000001
OK

TinyCLR OS V2 Seeed LoRa-E5 LoRaWAN library Part2

Nasty OTAA connect

After getting basic connectivity for my Seeedstudio LoRa-E5 Development Kit and Fezduino test rig working I wanted to see if I could get the device connected to The Things Industries(TTI) via the RAK7258 WisGate Edge Lite on the shelf in my office.

My Over the Air Activation (OTAA) implementation is very “nasty” as it is assumed that there are no timeouts or failures and it only sends one BCD message “48656c6c6f204c6f526157414e” which is “hello LoRaWAN”. The code just sequentially steps through the necessary commands (with a suitable delay after each is sent) to join the TTI network.

public class Program
{
#if TINYCLR_V2_FEZDUINO
   private static string SerialPortId = SC20100.UartPort.Uart5;
#endif
   private const string AppKey = "................................";

   //txByteCount = serialDevice.Write(UTF8Encoding.UTF8.GetBytes($"AT+ID=AppEui,{AppEui}\r\n"));
   //private const string AppEui = "................";

   //txByteCount = serialDevice.Write(UTF8Encoding.UTF8.GetBytes($"AT+ID=AppEui,\"{AppEui}\"\r\n"));
   private const string AppEui = ".. .. .. .. .. .. .. ..";

   private const byte messagePort = 1;

   //private const string payload = "48656c6c6f204c6f526157414e"; // Hello LoRaWAN
   private const string payload = "01020304"; // AQIDBA==
   //private const string payload = "04030201"; // BAMCAQ==

   public static void Main()
   {
      UartController serialDevice;
      int txByteCount;
      int rxByteCount;

      Debug.WriteLine("devMobile.IoT.SeeedE5.NetworkJoinOTAA starting");

      try
      {
         serialDevice = UartController.FromName(SerialPortId);

         serialDevice.SetActiveSettings(new UartSetting()
         {
            BaudRate = 9600,
            Parity = UartParity.None,
            StopBits = UartStopBitCount.One,
            Handshaking = UartHandshake.None,
            DataBits = 8
         });

         serialDevice.Enable();

         // Set the Region to AS923
         txByteCount = serialDevice.Write(UTF8Encoding.UTF8.GetBytes("AT+DR=AS923\r\n"));
         Debug.WriteLine($"TX: DR {txByteCount} bytes");
         Thread.Sleep(500);

         // Read the response
         rxByteCount = serialDevice.BytesToRead;
         if (rxByteCount > 0)
         {
            byte[] rxBuffer = new byte[rxByteCount];
            serialDevice.Read(rxBuffer);
            Debug.WriteLine($"RX :{UTF8Encoding.UTF8.GetString(rxBuffer)}");
         }

         // Set the Join mode
         txByteCount = serialDevice.Write(UTF8Encoding.UTF8.GetBytes("AT+MODE=LWOTAA\r\n"));
         Debug.WriteLine($"TX: MODE {txByteCount} bytes");
         Thread.Sleep(500);

         // Read the response
         rxByteCount = serialDevice.BytesToRead;
         if (rxByteCount > 0)
         {
            byte[] rxBuffer = new byte[rxByteCount];
            serialDevice.Read(rxBuffer);
            Debug.WriteLine($"RX :{UTF8Encoding.UTF8.GetString(rxBuffer)}");
         }

         // Set the appEUI
         txByteCount = serialDevice.Write(UTF8Encoding.UTF8.GetBytes($"AT+ID=AppEui,\"{AppEui}\"\r\n"));
         Debug.WriteLine($"TX: ID=AppEui {txByteCount} bytes");
         Thread.Sleep(500);

         // Read the response
         rxByteCount = serialDevice.BytesToRead;
         if (rxByteCount > 0)
         {
            byte[] rxBuffer = new byte[rxByteCount];
            serialDevice.Read(rxBuffer);
            Debug.WriteLine($"RX :{UTF8Encoding.UTF8.GetString(rxBuffer)}");
         }
            
         // Set the appKey
         txByteCount = serialDevice.Write(UTF8Encoding.UTF8.GetBytes($"AT+KEY=APPKEY,{AppKey}\r\n"));
         Debug.WriteLine($"TX: KEY=APPKEY {txByteCount} bytes");
         Thread.Sleep(500);

         // Read the response
         rxByteCount = serialDevice.BytesToRead;
         if (rxByteCount > 0)
         {
            byte[] rxBuffer = new byte[rxByteCount];
            serialDevice.Read(rxBuffer);
            Debug.WriteLine($"RX :{UTF8Encoding.UTF8.GetString(rxBuffer)}");
         }

         // Set the PORT
         txByteCount = serialDevice.Write(UTF8Encoding.UTF8.GetBytes($"AT+PORT={messagePort}\r\n"));
         Debug.WriteLine($"TX: PORT {txByteCount} bytes");
         Thread.Sleep(500);

         // Read the response
         rxByteCount = serialDevice.BytesToRead;
         if (rxByteCount > 0)
         {
            byte[] rxBuffer = new byte[rxByteCount];
            serialDevice.Read(rxBuffer);
            Debug.WriteLine($"RX :{UTF8Encoding.UTF8.GetString(rxBuffer)}");
         }

         // Join the network
         txByteCount = serialDevice.Write(UTF8Encoding.UTF8.GetBytes("AT+JOIN\r\n"));
         Debug.WriteLine($"TX: JOIN {txByteCount} bytes");
         Thread.Sleep(10000);

         // Read the response
         rxByteCount = serialDevice.BytesToRead;
         if (rxByteCount > 0)
         {
            byte[] rxBuffer = new byte[rxByteCount];
            serialDevice.Read(rxBuffer);
            Debug.WriteLine($"RX :{UTF8Encoding.UTF8.GetString(rxBuffer)}");
         }

         while (true)
         {
            // Unconfirmed message
            txByteCount = serialDevice.Write(UTF8Encoding.UTF8.GetBytes($"AT+MSGHEX=\"{payload}\"\r\n"));
            Debug.WriteLine($"TX: MSGHEX {txByteCount} bytes");

            // Confirmed message
            //txByteCount = serialDevice.Write(UTF8Encoding.UTF8.GetBytes($"AT+CMSGHEX=\"{payload}\"\r\n"));
            //Debug.WriteLine($"TX: CMSGHEX {txByteCount} bytes");

            Thread.Sleep(10000);

            // Read the response
            rxByteCount = serialDevice.BytesToRead;
            if (rxByteCount > 0)
            {
               byte[] rxBuffer = new byte[rxByteCount];
               serialDevice.Read(rxBuffer);
               Debug.WriteLine($"RX :{UTF8Encoding.UTF8.GetString(rxBuffer)}");
            }

            Thread.Sleep(30000);
         }
      }
      catch (Exception ex)
      {
         Debug.WriteLine(ex.Message);
      }
   }
}

The code is not suitable for production but it confirmed my software and hardware configuration worked.

The thread '<No Name>' (0x2) has exited with code 0 (0x0).
devMobile.IoT.SeeedE5.NetworkJoinOTAA starting
TX: DR 13 bytes
RX :+DR: AS923

TX: MODE 16 bytes
RX :+MODE: LWOTAA

TX: ID=AppEui 40 bytes
RX :+ID: AppEui, ..:..:.:.:.:.:.:.

TX: KEY=APPKEY 48 bytes
RX :+KEY: APPKEY ................................

TX: PORT 11 bytes
RX :+PORT: 1

TX: JOIN 9 bytes
RX :+JOIN: Start
+JOIN: NORMAL
+JOIN: Network joined
+JOIN: NetID 000013 DevAddr ..:..:..:..
+JOIN: Done

TX: MSGHEX 22 bytes
RX :+MSGHEX: Start
+MSGHEX: FPENDING
+MSGHEX: RXWIN1, RSSI -41, SNR 9.0
+MSGHEX: Done

TX: MSGHEX 22 bytes
RX :+MSGHEX: Start
+MSGHEX: Done

In the Visual Studio 2019 debug output I could see messages getting sent and then after a short delay they were visible in the TTI console.

Seeed E5 LoRaWAN dev Kit connecting in The Things Industries Device Live data tab

I had an issue with how the AppUI parameter was handled

   private const string AppKey = "................................";

   //txByteCount = serialDevice.Write(UTF8Encoding.UTF8.GetBytes($"AT+ID=AppEui,{AppEui}\r\n"));
   //private const string AppEui = "................";

   //txByteCount = serialDevice.Write(UTF8Encoding.UTF8.GetBytes($"AT+ID=AppEui,\"{AppEui}\"\r\n"));
   private const string AppEui = ".. .. .. .. .. .. .. ..";


It appears that If the appkey (or other string parameter) has spaces it has to be enclosed in quotations.

RAK811/RAK4200 AS923 Join Channels

When running an application which used my TinyCLR V2 RAK811 Module library on a FezDuino with a modified RAK811 LPWAN Evaluation Board(EVB) most join attempts on my Things Industries(TTI) instance would fail. This was a bit odd as connecting to The Things Network(TTN) was pretty reliable.

The thread '<No Name>' (0x2) has exited with code 0 (0x0).
devMobile.IoT.Rak811LoRaWanDeviceClient starting
12:00:12 Region AS923
12:00:12 ADR On
12:00:12 Unconfirmed
12:00:12 OTAA
12:00:13 Join start Timeout:30Sec
Join failed 26
The thread '<No Name>' (0x1) has exited with code 0 (0x0).
Done.

In TTI end device live data tab I could see the the joins attempts were failing with “Uplink channel Not found”

The Things Industries device live data tab “uplink channel not found” failures
The Things Industries device live data tab “uplink channel not found” detail

Initially I assumed this was an issue with my configuration of the RAKwireless RAK7258 gateway in my office that I was using for testing. After some discussions with a helpful TTI support person they suggested that I try disabling all bar the first two channels the RAK811 module was configured to use then see if worked.

I modified the intialise method of my TinyCLR V2 RAK811 Module library to disable all bar the first two channels

result = SendCommand("OK", "at+set_config=lora:ch_mask:2:0", CommandTimeoutDefault);
if (result != Result.Success)
{
#if DIAGNOSTICS
   Debug.WriteLine($" {DateTime.UtcNow:hh:mm:ss} at+set_config=lora:ch_mask:2:0 {result}");
#endif
   return result;
}

result = SendCommand("OK", "at+set_config=lora:ch_mask:3:0", CommandTimeoutDefault);
if (result != Result.Success)
{
#if DIAGNOSTICS
   Debug.WriteLine($" {DateTime.UtcNow:hh:mm:ss} at+set_config=lora:ch_mask:3:0 {result}");
#endif
   return result;
}

result = SendCommand("OK", "at+set_config=lora:ch_mask:4:0", CommandTimeoutDefault);
if (result != Result.Success)
{
#if DIAGNOSTICS
   Debug.WriteLine($" {DateTime.UtcNow:hh:mm:ss} at+set_config=lora:ch_mask:4:0 {result}");
#endif
   return result;
}

result = SendCommand("OK", "at+set_config=lora:ch_mask:5:0", CommandTimeoutDefault);
if (result != Result.Success)
{
#if DIAGNOSTICS
    Debug.WriteLine($" {DateTime.UtcNow:hh:mm:ss} at+set_config=lora:ch_mask:5:0 {result}");
#endif
   return result;
}

result = SendCommand("OK", "at+set_config=lora:ch_mask:6:0", CommandTimeoutDefault);
if (result != Result.Success)
{
#if DIAGNOSTICS
   Debug.WriteLine($" {DateTime.UtcNow:hh:mm:ss} at+set_config=lora:ch_mask:6:0 {result}");
#endif
   return result;
}

result = SendCommand("OK", "at+set_config=lora:ch_mask:7:0", CommandTimeoutDefault);
if (result != Result.Success)
{
#if DIAGNOSTICS
   Debug.WriteLine($" {DateTime.UtcNow:hh:mm:ss} at+set_config=lora:ch_mask:7:0 {result}");
#endif
   return result;
}

After modifying the code my Fezduino joined reliably.

The thread ” (0x2) has exited with code 0 (0x0).
devMobile.IoT.Rak811LoRaWanDeviceClient starting
12:00:12 Region AS923
12:00:12 ADR On
12:00:12 Unconfirmed
12:00:12 OTAA
12:00:13 Join start Timeout:30Sec
12:00:18 Join finish
Temperature : 19.9 °C
Pressure : 1014.0 HPa
Altitude : 143 meters
12:00:19 port:5 payload BCD:0073279C016700C8
12:00:44 Sleep
12:01:44 Wakeup
Temperature : 20.1 °C
Pressure : 1014.0 HPa
Altitude : 143 meters
12:01:44 port:5 payload BCD:0073279C016700C9
12:02:09 Sleep

The Things Industries device live data tab successful join.

After some further discussion with TTI support it looks like the RAK811 module doesn’t send join requests on the frequencies specified for the AS923 region in the LoRaWAN™1.1Regional Parameters.

LoRaWAN Regional Parameters AS923 Join-request frequencies

After confirming the join-request channel issue I went back to the RAKwireless forums with some new terms to search for and found that others were having a similar issue but with RAK4200 modules. My “best guess” is that the TTI implementation is more strict about join-request frequencies than the TTN

TTI V3 Connector Device EUI Representation

While debugging The Things Industries(TTI) V3 connector on my desktop I had noticed the Device EUI‘s were wrong.

TTI V3 Connector application running as a console application showing incorrect DeviceEUIs

The TTI V3 Connector code…

foreach (V3EndDevice device in endDevices.End_devices)
{
   if (DeviceAzureEnabled(device))
   {
      _logger.LogInformation("Config-ApplicationID:{0} DeviceID:{1} Device EUI:{2}", device.Ids.Application_ids.Application_id, device.Ids.Device_id, BitConverter.ToString(device.Ids.Dev_eui));

      tasks.Add(DeviceRegistration(device.Ids.Application_ids.Application_id, device.Ids.Device_id, _programSettings.ResolveDeviceModelId(device.Ids.Application_ids.Application_id, device.Attributes), stoppingToken));
   }
}

…uses some classes generated by nSwag based on the TheThingsNetwork/LoRaWAN-stack api.swagger.json

public partial class V3EndDeviceIdentifiers 
{
        [Newtonsoft.Json.JsonProperty("device_id", Required = Newtonsoft.Json.Required.Default, NullValueHandling = Newtonsoft.Json.NullValueHandling.Ignore)]
        public string Device_id { get; set; }
    
        [Newtonsoft.Json.JsonProperty("application_ids", Required = Newtonsoft.Json.Required.Default, NullValueHandling = Newtonsoft.Json.NullValueHandling.Ignore)]
        public V3ApplicationIdentifiers Application_ids { get; set; }
    
        /// <summary>The LoRaWAN DevEUI.</summary>
        [Newtonsoft.Json.JsonProperty("dev_eui", Required = Newtonsoft.Json.Required.Default, NullValueHandling = Newtonsoft.Json.NullValueHandling.Ignore)]
        public byte[] Dev_eui { get; set; }
    
        /// <summary>The LoRaWAN JoinEUI (AppEUI until LoRaWAN 1.0.3 end devices).</summary>
        [Newtonsoft.Json.JsonProperty("join_eui", Required = Newtonsoft.Json.Required.Default, NullValueHandling = Newtonsoft.Json.NullValueHandling.Ignore)]
        public byte[] Join_eui { get; set; }
    
        /// <summary>The LoRaWAN DevAddr.</summary>
        [Newtonsoft.Json.JsonProperty("dev_addr", Required = Newtonsoft.Json.Required.Default, NullValueHandling = Newtonsoft.Json.NullValueHandling.Ignore)]
        public byte[] Dev_addr { get; set; }
}

After some research I found references to the underlying problem in TTN and OpenAPI forums. The Dev_addr and Dev_eui fields are Base16(Hexidecimal) encoded binary but are being processed as if they were Base64(mime) encoded.

The TTI connector only displays the Device EUI so I changed the Dev_eui property to a string

public partial class V3EndDeviceIdentifiers 
{
        [Newtonsoft.Json.JsonProperty("device_id", Required = Newtonsoft.Json.Required.Default, NullValueHandling = Newtonsoft.Json.NullValueHandling.Ignore)]
        public string Device_id { get; set; }
    
        [Newtonsoft.Json.JsonProperty("application_ids", Required = Newtonsoft.Json.Required.Default, NullValueHandling = Newtonsoft.Json.NullValueHandling.Ignore)]
        public V3ApplicationIdentifiers Application_ids { get; set; }
    
        /// <summary>The LoRaWAN DevEUI.</summary>
        [Newtonsoft.Json.JsonProperty("dev_eui", Required = Newtonsoft.Json.Required.Default, NullValueHandling = Newtonsoft.Json.NullValueHandling.Ignore)]
        public string Dev_eui { get; set; }

      /// <summary>The LoRaWAN JoinEUI (AppEUI until LoRaWAN 1.0.3 end devices).</summary>
      [Newtonsoft.Json.JsonProperty("join_eui", Required = Newtonsoft.Json.Required.Default, NullValueHandling = Newtonsoft.Json.NullValueHandling.Ignore)]
        public byte[] Join_eui { get; set; }
    
        /// <summary>The LoRaWAN DevAddr.</summary>
        [Newtonsoft.Json.JsonProperty("dev_addr", Required = Newtonsoft.Json.Required.Default, NullValueHandling = Newtonsoft.Json.NullValueHandling.Ignore)]
        public byte[] Dev_addr { get; set; }
}

I also had to remove the BitConverter.ToString call

foreach (V3EndDevice device in endDevices.End_devices)
{
   if (DeviceAzureEnabled(device))
   {
      _logger.LogInformation("Config-ApplicationID:{0} DeviceID:{1} Device EUI:{2}", device.Ids.Application_ids.Application_id, device.Ids.Device_id, device.Ids.Dev_eui);

      tasks.Add(DeviceRegistration(device.Ids.Application_ids.Application_id, device.Ids.Device_id, _programSettings.ResolveDeviceModelId(device.Ids.Application_ids.Application_id, device.Attributes), stoppingToken));
   }
}

Now the DeviceEUI values are displayed correctly and searching for EndDevices in Azure Application Insights is easier

TTI V3 Connector application running as a console application showing correct DeviceEUIs

Modifying the nSwag generated classes is a really nasty way of fixing the problem but I think this approach is okay as it’s only one field and any other solution I could find was significantly more complex.

Device Provisioning Service(DPS) JsonData

While building my The Things Industries(TTI) V3 connector which uses the Azure Device Provisioning Service(DPS) the way pretty much all of the samples formatted the JsonData property of the ProvisioningRegistrationAdditionalData (part of Plug n Play provisioning) by manually constructing a JSON object which bugged me.

ProvisioningRegistrationAdditionalData provisioningRegistrationAdditionalData = new ProvisioningRegistrationAdditionalData()
{
   JsonData = $"{{\"modelId\": \"{modelId}\"}}"
};

result = await provClient.RegisterAsync(provisioningRegistrationAdditionalData);

I remembered seeing a sample where the DTDLV2 methodId was formatted by a library function and after a surprising amount of searching I found what I was looking for in Azure-Samples repository.

The code for the CreateDpsPayload method

// Copyright (c) Microsoft. All rights reserved.
// Licensed under the MIT license. See LICENSE file in the project root for full license information.

using Microsoft.Azure.Devices.Provisioning.Client.Extensions;

namespace Microsoft.Azure.Devices.Provisioning.Client.PlugAndPlay
{
    /// <summary>
    /// A helper class for formatting the DPS device registration payload, per plug and play convention.
    /// </summary>
    public static class PnpConvention
    {
        /// <summary>
        /// Create the DPS payload to provision a device as plug and play.
        /// </summary>
        /// <remarks>
        /// For more information on device provisioning service and plug and play compatibility,
        /// and PnP device certification, see <see href="https://docs.microsoft.com/en-us/azure/iot-pnp/howto-certify-device"/>.
        /// The DPS payload should be in the format:
        /// <code>
        /// {
        ///   "modelId": "dtmi:com:example:modelName;1"
        /// }
        /// </code>
        /// For information on DTDL, see <see href="https://github.com/Azure/opendigitaltwins-dtdl/blob/master/DTDL/v2/dtdlv2.md"/>
        /// </remarks>
        /// <param name="modelId">The Id of the model the device adheres to for properties, telemetry, and commands.</param>
        /// <returns>The DPS payload to provision a device as plug and play.</returns>
        public static string CreateDpsPayload(string modelId)
        {
            modelId.ThrowIfNullOrWhiteSpace(nameof(modelId));
            return $"{{\"modelId\":\"{modelId}\"}}";
        }
    }
}

With a couple of changes my code now uses the CreateDpsPayload method

using Microsoft.Azure.Devices.Provisioning.Client.PlugAndPlay;

...

using (var securityProvider = new SecurityProviderSymmetricKey(deviceId, deviceKey, null))
{
   using (var transport = new ProvisioningTransportHandlerAmqp(TransportFallbackType.TcpOnly))
   {
      ProvisioningDeviceClient provClient = ProvisioningDeviceClient.Create(
         Constants.AzureDpsGlobalDeviceEndpoint,
         deviceProvisiongServiceSettings.IdScope,
         securityProvider,
         transport);

      DeviceRegistrationResult result;

      if (!string.IsNullOrEmpty(modelId))
      {
         ProvisioningRegistrationAdditionalData provisioningRegistrationAdditionalData = new ProvisioningRegistrationAdditionalData()
         {
               JsonData = PnpConvention.CreateDpsPayload(modelId)
         };

         result = await provClient.RegisterAsync(provisioningRegistrationAdditionalData, stoppingToken);
      }
      else
      {
         result = await provClient.RegisterAsync(stoppingToken);
      }

      if (result.Status != ProvisioningRegistrationStatusType.Assigned)
      {
         _logger.LogError("Config-DeviceID:{0} Status:{1} RegisterAsync failed ", deviceId, result.Status);

         return false;
      }

      IAuthenticationMethod authentication = new DeviceAuthenticationWithRegistrySymmetricKey(result.DeviceId, (securityProvider as SecurityProviderSymmetricKey).GetPrimaryKey());

      deviceClient = DeviceClient.Create(result.AssignedHub, authentication, transportSettings);
   }
}