Random wanderings through Microsoft Azure esp. PaaS plumbing, the IoT bits, AI on Micro controllers, AI on Edge Devices, .NET nanoFramework, .NET Core on *nix and ML.NET+ONNX
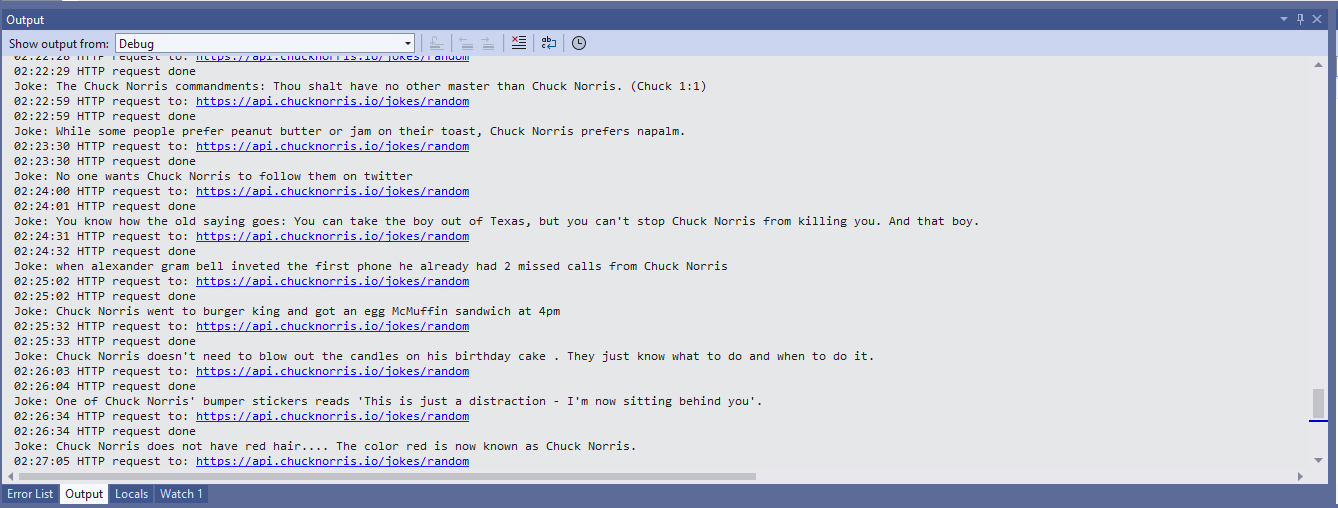
Some of the Chuck Norris facts are not suitable for school students so the request Uniform Resource Locator (URL) can be modified to ensure only “age appropriate” ones are returned.
The first step was to flash the WT32-SC01 with the latest version of the .NET nanoFramework for ESP32 devices. To get the device into “boot” mode I used a jumper wire to connect GPIO0 to ground before powering it up.
WT32-SC01 boot loader mode jumper
The .NET nanoFramework nanoff utility identified the device, downloaded the runtime package, and updated the device.
updating the WT32-SC01 with the nanoff utility
The next step was to run the blank NET nanoFramework sample application.
using System;
using System.Diagnostics;
using System.Threading;

namespace HelloWorld
{
    public class Program
    {
        public static void Main()
        {
            Debug.WriteLine("Hello from nanoFramework!");

            Thread.Sleep(Timeout.Infinite);

            // Browse our samples repository: https://github.com/nanoframework/samples
            // Check our documentation online: https://docs.nanoframework.net/
            // Join our lively Discord community: https://discord.gg/gCyBu8T
        }
    }
}
Microsoft Visual Studio 2022 displaying output of .NET nanoFramework Blank application
//
// Copyright (c) .NET Foundation and Contributors
// See LICENSE file in the project root for full license information.
//

using System.Device.Gpio;
using System;
using System.Threading;
using nanoFramework.Hardware.Esp32;

namespace Blinky
{
    public class Program
    {
        private static GpioController s_GpioController;
        public static void Main()
        {
            s_GpioController = new GpioController();

            // IO23 is LCD backlight
            GpioPin led = s_GpioController.OpenPin(Gpio.IO23,PinMode.Output );

            led.Write(PinValue.Low);

            while (true)
            {
                led.Toggle();
                Thread.Sleep(125);
                led.Toggle();
                Thread.Sleep(125);
                led.Toggle();
                Thread.Sleep(125);
                led.Toggle();
                Thread.Sleep(525);
            }
        }
    }
}
The
Flashing WT32-SC01 LCD backlight
Next steps getting the LCD+Touch panel and Wifi working
try
{
	this.azureIoTHubClient = DeviceClient.CreateFromConnectionString(this.azureIoTHubConnectionString, this.transportType);
}
catch (Exception ex)
{
	this.logging.LogMessage("AzureIOT Hub DeviceClient.CreateFromConnectionString failed " + ex.Message, LoggingLevel.Error);
	return;
}

try
{
	TwinCollection reportedProperties = new TwinCollection();

	// This is from the OS
	reportedProperties["Timezone"] = TimeZoneSettings.CurrentTimeZoneDisplayName;
	reportedProperties["OSVersion"] = Environment.OSVersion.VersionString;
	reportedProperties["MachineName"] = Environment.MachineName;

	reportedProperties["ApplicationDisplayName"] = package.DisplayName;
	reportedProperties["ApplicationName"] = packageId.Name;
	reportedProperties["ApplicationVersion"] = string.Format($"{version.Major}.{version.Minor}.{version.Build}.{version.Revision}");

	// Unique identifier from the hardware
	SystemIdentificationInfo systemIdentificationInfo = SystemIdentification.GetSystemIdForPublisher();
	using (DataReader reader = DataReader.FromBuffer(systemIdentificationInfo.Id))
	{
		byte[] bytes = new byte[systemIdentificationInfo.Id.Length];
		reader.ReadBytes(bytes);
		reportedProperties["SystemId"] = BitConverter.ToString(bytes);
	}
	this.azureIoTHubClient.UpdateReportedPropertiesAsync(reportedProperties).Wait();
}
catch (Exception ex)
{
	this.logging.LogMessage("Azure IoT Hub client UpdateReportedPropertiesAsync failed " + ex.Message, LoggingLevel.Error);
	return;
}

try
{
	LoggingFields configurationInformation = new LoggingFields();

	Twin deviceTwin = this.azureIoTHubClient.GetTwinAsync().GetAwaiter().GetResult();

	if (!deviceTwin.Properties.Desired.Contains("ImageUpdateDue") || !TimeSpan.TryParse(deviceTwin.Properties.Desired["ImageUpdateDue"].value.ToString(), out imageUpdateDue))
	{
		this.logging.LogMessage("DeviceTwin.Properties ImageUpdateDue setting missing or invalid format", LoggingLevel.Warning);
		return;
	}
	configurationInformation.AddTimeSpan("ImageUpdateDue", imageUpdateDue);

	if (!deviceTwin.Properties.Desired.Contains("ImageUpdatePeriod") || !TimeSpan.TryParse(deviceTwin.Properties.Desired["ImageUpdatePeriod"].value.ToString(), out imageUpdatePeriod))
	{
		this.logging.LogMessage("DeviceTwin.Properties ImageUpdatePeriod setting missing or invalid format", LoggingLevel.Warning);
		return;
	}
…
	if (!deviceTwin.Properties.Desired.Contains("DebounceTimeout") || !TimeSpan.TryParse(deviceTwin.Properties.Desired["DebounceTimeout"].value.ToString(), out debounceTimeout))
	{
		this.logging.LogMessage("DeviceTwin.Properties DebounceTimeout setting missing or invalid format", LoggingLevel.Warning);
		return;
	}
				configurationInformation.AddTimeSpan("DebounceTimeout", debounceTimeout);

	this.logging.LogEvent("Configuration settings", configurationInformation);
}
catch (Exception ex)
{
	this.logging.LogMessage("Azure IoT Hub client GetTwinAsync failed or property missing/invalid" + ex.Message, LoggingLevel.Error);
	return;
}
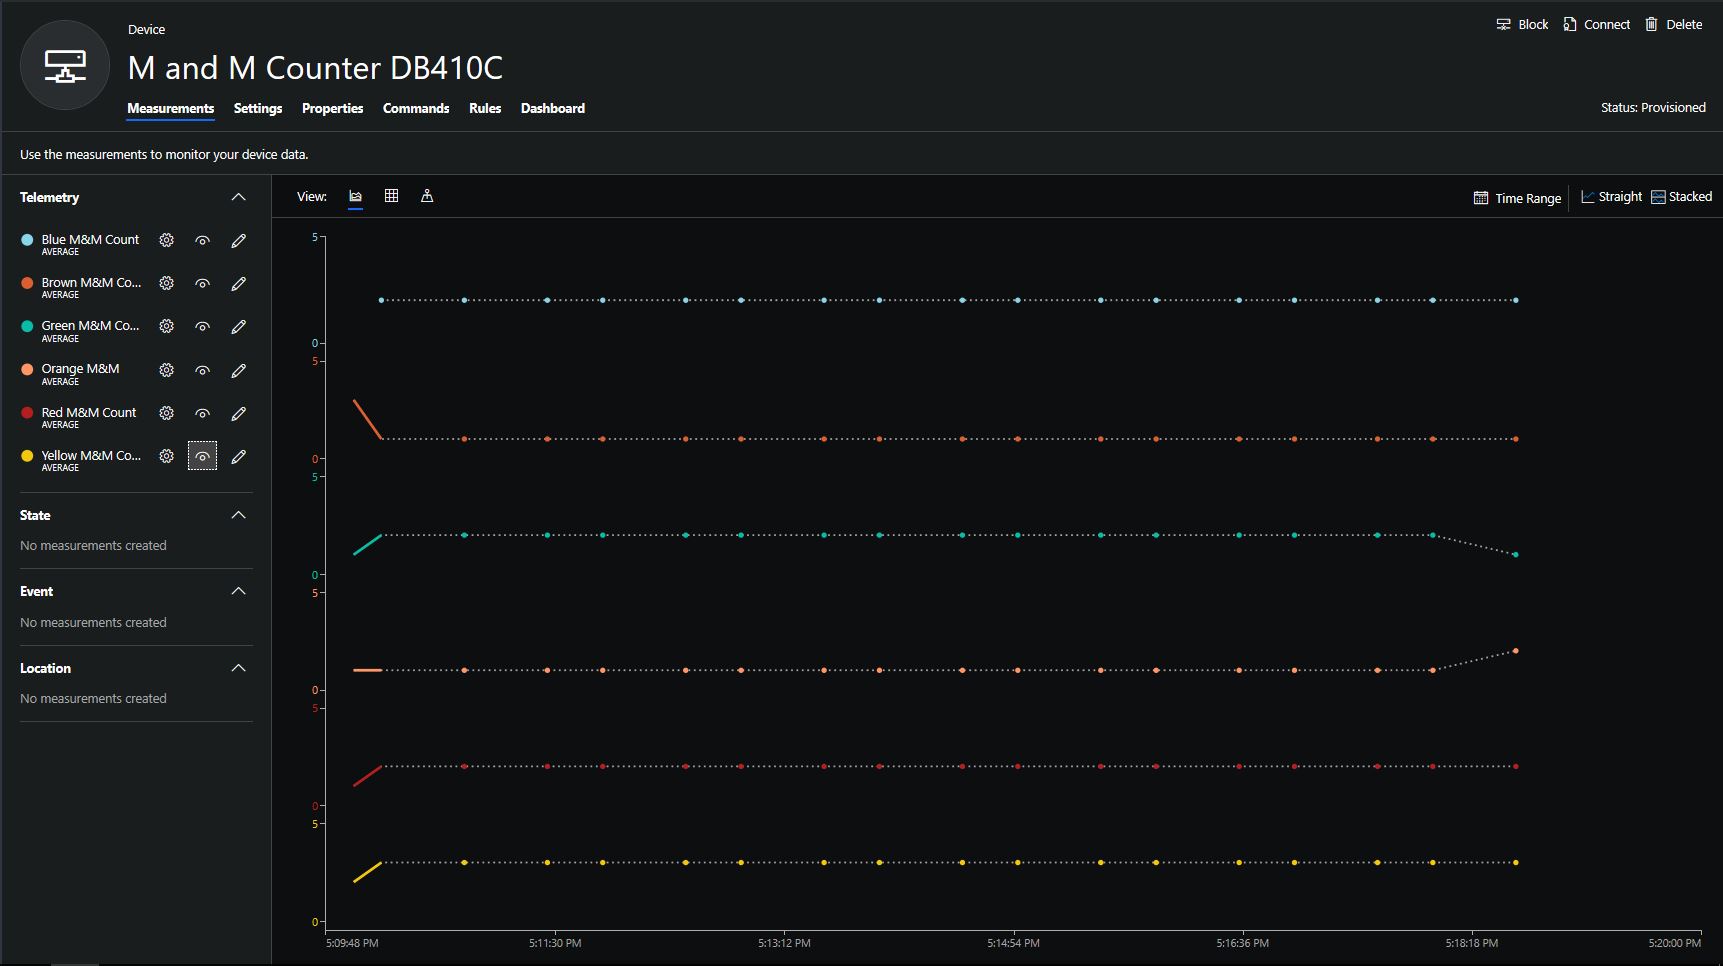
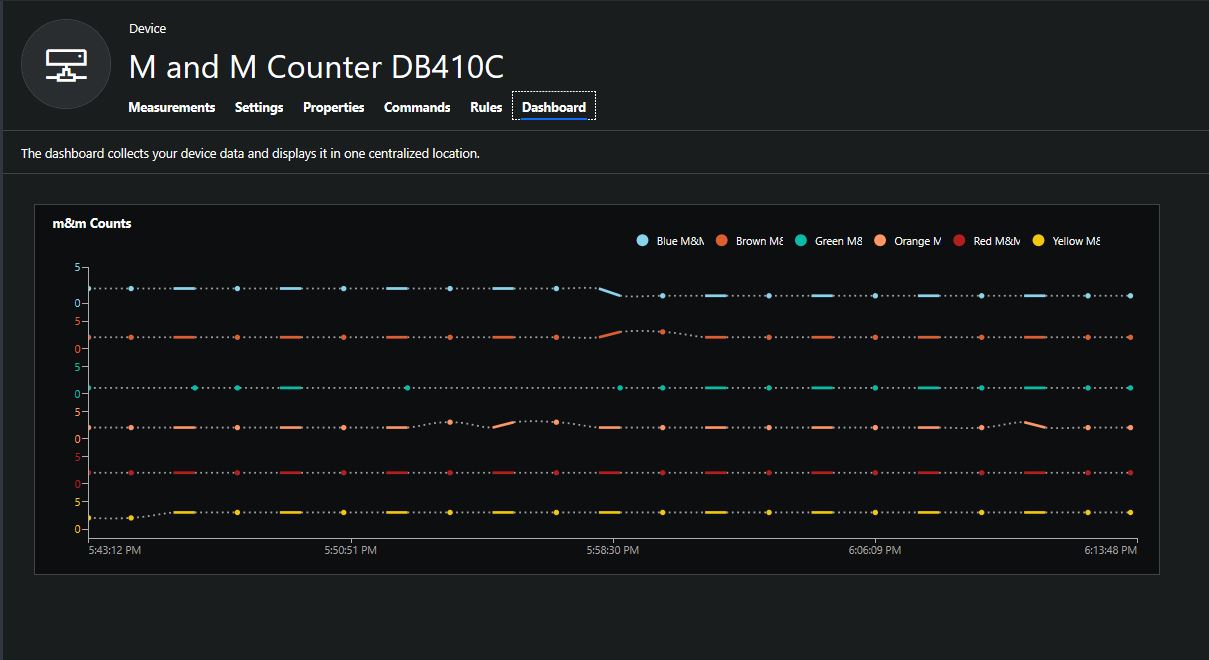
When the digital input (configured in the app.settings file) is strobed or the timer fires (configured in the device properties) an image is captured, uploaded to Azure Cognitive Services Custom Vision for processing.
The returned results are then post processed to make them Azure IoT Central friendly, and finally uploaded to an Azure IoT Hub.
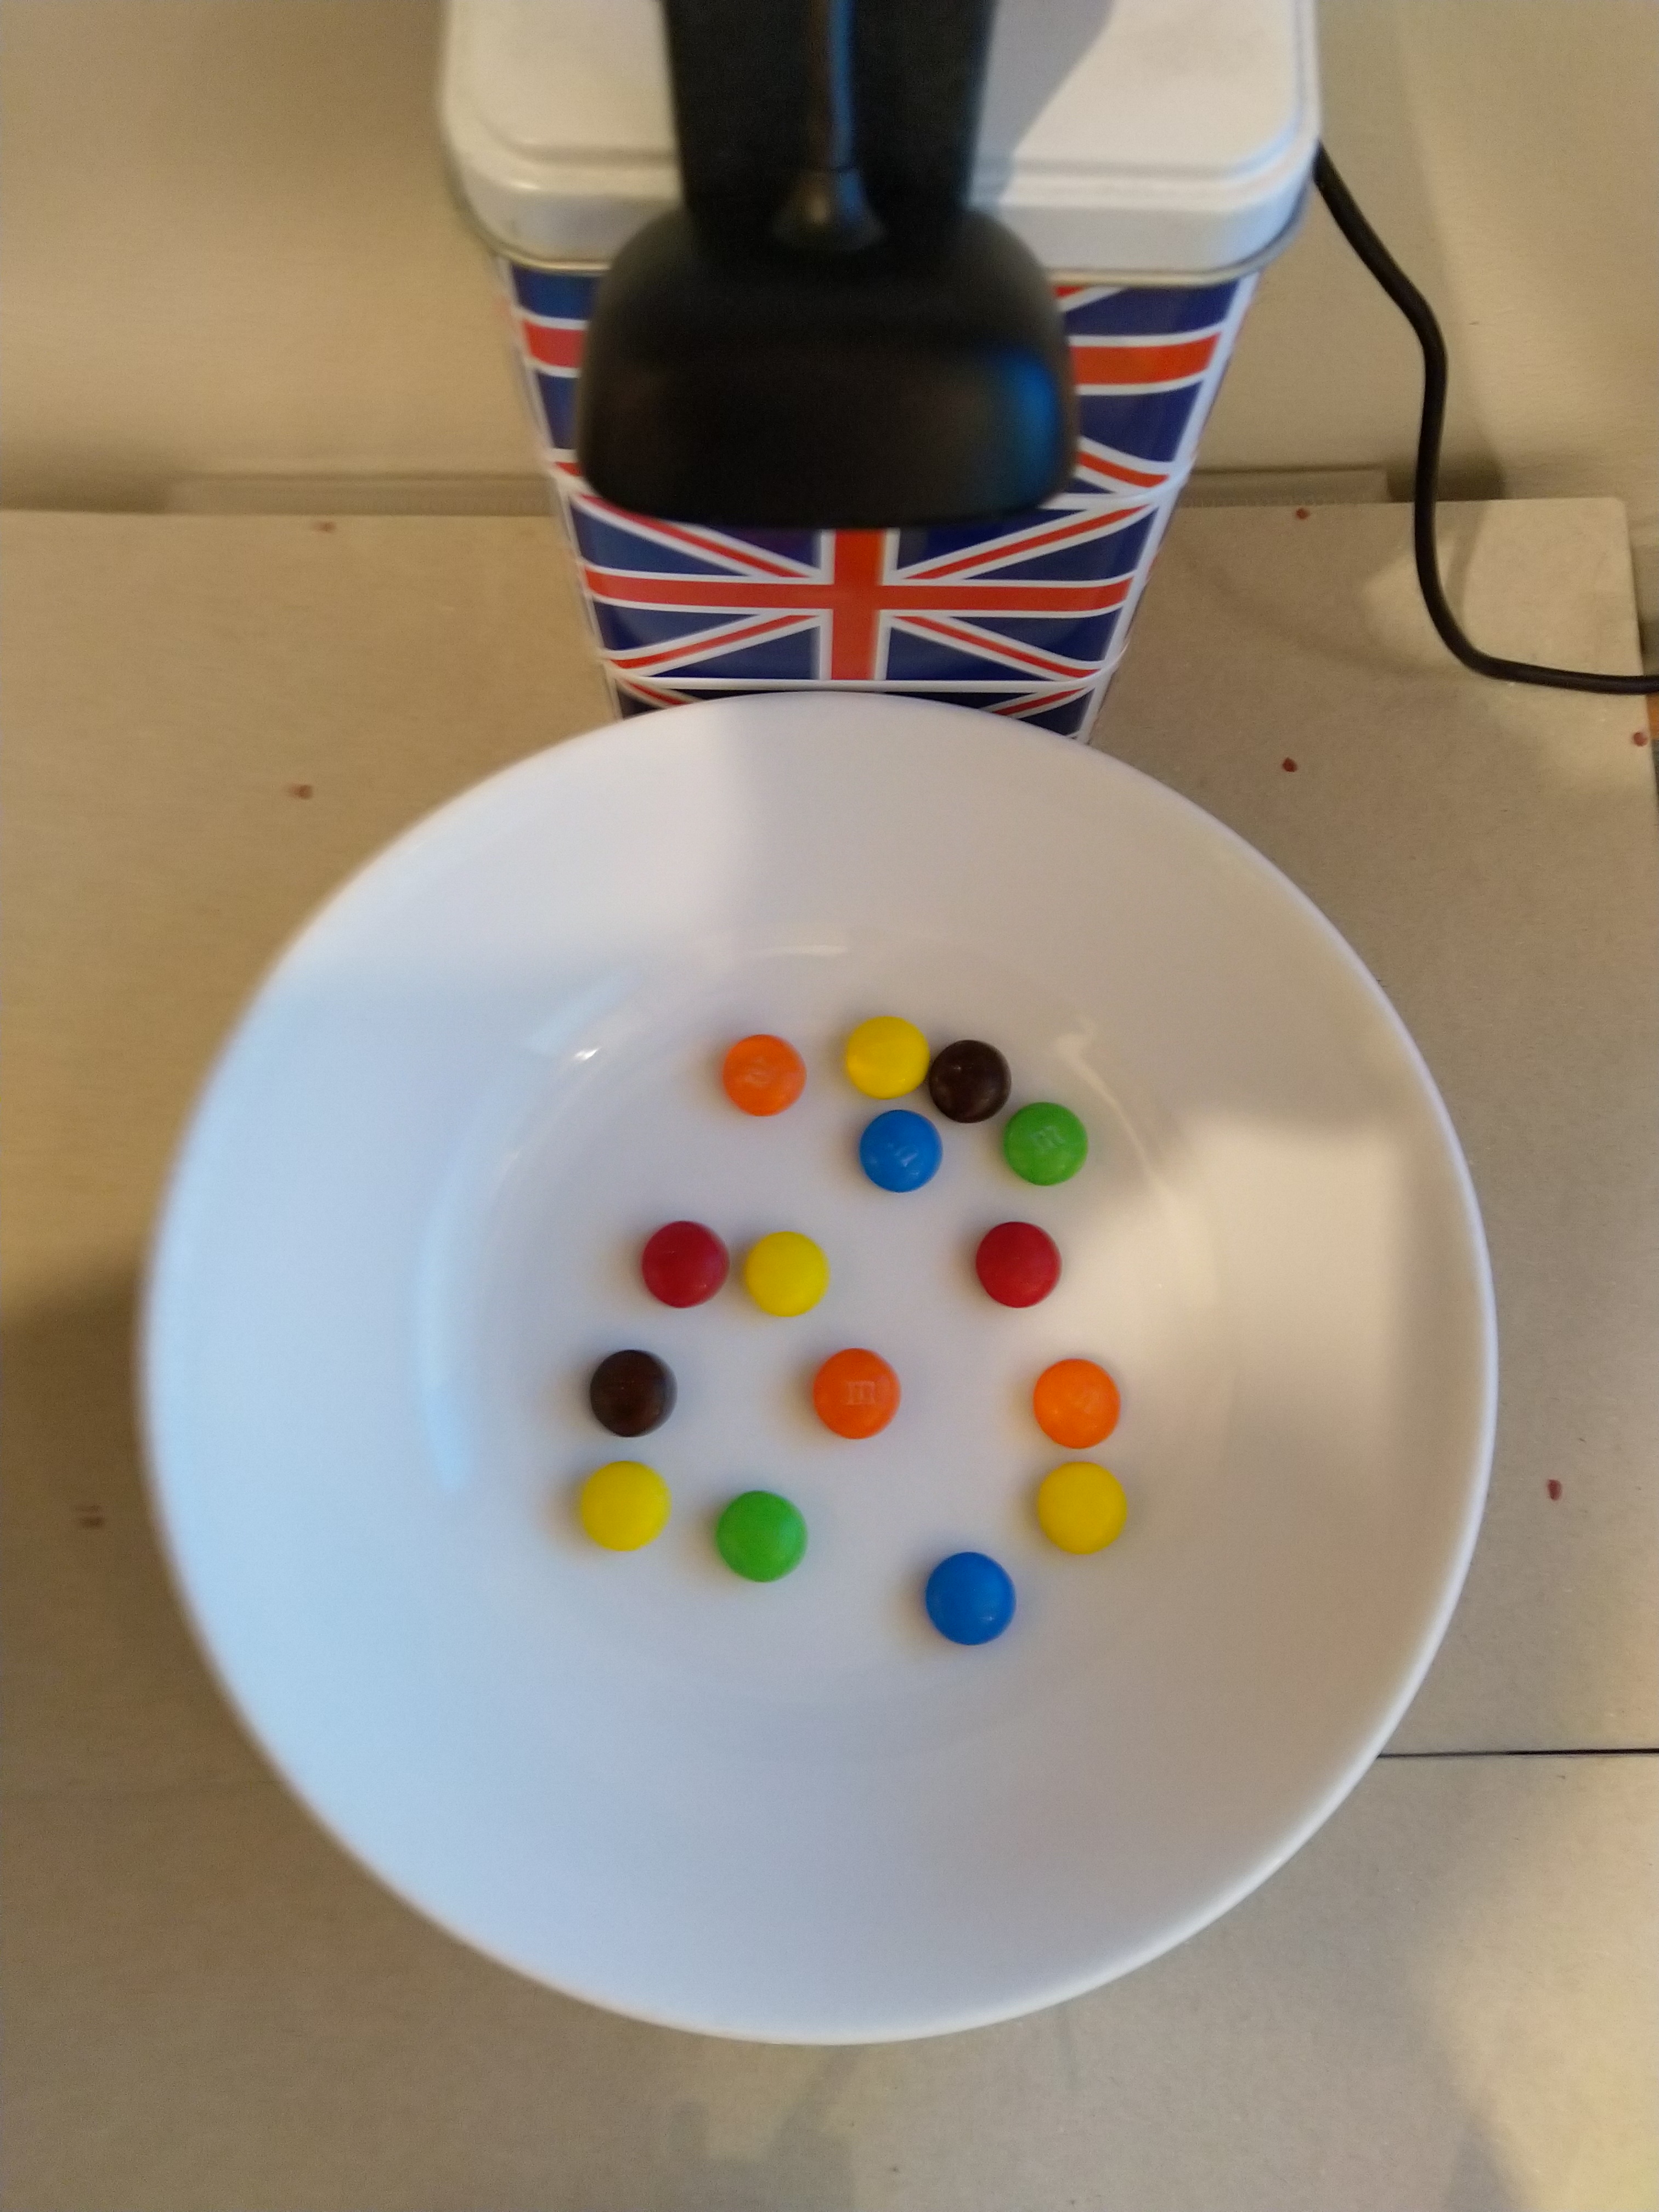
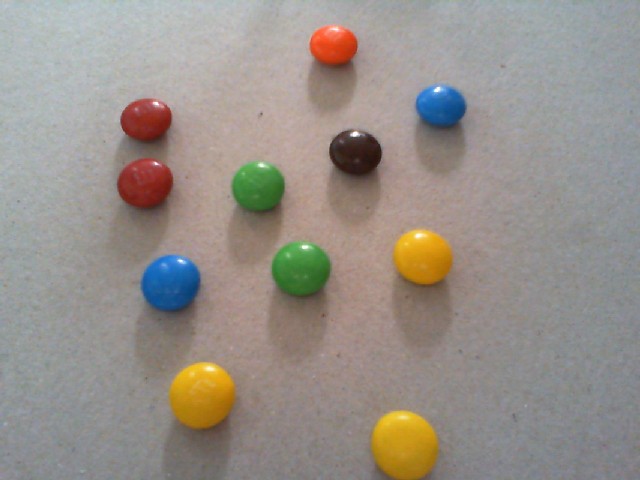
For testing I have used a simple object detection model.
I trained the model with images of 6 different colours of m&m’s.
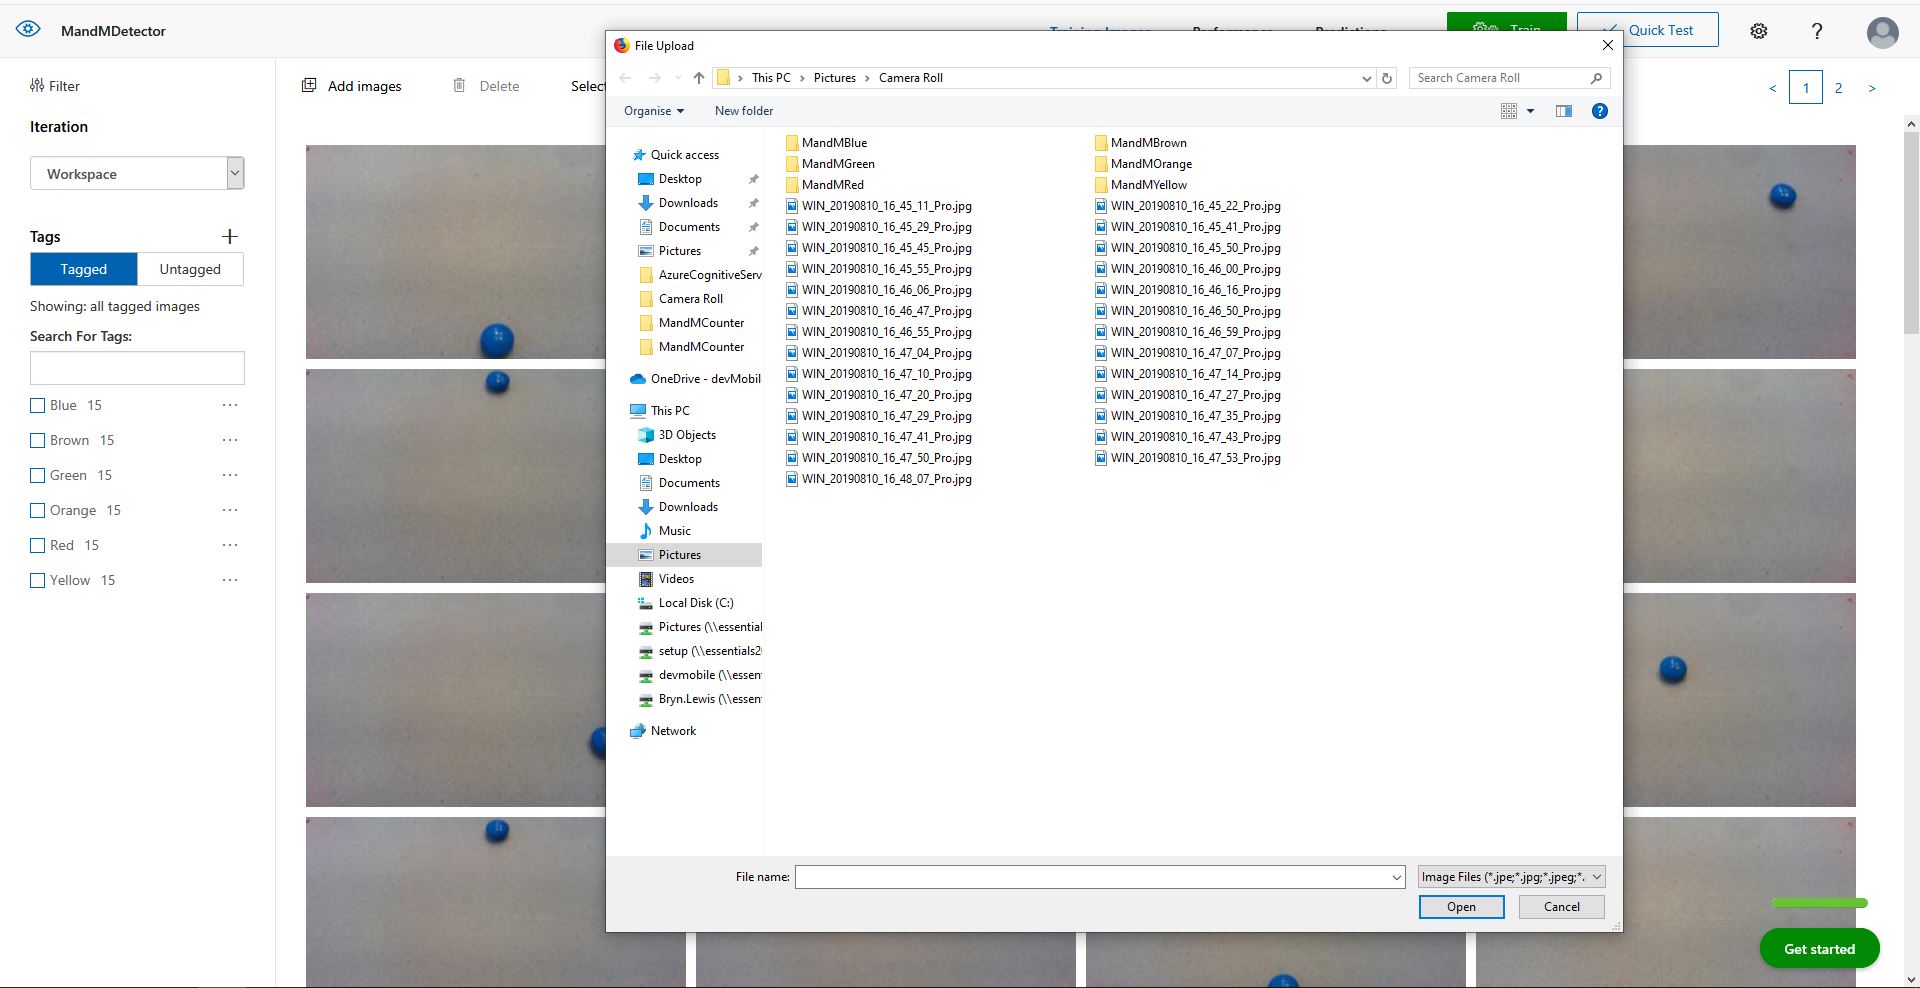
For my first dataset I tagged the location of a single m&m of each of the colour in 15 images.
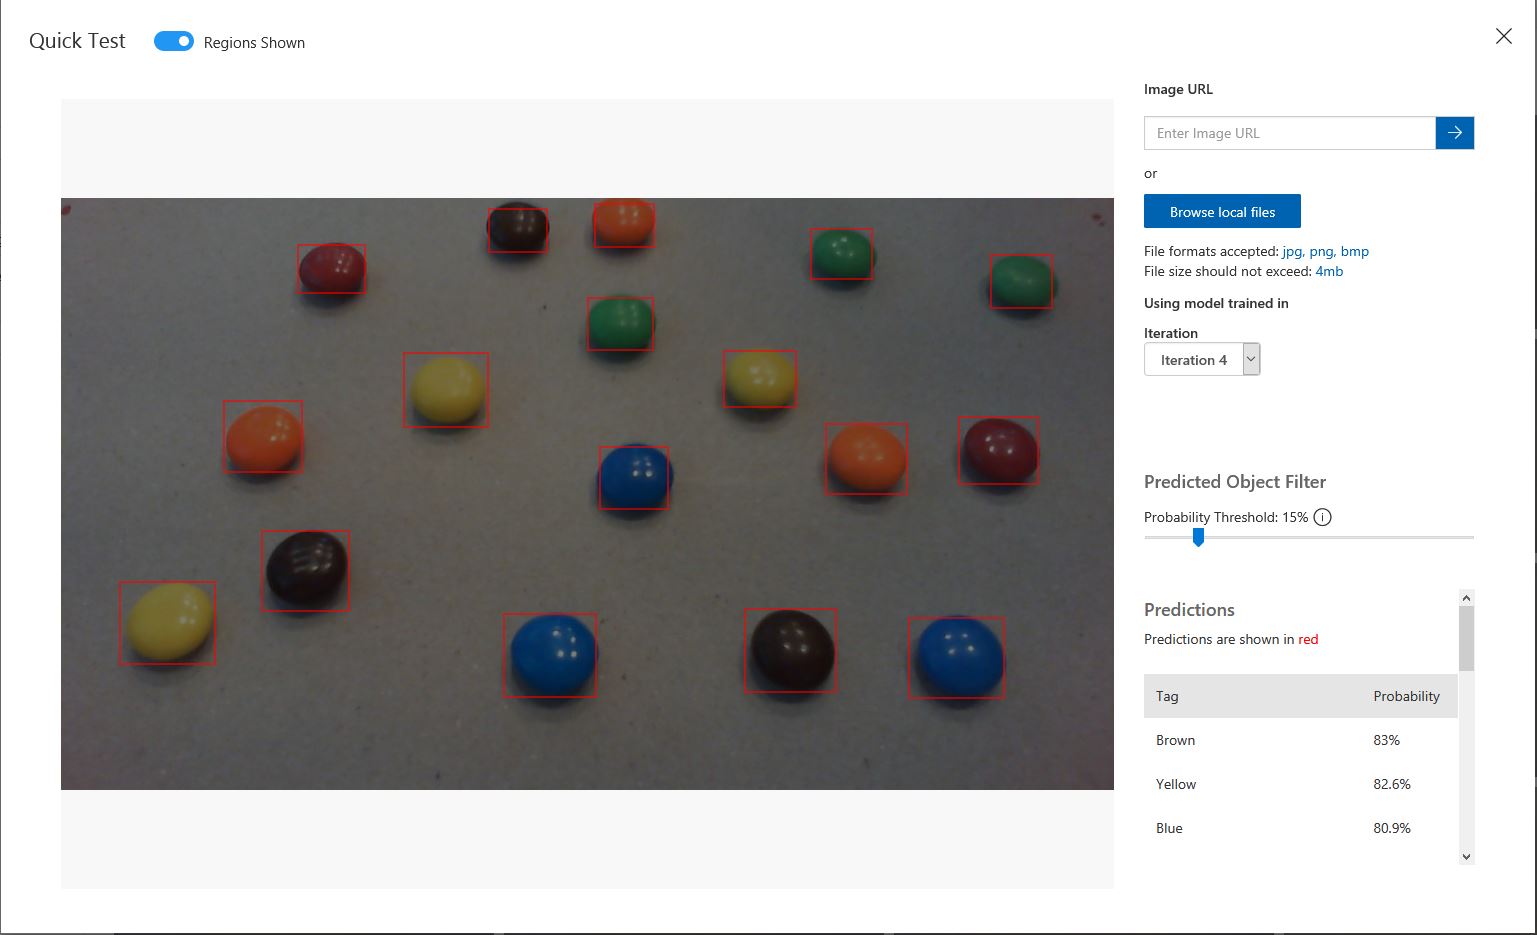
Testing the training of the model
I then trained the model multiple times adding additional images where the model was having trouble distiguishing colours.
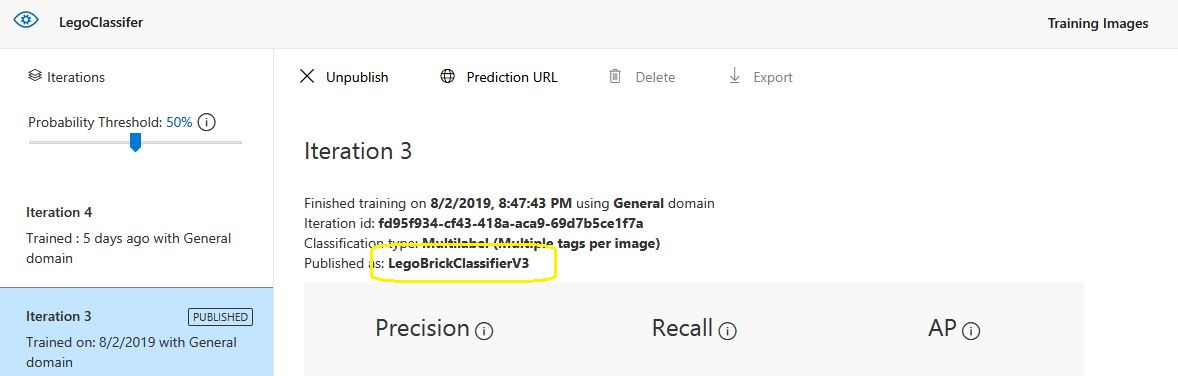
The published name comes from the training performance tab
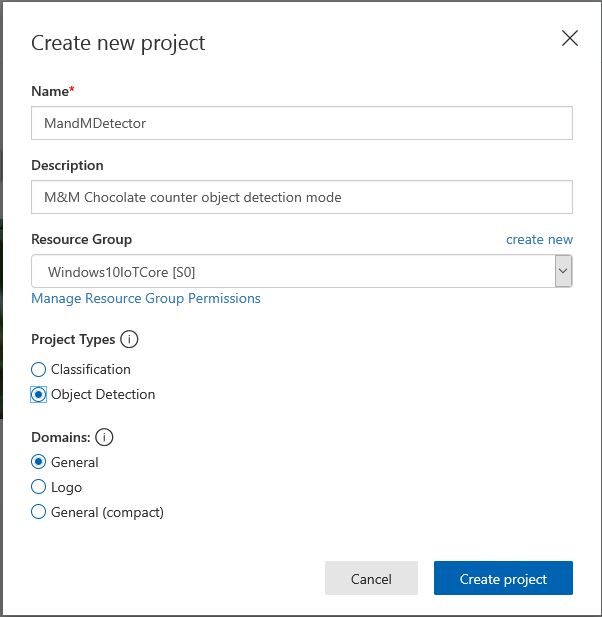
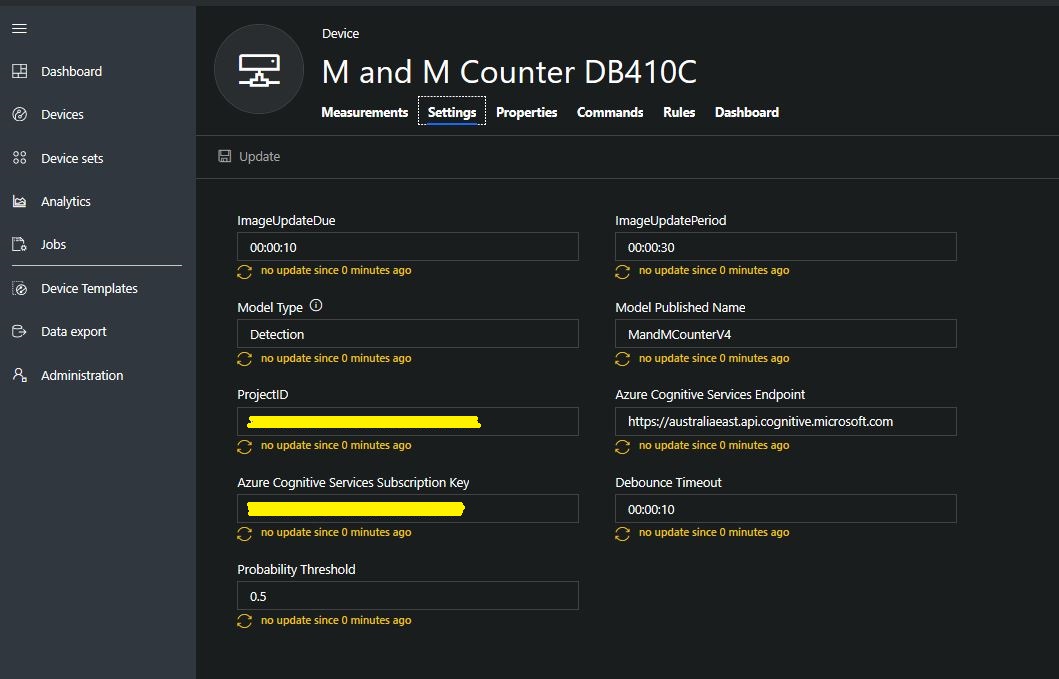
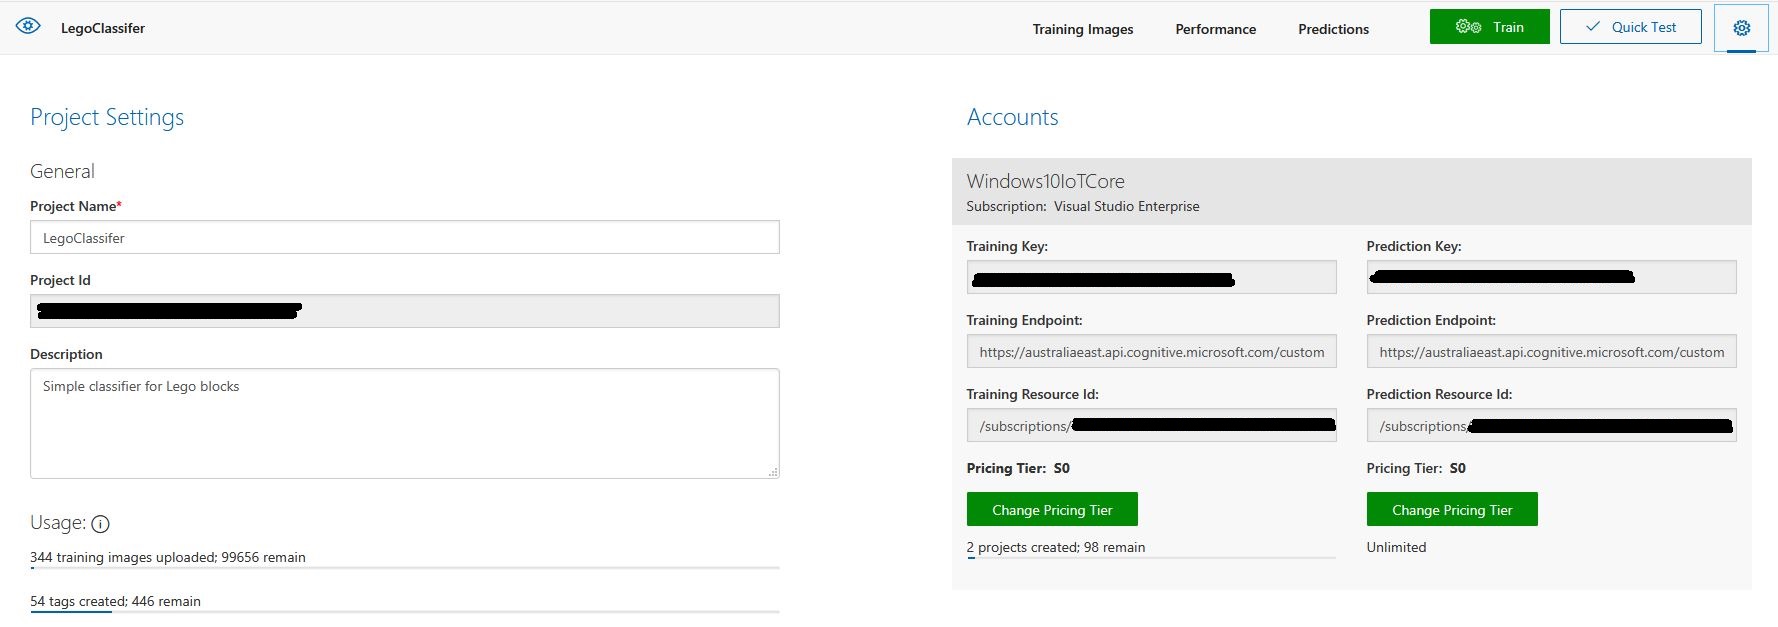
Project settings
The projectID, AzureCognitiveServicesSubscriptionKey (PredictionKey) and PublishedName (From the Performance tab in project) are from the custom vision project properties.
All of the Custom Vision model settings are configured in the Azure IoT Hub device properties.
The app.settings file contains only the hardware configuration settings and the Azure IoT Hub connection string.
The LED connected to the display pin is illuminated while an image is being processed or briefly flashed if the insufficient time between image captures has passed.
The image data is post processed differently based on the model.
// Post process the predictions based on the type of model
switch (modelType)
{
	case ModelType.Classification:
		// Use only the tags above the specified minimum probability
		foreach (var prediction in imagePrediction.Predictions)
		{
			if (prediction.Probability >= probabilityThreshold)
			{
				// Display and log the individual tag probabilities
				Debug.WriteLine($" Tag valid:{prediction.TagName} {prediction.Probability:0.00}");
				imageInformation.AddDouble($"Tag valid:{prediction.TagName}", prediction.Probability);
					telemetryDataPoint.Add(prediction.TagName, prediction.Probability);
			}
		}
		break;

	case ModelType.Detection:
		// Group the tags to get the count, include only the predictions above the specified minimum probability
		var groupedPredictions = from prediction in imagePrediction.Predictions
										 where prediction.Probability >= probabilityThreshold
										 group prediction by new { prediction.TagName }
				into newGroup
										 select new
										 {
											 TagName = newGroup.Key.TagName,
											 Count = newGroup.Count(),
										 };

		// Display and log the agregated predictions
		foreach (var prediction in groupedPredictions)
		{
			Debug.WriteLine($" Tag valid:{prediction.TagName} {prediction.Count}");
			imageInformation.AddInt32($"Tag valid:{prediction.TagName}", prediction.Count);
			telemetryDataPoint.Add(prediction.TagName, prediction.Count);
		}
		break;
	default:
		throw new ArgumentException("ModelType Invalid");
}
For a classifier only the tags with a probability greater than or equal the specified threshold are uploaded.
For a detection model the instances of each tag are counted. Only the tags with a prediction value greater than the specified threshold are included in the count.
The debugging output of the application includes the different categories identified in the captured image.
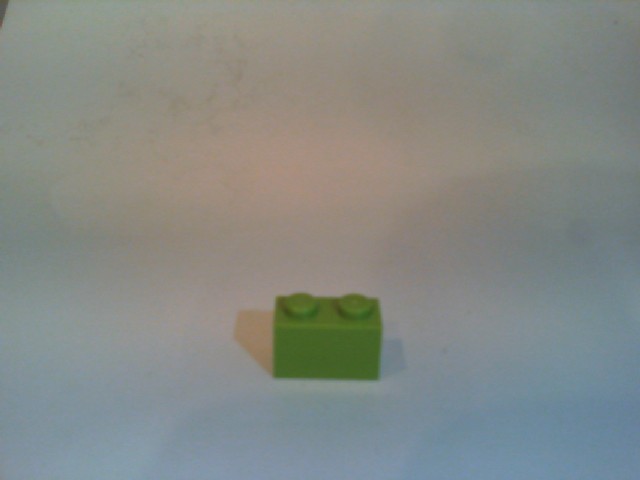
I found my small model was pretty good at detection of individual m&m as long as the ambient lighting was consistent, and the background fairly plain.
Sample image from test rig
Every so often the camera contrast setting went bad and could only be restored by restarting the device which needs further investigation.
Image with contrast problem
This application could be the basis for projects which need to run an Azure Cognitive Services model to count or classify then upload the results to an Azure IoT Hub or Azure IoT Central for presentation.
With a suitable model this application could be used to count the number of people in a room, which could be displayed along with the ambient temperature, humidity, CO2, and noise levels in Azure IoT Central.
The code for this application is available In on GitHub.
This application was inspired by one of teachers I work with wanting to count ducks in the stream on the school grounds. The school was having problems with water quality and the they wanted to see if the number of ducks was a factor. (Manually counting the ducks several times a day would be impractical).
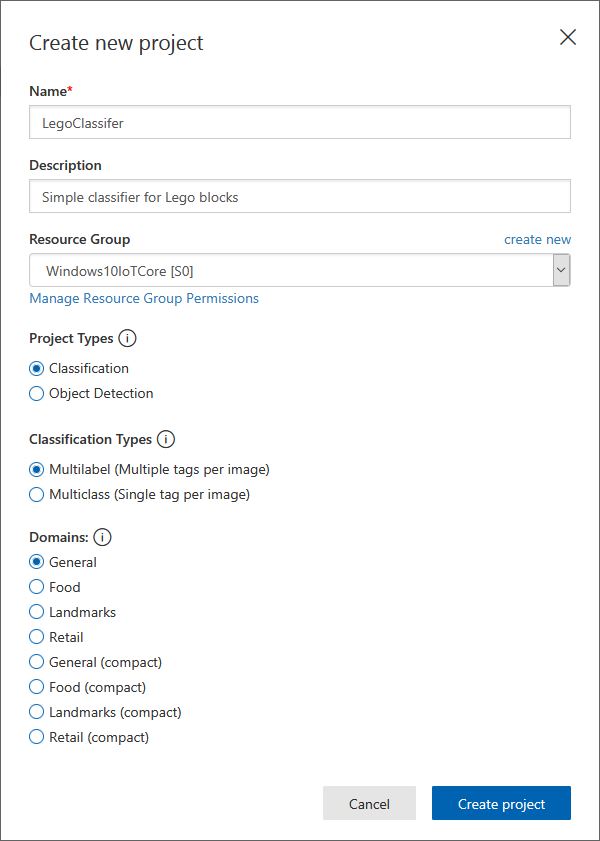
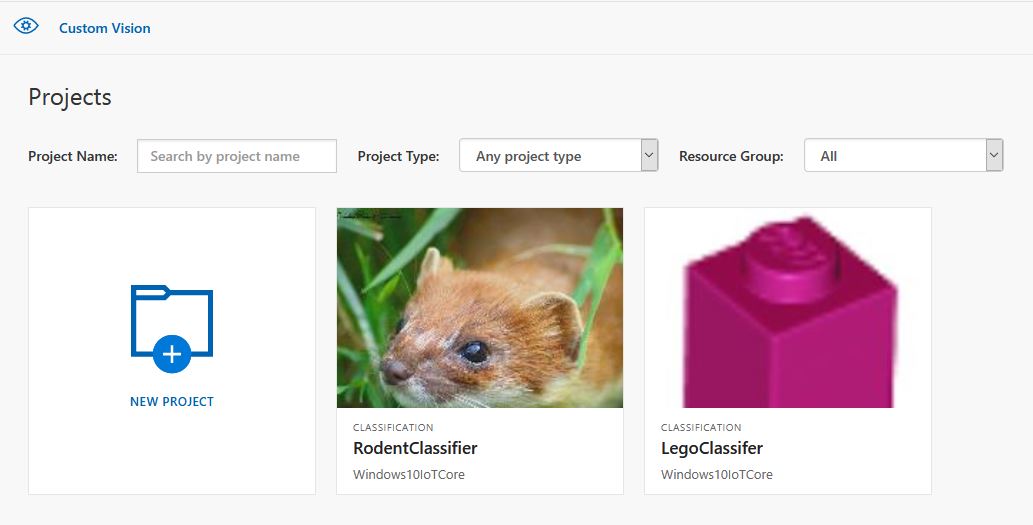
I didn’t have a source of training images so built an image classifier using my son’s Lego for testing. In a future post I will build an object detection model once I have some sample images of the stream captured by my Windows 10 IoT Core time lapse camera application.
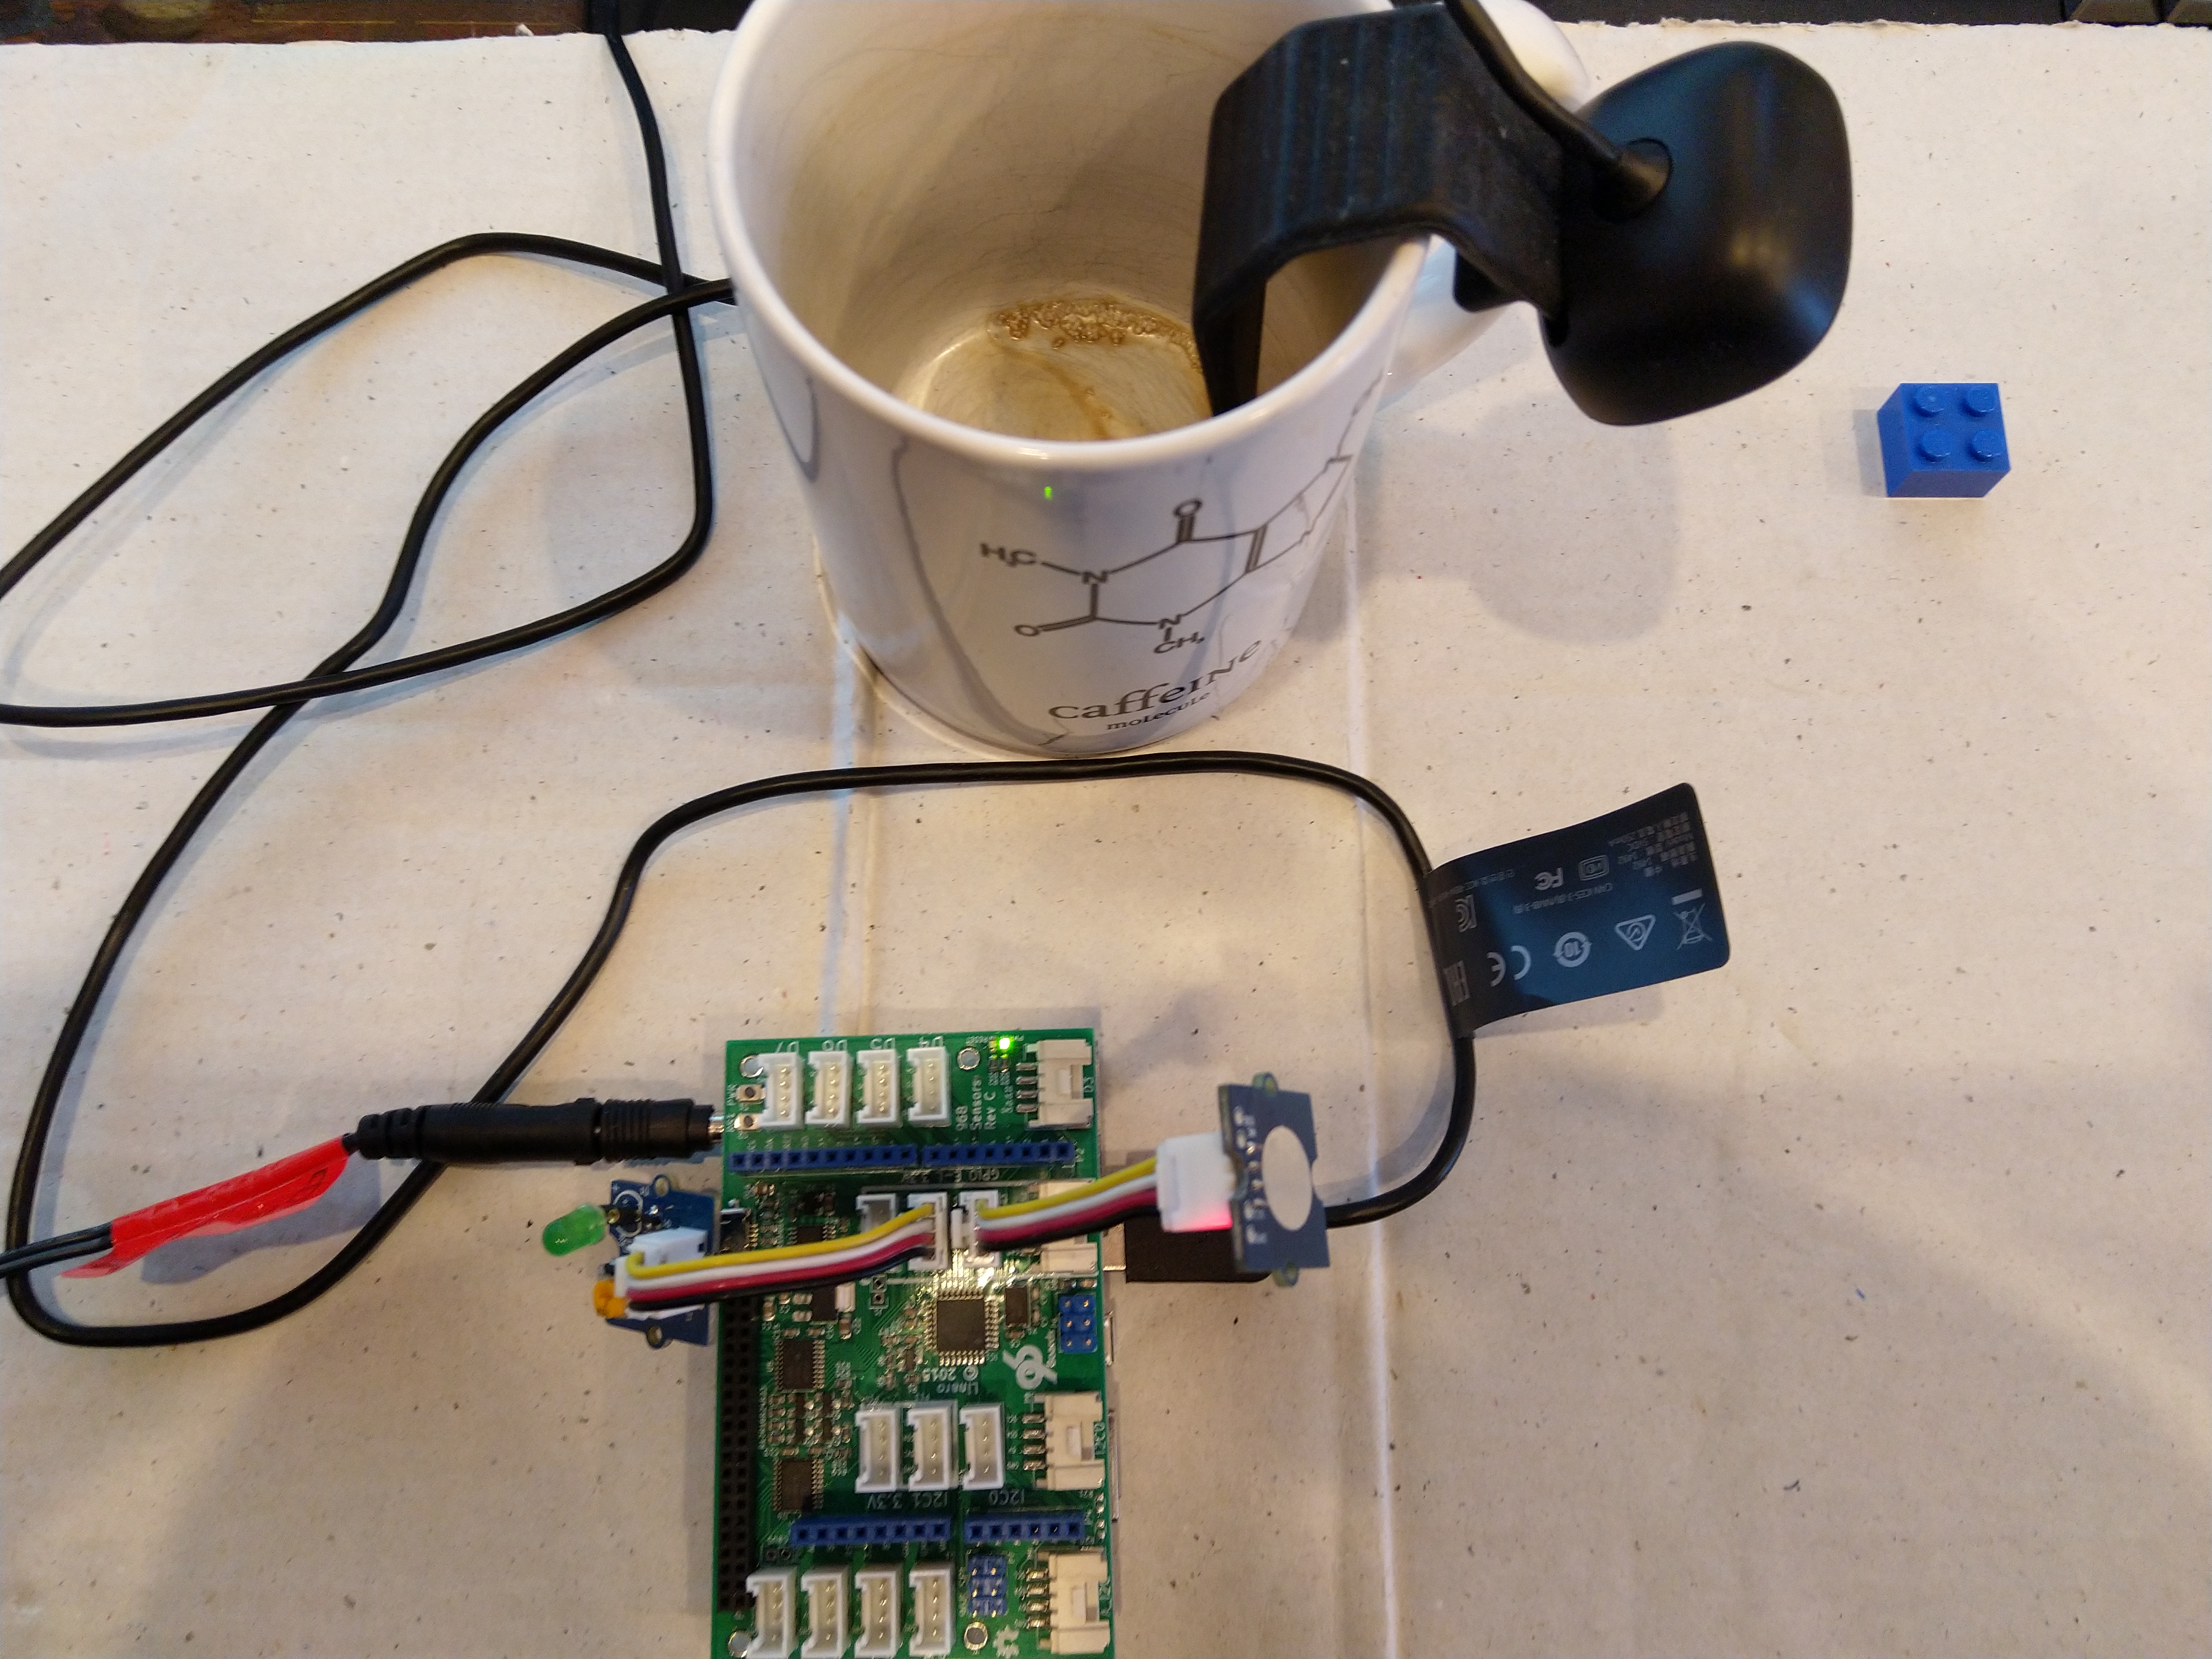
Every time the digital input is strobed by the infra red proximity sensor or touch button an image is captured, uploaded for processing, and results displayed in the debug output.
For testing I have used a simple multiclass classifier that I trained with a selection of my son’s Lego. I tagged the brick size height x width x length (1x2x3, smallest of width/height first) and colour (red, green, blue etc.)
The projectID, AzureCognitiveServicesSubscriptionKey (PredictionKey) and PublishedName (From the Performance tab in project) in the app.settings file come from the custom vision project properties.
The sample application only supports one trigger tag + probability and if this condition satisfied the Light Emitting Diode (LED) is turned on for 5 seconds. If an image is being processed or the minimum period between images has not passed the LED is illuminated for 5 milliseconds .
private async void InterruptGpioPin_ValueChanged(GpioPin sender, GpioPinValueChangedEventArgs args)
{
	DateTime currentTime = DateTime.UtcNow;
	Debug.WriteLine($"Digital Input Interrupt {sender.PinNumber} triggered {args.Edge}");

	if (args.Edge != this.interruptTriggerOn)
	{
		return;
	}

	// Check that enough time has passed for picture to be taken
	if ((currentTime - this.imageLastCapturedAtUtc) < this.debounceTimeout)
	{
		this.displayGpioPin.Write(GpioPinValue.High);
		this.displayOffTimer.Change(this.timerPeriodDetectIlluminated, this.timerPeriodInfinite);
		return;
	}

	this.imageLastCapturedAtUtc = currentTime;

	// Just incase - stop code being called while photo already in progress
	if (this.cameraBusy)
	{
		this.displayGpioPin.Write(GpioPinValue.High);
		this.displayOffTimer.Change(this.timerPeriodDetectIlluminated, this.timerPeriodInfinite);
		return;
	}

	this.cameraBusy = true;

	try
	{
		using (Windows.Storage.Streams.InMemoryRandomAccessStream captureStream = new Windows.Storage.Streams.InMemoryRandomAccessStream())
		{
			this.mediaCapture.CapturePhotoToStreamAsync(ImageEncodingProperties.CreateJpeg(), captureStream).AsTask().Wait();
			captureStream.FlushAsync().AsTask().Wait();
			captureStream.Seek(0);

			IStorageFile photoFile = await KnownFolders.PicturesLibrary.CreateFileAsync(ImageFilename, CreationCollisionOption.ReplaceExisting);
			ImageEncodingProperties imageProperties = ImageEncodingProperties.CreateJpeg();
			await this.mediaCapture.CapturePhotoToStorageFileAsync(imageProperties, photoFile);

			ImageAnalysis imageAnalysis = await this.computerVisionClient.AnalyzeImageInStreamAsync(captureStream.AsStreamForRead());

			Debug.WriteLine($"Tag count {imageAnalysis.Categories.Count}");

			if (imageAnalysis.Categories.Intersect(this.categoryList, new CategoryComparer()).Any())
			{
				this.displayGpioPin.Write(GpioPinValue.High);

				// Start the timer to turn the LED off
				this.displayOffTimer.Change(this.timerPeriodFaceIlluminated, this.timerPeriodInfinite);
					}

					LoggingFields imageInformation = new LoggingFields();

					imageInformation.AddDateTime("TakenAtUTC", currentTime);
					imageInformation.AddInt32("Pin", sender.PinNumber);
					Debug.WriteLine($"Categories:{imageAnalysis.Categories.Count}");
					imageInformation.AddInt32("Categories", imageAnalysis.Categories.Count);
					foreach (Category category in imageAnalysis.Categories)
					{
						Debug.WriteLine($" Category:{category.Name} {category.Score}");
						imageInformation.AddDouble($"Category:{category.Name}", category.Score);
					}

					this.logging.LogEvent("Captured image processed by Cognitive Services", imageInformation);
				}
			}
			catch (Exception ex)
			{
				this.logging.LogMessage("Camera photo or save failed " + ex.Message, LoggingLevel.Error);
			}
			finally
			{
				this.cameraBusy = false;
			}
		}

		private void TimerCallback(object state)
		{
			this.displayGpioPin.Write(GpioPinValue.Low);
		}

		internal class CategoryComparer : IEqualityComparer<Category>
		{
			public bool Equals(Category x, Category y)
			{
				if (string.Equals(x.Name, y.Name, StringComparison.OrdinalIgnoreCase))
				{
					return true;
				}

				return false;
			}

			public int GetHashCode(Category obj)
			{
				return obj.Name.GetHashCode();
			}
		}
I found my small model was pretty good at tagging images of Lego bricks as long as the ambient lighting was consistent and the background fairly plain.
When tagging many bricks my ability to distinguish pearl light grey, light grey, sand blue and grey bricks was a problem. I should have started with a limited palette (red, green, blue) of colours and shapes for my models while evaluating different tagging approaches.
The debugging output of the application includes the different categories identified in the captured image.
I’m going to run this application repeatedly, adding more images and retraining the model to see how it performs. Once the model is working wll I’ll try downloading it and running it on a device
Custom Vision Test Harness running on my desk
This sample could be used as a basis for projects like this cat door which stops your pet bringing in dead or wounded animals. The model could be trained with tags to indicate whether the cat is carrying a “present” for their human and locking the door if it is.
This application was inspired by one of teachers I work with wanting to check occupancy of different areas in the school library. I had been using the Computer Vision service to try and identify objects around my home and office which had been moderately successful but not terribly useful or accurate.
Every time the digital input is strobed by the passive infra red motion detector an image is captured, then uploaded for processing, and finally results displayed. For this sample I’m looking for categories which indicate the image is of a group of people (The categories are configured in the appsettings file)
If any of the specified categories are identified in the image I illuminate a Light Emitting Diode (LED) for 5 seconds, if an image is being processed or the minimum period between images has not passed the LED is illuminated for 5 milliseconds .
		private async void InterruptGpioPin_ValueChanged(GpioPin sender, GpioPinValueChangedEventArgs args)
		{
			DateTime currentTime = DateTime.UtcNow;
			Debug.WriteLine($"Digital Input Interrupt {sender.PinNumber} triggered {args.Edge}");

			if (args.Edge != this.interruptTriggerOn)
			{
				return;
			}

			// Check that enough time has passed for picture to be taken
			if ((currentTime - this.imageLastCapturedAtUtc) < this.debounceTimeout)
			{
				this.displayGpioPin.Write(GpioPinValue.High);
				this.displayOffTimer.Change(this.timerPeriodDetectIlluminated, this.timerPeriodInfinite);
				return;
			}

			this.imageLastCapturedAtUtc = currentTime;

			// Just incase - stop code being called while photo already in progress
			if (this.cameraBusy)
			{
				this.displayGpioPin.Write(GpioPinValue.High);
				this.displayOffTimer.Change(this.timerPeriodDetectIlluminated, this.timerPeriodInfinite);
				return;
			}

			this.cameraBusy = true;

			try
			{
				using (Windows.Storage.Streams.InMemoryRandomAccessStream captureStream = new Windows.Storage.Streams.InMemoryRandomAccessStream())
				{
					this.mediaCapture.CapturePhotoToStreamAsync(ImageEncodingProperties.CreateJpeg(), captureStream).AsTask().Wait();
					captureStream.FlushAsync().AsTask().Wait();
					captureStream.Seek(0);

					IStorageFile photoFile = await KnownFolders.PicturesLibrary.CreateFileAsync(ImageFilename, CreationCollisionOption.ReplaceExisting);
					ImageEncodingProperties imageProperties = ImageEncodingProperties.CreateJpeg();
					await this.mediaCapture.CapturePhotoToStorageFileAsync(imageProperties, photoFile);

					ImageAnalysis imageAnalysis = await this.computerVisionClient.AnalyzeImageInStreamAsync(captureStream.AsStreamForRead());

					Debug.WriteLine($"Tag count {imageAnalysis.Categories.Count}");

					if (imageAnalysis.Categories.Intersect(this.categoryList, new CategoryComparer()).Any())
					{
						this.displayGpioPin.Write(GpioPinValue.High);

						// Start the timer to turn the LED off
						this.displayOffTimer.Change(this.timerPeriodFaceIlluminated, this.timerPeriodInfinite);
					}

					LoggingFields imageInformation = new LoggingFields();

					imageInformation.AddDateTime("TakenAtUTC", currentTime);
					imageInformation.AddInt32("Pin", sender.PinNumber);
					Debug.WriteLine($"Categories:{imageAnalysis.Categories.Count}");
					imageInformation.AddInt32("Categories", imageAnalysis.Categories.Count);
					foreach (Category category in imageAnalysis.Categories)
					{
						Debug.WriteLine($" Category:{category.Name} {category.Score}");
						imageInformation.AddDouble($"Category:{category.Name}", category.Score);
					}

					this.logging.LogEvent("Captured image processed by Cognitive Services", imageInformation);
				}
			}
			catch (Exception ex)
			{
				this.logging.LogMessage("Camera photo or save failed " + ex.Message, LoggingLevel.Error);
			}
			finally
			{
				this.cameraBusy = false;
			}
		}

		private void TimerCallback(object state)
		{
			this.displayGpioPin.Write(GpioPinValue.Low);
		}

		internal class CategoryComparer : IEqualityComparer<Category>
		{
			public bool Equals(Category x, Category y)
			{
				if (string.Equals(x.Name, y.Name, StringComparison.OrdinalIgnoreCase))
				{
					return true;
				}

				return false;
			}

			public int GetHashCode(Category obj)
			{
				return obj.Name.GetHashCode();
			}
		}
I found that the Computer vision service was pretty good at categorising photos of images like this displayed on my second monitor as containing a group of people.
The debugging output of the application includes the different categories identified in the captured image.
Digital Input Interrupt 24 triggered RisingEdge
Digital Input Interrupt 24 triggered FallingEdge
'backgroundTaskHost.exe' (CoreCLR: CoreCLR_UWP_Domain): Loaded 'C:\Data\Programs\WindowsApps\Microsoft.NET.CoreFramework.Debug.2.2_2.2.27505.2_arm__8wekyb3d8bbwe\System.Diagnostics.DiagnosticSource.dll'. Skipped loading symbols. Module is optimized and the debugger option 'Just My Code' is enabled.
'backgroundTaskHost.exe' (CoreCLR: CoreCLR_UWP_Domain): Loaded 'C:\Data\Programs\WindowsApps\Microsoft.NET.CoreFramework.Debug.2.2_2.2.27505.2_arm__8wekyb3d8bbwe\System.Collections.NonGeneric.dll'. Skipped loading symbols. Module is optimized and the debugger option 'Just My Code' is enabled.
'backgroundTaskHost.exe' (CoreCLR: CoreCLR_UWP_Domain): Loaded 'C:\Data\Programs\WindowsApps\Microsoft.NET.CoreFramework.Debug.2.2_2.2.27505.2_arm__8wekyb3d8bbwe\System.Runtime.Serialization.Formatters.dll'. Skipped loading symbols. Module is optimized and the debugger option 'Just My Code' is enabled.
'backgroundTaskHost.exe' (CoreCLR: CoreCLR_UWP_Domain): Loaded 'C:\Data\Programs\WindowsApps\Microsoft.NET.CoreFramework.Debug.2.2_2.2.27505.2_arm__8wekyb3d8bbwe\System.Diagnostics.TraceSource.dll'. Skipped loading symbols. Module is optimized and the debugger option 'Just My Code' is enabled.
'backgroundTaskHost.exe' (CoreCLR: CoreCLR_UWP_Domain): Loaded 'C:\Data\Programs\WindowsApps\Microsoft.NET.CoreFramework.Debug.2.2_2.2.27505.2_arm__8wekyb3d8bbwe\System.Collections.Specialized.dll'. Skipped loading symbols. Module is optimized and the debugger option 'Just My Code' is enabled.
'backgroundTaskHost.exe' (CoreCLR: CoreCLR_UWP_Domain): Loaded 'C:\Data\Programs\WindowsApps\Microsoft.NET.CoreFramework.Debug.2.2_2.2.27505.2_arm__8wekyb3d8bbwe\System.Drawing.Primitives.dll'. Skipped loading symbols. Module is optimized and the debugger option 'Just My Code' is enabled.
'backgroundTaskHost.exe' (CoreCLR: CoreCLR_UWP_Domain): Loaded 'C:\Data\Programs\WindowsApps\Microsoft.NET.CoreFramework.Debug.2.2_2.2.27505.2_arm__8wekyb3d8bbwe\System.Runtime.Serialization.Primitives.dll'. Skipped loading symbols. Module is optimized and the debugger option 'Just My Code' is enabled.
'backgroundTaskHost.exe' (CoreCLR: CoreCLR_UWP_Domain): Loaded 'C:\Data\Programs\WindowsApps\Microsoft.NET.CoreFramework.Debug.2.2_2.2.27505.2_arm__8wekyb3d8bbwe\System.Data.Common.dll'. Skipped loading symbols. Module is optimized and the debugger option 'Just My Code' is enabled.
'backgroundTaskHost.exe' (CoreCLR: CoreCLR_UWP_Domain): Loaded 'C:\Data\Programs\WindowsApps\Microsoft.NET.CoreFramework.Debug.2.2_2.2.27505.2_arm__8wekyb3d8bbwe\System.Xml.ReaderWriter.dll'. Skipped loading symbols. Module is optimized and the debugger option 'Just My Code' is enabled.
'backgroundTaskHost.exe' (CoreCLR: CoreCLR_UWP_Domain): Loaded 'C:\Data\Programs\WindowsApps\Microsoft.NET.CoreFramework.Debug.2.2_2.2.27505.2_arm__8wekyb3d8bbwe\System.Private.Xml.dll'. Skipped loading symbols. Module is optimized and the debugger option 'Just My Code' is enabled.
'backgroundTaskHost.exe' (CoreCLR: CoreCLR_UWP_Domain): Loaded 'Anonymously Hosted DynamicMethods Assembly'.
Tag count 1
Categories:1
 Category:people_group 0.8671875
The thread 0x634 has exited with code 0 (0x0).
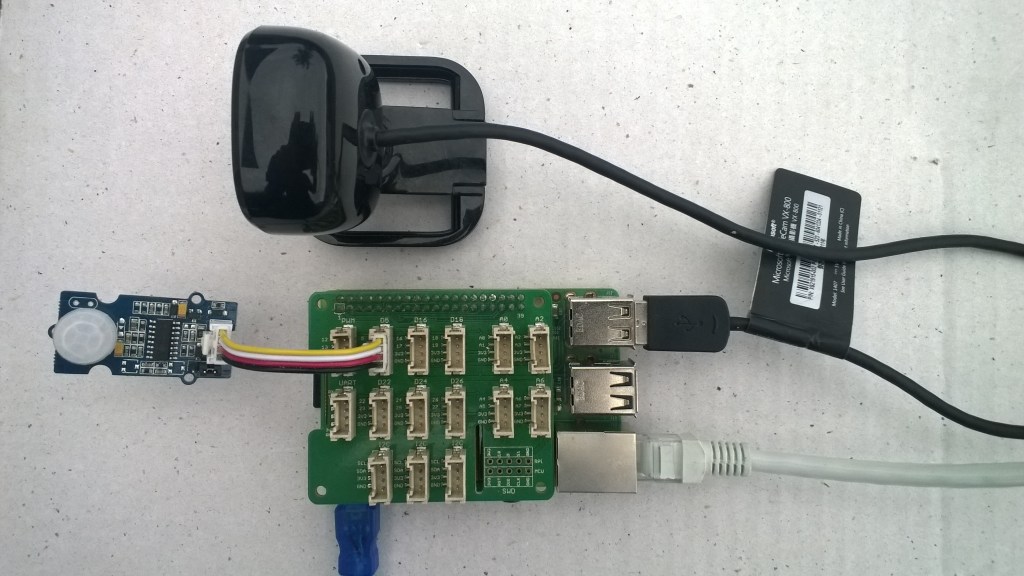
I used an infrared motion sensor to trigger capture and processing of an image to simulate a application for detecting if there is a group of people in an area of the school library.
I’m going to run this application alongside one of my time-lapse applications to record a days worth of images and manually check the accuracy of the image categorisation. I think that camera location maybe important as well so I’ll try a selection of different USB cameras and locations.
Trial PIR triggered computer vision client
I also found the small PIR motion detector didn’t work very well in a larger space so I’m going to trial a configurable sensor and a repurposed burglar alarm sensor.
This application was inspired by one of my students who has been looking at an Arduino based LoRa wireless connected sensor for monitoring Ultraviolet(UV) light levels and wanted to check that juniors at the school were wearing their hats on sunny days before going outside.
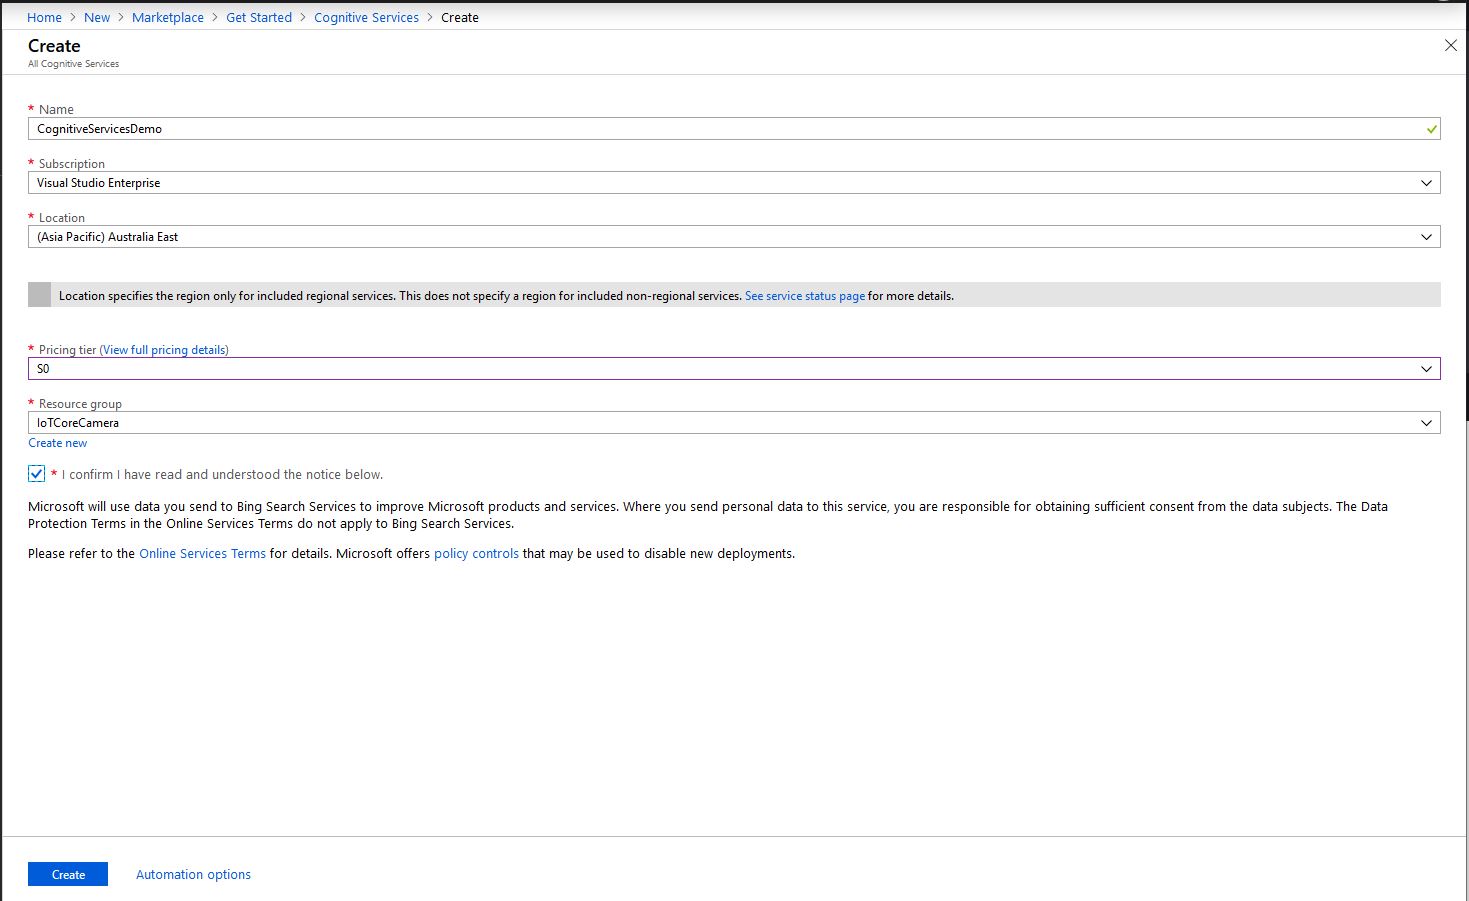
First I needed create a Cognitive Services instance and get the subscription key and endpoint.
Azure Cognitive Services Instance Creation
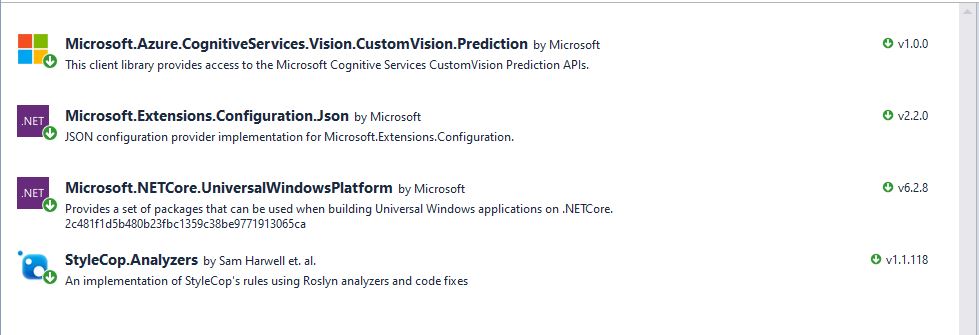
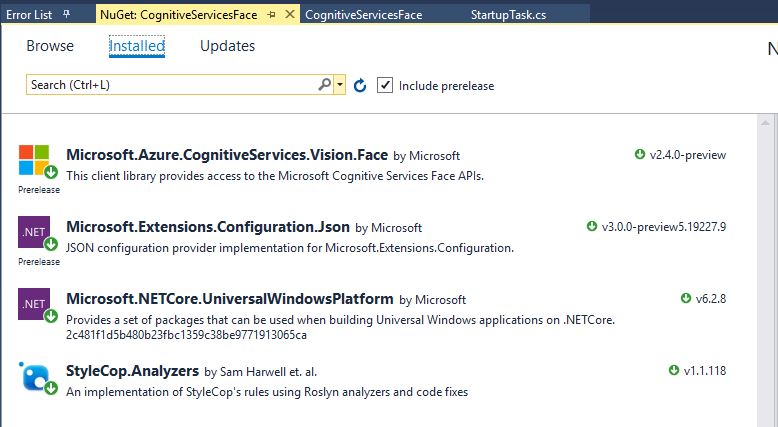
Then I added the Azure Cognitive Services Face API NuGet packages into my Visual Studio Windows IoT Core project
Azure Cognitive Services Vision Face API library
Then initialise the Face API client
try
{
	this.faceClient = new FaceClient(
			 new Microsoft.Azure.CognitiveServices.Vision.Face.ApiKeyServiceClientCredentials(this.azureCognitiveServicesSubscriptionKey),
											 new System.Net.Http.DelegatingHandler[] { })
	{
		Endpoint = this.azureCognitiveServicesEndpoint,
	};
}
catch (Exception ex)
{
	this.logging.LogMessage("Azure Cognitive Services Face Client configuration failed " + ex.Message, LoggingLevel.Error);
	return;
}
Then every time a digital input is strobed and image is captured, then uploaded for processing, and finally results displayed. The interrupt handler has code to stop re-entrancy and contactor bounce causing issues. I also requested that the Face service include age and gender attributes with associated confidence values.
If a face is found in the image I illuminate a Light Emitting Diode (LED) for 5 seconds, if an image is being processed or the minimum period between images has not passed the LED is illuminated for 5 milliseconds .
private async void InterruptGpioPin_ValueChanged(GpioPin sender, GpioPinValueChangedEventArgs args)
{
	DateTime currentTime = DateTime.UtcNow;
	Debug.WriteLine($"Digital Input Interrupt {sender.PinNumber} triggered {args.Edge}");

	if (args.Edge != this.interruptTriggerOn)
	{
		return;
	}

	// Check that enough time has passed for picture to be taken
	if ((currentTime - this.imageLastCapturedAtUtc) < this.debounceTimeout)
	{
		this.displayGpioPin.Write(GpioPinValue.High);
		this.displayOffTimer.Change(this.timerPeriodDetectIlluminated, this.timerPeriodInfinite);
		return;
	}

	this.imageLastCapturedAtUtc = currentTime;

	// Just incase - stop code being called while photo already in progress
	if (this.cameraBusy)
	{
		this.displayGpioPin.Write(GpioPinValue.High);
		this.displayOffTimer.Change(this.timerPeriodDetectIlluminated, this.timerPeriodInfinite);
		return;
	}

	this.cameraBusy = true;

	try
	{
		using (Windows.Storage.Streams.InMemoryRandomAccessStream captureStream = new Windows.Storage.Streams.InMemoryRandomAccessStream())
		{
			this.mediaCapture.CapturePhotoToStreamAsync(ImageEncodingProperties.CreateJpeg(), captureStream).AsTask().Wait();
			captureStream.FlushAsync().AsTask().Wait();
			captureStream.Seek(0);
			IStorageFile photoFile = await KnownFolders.PicturesLibrary.CreateFileAsync(ImageFilename, CreationCollisionOption.ReplaceExisting);
			ImageEncodingProperties imageProperties = ImageEncodingProperties.CreateJpeg();
			await this.mediaCapture.CapturePhotoToStorageFileAsync(imageProperties, photoFile);

			IList<FaceAttributeType> returnfaceAttributes = new List<FaceAttributeType>();
			returnfaceAttributes.Add(FaceAttributeType.Gender);
			returnfaceAttributes.Add(FaceAttributeType.Age);

			IList<DetectedFace> detectedFaces = await this.faceClient.Face.DetectWithStreamAsync(captureStream.AsStreamForRead(), returnFaceAttributes: returnfaceAttributes);

			Debug.WriteLine($"Count {detectedFaces.Count}");

			if (detectedFaces.Count > 0)
			{
				this.displayGpioPin.Write(GpioPinValue.High);

						// Start the timer to turn the LED off
				this.displayOffTimer.Change(this.timerPeriodFaceIlluminated, this.timerPeriodInfinite);
			}

			LoggingFields imageInformation = new LoggingFields();
			imageInformation.AddDateTime("TakenAtUTC", currentTime);
			imageInformation.AddInt32("Pin", sender.PinNumber);
			imageInformation.AddInt32("Faces", detectedFaces.Count);
			foreach (DetectedFace detectedFace in detectedFaces)
			{
				Debug.WriteLine("Face");
				if (detectedFace.FaceId.HasValue)
				{
					imageInformation.AddGuid("FaceId", detectedFace.FaceId.Value);
					Debug.WriteLine($" Id:{detectedFace.FaceId.Value}");
				}
				imageInformation.AddInt32("Left", detectedFace.FaceRectangle.Left);
				imageInformation.AddInt32("Width", detectedFace.FaceRectangle.Width);
				imageInformation.AddInt32("Top", detectedFace.FaceRectangle.Top);
				imageInformation.AddInt32("Height", detectedFace.FaceRectangle.Height);
				Debug.WriteLine($" L:{detectedFace.FaceRectangle.Left} W:{detectedFace.FaceRectangle.Width} T:{detectedFace.FaceRectangle.Top} H:{detectedFace.FaceRectangle.Height}");
				if (detectedFace.FaceAttributes != null)
				{
					if (detectedFace.FaceAttributes.Gender.HasValue)
					{
						imageInformation.AddString("Gender", detectedFace.FaceAttributes.Gender.Value.ToString());
						Debug.WriteLine($" Gender:{detectedFace.FaceAttributes.Gender.ToString()}");
					}

					if (detectedFace.FaceAttributes.Age.HasValue)
					{
						imageInformation.AddDouble("Age", detectedFace.FaceAttributes.Age.Value);
						Debug.WriteLine($" Age:{detectedFace.FaceAttributes.Age.Value.ToString("F1")}");
					}
				}
			}

			this.logging.LogEvent("Captured image processed by Cognitive Services", imageInformation);
		}
	}
	catch (Exception ex)
	{
		this.logging.LogMessage("Camera photo or save failed " + ex.Message, LoggingLevel.Error);
	}
	finally
	{
		this.cameraBusy = false;
	}
}

private void TimerCallback(object state)
{
	this.displayGpioPin.Write(GpioPinValue.Low);
}
This is the image uploaded to the Cognitive Services Vision Face API from my DragonBoard 410C
Which was a photo of this sample image displayed on my second monitor
The debugging output of the application includes the bounding box, gender, age and unique identifier of each detected face.
Digital Input Interrupt 24 triggered RisingEdge
Digital Input Interrupt 24 triggered FallingEdge
Count 13
Face
 Id:41ab8a38-180e-4b63-ab47-d502b8534467
 L:12 W:51 T:129 H:51
 Gender:Female
 Age:24.0
Face
 Id:554f7557-2b78-4392-9c73-5e51fedf0300
 L:115 W:48 T:146 H:48
 Gender:Female
 Age:19.0
Face
 Id:f67ae4cc-1129-46a8-8c5b-0e79f350cbaa
 L:547 W:46 T:162 H:46
 Gender:Female
 Age:56.0
Face
 Id:fad453fb-0923-4ae2-8c9d-73c9d89eaaf4
 L:585 W:45 T:116 H:45
 Gender:Female
 Age:25.0
Face
 Id:c2d2ca4e-faa6-49e8-8cd9-8d21abfc374c
 L:410 W:44 T:154 H:44
 Gender:Female
 Age:23.0
Face
 Id:6fb75edb-654c-47ff-baf0-847a31d2fd85
 L:70 W:44 T:57 H:44
 Gender:Male
 Age:37.0
Face
 Id:d6c97a9a-c49f-4d9c-8eac-eb2fbc03abc1
 L:469 W:44 T:122 H:44
 Gender:Female
 Age:38.0
Face
 Id:e193bf15-6d8c-4c30-adb5-4ca5fb0f0271
 L:206 W:44 T:117 H:44
 Gender:Male
 Age:33.0
Face
 Id:d1ba5a42-0475-4b65-afc8-0651439e1f1e
 L:293 W:44 T:74 H:44
 Gender:Male
 Age:59.0
Face
 Id:b6a7c551-bdad-4e38-8976-923b568d2721
 L:282 W:43 T:144 H:43
 Gender:Female
 Age:28.0
Face
 Id:8be87f6d-7350-4bc3-87f5-3415894b8fac
 L:513 W:42 T:78 H:42
 Gender:Male
 Age:36.0
Face
 Id:e73bd4d7-81a4-403c-aa73-1408ae1068c0
 L:163 W:36 T:94 H:36
 Gender:Female
 Age:44.0
Face
 Id:462a6948-a05e-4fea-918d-23d8289e0401
 L:407 W:36 T:73 H:36
 Gender:Male
 Age:27.0
The thread 0x8e0 has exited with code 0 (0x0).
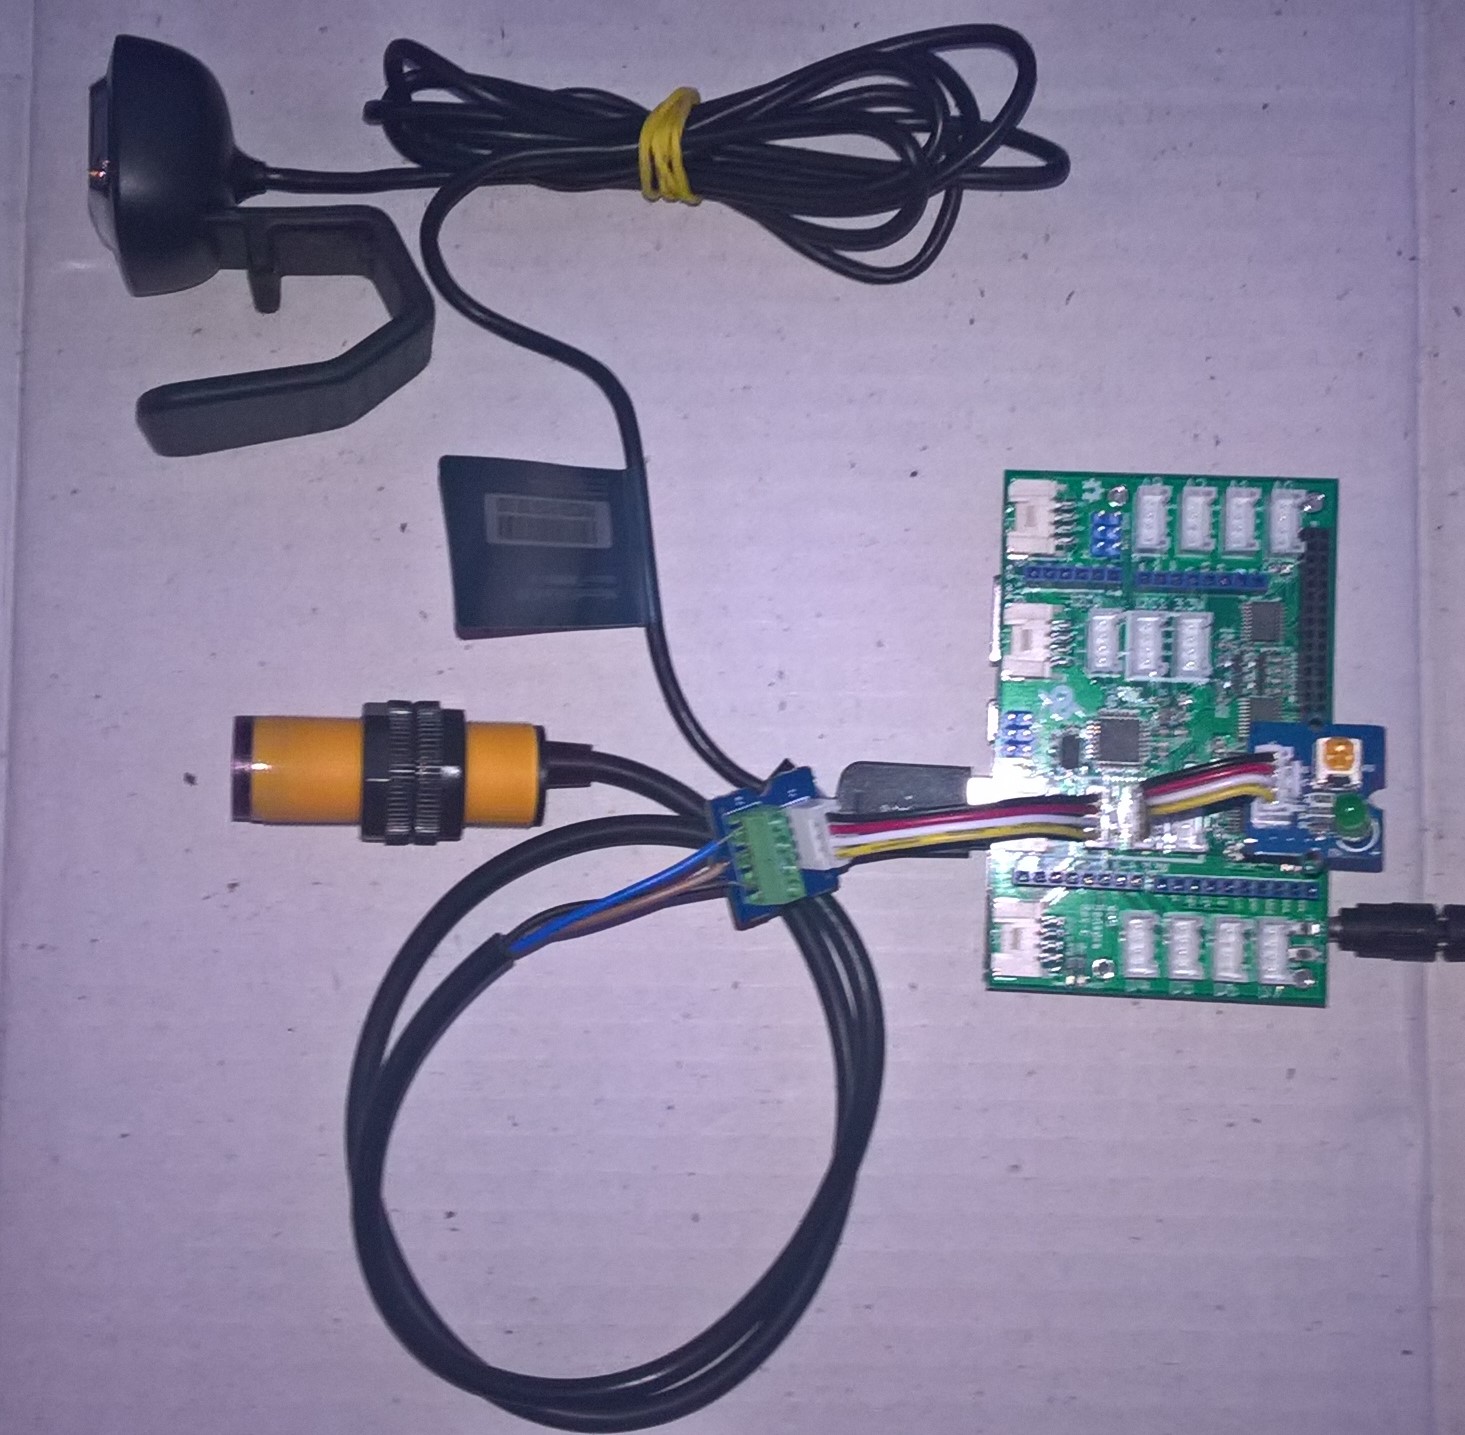
I used a simple infrared proximity sensor trigger the image capture to simulate an application for monitoring the number of people in or people entering a room.
Infrared Proximity Sensor triggered Face API test client
Overall I found that with not a lot of code I could capture an image, upload it to Azure Cognitive Services Face API for processing and the algorithm would reasonably reliably detect faces and features.
Elecrow Crowtail to Grove 4 pin Conversion Cable USD1.00
The code is pretty basic, it reads a value from the light sensor, scales it, then packs the payload and sets the necessary RFM9X/SX127X LoRa module configuration, has no power conservation, advanced wireless configuration etc.
/*
  Adapted from LoRa Duplex communication with Sync Word

  Sends Light data from Seeedstudio

   https://www.seeedstudio.com/Grove-Light-Sensor-v1-2-p-2727.html

  To my Windows 10 IoT Core RFM 9X library

  https://blog.devmobile.co.nz/2018/09/03/rfm9x-iotcore-payload-addressing/

*/
#include               // include libraries
#include
const int csPin = 10;          // LoRa radio chip select
const int resetPin = 9;       // LoRa radio reset
const int irqPin = 2;         // change for your board; must be a hardware interrupt pin

// Field gateway configuration
const char FieldGatewayAddress[] = "LoRaIoT1";
const float FieldGatewayFrequency =  915000000.0;
const byte FieldGatewaySyncWord = 0x12 ;

// Payload configuration
const int PayloadSizeMaximum = 64 ;
byte payload[PayloadSizeMaximum] = "";
const byte SensorReadingSeperator = ',' ;

// Manual serial number configuration
const char DeviceId[] = {"Elecrow32u4"};

const int analogInPin = A0;
const int LoopSleepDelaySeconds = 60 ;

void setup() {
  Serial.begin(9600);

  Serial.println("LoRa Setup");

  // override the default CS, reset, and IRQ pins (optional)
  LoRa.setPins(csPin, resetPin, irqPin);// set CS, reset, IRQ pin

  if (!LoRa.begin(FieldGatewayFrequency))
  {
    Serial.println("LoRa init failed. Check your connections.");
    while (true);
  }

  // Need to do this so field gateways pays attention to messages from this device
  LoRa.enableCrc();
  LoRa.setSyncWord(FieldGatewaySyncWord);

  LoRa.dumpRegisters(Serial);
  Serial.println("LoRa Setup done.");

  Serial.println("Setup done");
}

void loop()
{
  int payloadLength = 0 ;
  int sensorValue = 0;
  int outputValue = 0;

  Serial.println("Loop called");
  memset(payload, 0, sizeof(payload));

  // Scale the sensor value to a %
  sensorValue = analogRead(analogInPin);
  outputValue = map(sensorValue, 0, 1023, 0, 100);

  // prepare the payload header with "To" Address length (top nibble) and "From" address length (bottom nibble)
  payload[0] = (strlen(FieldGatewayAddress) << 4) | strlen( DeviceId ) ;
  payloadLength += 1;

  // Copy the "To" address into payload
  memcpy(&payload[payloadLength], FieldGatewayAddress, strlen(FieldGatewayAddress));
  payloadLength += strlen(FieldGatewayAddress) ;

  // Copy the "From" into payload
  memcpy(&payload[payloadLength], DeviceId, strlen(DeviceId));
  payloadLength += strlen(DeviceId) ;

  Serial.println("Loop called 5");

  Serial.print("L:");
  Serial.print( outputValue ) ;
  Serial.println( "%" ) ;

  // Copy the temperature into the payload
  payload[ payloadLength] = 'l';
  payloadLength += 1 ;
  payload[ payloadLength] = ' ';
  payloadLength += 1 ;
  payloadLength += strlen( itoa(outputValue, &payload[payloadLength],10 ));

  // display info about payload then send it (No ACK) with LoRa unlike nRF24L01
  Serial.print( "RFM9X/SX127X Payload length:");
  Serial.print( payloadLength );
  Serial.println( " bytes" );

  LoRa.beginPacket();
  LoRa.write( payload, payloadLength );
  LoRa.endPacket();

  Serial.println("Loop done");

  delay(LoopSleepDelaySeconds * 1000l);
}
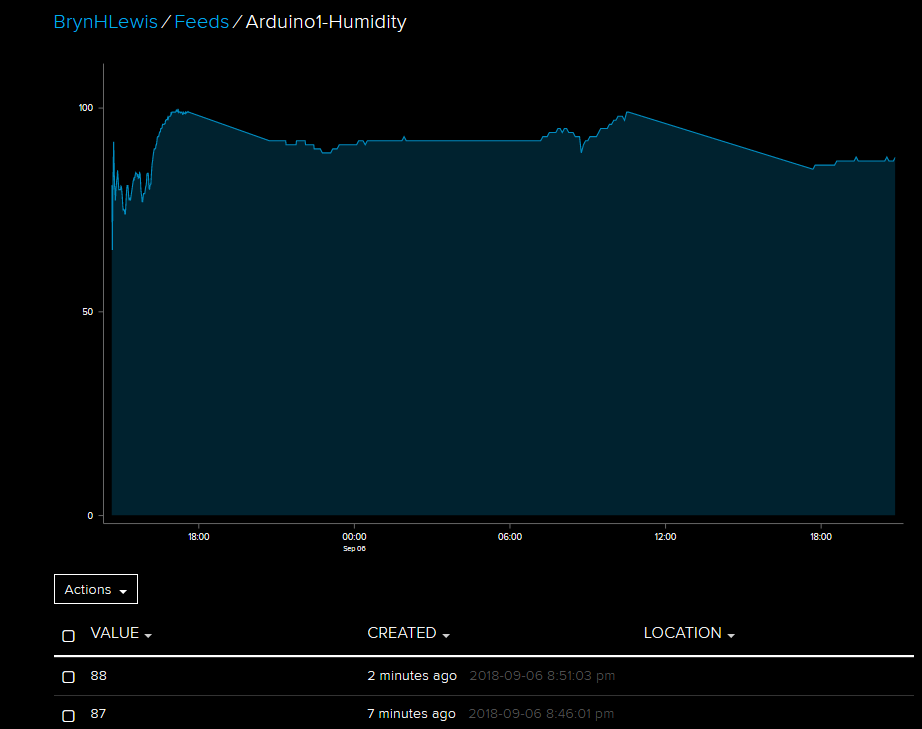
In the debug output window the messages from the device looked like this
14:06:38-RX From Elecrow32u4 PacketSnr 9.8 Packet RSSI -88dBm RSSI -110dBm = 4 byte message "l 85"
Sensor Elecrow32u4l Value 85
AzureIoTHubClient SendEventAsync start
AzureIoTHubClient SendEventAsync finish
The thread 0x930 has exited with code 0 (0x0).
The thread 0xb74 has exited with code 0 (0x0).
The thread 0x3c8 has exited with code 0 (0x0).
The thread 0x984 has exited with code 0 (0x0).
14:07:01-RX From IoTMCU915 PacketSnr 9.3 Packet RSSI -87dBm RSSI -110dBm = 12 byte message "t 13.7,h 113"
Sensor IoTMCU915t Value 13.7
Sensor IoTMCU915h Value 113
AzureIoTHubClient SendEventAsync start
AzureIoTHubClient SendEventAsync finish
The thread 0x6e8 has exited with code 0 (0x0).
The thread 0x7b4 has exited with code 0 (0x0).
The thread 0xe9c has exited with code 0 (0x0).
My battery is a bit of an overkill and to reduce power consumption I would disconnect/remove the light emitting diode(LED)
So far battery life and wireless communications range for the Arduino clients is looking pretty good. CRC presence checking and validation is turned so have a look at one of the sample clients.
It took a bit longer than expected as upgrading to the latest version (v1.18.0 as at 12 Sep 2018) of Microsoft.Azure.Devices.Client (from 1.6.3) broke my field gateway with timeouts and exceptions.
I’ll be doing some more testing over the next couple of weeks so it is a work in progress.
While building this AdaFruit.IO LoRa field gateway, and sample clients I revisited my RFM9XLoRa-Net library a couple of times adding functionality and renaming constants to make it more consistent. I made many of the default values public so they could be used in the field gateway config file.
The bare minimum configuration is
The signal to noise Ratio (SNR) and Received Signal Strength Indication(RSSI) for inbound messages required reading values from three registers
•RegPktSnrValue
•RegPktRssiValue
•RegRssiValue
I had to modify the OnDataRecievedHandler method signature so the values could be returned
public delegate void OnDataRecievedHandler(float packetSnr, int packetRssi, int rssi, byte[] data);
I was inspired by the RSSI adjustment approach used in the Arduino-LoRa library
// Get the RSSI HF vs. LF port adjustment section 5.5.5 RSSI and SNR in LoRa Mode
float packetSnr = this.Rfm9XLoraModem.ReadByte((byte)Registers.RegPktSnrValue) * 0.25f;

int rssi = this.Rfm9XLoraModem.ReadByte((byte)Registers.RegRssiValue);
if (Frequency > RFMidBandThreshold)
{
  rssi = RssiAdjustmentHF + rssi;
}
else
{
  rssi = RssiAdjustmentLF + rssi;
}

int packetRssi = this.Rfm9XLoraModem.ReadByte((byte)Registers.RegPktRssiValue);
if (Frequency > RFMidBandThreshold)
{
  packetRssi = RssiAdjustmentHF + packetRssi;
}
else
{
  packetRssi = RssiAdjustmentLF + packetRssi;
}

OnDataReceived?.Invoke( packetSnr, packetRssi, rssi, messageBytes);
The values displayed in the Rfm9xLoRaDeviceClient application looked reasonable, but will need further checking