Random wanderings through Microsoft Azure esp. PaaS plumbing, the IoT bits, AI on Micro controllers, AI on Edge Devices, .NET nanoFramework, .NET Core on *nix and ML.NET+ONNX
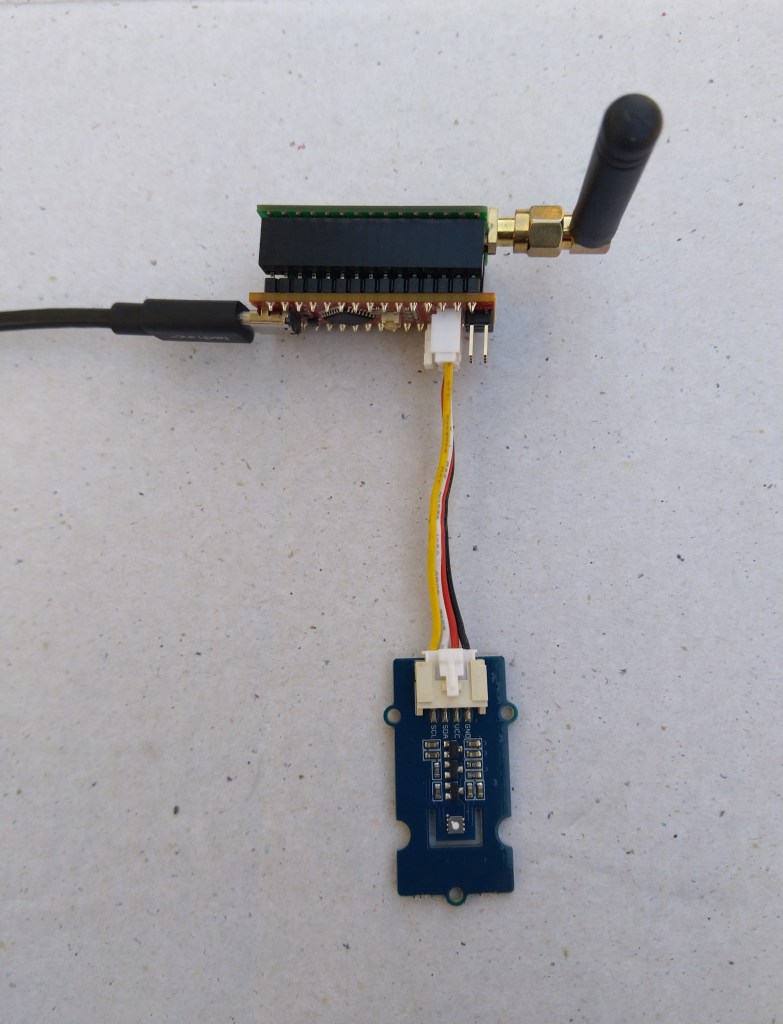
Seeeduino Nano easySensors shield and Grove VOC & eCO2 Sensor
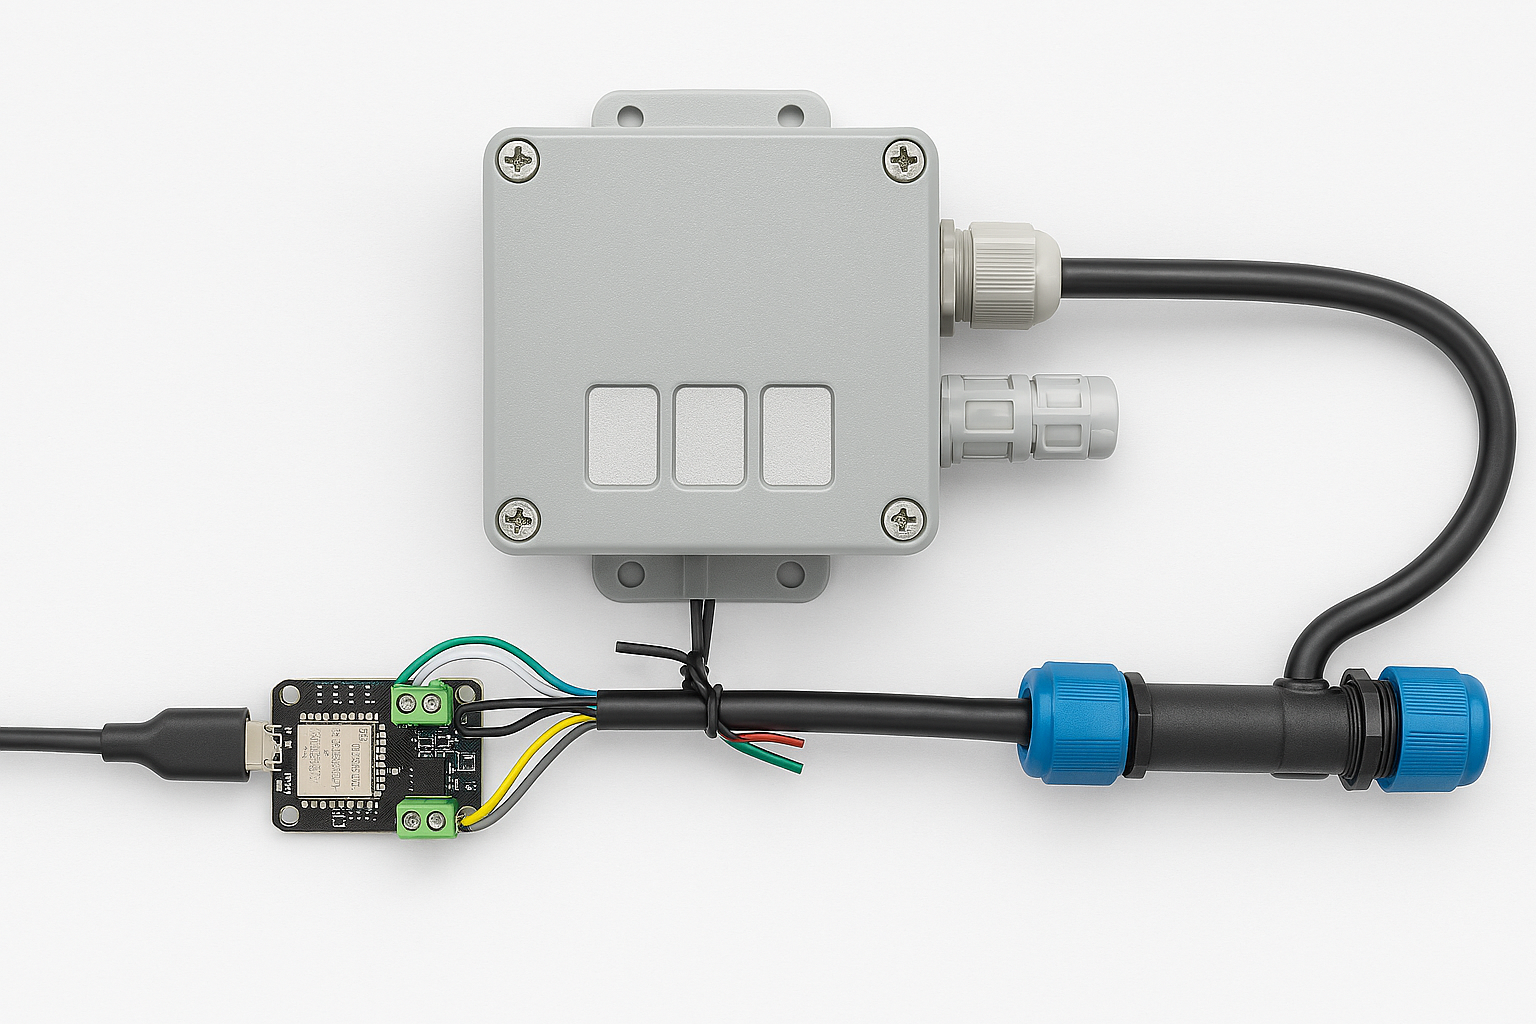
Seeeduino Nano devices have a single on-board I2C socket which meant I didn’t need a Grove Shield for Arduino Nano which reduced the size and cost of the sensor node.
My first attempt failed with an issues accessing an Analog port to read the serial number from the Microchip ATSHA204 security chip. After looking at the Seeed SGP30 library source code (based on Sensiron samples) I think the my Nano device was running out of memory. I then searched for other Arduino compatible SGP30 libraries and rebuilt he application with the one from Sparkfun,
/*
Copyright ® 2019 August devMobile Software, All Rights Reserved
THIS CODE AND INFORMATION IS PROVIDED "AS IS" WITHOUT WARRANTY OF ANY
KIND, EITHER EXPRESSED OR IMPLIED, INCLUDING BUT NOT LIMITED TO THE
IMPLIED WARRANTIES OF MERCHANTABILITY AND/OR FITNESS FOR A PARTICULAR
PURPOSE.
You can do what you want with this code, acknowledgment would be nice.
http://www.devmobile.co.nz
Seeedstudio Grove - VOC and eCO2 Gas Sensor (SGP30)
https://www.seeedstudio.com/Grove-VOC-and-eCO2-Gas-Sensor-SGP30-p-3071.html
Seeeduino Nano
https://www.seeedstudio.com/Seeeduino-Nano-p-4111.html
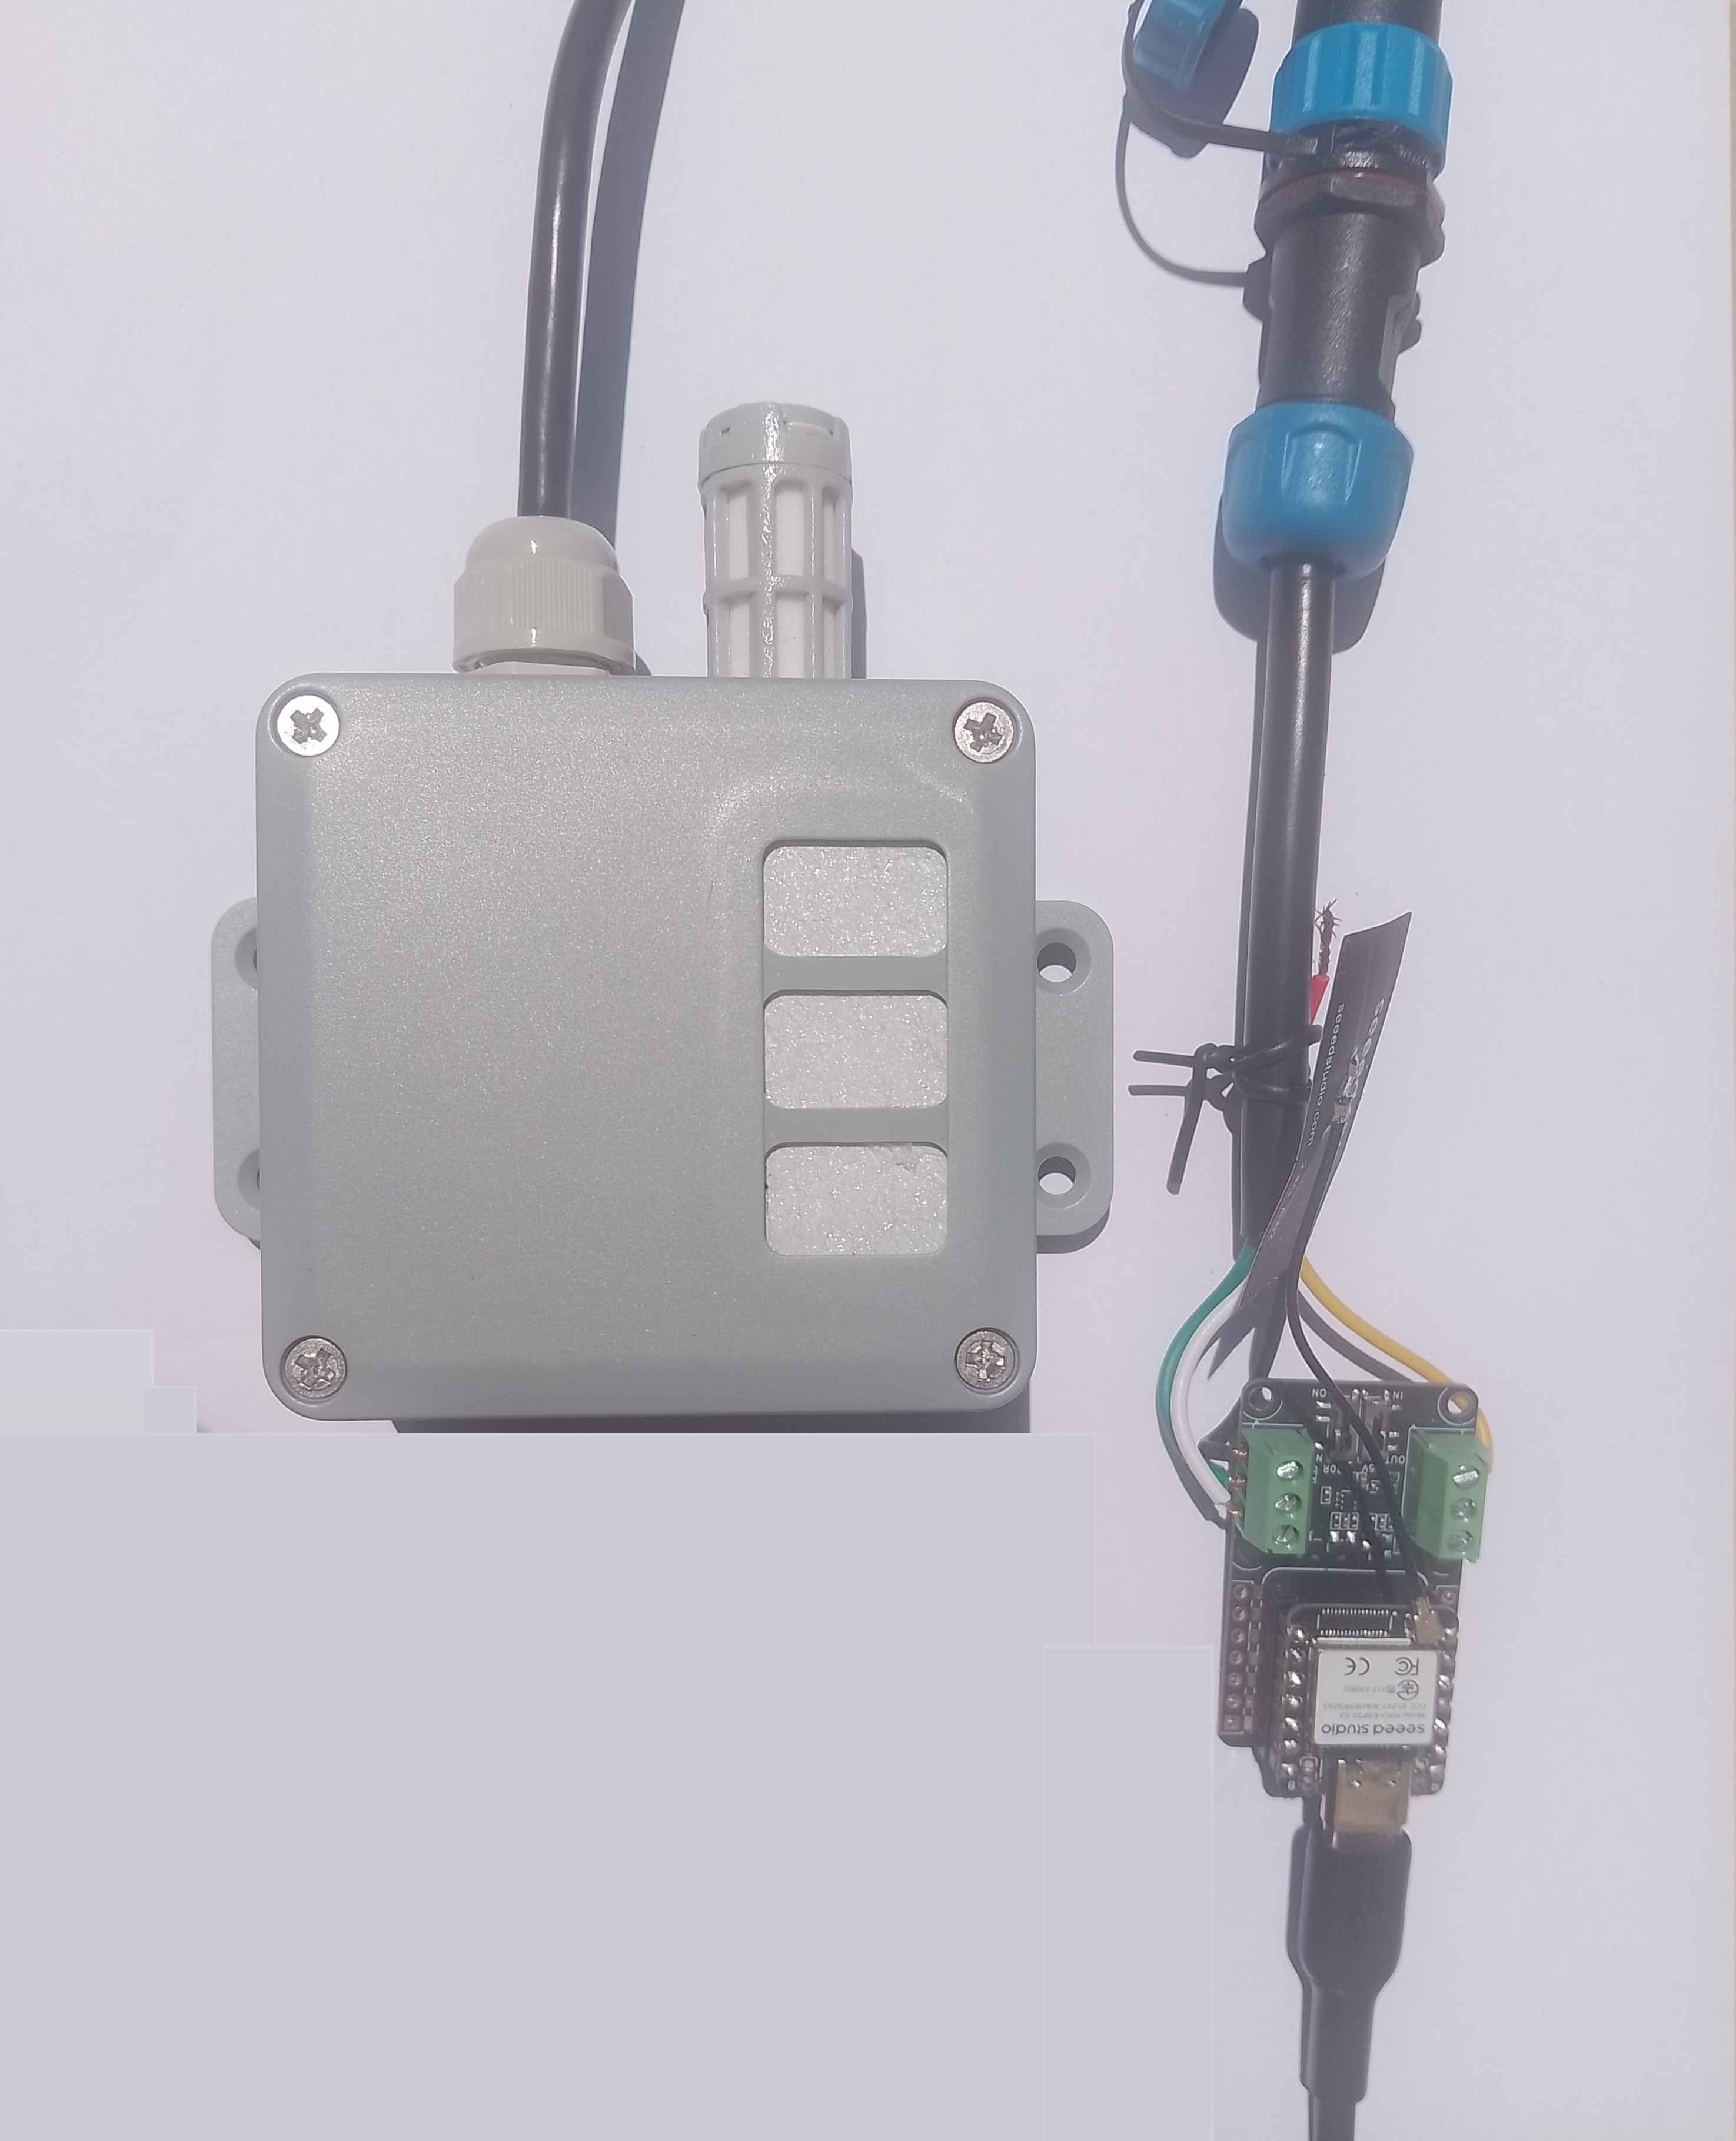
Polycarbonate enclosure approx 3.5" x 4.5"
2 x Cable glands
1 x Grommet to seal SMA antenna connector
3M command adhesive strips to hold battery & device in place
*/
#include <stdlib.h>
#include "SparkFun_SGP30_Arduino_Library.h"
#include <LoRa.h>
#include <sha204_library.h>
//#define DEBUG
//#define DEBUG_TELEMETRY
//#define DEBUG_LORA
#define DEBUG_VOC_AND_CO2
#define UNITS_VOC "ppb"
#define UNITS_CO2 "ppm"
// LoRa field gateway configuration (these settings must match your field gateway)
const byte DeviceAddressMaximumLength = 15 ;
const char FieldGatewayAddress[] = {"LoRaIoT1"};
const float FieldGatewayFrequency = 915000000.0;
const byte FieldGatewaySyncWord = 0x12 ;
// Payload configuration
const int ChipSelectPin = 10;
const int ResetPin = 9;
const int InterruptPin = 2;
// LoRa radio payload configuration
const byte SensorIdValueSeperator = ' ' ;
const byte SensorReadingSeperator = ',' ;
const unsigned long SensorUploadDelay = 60000;
// ATSHA204 secure authentication, validation with crypto and hashing (currently only using for unique serial number)
const byte Atsha204Port = A3;
atsha204Class sha204(Atsha204Port);
const byte DeviceSerialNumberLength = 9 ;
byte deviceSerialNumber[DeviceSerialNumberLength] = {""};
SGP30 mySensor; //create an object of the SGP30 class
const byte PayloadSizeMaximum = 64 ;
byte payload[PayloadSizeMaximum];
byte payloadLength = 0 ;
void setup()
{
Serial.begin(9600);
#ifdef DEBUG
while (!Serial);
#endif
Serial.println("Setup called");
Serial.print("Field gateway:");
Serial.print(FieldGatewayAddress ) ;
Serial.print(" Frequency:");
Serial.print( FieldGatewayFrequency,0 ) ;
Serial.print("MHz SyncWord:");
Serial.print( FieldGatewaySyncWord ) ;
Serial.println();
// Retrieve the serial number then display it nicely
if(sha204.getSerialNumber(deviceSerialNumber))
{
Serial.println("sha204.getSerialNumber failed");
while (true); // Drop into endless loop requiring restart
}
Serial.print("SNo:");
DisplayHex( deviceSerialNumber, DeviceSerialNumberLength);
Serial.println();
Serial.println("LoRa setup start");
// override the default chip select and reset pins
LoRa.setPins(ChipSelectPin, ResetPin, InterruptPin);
if (!LoRa.begin(FieldGatewayFrequency))
{
Serial.println("LoRa begin failed");
while (true); // Drop into endless loop requiring restart
}
// Need to do this so field gateway pays attention to messsages from this device
LoRa.enableCrc();
LoRa.setSyncWord(FieldGatewaySyncWord);
#ifdef DEBUG_LORA
LoRa.dumpRegisters(Serial);
#endif
Serial.println("LoRa Setup done.");
// Configure the DF Robot SHT20, temperature & humidity sensor
Serial.println("SGP30 setup start");
Wire.begin();
if(mySensor.begin() == false)
{
Serial.println("SQP-30 initialisation failed");
while (true); // Drop into endless loop requiring restart
}
mySensor.initAirQuality();
delay(1000);
Serial.println("SGP30 setup done");
PayloadHeader((byte *)FieldGatewayAddress,strlen(FieldGatewayAddress), deviceSerialNumber, DeviceSerialNumberLength);
Serial.println("Setup done");
Serial.println();
}
void loop()
{
unsigned long currentMilliseconds = millis();
Serial.println("Loop called");
mySensor.measureAirQuality();
PayloadReset();
PayloadAdd( "v", mySensor.TVOC, false);
PayloadAdd( "c", mySensor.CO2, false);
#ifdef DEBUG_VOC_AND_CO2
Serial.print("VoC:");
Serial.print( mySensor.TVOC ) ;
Serial.print( UNITS_VOC ) ;
Serial.print(" Co2:");
Serial.print( mySensor.CO2 ) ;
Serial.println( UNITS_CO2 ) ;
#endif
#ifdef DEBUG_TELEMETRY
Serial.println();
Serial.print("RFM9X/SX127X Payload length:");
Serial.print(payloadLength);
Serial.println(" bytes");
#endif
LoRa.beginPacket();
LoRa.write(payload, payloadLength);
LoRa.endPacket();
Serial.println("Loop done");
Serial.println();
delay(SensorUploadDelay - (millis() - currentMilliseconds ));
}
void PayloadHeader( const byte *to, byte toAddressLength, const byte *from, byte fromAddressLength)
{
byte addressesLength = toAddressLength + fromAddressLength ;
payloadLength = 0 ;
// prepare the payload header with "To" Address length (top nibble) and "From" address length (bottom nibble)
payload[payloadLength] = (toAddressLength << 4) | fromAddressLength ;
payloadLength += 1;
// Copy the "To" address into payload
memcpy(&payload[payloadLength], to, toAddressLength);
payloadLength += toAddressLength ;
// Copy the "From" into payload
memcpy(&payload[payloadLength], from, fromAddressLength);
payloadLength += fromAddressLength ;
}
void PayloadAdd( const char *sensorId, float value, byte decimalPlaces, bool last)
{
byte sensorIdLength = strlen( sensorId ) ;
memcpy( &payload[payloadLength], sensorId, sensorIdLength) ;
payloadLength += sensorIdLength ;
payload[ payloadLength] = SensorIdValueSeperator;
payloadLength += 1 ;
payloadLength += strlen( dtostrf(value, -1, decimalPlaces, (char *)&payload[payloadLength]));
if (!last)
{
payload[ payloadLength] = SensorReadingSeperator;
payloadLength += 1 ;
}
#ifdef DEBUG_TELEMETRY
Serial.print("PayloadAdd float-payloadLength:");
Serial.print( payloadLength);
Serial.println( );
#endif
}
void PayloadAdd( char *sensorId, int value, bool last )
{
byte sensorIdLength = strlen(sensorId) ;
memcpy(&payload[payloadLength], sensorId, sensorIdLength) ;
payloadLength += sensorIdLength ;
payload[ payloadLength] = SensorIdValueSeperator;
payloadLength += 1 ;
payloadLength += strlen(itoa( value,(char *)&payload[payloadLength],10));
if (!last)
{
payload[ payloadLength] = SensorReadingSeperator;
payloadLength += 1 ;
}
#ifdef DEBUG_TELEMETRY
Serial.print("PayloadAdd int-payloadLength:" );
Serial.print(payloadLength);
Serial.println( );
#endif
}
void PayloadAdd( char *sensorId, unsigned int value, bool last )
{
byte sensorIdLength = strlen(sensorId) ;
memcpy(&payload[payloadLength], sensorId, sensorIdLength) ;
payloadLength += sensorIdLength ;
payload[ payloadLength] = SensorIdValueSeperator;
payloadLength += 1 ;
payloadLength += strlen(utoa( value,(char *)&payload[payloadLength],10));
if (!last)
{
payload[ payloadLength] = SensorReadingSeperator;
payloadLength += 1 ;
}
#ifdef DEBUG_TELEMETRY
Serial.print("PayloadAdd uint-payloadLength:");
Serial.print(payloadLength);
Serial.println( );
#endif
}
void PayloadReset()
{
byte fromAddressLength = payload[0] & 0xf ;
byte toAddressLength = payload[0] >> 4 ;
payloadLength = toAddressLength + fromAddressLength + 1;
}
void DisplayHex( byte *byteArray, byte length)
{
for (int i = 0; i < length ; i++)
{
// Add a leading zero
if ( byteArray[i] < 16)
{
Serial.print("0");
}
Serial.print(byteArray[i], HEX);
if ( i < (length-1)) // Don't put a - after last digit
{
Serial.print("-");
}
}
}
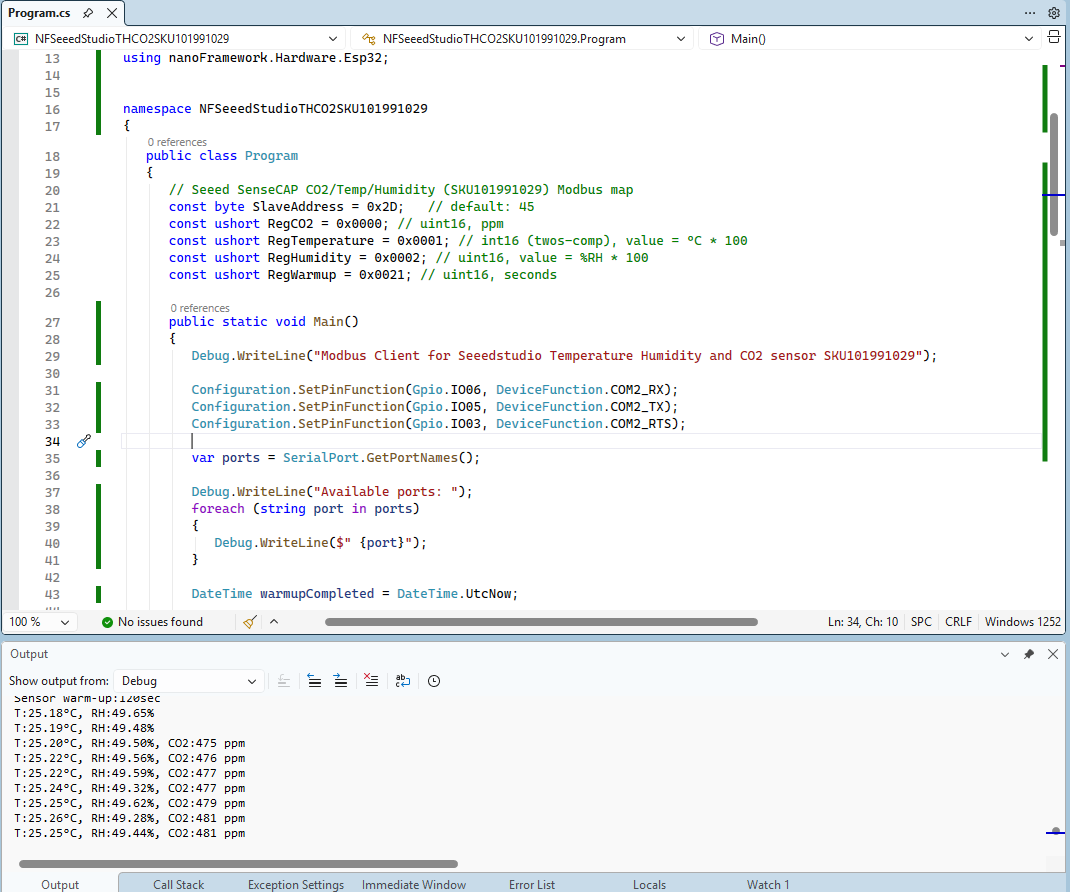
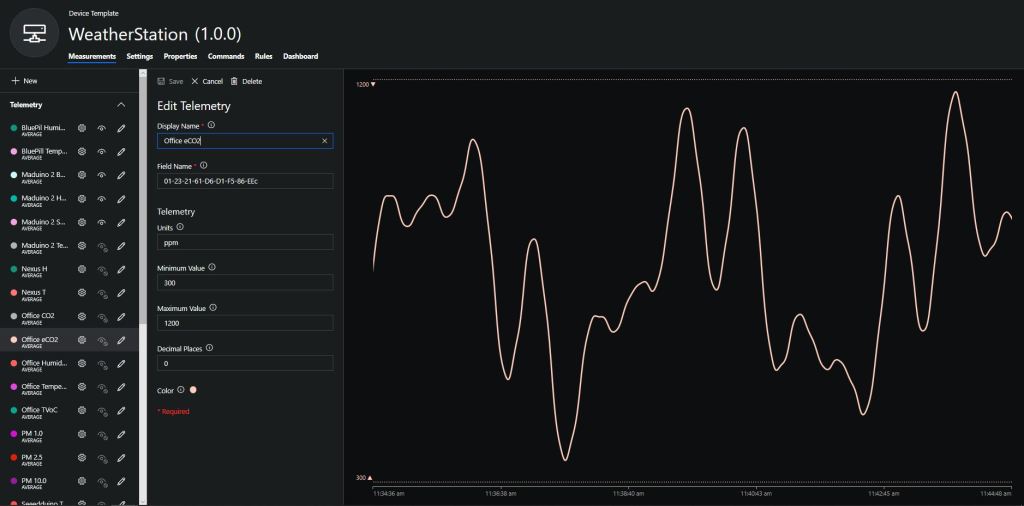
To configure the device in Azure IoT Central (similar process for Adafruit.IO, working on support for losant, and ubidots) I copied the SNo: from the Arduino development tool logging window and appended c for the CO2 parts per million (ppm), v for VOC parts per billion (ppb) unique serial number from the ATSHA204A chip. (N.B. pay attention to the case of the field names they are case sensitive)
Azure IoT Central configuration
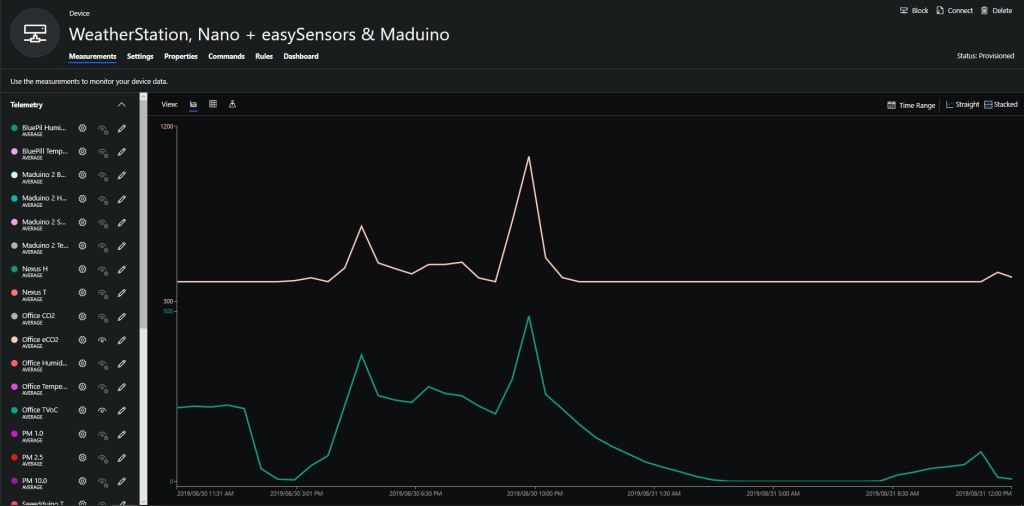
Overall the performance of the VoC sensor data is looking pretty positive, the eCO2 readings need some further investigation as they track the VOC levels. The large spike in the graph below is me putting an open vivid marker on my desk near the sensor.
Seeeduino Nano devices have a single on-board I2C socket which meant I didn’t need a Grove Shield for Arduino Nano which reduced the size and cost of the sensor node.
I downloaded the seeedstudio wiki example calibration code, compiled and uploaded it to one of my Seeeduino Nano devices. When activated for the first time a period of minimum 7 days is needed so that the sensor algorithm can find its initial parameter set. During this period the sensor has to be exposed to fresh air for at least 1 hour every day.
During the calibration process I put the device in my garage and left the big door open for at least an hour every day. Once the sensor was calibrated I bought it inside at put it on the bookcase in my office.
To configure the device in Azure IoT Central (similar process for Adafruit.IO, working on support for losant, and ubidots) I copied the SNo: from the Arduino development tool logging window and appended c for the CO2 parts per million (ppm), h for the humidity % and t for the temperature °C to the unique serial number from the ATSHA204A chip. (N.B. pay attention to the case of the field names they are case sensitive)
Azure IoT Central telemetry configuration
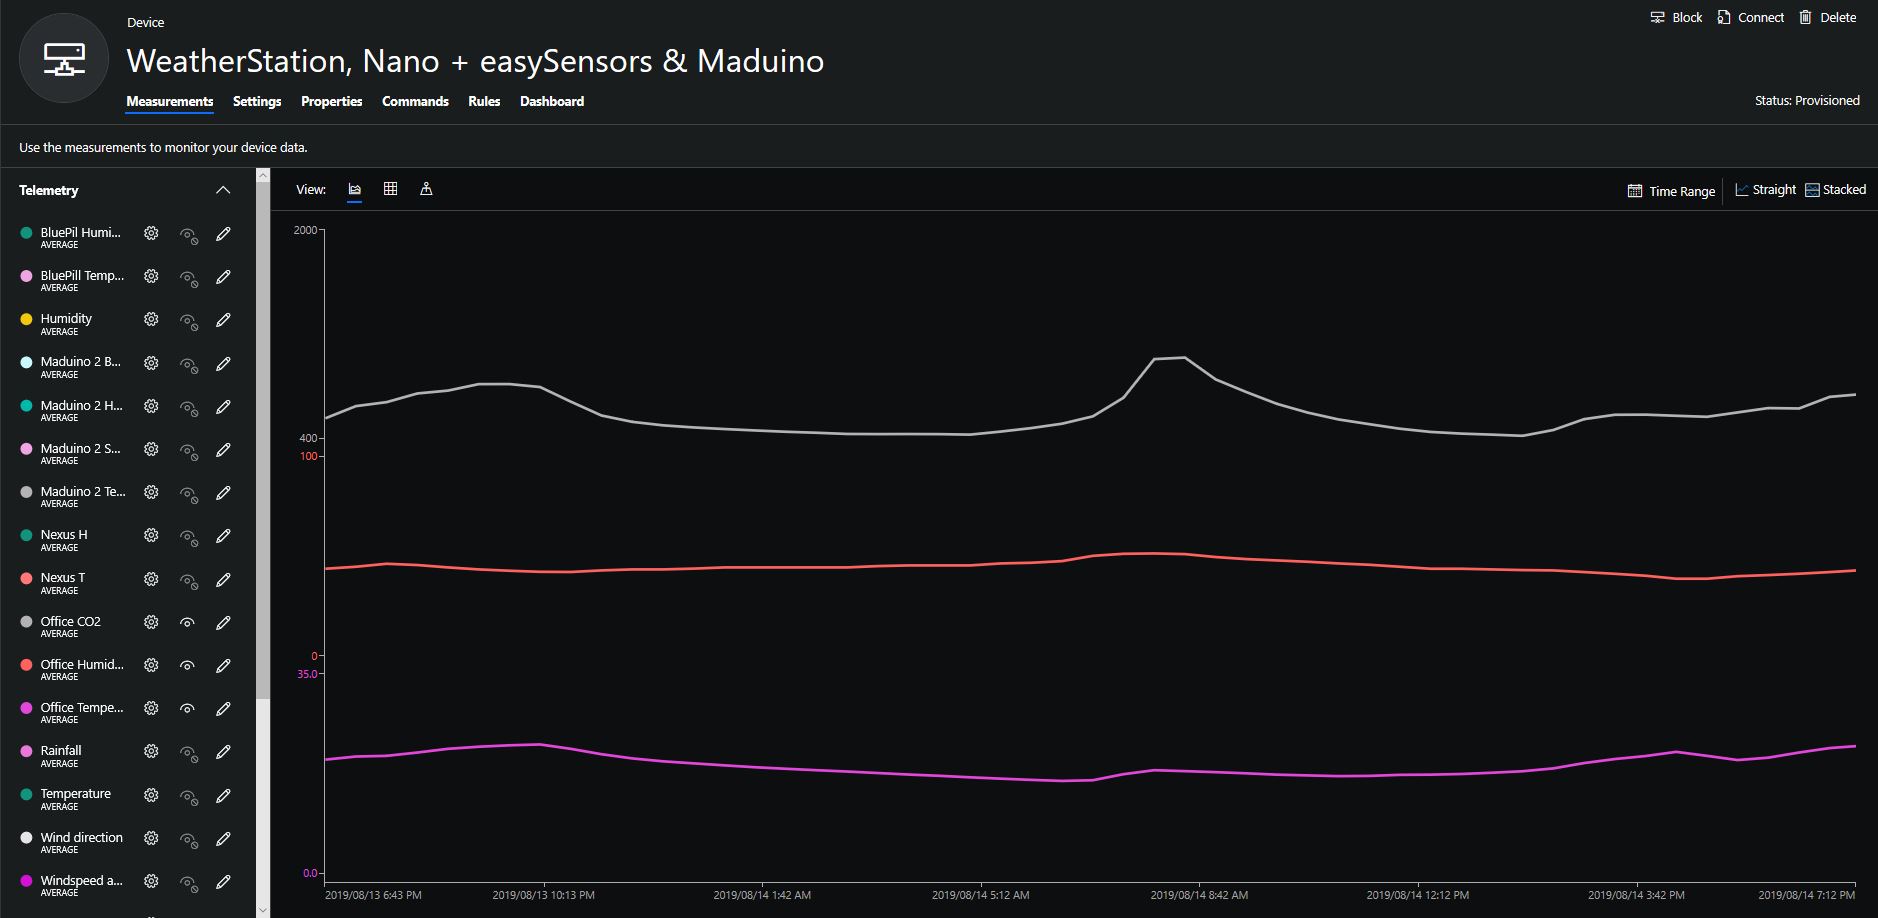
Overall the performance of the sensor is looking pretty positive, the CO2 levels fluctuate in a acceptable range (based on office occupancy), and the temperature + humidity readings track quite closely to the other two sensor nodes in my office. The only issue so far is my lack of USB-C cables to power the devices in the field
CO2, Humidity and Temperature in my office for a day
/***************************************************
* Infrared CO2 Sensor 0-50000ppm(Wide Range)
* ****************************************************
* The follow example is used to detect CO2 concentration.

* @author lg.gang(lg.gang@qq.com)
* @version  V1.0
* @date  2016-6-6

* GNU Lesser General Public License.
* See <http://www.gnu.org/licenses/> for details.
* All above must be included in any redistribution
* ****************************************************/
#include <SoftwareSerial.h>
SoftwareSerial mySerial(10, 11); // RX, TX
unsigned char hexdata[9] = {0xFF,0x01,0x86,0x00,0x00,0x00,0x00,0x00,0x79}; //Read the gas density command /Don't change the order
void setup() {

  Serial.begin(9600);
  while (!Serial) {

  }
  mySerial.begin(9600);

}

void loop() {
   mySerial.write(hexdata,9);
   delay(500);

 for(int i=0,j=0;i<9;i++)
 {
  if (mySerial.available()>0)
  {
     long hi,lo,CO2;
     int ch=mySerial.read();

    if(i==2){     hi=ch;   }   //High concentration
    if(i==3){     lo=ch;   }   //Low concentration
    if(i==8) {
               CO2=hi*256+lo;  //CO2 concentration
      Serial.print("CO2 concentration: ");
      Serial.print(CO2);
      Serial.println("ppm");
      }
    }
  }
}
After some GitHub searching the second library I looked at was abbozza_CO2_MHZ16_arduino by Michael Brinkmeier. This library appears to be “plug-in” module for the abbozza! framework. I didn’t use this library due to the lack of checksum & packet header/footer validation.
/**
 * @license
 * abbozza! Calliope plugin for the MH-Z16 CO2 sensor
 *
 * The sensor has to be connected to a serial connection with 9600 baud.
 *
 * Copyright 2015 Michael Brinkmeier ( michael.brinkmeier@uni-osnabrueck.de )
 *
 * Licensed under the Apache License, Version 2.0 (the "License");
 * you may not use this file except in compliance with the License.
 * You may obtain a copy of the License at
 *
 *   http://www.apache.org/licenses/LICENSE-2.0
 *
 * Unless required by applicable law or agreed to in writing, software
 * distributed under the License is distributed on an "AS IS" BASIS,
 * WITHOUT WARRANTIES OR CONDITIONS OF ANY KIND, either express or implied.
 * See the License for the specific language governing permissions and
 * limitations under the License.
 */

#include "SoftwareSerial.h"
#include "MHZ16.h"
#include "Arduino.h"

MHZ16::MHZ16(int tx, int rx) {
    this->serial = new SoftwareSerial(rx,tx,false);
    this->serial->begin(9600);
}


void MHZ16::calibrate() {
    int idx;
    for (idx = 0; idx < 9; idx++) {
        serial->write(cal[idx]);
    }
    delay(10);
}

void MHZ16::doMeasurement() {
    int idx;
    int bu;

    for (idx = 0; idx < 9; idx++) {
        serial->write(cmd[idx]);
    }
    delay(10);

    while (serial->available()) {
        do {
            bu = serial->read();
        } while (bu != 255);
        buf[0] = bu;

        idx = 1;
        while (serial->available() && (idx < 9)) {
            bu = serial->read();
            buf[idx] = bu;
            idx++;
        }

        if (idx == 9) {
            PPM = ((int) buf[2]) *256 + ((int) buf[3]);
        }
    }
}

int MHZ16::getPPM() {
    return PPM;
}
Their library had checksum & packet header/footer validation but I didn’t use it because the carbon dioxide concentration was calculated using 4 bytes (maybe this was to support the different range sensors?)
/*
Description:
This is a example code for Sandbox Electronics NDIR CO2 sensor module.
You can get one of those products on
http://sandboxelectronics.com

Version:
V1.2

Release Date:
2019-01-10

Author:
Tiequan Shao          support@sandboxelectronics.com

Lisence:
CC BY-NC-SA 3.0

Please keep the above information when you use this code in your project.
*/

#include <SoftwareSerial.h>
#include <NDIR_SoftwareSerial.h>
#define  RECEIVE_TIMEOUT  (100)

#if ARDUINO >= 100
    #include "Arduino.h"
#else
    #include "WProgram.h"
#endif

class SoftwareSerial;

uint8_t NDIR_SoftwareSerial::cmd_measure[9]                = {0xFF,0x01,0x9C,0x00,0x00,0x00,0x00,0x00,0x63};
uint8_t NDIR_SoftwareSerial::cmd_calibrateZero[9]          = {0xFF,0x01,0x87,0x00,0x00,0x00,0x00,0x00,0x78};
uint8_t NDIR_SoftwareSerial::cmd_enableAutoCalibration[9]  = {0xFF,0x01,0x79,0xA0,0x00,0x00,0x00,0x00,0xE6};
uint8_t NDIR_SoftwareSerial::cmd_disableAutoCalibration[9] = {0xFF,0x01,0x79,0x00,0x00,0x00,0x00,0x00,0x86};

NDIR_SoftwareSerial::NDIR_SoftwareSerial(uint8_t rx_pin, uint8_t tx_pin) : serial(rx_pin, tx_pin, false)
{
}


uint8_t NDIR_SoftwareSerial::begin()
{
    serial.begin(9600);

    if (measure()) {
        return true;
    } else {
        return false;
    }
}

uint8_t NDIR_SoftwareSerial::measure()
{
    uint8_t i;
    uint8_t buf[9];
    uint32_t start = millis();

    serial.flush();

    for (i=0; i<9; i++) {
        serial.write(cmd_measure[i]);
    }

    for (i=0; i<9;) {
        if (serial.available()) {
            buf[i++] = serial.read();
        }

        if (millis() - start > RECEIVE_TIMEOUT) {
            return false;
        }
    }

    if (parse(buf)) {
        return true;
    }

    return false;
}


void NDIR_SoftwareSerial::calibrateZero()
{
    uint8_t i;

    for (i=0; i<9; i++) {
        serial.write(cmd_calibrateZero[i]);
    }
}


void NDIR_SoftwareSerial::enableAutoCalibration()
{
    uint8_t i;

    for (i=0; i<9; i++) {
        serial.write(cmd_enableAutoCalibration[i]);
    }
}


void NDIR_SoftwareSerial::disableAutoCalibration()
{
    uint8_t i;

    for (i=0; i<9; i++) {
        serial.write(cmd_disableAutoCalibration[i]);
    }
}


uint8_t NDIR_SoftwareSerial::parse(uint8_t *pbuf)
{
    uint8_t i;
    uint8_t checksum = 0;

    for (i=0; i<9; i++) {
        checksum += pbuf[i];
    }

    if (pbuf[0] == 0xFF && pbuf[1] == 0x9C && checksum == 0xFF) {
        ppm = (uint32_t)pbuf[2] << 24 | (uint32_t)pbuf[3] << 16 | (uint32_t)pbuf[4] << 8 | pbuf[5];
        return true;
    } else {
        return false;
    }
}
The forth library I looked at was MHZ-Z-C02-Sensors by Tobias Schürg this library was for different series of MHZ sensors. With re-synching, configurable timeouts and checksum validation it looked like the code could easily be adapted for the MH-Z16.
/* MHZ library

    By Tobias Schürg
*/

#include "MHZ.h"

const int MHZ14A = 14;
const int MHZ19B = 19;

const int MHZ14A_RESPONSE_TIME = 60;
const int MHZ19B_RESPONSE_TIME = 120;

const int STATUS_NO_RESPONSE = -2;
const int STATUS_CHECKSUM_MISMATCH = -3;
const int STATUS_INCOMPLETE = -4;
const int STATUS_NOT_READY = -5;

unsigned long lastRequest = 0;

MHZ::MHZ(uint8_t rxpin, uint8_t txpin, uint8_t pwmpin, uint8_t type)
    : co2Serial(rxpin, txpin) {
  _rxpin = rxpin;
  _txpin = txpin;
  _pwmpin = pwmpin;
  _type = type;

  co2Serial.begin(9600);
}

/**
 * Enables or disables the debug mode (more logging).
 */
void MHZ::setDebug(boolean enable) {
  debug = enable;
  if (debug) {
    Serial.println(F("MHZ: debug mode ENABLED"));
  } else {
    Serial.println(F("MHZ: debug mode DISABLED"));
  }
}

boolean MHZ::isPreHeating() {
  if (_type == MHZ14A) {
    return millis() < (3 * 60 * 1000);
  } else if (_type == MHZ19B) {
    return millis() < (3 * 60 * 1000);
  } else {
    Serial.println(F("MHZ::isPreHeating() => UNKNOWN SENSOR"));
    return false;
  }
}

boolean MHZ::isReady() {
  if (isPreHeating()) return false;
  if (_type == MHZ14A)
    return lastRequest < millis() - MHZ14A_RESPONSE_TIME;
  else if (_type == MHZ19B)
    return lastRequest < millis() - MHZ19B_RESPONSE_TIME;
  else {
    Serial.print(F("MHZ::isReady() => UNKNOWN SENSOR \""));
    Serial.print(_type);
    Serial.println(F("\""));
    return true;
  }
}

int MHZ::readCO2UART() {
  if (!isReady()) return STATUS_NOT_READY;
  if (debug) Serial.println(F("-- read CO2 uart ---"));
  byte cmd[9] = {0xFF, 0x01, 0x86, 0x00, 0x00, 0x00, 0x00, 0x00, 0x79};
  byte response[9];  // for answer

  if (debug) Serial.print(F("  >> Sending CO2 request"));
  co2Serial.write(cmd, 9);  // request PPM CO2
  lastRequest = millis();

  // clear the buffer
  memset(response, 0, 9);

  int waited = 0;
  while (co2Serial.available() == 0) {
    if (debug) Serial.print(".");
    delay(100);  // wait a short moment to avoid false reading
    if (waited++ > 10) {
      if (debug) Serial.println(F("No response after 10 seconds"));
      co2Serial.flush();
      return STATUS_NO_RESPONSE;
    }
  }
  if (debug) Serial.println();

  // The serial stream can get out of sync. The response starts with 0xff, try
  // to resync.
  // TODO: I think this might be wrong any only happens during initialization?
  boolean skip = false;
  while (co2Serial.available() > 0 && (unsigned char)co2Serial.peek() != 0xFF) {
    if (!skip) {
      Serial.print(F("MHZ: - skipping unexpected readings:"));
      skip = true;
    }
    Serial.print(" ");
    Serial.print(co2Serial.peek(), HEX);
    co2Serial.read();
  }
  if (skip) Serial.println();

  if (co2Serial.available() > 0) {
    int count = co2Serial.readBytes(response, 9);
    if (count < 9) {
      co2Serial.flush();
      return STATUS_INCOMPLETE;
    }
  } else {
    co2Serial.flush();
    return STATUS_INCOMPLETE;
  }

  if (debug) {
    // print out the response in hexa
    Serial.print(F("  << "));
    for (int i = 0; i < 9; i++) {
      Serial.print(response[i], HEX);
      Serial.print(F("  "));
    }
    Serial.println(F(""));
  }

  // checksum
  byte check = getCheckSum(response);
  if (response[8] != check) {
    Serial.println(F("MHZ: Checksum not OK!"));
    Serial.print(F("MHZ: Received: "));
    Serial.println(response[8], HEX);
    Serial.print(F("MHZ: Should be: "));
    Serial.println(check, HEX);
    temperature = STATUS_CHECKSUM_MISMATCH;
    co2Serial.flush();
    return STATUS_CHECKSUM_MISMATCH;
  }

  int ppm_uart = 256 * (int)response[2] + response[3];

  temperature = response[4] - 44;  // - 40;

  byte status = response[5];
  if (debug) {
    Serial.print(F(" # PPM UART: "));
    Serial.println(ppm_uart);
    Serial.print(F(" # Temperature? "));
    Serial.println(temperature);
  }

  // Is always 0 for version 14a  and 19b
  // Version 19a?: status != 0x40
  if (debug && status != 0) {
    Serial.print(F(" ! Status maybe not OK ! "));
    Serial.println(status, HEX);
  } else if (debug) {
    Serial.print(F(" Status  OK: "));
    Serial.println(status, HEX);
  }

  co2Serial.flush();
  return ppm_uart;
}

uint8_t MHZ::getLastTemperature() {
  if (isPreHeating()) return STATUS_NOT_READY;
  return temperature;
}

byte MHZ::getCheckSum(byte* packet) {
  if (debug) Serial.println(F("  getCheckSum()"));
  byte i;
  unsigned char checksum = 0;
  for (i = 1; i < 8; i++) {
    checksum += packet[i];
  }
  checksum = 0xff - checksum;
  checksum += 1;
  return checksum;
}

int MHZ::readCO2PWM() {
  // if (!isReady()) return STATUS_NOT_READY; not needed?
  if (debug) Serial.print(F("-- reading CO2 from pwm "));
  unsigned long th, tl, ppm_pwm = 0;
  do {
    if (debug) Serial.print(".");
    th = pulseIn(_pwmpin, HIGH, 1004000) / 1000;
    tl = 1004 - th;
    ppm_pwm = 5000 * (th - 2) / (th + tl - 4);
  } while (th == 0);
  if (debug) {
    Serial.print(F("\n # PPM PWM: "));
    Serial.println(ppm_pwm);
  }
  return ppm_pwm;
}
The forth library I looked at was MHZ16_uart by Intar it had been updated recently, was quite lightweight, had timeouts, checksum & packet header/footer validation.
/*
  MHZ16_uart.cpp - MH-Z16 CO2 sensor library for ESP-32
  by Intar BV
  version 0.1

  License MIT
*/

#include "MHZ16_uart.h"
#include "Arduino.h"


#define WAIT_READ_TIMES	100
#define WAIT_READ_DELAY	10

// public

MHZ16_uart::MHZ16_uart(){
}
MHZ16_uart::MHZ16_uart(int rx, int tx){
	begin(rx,tx);
}

MHZ16_uart::~MHZ16_uart(){
}

#ifdef ARDUINO_ARCH_ESP32
void MHZ16_uart::begin(int rx, int tx, int s){
	_rx_pin = rx;
	_tx_pin = tx;
	_start_millis = millis();
	_serialno = s;
}
#else
void MHZ16_uart::begin(int rx, int tx){
	_rx_pin = rx;
	_start_millis = millis();
	_tx_pin = tx;
}
#endif

void MHZ16_uart::calibrateZero() {
	writeCommand( zerocalib );
}

void MHZ16_uart::calibrateSpan(int ppm) {
	if( ppm < 1000 )	return;

	uint8_t com[MHZ16_uart::REQUEST_CNT];
	for(int i=0; i<MHZ16_uart::REQUEST_CNT; i++) {
		com[i] = spancalib[i];
	}
	com[3] = (uint8_t)(ppm/256);
	com[4] = (uint8_t)(ppm%256);
	writeCommand( com );
}

int MHZ16_uart::getPPM() {
	return getSerialData();
}

boolean MHZ16_uart::isWarming(){
	return millis() <= _start_millis + PREHEAT_MS;
}

//protected
void MHZ16_uart::writeCommand(uint8_t cmd[]) {
	writeCommand(cmd,NULL);
}

void MHZ16_uart::writeCommand(uint8_t cmd[], uint8_t* response) {
#ifdef ARDUINO_ARCH_ESP32
	HardwareSerial hserial(_serialno);
	hserial.begin(9600, SERIAL_8N1, _rx_pin, _tx_pin);
#else
	SoftwareSerial hserial(_rx_pin, _tx_pin);
	hserial.begin(9600);
#endif
    hserial.write(cmd, REQUEST_CNT);
	hserial.write(MHZ16_checksum(cmd));
	hserial.flush();

	if (response != NULL) {
		int i = 0;
		while(hserial.available() <= 0) {
			if( ++i > WAIT_READ_TIMES ) {
				Serial.println("error: can't get MH-Z16 response.");
				return;
			}
			yield();
			delay(WAIT_READ_DELAY);
		}
		hserial.readBytes(response, MHZ16_uart::RESPONSE_CNT);
	}

}

//private

int MHZ16_uart::getSerialData() {
	uint8_t buf[MHZ16_uart::RESPONSE_CNT];
	for( int i=0; i<MHZ16_uart::RESPONSE_CNT; i++){
		buf[i]=0x0;
	}

	writeCommand(getppm, buf);
	int co2 = 0, co2temp = 0, co2status =  0;

	// parse
	if (buf[0] == 0xff && buf[1] == 0x86 && MHZ16_checksum(buf) == buf[MHZ16_uart::RESPONSE_CNT-1]) {
		co2 = buf[2] * 256 + buf[3];
	} else {
		co2 = co2temp = co2status = -1;
	}
	return co2;
}

uint8_t MHZ16_uart::MHZ16_checksum( uint8_t com[] ) {
	uint8_t sum = 0x00;
	for ( int i = 1; i < MHZ16_uart::REQUEST_CNT; i++) {
		sum += com[i];
	}
	sum = 0xff - sum + 0x01;
	return sum;
}
It ran second time on one of my Arduino devices (after I figured out how to configure the serial port pins) and though intended for an ESP8266 device this is the library I will field test.
#include <MHZ16_uart.h>

//Select 2 digital pins as SoftwareSerial's Rx and Tx. For example, Rx=2 Tx=3
MHZ16_uart mySensor(4,5);

void setup()
{
  Serial.begin(9600);

  mySensor.begin(4,5);
}


void loop()
{
  if ( !mySensor.isWarming())
  {
    Serial.print("CO2 Concentration is ");
    Serial.print(mySensor.getPPM());
    Serial.println("ppm");
  }
  else
{
    Serial.println("isWarming");
  }

  delay(10000);
}
This was just a sample of the libraries I found on GitHub if I missed a good a library contact me via the comments.
I increased delay between readings to 10sec and reduced the baud rate of the serial logging to 9600baud.
/*
  This test code is write for Arduino AVR Series(UNO, Leonardo, Mega)
  If you want to use with LinkIt ONE, please connect the module to D0/1 and modify:

  // #include <SoftwareSerial.h>
  // SoftwareSerial s_serial(2, 3);      // TX, RX

  #define sensor Serial1
*/


#include <SoftwareSerial.h>
SoftwareSerial s_serial(2, 3);      // TX, RX

#define sensor s_serial

const unsigned char cmd_get_sensor[] =
{
    0xff, 0x01, 0x86, 0x00, 0x00,
    0x00, 0x00, 0x00, 0x79
};

unsigned char dataRevice[9];
int temperature;
int CO2PPM;

void setup()
{
    sensor.begin(9600);
    Serial.begin(9600);
    Serial.println("get a 'g', begin to read from sensor!");
    Serial.println("********************************************************");
    Serial.println();
}

void loop()
{
    if(dataRecieve())
    {
        Serial.print("Temperature: ");
        Serial.print(temperature);
        Serial.print("  CO2: ");
        Serial.print(CO2PPM);
        Serial.println("");
    }
    delay(10000);
}

bool dataRecieve(void)
{
    byte data[9];
    int i = 0;

    //transmit command data
    for(i=0; i<sizeof(cmd_get_sensor); i++)
    {
        sensor.write(cmd_get_sensor[i]);
    }
    delay(10);
    //begin reveiceing data
    if(sensor.available())
    {
        while(sensor.available())
        {
            for(int i=0;i<9; i++)
            {
                data[i] = sensor.read();
            }
        }
    }

    for(int j=0; j<9; j++)
    {
        Serial.print(data[j]);
        Serial.print(" ");
    }
    Serial.println("");

    if((i != 9) || (1 + (0xFF ^ (byte)(data[1] + data[2] + data[3] + data[4] + data[5] + data[6] + data[7]))) != data[8])
    {
        return false;
    }

    CO2PPM = (int)data[2] * 256 + (int)data[3];
    temperature = (int)data[4] - 40;

    return true;
}
The debug output wasn’t too promising there weren’t any C02 parts per million (ppm) values and the response payloads looked wrong. So I downloaded the MH-Z16 NDIR CO2 Sensor datasheet for some background. The datasheet didn’t mention any temperature data in the message payloads so I removed that code.
The response payload validation code was all on one line and hard to figure out what it was doing.
To make debugging easier I split the payload validation code into several steps so I could see what was failing.
/*
  This test code is write for Arduino AVR Series(UNO, Leonardo, Mega)
  If you want to use with LinkIt ONE, please connect the module to D0/1 and modify:

  // #include <SoftwareSerial.h>
  // SoftwareSerial s_serial(2, 3);      // TX, RX

  #define sensor Serial1
*/


#include <SoftwareSerial.h>
SoftwareSerial s_serial(2, 3);      // TX, RX

#define sensor s_serial

const unsigned char cmd_get_sensor[] =
{
    0xff, 0x01, 0x86, 0x00, 0x00,
    0x00, 0x00, 0x00, 0x79
};

unsigned char dataRevice[9];
int CO2PPM;

void setup()
{
    sensor.begin(9600);
    Serial.begin(9600);
    Serial.println("get a 'g', begin to read from sensor!");
    Serial.println("********************************************************");
    Serial.println();
}

void loop()
{
    if(dataRecieve())
    {
        Serial.print("  CO2: ");
        Serial.print(CO2PPM);
        Serial.println("");
    }
    delay(10000);
}

bool dataRecieve(void)
{
    byte data[9];
    int i = 0;

    //transmit command data
    for(i=0; i<sizeof(cmd_get_sensor); i++)
    {
        sensor.write(cmd_get_sensor[i]);
    }
    delay(10);
    //begin reveiceing data
    if(sensor.available())
    {
        while(sensor.available())
        {
            for(int i=0;i<9; i++)
            {
                data[i] = sensor.read();
            }
        }
    }

    for(int j=0; j<9; j++)
    {
        Serial.print(data[j]);
        Serial.print(" ");
    }
    Serial.println("");

    // First calculate then validate the check sum as there is no point in proceeding if the packet is corrupted. (code inspired by datasheet algorithm)
    byte checksum = 0 ;
    for(int j=1; j<8; j++)
    {
      checksum += data[j];
    }
    checksum=0xff-checksum;
    checksum+=1;

    if  (checksum != data[8])
    {
      Serial.println("Error checksum");
      return false;
    }

    // Then check the start byte to make sure response is what we were expecting
    if ( data[0] != 0xFF )
    {
        Serial.println("Error start byte");
        return false;
    }

    // Then check the command byte to make sure response is what we were expecting
    if ( data[1] != 0x86 )
    {
        Serial.println("Error command");
        return false;
    }


    CO2PPM = (int)data[2] * 256 + (int)data[3];

    return true;
}
From these modifications I could see the payload was messed up and based on the datasheet message descriptions it looked like it was offset by a byte or two.
I had a look at the code and the delay(10) after sending the sensor reading request message caught my attention. I have found that often delay(x) commands are used to “tweak” the code to get it to work.
These “tweaks” often break when code is run on a different device or sensor firmware is updated changing the timing of individual bytes, or request-response processes.
I removed the delay(10) replaced it with a serial.flush() and changed the code to display the payload bytes in hexadecimal.
/*
  This test code is write for Arduino AVR Series(UNO, Leonardo, Mega)
  If you want to use with LinkIt ONE, please connect the module to D0/1 and modify:

  // #include <SoftwareSerial.h>
  // SoftwareSerial s_serial(2, 3);      // TX, RX

  #define sensor Serial1
*/


#include <SoftwareSerial.h>
SoftwareSerial s_serial(2, 3);      // TX, RX

#define sensor s_serial

const unsigned char cmd_get_sensor[] =
{
    0xff, 0x01, 0x86, 0x00, 0x00,
    0x00, 0x00, 0x00, 0x79
};

unsigned char dataRevice[9];
int CO2PPM;

void setup()
{
    sensor.begin(9600);
    Serial.begin(9600);
    Serial.println("get a 'g', begin to read from sensor!");
    Serial.println("********************************************************");
    Serial.println();
}

void loop()
{
    if(dataRecieve())
    {
        Serial.print("  CO2: ");
        Serial.print(CO2PPM);
        Serial.println("");
    }
    delay(10000);
}

bool dataRecieve(void)
{
    byte data[9];
    int i = 0;

    //transmit command data
    for(i=0; i<sizeof(cmd_get_sensor); i++)
    {
        sensor.write(cmd_get_sensor[i]);
    }
    Serial.flush();

    //begin reveiceing data
    if(sensor.available())
    {
        while(sensor.available())
        {
            for(int i=0;i<9; i++)
            {
                data[i] = sensor.read();
            }
        }
    }

    for(int j=0; j<9; j++)
    {
        Serial.print(data[j],HEX);
        Serial.print(" ");
    }
    Serial.println("");

    // First calculate then validate the check sum as there is no point in proceeding if the packet is corrupted. (code inspired by datasheet algorithm)
    byte checksum = 0 ;
    for(int j=1; j<8; j++)
    {
      checksum += data[j];
    }
    checksum=0xff-checksum;
    checksum+=1;

    if  (checksum != data[8])
    {
      Serial.println("Error checksum");
      return false;
    }

    // Then check the start byte to make sure response is what we were expecting
    if ( data[0] != 0xFF )
    {
        Serial.println("Error start byte");
        return false;
    }

    // Then check the command byte to make sure response is what we were expecting
    if ( data[1] != 0x86 )
    {
        Serial.println("Error command");
        return false;
    }


    CO2PPM = (int)data[2] * 256 + (int)data[3];

    return true;
}
The initial values from the sensor were a bit high, but after leaving the device running for 3 minutes (Preheat time in the documentation) they settled down into a reasonable range