Training a model with Azure AI Machine Learning

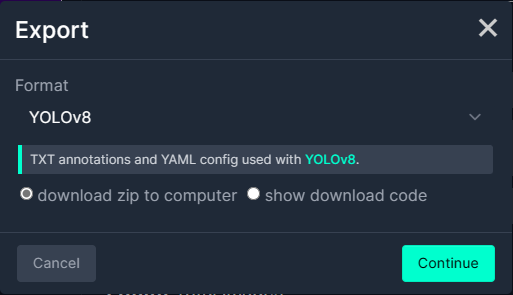
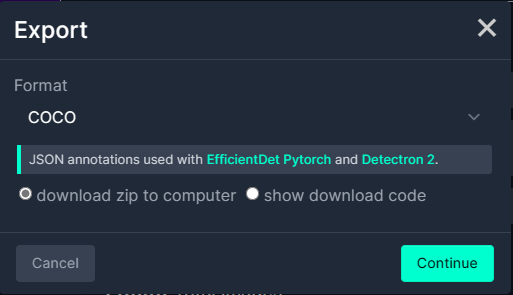
I exported the Tennis Ball by Ugur Ozdemir dataset in a suitable format I could use it to train a model using the Visual Studio 2022 ML.Net support. The first step was to export the Tennis Ball dataset in COCO (Common Objects in Context) format.

Exporting Tennis ball dataset in COCO format

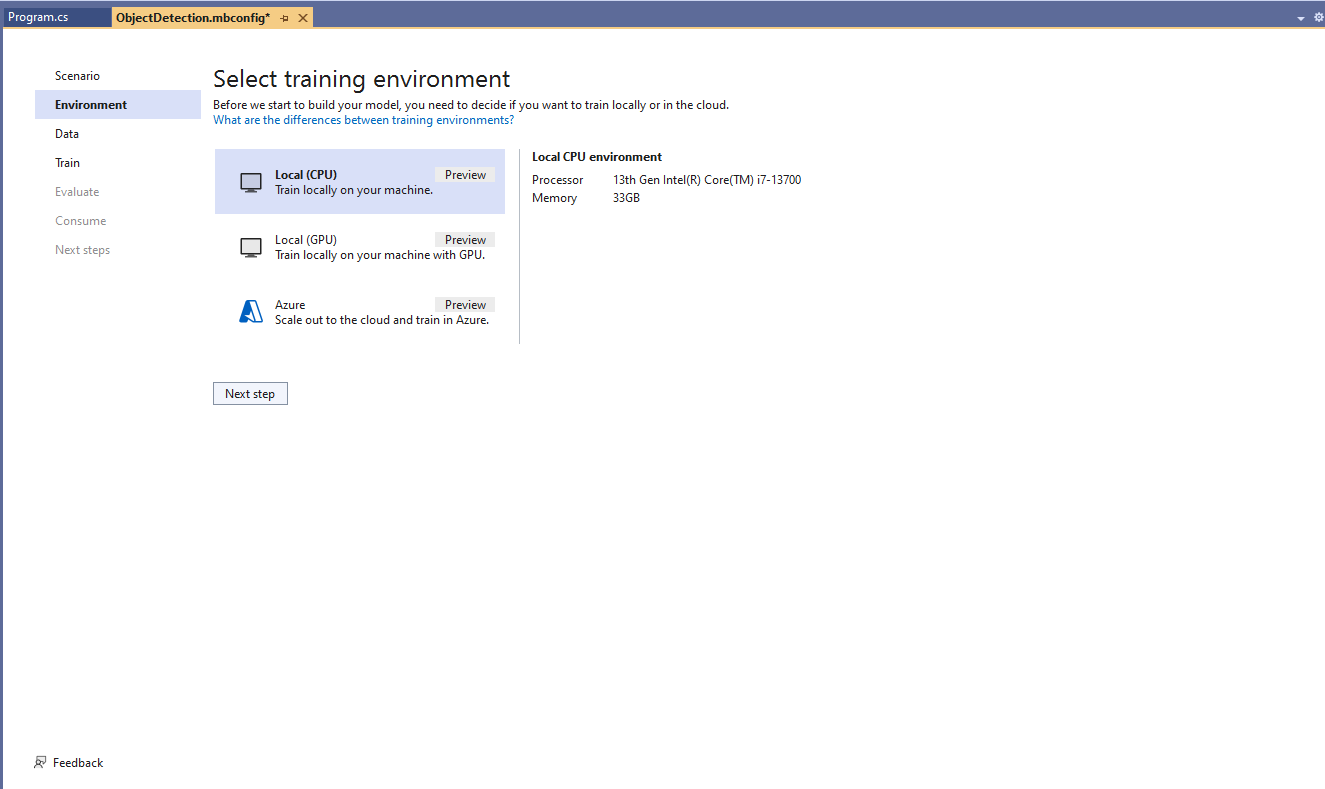
My development box doesn’t have a suitable Local(GPU) and Local(CPU) training failed

Local CPU selected for model training

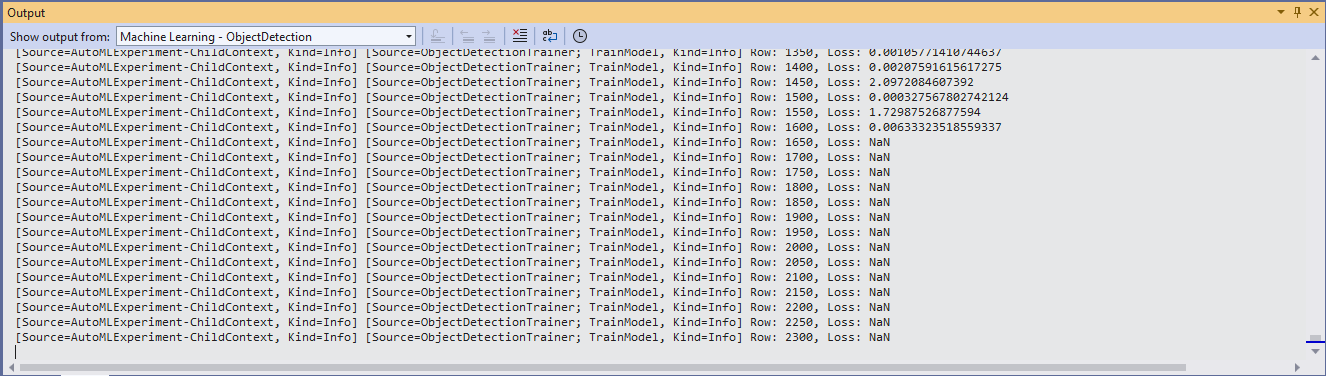
After a couple of hours training the in the Visual Studio 2022 the output “Loss” value was NaN and the training didn’t end successfully.

Local CPU model training failure

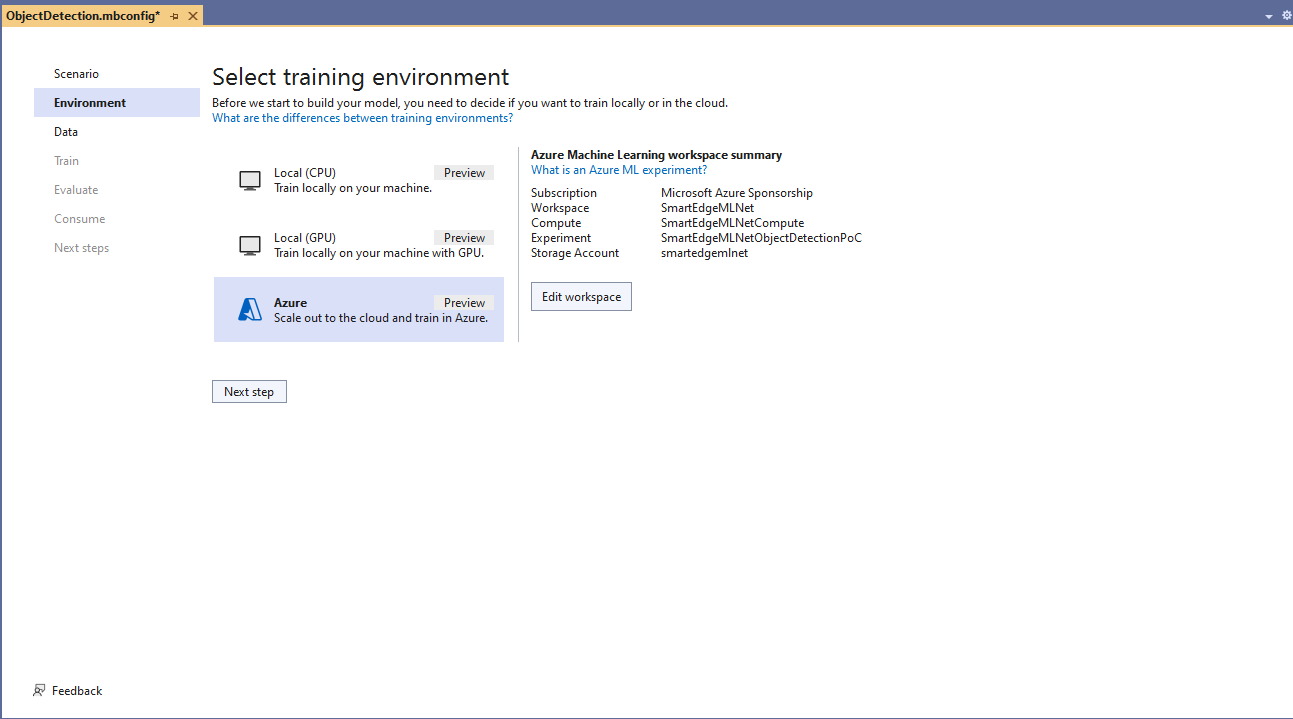
Training with Local(CPU) failed so I then tried again with ML.Net Azure Machine Learning option.

Azure Machine Learning selected for model training

The configuration of my Azure Machine Learning experiment which represent the collection of trials used took much longer than expected.

Insufficient SKUs available in Australia East

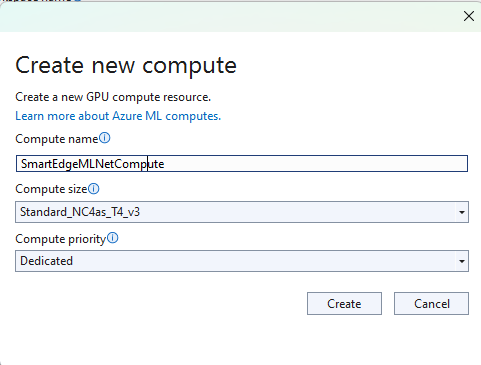
Initially my subscription had Insufficient Standard NC4as_T4_v3 SKUs in Australia East so I had to request a quota increase which took a couple of support tickets.

Training Environment Provisioned
Uploading the model training dataset

I do wonder why they include Microsoft’s Visual Object Tagging Tool(VOTT) format as an option because there has been no work done on the project since late 2021.

Uploading the model validation dataset

I need to check how the Roboflow dataset was loaded (I think possibly only the training dataset was loaded, so that was split into training and test datasets) and trial different configurations.

I like the machine generated job names “frank machine”, “tough fowl” and “epic chicken”.

Azure Machine Learning Job list

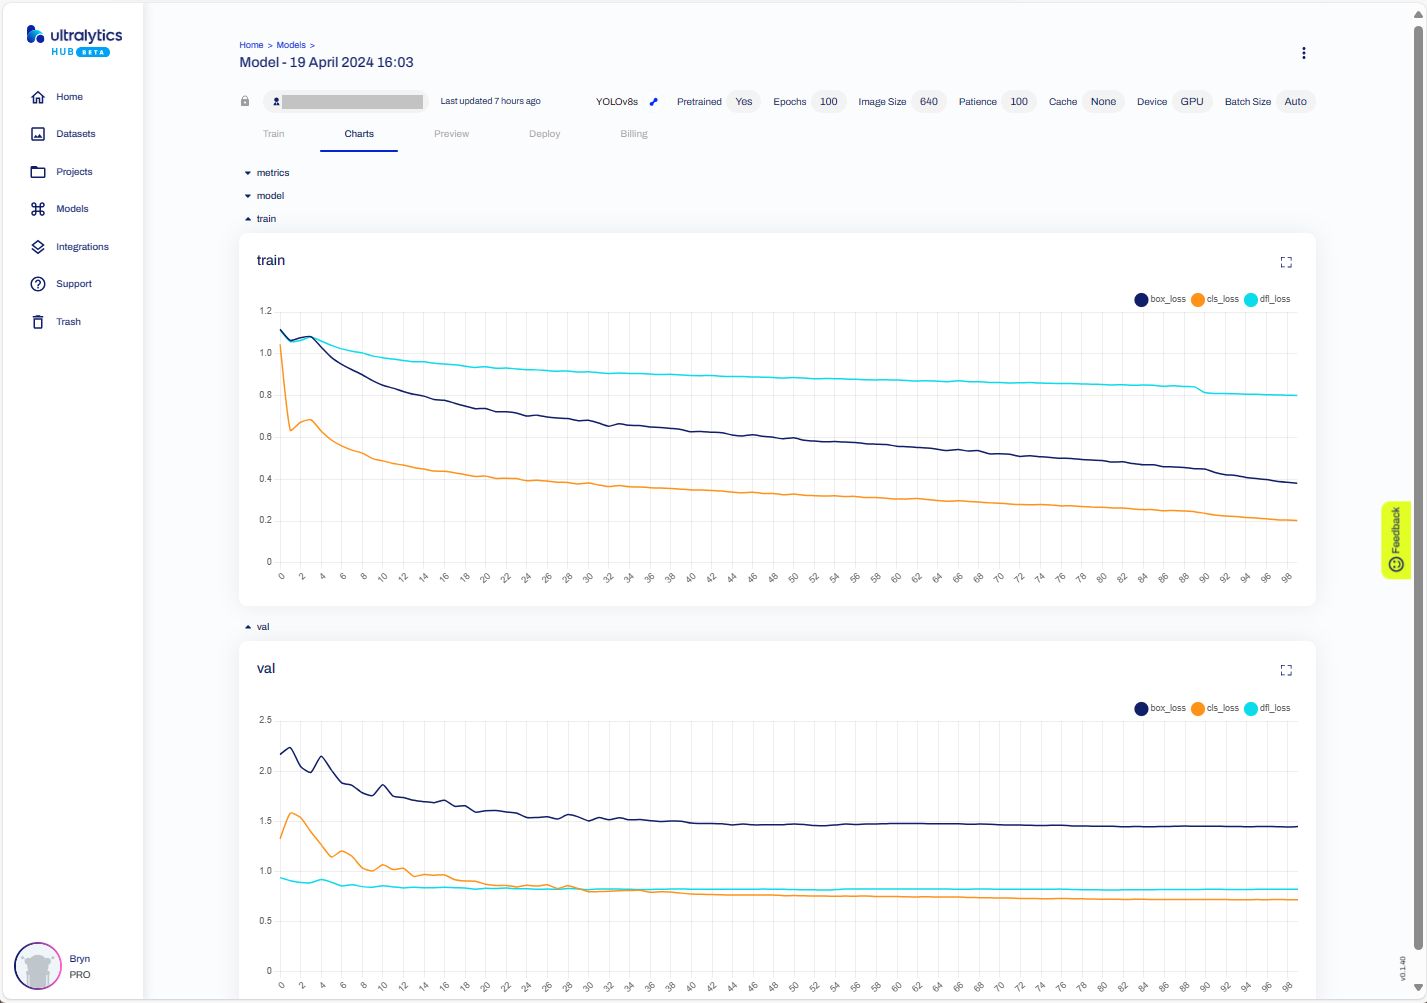
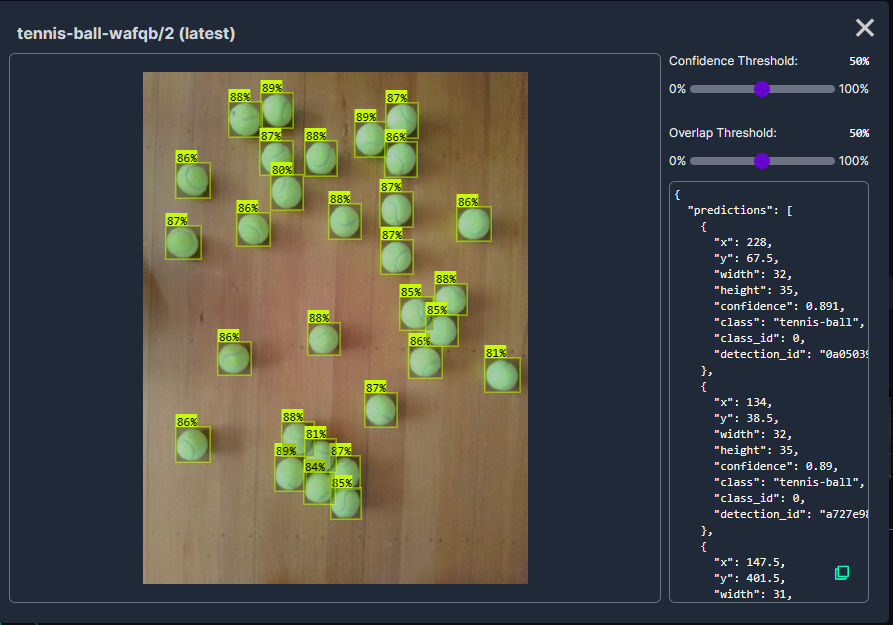
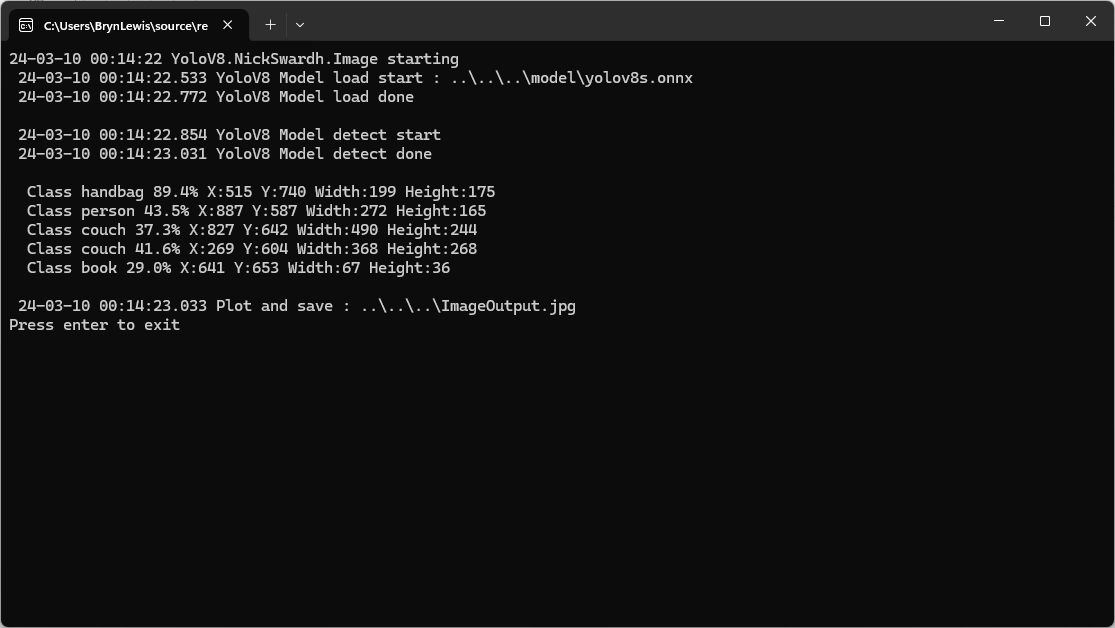
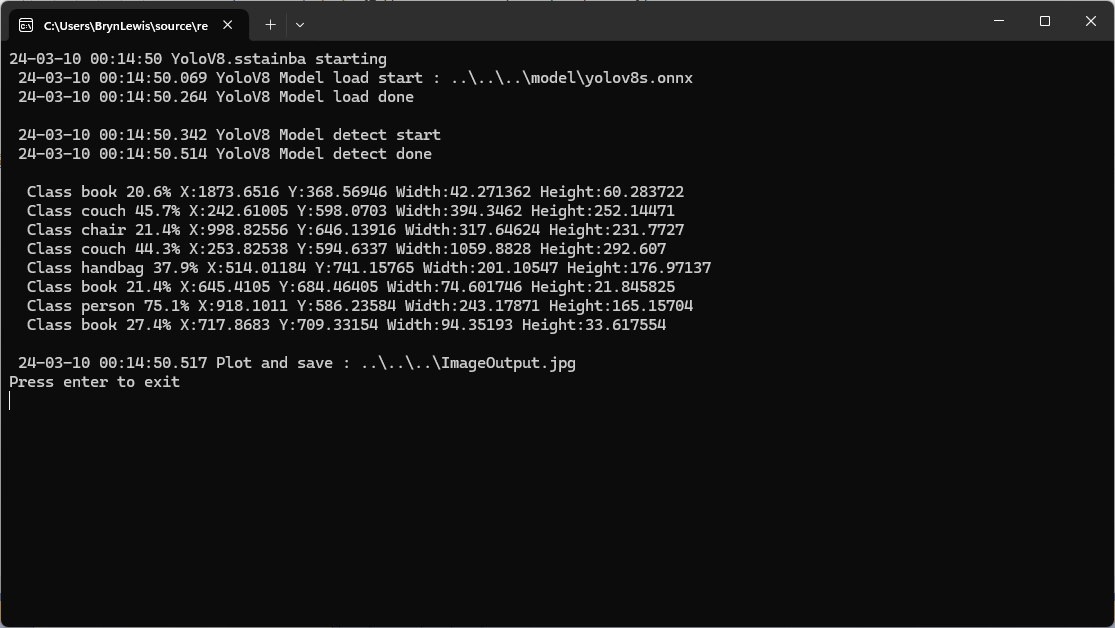
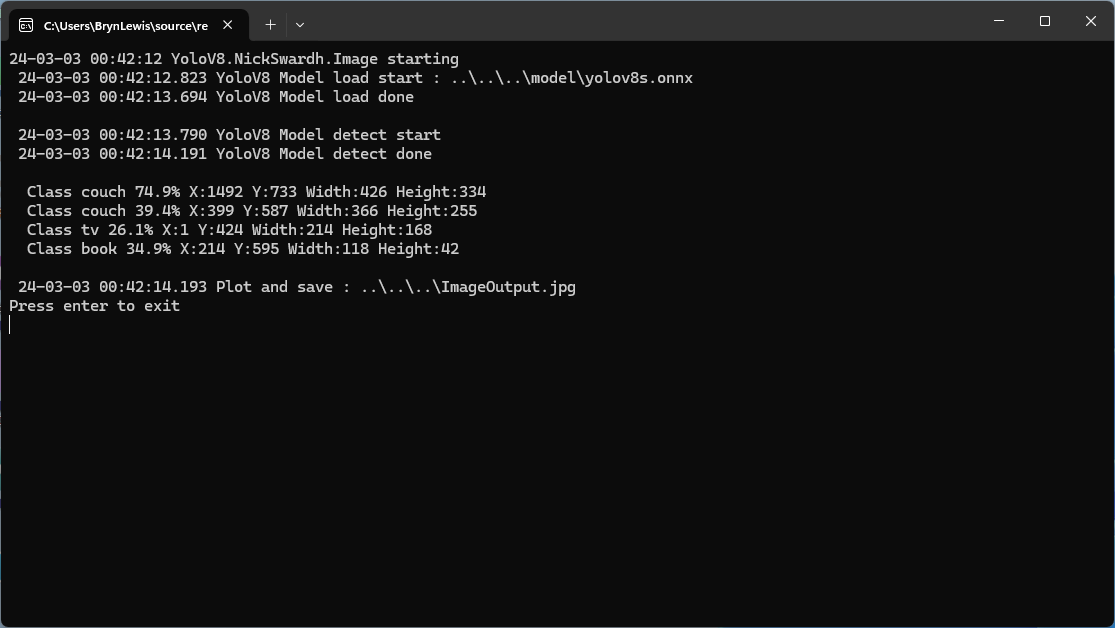
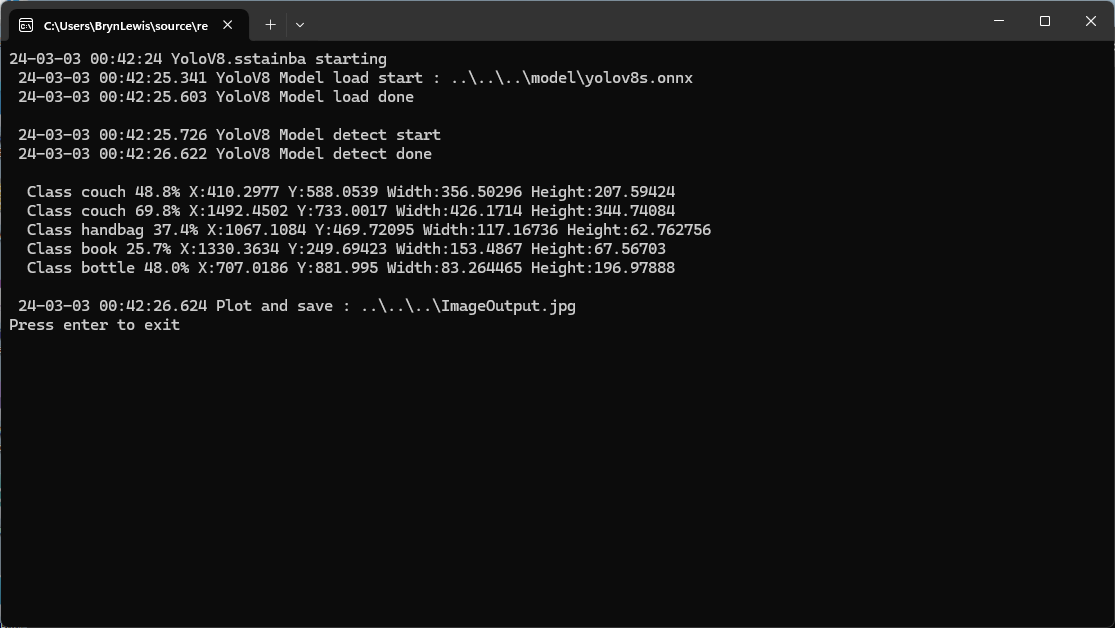
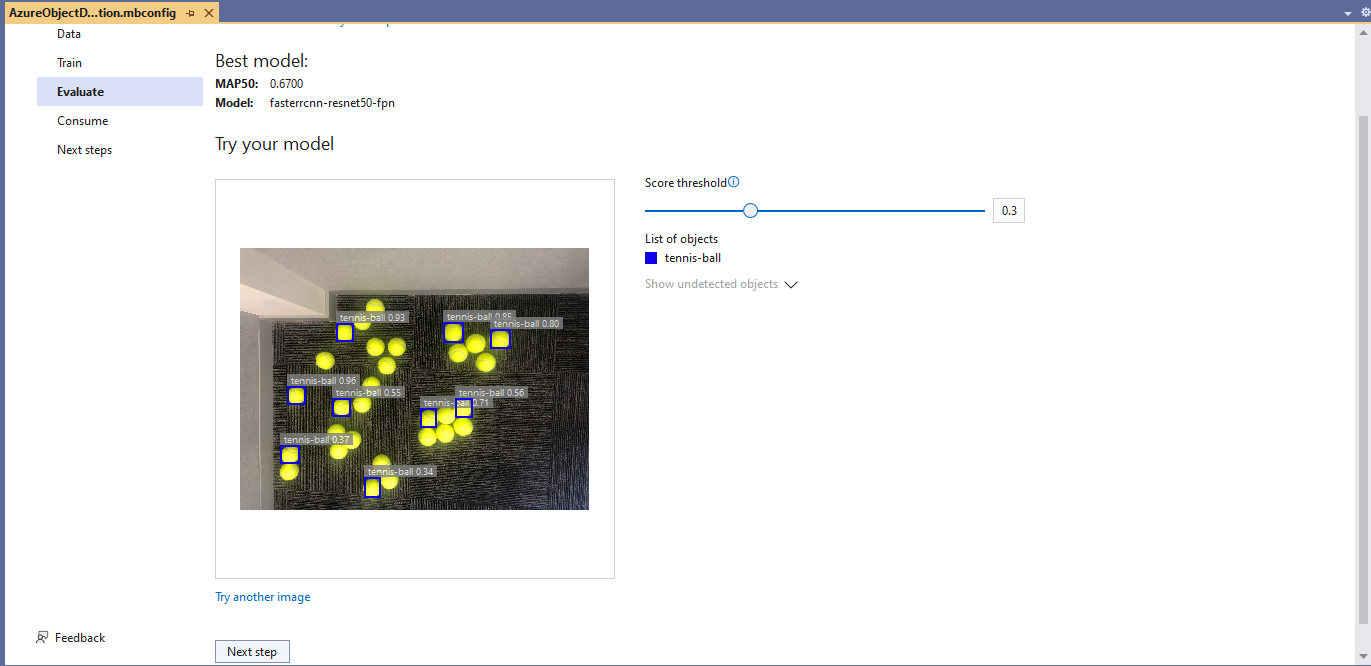
I found my Ultralytics YoloV8 model coped better with different backgrounds and tennis ball colours.

Evaluating model with tennis balls on my living room floor
Evaluating model with tennis balls on the office floor

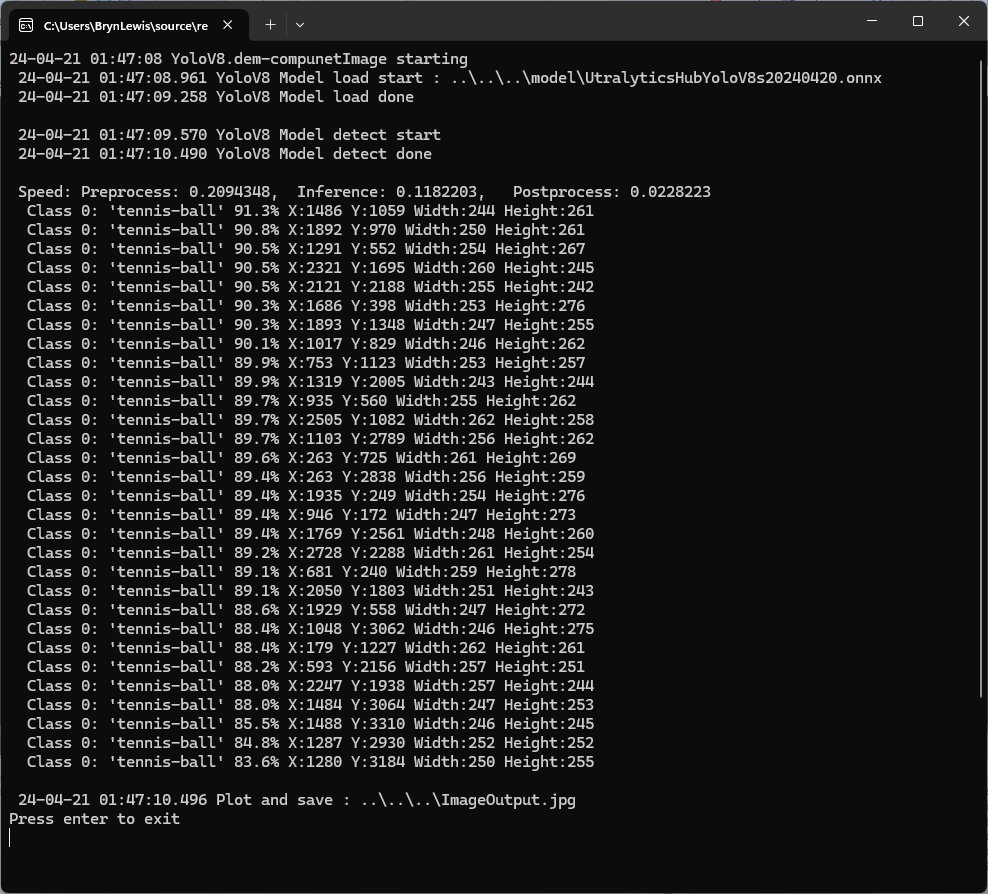
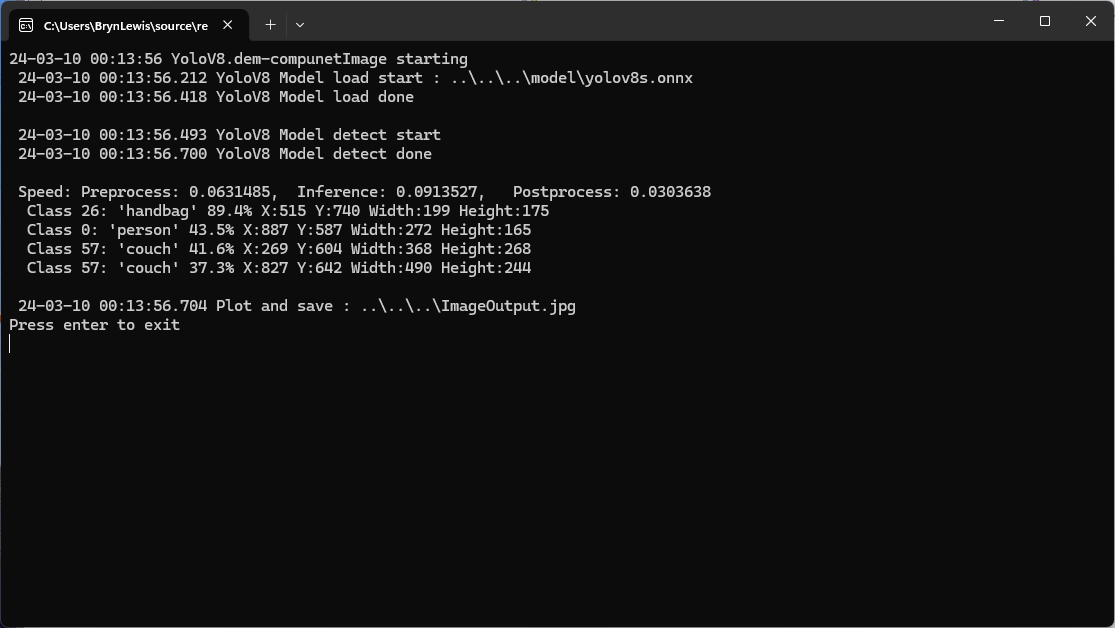
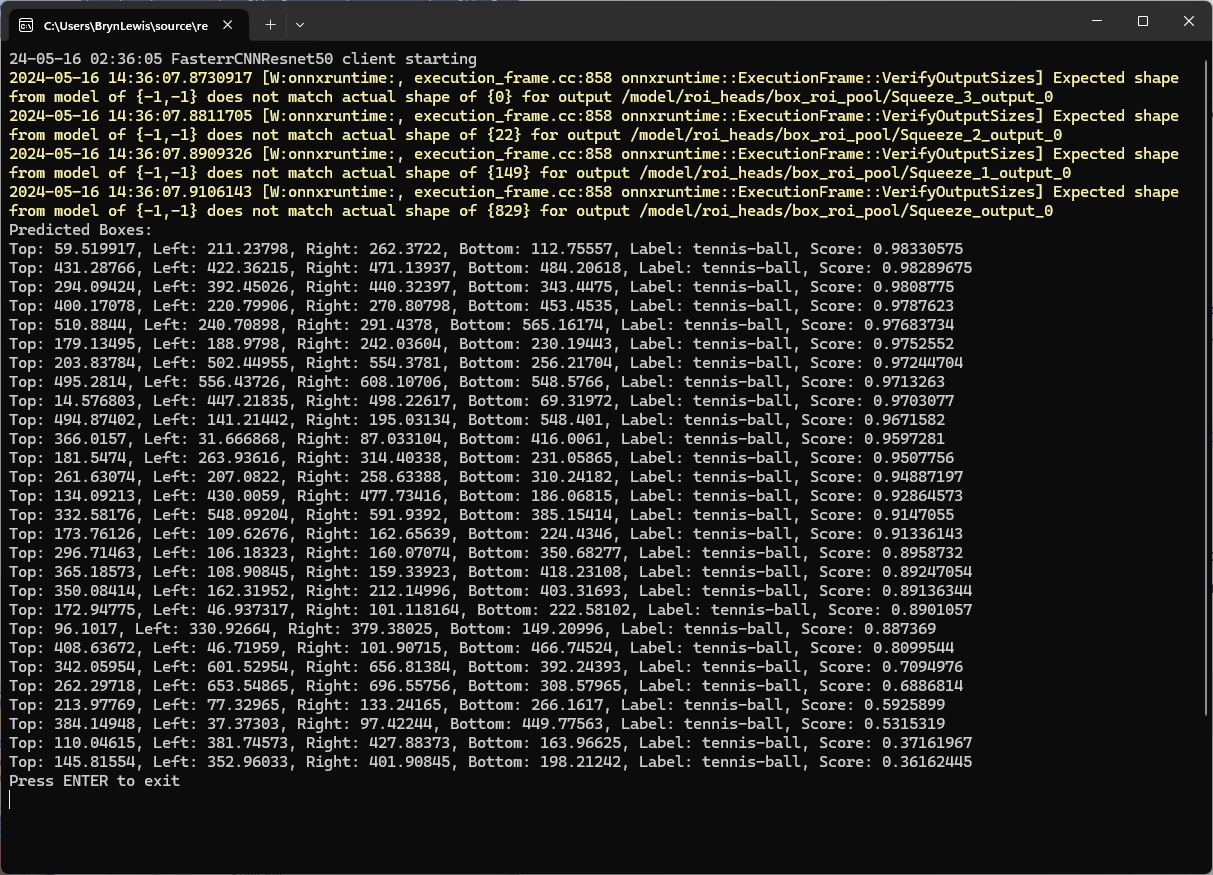
I used the “generated” code to consume the model with a simple console application.

Visual Studio 2022 ML.Net Integration client code generation
static async Task Main()
{
   Console.WriteLine($"{DateTime.UtcNow:yy-MM-dd HH:mm:ss} FasterrCNNResnet50 client starting");

   try
   {
      // load the app settings into configuration
      var configuration = new ConfigurationBuilder()
            .AddJsonFile("appsettings.json", false, true)
      .Build();

      Model.ApplicationSettings _applicationSettings = configuration.GetSection("ApplicationSettings").Get<Model.ApplicationSettings>();

      // Create single instance of sample data from first line of dataset for model input
      var image = MLImage.CreateFromFile(_applicationSettings.ImageInputPath);

      AzureObjectDetection.ModelInput sampleData = new AzureObjectDetection.ModelInput()
      {
         ImageSource = image,
      };

      // Make a single prediction on the sample data and print results.
      var predictionResult = AzureObjectDetection.Predict(sampleData);

      Console.WriteLine("Predicted Boxes:");
      Console.WriteLine(predictionResult);
   }
   catch (Exception ex)
   {
      Console.WriteLine($"{DateTime.UtcNow:yy-MM-dd HH:mm:ss} MQTTnet.Publish failed {ex.Message}");
   }

   Console.WriteLine("Press ENTER to exit");
   Console.ReadLine();
}

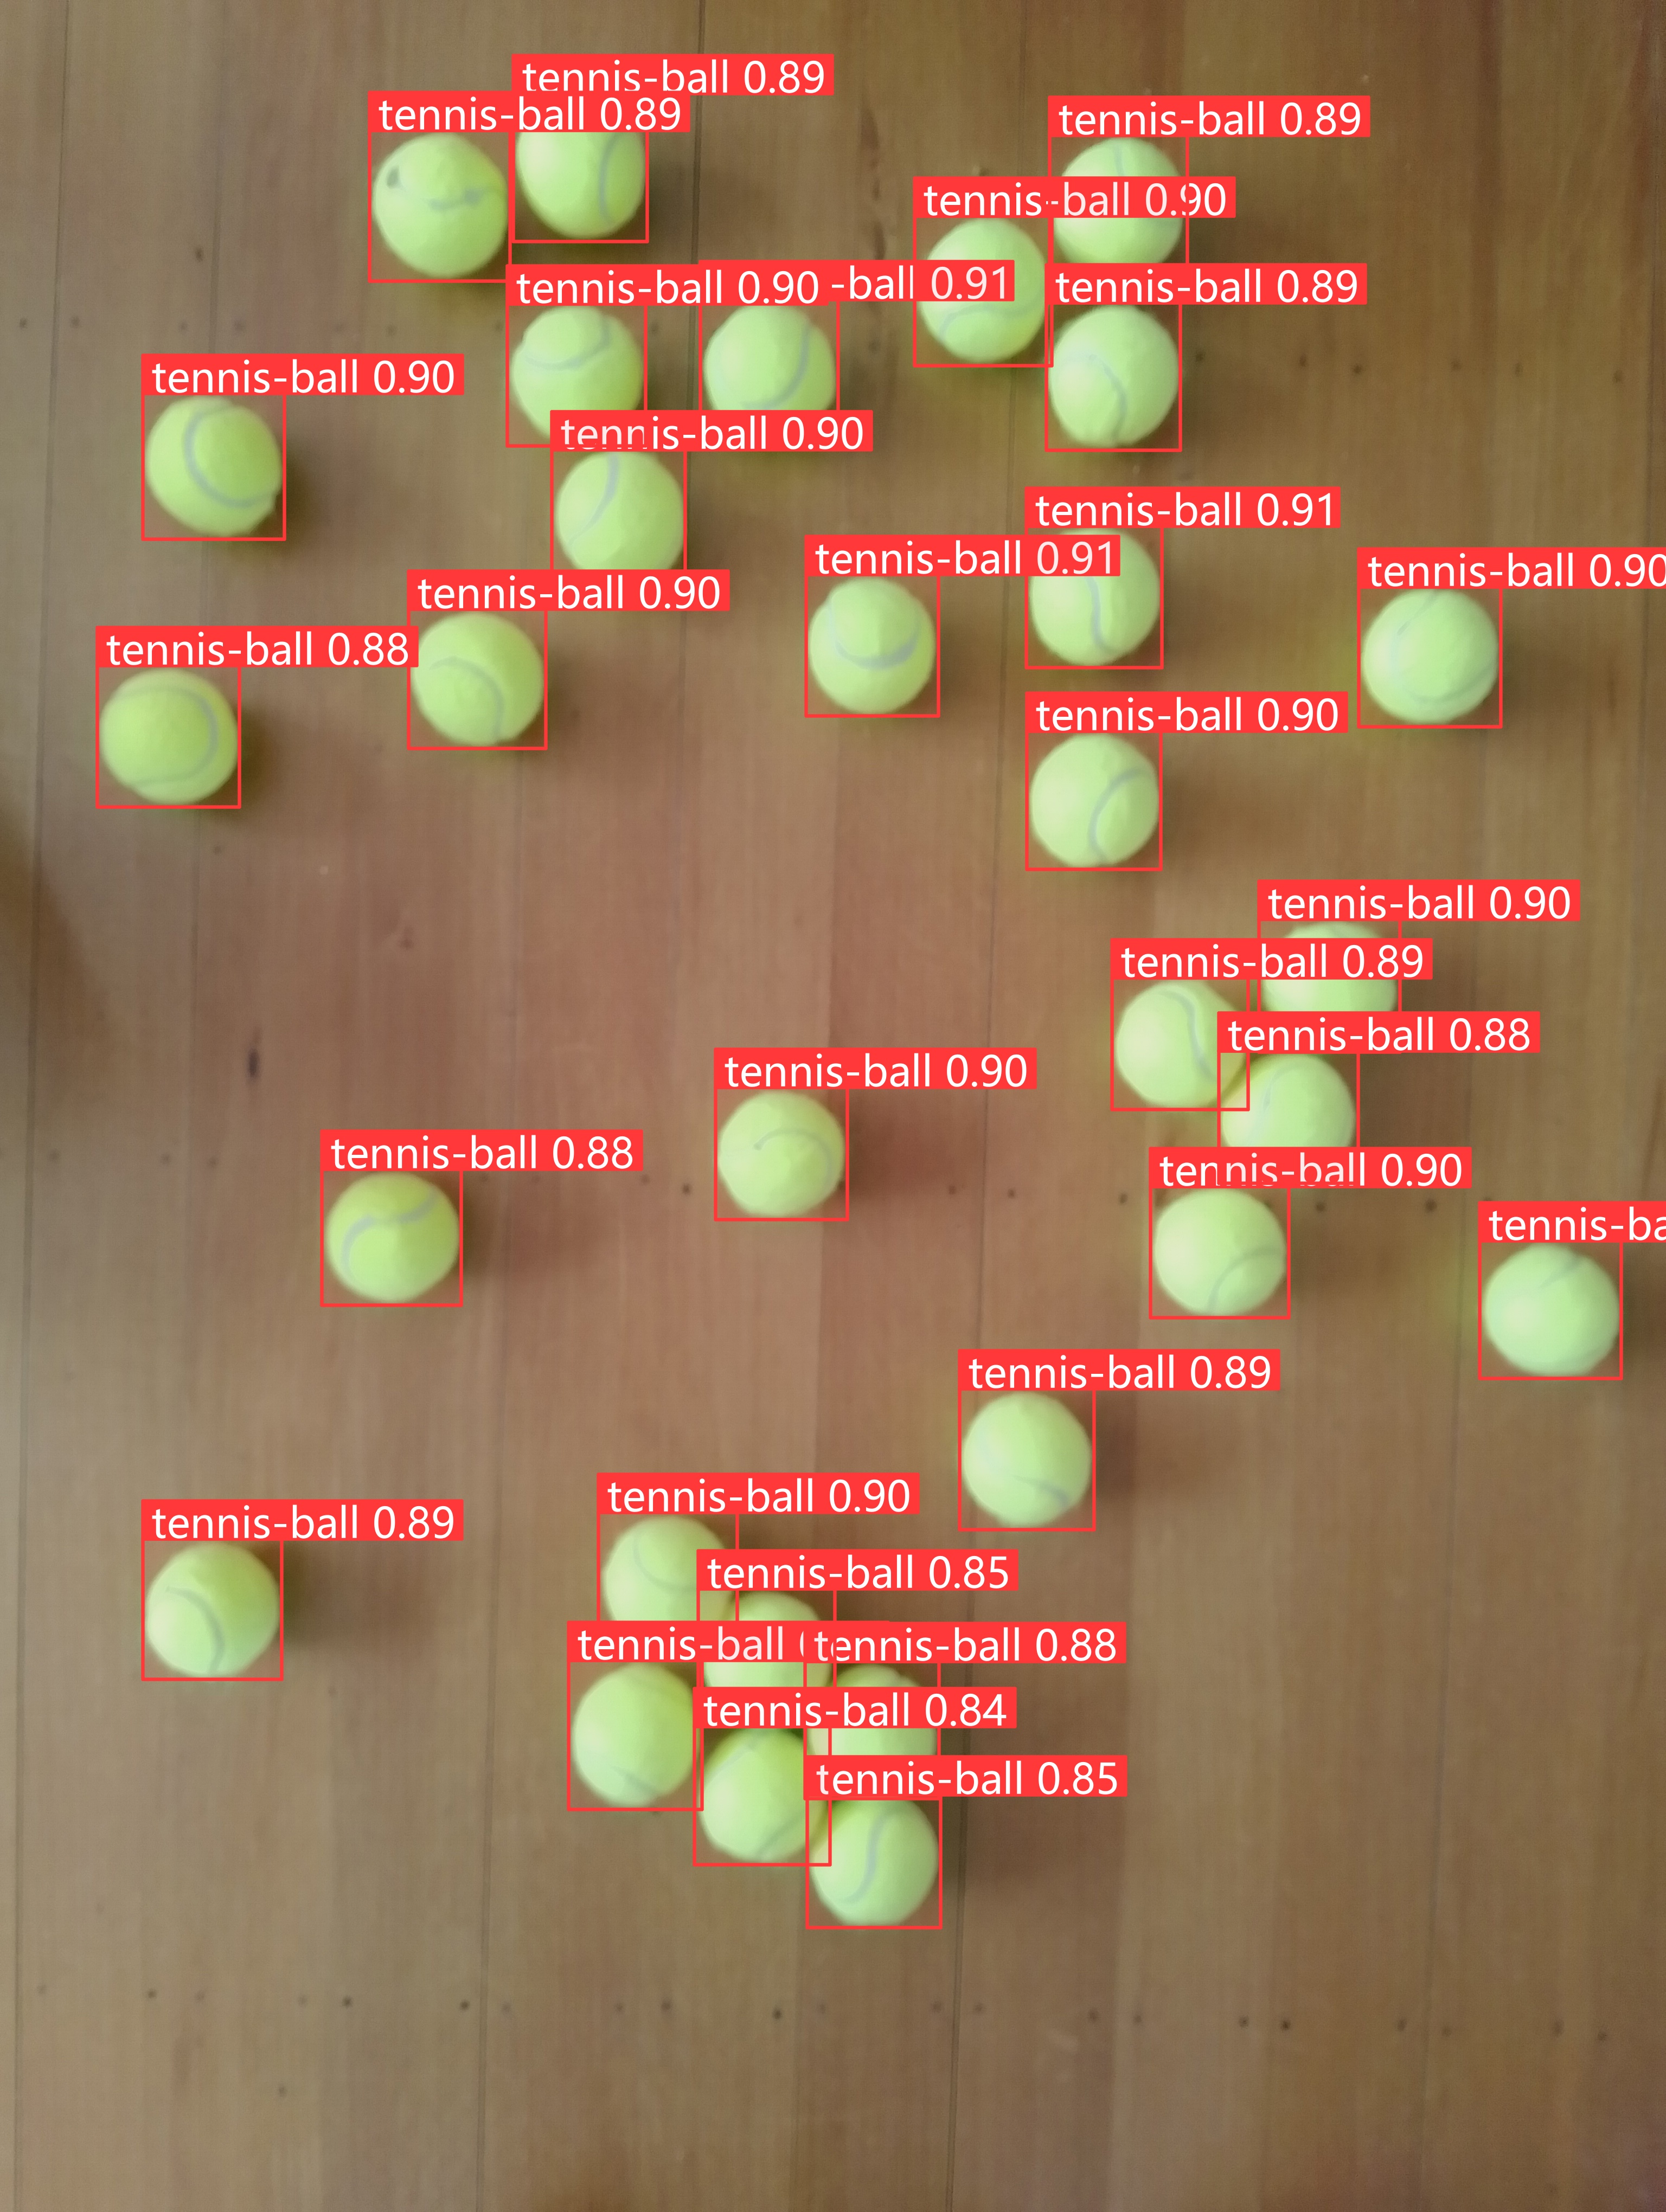
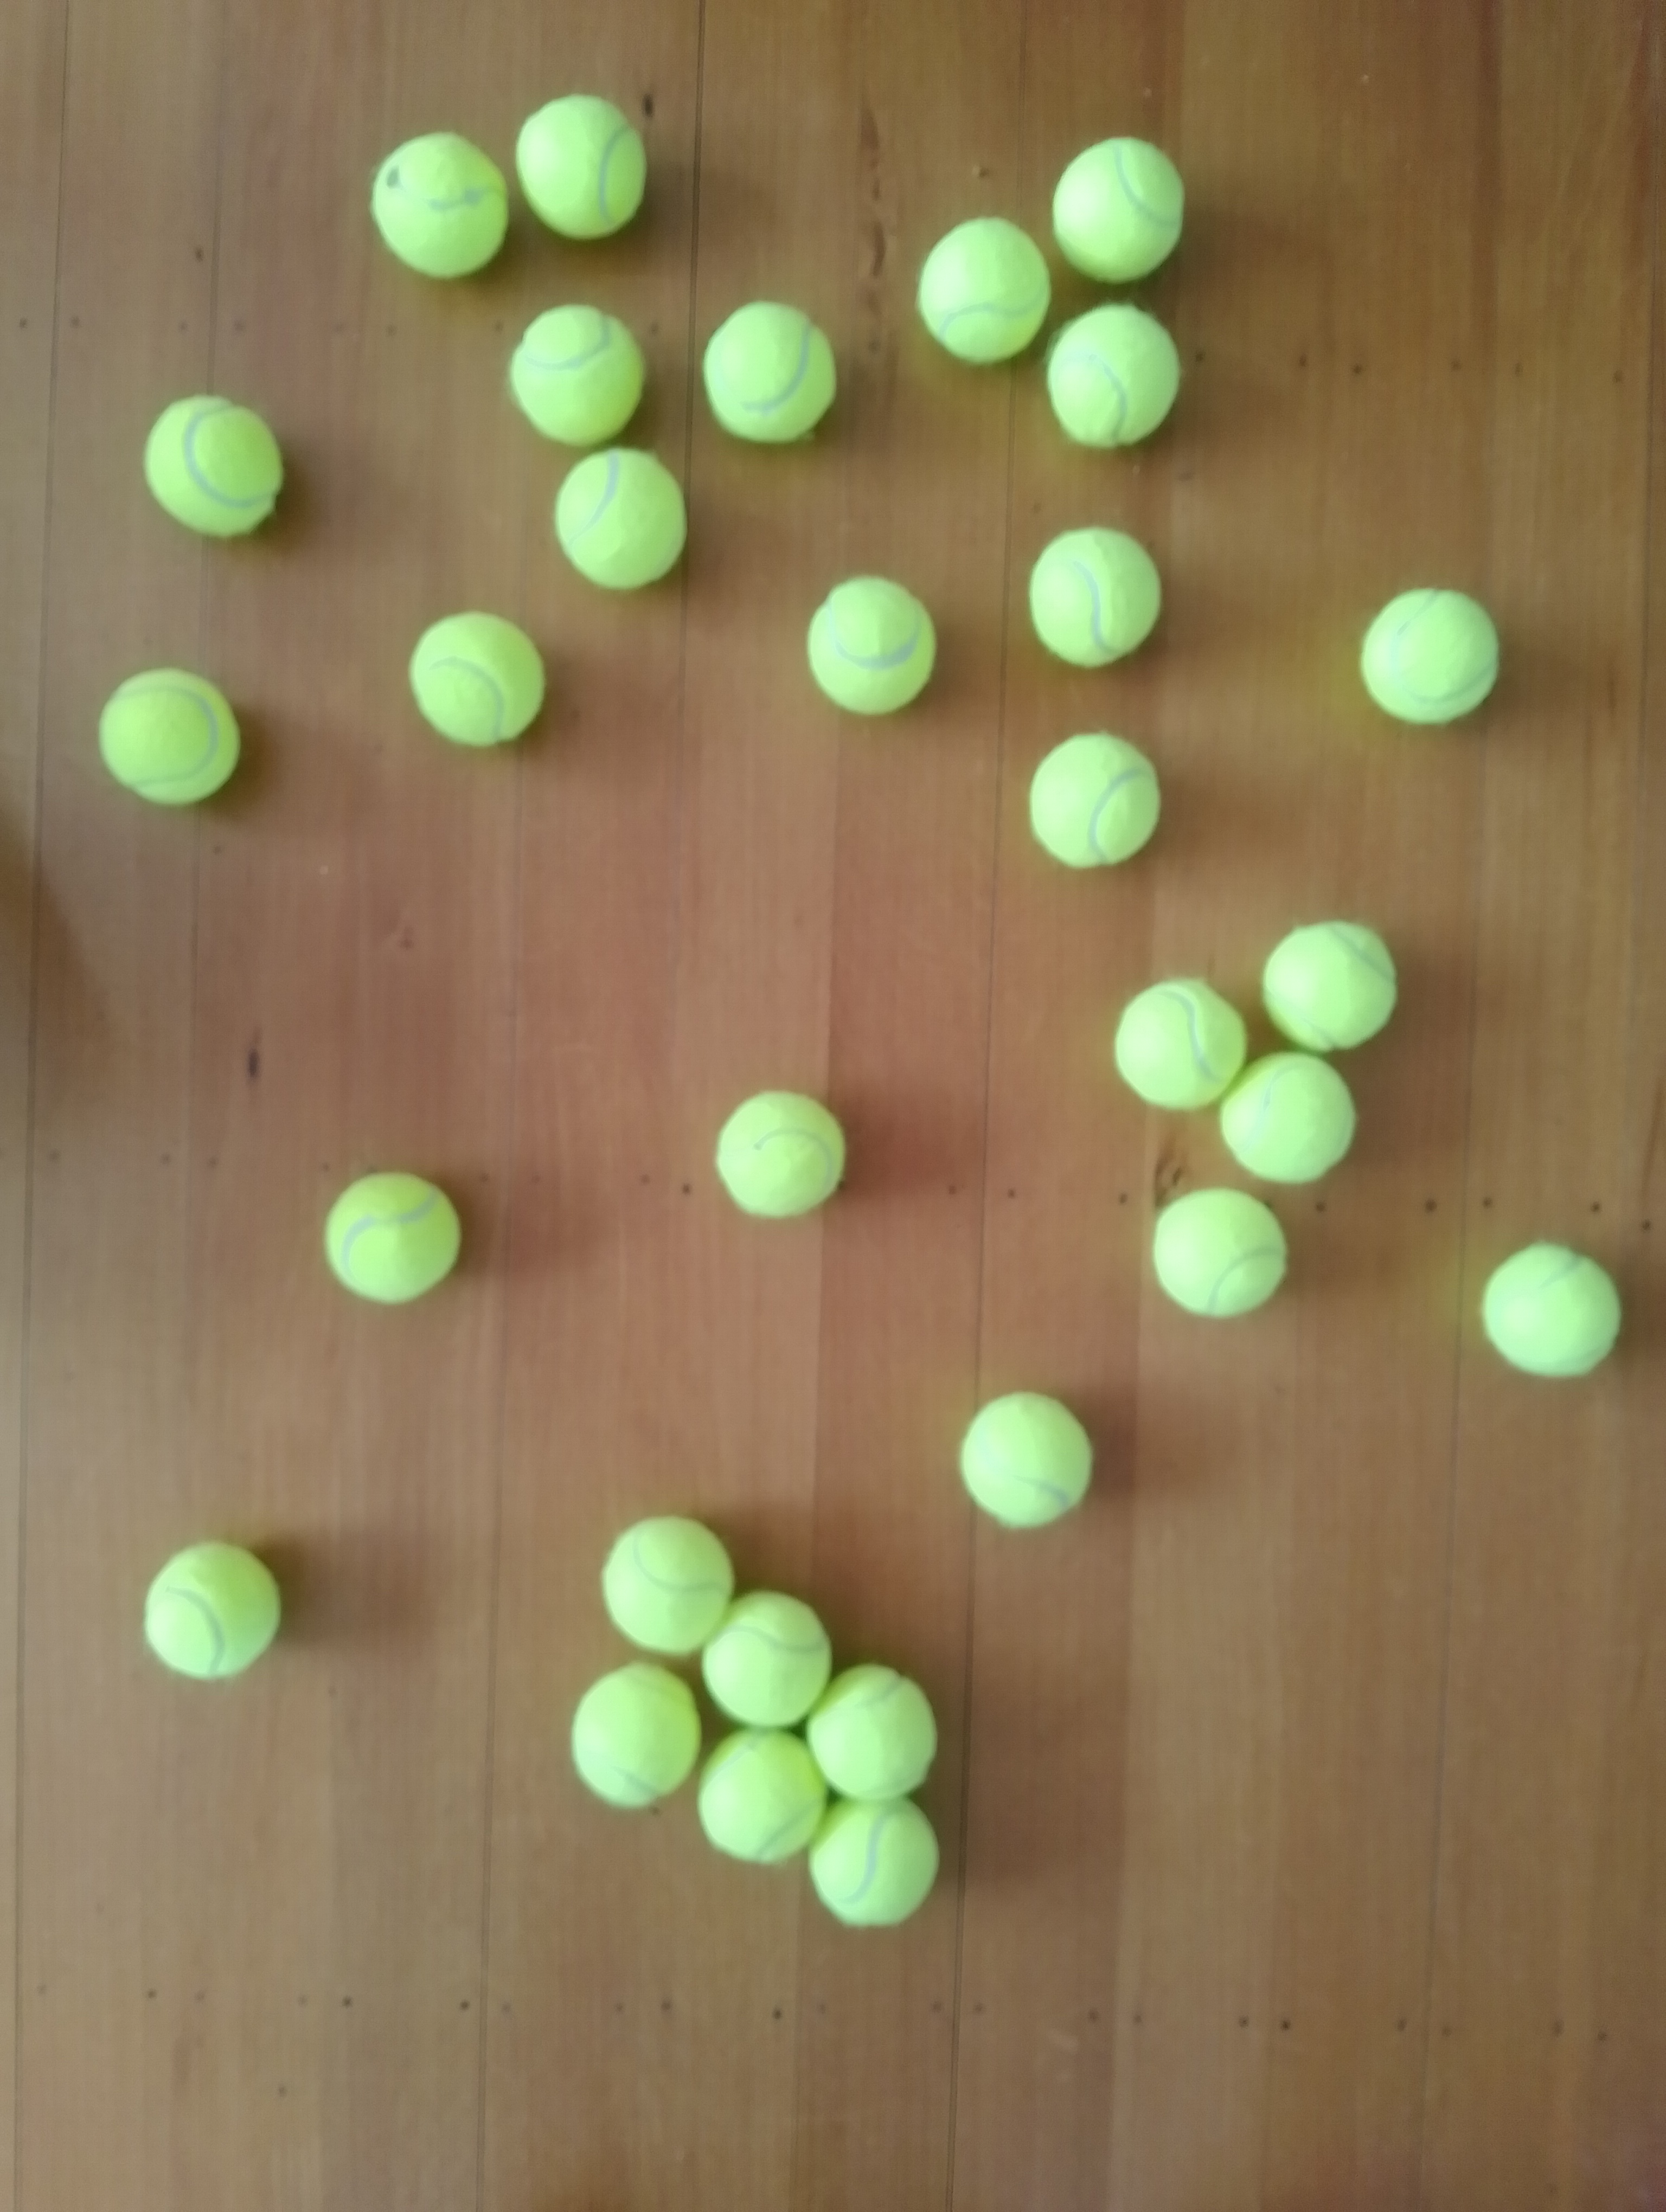
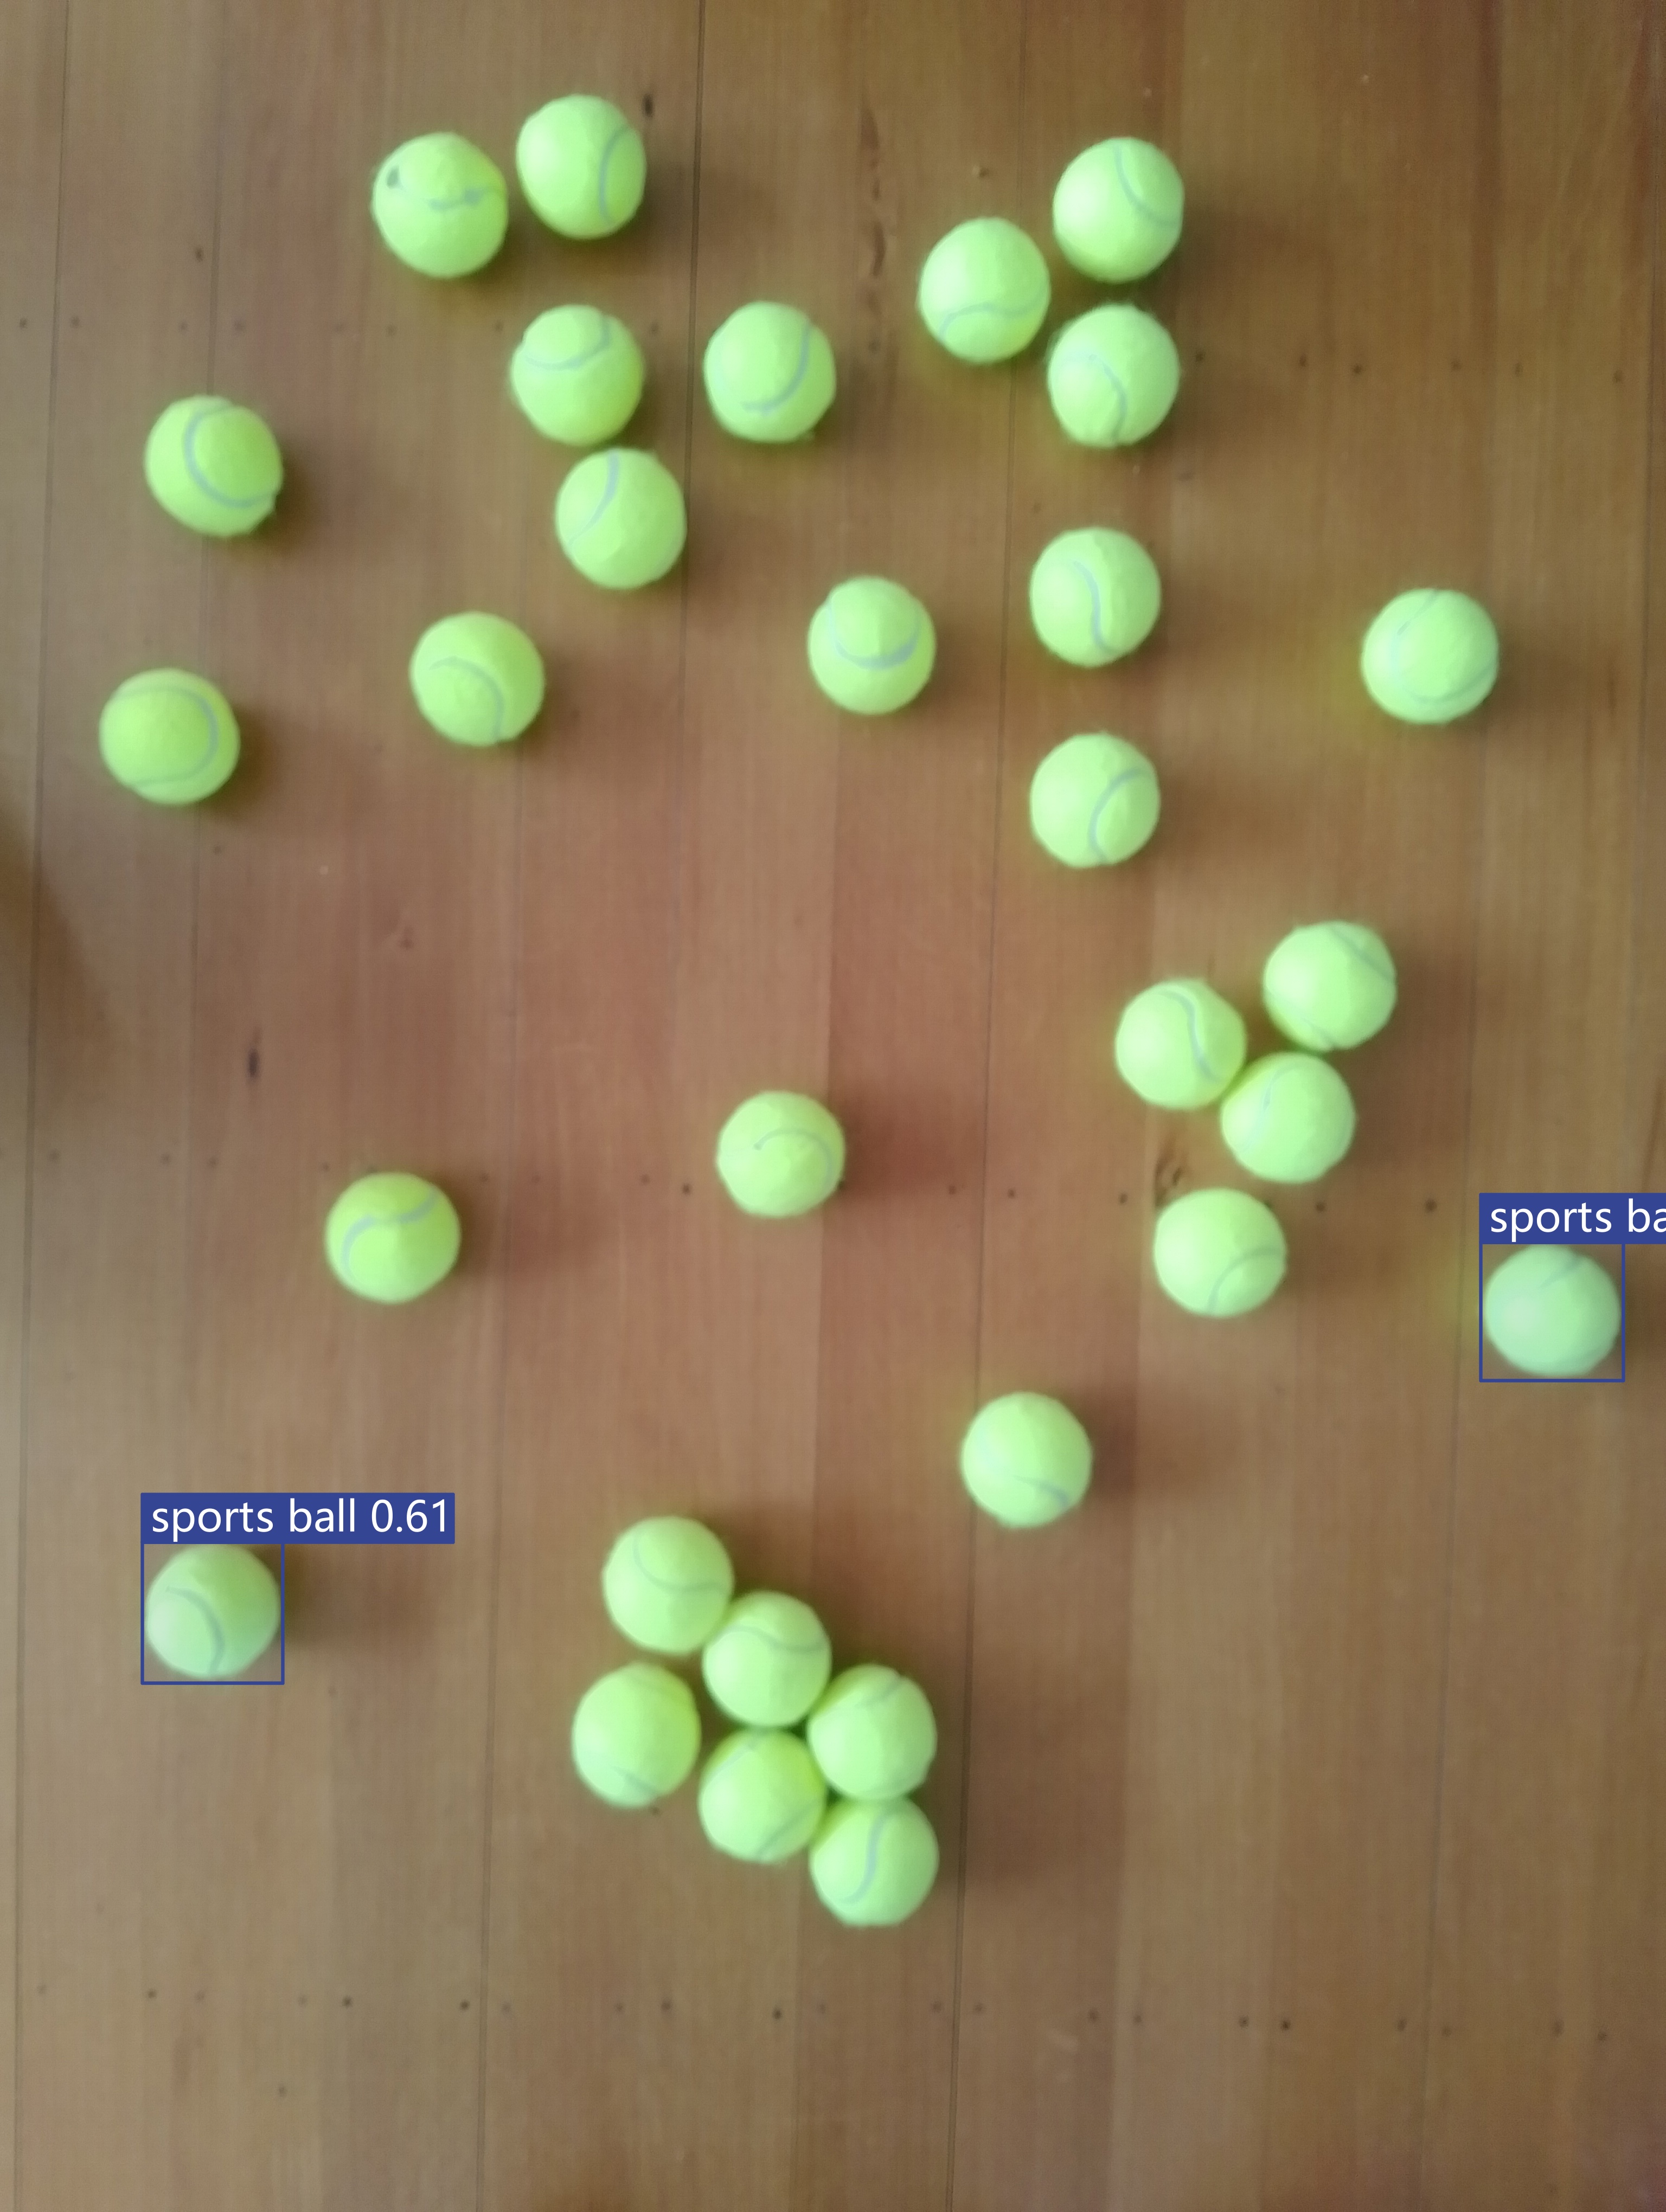
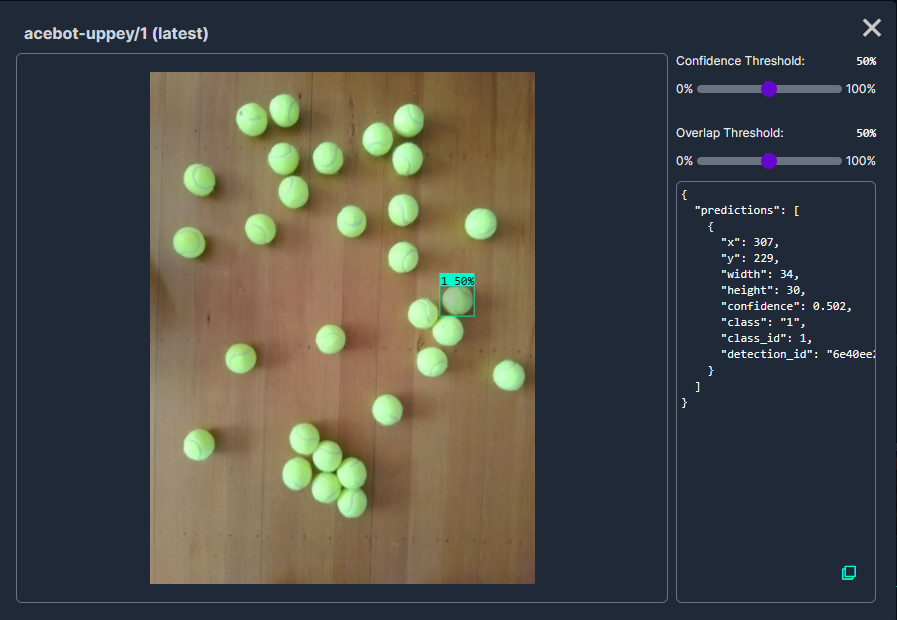
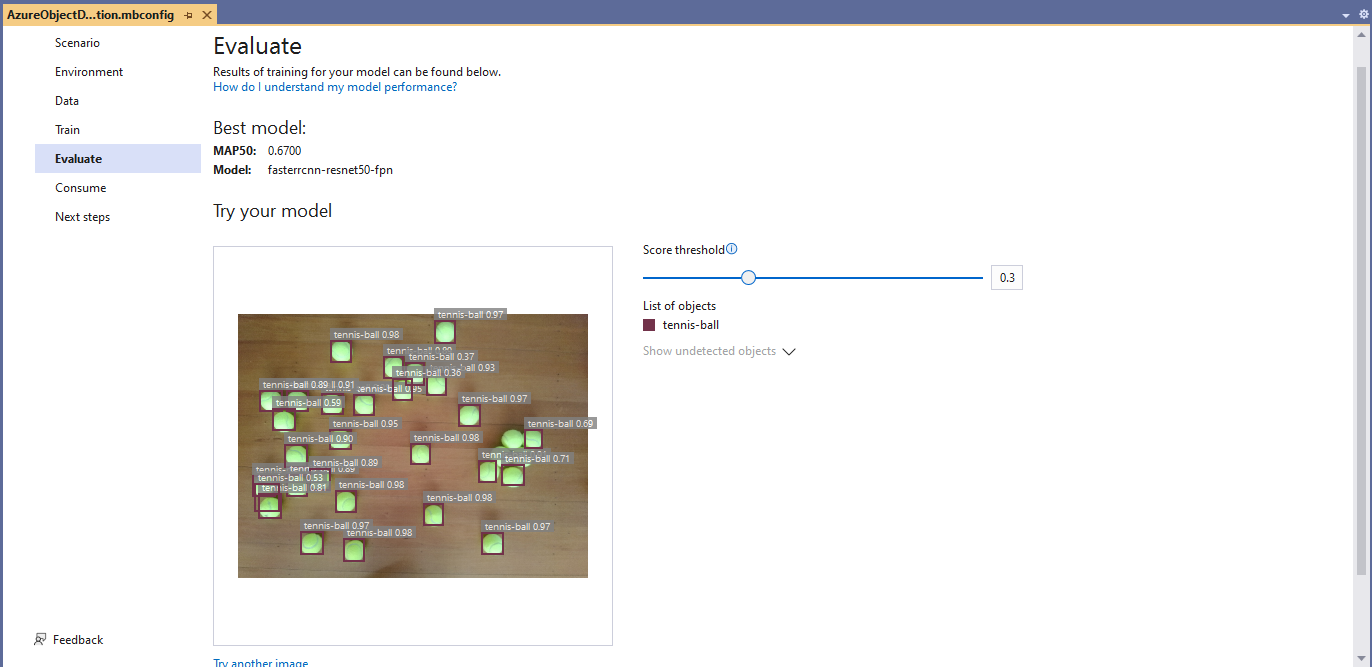
The initial model was detecting only 28 (with much lower confidences) of the 30 tennis balls in the sample images.

Output of console application with object detection information

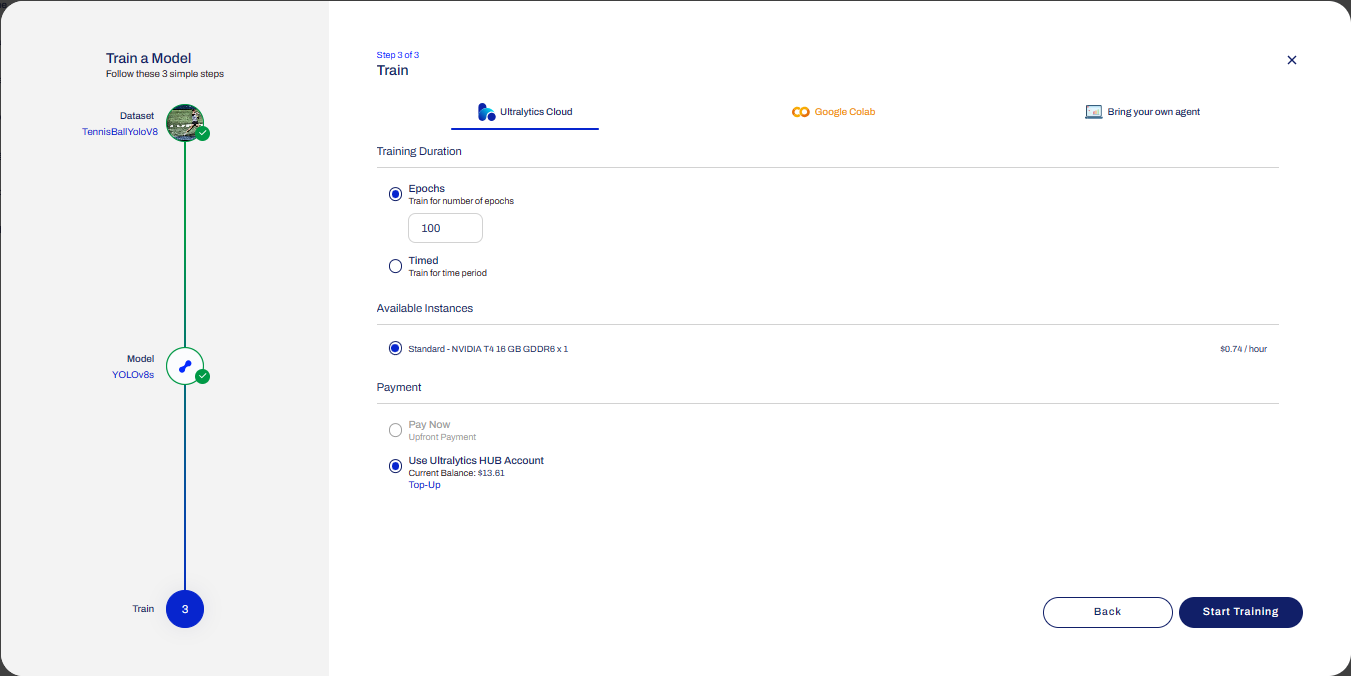
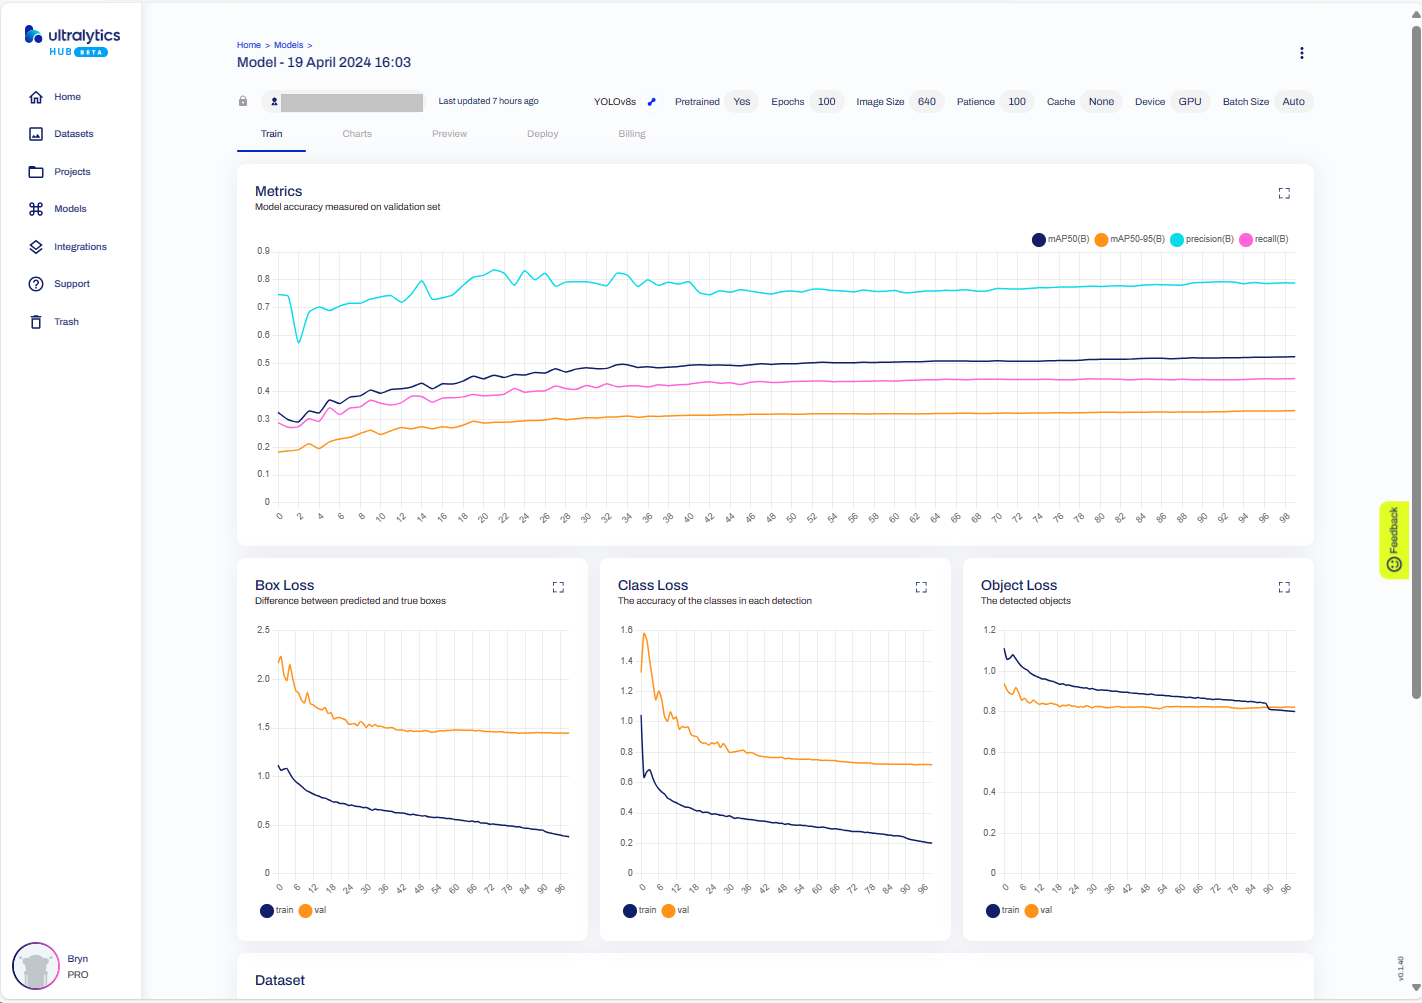
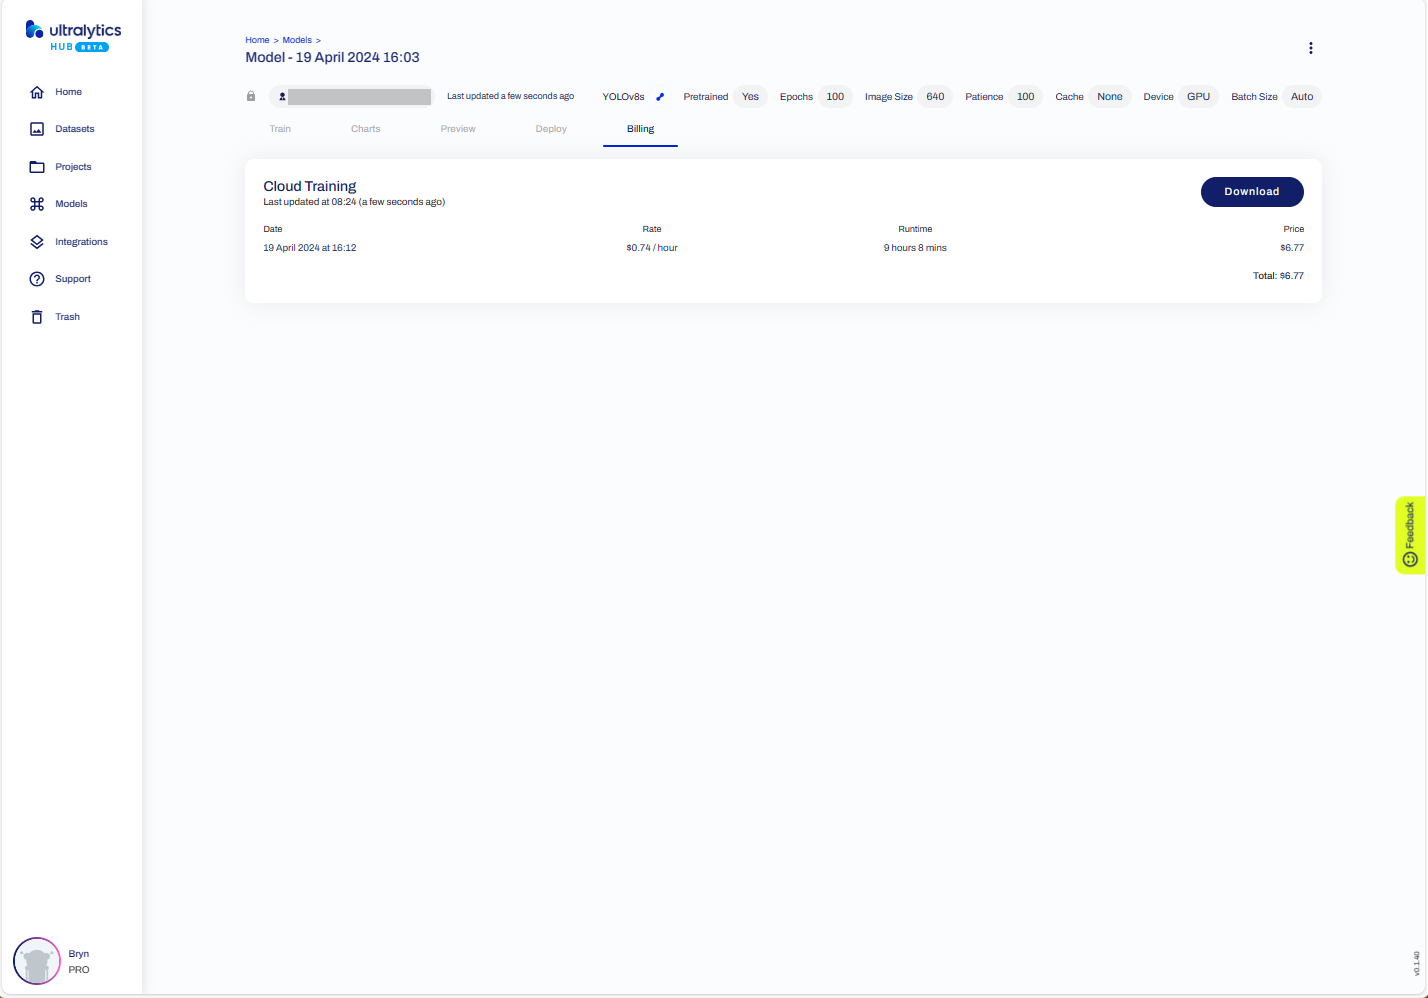
I used the “default configuration” settings and ran the model training for 17.5 hours overnight which cost roughly USD24.

Azure Pricing Calculator estimate for my training setup

This post is not about how train a “good” model it is the approach I took to create a “proof of concept” model for a demonstration.

Myriota Connector – Azure IoT Central Downlink Methods

This post is about Azure IoT Central downlink methods and should be read in conjunction with the Myriota Connector – Azure IoT Central Downlink Methods post. My Myriota Sense and Locate template has 4 commands and in this post, I have focused on the fan speed command.

Sense and Locate Azure IoT Central Template

The Myriota Connector only supports Direct Methods which provide immediate confirmation of the result being queued by the Myriota Cloud API. The Myriota (API) control message send method responds with 400 Bad Request if there is already a message being sent to a device.

Myriota Azure Function Environment Variable configuration

The fan speed downlink payload formatter is specified in the Azure Function Environment Variables.

Sense and Locate Azure IoT Central Template Fan Speed Enumeration

The fan speed value in the message payload is configured in the fan speed enumeration.

Sense and Locate Azure IoT Central Command Fan Speed Selection

The FanSpeed.cs payload formatter extracts the FanSpeed value from the Javascript Object Notation(JSON) payload and returns a two-byte array containing the message type and speed of the fan.

using System;
using System.Collections.Generic;

using Newtonsoft.Json;
using Newtonsoft.Json.Linq;

public class FormatterDownlink : PayloadFormatter.IFormatterDownlink
{
   public byte[] Evaluate(string terminalId, string methodName, JObject payloadJson, byte[] payloadBytes)
   {
      byte? status = payloadJson.Value<byte?>("FanSpeed");

      if (!status.HasValue)
      {
         return new byte[] { };
      }

      return new byte[] { 1, status.Value };
   }
}

Sense and Locate Azure IoT Central Command Fan Speed History

Each Azure Application Insights log entry starts with the TerminalID (to simplify searching for all the messages related to device) and the requestId a Globally Unique Identifier (GUID) to simplify searching for all the “steps” associated with sending/receiving a message) with the rest of the logging message containing “step” specific diagnostic information.

Sense and Locate Azure IoT Central Command Fan Speed Application Insights

In the Myriota Device Manager the status of Control Messages can be tracked and they can be cancelled if in the “pending” state.

Myriota Control Message status Pending

A Control Message can take up to 24hrs to be delivered and confirmation of delivery has to be implemented by the application developer.

YoloV8-Training a model with Ultralytics Hub

After uploading the roboflow Tennis Ball dataset from my previous post to an Ultralytics Hub dataset. I then used my Ultralytics Pro plan to train a proof of concept(PoC) YoloV8 model.

Creating a new Ultralytics project
Selecting training type the dataset to upload
Checking the Tennis Ball dataset upload
Confirming the number of classes and splits of the training dataset
Selecting the output model architecture (YoloV8s).
Configuring the number of epochs and payment method
Preparing the cloud instance(s) for training
The midpoint of the training process
The training process completed with some basic model metrics.
The resources used and model accuracy metrics.
Model training metrics.
Testing the trained model inference results with my test image.
Exporting the trained YoloV8 model in ONNX format.
The duration and cost of training the model.
Testing the YoloV8 model with the dem-compunet.Image console application
Marked-up image generated by the dem-compunet.Image console application.

In this post I have not covered YoloV8 model selection and tuning of the training configuration to optimise the “performance” of the model. I used the default settings and then ran the model training overnight which cost USD6.77

This post is not about how create a “good” model it is the approach I took to create a “proof of concept” model for a demonstration.

YoloV8-Selecting a roboflow dataset

To comply with the Ultralytics AGPL-3.0 License and to use an Ultralytics Pro plan the source code and models for an application have to be open source. Rather than publishing my YoloV8 model (which is quite large) this is the first in a series of posts which detail the process I used to create it. (which I think is more useful)

The single test image (not a good idea) is a photograph of 30 tennis balls on my living room floor.

Test image of 30 tennis balls on my living room floor

I stared with the “default” yolov8s.onnx model which is included in the YoloV8 nuget package Github repository YoloV8.Demo application.

YoloV8s.Onnx Tennis ball object detection results

The object detection results using the “default” model were pretty bad, but this wasn’t a surprise as the model is not optimised for this sort of problem.

Roboflow has a suite of tools for annotating, automatic labelling, training and deployment of models as well as a roboflow universe which (according to their website) is “The largest resource of computer vision datasets and pre-trained models”.

roboflow universe open-source model dataset search

I have used datasets from roboflow universe which is a great resource for building “proof of concept” applications.

roboflow universe dataset search

The first step was to identify some datasets which would improve my tennis ball object detection model results. After some searching (with tennis, tennis-ball etc. classes) and filtering (object detection, has a model for faster evaluation, more the 5000 images) to reduce the search results to a manageable number, I identified 5 datasets worth further evaluation.

In my scenario the performance of the Acebot by Mrunal model was worse than the “default” yolov8s model.

In my scenario the performance of the tennis racket by test model was similar to the “default” yolov8s model.

In my scenario the performance of the Tennis Ball by Hust model was a bit better than the “default” yolov8s mode

In my scenario the performance of the roboflow_oball by ahmedelshalkany model was pretty good it detected 28 of the 30 tennis balls.

In my scenario the performance of the Tennis Ball by Ugur Ozdemir model was good it detected all of the 30 tennis balls.

I then exported the Tennis Ball by Ugur Ozdemir dataset in a YoloV8 compatible format so I could use it on the Ultralytics Hub service with my Ultralytics Pro plan to train a model.

This post is not about how create a “good” dataset it is the approach I took to create a “proof of concept” dataset for a demonstration.

Airbnb Dataset – Calendar information

As part of some scale testing of my WebAPIDapper and WebMinimalAPIDapper i have been “cleaning up” a portion of the Inside Airbnb London dataset. To make the scale testing results more realistic I wanted at least one table with lots of rows.

CREATE TABLE [dbo].[CalendarRawDetailed](
	[listing_id] [bigint] NOT NULL,
	[Date] [date] NOT NULL,
	[Xavailable] [bit] NULL,
	[available] [nvarchar](5) NOT NULL,
	[Xprice] [money] NULL,
	[price] [nvarchar](30) NOT NULL,
	[Xadjusted_price] [money] NULL,
	[adjusted_price] [nvarchar](30) NOT NULL,
	[Xminimum_nights] [smallint] NULL,
	[minimum_nights] [nvarchar](30) NOT NULL,
	[Xmaximum_nights] [smallint] NULL,
	[maximum_nights] [nvarchar](30) NOT NULL
) ON [PRIMARY]

The CalendarRawDetailed had some invalid values which were most probably due formatting inconsistencies on the AirBnb website

SELECT COUNT(*) FROM CalendarRawDetailed WHERE Xminimum_nights IS NULL
SELECT * FROM CalendarRawDetailed WHERE Xminimum_nights IS NULL

SELECT COUNT(*) FROM CalendarRawDetailed WHERE Xmaximum_nights IS NULL
SELECT * FROM CalendarRawDetailed WHERE Xmaximum_nights IS NULL

SELECT COUNT(*) FROM CalendarRawDetailed WHERE Xadjusted_price IS NULL
SELECT * FROM CalendarRawDetailed WHERE Xadjusted_price IS NULL

SELECT COUNT(*) FROM CalendarRawDetailed WHERE Xprice IS NULL
SELECT * FROM CalendarRawDetailed WHERE Xprice IS NULL

Where possible I recovered the values with an “incorrect” format, but some rows had to be deleted.

UPDATE CalendarRawDetailed SET Xmaximum_nights =  TRY_CONVERT(smallint,  RTRIM(maximum_nights, '"')) WHERE Xmaximum_nights IS NULL

UPDATE CalendarRawDetailed SET XmINimum_nights =  TRY_CONVERT(smallint,  RTRIM(mINimum_nights, '"')) WHERE Xminimum_nights IS NULL

UPDATE CalendarRawDetailed SET Xadjusted_price =  TRY_CONVERT(money,  LTRIM(adjusted_price, '$')) --WHERE Xmaximum_nights IS NULL

SELECT *
FROM CalendarRawDetailed 
WHERE Xadjusted_price IS NULL 
DELETE FROM CalendarRawDetailed WHERE Xmaximum_nights IS NULL 

UPDATE CalendarRawDetailed set Xavailable = 1 where available = 't'

The Calendar table has 365 rows for each listing, and I will update Calendar dates, so they are in the “future”.

CREATE TABLE [dbo].[Calendar](
   [listing_id] [bigint] NOT NULL,
   [date] [date] NOT NULL,
   [available] [bit] NOT NULL,
   [price] [money] NOT NULL,
   [adjusted_price] [money] NOT NULL,
   [minimum_nights] [smallint] NOT NULL,
   [maximum_nights] [smallint] NOT NULL
) ON [PRIMARY]

The Calendar table as approximately 31 million rows which should be plenty for my scale testing.

Azure Event Grid YoloV8- Basic MQTT Client Object Detection

The Azure.EventGrid.Image.Detect application downloads images from a security camera, processes them with the default YoloV8(by Ultralytics) object detection model, then publishes the results to an Azure Event Grid MQTT broker topic.

The Unv ADZK-10 camera used in this sample has a Hypertext Transfer Protocol (HTTP) Uniform Resource Locator(URL) for downloading the current image. Like the YoloV8.Detect.SecurityCamera.Stream sample the image “streamed” using the HttpClient.GetStreamAsync to the YoloV8 DetectAsync method.

private async void ImageUpdateTimerCallback(object? state)
{
   DateTime requestAtUtc = DateTime.UtcNow;

   // Just incase - stop code being called while photo or prediction already in progress
   if (_ImageProcessing)
   {
      return;
   }
   _ImageProcessing = true;

   try
   {
      _logger.LogDebug("Camera request start");

      DetectionResult result;

      using (Stream cameraStream = await _httpClient.GetStreamAsync(_applicationSettings.CameraUrl))
      {
         result = await _predictor.DetectAsync(cameraStream);
      }

      _logger.LogInformation("Speed Preprocess:{Preprocess} Postprocess:{Postprocess}", result.Speed.Preprocess, result.Speed.Postprocess);

      if (_logger.IsEnabled(LogLevel.Debug))
      {
         _logger.LogDebug("Detection results");

         foreach (var box in result.Boxes)
         {
            _logger.LogDebug(" Class {box.Class} {Confidence:f1}% X:{box.Bounds.X} Y:{box.Bounds.Y} Width:{box.Bounds.Width} Height:{box.Bounds.Height}", box.Class, box.Confidence * 100.0, box.Bounds.X, box.Bounds.Y, box.Bounds.Width, box.Bounds.Height);
         }
      }

      var message = new MQTT5PublishMessage
      {
         Topic = string.Format(_applicationSettings.PublishTopic, _applicationSettings.UserName),
         Payload = Encoding.ASCII.GetBytes(JsonSerializer.Serialize(new
         {
            result.Boxes,
         })),
         QoS = _applicationSettings.PublishQualityOfService,
      };

      _logger.LogDebug("HiveMQ.Publish start");

      var resultPublish = await _mqttclient.PublishAsync(message);

      _logger.LogDebug("HiveMQ.Publish done");
   }
   catch (Exception ex)
   {
      _logger.LogError(ex, "Camera image download, processing, or telemetry failed");
   }
   finally
   {
      _ImageProcessing = false;
   }

   TimeSpan duration = DateTime.UtcNow - requestAtUtc;

   _logger.LogDebug("Camera Image download, processing and telemetry done {TotalSeconds:f2} sec", duration.TotalSeconds);
}

The application uses a Timer(with configurable Due and Period times) to poll the security camera, detect objects in the image then publish a JavaScript Object Notation(JSON) representation of the results to Azure Event Grid MQTT broker topic using a HiveMQ client.

Console application displaying object detection results

The uses the Microsoft.Extensions.Logging library to publish diagnostic information to the console while debugging the application.

Visual Studio 2022 QuickWatch displaying object detection results.

To check the results I put a breakpoint in the timer just after DetectAsync method is called and then used the Visual Studio 2022 Debugger QuickWatch functionality to inspect the contents of the DetectionResult object.

Visual Studio 2022 JSON Visualiser displaying object detection results.

To check the JSON payload of the MQTT message I put a breakpoint just before the HiveMQ PublishAsync method. I then inspected the payload using the Visual Studio 2022 JSON Visualizer.

Security Camera image for object detection photo bombed by Yarnold our Standard Apricot Poodle.

This application can also be deployed as a Linux systemd Service so it will start then run in the background. The same approach as the YoloV8.Detect.SecurityCamera.Stream sample is used because the image doesn’t have to be saved on the local filesystem.

YoloV8-File, Stream, & Byte array Camera Images

After building some proof-of-concept applications I have decided to use the YoloV8 by dme-compunet NuGet because it supports async await and code with async await is always better (yeah right).

The YoloV8.Detect.SecurityCamera.File sample downloads images from the security camera to the local file system, then calls DetectAsync with the local file path.

private static async void ImageUpdateTimerCallback(object state)
{
   //...
   try
   {
      Console.WriteLine($"{DateTime.UtcNow:yy-MM-dd HH:mm:ss:fff} YoloV8 Security Camera Image File processing start");

      using (Stream cameraStream = await _httpClient.GetStreamAsync(_applicationSettings.CameraUrl))
      using (Stream fileStream = System.IO.File.Create(_applicationSettings.ImageFilepath))
      {
         await cameraStream.CopyToAsync(fileStream);
      }

      DetectionResult result = await _predictor.DetectAsync(_applicationSettings.ImageFilepath);

      Console.WriteLine($"Speed: {result.Speed}");

      foreach (var prediction in result.Boxes)
      {
         Console.WriteLine($" Class {prediction.Class} {(prediction.Confidence * 100.0):f1}% X:{prediction.Bounds.X} Y:{prediction.Bounds.Y} Width:{prediction.Bounds.Width} Height:{prediction.Bounds.Height}");
      }

      Console.WriteLine($"{DateTime.UtcNow:yy-MM-dd HH:mm:ss:fff} YoloV8 Security Camera Image processing done");
   }
   catch (Exception ex)
   {
      Console.WriteLine($"{DateTime.UtcNow:yy-MM-dd HH:mm:ss} YoloV8 Security camera image download or YoloV8 prediction failed {ex.Message}");
   }
//...
}
Console application using camera image saved on filesystem

The YoloV8.Detect.SecurityCamera.Bytes sample downloads images from the security camera as an array of bytes then calls DetectAsync.

private static async void ImageUpdateTimerCallback(object state)
{
   //...
   try
   {
      Console.WriteLine($"{DateTime.UtcNow:yy-MM-dd HH:mm:ss:fff} YoloV8 Security Camera Image Bytes processing start");

      byte[] bytes = await _httpClient.GetByteArrayAsync(_applicationSettings.CameraUrl);

      DetectionResult result = await _predictor.DetectAsync(bytes);

      Console.WriteLine($"Speed: {result.Speed}");

      foreach (var prediction in result.Boxes)
      {
         Console.WriteLine($" Class {prediction.Class} {(prediction.Confidence * 100.0):f1}% X:{prediction.Bounds.X} Y:{prediction.Bounds.Y} Width:{prediction.Bounds.Width} Height:{prediction.Bounds.Height}");
      }

      Console.WriteLine($"{DateTime.UtcNow:yy-MM-dd HH:mm:ss:fff} YoloV8 Security Camera Image processing done");
   }
   catch (Exception ex)
   {
      Console.WriteLine($"{DateTime.UtcNow:yy-MM-dd HH:mm:ss} YoloV8 Security camera image download or YoloV8 prediction failed {ex.Message}");
   }
//...
}
Console application downloading camera image as an array bytes.

The YoloV8.Detect.SecurityCamera.Stream sample “streams” the image from the security camera to DetectAsync.

private static async void ImageUpdateTimerCallback(object state)
{
   // ...
   try
   {
      Console.WriteLine($"{DateTime.UtcNow:yy-MM-dd HH:mm:ss:fff} YoloV8 Security Camera Image Stream processing start");

      DetectionResult result;

      using (System.IO.Stream cameraStream = await _httpClient.GetStreamAsync(_applicationSettings.CameraUrl))
      {
         result = await _predictor.DetectAsync(cameraStream);
      }

      Console.WriteLine($"Speed: {result.Speed}");

      foreach (var prediction in result.Boxes)
      {
         Console.WriteLine($" Class {prediction.Class} {(prediction.Confidence * 100.0):f1}% X:{prediction.Bounds.X} Y:{prediction.Bounds.Y} Width:{prediction.Bounds.Width} Height:{prediction.Bounds.Height}");
      }

      Console.WriteLine($"{DateTime.UtcNow:yy-MM-dd HH:mm:ss:fff} YoloV8 Security Camera Image processing done");
   }
   catch (Exception ex)
   {
      Console.WriteLine($"{DateTime.UtcNow:yy-MM-dd HH:mm:ss} YoloV8 Security camera image download or YoloV8 prediction failed {ex.Message}");
   }
//...
}
Console application streaming camera image.

The ImageSelector parameter of DetectAsync caught my attention as I hadn’t seen this approach used before. The developers who wrote the NuGet package are definitely smarter than me so I figured I might learn something useful digging deeper.

My sample object detection applications all call

public static async Task<DetectionResult> DetectAsync(this YoloV8 predictor, ImageSelector selector)
{
    return await Task.Run(() => predictor.Detect(selector));
}

Which then invokes

public static DetectionResult Detect(this YoloV8 predictor, ImageSelector selector)
{
    predictor.ValidateTask(YoloV8Task.Detect);

    return predictor.Run(selector, (outputs, image, timer) =>
    {
        var output = outputs[0].AsTensor<float>();

        var parser = new DetectionOutputParser(predictor.Metadata, predictor.Parameters);

        var boxes = parser.Parse(output, image);
        var speed = timer.Stop();

        return new DetectionResult
        {
            Boxes = boxes,
            Image = image,
            Speed = speed,
        };
    });

    public TResult Run<TResult>(ImageSelector selector, PostprocessContext<TResult> postprocess) where TResult : YoloV8Result
    {
        using var image = selector.Load(true);

        var originSize = image.Size;

        var timer = new SpeedTimer();

        timer.StartPreprocess();

        var input = Preprocess(image);

        var inputs = MapNamedOnnxValues([input]);

        timer.StartInference();

        using var outputs = Infer(inputs);

        var list = new List<NamedOnnxValue>(outputs);

        timer.StartPostprocess();

        return postprocess(list, originSize, timer);
    }
}

It looks like most of the image loading magic of ImageSelector class is implemented using the SixLabors library…

public class ImageSelector<TPixel> where TPixel : unmanaged, IPixel<TPixel>
{
    private readonly Func<Image<TPixel>> _factory;

    public ImageSelector(Image image)
    {
        _factory = image.CloneAs<TPixel>;
    }

    public ImageSelector(string path)
    {
        _factory = () => Image.Load<TPixel>(path);
    }

    public ImageSelector(byte[] data)
    {
        _factory = () => Image.Load<TPixel>(data);
    }

    public ImageSelector(Stream stream)
    {
        _factory = () => Image.Load<TPixel>(stream);
    }

    internal Image<TPixel> Load(bool autoOrient)
    {
        var image = _factory();

        if (autoOrient)
            image.Mutate(x => x.AutoOrient());

        return image;
    }

    public static implicit operator ImageSelector<TPixel>(Image image) => new(image);
    public static implicit operator ImageSelector<TPixel>(string path) => new(path);
    public static implicit operator ImageSelector<TPixel>(byte[] data) => new(data);
    public static implicit operator ImageSelector<TPixel>(Stream stream) => new(stream);
}

Learnt something new must be careful to apply it only where it adds value.

YoloV8-One of these NuGets is not like the others

A couple of days after my initial testing the YoloV8 by dme-compunet NuGet was updated so I reran my test harnesses.

Then the YoloDotNet by NichSwardh NuGet was also updated so I reran my all my test harnesses again.

Even though the YoloV8 by sstainba NuGet hadn’t been updated I ran the test harness just incase.

The dme-compunet YoloV8 and NickSwardh YoloDotNet NuGets results are now the same (bar the 30% cutoff) and YoloV8 by sstainba results have not changed.

YoloV8-All of these NuGets are not like the others

As part investigating which YoloV8 NuGet to use, I built three trial applications using dme-compunet YoloV8, sstainba Yolov8.Net, and NickSwardh YoloDotNet NuGets.

All of the implementations load the model, load the sample image, detect objects in the image, then markup the image with the classification, minimum bounding boxes, and confidences of each object.

Input Image

The first implementation uses YoloV8 by dme-compunet which supports asynchronous operation. The image is loaded asynchronously, the prediction is asynchronous, then marked up and saved asynchronously.

using (var predictor = new Compunet.YoloV8.YoloV8(_applicationSettings.ModelPath))
{
   Console.WriteLine($" {DateTime.UtcNow:yy-MM-dd HH:mm:ss.fff} YoloV8 Model load done");
   Console.WriteLine();

   using (var image = await SixLabors.ImageSharp.Image.LoadAsync<Rgba32>(_applicationSettings.ImageInputPath))
   {
      Console.WriteLine($" {DateTime.UtcNow:yy-MM-dd HH:mm:ss.fff} YoloV8 Model detect start");

      var predictions = await predictor.DetectAsync(image);

      Console.WriteLine($" {DateTime.UtcNow:yy-MM-dd HH:mm:ss.fff} YoloV8 Model detect done");
      Console.WriteLine();

      Console.WriteLine($" Speed: {predictions.Speed}");

      foreach (var prediction in predictions.Boxes)
      {
         Console.WriteLine($"  Class {prediction.Class} {(prediction.Confidence * 100.0):f1}% X:{prediction.Bounds.X} Y:{prediction.Bounds.Y} Width:{prediction.Bounds.Width} Height:{prediction.Bounds.Height}");
      }
      Console.WriteLine();

      Console.WriteLine($" {DateTime.UtcNow:yy-MM-dd HH:mm:ss.fff} Plot and save : {_applicationSettings.ImageOutputPath}");

      SixLabors.ImageSharp.Image imageOutput = await predictions.PlotImageAsync(image);

      await imageOutput.SaveAsJpegAsync(_applicationSettings.ImageOutputPath);
   }
}
dme-compunet YoloV8 test application output

The second implementation uses YoloDotNet by NichSwardh which partially supports asynchronous operation. The image is loaded asynchronously, the prediction is synchronous, the markup is synchronous, and then saved asynchronously.

using (var predictor = new Yolo(_applicationSettings.ModelPath, false))
{
   Console.WriteLine($" {DateTime.UtcNow:yy-MM-dd HH:mm:ss.fff} YoloV8 Model load done");
   Console.WriteLine();

   using (var image = await SixLabors.ImageSharp.Image.LoadAsync<Rgba32>(_applicationSettings.ImageInputPath))
   {
      Console.WriteLine($" {DateTime.UtcNow:yy-MM-dd HH:mm:ss.fff} YoloV8 Model detect start");

      var predictions = predictor.RunObjectDetection(image);

      Console.WriteLine($" {DateTime.UtcNow:yy-MM-dd HH:mm:ss.fff} YoloV8 Model detect done");
      Console.WriteLine();

      foreach (var predicition in predictions)
      {
         Console.WriteLine($"  Class {predicition.Label.Name} {(predicition.Confidence * 100.0):f1}% X:{predicition.BoundingBox.Left} Y:{predicition.BoundingBox.Y} Width:{predicition.BoundingBox.Width} Height:{predicition.BoundingBox.Height}");
      }
      Console.WriteLine();

      Console.WriteLine($" {DateTime.UtcNow:yy-MM-dd HH:mm:ss.fff} Plot and save : {_applicationSettings.ImageOutputPath}");

      image.Draw(predictions);

      await image.SaveAsJpegAsync(_applicationSettings.ImageOutputPath);
   }
}
nickswardth YoloDotNet test application output

The third implementation uses YoloV8 by sstainba which partially supports asynchronous operation. The image is loaded asynchronously, the prediction is synchronous, the markup is synchronous, and then saved asynchronously.

using (var predictor = YoloV8Predictor.Create(_applicationSettings.ModelPath))
{
   Console.WriteLine($" {DateTime.UtcNow:yy-MM-dd HH:mm:ss.fff} YoloV8 Model load done");
   Console.WriteLine();

   using (var image = await SixLabors.ImageSharp.Image.LoadAsync<Rgba32>(_applicationSettings.ImageInputPath))
   {
      Console.WriteLine($" {DateTime.UtcNow:yy-MM-dd HH:mm:ss.fff} YoloV8 Model detect start");

      var predictions = predictor.Predict(image);

      Console.WriteLine($" {DateTime.UtcNow:yy-MM-dd HH:mm:ss.fff} YoloV8 Model detect done");
      Console.WriteLine();

      foreach (var prediction in predictions)
      {
         Console.WriteLine($"  Class {prediction.Label.Name} {(prediction.Score * 100.0):f1}% X:{prediction.Rectangle.X} Y:{prediction.Rectangle.Y} Width:{prediction.Rectangle.Width} Height:{prediction.Rectangle.Height}");
      }

      Console.WriteLine();

      Console.WriteLine($" {DateTime.UtcNow:yy-MM-dd HH:mm:ss.fff} Plot and save : {_applicationSettings.ImageOutputPath}");

      // This is a bit hacky should be fixed up in future release
      Font font = new Font(SystemFonts.Get(_applicationSettings.FontName), _applicationSettings.FontSize);
      foreach (var prediction in predictions)
      {
         var x = (int)Math.Max(prediction.Rectangle.X, 0);
         var y = (int)Math.Max(prediction.Rectangle.Y, 0);
         var width = (int)Math.Min(image.Width - x, prediction.Rectangle.Width);
         var height = (int)Math.Min(image.Height - y, prediction.Rectangle.Height);

         //Note that the output is already scaled to the original image height and width.

         // Bounding Box Text
         string text = $"{prediction.Label.Name} [{prediction.Score}]";
         var size = TextMeasurer.MeasureSize(text, new TextOptions(font));

         image.Mutate(d => d.Draw(Pens.Solid(Color.Yellow, 2), new Rectangle(x, y, width, height)));

         image.Mutate(d => d.DrawText(text, font, Color.Yellow, new Point(x, (int)(y - size.Height - 1))));
      }

      await image.SaveAsJpegAsync(_applicationSettings.ImageOutputPath);
   }
}
sstainba YoloV8 test application output

I don’t understand why the three NuGets produced different results which is worrying.

Azure Event Grid MQTT-With HiveMQ & MQTTnet Clients

Most of the examples of connecting to Azure Event Grid’s MQTT broker use MQTTnet so for a bit of variety I started with a hivemq-mqtt-client-dotnet based client. (A customer had been evaluating HiveMQ for a project which was later cancelled)

BEWARE – ClientID parameter is case sensitive.

The HiveMQ client was “inspired” by the How to Guides > Custom Client Certificates documentation.

class Program
{
   private static Model.ApplicationSettings _applicationSettings;
   private static HiveMQClient _client;
   private static bool _publisherBusy = false;

   static async Task Main()
   {
      Console.WriteLine($"{DateTime.UtcNow:yy-MM-dd HH:mm:ss} Hive MQ client starting");

      try
      {
         // load the app settings into configuration
         var configuration = new ConfigurationBuilder()
               .AddJsonFile("appsettings.json", false, true)
               .AddUserSecrets<Program>()
         .Build();

         _applicationSettings = configuration.GetSection("ApplicationSettings").Get<Model.ApplicationSettings>();

         var optionsBuilder = new HiveMQClientOptionsBuilder();

         optionsBuilder
            .WithClientId(_applicationSettings.ClientId)
            .WithBroker(_applicationSettings.Host)
            .WithPort(_applicationSettings.Port)
            .WithUserName(_applicationSettings.UserName)
            .WithCleanStart(_applicationSettings.CleanStart)
            .WithClientCertificate(_applicationSettings.ClientCertificateFileName, _applicationSettings.ClientCertificatePassword)
            .WithUseTls(true);

         using (_client = new HiveMQClient(optionsBuilder.Build()))
         {
            _client.OnMessageReceived += OnMessageReceived;

            var connectResult = await _client.ConnectAsync();
            if (connectResult.ReasonCode != ConnAckReasonCode.Success)
            {
               throw new Exception($"Failed to connect: {connectResult.ReasonString}");
            }

            Console.WriteLine($"Subscribed to Topic");
            foreach (string topic in _applicationSettings.SubscribeTopics.Split(',', StringSplitOptions.RemoveEmptyEntries | StringSplitOptions.TrimEntries))
            {
               var subscribeResult = await _client.SubscribeAsync(topic, _applicationSettings.SubscribeQualityOfService);

               Console.WriteLine($" Topic:{topic} Result:{subscribeResult.Subscriptions[0].SubscribeReasonCode}");
            }
   }
//...
}
HiveMQ Client console application output

The MQTTnet client was “inspired” by the Azure MQTT .NET Application sample

class Program
{
   private static Model.ApplicationSettings _applicationSettings;
   private static IMqttClient _client;
   private static bool _publisherBusy = false;

   static async Task Main()
   {
      Console.WriteLine($"{DateTime.UtcNow:yy-MM-dd HH:mm:ss} MQTTNet client starting");

      try
      {
         // load the app settings into configuration
         var configuration = new ConfigurationBuilder()
               .AddJsonFile("appsettings.json", false, true)
               .AddUserSecrets<Program>()
         .Build();

         _applicationSettings = configuration.GetSection("ApplicationSettings").Get<Model.ApplicationSettings>();

         var mqttFactory = new MqttFactory();

         using (_client = mqttFactory.CreateMqttClient())
         {
            // Certificate based authentication
            List<X509Certificate2> certificates = new List<X509Certificate2>
            {
               new X509Certificate2(_applicationSettings.ClientCertificateFileName, _applicationSettings.ClientCertificatePassword)
            };

            var tlsOptions = new MqttClientTlsOptionsBuilder()
                  .WithClientCertificates(certificates)
                  .WithSslProtocols(System.Security.Authentication.SslProtocols.Tls12)
                  .UseTls(true)
                  .Build();

            MqttClientOptions mqttClientOptions = new MqttClientOptionsBuilder()
                     .WithClientId(_applicationSettings.ClientId)
                     .WithTcpServer(_applicationSettings.Host, _applicationSettings.Port)
                     .WithCredentials(_applicationSettings.UserName, _applicationSettings.Password)
                     .WithCleanStart(_applicationSettings.CleanStart)
                     .WithTlsOptions(tlsOptions)
                     .Build();

            var connectResult = await _client.ConnectAsync(mqttClientOptions);
            if (connectResult.ResultCode != MqttClientConnectResultCode.Success)
            {
               throw new Exception($"Failed to connect: {connectResult.ReasonString}");
            }

            _client.ApplicationMessageReceivedAsync += OnApplicationMessageReceivedAsync;

            Console.WriteLine($"Subscribed to Topic");
            foreach (string topic in _applicationSettings.SubscribeTopics.Split(',', StringSplitOptions.RemoveEmptyEntries | StringSplitOptions.TrimEntries))
            {
               var subscribeResult = await _client.SubscribeAsync(topic, _applicationSettings.SubscribeQualityOfService);

               Console.WriteLine($" {topic} Result:{subscribeResult.Items.First().ResultCode}");
            }
      }
//...
}
MQTTnet client console application output

The design of the MQTT protocol means that the hivemq-mqtt-client-dotnet and MQTTnet implementations are similar. Having used both I personally prefer the HiveMQ client library.