During the week another couple of Raspberry PI2/3/Zero shields arrived from uputronics. The two Raspberry PiZero LoRa(TM) Expansion Boards had arrived earlier so I unpacked them first. They were in small cardboard boxes with bolts+spacers and had a small set of printed instructions which was quite professional.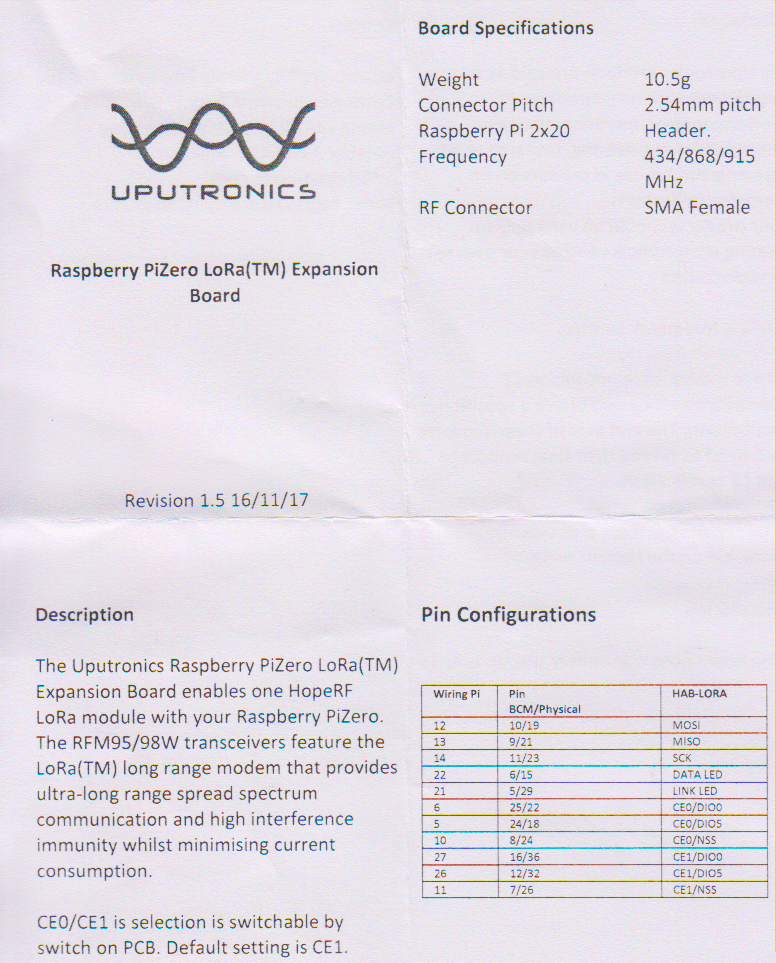
These shields also have a switch for configuring the chip select line which is quite a neat feature and means they can be stacked. Unlike the other shields I have tested these appear not to have the reset line of the RFM9X connected.
The first step was to get the SPI connectivity sorted
//---------------------------------------------------------------------------------
// Copyright (c) August 2018, devMobile Software
//
// Licensed under the Apache License, Version 2.0 (the "License");
// you may not use this file except in compliance with the License.
// You may obtain a copy of the License at
//
//     http://www.apache.org/licenses/LICENSE-2.0
//
// Unless required by applicable law or agreed to in writing, software
// distributed under the License is distributed on an "AS IS" BASIS,
// WITHOUT WARRANTIES OR CONDITIONS OF ANY KIND, either express or implied.
// See the License for the specific language governing permissions and
// limitations under the License.
//
//---------------------------------------------------------------------------------
namespace devMobile.IoT.Rfm9x.UputronicsRPZeroSPI
{
	using System;
	using System.Diagnostics;
	using System.Threading;
	using Windows.ApplicationModel.Background;
	using Windows.Devices.Spi;

	public sealed class StartupTask : IBackgroundTask
	{
		public void Run(IBackgroundTaskInstance taskInstance)
		{
#if CS0
			const int chipSelectPinNumber = 0;
#endif
#if CS1
			const int chipSelectPinNumber = 1;
#endif
			SpiController spiController = SpiController.GetDefaultAsync().AsTask().GetAwaiter().GetResult();
			var settings = new SpiConnectionSettings(chipSelectPinNumber)
			{
				ClockFrequency = 500000,
				Mode = SpiMode.Mode0,   // From SemTech docs pg 80 CPOL=0, CPHA=0
			};
			SpiDevice Device = spiController.GetDevice(settings);

			while (true)
			{
				byte[] writeBuffer = new byte[] { 0x42 }; // RegVersion
				byte[] readBuffer = new byte[1];

				// Read the RegVersion silicon ID to check SPI works
				Device.TransferSequential(writeBuffer, readBuffer);

				Debug.WriteLine("Register RegVer 0x{0:x2} - Value 0X{1:x2} - Bits {2}", writeBuffer[0], readBuffer[0], Convert.ToString(readBuffer[0], 2).PadLeft(8, '0'));

				Thread.Sleep(10000);
			}
		}
	}
}
The output confirmed the code worked with both CS0 and CS1 defined
Register RegVer 0x42 - Value 0X12 - Bits 00010010
Register RegVer 0x42 - Value 0X12 - Bits 00010010
Register RegVer 0x42 - Value 0X12 - Bits 00010010
The program '[2144] backgroundTaskHost.exe' has exited with code -1 (0xffffffff).
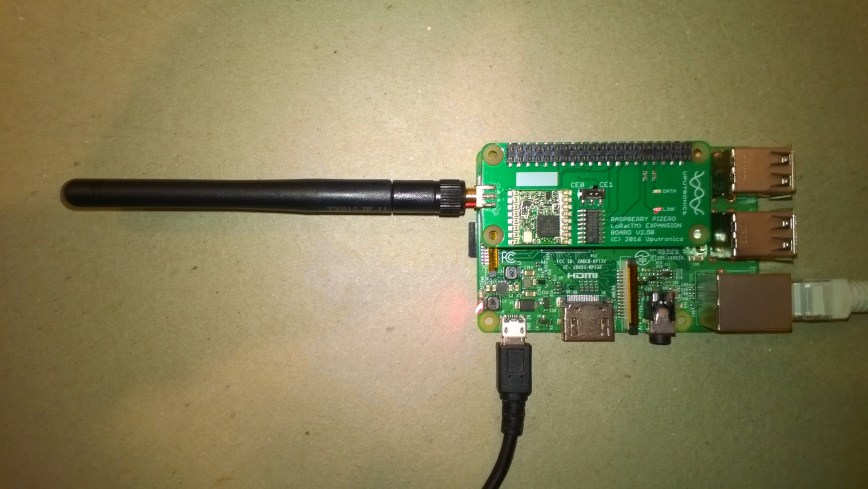
The shield has two onboard Light Emitting Diodes (LEDs) so I wrote a simple test application to flash them alternately.
//---------------------------------------------------------------------------------
// Copyright (c) July 2018, devMobile Software
//
// Licensed under the Apache License, Version 2.0 (the "License");
// you may not use this file except in compliance with the License.
// You may obtain a copy of the License at
//
//     http://www.apache.org/licenses/LICENSE-2.0
//
// Unless required by applicable law or agreed to in writing, software
// distributed under the License is distributed on an "AS IS" BASIS,
// WITHOUT WARRANTIES OR CONDITIONS OF ANY KIND, either express or implied.
// See the License for the specific language governing permissions and
// limitations under the License.
//
//---------------------------------------------------------------------------------
namespace devMobile.IoT.Rfm9x.UputronicsRPZeroLed
{
	using System;
	using System.Threading;
	using Windows.ApplicationModel.Background;
	using Windows.Devices.Gpio;

	public sealed class StartupTask : IBackgroundTask
	{
		public void Run(IBackgroundTaskInstance taskInstance)
		{
			GpioController gpioController = GpioController.GetDefault();
			GpioPin dataLedPin = gpioController.OpenPin(13);
			dataLedPin.SetDriveMode(GpioPinDriveMode.Output);
			dataLedPin.Write(GpioPinValue.Low);
			GpioPin linkLedPin = gpioController.OpenPin(6);
			linkLedPin.SetDriveMode(GpioPinDriveMode.Output);
			linkLedPin.Write(GpioPinValue.High);

			while (true)
			{

				if (dataLedPin.Read() == GpioPinValue.High)
				{
					dataLedPin.Write(GpioPinValue.Low);
				}
				else
				{
					dataLedPin.Write(GpioPinValue.High);
				}

				if (linkLedPin.Read() == GpioPinValue.High)
				{
					linkLedPin.Write(GpioPinValue.Low);
				}
				else
				{
					linkLedPin.Write(GpioPinValue.High);
				}

				Thread.Sleep(500);
			}
		}
	}
}
The two LEDs are labelled Data and Link but the pin numbers in the documentation were for an RPI Zero so didn’t match the ones I had to configure in code for my RPI3.
Overall the shield was professionally packaged and appears well engineered.
