The Things Network Client Part2

MQTT connectivity

In a previous post I couldn’t add a TTN V3EndDevice to an application (I’m going try again soon) using the REST API so I figured would try out the MQTT API. My aim was to get notifications of when a Device was created/updated/deleted in an Application.

After some tinkering with the format of MQTT usernames and passwords I can connect to my V3 instance and successfully subscribe to topics. But, currently(Aug 2020) I’m not receiving any messages when I create, update or delete a Device. I have tried different Quality of Service QoS settings etc. and I wonder if my topic names aren’t quite right.

.Net Core MQTT Client

I wanted notifications so I could “automagically” provision a device in an Azure IoT Hub (maybe with a tag indicating it’s an “orphan” so it is discoverable) or in Azure IoT Central when a Device was created in TTN.

This looked like a good approach as my Azure IoT Hub applications have other devices which are not connected via LoRaWAN, and there are many specialised LoRaWAN settings which would need to be validated, stored etc. by my software. (maybe TTN device templates would make this easier). The TTN software is pretty good at managing devices so why would I “re-invent the wheel”.

I built a “nasty” console application using MQTTNet so that I could figure out how to connect to my V3 setup and subscribe to topics.

namespace devMobile.TheThingsNetwork.MqttClient
{
   using System;
   using System.Diagnostics;
   using System.Threading;
   using System.Threading.Tasks;

   using MQTTnet;
   using MQTTnet.Client;
   using MQTTnet.Client.Disconnecting;
   using MQTTnet.Client.Options;
   using MQTTnet.Client.Receiving;
   using MQTTnet.Client.Subscribing;

   class Program
   {
      private static IMqttClient mqttClient = null;
      private static IMqttClientOptions mqttOptions = null;
      private static string server;
      private static string username;
      private static string password;
      private static string clientId;

      static async Task Main(string[] args)
      {
         MqttFactory factory = new MqttFactory();
         mqttClient = factory.CreateMqttClient();

         if (args.Length != 4)
         {
            Console.WriteLine("[MQTT Server] [UserName] [Password] [ClientID]");
            Console.WriteLine("Press <enter> to exit");
            Console.ReadLine();
            return;
         }

         server = args[0];
         username = args[1];
         password = args[2];
         clientId = args[3];

         mqttOptions = new MqttClientOptionsBuilder()
            .WithTcpServer(server)
            .WithCredentials(username, password)
            .WithClientId(clientId)
            .WithTls()
            .Build();

         mqttClient.UseDisconnectedHandler(new MqttClientDisconnectedHandlerDelegate(e => MqttClient_Disconnected(e)));
         mqttClient.UseApplicationMessageReceivedHandler(new MqttApplicationMessageReceivedHandlerDelegate(e => MqttClient_ApplicationMessageReceived(e)));
         await mqttClient.ConnectAsync(mqttOptions);

         // Different topics I have tried
         string topic;
         topic = $"v3/{username}/devices/{clientId}/events/update";
         //topic = $"v3/{username}/devices/{clientId}/events/create";
         //topic = $"v3/{username}/devices/{clientId}/events/delete";
         //topic = $"v3/{username}/devices/+/events/+";
         //topic = $"v3/{username}/devices/+/events/create";
         //topic = $"v3/{username}/devices/+/events/update";
         //topic = $"v3/{username}/devices/+/events/delete";
         //topic = $"v3/{username}/devices/+/events/+";

         MqttClientSubscribeResult result;

         // Different QoS I have tried
         //result = await mqttClient.SubscribeAsync(topic, MQTTnet.Protocol.MqttQualityOfServiceLevel.AtMostOnce);
         result = await mqttClient.SubscribeAsync(topic, MQTTnet.Protocol.MqttQualityOfServiceLevel.AtLeastOnce);
         //result = await mqttClient.SubscribeAsync(topic, MQTTnet.Protocol.MqttQualityOfServiceLevel.ExactlyOnce);

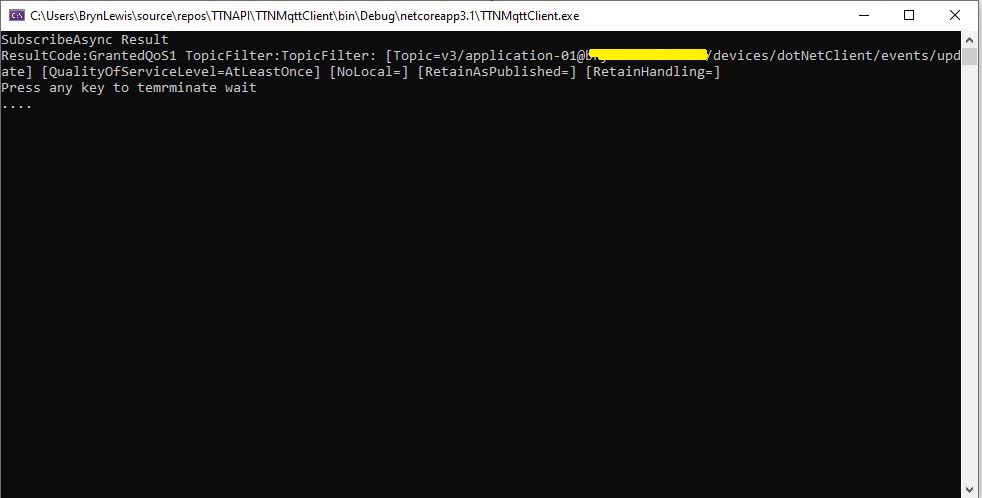
         Console.WriteLine("SubscribeAsync Result");
         foreach ( var resultItem in result.Items)
         {
            Console.WriteLine($"ResultCode:{resultItem.ResultCode} TopicFilter:{resultItem.TopicFilter}");
         }                     

         Console.WriteLine("Press any key to temrminate wait");
         while (!Console.KeyAvailable)
         {
            Console.Write(".");

            Thread.Sleep(30100);
         }

         Console.WriteLine("Press <enter> to exit");
         Console.ReadLine();
         return;
      }

      private static void MqttClient_ApplicationMessageReceived(MqttApplicationMessageReceivedEventArgs e)
      {
         Console.WriteLine($"ClientId:{e.ClientId} Topic:{e.ApplicationMessage.Topic} Payload:{e.ApplicationMessage.ConvertPayloadToString()}");
      }

      private static async void MqttClient_Disconnected(MqttClientDisconnectedEventArgs e)
      {
         Debug.WriteLine("Disconnected");
         await Task.Delay(TimeSpan.FromSeconds(5));

         try
         {
            await mqttClient.ConnectAsync(mqttOptions);
         }
         catch (Exception ex)
         {
            Debug.WriteLine("Reconnect failed {0}", ex.Message);
         }
      }
   }
}

I’m going to post some questions on the TTN forums and Slack community to see if what I’m trying to do is supported/possible.

I got some helpful responses on the TTN forums and it looks like what I want todo is not supported by the V3 stack (Aug2020) and I will have to use gRPC.

The Things Network Client Part1

Basic connectivity

Over the last few months I have been using the community version of The Things Network(TTN) to test my LoRaWAN RakWireless RAK811 EVB based nanoFramework and TinyCLR clients.

As I was manually configuring TTN clients references to an application programming interface(API) caught my attention. In my day job I use tools from SmartBear and RicoSuter to generate .Net Core clients (for APSP.NET Core Web APIs I have build) from their OpenAPI descriptions.

The first step was to download the API swagger from The Things Network Github repository.

Things Network Github repository

I then used nSwagStudio to generate a C# client from a local copy of the API swagger (in the future I will use download the swagger and use the command line tools).

nSwag User Interface

At this point I had a basic client for the TTN network stack API which lacked support for the TTN security model etc. After looking at the TTN API documentation I figured out I need to add a header which contained an API Key from the TTN application configuration.

namespace TheThingsNetwork.API
{
	public partial class EndDeviceRegistryClient
	{
		public string ApiKey { set; get; }

		partial void PrepareRequest(System.Net.Http.HttpClient client, System.Net.Http.HttpRequestMessage request, string url)
		{
			if (!client.DefaultRequestHeaders.Contains("Authorization"))
			{
				client.DefaultRequestHeaders.Add("Authorization", $"Bearer {ApiKey}");
			}
		}
	}
}

In the TTN console on the overview page for my application I created an Access Key.

I then added some attributes to one of my devices so I had some addition device configuration data to display(I figured these could be useful for Azure IoT Hub configuration parameters etc. more about this later..)

Basic Device configuration in TTN Enterprise

I built a nasty console application which displayed some basic device configuration information to confirm I could authenticate and enumerate.

//---------------------------------------------------------------------------------
// Copyright (c) August 2020, devMobile Software
//
// Licensed under the Apache License, Version 2.0 (the "License");
// you may not use this file except in compliance with the License.
// You may obtain a copy of the License at
//
//     http://www.apache.org/licenses/LICENSE-2.0
//
// Unless required by applicable law or agreed to in writing, software
// distributed under the License is distributed on an "AS IS" BASIS,
// WITHOUT WARRANTIES OR CONDITIONS OF ANY KIND, either express or implied.
// See the License for the specific language governing permissions and
// limitations under the License.
//
// SECURITY_ANONYMISE
//---------------------------------------------------------------------------------
namespace TheThingsNetwork.EndDeviceClient
{
	using System;
	using System.Collections.Generic;
	using System.Net.Http;
	using TheThingsNetwork.API;

	class Program
	{
		static void Main(string[] args)
		{
			Console.WriteLine("TheThingsNetwork.EndDeviceClient starting");

			if (args.Length != 3)
			{
				Console.WriteLine("EndDeviceClient <baseURL> <applicationId> <apiKey>");
				Console.WriteLine("Press <enter> to exit");
				Console.ReadLine();
				return;
			}
			string baseUrl = args[0];
#if !SECURITY_ANONYMISE
			Console.WriteLine($"baseURL: {baseUrl}");
#endif
			string applicationId = args[1];
#if !SECURITY_ANONYMISE
			Console.WriteLine($"applicationId: {applicationId}");
#endif
			string apiKey = args[2];
#if !SECURITY_ANONYMISE
			Console.WriteLine($"apiKey: {apiKey}");
			Console.WriteLine();
#endif

			using (HttpClient httpClient = new HttpClient())
			{
				EndDeviceRegistryClient endDeviceRegistryClient = new EndDeviceRegistryClient(baseUrl, httpClient);
				endDeviceRegistryClient.ApiKey = apiKey;

				try
				{
					V3EndDevices endDevices = endDeviceRegistryClient.ListAsync(applicationId).GetAwaiter().GetResult();

					foreach (V3EndDevice v3EndDevice in endDevices.End_devices)
					{
#if SECURITY_ANONYMISE
						v3EndDevice.Ids.Dev_eui[7] = 0x0;
						v3EndDevice.Ids.Dev_eui[8] = 0x0;
						v3EndDevice.Ids.Dev_eui[9] = 0x0;
						v3EndDevice.Ids.Dev_eui[10] = 0x0;
						v3EndDevice.Ids.Dev_eui[11] = 0x0;
#endif
						Console.WriteLine($"Device ID:{v3EndDevice.Ids.Device_id} DevEUI:{Convert.ToBase64String(v3EndDevice.Ids.Dev_eui)}");
						Console.WriteLine($"   CreatedAt: {v3EndDevice.Created_at:dd-MM-yy HH:mm:ss} UpdatedAt: {v3EndDevice.Updated_at:dd-MM-yy HH:mm:ss}");

						string[] fieldMaskPaths = { "name", "description", "attributes" };

						var endDevice = endDeviceRegistryClient.GetAsync(applicationId, v3EndDevice.Ids.Device_id, field_mask_paths: fieldMaskPaths).GetAwaiter().GetResult();

						Console.WriteLine($"   Name: {endDevice.Name}");
						Console.WriteLine($"   Description: {endDevice.Description}");
						if (endDevice.Attributes != null)
						{
							foreach (KeyValuePair<string, string> attribute in endDevice.Attributes)
							{
								Console.WriteLine($"      Key: {attribute.Key} Name: {attribute.Value}");
							}
						}
						Console.WriteLine();
					}
				}
				catch (Exception ex)
				{
					Console.WriteLine(ex.Message);
				}

				Console.WriteLine("Press <enter> to exit");
				Console.ReadLine();
			}
		}
	}
}

I added some code so I could anonymise the displayed configuration so I could take screen grabs without revealing any sensitive information.

TTN API Client V1

Initially I struggled with versioning issues as the TTN community network is running V2 and the github repository was for V3. I approached TTN and they gave me access to a “limited” account on the enterprise network.

I also struggled with the number of blank fields in responses and spent some time learning GO (the programming language TTN is built with) to figure out how to use fieldMaskPaths etc.

string[] fieldMaskPaths = { "name", "description", "attributes" };

V3EndDevice endDevice = endDeviceRegistryClient.GetAsync(applicationId, v3EndDevice.Ids.Device_id, field_mask_paths: fieldMaskPaths).GetAwaiter().GetResult();

Overall things went pretty well but I expect to basic GO programing skills one this project is finished.

As hinted at earlier in this post the end goal of this project is to build an Azure IoT hub integration.

TinyCLR OS V2 RC1 RAK811 LoRaWAN library Part1

Basic connectivity

Over the weekend I have been working on a GHI Electronics TinyCLR V2  C# library for my modified RAK811 LPWAN Evaluation Board(EVB) from RAK Wireless. My initial test rig is based on an Fezduino board which has Arduino Uno R3 format socket for the EVB.

Fezduino with RAK Wisnode shield

The code has compile time options for synchronous and asynchronous operation.

   public class Program
   {
      private static UartController serialDevice;
      private const string ATCommand = "at+version\r\n";
#if TINYCLR_V2_FEZDUINO
      private static string SerialPortId = SC20100.UartPort.Uart5;
#endif

      public static void Main()
      {
         Debug.WriteLine("devMobile.IoT.Rak811.ShieldSerial starting");

         try
         {
            serialDevice = UartController.FromName(SerialPortId);

            serialDevice.SetActiveSettings(new UartSetting()
            {
               BaudRate = 9600,
               Parity = UartParity.None,
               StopBits = UartStopBitCount.One,
               Handshaking = UartHandshake.None,
               DataBits = 8
            });

            serialDevice.Enable();

#if SERIAL_ASYNC_READ
            serialDevice.DataReceived += SerialDevice_DataReceived;
#endif

            while (true)
            {
               byte[] txBuffer = UTF8Encoding.UTF8.GetBytes(ATCommand);

               int txByteCount = serialDevice.Write(txBuffer);
               Debug.WriteLine($"TX: {txByteCount} bytes");

#if SERIAL_SYNC_READ
               while( serialDevice.BytesToWrite>0)
               {
                  Debug.WriteLine($" BytesToWrite {serialDevice.BytesToWrite}");
                  Thread.Sleep(100);
               }

               int rxByteCount = serialDevice.BytesToRead;
               if (rxByteCount>0)
               {
                  byte[] rxBuffer = new byte[rxByteCount];

                  serialDevice.Read(rxBuffer);

                  Debug.WriteLine($"RX sync:{rxByteCount} bytes read");
                  String response = UTF8Encoding.UTF8.GetString(rxBuffer);
                  Debug.WriteLine($"RX sync:{response}");
               }
#endif

               Thread.Sleep(20000);
            }
         }
         catch (Exception ex)
         {
            Debug.WriteLine(ex.Message);
         }
      }


#if SERIAL_ASYNC_READ
      private static void SerialDevice_DataReceived(UartController sender, DataReceivedEventArgs e)
      {
         byte[] rxBuffer = new byte[e.Count];

         serialDevice.Read(rxBuffer, 0, e.Count);

         Debug.WriteLine($"RX Async:{e.Count} bytes read");
         String response = UTF8Encoding.UTF8.GetString(rxBuffer);
         Debug.WriteLine($"RX Async:{response}");
      }
#endif
   }

When I first ran the code I noticed the serialDevice.Read timed out before any characters were received.

The thread '<No Name>' (0x2) has exited with code 0 (0x0).
devMobile.IoT.Rak811.ShieldSerial starting
TX: 12 bytes
TX: 12 bytes
RX sync:19 bytes read
RX sync:OK V3.0.0.13.H.T3

TX: 12 bytes
RX sync:19 bytes read
RX sync:OK V3.0.0.13.H.T3

TX: 12 bytes
RX sync:19 bytes read
RX sync:OK V3.0.0.13.H.T3

I then added code to check the message had been sent and the code worked as expected. I now think, that rather than checking that the characters had been sent the short 100mSec delay was more important.

The thread '<No Name>' (0x2) has exited with code 0 (0x0).
devMobile.IoT.Rak811.ShieldSerial starting
TX: 12 bytes
 BytesToWrite 10
RX sync:19 bytes read
RX sync:OK V3.0.0.13.H.T3

TX: 12 bytes
 BytesToWrite 10
RX sync:19 bytes read
RX sync:OK V3.0.0.13.H.T3

TX: 12 bytes
 BytesToWrite 10
RX sync:19 bytes read
RX sync:OK V3.0.0.13.H.T3

I then added code to receive data asynchronously and the response to the version request was received as expected.

The thread '<No Name>' (0x2) has exited with code 0 (0x0).
devMobile.IoT.Rak811.ShieldSerial starting
TX: 12 bytes
RX Async:1 bytes read
RX Async:O
RX Async:8 bytes read
RX Async:K V3.0.0
RX Async:10 bytes read
RX Async:.13.H.T3

TX: 12 bytes
RX Async:1 bytes read
RX Async:O
RX Async:5 bytes read
RX Async:K V3.
RX Async:9 bytes read
RX Async:0.0.13.H.
RX Async:4 bytes read
RX Async:T3

RAK811 LPWAN EVB Part3

Invalidating the warranty…

I wanted the RAK811 LPWAN Evaluation Board(EVB) -AS923 to work with selection of my Arduino and nanoFramework devices. The first decision was which of the hardware serial port (D0,D1) or the software serial port (D10,D11) should be connected to P1?

To use the EVB with my STM32F691DISCOVERY board running the nanoFramework (COM5 on the hardware serial port pins D0,D1) I removed R17&R19.

After some tinkering, I found that R8 which is connected to the RAK811 module reset had to be cut as well for the shield to work on my Arduino Uno R3 and STM32F691DISCOVERY devices.

RAK811 EVB with R17,R19 & R8 cut

I can still run the Arduino Uno R3 and RAK811 EVB in the original configuration with a couple of jumper leads

RAK811 on Arduino with Serial connected to D10,D1 a SoftwareSerial port

For devices where I needed D10,D11 for a  Serial Peripheral Interface(SPI) I could use an FTDI board and a couple of other pins (in this case D2,D3) for serial logging.

RAK811 on Arduino with Serial connected to D2,D2 a SoftwareSerial port

After debugging some code I also replaced the small jumpers on P1 with a couple of jumper leads so it was less fiddly to swap from downloading to debugging.

RAK811 LPWAN EVB Part2

How can I use this…

Just over a week ago I purchased a RAK811 LPWAN Evaluation Board -AS923 and now I want to trial it with selection of devices and configurations.

Initially I didn’t want to modify the shield by removing resistors as I only have one, and I’m not certain what device(s) it will be used with. The initial hardware configuration required jumpers for the serial port, ground and 5V power.

Arduino Uno R3 and RAK811 LPWAN Evaluation board 5V config

After looking at the schematic it should be possible to use the shield with a 3v3 device.

RAK 811 EVB schematic pg1
RAK 811 EVB schematic pg2

I confirmed this with a Seeeduino V4.2 devices set to 3v3, by putting a jumper on J1 and shifting the jumper wire from the 5V to the 3V3 pin.

Seeeduino V4 and RAK811 LPWAN Evaluation board 3V3 config

The next step was to see how I could get the RAK shield working on other devices without jumpers. On Arduino Uno R3 devices D0&D1 are the hardware(HW) serial port which are used for uploading sketches, and diagnostic logging.

The shield also connects the module serial port to D0&D1 to D10&D11, so by removing R17&R19 the shield should work on a device This would also allow the use of the Serial Peripheral Interface(SPI) port for other applications.

Using the HW Serial port but without any logging.

Unplugging the jumpers to upload was painful but the lack of logging made it really hard to debug my code.

To get around this I configured a SoftwareSerial port on D2&D3 for logging.

/********************************************************
 * This demo is only supported after RUI firmware version 3.0.0.13.X on RAK811
 * Master Board Uart Receive buffer size at least 128 bytes. 
 ********************************************************/
//#define SERIAL_BUFFER_SIZE 128
//#define SERIAL_TX_BUFFER_SIZE 64
//#define SERIAL_RX_BUFFER_SIZE 128
//#define _SS_MAX_RX_BUFF 128
#include "RAK811.h"
#include "SoftwareSerial.h"
#define WORK_MODE LoRaWAN   //  LoRaWAN or LoRaP2P
#define JOIN_MODE OTAA    //  OTAA or ABP
#if JOIN_MODE == OTAA
String DevEui = "..."; // From TTN
String AppEui = "...";
String AppKey = "...";
#else JOIN_MODE == ABP
String NwkSKey = "...";
String AppSKey = "...";
String DevAddr = "...";
#endif

#define TXpin 3   // Set the virtual serial port pins
#define RXpin 2

SoftwareSerial DebugSerial(RXpin,TXpin); // Declare a virtual serial port for debugging
#define ATSerial Serial

char buffer[]= "48656C6C6F20776F726C6435";

bool InitLoRaWAN(void);
RAK811 RAKLoRa(ATSerial,DebugSerial);

void setup() {
  DebugSerial.begin(19200);
  DebugSerial.println(F("Starting"));
  while(DebugSerial.available())
  {
    DebugSerial.read(); 
  }
  
  ATSerial.begin(9600); //set ATSerial baudrate:This baud rate has to be consistent with  the baud rate of the WisNode device.
  while(ATSerial.available())
  {
    ATSerial.read(); 
  }

  if(!RAKLoRa.rk_setWorkingMode(0))  //set WisNode work_mode to LoRaWAN.
  {
    DebugSerial.println(F("set work_mode failed, please reset module."));
    while(1);
  }
  
  RAKLoRa.rk_getVersion();  //get RAK811 firmware version
  DebugSerial.println(RAKLoRa.rk_recvData());  //print version number

  DebugSerial.println(F("Start init RAK811 parameters..."));
 
  if (!InitLoRaWAN())  //init LoRaWAN
  {
    DebugSerial.println(F("Init error,please reset module.")); 
    while(1);
  }

  DebugSerial.println(F("Start to join LoRaWAN..."));
  while(!RAKLoRa.rk_joinLoRaNetwork(60))  //Joining LoRaNetwork timeout 60s
  {
    DebugSerial.println();
    DebugSerial.println(F("Rejoin again after 5s..."));
    delay(5000);
  }
  DebugSerial.println(F("Join LoRaWAN success"));

  if(!RAKLoRa.rk_isConfirm(0))  //set LoRa data send package type:0->unconfirm, 1->confirm
  {
    DebugSerial.println(F("LoRa data send package set error,please reset module.")); 
    while(1);    
  }
}

bool InitLoRaWAN(void)
{
  if(RAKLoRa.rk_setJoinMode(JOIN_MODE))  //set join_mode:OTAA
  {
    if(RAKLoRa.rk_setRegion(0))  //set region EU868
    {
      if (RAKLoRa.rk_initOTAA(DevEui, AppEui, AppKey))
      {
        DebugSerial.println(F("RAK811 init OK!"));  
        return true;    
      }
    }
  }
  return false;
}

void loop() 
{
  DebugSerial.println(F("Start send data..."));
  if (RAKLoRa.rk_sendData(1, buffer))
  {    
    //for (unsigned long start = millis(); millis() - start < 300000L;)
    for (unsigned long start = millis(); millis() - start < 10000L;)
    {
      String ret = RAKLoRa.rk_recvData();
      if(ret != NULL)
      { 
        DebugSerial.println("ret != NULL");
        DebugSerial.println(ret);
      }
      if((ret.indexOf("OK")>0)||(ret.indexOf("ERROR")>0))
      {
        DebugSerial.println(F("Go to Sleep."));
        RAKLoRa.rk_sleep(1);  //Set RAK811 enter sleep mode
        delay(10000);  //delay 10s
        RAKLoRa.rk_sleep(0);  //Wakeup RAK811 from sleep mode
        break;
      }
    }
  }
}

I used an FTDI module I had lying around to connect the diagnostic logging serial port on the test rig to my development box.

Using the HW Serial port but with logging.

Now I only had to unplug the jumpers for D0&D1 and change ports in the Arduino IDE. One port for debugging the other for downloading.

Depending on the application I may remove R8 so I can manually reset the shield.

RAK811 LPWAN EVB Part1

I followed the instructions…

Just over a week ago I purchased some gear from RAK Wireless, the shipping was reasonable, it arrived promptly, and was well packaged. I had ordered

I figured a good first project would be to get the evaluation board going with one of my older Arduino Uno R3 devices following the Interfacing your RAK811 LPWAN Evaluation Board with Arduino Boards instructions.

The evaluation board was in its own box along with a USB cable, some spare PCB jumpers, some jumper leads and an antenna labeled with the frequency band which was thoughtful.

Arduino Uno R3 and RAK811 LPWAN Evaluation board 5V config

I downloaded the specified library from the RAK Wireless Github repository extracted the contents and copied the V1.3 directory into the libraries folder of my Arduino IDE install.

I updated the module software to the latest using the tools provided in the github download and checked this with the RAK Serial Port tool over the Universal Serial Bus(USB) connection (make sure the jumpers next to the antenna connection are set correctly)

Version number check with RAK Serial Port tool

I created a new project based on JoinNetworkOTAA (Over the Air Activation) example.

/********************************************************
 * This demo is only supported after RUI firmware version 3.0.0.13.X on RAK811
 * Master Board Uart Receive buffer size at least 128 bytes. 
 ********************************************************/

#include "RAK811.h"
#include "SoftwareSerial.h"
#define WORK_MODE LoRaWAN   //  LoRaWAN or LoRaP2P
#define JOIN_MODE OTAA    //  OTAA or ABP
#if JOIN_MODE == OTAA
String DevEui = "8680000000000001";
String AppEui = "70B3D57ED00285A7";
String AppKey = "DDDFB1023885FBFF74D3A55202EDF2B1";
#else JOIN_MODE == ABP
String NwkSKey = "69AF20AEA26C01B243945A28C9172B42";
String AppSKey = "841986913ACD00BBC2BE2479D70F3228";
String DevAddr = "260125D7";
#endif
#define TXpin 11   // Set the virtual serial port pins
#define RXpin 10
#define DebugSerial Serial
SoftwareSerial ATSerial(RXpin,TXpin);    // Declare a virtual serial port
char buffer[]= "72616B776972656C657373";

bool InitLoRaWAN(void);
RAK811 RAKLoRa(ATSerial,DebugSerial);


void setup() {
  DebugSerial.begin(115200);
  while(DebugSerial.available())
  {
    DebugSerial.read(); 
  }
  
  ATSerial.begin(9600); //set ATSerial baudrate:This baud rate has to be consistent with  the baud rate of the WisNode device.
  while(ATSerial.available())
  {
    ATSerial.read(); 
  }

  if(!RAKLoRa.rk_setWorkingMode(0))  //set WisNode work_mode to LoRaWAN.
  {
    DebugSerial.println(F("set work_mode failed, please reset module."));
    while(1);
  }
  
  RAKLoRa.rk_getVersion();  //get RAK811 firmware version
  DebugSerial.println(RAKLoRa.rk_recvData());  //print version number

  DebugSerial.println(F("Start init RAK811 parameters..."));
 
  if (!InitLoRaWAN())  //init LoRaWAN
  {
    DebugSerial.println(F("Init error,please reset module.")); 
    while(1);
  }

  DebugSerial.println(F("Start to join LoRaWAN..."));
  while(!RAKLoRa.rk_joinLoRaNetwork(60))  //Joining LoRaNetwork timeout 60s
  {
    DebugSerial.println();
    DebugSerial.println(F("Rejoin again after 5s..."));
    delay(5000);
  }
  DebugSerial.println(F("Join LoRaWAN success"));

  if(!RAKLoRa.rk_isConfirm(0))  //set LoRa data send package type:0->unconfirm, 1->confirm
  {
    DebugSerial.println(F("LoRa data send package set error,please reset module.")); 
    while(1);    
  }
}

bool InitLoRaWAN(void)
{
  if(RAKLoRa.rk_setJoinMode(JOIN_MODE))  //set join_mode:OTAA
  {
    if(RAKLoRa.rk_setRegion(0))  //set region EU868
    {
      if (RAKLoRa.rk_initOTAA(DevEui, AppEui, AppKey))
      {
        DebugSerial.println(F("RAK811 init OK!"));  
        return true;    
      }
    }
  }
  return false;
}

void loop() {
  DebugSerial.println(F("Start send data..."));
  if (RAKLoRa.rk_sendData(1, buffer))
  {    
    for (unsigned long start = millis(); millis() - start < 90000L;)
    {
      String ret = RAKLoRa.rk_recvData();
      if(ret != NULL)
      { 
        DebugSerial.println(ret);
      }
      if((ret.indexOf("OK")>0)||(ret.indexOf("ERROR")>0))
      {
        DebugSerial.println(F("Go to Sleep."));
        RAKLoRa.rk_sleep(1);  //Set RAK811 enter sleep mode
        delay(10000);  //delay 10s
        RAKLoRa.rk_sleep(0);  //Wakeup RAK811 from sleep mode
        break;
      }
    }
  }
}

I had to look at the library code to work out the value the rk_setRegion call needed for the AS932 band used in my region

bool RAK811::rk_setRegion(int region)
{
  if (region > 9)
  {
    _serial1.println(F("Parameter error"));
    return false;
  }
  String REGION;
  switch (region)
  {
    case 0:REGION="AS923";
      break;
    case 1:REGION="AU915";
      break;
    case 2:REGION="CN470";
      break;
    case 3:REGION="CN779";
      break;
    case 4:REGION="EU433";
      break;
    case 5:REGION="EU868";
      break;
    case 6:REGION="KR920";
      break;
    case 7:REGION="IN865";
      break;
    case 8:REGION="US915";
      break;
    case 9:REGION="US915_Hybrid";
      break;
  }
  _serial1.println("Current work region: "+REGION);
  sendRawCommand("at+set_config=lora:region:" + REGION);
  ret = rk_recvData();
#if defined DEBUG_MODE
  _serial1.println(ret);
#endif
  if (ret.indexOf("OK") >= 0)
  {
    return true;
  }
  else
  {
    return false;
  }
}

I compiled the code, uploaded it to my device and it didn’t work…

Arduino monitor output showing rk_setWorkingMode failing

I then had a look at the Arduino library code and enabled some of the commented out diagnostic println statements. At the time it did seem odd there were no responses from the module.

Arduino monitor output showing rk_setWorkingMode failing with debugging

I had noticed some odd characters in the RAK Serial Port Tool while checking version numbers etc.

Setting work Mode with RAK Serial Port Tool

It looked like maybe the serial port was having some issues, so I double checked my modification of the HardwareSerial.h file and began to wonder (as the binary size wasn’t changing) if I had the right file. After some research I found there are several copies of that file and I wasn’t modifying the correct one.

Multiple locations of HardwareSerial.h

Then I realised that the port sending AT Commands to the module was actually a SoftwareSerial port not a hardware one. I then tried changing the size of the software serial buffers but still was having problems.

Arduino tool with default buffer sizes (833 bytes)
Arduino tool with non-default buffer sizes (961 bytes)

I then tried recompiling with different settings to see if the serial port issues would stop. The global variables size changed which showed I had the right files/settings but the code still didn’t work.

Going back over my settings I tried the command used in the rk_setWorkingMode call in the RAK Serial Port Tool and it worked.

I then then went for a walk and when I came back I realised the module speed was set to 115200 baud by default (which it is). I then used at+set_config=device:uart:1:9600 (don’t forget to press <enter> at end of the line) to set baud rate to match the code.

Setting device to 9600 baud

I then changed the jumpers and ran the software again…

So, it looks like the RAK811 module was set to 115200 baud (web based setup instructions), but the later library versions were 9600 baud, but the instructions didn’t mention the need to change the speed with the RAK Serial port tool.

Image of code and setup from RAK instructions

Now that my device is trying to connect to a network I need to configure the LoRaWAN network settings. I’m going to use the RAK7246G LPWAN Developer Gateway and the nationwide LoRaWAN network operated by Spark in New Zealand.