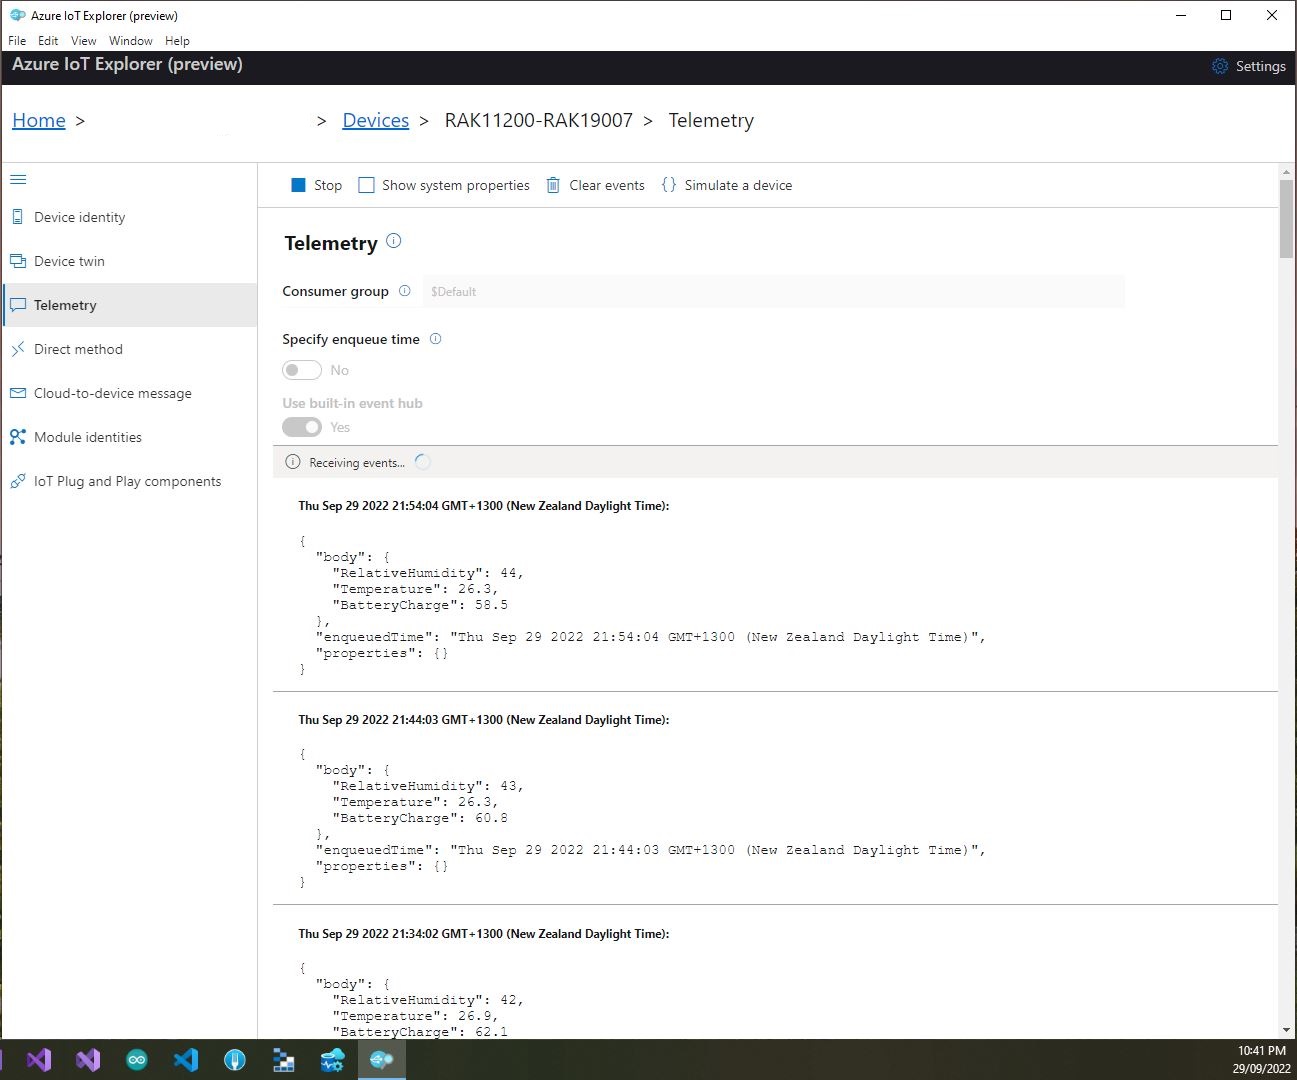
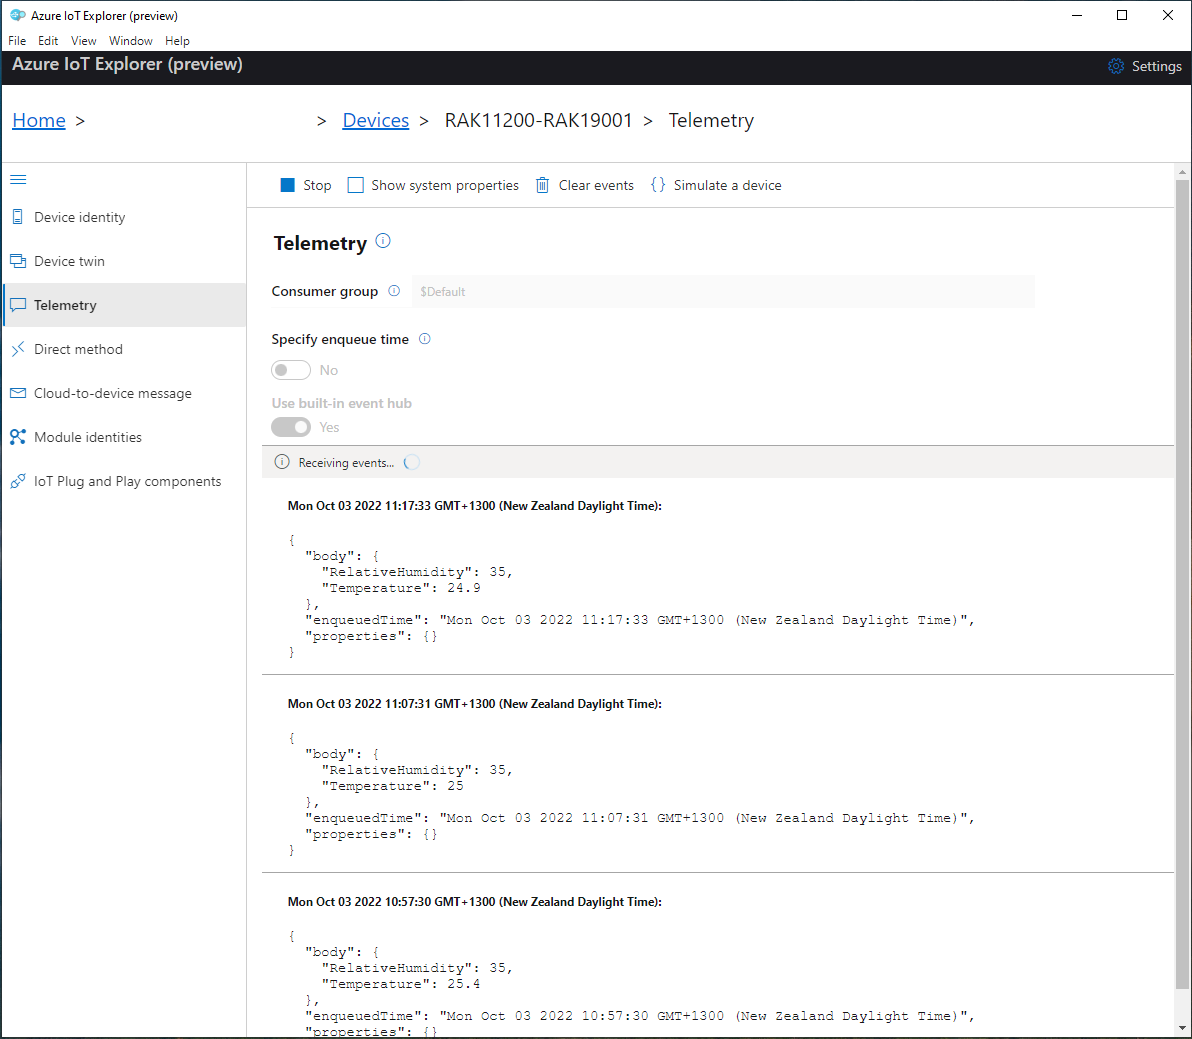
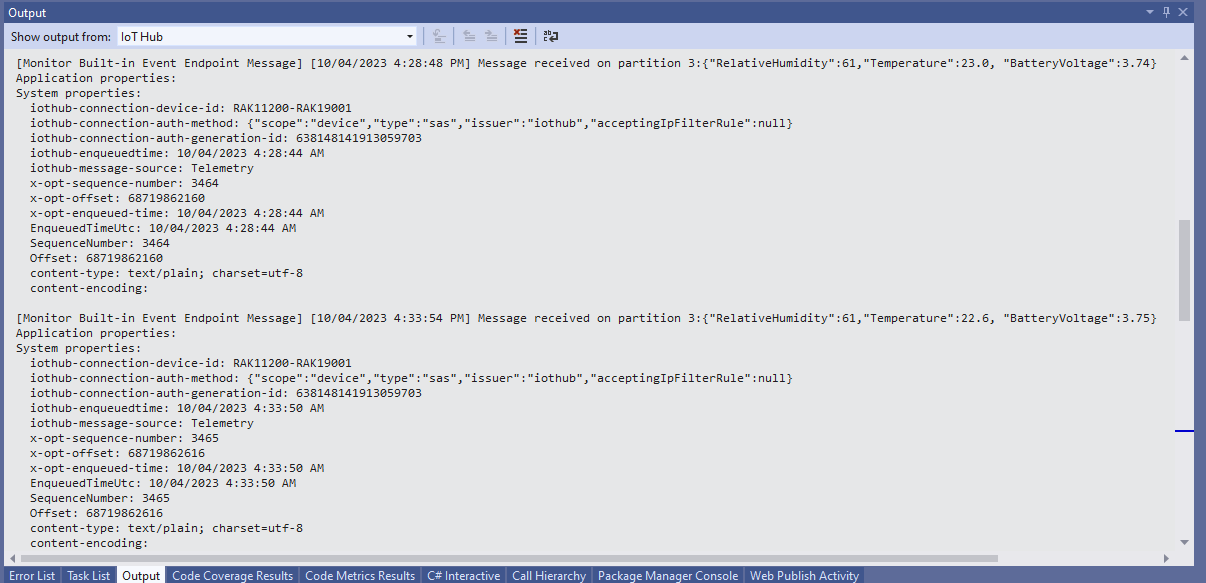
My test setup was a RAK11200 WisBlock WiFi Module, RAK19001 WisBlock Base Board, RAK1901 WisBlock Temperature and Humidity Sensor, 1200mAH Lithium Polymer (LiPo) battery and SKU920100 Solar Board. The test setup uploads temperature, humidity and battery voltage telemetry to an Azure IoT Hub every 5 minutes (short delay so battery life reduced).
The first step was to check that I could get a “battery voltage” value for the RAKWireless RAK11200 WisBlock WiFi Module on a RAK19001 WisBlock Base Board for managing “brownouts” and send to my Azure IoT Hub.

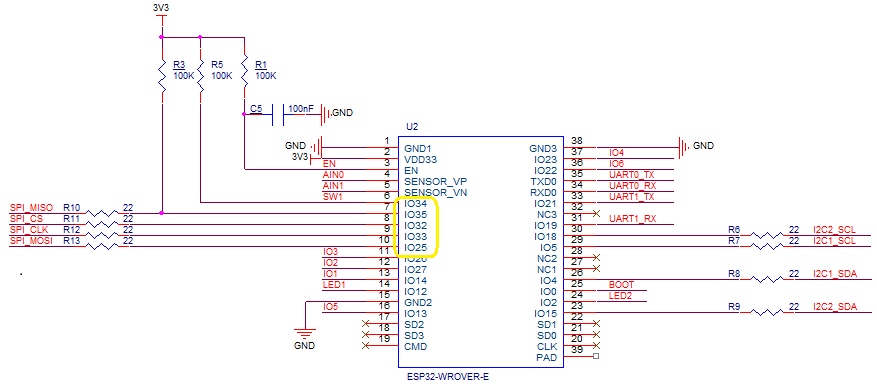
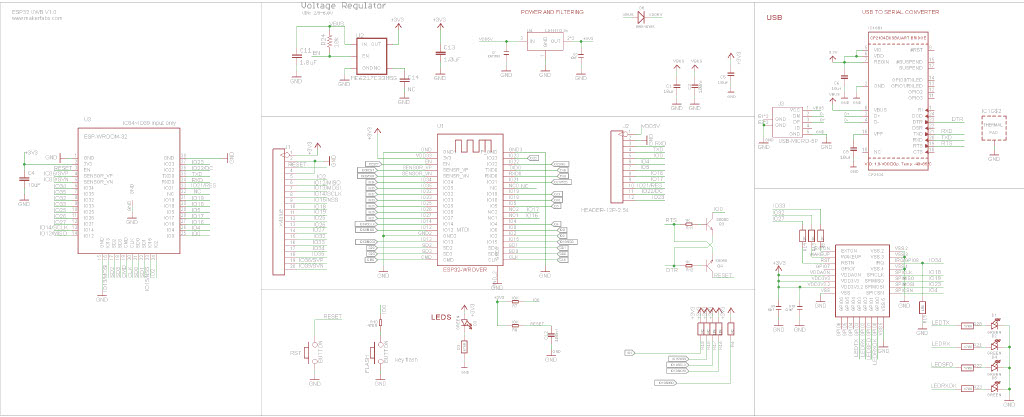
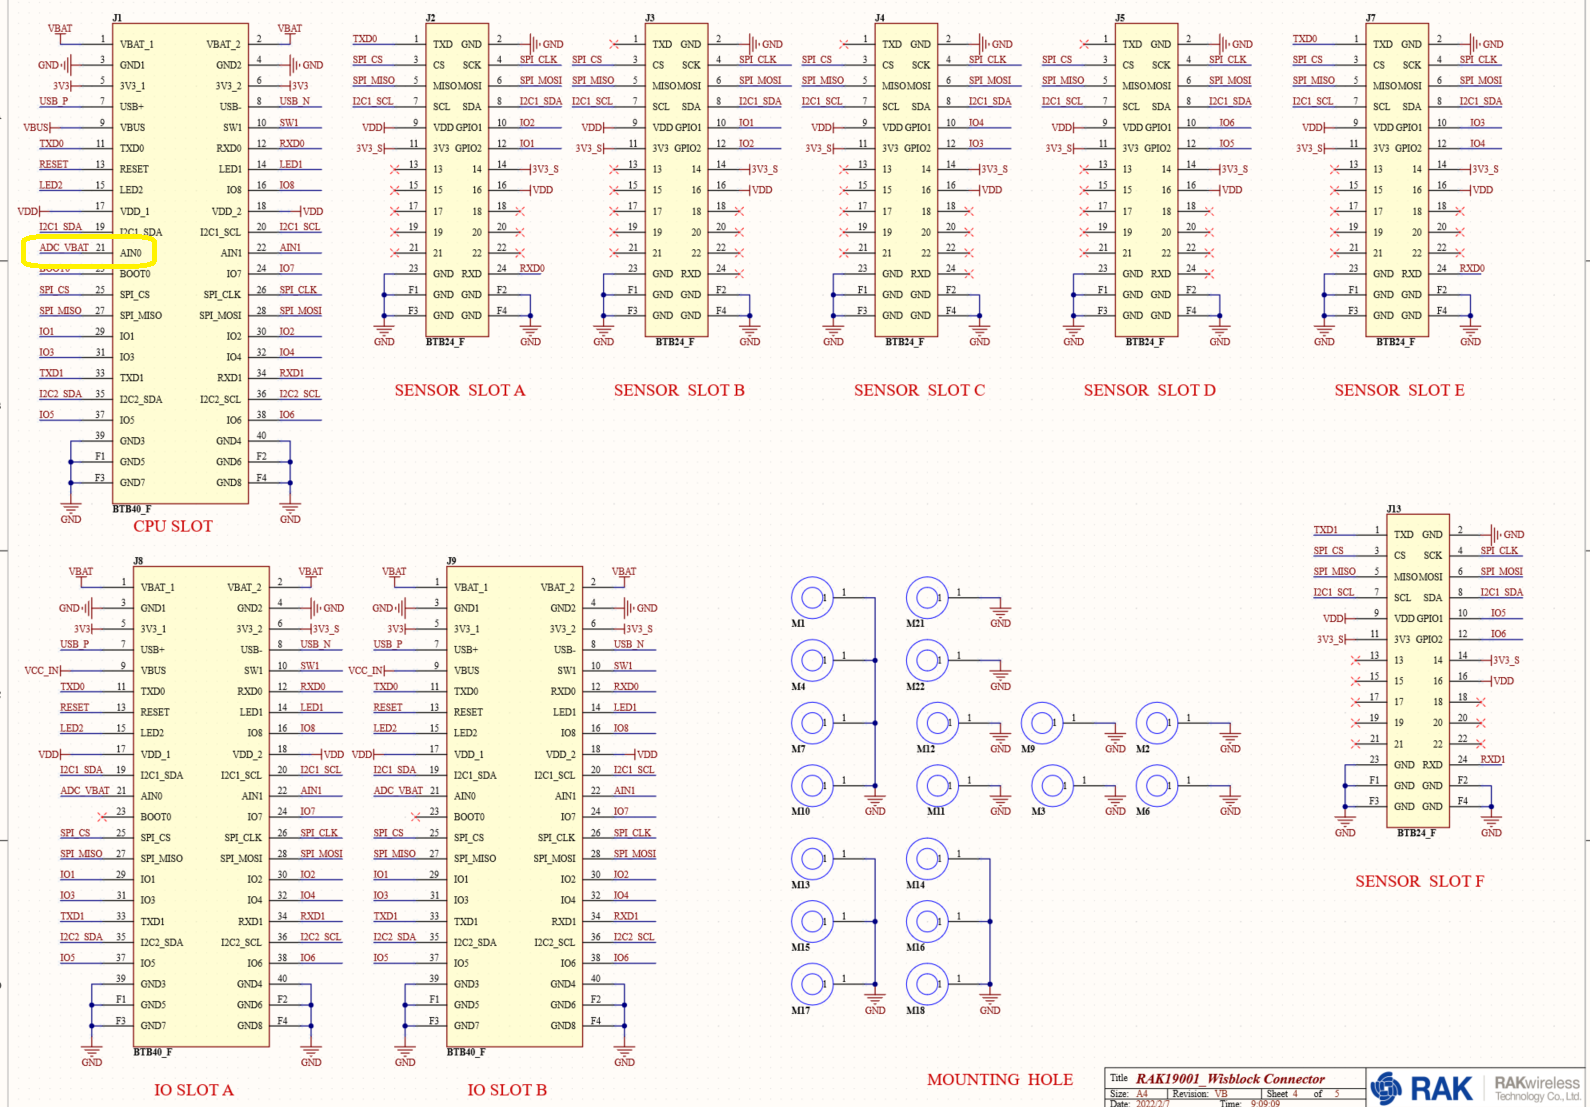
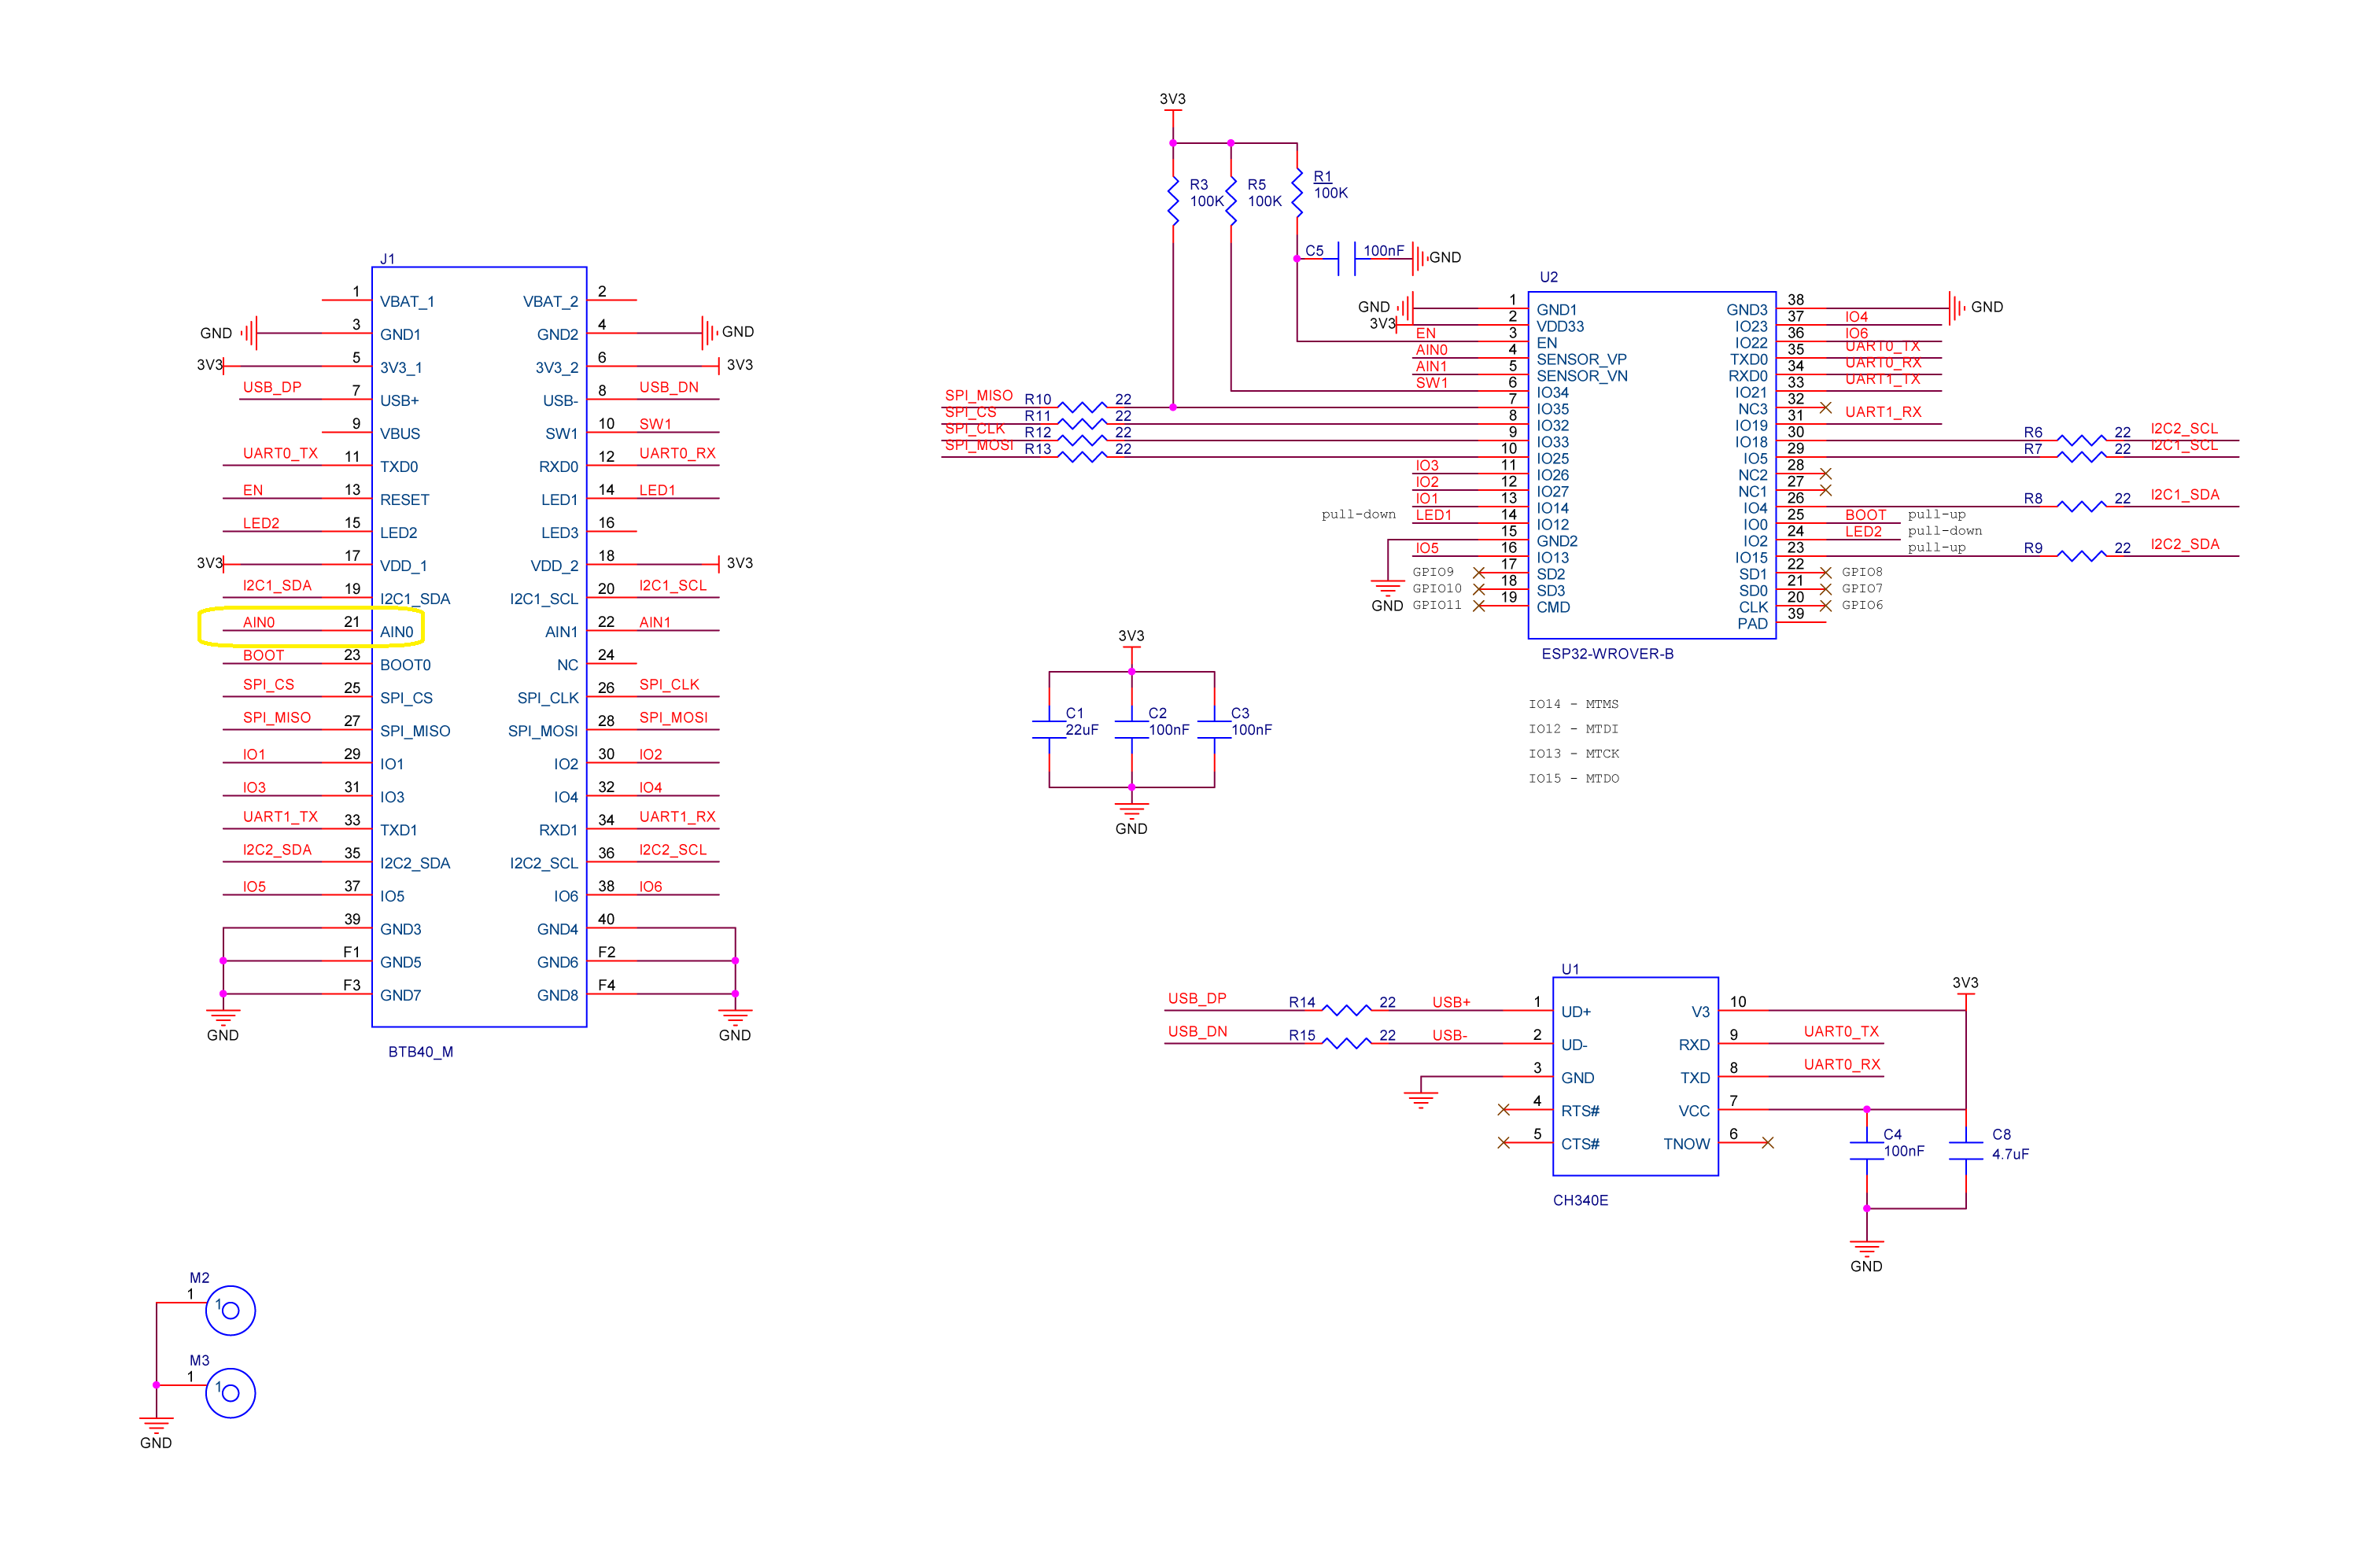
The RAK19001 WisBlock Base Board has a voltage divider (R4&R5 with output ADC_VBAT) which is connected to pin 21(AIN0) on the CPU slot connector.
The RAK19001 WisBlock Base Board has quite a low leakage current so the majority of the power consumption should be the RAK11200 WisBlock WiFi Module.

I used AdcController + AdcChannel to read AIN0 and modified the code using the formula (for a RAK4631 module) in the RAK Wireless forums to calculate the battery voltage. (UPDATE This calculation is not applicable to my scenario)
When “slept” the RAK11200 WisBlock WiFi Module power consumption is very low

public static void Main()
{
Debug.WriteLine($"{DateTime.UtcNow:HH:mm:ss} devMobile.IoT.RAK.Wisblock.AzureIoTHub.RAK11200.PowerSleep starting");
Thread.Sleep(5000); // This do debugger can attach consider removing in realease version
try
{
double batteryVoltage;
Configuration.SetPinFunction(Gpio.IO04, DeviceFunction.I2C1_DATA);
Configuration.SetPinFunction(Gpio.IO05, DeviceFunction.I2C1_CLOCK);
Debug.WriteLine($"{DateTime.UtcNow:HH:mm:ss} Battery voltage measurement");
// Configure Analog input (AIN0) port then read the "battery charge"
AdcController adcController = new AdcController();
using (AdcChannel batteryVoltageAdcChannel = adcController.OpenChannel(AdcControllerChannel))
{
// https://forum.rakwireless.com/t/custom-li-ion-battery-voltage-calculation-in-rak4630/4401/7
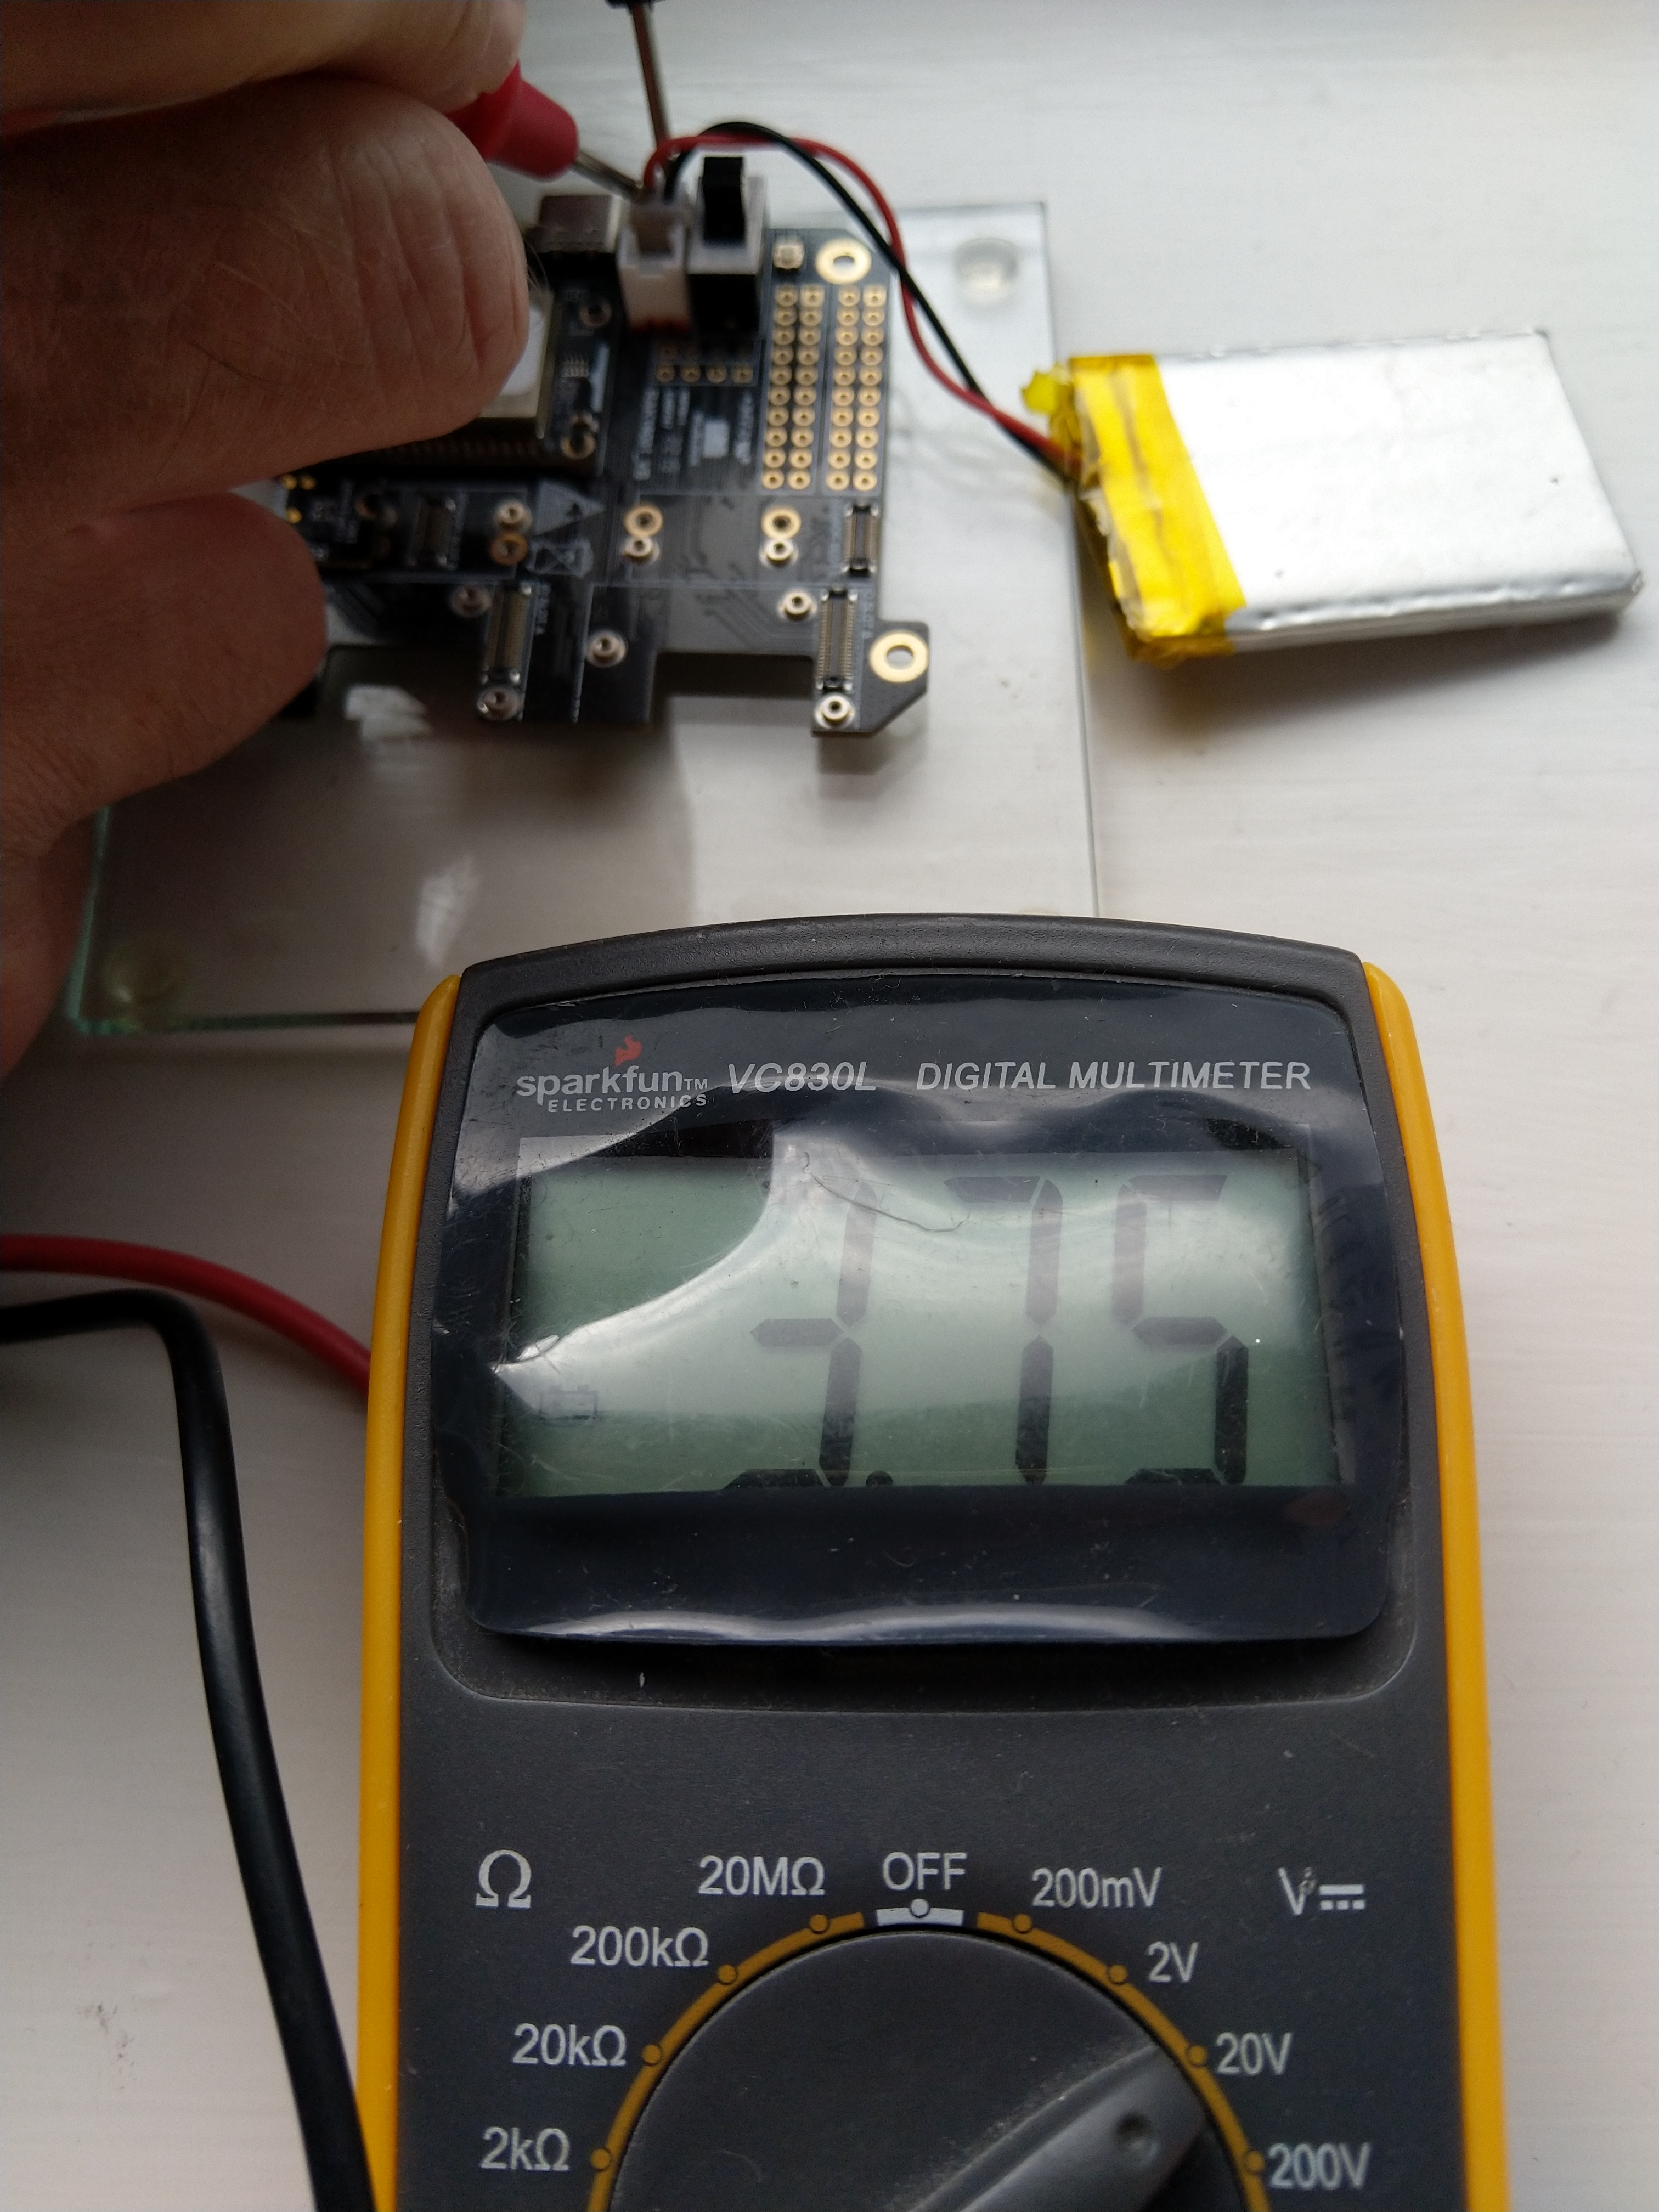
// When I checked with multimeter I had to increase 1.72 to 1.9
batteryVoltage = batteryVoltageAdcChannel.ReadValue() * (3.0 / 4096) * 1.9;
Debug.WriteLine($" BatteryVoltage {batteryVoltage:F2}");
if (batteryVoltage < Config.BatteryVoltageBrownOutThreshold)
{
Sleep.EnableWakeupByTimer(Config.FailureRetryInterval);
Sleep.StartDeepSleep();
}
}
Debug.WriteLine($"{DateTime.UtcNow:HH:mm:ss} Wifi connecting");
if (!WifiNetworkHelper.ConnectDhcp(Config.Ssid, Config.Password, requiresDateTime: true))
{
if (NetworkHelper.HelperException != null)
{
Debug.WriteLine($"{DateTime.UtcNow:HH:mm:ss} WifiNetworkHelper.ConnectDhcp failed {NetworkHelper.HelperException}");
}
Sleep.EnableWakeupByTimer(Config.FailureRetryInterval);
Sleep.StartDeepSleep();
}
Debug.WriteLine($"{DateTime.UtcNow:HH:mm:ss} Wifi connected");
// Configure the SHTC3
I2cConnectionSettings settings = new(I2cDeviceBusID, Shtc3.DefaultI2cAddress);
string payload ;
using (I2cDevice device = I2cDevice.Create(settings))
using (Shtc3 shtc3 = new(device))
{
if (shtc3.TryGetTemperatureAndHumidity(out var temperature, out var relativeHumidity))
{
Debug.WriteLine($" Temperature {temperature.DegreesCelsius:F1}°C Humidity {relativeHumidity.Value:F0}% BatteryVoltage {batteryVoltage:F2}");
payload = $"{{\"RelativeHumidity\":{relativeHumidity.Value:F0},\"Temperature\":{temperature.DegreesCelsius:F1}, \"BatteryVoltage\":{batteryVoltage:F2}}}";
}
else
{
Debug.WriteLine($" BatteryVoltage {batteryVoltage:F2}");
payload = $"{{\"BatteryVoltage\":{batteryVoltage:F2}}}";
}
#if SLEEP_SHT3C
shtc3.Sleep();
#endif
}
// Configure the HttpClient uri, certificate, and authorization
string uri = $"{Config.AzureIoTHubHostName}.azure-devices.net/devices/{Config.DeviceID}";
HttpClient httpClient = new HttpClient()
{
SslProtocols = System.Net.Security.SslProtocols.Tls12,
HttpsAuthentCert = new X509Certificate(Config.DigiCertBaltimoreCyberTrustRoot),
BaseAddress = new Uri($"https://{uri}/messages/events?api-version=2020-03-13"),
};
httpClient.DefaultRequestHeaders.Add("Authorization", SasTokenGenerate(uri, Config.Key, DateTime.UtcNow.Add(Config.SasTokenRenewFor)));
Debug.WriteLine($"{DateTime.UtcNow:HH:mm:ss} Azure IoT Hub device {Config.DeviceID} telemetry update start");
HttpResponseMessage response = httpClient.Post("", new StringContent(payload));
Debug.WriteLine($"{DateTime.UtcNow:HH:mm:ss} Response code:{response.StatusCode}");
response.EnsureSuccessStatusCode();
}
catch (Exception ex)
{
Debug.WriteLine($"{DateTime.UtcNow:HH:mm:ss} Azure IoT Hub telemetry update failed:{ex.Message} {ex?.InnerException?.Message}");
Sleep.EnableWakeupByTimer(Config.FailureRetryInterval);
Sleep.StartDeepSleep();
}
Sleep.EnableWakeupByTimer(Config.TelemetryUploadInterval);
#if SLEEP_LIGHT
Sleep.StartLightSleep();
#endif
#if SLEEP_DEEP
Sleep.StartDeepSleep();
#endif
}
The nanoFramework.Hardware.Esp32.Sleep functionality supports LightSleep and DeepSleep states. The ESP32 device can be “woken up” by GPIO pin(s), Touch pad activity or by a Timer.
After some “tinkering” I found the voltage calculation was surprisingly accurate (usually within 0.01V) for my RAK19001 and RAK19007 base boards.
When the battery voltage was close to its minimum working voltage of the ESP32 device it would reboot when the WifiNetworkHelper.ConnectDhcp method was called. This would quickly drain the battery flat even when the solar panel was trying to charge the battery.
Now, before trying to connect to the wireless network the battery voltage is checked and if too low (more experimentation required) the device goes into a deep sleep for a configurable period (more experimentation required). This is so the solar panel can charge the battery to a level where wireless connectivity will work.