Random wanderings through Microsoft Azure esp. PaaS plumbing, the IoT bits, AI on Micro controllers, AI on Edge Devices, .NET nanoFramework, .NET Core on *nix and ML.NET+ONNX
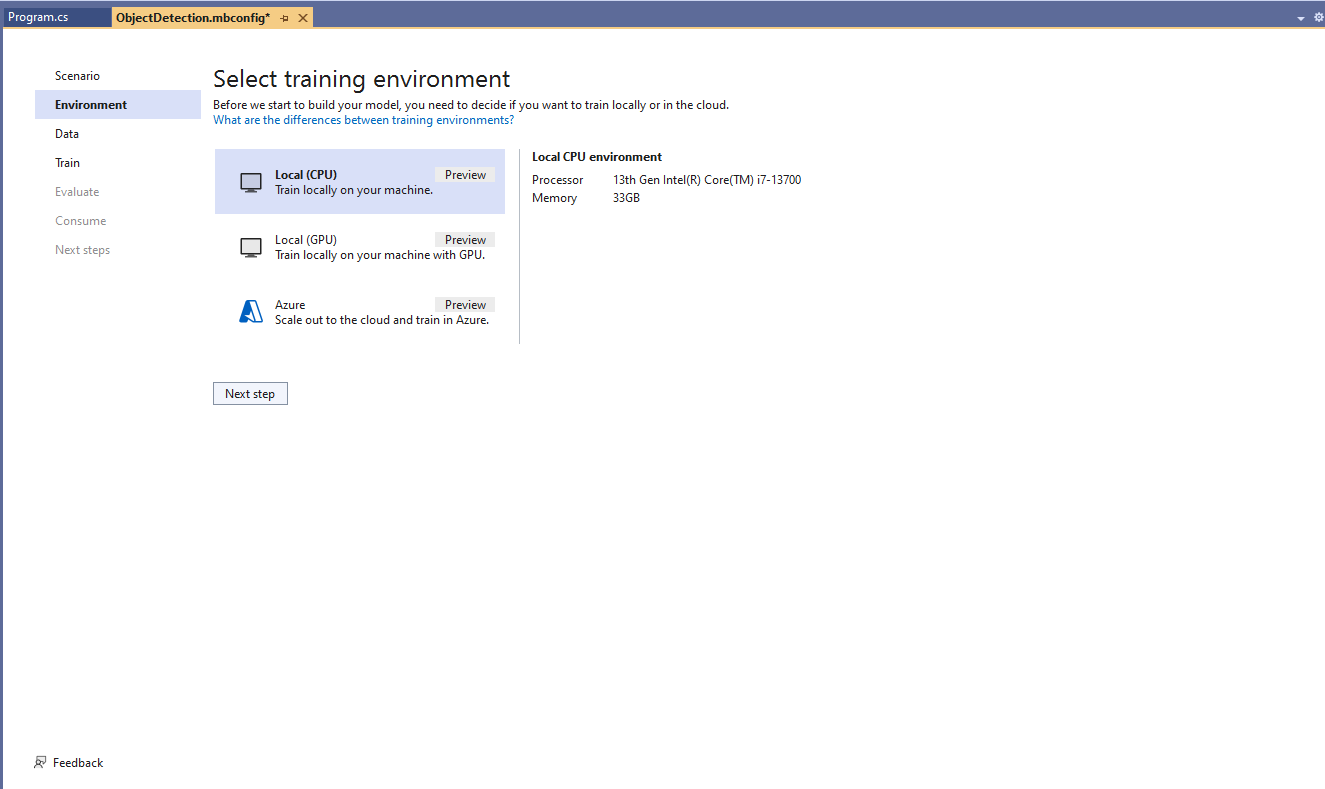
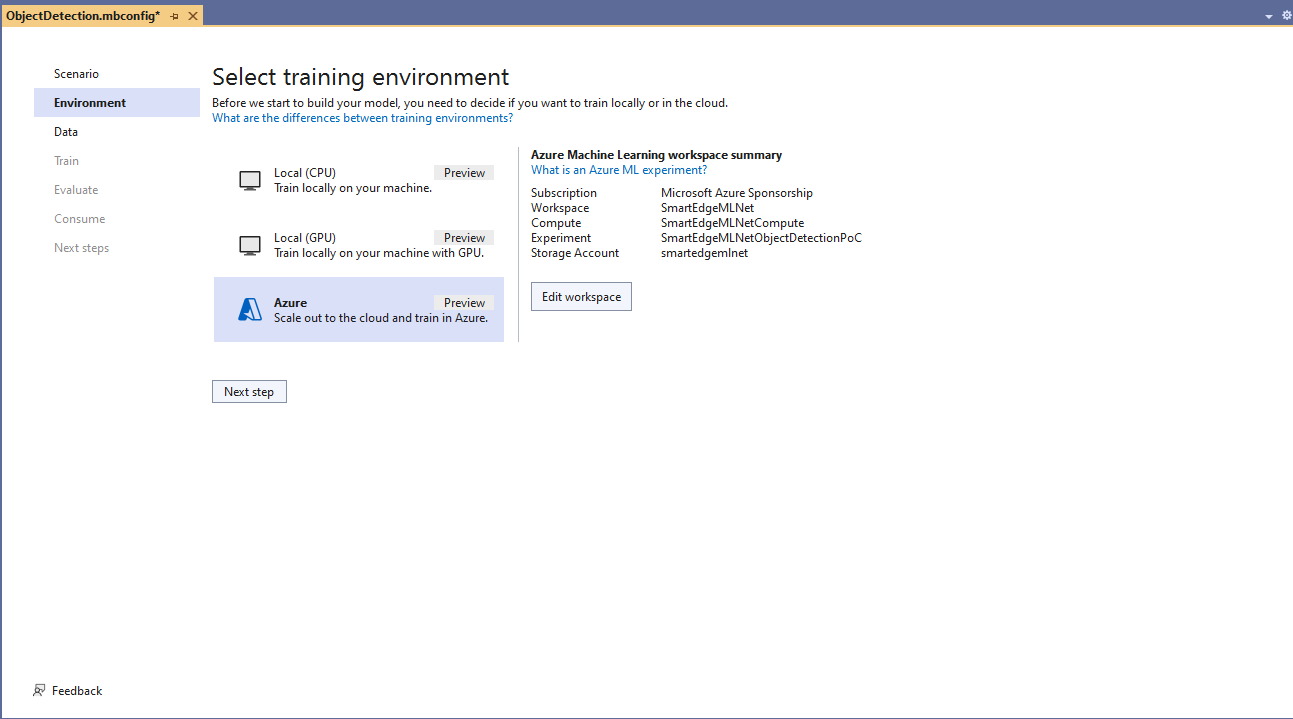
Azure Machine Learning selected for model training
The configuration of my Azure Machine Learning experiment which represent the collection of trials used took much longer than expected.
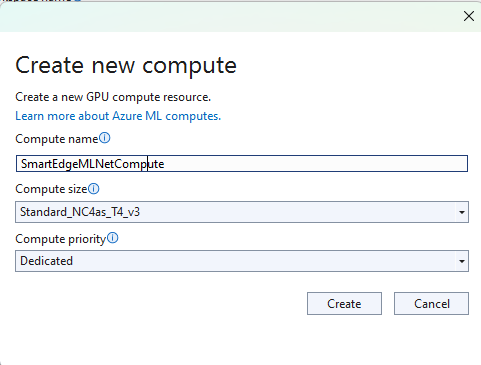
Insufficient SKUs available in Australia East
Initially my subscription had Insufficient Standard NC4as_T4_v3 SKUs in Australia East so I had to request a quota increase which took a couple of support tickets.
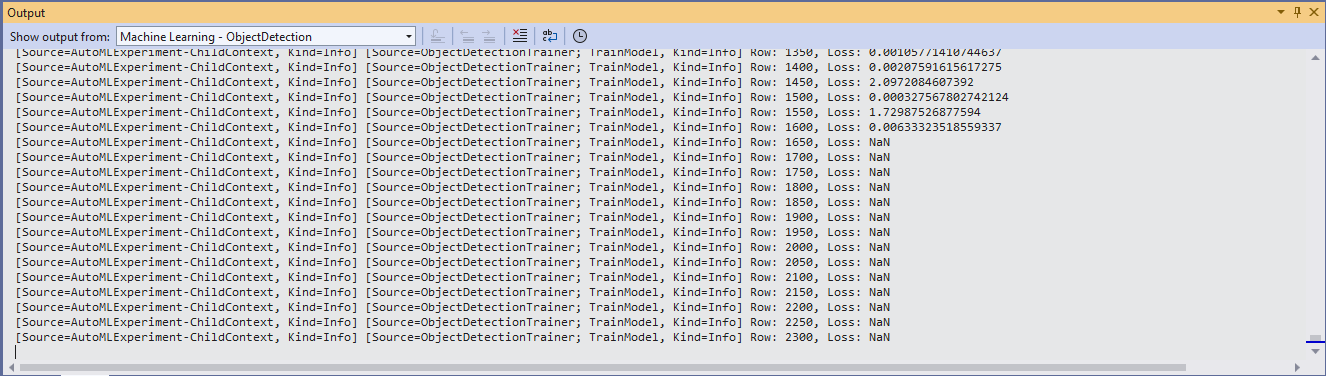
I need to check how the Roboflow dataset was loaded (I think possibly only the training dataset was loaded, so that was split into training and test datasets) and trial different configurations.
I like the machine generated job names “frank machine”, “tough fowl” and “epic chicken”.
Azure Machine Learning Job list
I found my Ultralytics YoloV8 model coped better with different backgrounds and tennis ball colours.
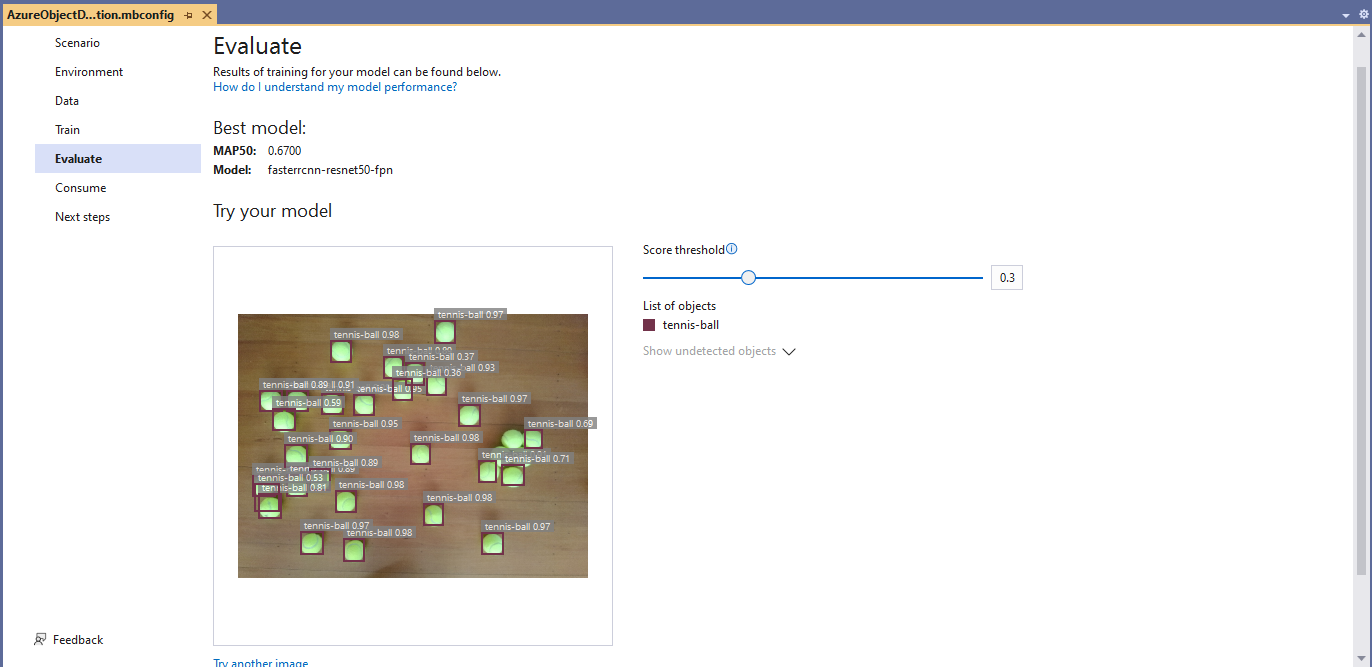
Evaluating model with tennis balls on my living room floor
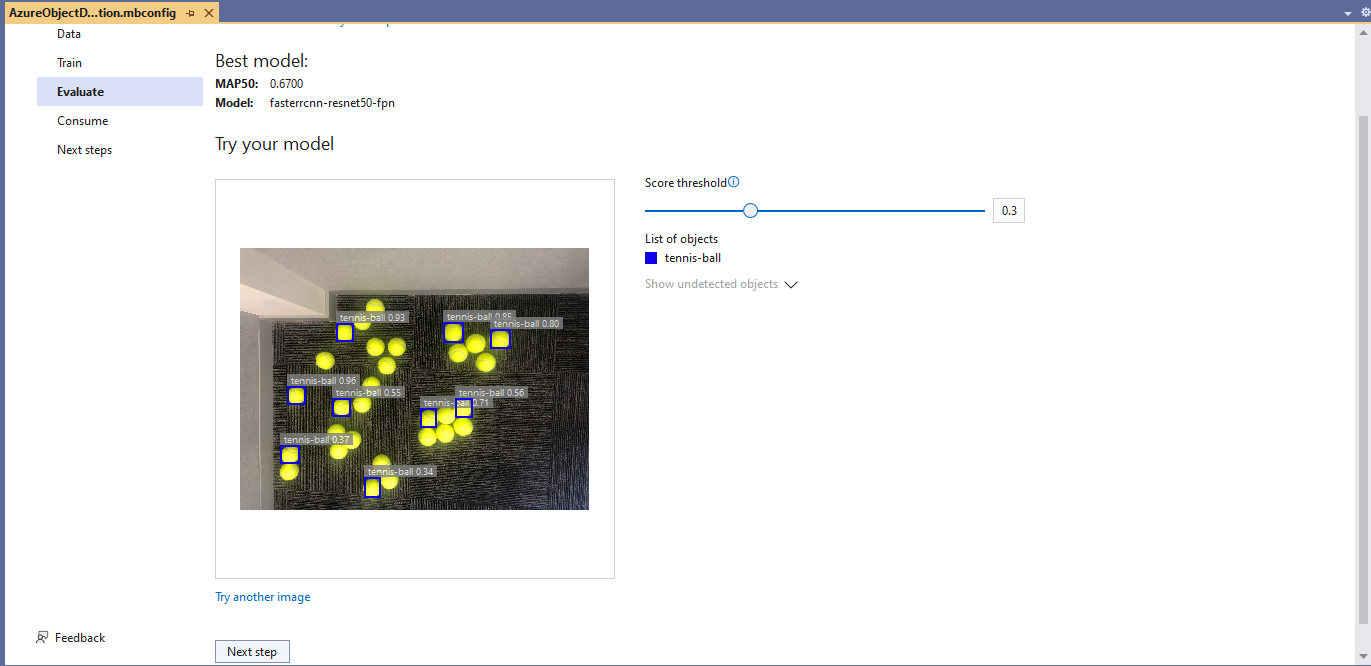
Evaluating model with tennis balls on the office floor
I used the “generated” code to consume the model with a simple console application.
Visual Studio 2022 ML.Net Integration client code generation
static async Task Main()
{
   Console.WriteLine($"{DateTime.UtcNow:yy-MM-dd HH:mm:ss} FasterrCNNResnet50 client starting");

   try
   {
      // load the app settings into configuration
      var configuration = new ConfigurationBuilder()
            .AddJsonFile("appsettings.json", false, true)
      .Build();

      Model.ApplicationSettings _applicationSettings = configuration.GetSection("ApplicationSettings").Get<Model.ApplicationSettings>();

      // Create single instance of sample data from first line of dataset for model input
      var image = MLImage.CreateFromFile(_applicationSettings.ImageInputPath);

      AzureObjectDetection.ModelInput sampleData = new AzureObjectDetection.ModelInput()
      {
         ImageSource = image,
      };

      // Make a single prediction on the sample data and print results.
      var predictionResult = AzureObjectDetection.Predict(sampleData);

      Console.WriteLine("Predicted Boxes:");
      Console.WriteLine(predictionResult);
   }
   catch (Exception ex)
   {
      Console.WriteLine($"{DateTime.UtcNow:yy-MM-dd HH:mm:ss} MQTTnet.Publish failed {ex.Message}");
   }

   Console.WriteLine("Press ENTER to exit");
   Console.ReadLine();
}
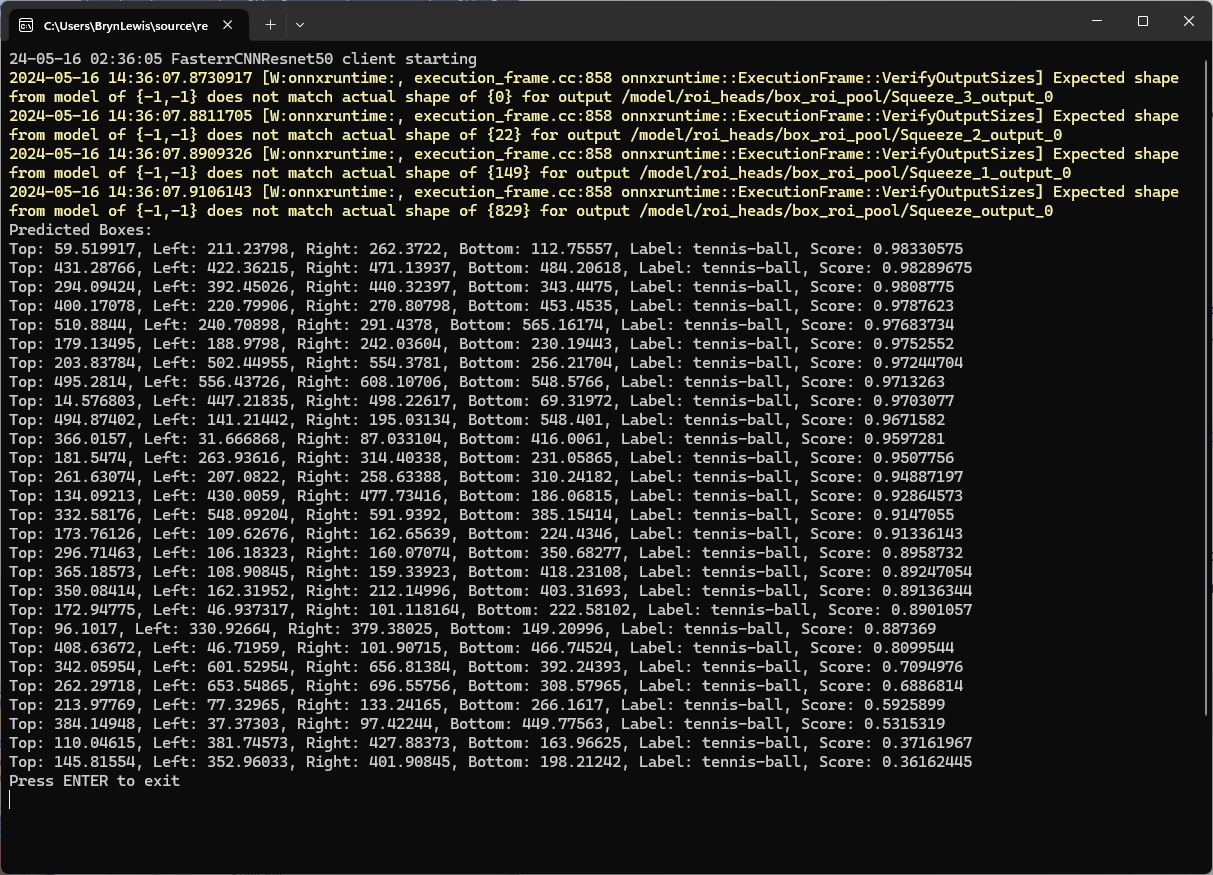
The initial model was detecting only 28 (with much lower confidences) of the 30 tennis balls in the sample images.
Output of console application with object detection information
I used the “default configuration” settings and ran the model training for 17.5 hours overnight which cost roughly USD24.
Azure Pricing Calculator estimate for my training setup
This post is not about how train a “good” model it is the approach I took to create a “proof of concept” model for a demonstration.
Confirming the number of classes and splits of the training dataset
Selecting the output model architecture (YoloV8s).
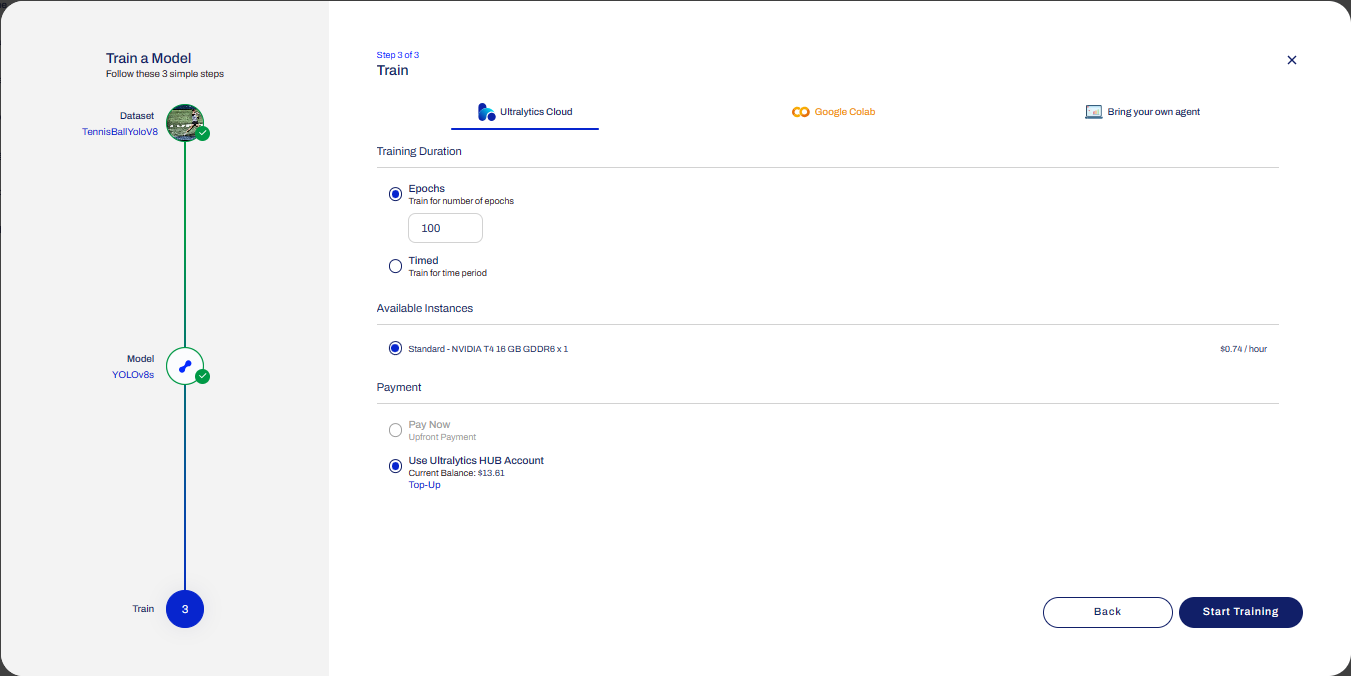
Configuring the number of epochs and payment method
Preparing the cloud instance(s) for training
The midpoint of the training process
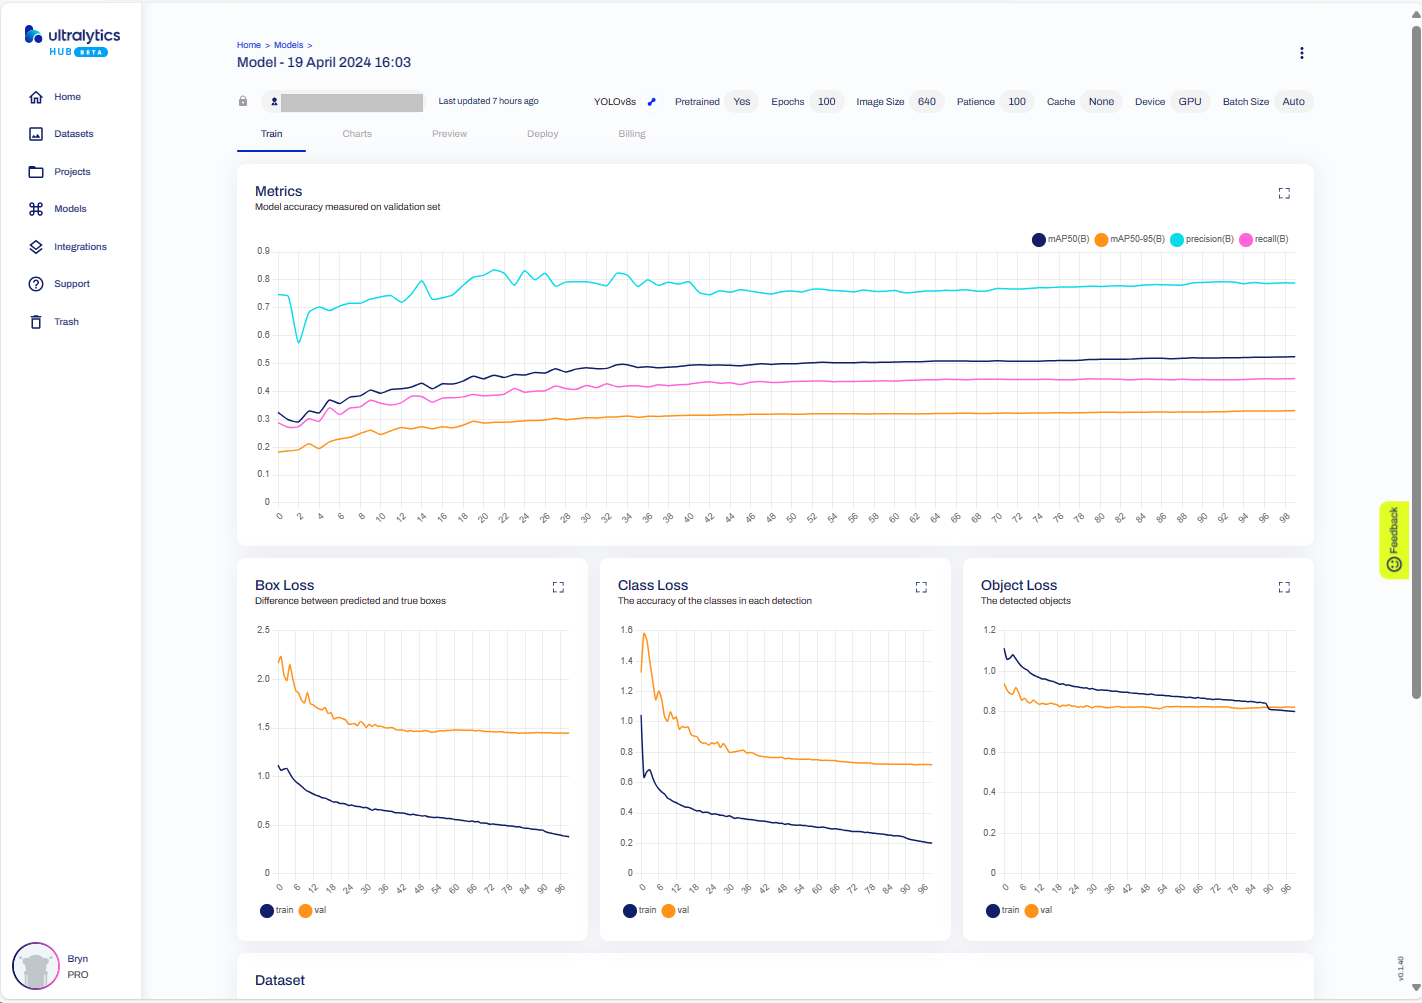
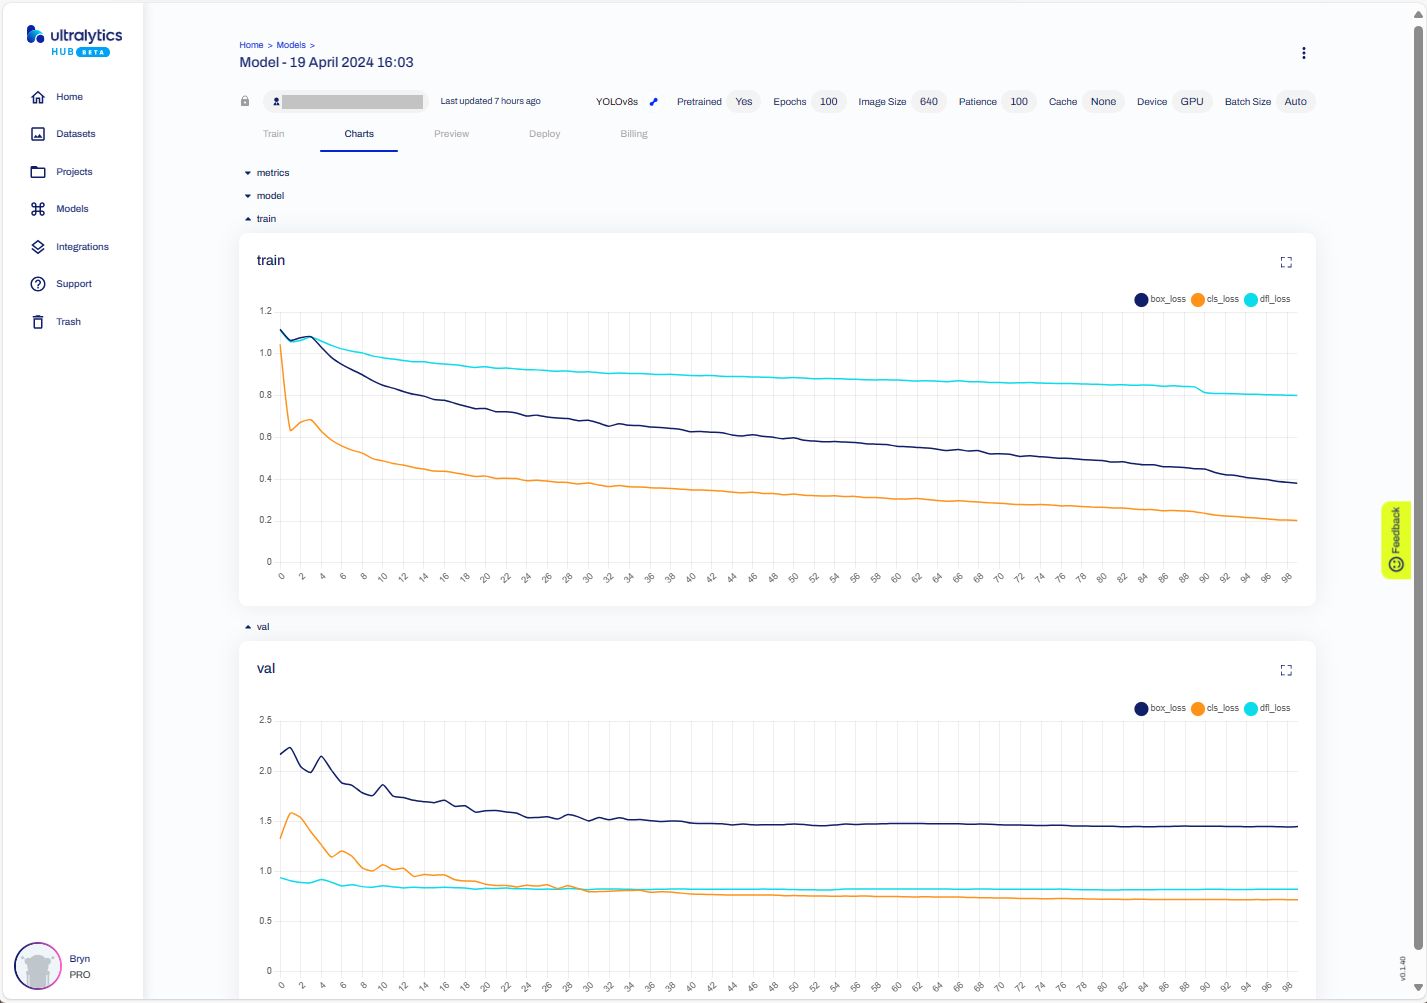
The training process completed with some basic model metrics.
The resources used and model accuracy metrics.
Model training metrics.
Testing the trained model inference results with my test image.
Exporting the trained YoloV8 model in ONNX format.
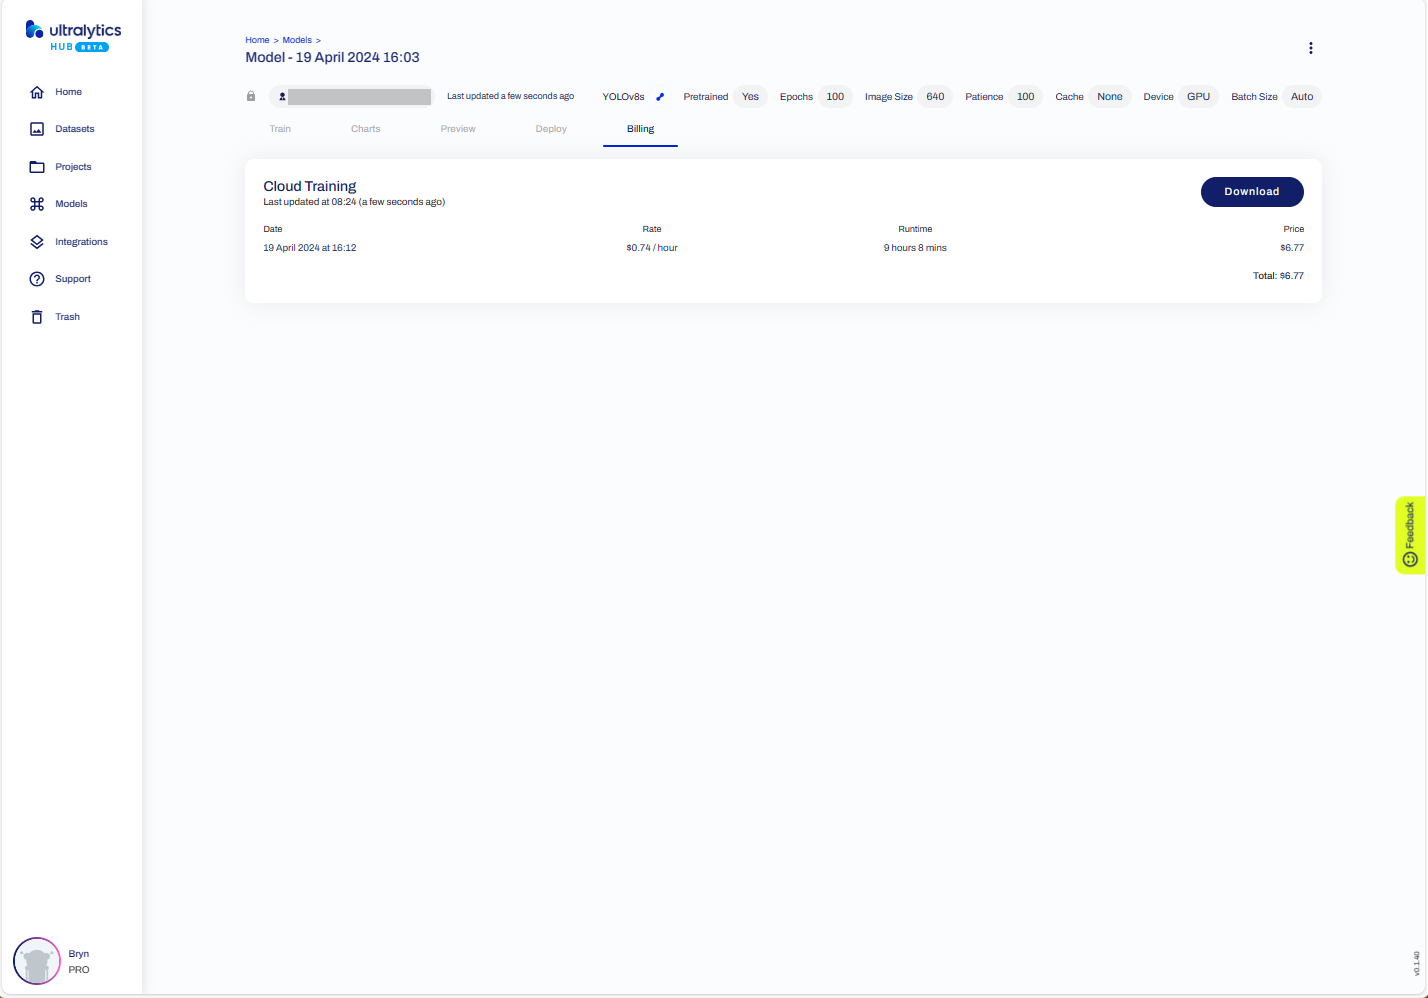
The duration and cost of training the model.
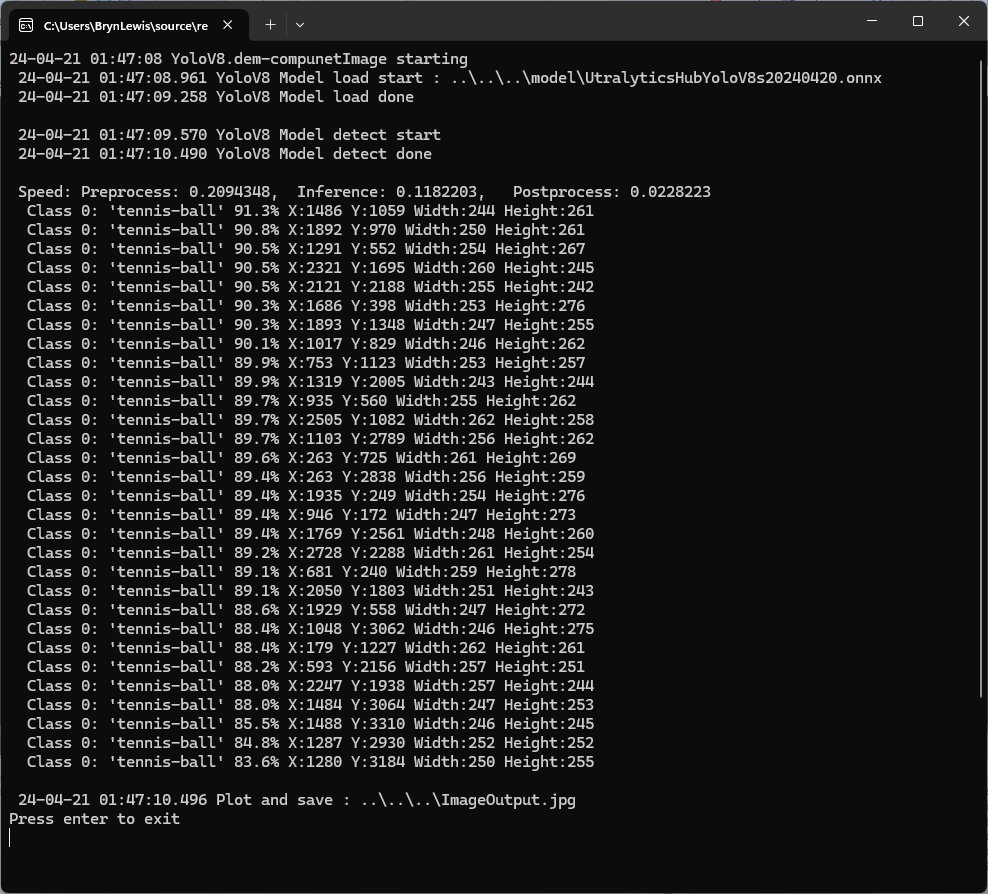
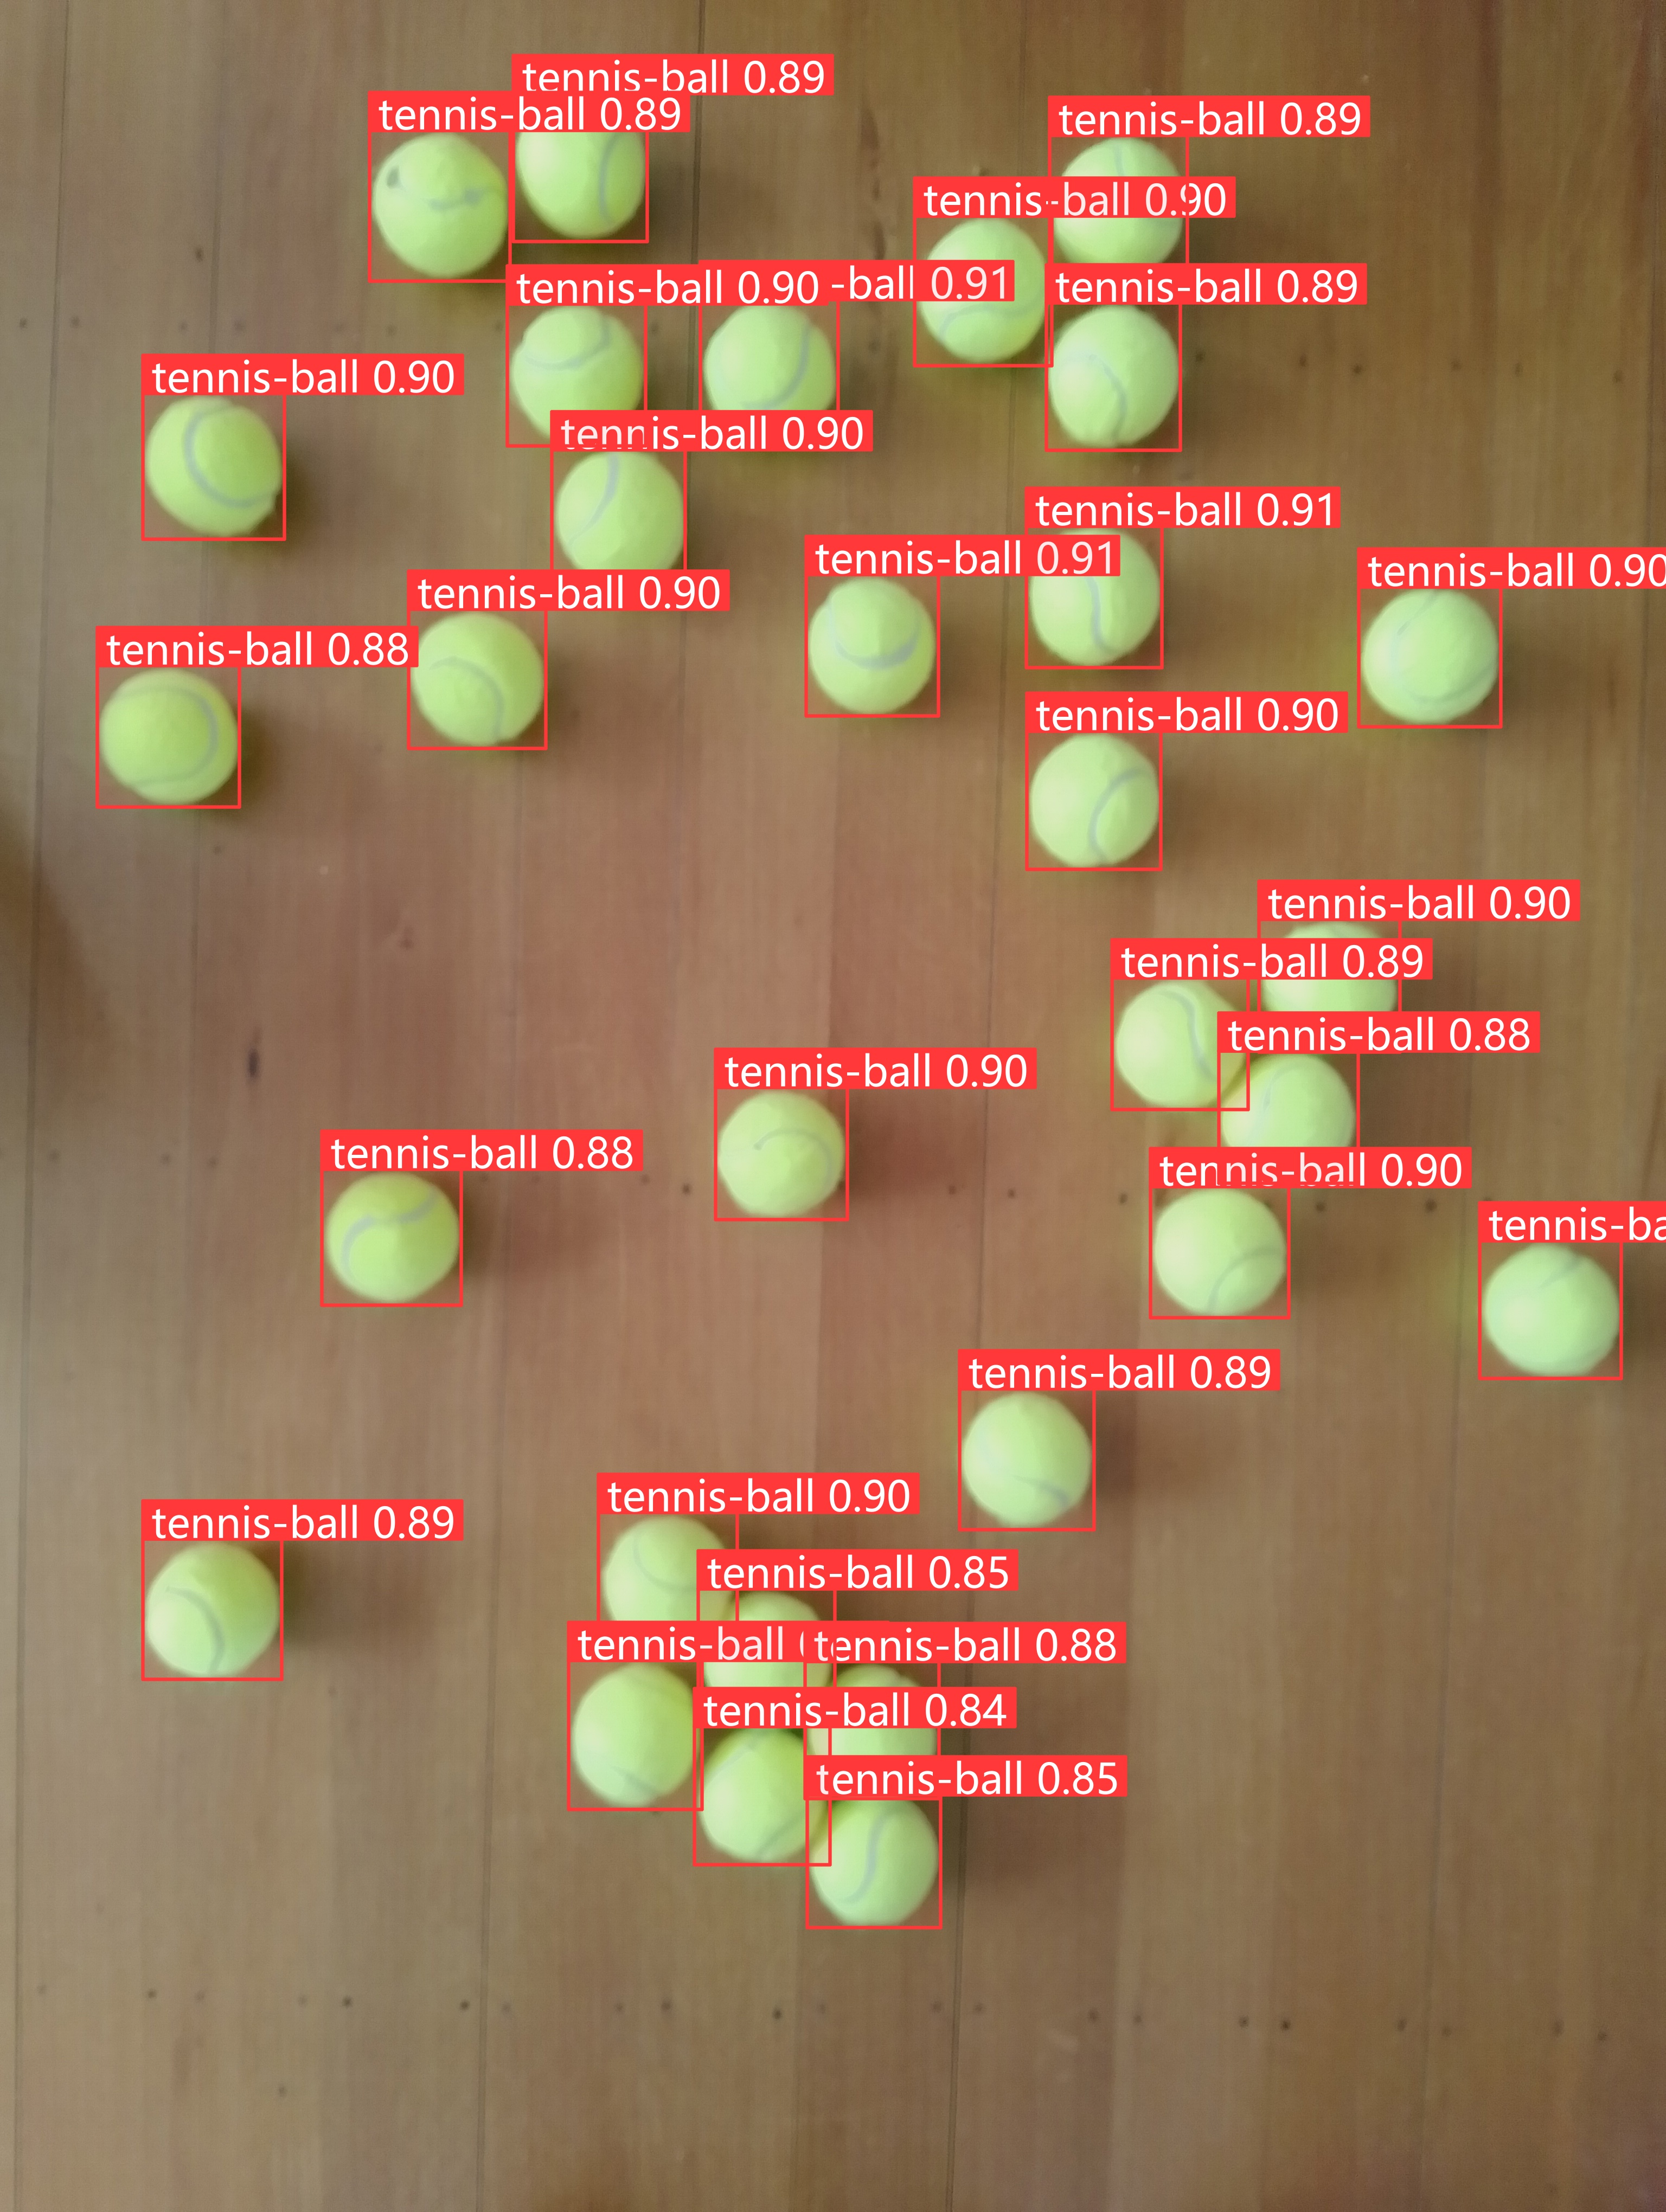
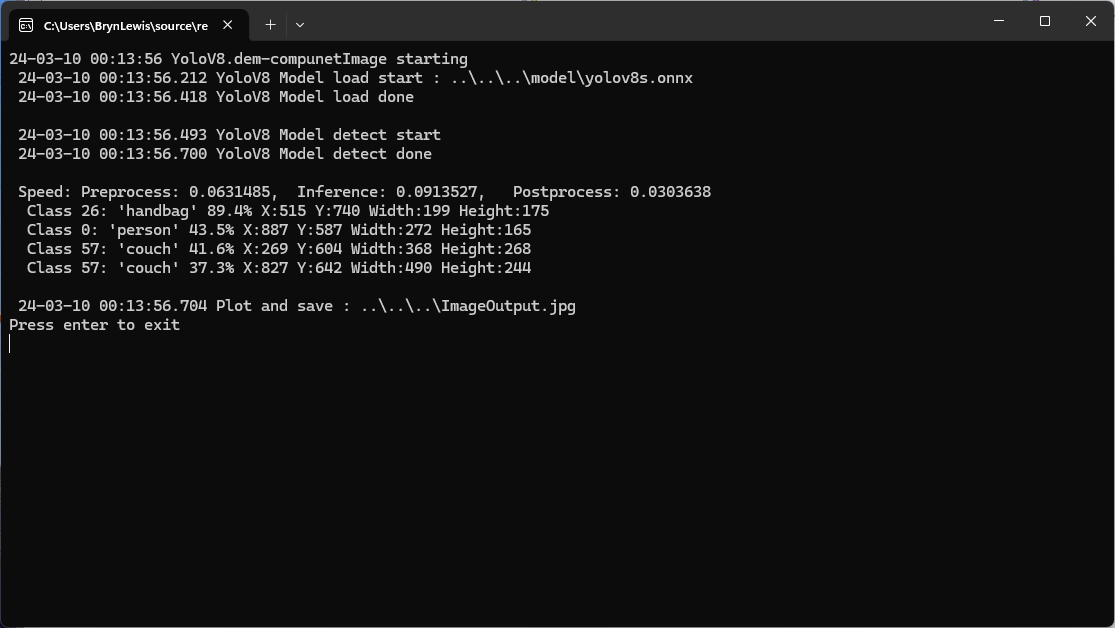
Testing the YoloV8 model with the dem-compunet.Image console application
Marked-up image generated by the dem-compunet.Image console application.
In this post I have not covered YoloV8 model selection and tuning of the training configuration to optimise the “performance” of the model. I used the default settings and then ran the model training overnight which cost USD6.77
This post is not about how create a “good” model it is the approach I took to create a “proof of concept” model for a demonstration.
To comply with the Ultralytics AGPL-3.0 License and to use an Ultralytics Pro plan the source code and models for an application have to be open source. Rather than publishing my YoloV8 model (which is quite large) this is the first in a series of posts which detail the process I used to create it. (which I think is more useful)
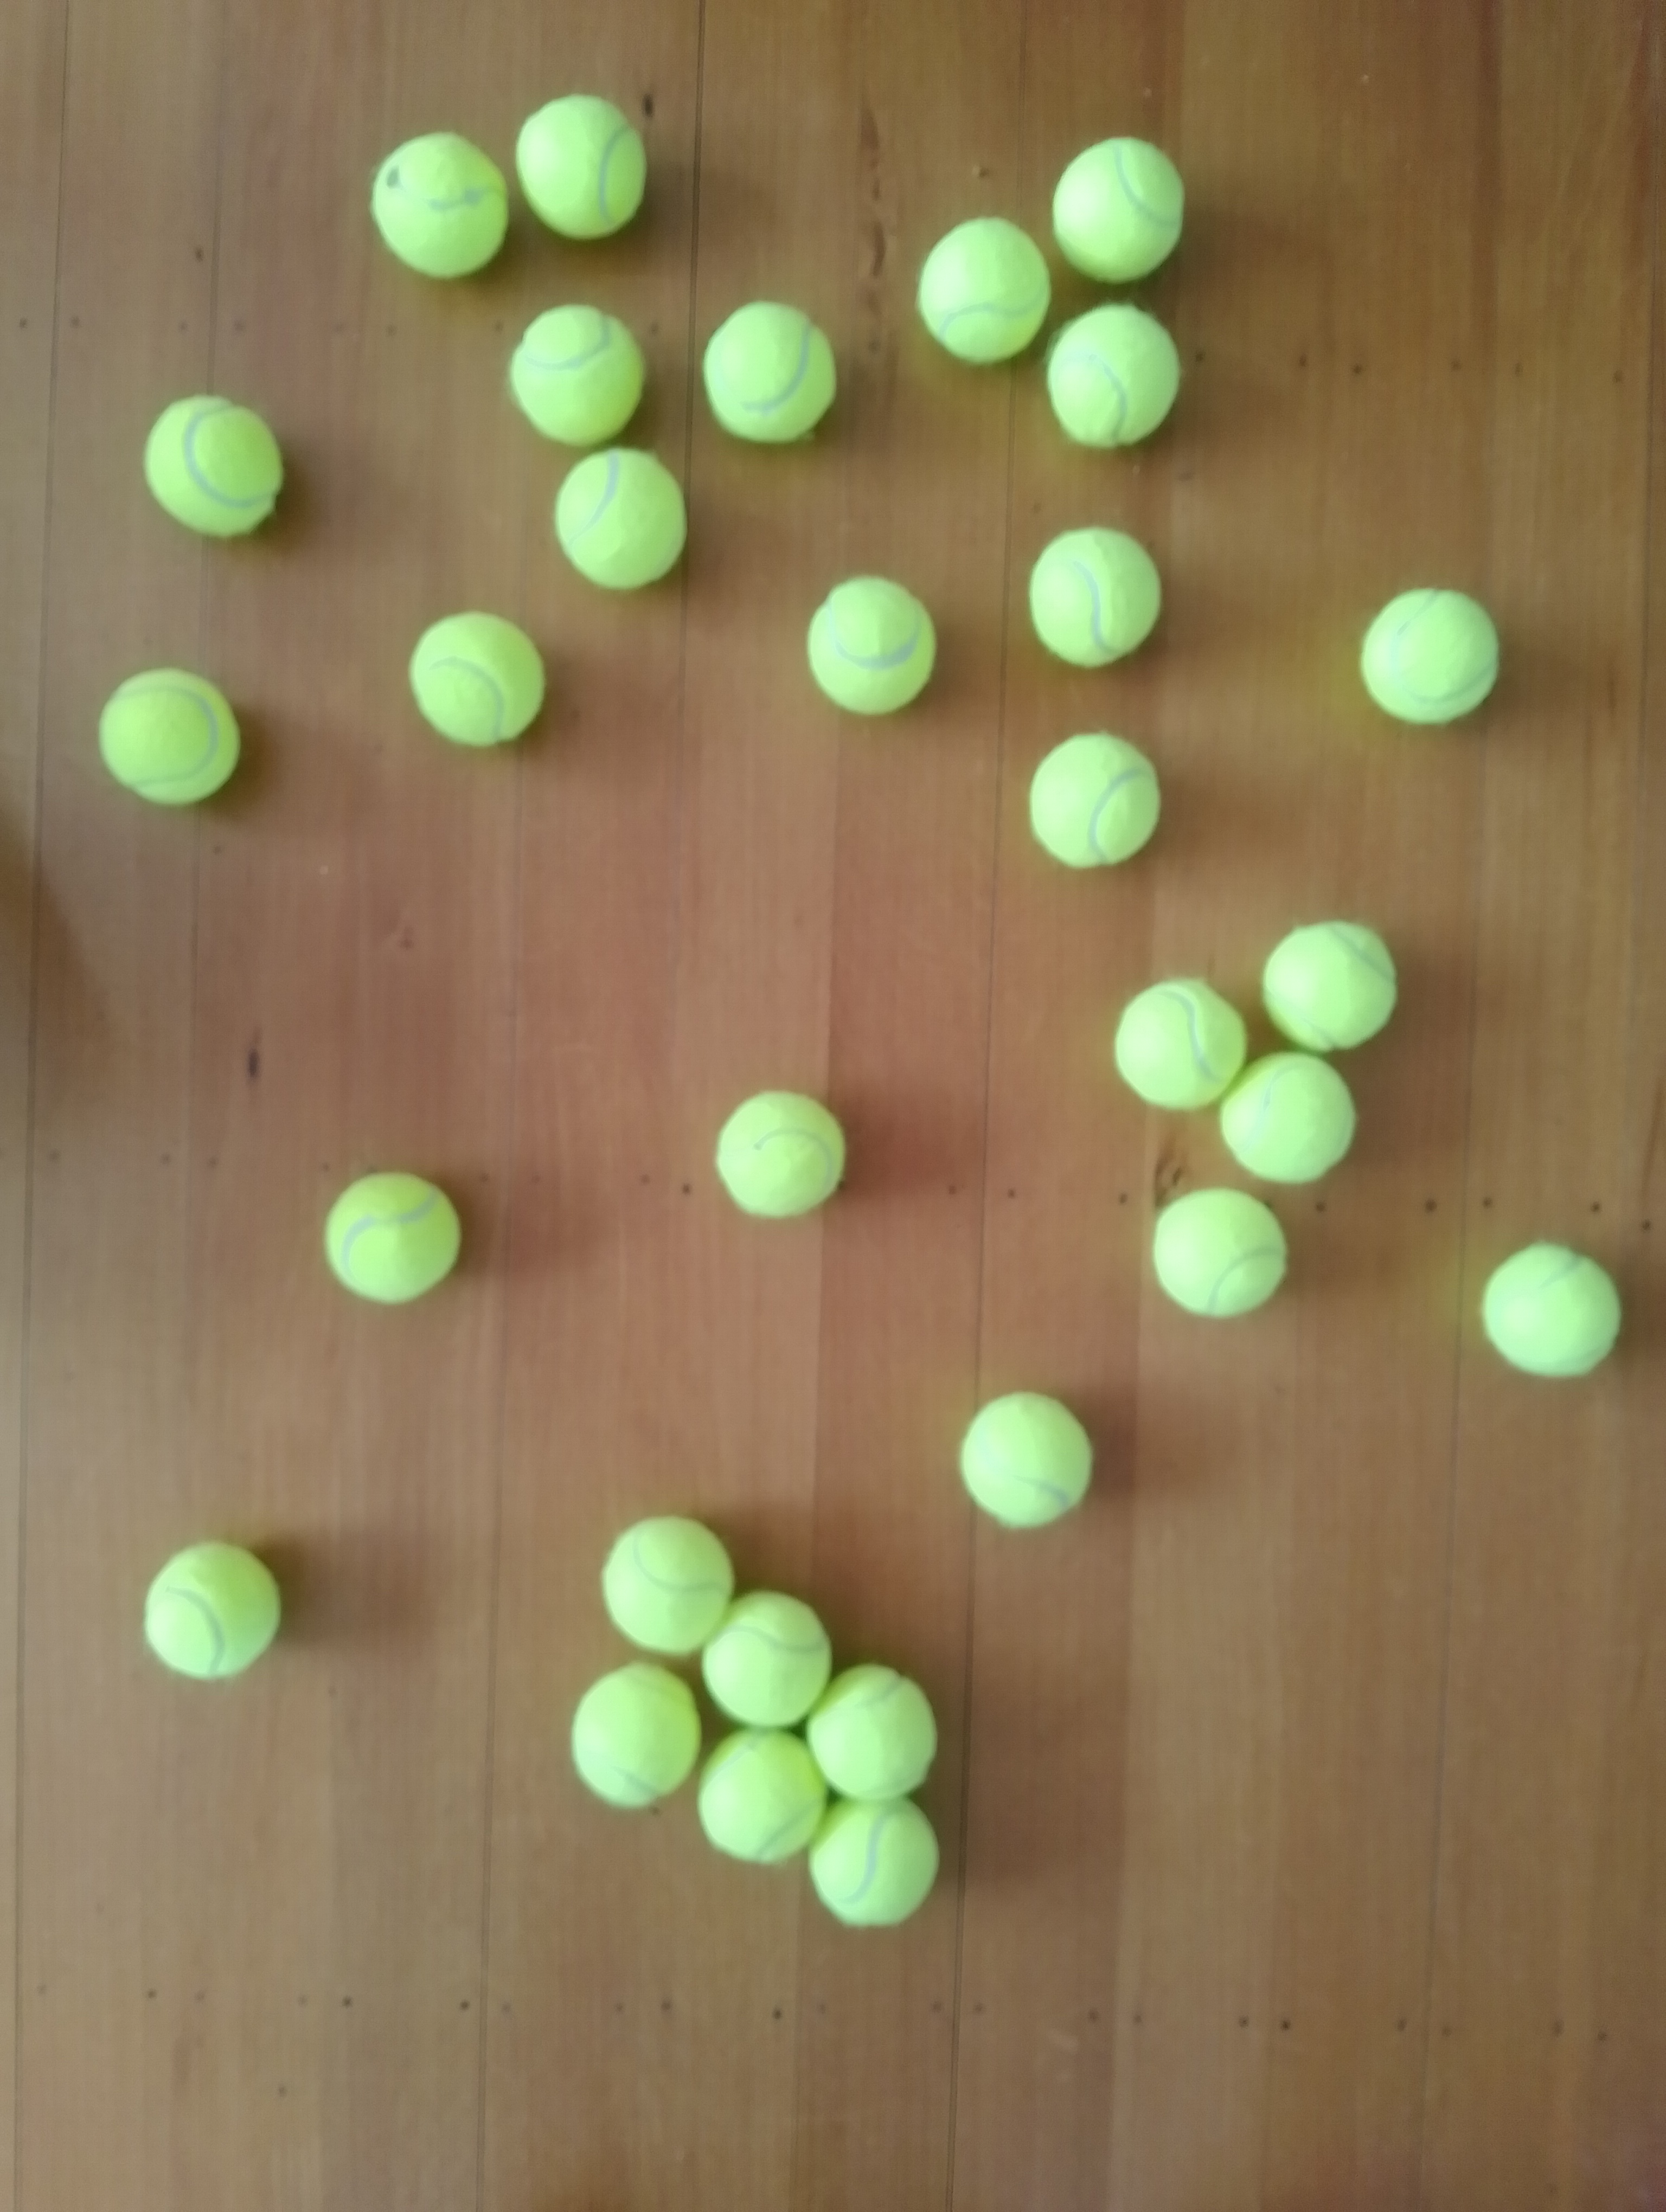
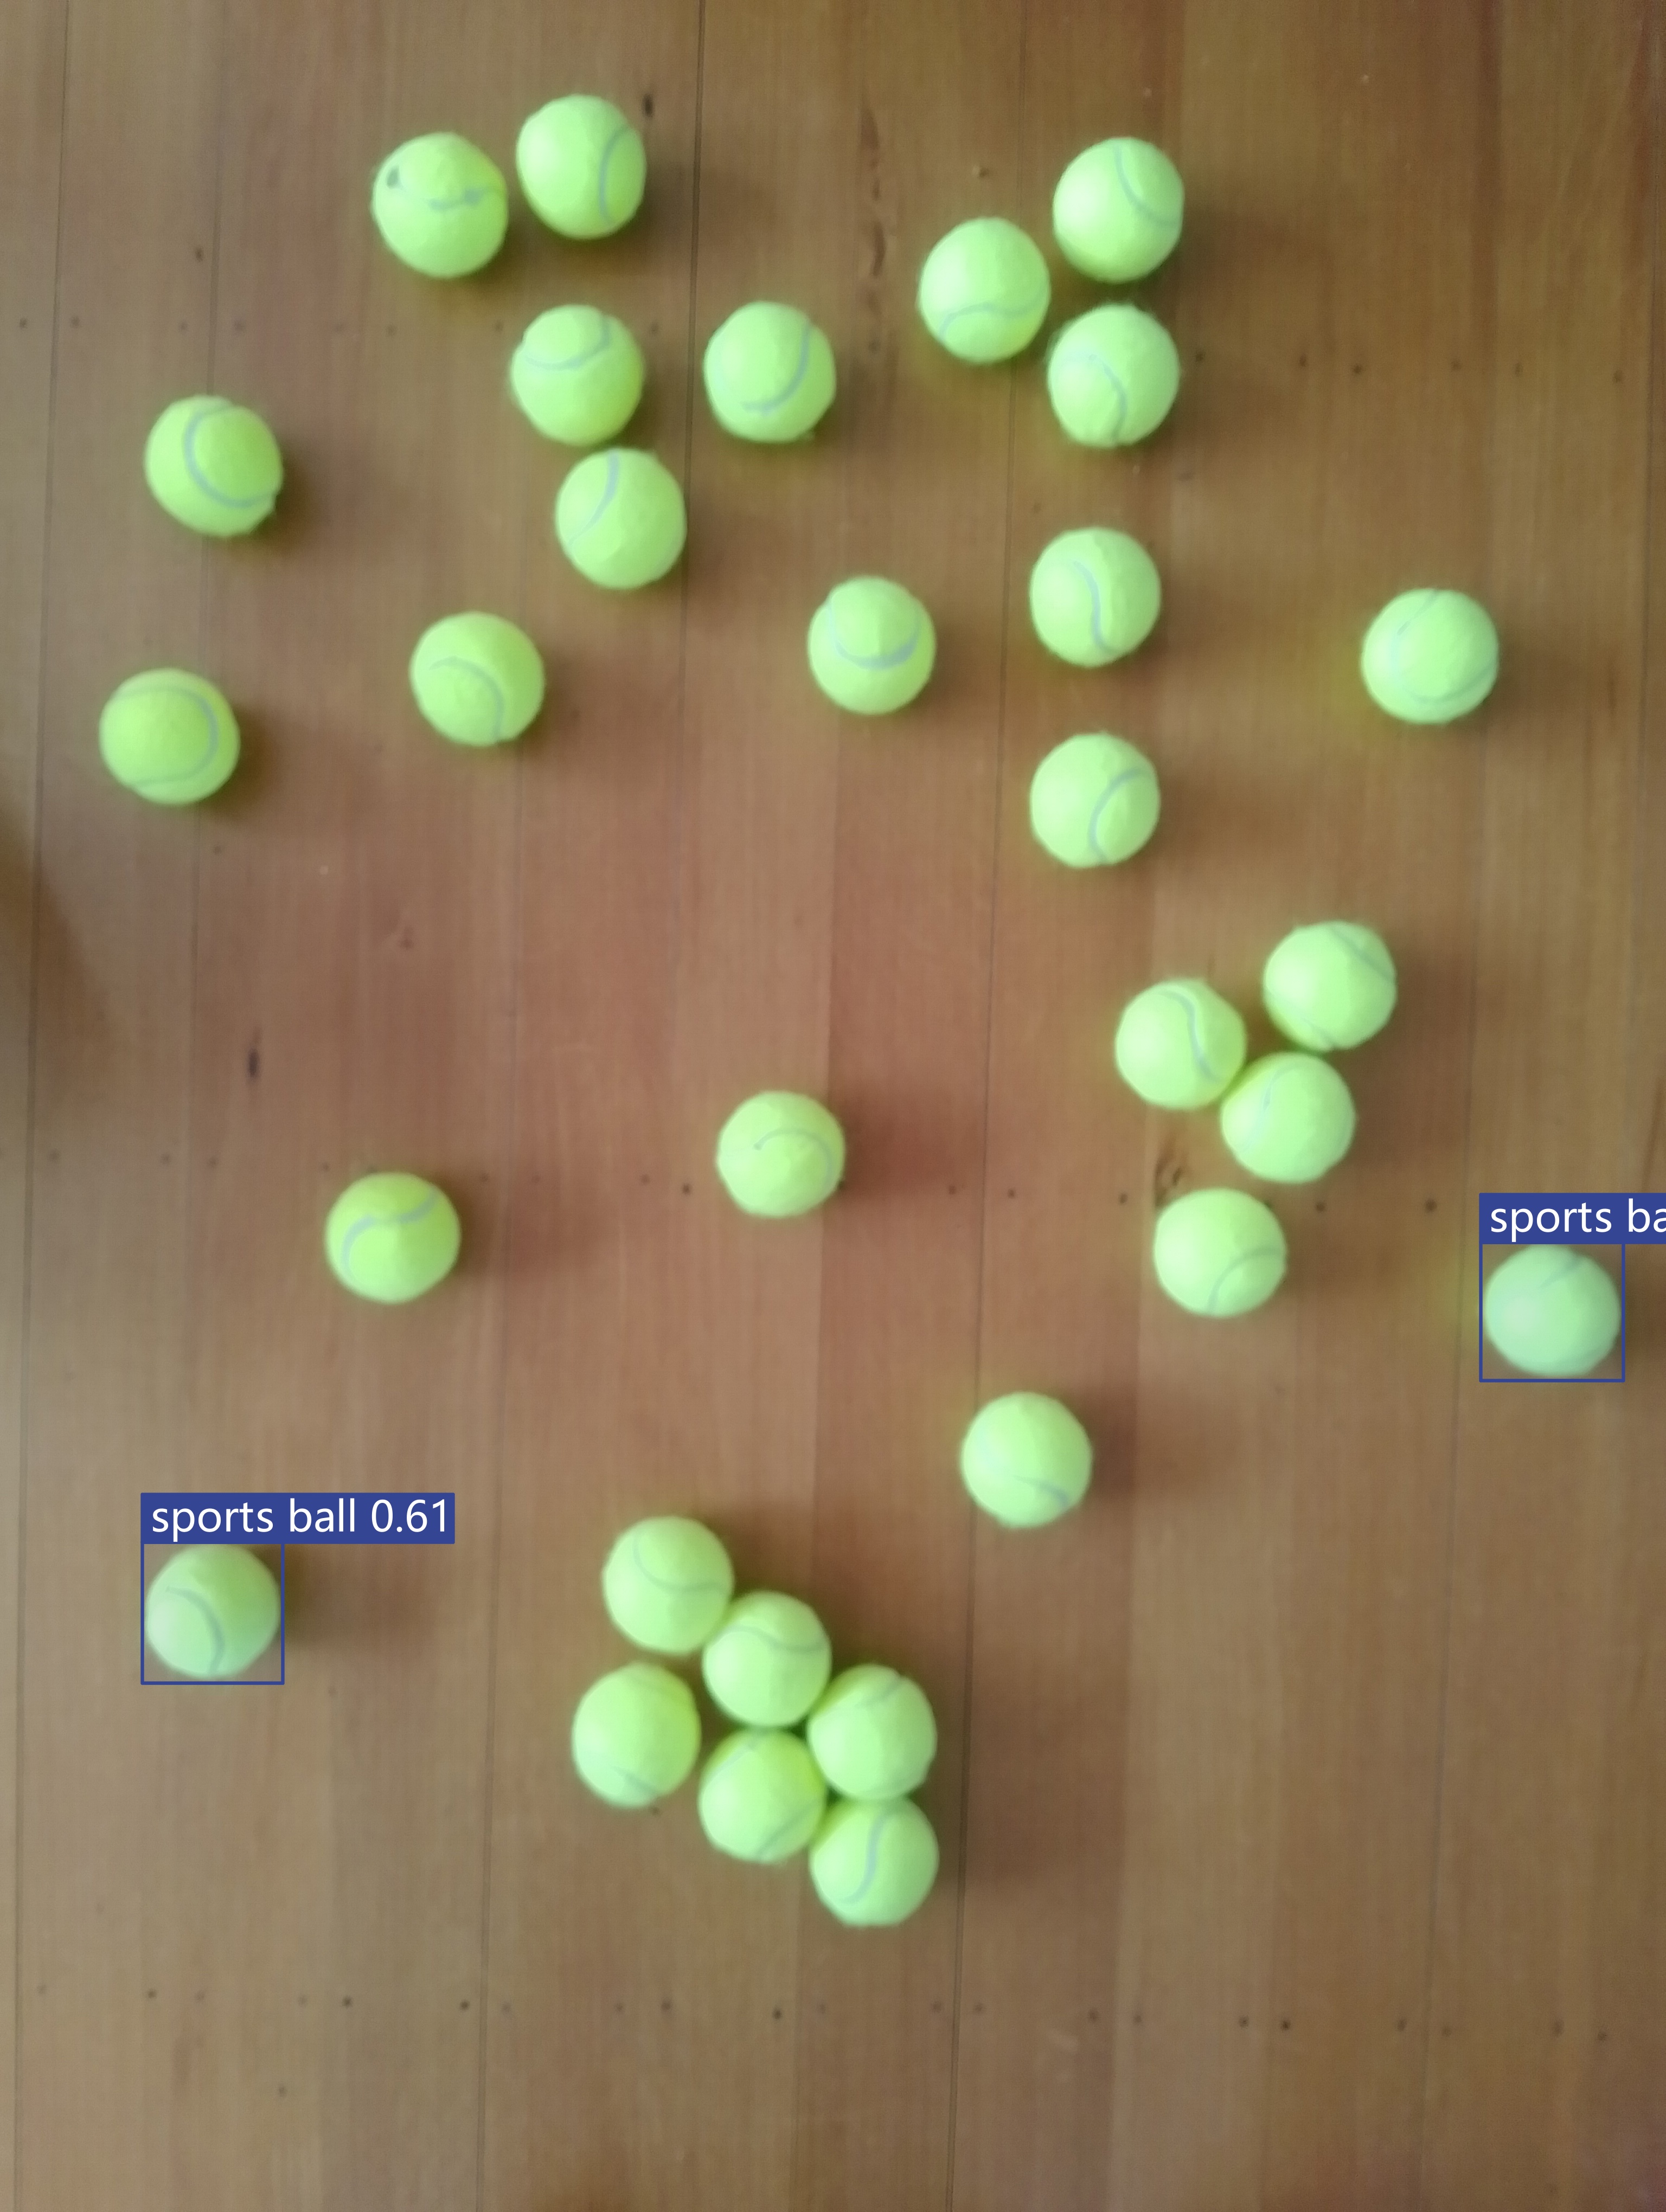
The single test image (not a good idea) is a photograph of 30 tennis balls on my living room floor.
Test image of 30 tennis balls on my living room floor
The object detection results using the “default” model were pretty bad, but this wasn’t a surprise as the model is not optimised for this sort of problem.
roboflow universe open-source model dataset search
I have used datasets from roboflow universe which is a great resource for building “proof of concept” applications.
roboflow universe dataset search
The first step was to identify some datasets which would improve my tennis ball object detection model results. After some searching (with tennis, tennis-ball etc. classes) and filtering (object detection, has a model for faster evaluation, more the 5000 images) to reduce the search results to a manageable number, I identified 5 datasets worth further evaluation.
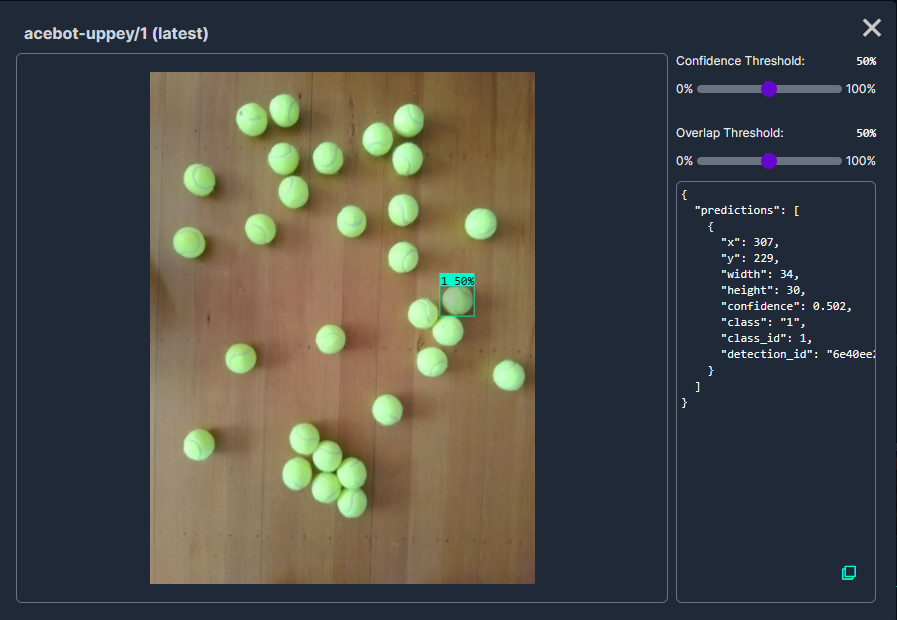
In my scenario the performance of the Acebot by Mrunal model was worse than the “default” yolov8s model.
In my scenario the performance of the tennis racket by test model was similar to the “default” yolov8s model.
In my scenario the performance of the Tennis Ball by Hust model was a bit better than the “default” yolov8s mode
In my scenario the performance of the roboflow_oball by ahmedelshalkany model was pretty good it detected 28 of the 30 tennis balls.
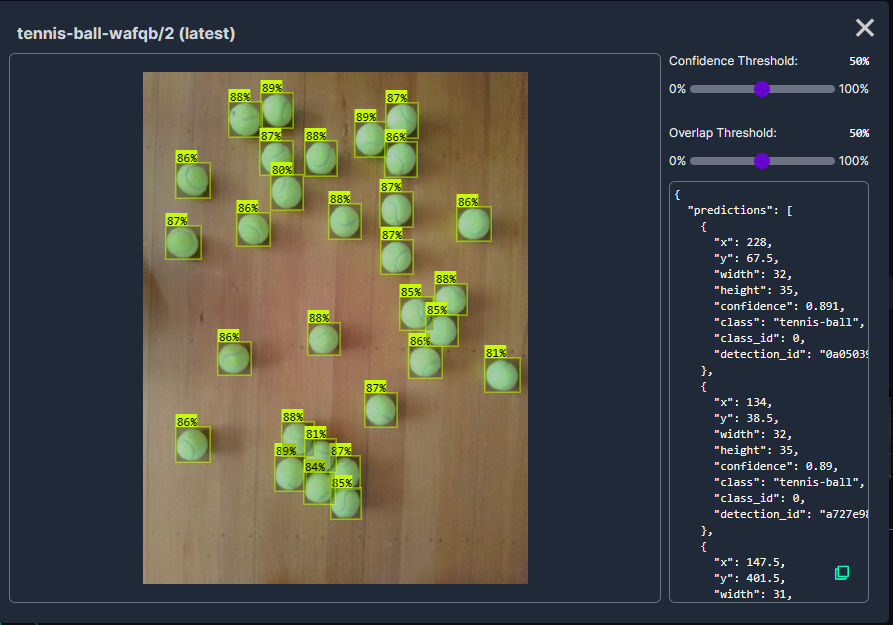
In my scenario the performance of the Tennis Ball by Ugur Ozdemir model was good it detected all of the 30 tennis balls.
The uses the Microsoft.Extensions.Logging library to publish diagnostic information to the console while debugging the application.
Visual Studio 2022 QuickWatch displaying object detection results.
To check the results I put a breakpoint in the timer just after DetectAsync method is called and then used the Visual Studio 2022 Debugger QuickWatch functionality to inspect the contents of the DetectionResult object.
Visual Studio 2022 JSON Visualiser displaying object detection results.
Security Camera image for object detection photo bombed by Yarnold our Standard Apricot Poodle.
This application can also be deployed as a Linuxsystemd Service so it will start then run in the background. The same approach as the YoloV8.Detect.SecurityCamera.Stream sample is used because the image doesn’t have to be saved on the local filesystem.
The YoloV8.Detect.SecurityCamera.File sample downloads images from the security camera to the local file system, then calls DetectAsync with the local file path.
private static async void ImageUpdateTimerCallback(object state)
{
   //...
   try
   {
      Console.WriteLine($"{DateTime.UtcNow:yy-MM-dd HH:mm:ss:fff} YoloV8 Security Camera Image File processing start");

      using (Stream cameraStream = await _httpClient.GetStreamAsync(_applicationSettings.CameraUrl))
      using (Stream fileStream = System.IO.File.Create(_applicationSettings.ImageFilepath))
      {
         await cameraStream.CopyToAsync(fileStream);
      }

      DetectionResult result = await _predictor.DetectAsync(_applicationSettings.ImageFilepath);

      Console.WriteLine($"Speed: {result.Speed}");

      foreach (var prediction in result.Boxes)
      {
         Console.WriteLine($" Class {prediction.Class} {(prediction.Confidence * 100.0):f1}% X:{prediction.Bounds.X} Y:{prediction.Bounds.Y} Width:{prediction.Bounds.Width} Height:{prediction.Bounds.Height}");
      }

      Console.WriteLine($"{DateTime.UtcNow:yy-MM-dd HH:mm:ss:fff} YoloV8 Security Camera Image processing done");
   }
   catch (Exception ex)
   {
      Console.WriteLine($"{DateTime.UtcNow:yy-MM-dd HH:mm:ss} YoloV8 Security camera image download or YoloV8 prediction failed {ex.Message}");
   }
//...
}
Console application using camera image saved on filesystem
The ImageSelector parameter of DetectAsync caught my attention as I hadn’t seen this approach used before. The developers who wrote the NuGet package are definitely smarter than me so I figured I might learn something useful digging deeper.
public static DetectionResult Detect(this YoloV8 predictor, ImageSelector selector)
{
    predictor.ValidateTask(YoloV8Task.Detect);

    return predictor.Run(selector, (outputs, image, timer) =>
    {
        var output = outputs[0].AsTensor<float>();

        var parser = new DetectionOutputParser(predictor.Metadata, predictor.Parameters);

        var boxes = parser.Parse(output, image);
        var speed = timer.Stop();

        return new DetectionResult
        {
            Boxes = boxes,
            Image = image,
            Speed = speed,
        };
    });

    public TResult Run<TResult>(ImageSelector selector, PostprocessContext<TResult> postprocess) where TResult : YoloV8Result
    {
        using var image = selector.Load(true);

        var originSize = image.Size;

        var timer = new SpeedTimer();

        timer.StartPreprocess();

        var input = Preprocess(image);

        var inputs = MapNamedOnnxValues([input]);

        timer.StartInference();

        using var outputs = Infer(inputs);

        var list = new List<NamedOnnxValue>(outputs);

        timer.StartPostprocess();

        return postprocess(list, originSize, timer);
    }
}
It looks like most of the image loading magic of ImageSelector class is implemented using the SixLabors library…
public class ImageSelector<TPixel> where TPixel : unmanaged, IPixel<TPixel>
{
    private readonly Func<Image<TPixel>> _factory;

    public ImageSelector(Image image)
    {
        _factory = image.CloneAs<TPixel>;
    }

    public ImageSelector(string path)
    {
        _factory = () => Image.Load<TPixel>(path);
    }

    public ImageSelector(byte[] data)
    {
        _factory = () => Image.Load<TPixel>(data);
    }

    public ImageSelector(Stream stream)
    {
        _factory = () => Image.Load<TPixel>(stream);
    }

    internal Image<TPixel> Load(bool autoOrient)
    {
        var image = _factory();

        if (autoOrient)
            image.Mutate(x => x.AutoOrient());

        return image;
    }

    public static implicit operator ImageSelector<TPixel>(Image image) => new(image);
    public static implicit operator ImageSelector<TPixel>(string path) => new(path);
    public static implicit operator ImageSelector<TPixel>(byte[] data) => new(data);
    public static implicit operator ImageSelector<TPixel>(Stream stream) => new(stream);
}
Learnt something new must be careful to apply it only where it adds value.
All of the implementations load the model, load the sample image, detect objects in the image, then markup the image with the classification, minimum bounding boxes, and confidences of each object.
Input Image
The first implementation uses YoloV8 by dme-compunet which supports asynchronous operation. The image is loaded asynchronously, the prediction is asynchronous, then marked up and saved asynchronously.
using (var predictor = new Compunet.YoloV8.YoloV8(_applicationSettings.ModelPath))
{
   Console.WriteLine($" {DateTime.UtcNow:yy-MM-dd HH:mm:ss.fff} YoloV8 Model load done");
   Console.WriteLine();

   using (var image = await SixLabors.ImageSharp.Image.LoadAsync<Rgba32>(_applicationSettings.ImageInputPath))
   {
      Console.WriteLine($" {DateTime.UtcNow:yy-MM-dd HH:mm:ss.fff} YoloV8 Model detect start");

      var predictions = await predictor.DetectAsync(image);

      Console.WriteLine($" {DateTime.UtcNow:yy-MM-dd HH:mm:ss.fff} YoloV8 Model detect done");
      Console.WriteLine();

      Console.WriteLine($" Speed: {predictions.Speed}");

      foreach (var prediction in predictions.Boxes)
      {
         Console.WriteLine($"  Class {prediction.Class} {(prediction.Confidence * 100.0):f1}% X:{prediction.Bounds.X} Y:{prediction.Bounds.Y} Width:{prediction.Bounds.Width} Height:{prediction.Bounds.Height}");
      }
      Console.WriteLine();

      Console.WriteLine($" {DateTime.UtcNow:yy-MM-dd HH:mm:ss.fff} Plot and save : {_applicationSettings.ImageOutputPath}");

      SixLabors.ImageSharp.Image imageOutput = await predictions.PlotImageAsync(image);

      await imageOutput.SaveAsJpegAsync(_applicationSettings.ImageOutputPath);
   }
}
dme-compunet YoloV8 test application output
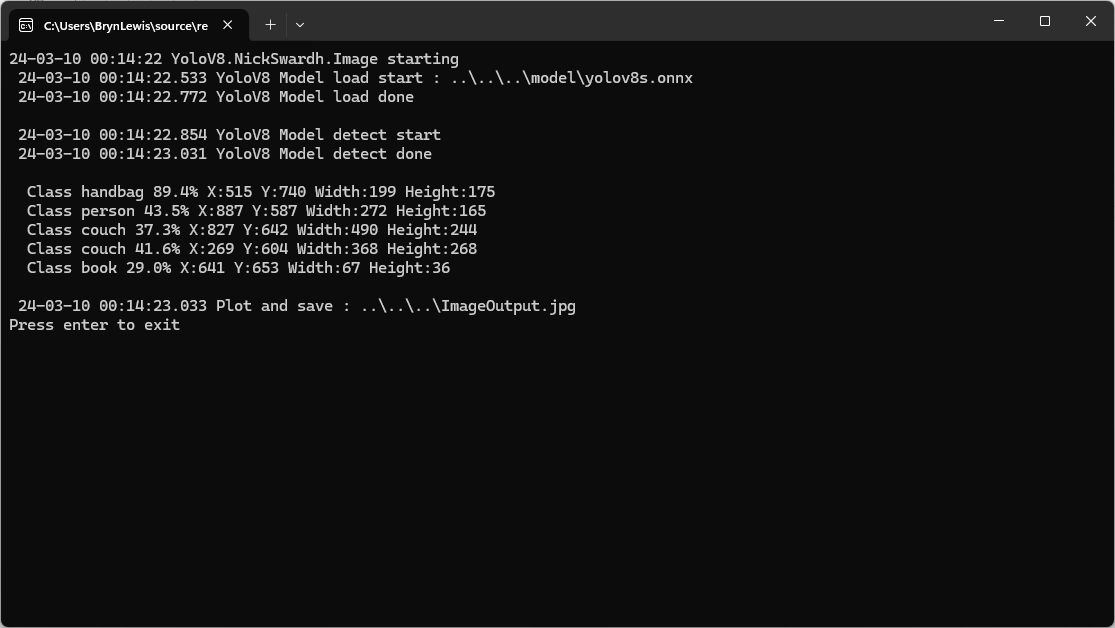
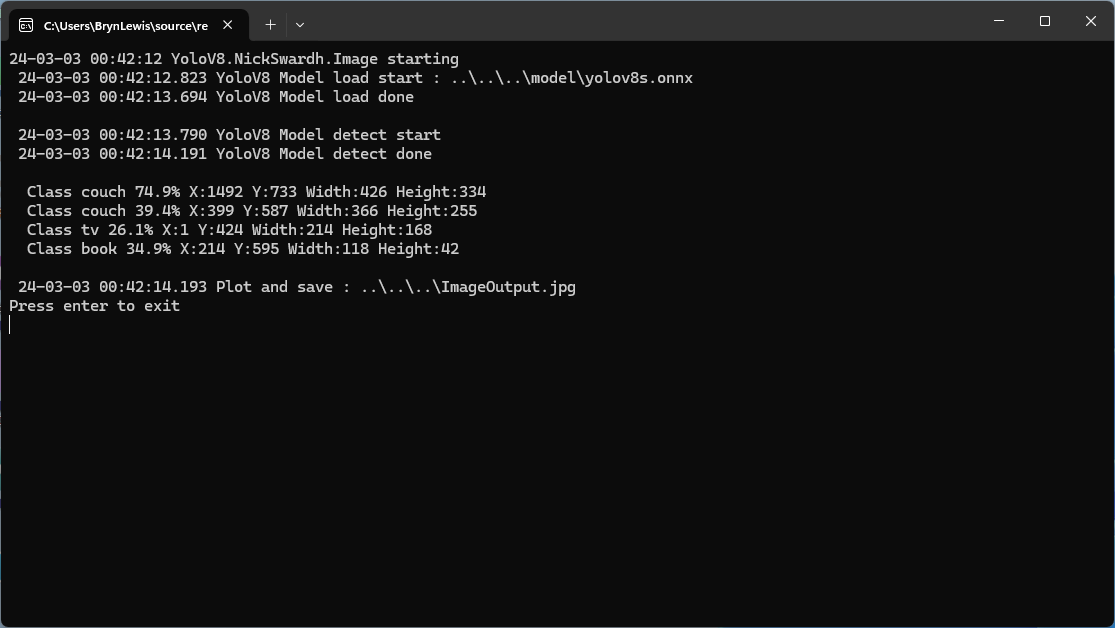
The second implementation uses YoloDotNet by NichSwardh which partially supports asynchronous operation. The image is loaded asynchronously, the prediction is synchronous, the markup is synchronous, and then saved asynchronously.
using (var predictor = new Yolo(_applicationSettings.ModelPath, false))
{
   Console.WriteLine($" {DateTime.UtcNow:yy-MM-dd HH:mm:ss.fff} YoloV8 Model load done");
   Console.WriteLine();

   using (var image = await SixLabors.ImageSharp.Image.LoadAsync<Rgba32>(_applicationSettings.ImageInputPath))
   {
      Console.WriteLine($" {DateTime.UtcNow:yy-MM-dd HH:mm:ss.fff} YoloV8 Model detect start");

      var predictions = predictor.RunObjectDetection(image);

      Console.WriteLine($" {DateTime.UtcNow:yy-MM-dd HH:mm:ss.fff} YoloV8 Model detect done");
      Console.WriteLine();

      foreach (var predicition in predictions)
      {
         Console.WriteLine($"  Class {predicition.Label.Name} {(predicition.Confidence * 100.0):f1}% X:{predicition.BoundingBox.Left} Y:{predicition.BoundingBox.Y} Width:{predicition.BoundingBox.Width} Height:{predicition.BoundingBox.Height}");
      }
      Console.WriteLine();

      Console.WriteLine($" {DateTime.UtcNow:yy-MM-dd HH:mm:ss.fff} Plot and save : {_applicationSettings.ImageOutputPath}");

      image.Draw(predictions);

      await image.SaveAsJpegAsync(_applicationSettings.ImageOutputPath);
   }
}
nickswardth YoloDotNet test application output
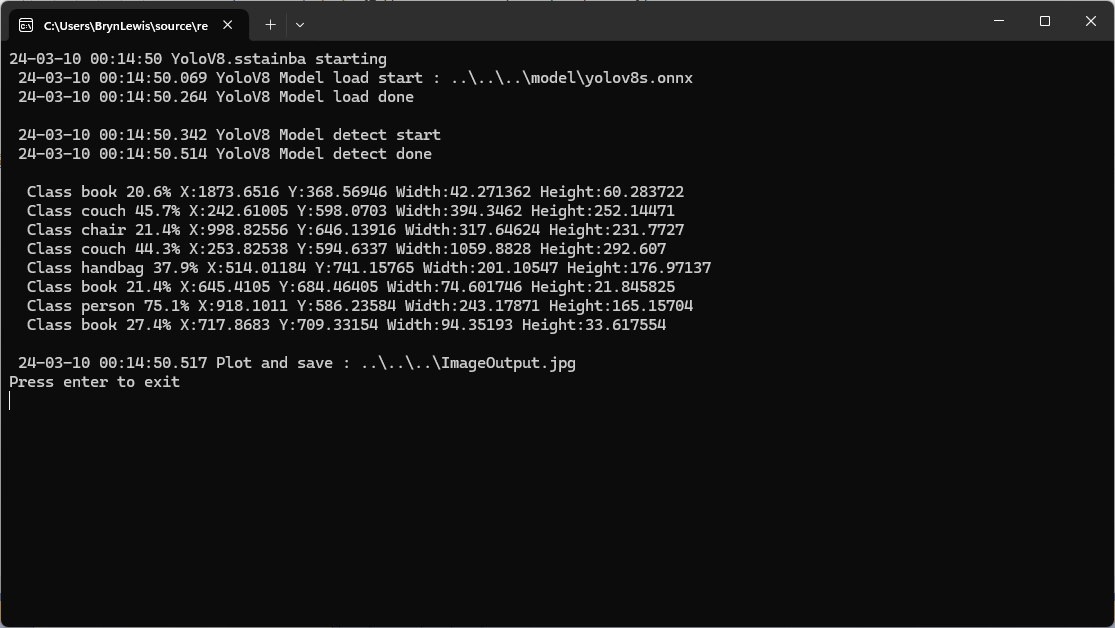
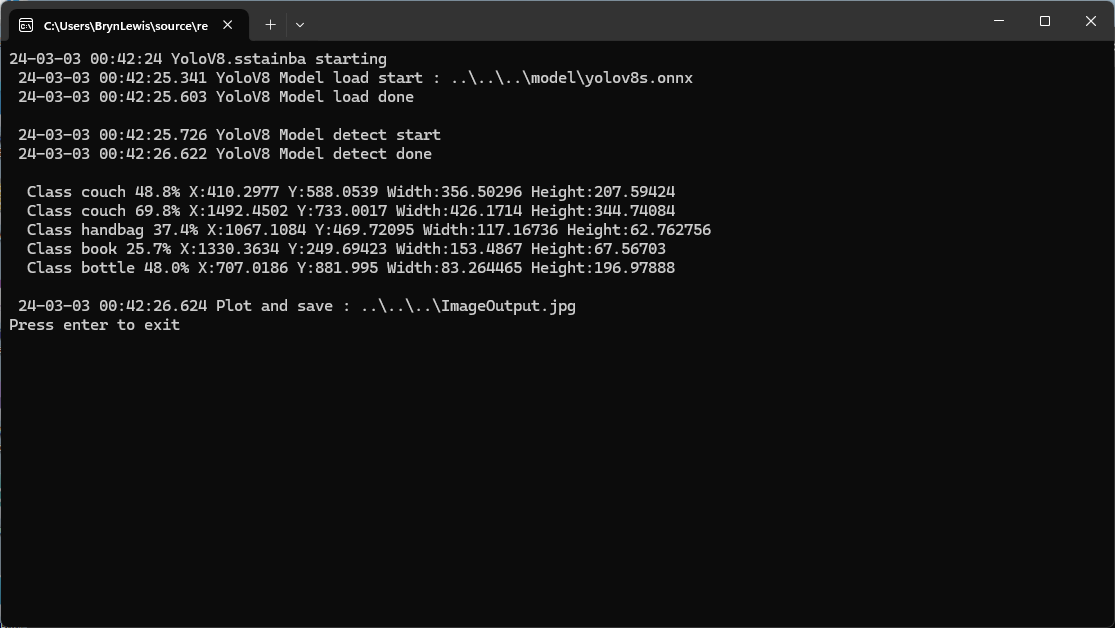
The third implementation uses YoloV8 by sstainba which partially supports asynchronous operation. The image is loaded asynchronously, the prediction is synchronous, the markup is synchronous, and then saved asynchronously.
using (var predictor = YoloV8Predictor.Create(_applicationSettings.ModelPath))
{
   Console.WriteLine($" {DateTime.UtcNow:yy-MM-dd HH:mm:ss.fff} YoloV8 Model load done");
   Console.WriteLine();

   using (var image = await SixLabors.ImageSharp.Image.LoadAsync<Rgba32>(_applicationSettings.ImageInputPath))
   {
      Console.WriteLine($" {DateTime.UtcNow:yy-MM-dd HH:mm:ss.fff} YoloV8 Model detect start");

      var predictions = predictor.Predict(image);

      Console.WriteLine($" {DateTime.UtcNow:yy-MM-dd HH:mm:ss.fff} YoloV8 Model detect done");
      Console.WriteLine();

      foreach (var prediction in predictions)
      {
         Console.WriteLine($"  Class {prediction.Label.Name} {(prediction.Score * 100.0):f1}% X:{prediction.Rectangle.X} Y:{prediction.Rectangle.Y} Width:{prediction.Rectangle.Width} Height:{prediction.Rectangle.Height}");
      }

      Console.WriteLine();

      Console.WriteLine($" {DateTime.UtcNow:yy-MM-dd HH:mm:ss.fff} Plot and save : {_applicationSettings.ImageOutputPath}");

      // This is a bit hacky should be fixed up in future release
      Font font = new Font(SystemFonts.Get(_applicationSettings.FontName), _applicationSettings.FontSize);
      foreach (var prediction in predictions)
      {
         var x = (int)Math.Max(prediction.Rectangle.X, 0);
         var y = (int)Math.Max(prediction.Rectangle.Y, 0);
         var width = (int)Math.Min(image.Width - x, prediction.Rectangle.Width);
         var height = (int)Math.Min(image.Height - y, prediction.Rectangle.Height);

         //Note that the output is already scaled to the original image height and width.

         // Bounding Box Text
         string text = $"{prediction.Label.Name} [{prediction.Score}]";
         var size = TextMeasurer.MeasureSize(text, new TextOptions(font));

         image.Mutate(d => d.Draw(Pens.Solid(Color.Yellow, 2), new Rectangle(x, y, width, height)));

         image.Mutate(d => d.DrawText(text, font, Color.Yellow, new Point(x, (int)(y - size.Height - 1))));
      }

      await image.SaveAsJpegAsync(_applicationSettings.ImageOutputPath);
   }
}
sstainba YoloV8 test application output
I don’t understand why the three NuGets produced different results which is worrying.
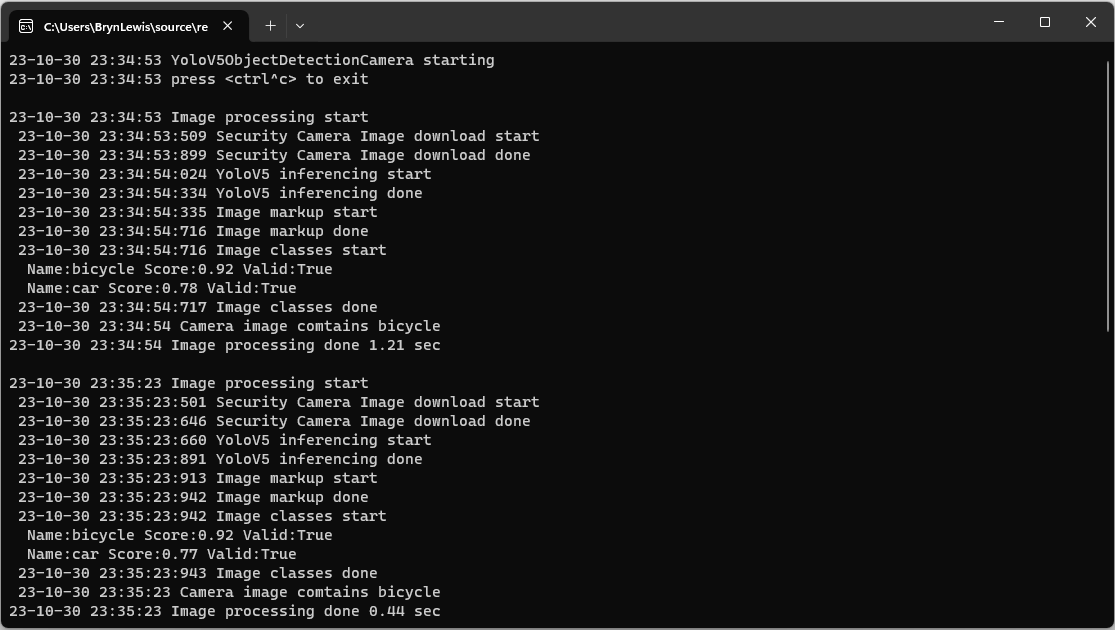
private static async void ImageUpdateTimerCallback(object state)
{
   DateTime requestAtUtc = DateTime.UtcNow;

   // Just incase - stop code being called while photo already in progress
   if (_cameraBusy)
   {
      return;
   }
   _cameraBusy = true;

   Console.WriteLine($"{DateTime.UtcNow:yy-MM-dd HH:mm:ss} Image processing start");

   try
   {
#if SECURITY_CAMERA
      Console.WriteLine($" {DateTime.UtcNow:yy-MM-dd HH:mm:ss:fff} Security Camera Image download start");

      using (Stream cameraStream = await _httpClient.GetStreamAsync(_applicationSettings.CameraUrl))
      using (Stream fileStream = File.Create(_applicationSettings.ImageInputFilenameLocal))
      {
         await cameraStream.CopyToAsync(fileStream);
      }

      Console.WriteLine($" {DateTime.UtcNow:yy-MM-dd HH:mm:ss:fff} Security Camera Image download done");
#endif

      List<YoloPrediction> predictions;

      // Process the image on local file system
      using (Image<Rgba32> image = await Image.LoadAsync<Rgba32>(_applicationSettings.ImageInputFilenameLocal))
      {
         Console.WriteLine($" {DateTime.UtcNow:yy-MM-dd HH:mm:ss:fff} YoloV5 inferencing start");
         predictions = _scorer.Predict(image);
         Console.WriteLine($" {DateTime.UtcNow:yy-MM-dd HH:mm:ss:fff} YoloV5 inferencing done");

#if OUTPUT_IMAGE_MARKUP
         Console.WriteLine($" {DateTime.UtcNow:yy-MM-dd HH:mm:ss:fff} Image markup start");

         var font = new Font(new FontCollection().Add(_applicationSettings.ImageOutputMarkupFontPath), _applicationSettings.ImageOutputMarkupFontSize);

         foreach (var prediction in predictions) // iterate predictions to draw results
         {
            double score = Math.Round(prediction.Score, 2);

            var (x, y) = (prediction.Rectangle.Left - 3, prediction.Rectangle.Top - 23);

            image.Mutate(a => a.DrawPolygon(Pens.Solid(prediction.Label.Color, 1),
                  new PointF(prediction.Rectangle.Left, prediction.Rectangle.Top),
                  new PointF(prediction.Rectangle.Right, prediction.Rectangle.Top),
                  new PointF(prediction.Rectangle.Right, prediction.Rectangle.Bottom),
                  new PointF(prediction.Rectangle.Left, prediction.Rectangle.Bottom)
            ));

            image.Mutate(a => a.DrawText($"{prediction.Label.Name} ({score})",
                  font, prediction.Label.Color, new PointF(x, y)));
         }

         await image.SaveAsJpegAsync(_applicationSettings.ImageOutputFilenameLocal);

         Console.WriteLine($" {DateTime.UtcNow:yy-MM-dd HH:mm:ss:fff} Image markup done");
#endif
      }


#if PREDICTION_CLASSES
      Console.WriteLine($" {DateTime.UtcNow:yy-MM-dd HH:mm:ss:fff} Image classes start");
      foreach (var prediction in predictions)
      {
         Console.WriteLine($"  Name:{prediction.Label.Name} Score:{prediction.Score:f2} Valid:{prediction.Score > _applicationSettings.PredictionScoreThreshold}");
      }
      Console.WriteLine($" {DateTime.UtcNow:yy-MM-dd HH:mm:ss:fff} Image classes done");
#endif

#if PREDICTION_CLASSES_OF_INTEREST
      IEnumerable<string> predictionsOfInterest = predictions.Where(p => p.Score > _applicationSettings.PredictionScoreThreshold).Select(c => c.Label.Name).Intersect(_applicationSettings.PredictionLabelsOfInterest, StringComparer.OrdinalIgnoreCase);

      if (predictionsOfInterest.Any())
      {
         Console.WriteLine($" {DateTime.UtcNow:yy-MM-dd HH:mm:ss} Camera image comtains {String.Join(",", predictionsOfInterest)}");
      }

#endif
   }
   catch (Exception ex)
   {
      Console.WriteLine($"{DateTime.UtcNow:yy-MM-dd HH:mm:ss} Camera image download, upload or post procesing failed {ex.Message}");
   }
   finally
   {
      _cameraBusy = false;
   }

   TimeSpan duration = DateTime.UtcNow - requestAtUtc;

   Console.WriteLine($"{DateTime.UtcNow:yy-MM-dd HH:mm:ss} Image processing done {duration.TotalSeconds:f2} sec");
   Console.WriteLine();
}
The names of the input image, output image and yoloV5 model file are configured in the appsettings.json (on device) or secrets.json (Visual Studio 2022 desktop) file. The location (ImageOutputMarkupFontPath) and size (ImageOutputMarkupFontSize) of the font used are configurable to make it easier run the application on different devices and operating systems.
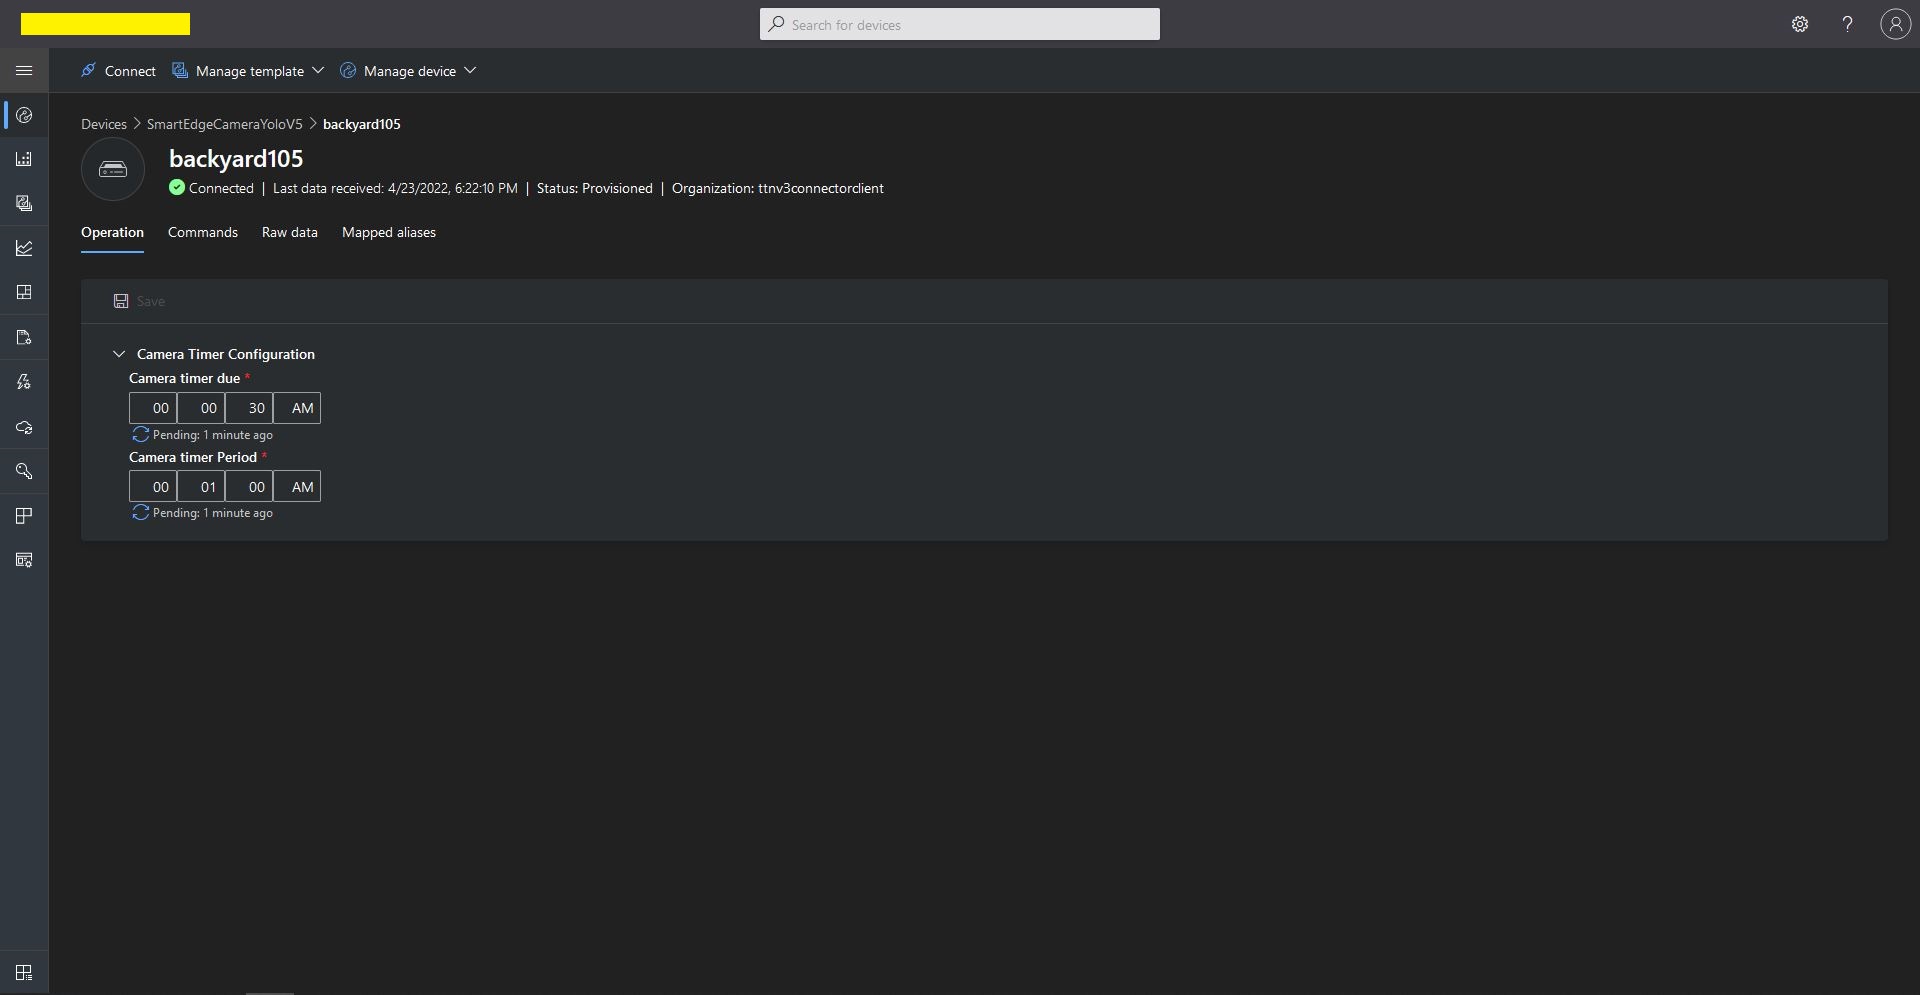
This post builds on my Smartish Edge Camera -Azure IoT Direct Methods post adding two updateable properties for the image capture and processing timer the due and period values. The two properties can be updated together or independently but the values are not persisted.
When I was searching for answers I found this code in many posts and articles but it didn’t really cover my scenario.
private static async Task OnDesiredPropertyChanged(TwinCollection desiredProperties,
  object userContext)
{
   Console.WriteLine("desired property chPleange:");
   Console.WriteLine(JsonConvert.SerializeObject(desiredProperties));
   Console.WriteLine("Sending current time as reported property");
   TwinCollection reportedProperties = new TwinCollection
   {
       ["DateTimeLastDesiredPropertyChangeReceived"] = DateTime.Now
   };

    await Client.UpdateReportedPropertiesAsync(reportedProperties).ConfigureAwait(false);
}
protected override async Task ExecuteAsync(CancellationToken stoppingToken)
{
_logger.LogInformation("Azure IoT Smart Edge Camera Service starting");
try
{
#if AZURE_IOT_HUB_CONNECTION
_deviceClient = await AzureIoTHubConnection();
#endif
#if AZURE_IOT_HUB_DPS_CONNECTION
_deviceClient = await AzureIoTHubDpsConnection();
#endif
#if AZURE_DEVICE_PROPERTIES
_logger.LogTrace("ReportedPropeties upload start");
TwinCollection reportedProperties = new TwinCollection();
reportedProperties["OSVersion"] = Environment.OSVersion.VersionString;
reportedProperties["MachineName"] = Environment.MachineName;
reportedProperties["ApplicationVersion"] = Assembly.GetAssembly(typeof(Program)).GetName().Version;
reportedProperties["ImageTimerDue"] = _applicationSettings.ImageTimerDue;
reportedProperties["ImageTimerPeriod"] = _applicationSettings.ImageTimerPeriod;
reportedProperties["YoloV5ModelPath"] = _applicationSettings.YoloV5ModelPath;
reportedProperties["PredictionScoreThreshold"] = _applicationSettings.PredictionScoreThreshold;
reportedProperties["PredictionLabelsOfInterest"] = _applicationSettings.PredictionLabelsOfInterest;
reportedProperties["PredictionLabelsMinimum"] = _applicationSettings.PredictionLabelsMinimum;
await _deviceClient.UpdateReportedPropertiesAsync(reportedProperties, stoppingToken);
_logger.LogTrace("ReportedPropeties upload done");
#endif
_logger.LogTrace("YoloV5 model setup start");
_scorer = new YoloScorer<YoloCocoP5Model>(_applicationSettings.YoloV5ModelPath);
_logger.LogTrace("YoloV5 model setup done");
_ImageUpdatetimer = new Timer(ImageUpdateTimerCallback, null, _applicationSettings.ImageTimerDue, _applicationSettings.ImageTimerPeriod);
await _deviceClient.SetMethodHandlerAsync("ImageTimerStart", ImageTimerStartHandler, null);
await _deviceClient.SetMethodHandlerAsync("ImageTimerStop", ImageTimerStopHandler, null);
await _deviceClient.SetMethodDefaultHandlerAsync(DefaultHandler, null);
await _deviceClient.SetDesiredPropertyUpdateCallbackAsync(OnDesiredPropertyChangedAsync, null);
try
{
await Task.Delay(Timeout.Infinite, stoppingToken);
}
catch (TaskCanceledException)
{
_logger.LogInformation("Application shutown requested");
}
}
catch (Exception ex)
{
_logger.LogError(ex, "Application startup failure");
}
finally
{
_deviceClient?.Dispose();
}
_logger.LogInformation("Azure IoT Smart Edge Camera Service shutdown");
}
// Lots of other code here
private async Task OnDesiredPropertyChangedAsync(TwinCollection desiredProperties, object userContext)
{
TwinCollection reportedProperties = new TwinCollection();
_logger.LogInformation("OnDesiredPropertyChanged handler");
// NB- This approach does not save the ImageTimerDue or ImageTimerPeriod, a stop/start with return to appsettings.json configuration values. If only
// one parameter specified other is default from appsettings.json. If timer settings changed I think they won't take
// effect until next time Timer fires.
try
{
// Check to see if either of ImageTimerDue or ImageTimerPeriod has changed
if (!desiredProperties.Contains("ImageTimerDue") && !desiredProperties.Contains("ImageTimerPeriod"))
{
_logger.LogInformation("OnDesiredPropertyChanged neither ImageTimerDue or ImageTimerPeriod present");
return;
}
TimeSpan imageTimerDue = _applicationSettings.ImageTimerDue;
// Check that format of ImageTimerDue valid if present
if (desiredProperties.Contains("ImageTimerDue"))
{
if (TimeSpan.TryParse(desiredProperties["ImageTimerDue"].Value, out imageTimerDue))
{
reportedProperties["ImageTimerDue"] = imageTimerDue;
}
else
{
_logger.LogInformation("OnDesiredPropertyChanged ImageTimerDue invalid");
return;
}
}
TimeSpan imageTimerPeriod = _applicationSettings.ImageTimerPeriod;
// Check that format of ImageTimerPeriod valid if present
if (desiredProperties.Contains("ImageTimerPeriod"))
{
if (TimeSpan.TryParse(desiredProperties["ImageTimerPeriod"].Value, out imageTimerPeriod))
{
reportedProperties["ImageTimerPeriod"] = imageTimerPeriod;
}
else
{
_logger.LogInformation("OnDesiredPropertyChanged ImageTimerPeriod invalid");
return;
}
}
_logger.LogInformation("Desired Due:{0} Period:{1}", imageTimerDue, imageTimerPeriod);
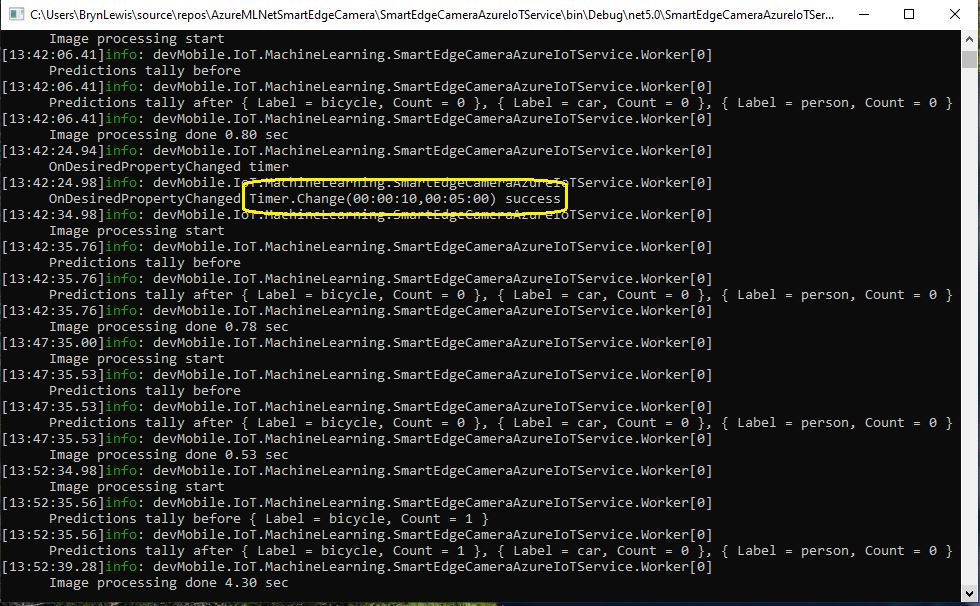
if (!_ImageUpdatetimer.Change(imageTimerDue, imageTimerPeriod))
{
_logger.LogInformation("Desired Due:{0} Period:{1} failed", imageTimerDue, imageTimerPeriod);
}
await _deviceClient.UpdateReportedPropertiesAsync(reportedProperties);
}
catch (Exception ex)
{
_logger.LogError(ex, "OnDesiredPropertyChangedAsync handler failed");
}
}
The TwinCollection desiredProperties is checked for ImageTimerDue and ImageTimerPeriod properties and if either of these are present and valid the Timer.Change method is called.
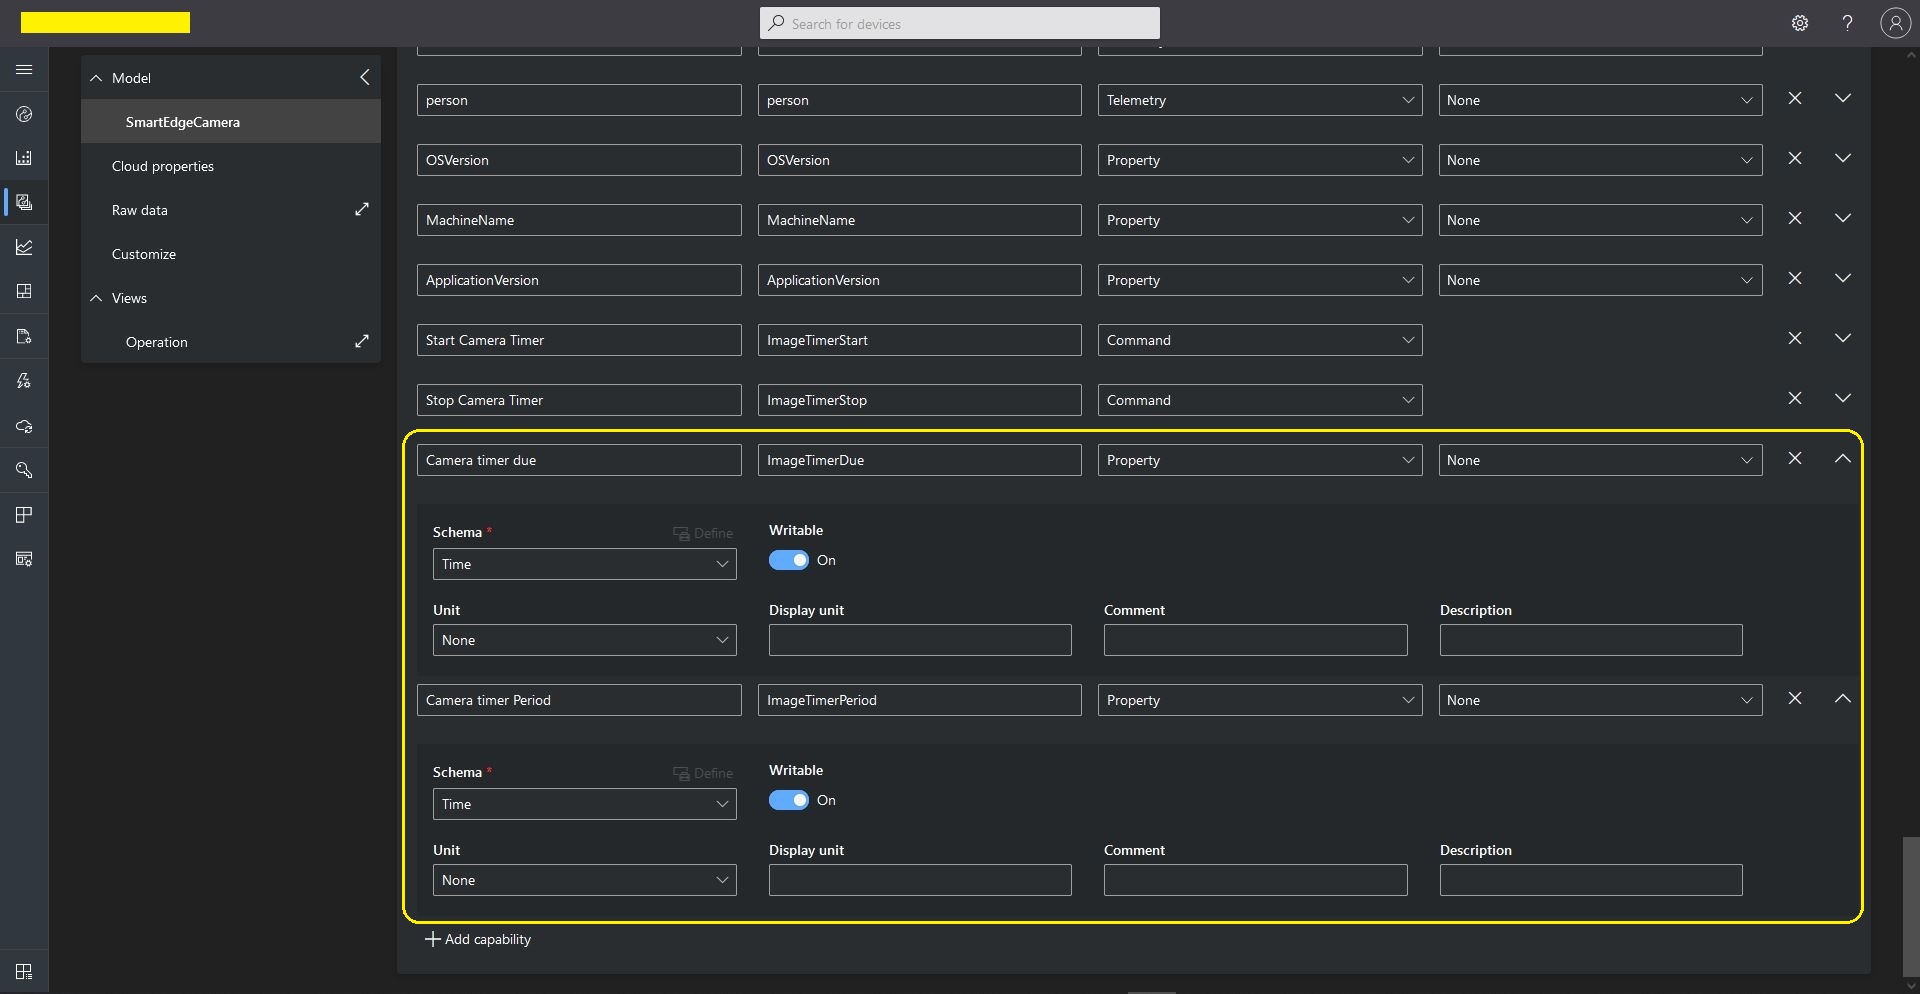
Azure IoT Central SmartEdgeCamera Device template capabilities
I added a View to the template so the two properties could be changed (I didn’t configure either as required)
Azure IoT Central SmartEdgeCamera Device Default view designer
In the “Device Properties”, “Operation Tab” when I changed the ImageTimerDue and/or ImageTimerPeriod there was visual feedback that there was an update in progress.
Azure IoT Central SmartEdgeCamera Device Properties update start
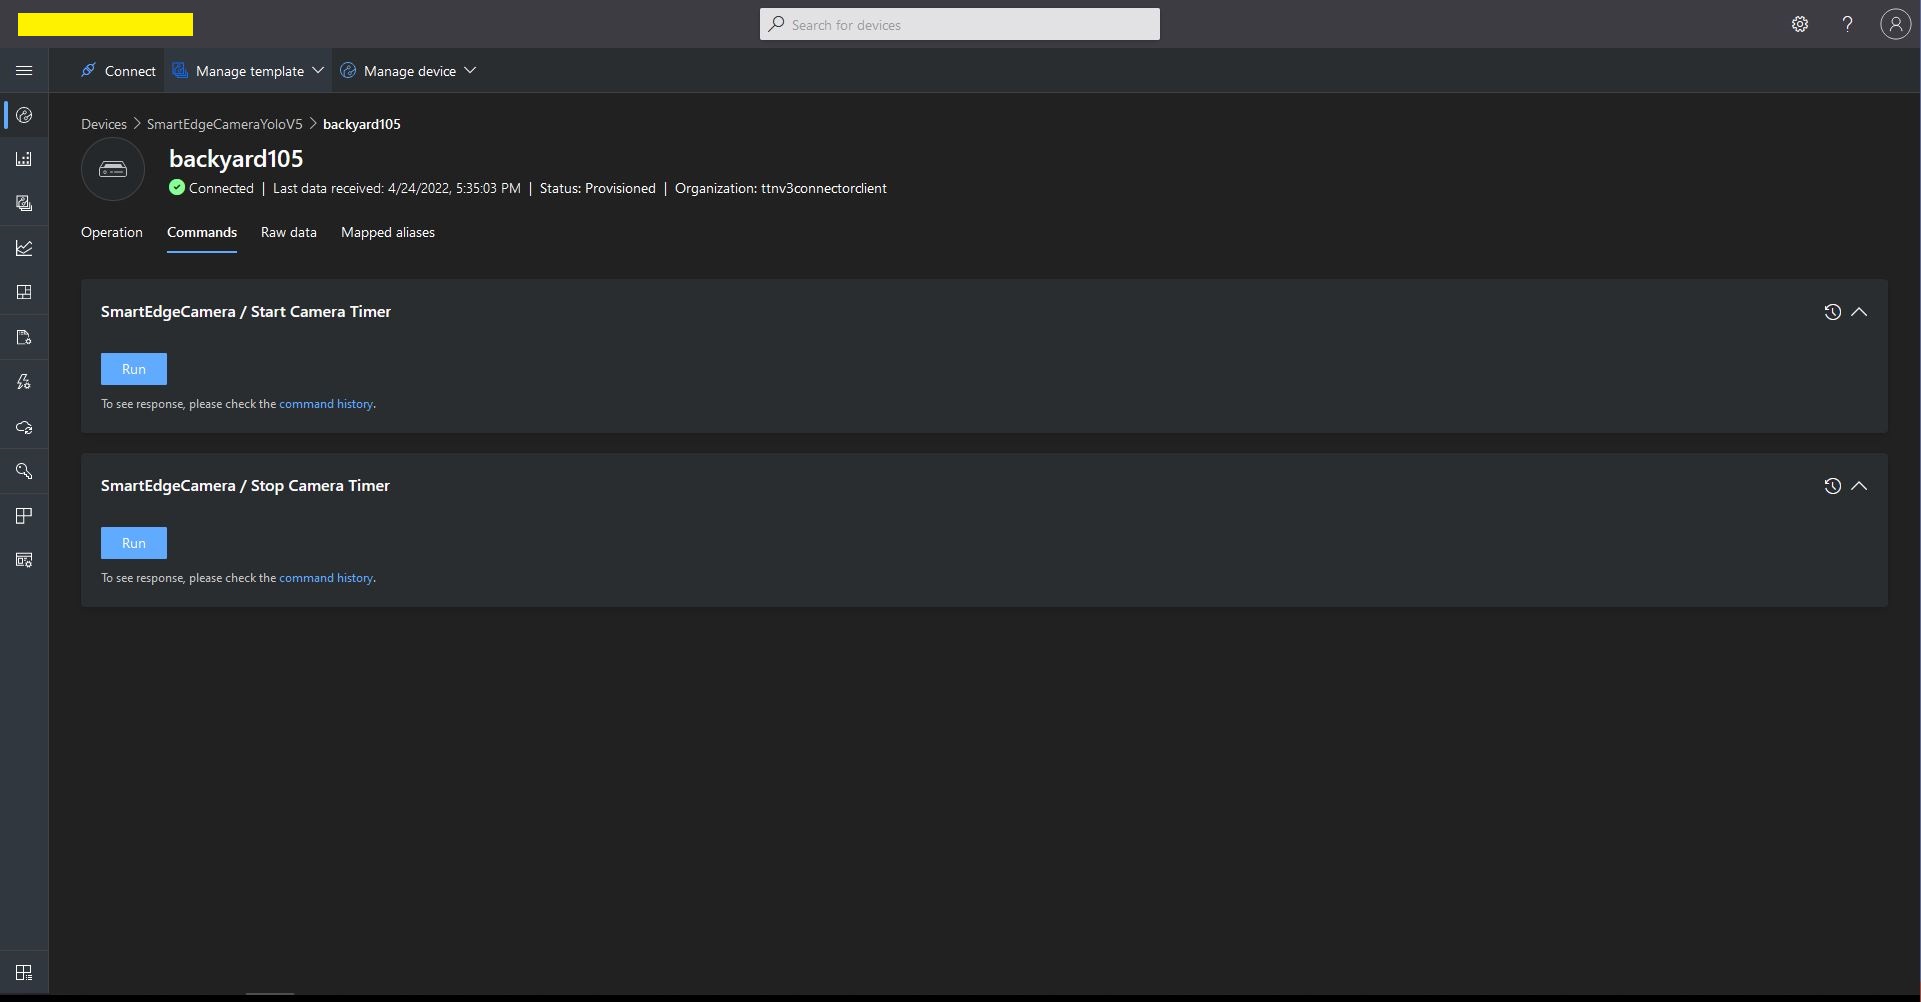
Azure IoT Central Template Direct Method configuration
Azure IoT Central Template Direct Method invocation
Azure Smart Edge Camera console application Start Direct Method call
Initially, I had one long post which covered Direct Methods, Readonly Properties and Updateable Properties but it got too long so I split it into three.