Random wanderings through Microsoft Azure esp. PaaS plumbing, the IoT bits, AI on Micro controllers, AI on Edge Devices, .NET nanoFramework, .NET Core on *nix and ML.NET+ONNX
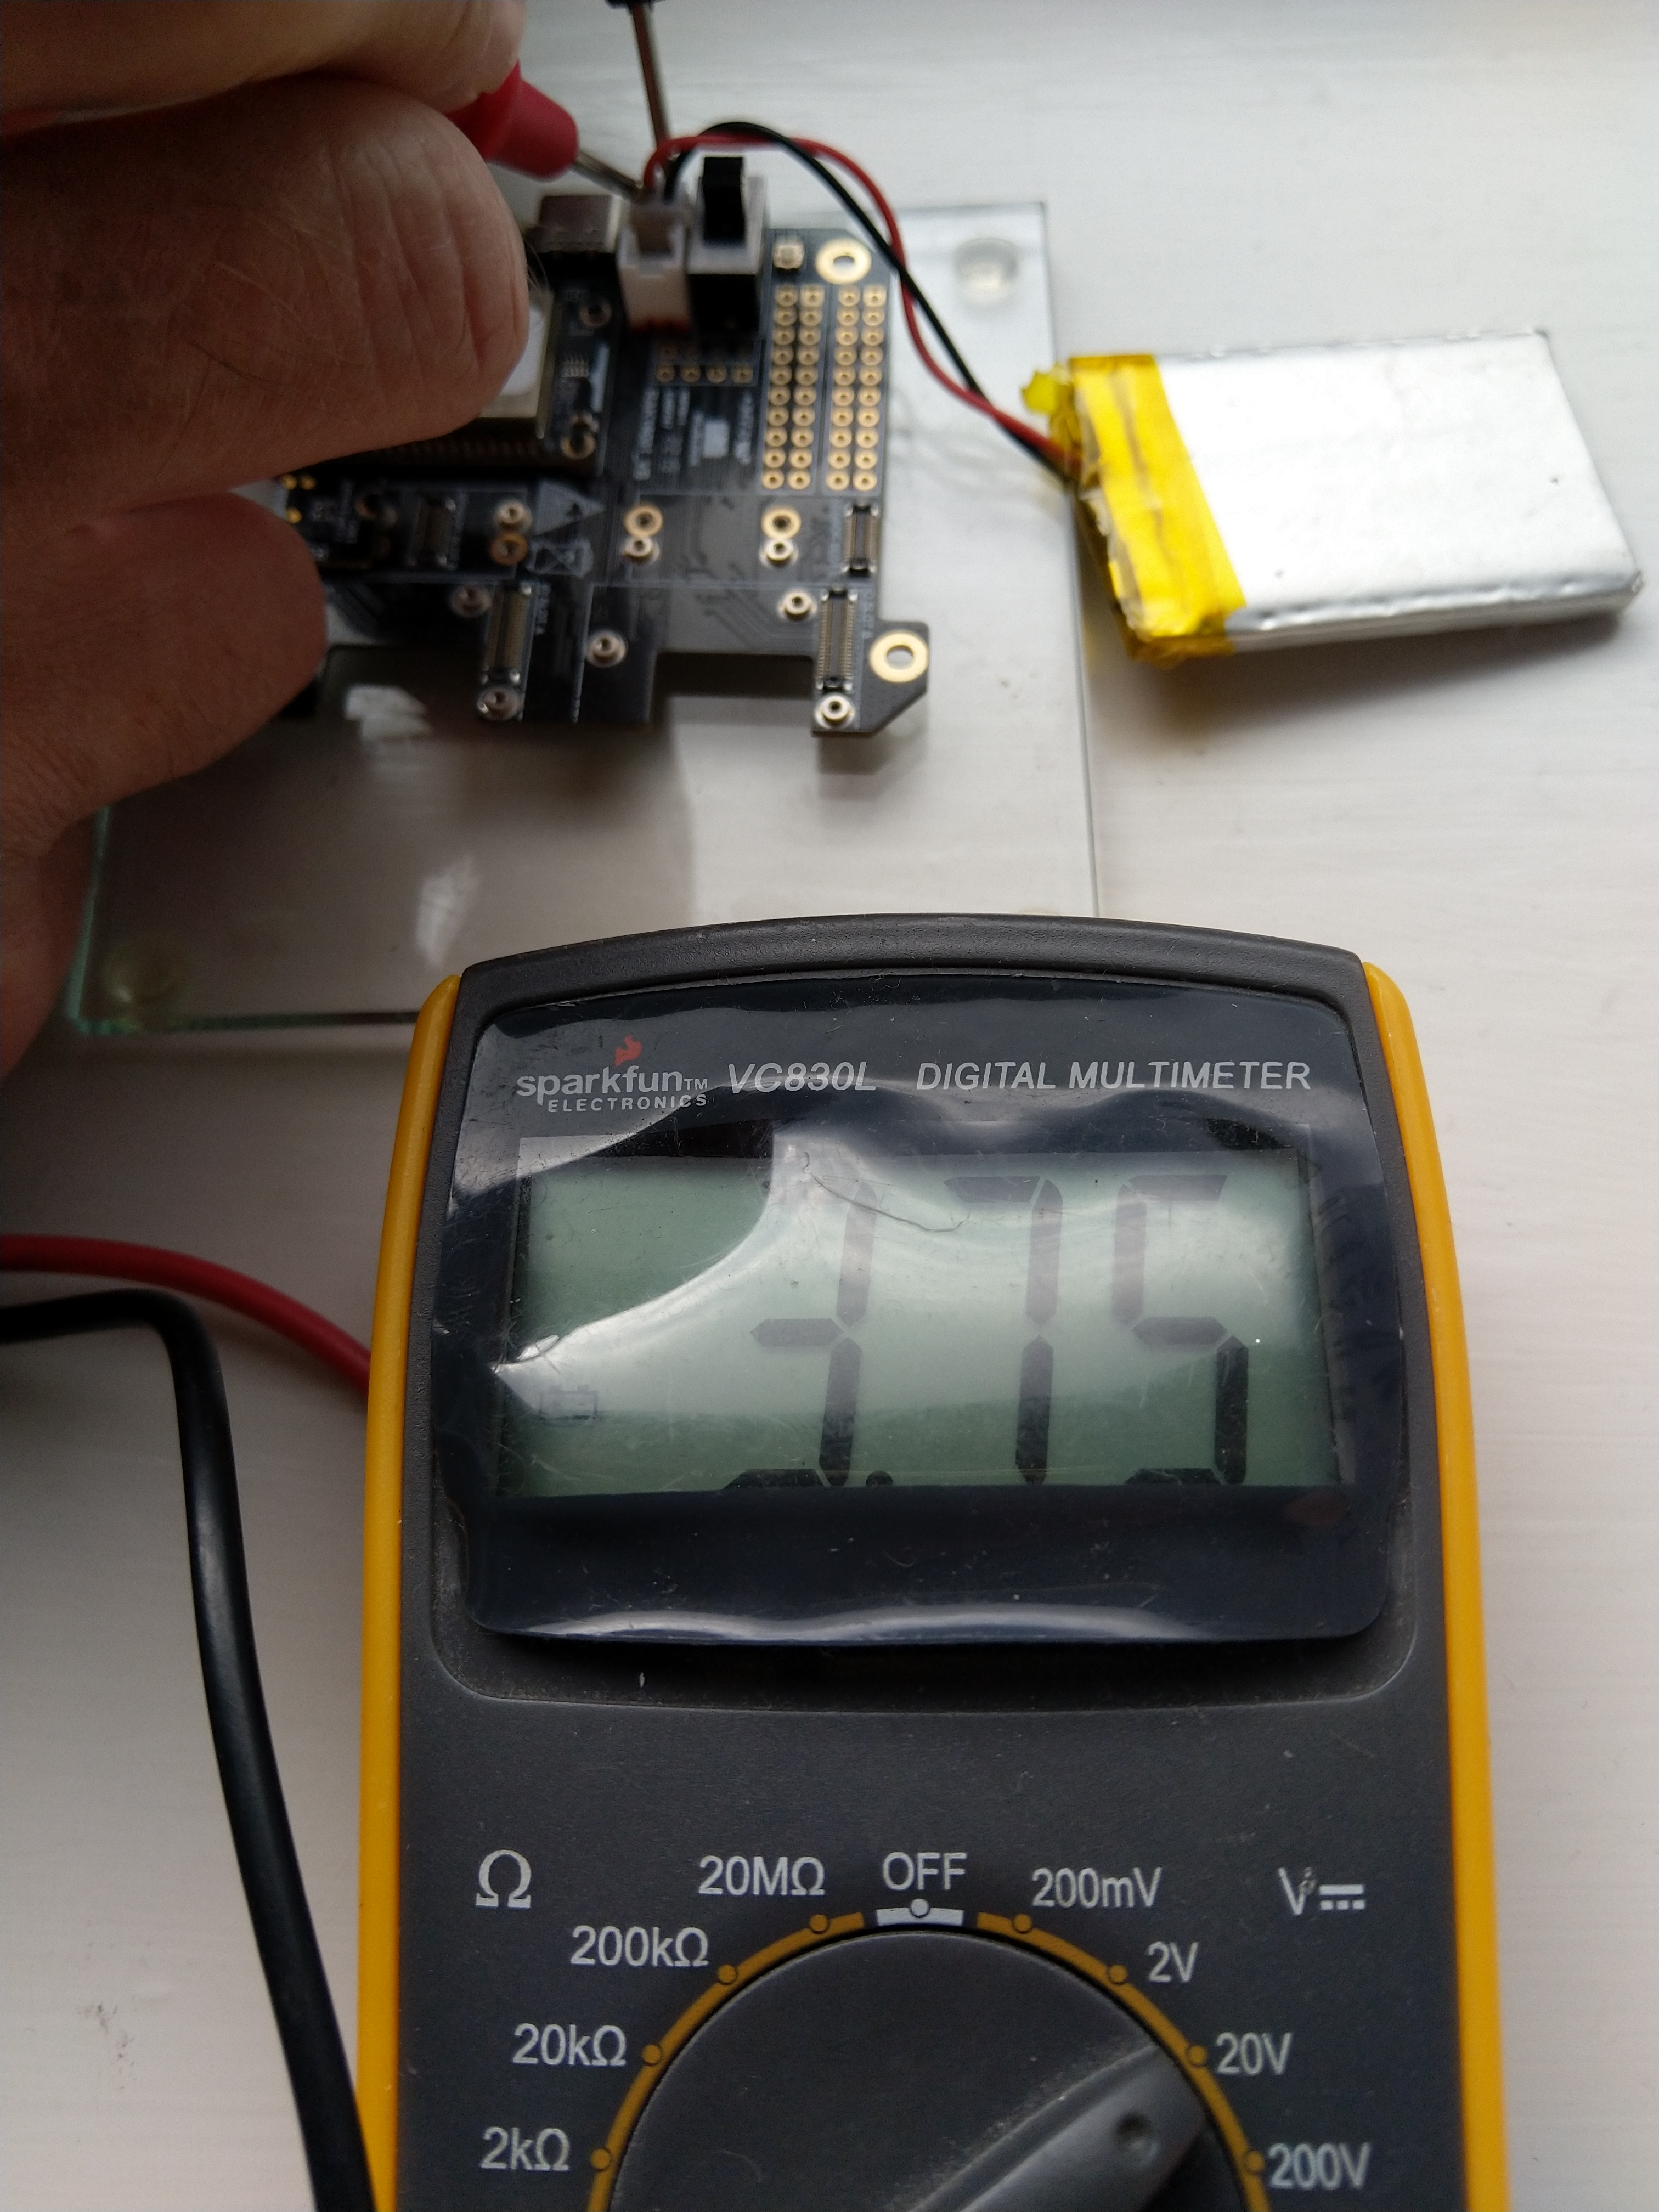
The voltage my test setup was calculating looked wrong, then I realised that the sample calculation in the RAK Wireless forums wasn’t applicable to my setup.
I updated the formula used to calculate the battery voltage and deployed the application
public static void Main()
{
    Debug.WriteLine($"{DateTime.UtcNow:HH:mm:ss} devMobile.IoT.RAK.Wisblock.AzureIoTHub.RAK11200.PowerSleep starting");

    Thread.Sleep(5000);

    try
    {
        double batteryVoltage;

        Configuration.SetPinFunction(Gpio.IO04, DeviceFunction.I2C1_DATA);
        Configuration.SetPinFunction(Gpio.IO05, DeviceFunction.I2C1_CLOCK);

        Debug.WriteLine($"{DateTime.UtcNow:HH:mm:ss} Battery voltage measurement");

        // Configure Analog input (AIN0) port then read the "battery charge"
        AdcController adcController = new AdcController();

        using (AdcChannel batteryVoltageAdcChannel = adcController.OpenChannel(AdcControllerChannel))
        {
            batteryVoltage = batteryVoltageAdcChannel.ReadValue() / 723.7685;

            Debug.WriteLine($" BatteryVoltage {batteryVoltage:F2}");

            if (batteryVoltage < Config.BatteryVoltageBrownOutThreshold)
            {
                Sleep.EnableWakeupByTimer(Config.FailureRetryInterval);
                Sleep.StartDeepSleep();
            }
        }
        catch (Exception ex)
        {
...
}
To test the accuracy of the voltage calculation I am going to run my setup on the office windowsill for a week regularly measuring the voltage. Then, turn the solar panel over (so the battery is not getting charged) and monitor the battery discharging until the RAK11200 WisBlock WiFi Module won’t connect to the network.
After some “tinkering” I found the voltage calculation was surprisingly accurate (usually within 0.01V) for my RAK19001 and RAK19007 base boards.
When the battery voltage was close to its minimum working voltage of the ESP32 device it would reboot when the WifiNetworkHelper.ConnectDhcp method was called. This would quickly drain the battery flat even when the solar panel was trying to charge the battery.
Now, before trying to connect to the wireless network the battery voltage is checked and if too low (more experimentation required) the device goes into a deep sleep for a configurable period (more experimentation required). This is so the solar panel can charge the battery to a level where wireless connectivity will work.
Important: make sure you setup the I2C pins especially on ESP32 Devices before creating the I2cDevice,
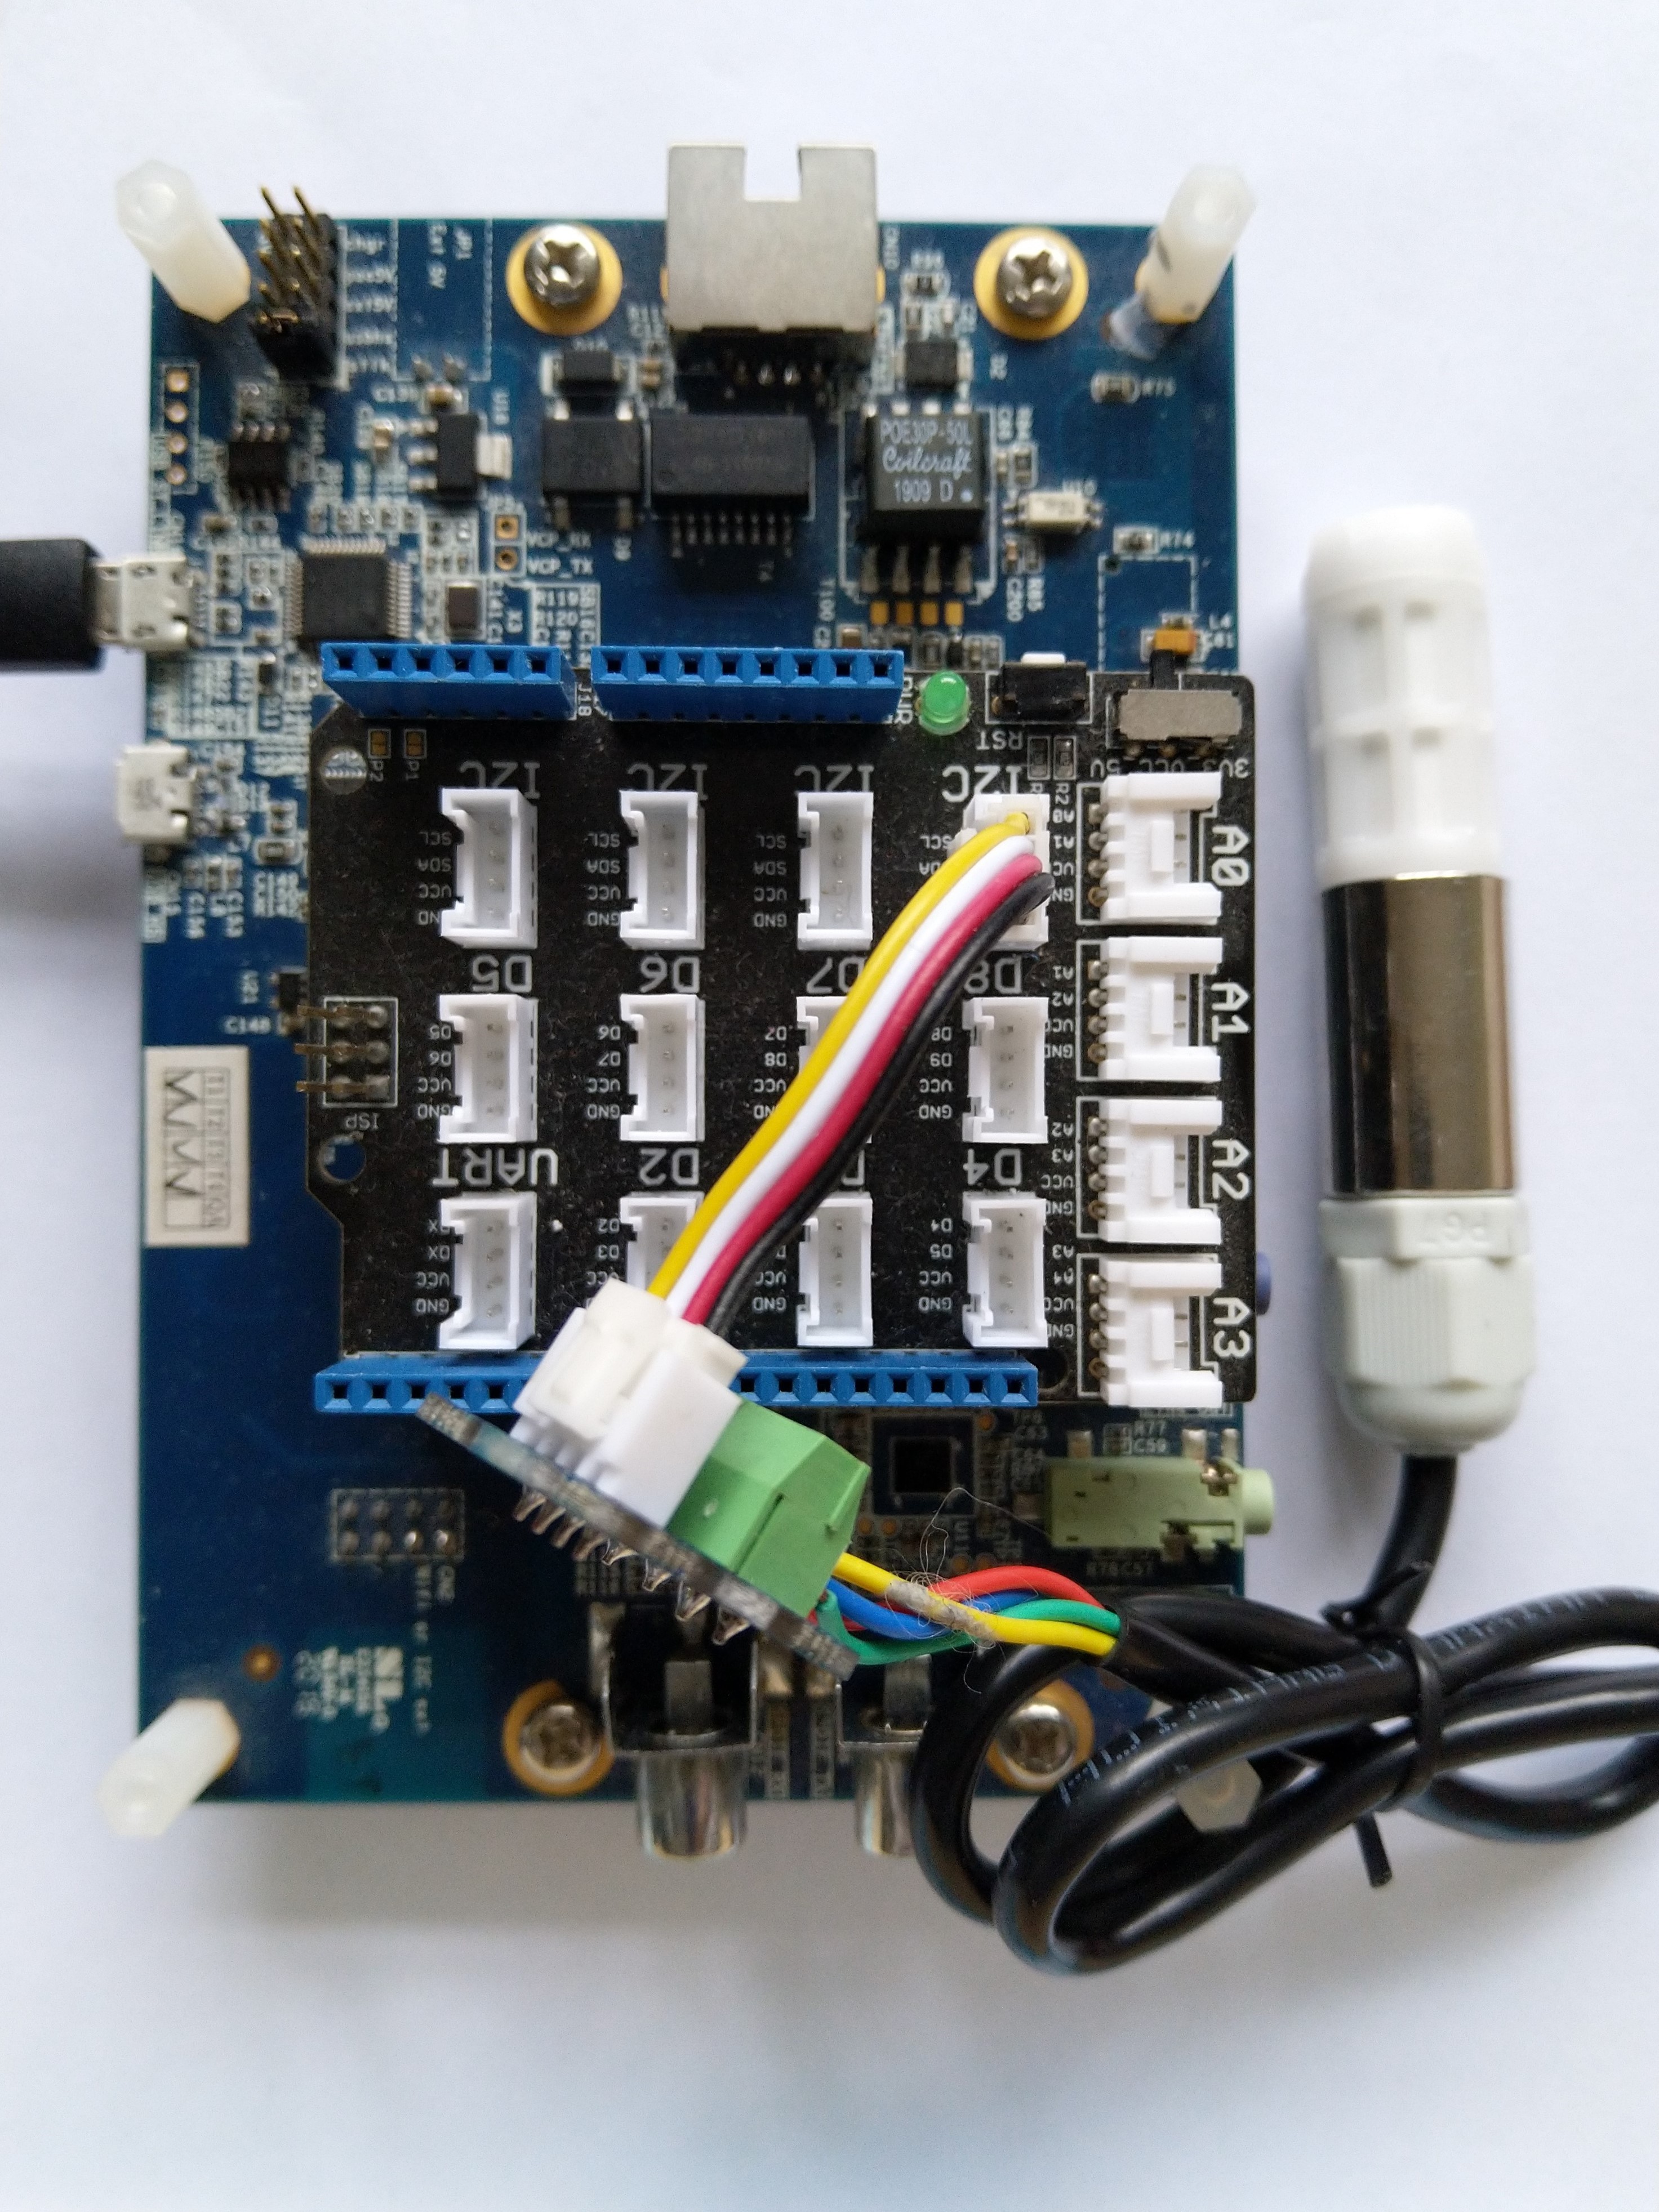
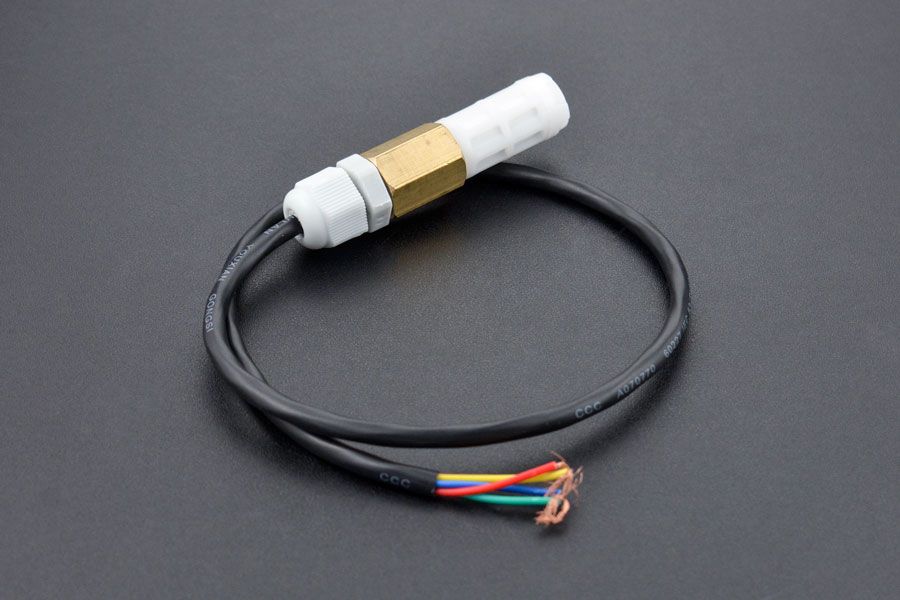
SHT20 +STM32F769 Discovery test rig
The .NET nanoFramework device libraries use a TryGet… pattern to retrieve sensor value, this library throws an exception if reading a sensor value fails. I’m not certain which approach is “better” as reading Sensirion SHT20 temperature and humidity(Waterproof) has never failed The only time reading a value failed was when I unplugged the device which I think is “exceptional”.
//---------------------------------------------------------------------------------
// Copyright (c) March 2023, devMobile Software
//
// Licensed under the Apache License, Version 2.0 (the "License");
// you may not use this file except in compliance with the License.
// You may obtain a copy of the License at
//
//     http://www.apache.org/licenses/LICENSE-2.0
//
// Unless required by applicable law or agreed to in writing, software
// distributed under the License is distributed on an "AS IS" BASIS,
// WITHOUT WARRANTIES OR CONDITIONS OF ANY KIND, either express or implied.
// See the License for the specific language governing permissions and
// limitations under the License.
//
// nanoff --target ST_STM32F769I_DISCOVERY --update
// nanoff --platform ESP32 --serialport COM7 --update
//
//---------------------------------------------------------------------------------
#define ST_STM32F769I_DISCOVERY
//#define  SPARKFUN_ESP32_THING_PLUS
namespace devMobile.IoT.Device.Sht20
{
    using System;
    using System.Device.I2c;
    using System.Threading;

#if SPARKFUN_ESP32_THING_PLUS
    using nanoFramework.Hardware.Esp32;
#endif

    class Program
    {
        static void Main(string[] args)
        {
            const int busId = 1;

            Thread.Sleep(5000);

#if SPARKFUN_ESP32_THING_PLUS
            Configuration.SetPinFunction(Gpio.IO23, DeviceFunction.I2C1_DATA);
            Configuration.SetPinFunction(Gpio.IO22, DeviceFunction.I2C1_CLOCK);
#endif

            I2cConnectionSettings i2cConnectionSettings = new(busId, Sht20.DefaultI2cAddress);

            using I2cDevice i2cDevice = I2cDevice.Create(i2cConnectionSettings);
            {
                using (Sht20 sht20 = new Sht20(i2cDevice))
                {
                    sht20.Reset();

                    while (true)
                    {
                        double temperature = sht20.Temperature();
                        double humidity = sht20.Humidity();
#if HEATER_ON_OFF
					    sht20.HeaterOn();
					    Console.WriteLine($"{DateTime.Now:HH:mm:ss} HeaterOn:{sht20.IsHeaterOn()}");
#endif
                        Console.WriteLine($"{DateTime.UtcNow:HH:mm:ss} Temperature:{temperature:F1}°C Humidity:{humidity:F0}% HeaterOn:{sht20.IsHeaterOn()}");
#if HEATER_ON_OFF
					    sht20.HeaterOff();
					    Console.WriteLine($"{DateTime.Now:HH:mm:ss} HeaterOn:{sht20.IsHeaterOn()}");
#endif
                        Thread.Sleep(1000);
                    }
                }
            }
        }
    }
}
I’m going to soak test the library for a week to check that is working okay, then most probably refactor the code so it can be added to the nanoFramework IoT.Device Library repository.
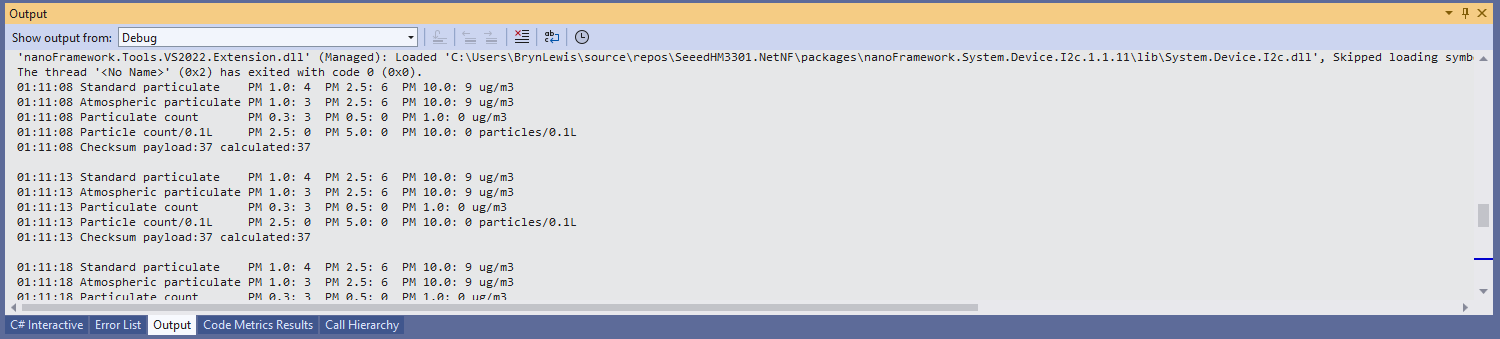
The unpacking of the value standard particulate, particulate count and particle count values is fairly repetitive, but I will fix it in the next version.
Visual Studio 2022 Debug output
The checksum calculation isn’t great even a simple cyclic redundancy check(CRC) would be an improvement on summing the 28 bytes of the payload.
When developing libraries it’s good to have a selection of different platforms for testing as this can significantly improve the quality and robustness of the implementation. A few months ago I noticed that RAK Wireless have a UWB Module Decawave DW1000 Wisblock so I added one to an order.
I have added a couple of C# processor directives (MAKERFABS_ESP32UWB & RAK11200_RAK1907_RAK13801) so the platform that the Qorvo DW1000 module is running on can be configured.
public class Program
{
#if MAKERFABS_ESP32UWB
private const int SpiBusId = 1;
private const int chipSelectLine = Gpio.IO04;
#endif
#if RAK11200_RAK1907_RAK13801
private const int SpiBusId = 1;
private const int chipSelectLine = Gpio.IO32;
#endif
public static void Main()
{
Thread.Sleep(5000);
Debug.WriteLine("devMobile.IoT.Dw1000.ShieldSPI starting");
try
{
#if MAKERFABS_ESP32UWB
Configuration.SetPinFunction(Gpio.IO19, DeviceFunction.SPI1_MISO);
Configuration.SetPinFunction(Gpio.IO23, DeviceFunction.SPI1_MOSI);
Configuration.SetPinFunction(Gpio.IO18, DeviceFunction.SPI1_CLOCK);
#endif
#if RAK11200_RAK1907_RAK13801
Configuration.SetPinFunction(Gpio.IO35, DeviceFunction.SPI1_MISO);
Configuration.SetPinFunction(Gpio.IO25, DeviceFunction.SPI1_MOSI);
Configuration.SetPinFunction(Gpio.IO33, DeviceFunction.SPI1_CLOCK);
#endif
var settings = new SpiConnectionSettings(SpiBusId, chipSelectLine)
{
ClockFrequency = 2000000,
Mode = SpiMode.Mode0,
};
using (SpiDevice device = SpiDevice.Create(settings))
{
while (true)
{
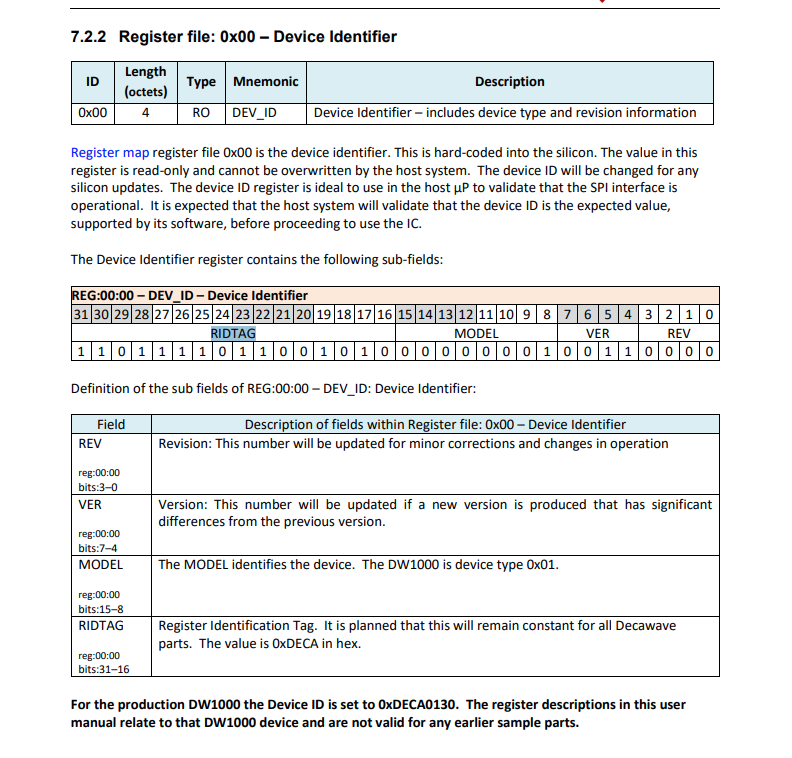
byte[] writeBuffer = new byte[] { 0x0, 0x0, 0x0, 0x0, 0x0 }; // 0x0 = DEV_ID
byte[] readBuffer = new byte[writeBuffer.Length];
device.TransferFullDuplex(writeBuffer, readBuffer); // 15, 48, 1, 202, 222
uint ridTag = (uint)(readBuffer[4]<< 8 | readBuffer[3]);
byte model = readBuffer[2];
byte ver = (byte)(readBuffer[1] >> 4);
byte rev = (byte)(readBuffer[1] & 0x0f);
Debug.WriteLine(String.Format($"RIDTAG 0x{ridTag:X2} MODEL 0x{model:X2} VER 0X{ver:X2} REV 0x{rev:X2}"));
Thread.Sleep(10000);
}
}
}
catch (Exception ex)
{
Debug.WriteLine(ex.Message);
}
}
}
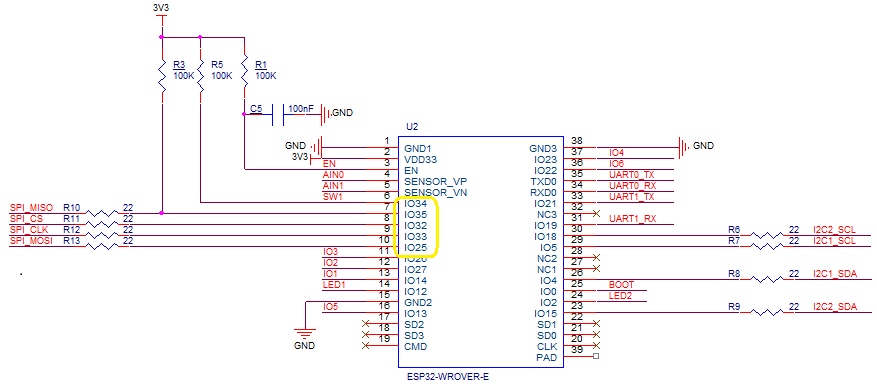
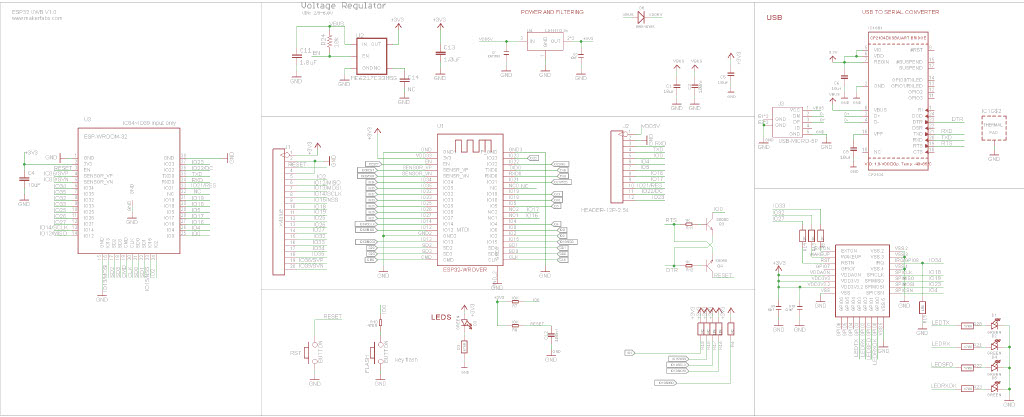
The alignment of the RAK11200 WisBiock Core Module pins and labels on the circuit diagram tripped me up. My initial configuration caused the device to reboot every time the application started.
Visual Studio 2022 Debug window displaying the decoded value from Register 0x0
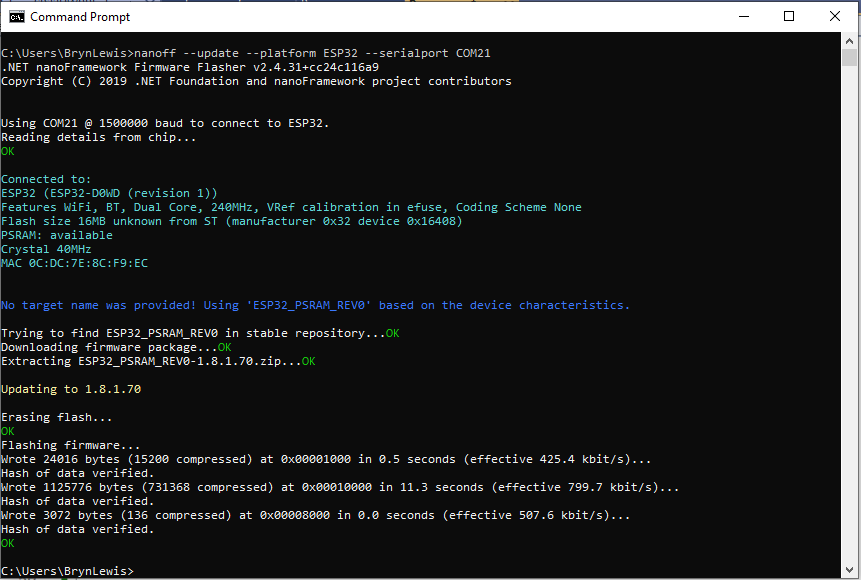
At the top of test applications, I usually have a brief delay i.e Thread.Sleep(5000) so I can attach the debugger or erase the flash before the application crashes.
Even though SPI is an industry standard there are often subtle differences which need to be taken into account when reading from/writing to registers. The DW1000 has a static “Device Identifier” which I used to debug my “proof of concept” code.
DW1000 Datasheet Register Map documentation for Register 0x00
The DeviceSPI program reads register 0x00 and then displays the decoded payload.
public class Program
{
#if MAKERFABS_ESP32UWB
    private const int SpiBusId = 1;
    private const int chipSelectLine = Gpio.IO04;
#endif

    public static void Main()
    {
        Thread.Sleep(5000);

        Debug.WriteLine("devMobile.IoT.Dw1000.ShieldSPI starting");

        try
        {
#if MAKERFABS_ESP32UWB
            Configuration.SetPinFunction(Gpio.IO19, DeviceFunction.SPI1_MISO);
            Configuration.SetPinFunction(Gpio.IO23, DeviceFunction.SPI1_MOSI);
            Configuration.SetPinFunction(Gpio.IO18, DeviceFunction.SPI1_CLOCK);
#endif
            var settings = new SpiConnectionSettings(SpiBusId, chipSelectLine)
            {
                ClockFrequency = 2000000,
                Mode = SpiMode.Mode0,
            };

            using (SpiDevice device = SpiDevice.Create(settings))
            {
                Thread.Sleep(500);

                while (true)
                {
                    /*
                    byte[] writeBuffer = new byte[] { 0x0, 0x0, 0x0, 0x0, 0x0 }; // 0x0 = DEV_ID
                    byte[] readBuffer = new byte[writeBuffer.Length];

                    device.TransferFullDuplex(writeBuffer, readBuffer); // 15, 48, 1, 202, 222
                    */

                    byte[] writeBuffer = new byte[] { 0x0 }; // 0x0 = DEV_ID
                    byte[] readBuffer = new byte[5];

                    device.TransferFullDuplex(writeBuffer, readBuffer); // 15, 48, 1, 202, 222

                    uint ridTag = (uint)(readBuffer[4]<< 8 | readBuffer[3]);
                    byte model = readBuffer[2];
                    byte ver = (byte)(readBuffer[1] >> 4);
                    byte rev = (byte)(readBuffer[1] & 0x0f);

                    Debug.WriteLine(String.Format($"RIDTAG 0x{ridTag:X2} MODEL 0x{model:X2} VER 0X{ver:X2} REV 0x{rev:X2}"));

                    Thread.Sleep(10000);
                }
            }
        }
        catch (Exception ex)
        {
            Debug.WriteLine(ex.Message);
        }
    }
}
Visual Studio 2022 Debug window displaying the decoded value from Register 0x0
The DW1000 User Manual is > 240 pages, with roughly 140 pages of detailed documentation about the DW1000 register set so progress will be slow.
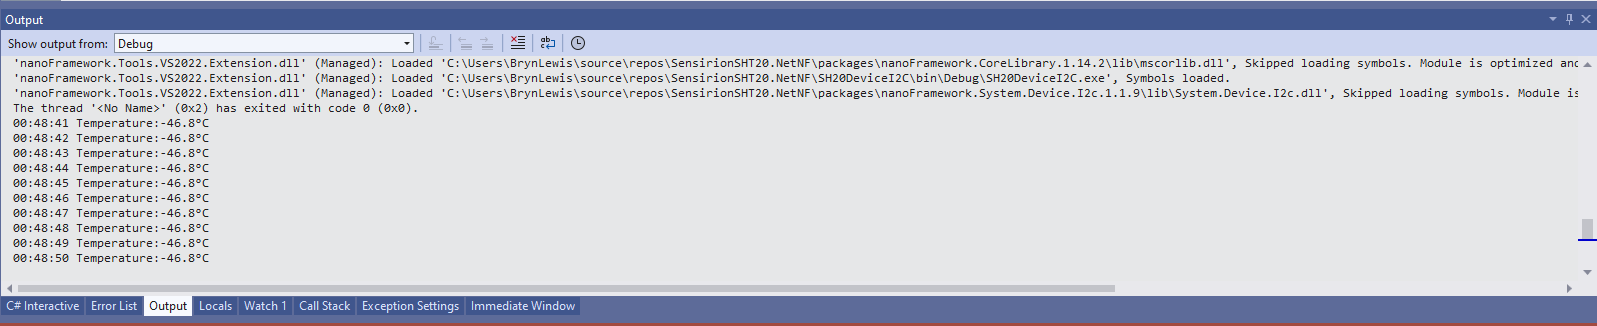
The SH20DeviceI2C application has lots of magic numbers from the SHT20 datasheet and was just a tool for exploring how the sensor works.
 public static void Main()
{
    I2cConnectionSettings i2cConnectionSettings = new(1, 0x40);

    // i2cDevice.Dispose in final program
    I2cDevice i2cDevice = I2cDevice.Create(i2cConnectionSettings);

    while (true)
    {
        byte[] readBuffer = new byte[3] { 0, 0, 0 };

        // First temperature
        i2cDevice.WriteByte(0xF3);

        //Thread.Sleep(50); // no go -46.8
        //Thread.Sleep(60);
        Thread.Sleep(70);
        //Thread.Sleep(90);
        //Thread.Sleep(110);

        i2cDevice.Read(readBuffer);

        ushort temperatureRaw = (ushort)(readBuffer[0] << 8);
        temperatureRaw += readBuffer[1];

        //Debug.WriteLine($"Raw {temperatureRaw}");

        double temperature = temperatureRaw * (175.72 / 65536.0) - 46.85;

        // Then read the Humidity
        i2cDevice.WriteByte(0xF5);

        //Thread.Sleep(50);
        //Thread.Sleep(60);
        Thread.Sleep(70);
        //Thread.Sleep(90);
        //Thread.Sleep(110);

        i2cDevice.Read(readBuffer);

        ushort humidityRaw = (ushort)(readBuffer[0] << 8);
        humidityRaw += readBuffer[1];

        //Debug.WriteLine($"Raw {humidityRaw}");

        double humidity = humidityRaw * (125.0 / 65536.0) - 6.0;

        //Console.WriteLine($"{DateTime.UtcNow:HH:mm:ss} Temperature:{temperature:F1}°C");
        //Console.WriteLine($"{DateTime.UtcNow:HH:mm:ss} Humidity:{humidity:F0}%");
        Console.WriteLine($"{DateTime.UtcNow:HH:mm:ss} Temperature:{temperature:F1}°C Humidity:{humidity:F0}%");

        Thread.Sleep(1000);
    }
}
While tinkering with the sensor I found that having a short delay between initiating the temperature reading (TemperatureNoHold = 0xF3 was used so as not to hang up the I2C bus) and reading the value was important.
Temperature value without Thread.Sleep
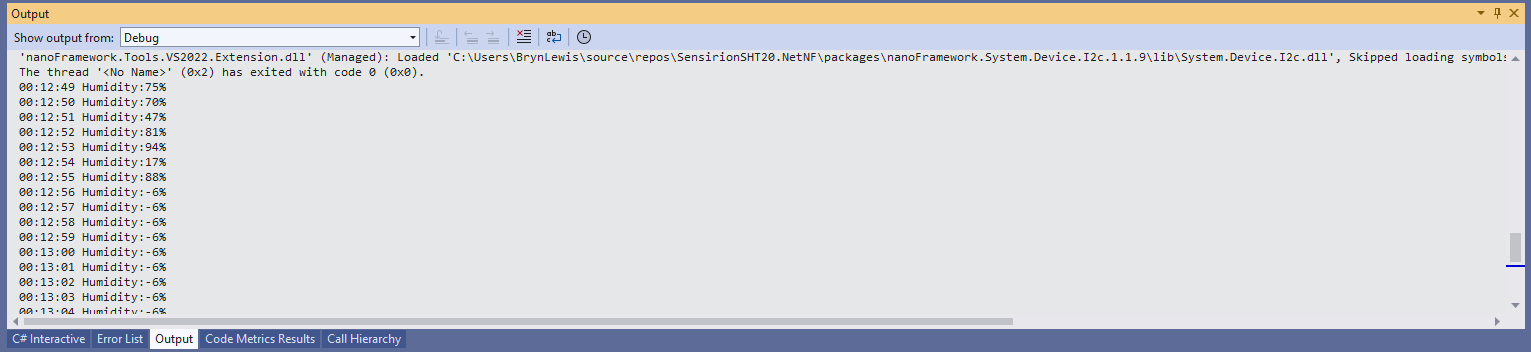
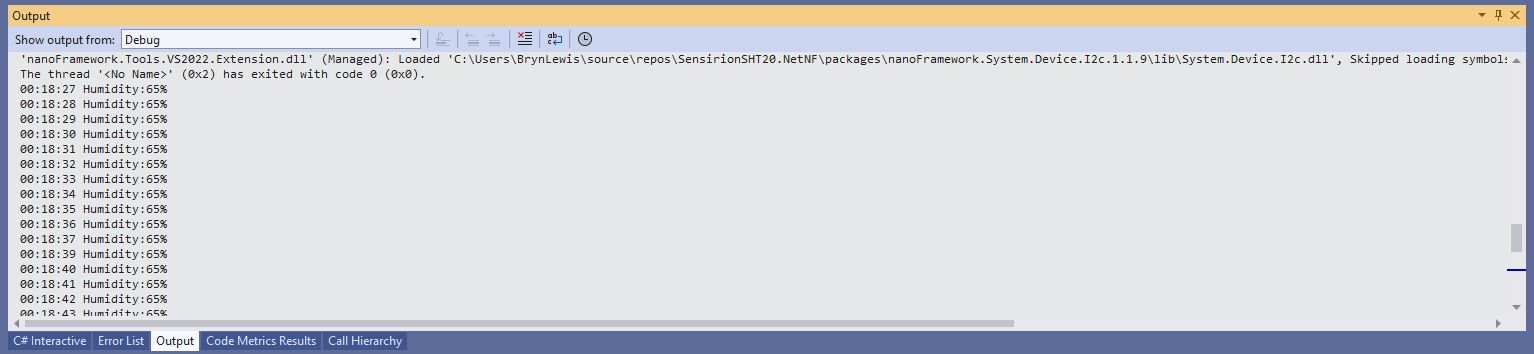
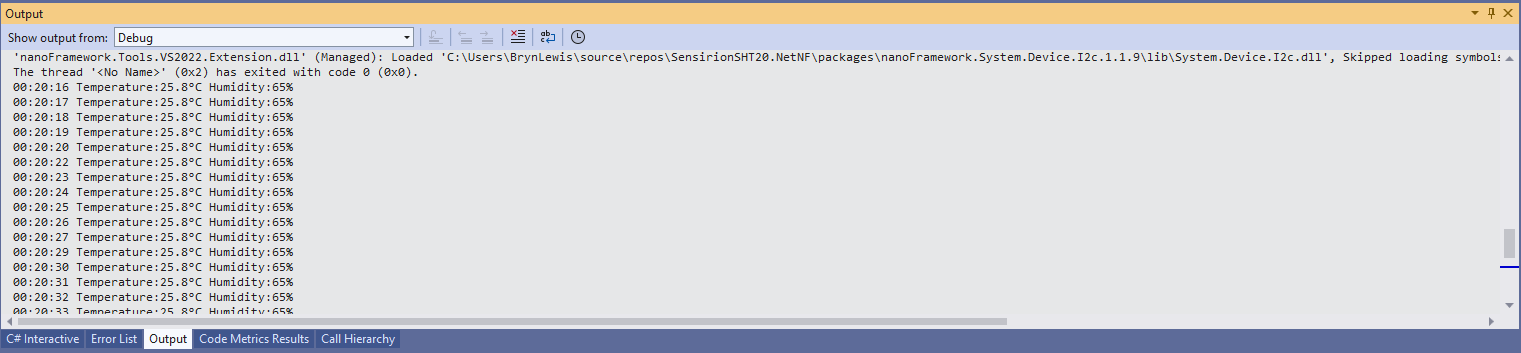
When I ran the application without a Thread.Sleep(70) the temperature and/or humidity the values were incorrect and sometimes quite random.
Temperature value with Thread.Sleep(70)
Humidity value without Thread.Sleep
Humidity value with Thread.Sleep(70)
Temperature and Humidity values with Thread.Sleep(70)
I’m going to soak test the library for a week to check that is working okay, then refactor the code so it can be added to the nanoFramework IoT.Device Library repository.
public static void Main()
{
    Debug.WriteLine($"{DateTime.UtcNow:HH:mm:ss} devMobile.IoT.RAK.Wisblock.AzureIoTHub.RAK11200.PowerSleep starting");

    Thread.Sleep(5000);

    try
    {
        Configuration.SetPinFunction(Gpio.IO04, DeviceFunction.I2C1_DATA);
        Configuration.SetPinFunction(Gpio.IO05, DeviceFunction.I2C1_CLOCK);

        Debug.WriteLine($"{DateTime.UtcNow:HH:mm:ss} Wifi connecting");

        if (!WifiNetworkHelper.ConnectDhcp(Config.Ssid, Config.Password, requiresDateTime: true))
       {
            if (NetworkHelper.HelperException != null)
            {
                 Debug.WriteLine($"{DateTime.UtcNow:HH:mm:ss} WifiNetworkHelper.ConnectDhcp failed {NetworkHelper.HelperException}");
            }

            Sleep.EnableWakeupByTimer(Config.FailureRetryInterval);
            Sleep.StartDeepSleep();
        }

        Debug.WriteLine($"{DateTime.UtcNow:HH:mm:ss} Wifi connected");

        // Configure the SHTC3
        I2cConnectionSettings settings = new(I2cDeviceBusID, Shtc3.DefaultI2cAddress);
        I2cDevice device = I2cDevice.Create(settings);
        Shtc3 shtc3 = new(device);

        // Assuming that if TryGetTemperatureAndHumidity fails accessing temperature or relativeHumidity will cause an exception
        shtc3.TryGetTemperatureAndHumidity(out var temperature, out var relativeHumidity);

#if SLEEP_SHT3C
        shtc3.Sleep();
#endif

        // Configure Analog input (AIN0) port then read the "battery charge"
        AdcController adcController = new AdcController();
        AdcChannel batteryChargeAdcChannel = adcController.OpenChannel(AdcControllerChannel);

        double batteryCharge = batteryChargeAdcChannel.ReadRatio() * 100.0;

        Debug.WriteLine($" Temperature {temperature.DegreesCelsius:F1}°C Humidity {relativeHumidity.Value:F0}% BatteryCharge {batteryCharge:F1}");

        // Assemble the JSON payload, should use nanoFramework.Json
        string payload = $"{{\"RelativeHumidity\":{relativeHumidity.Value:F0},\"Temperature\":{temperature.DegreesCelsius.ToString("F1")}, \"BatteryCharge\":{batteryCharge:F1}}}";

        // Configure the HttpClient uri, certificate, and authorization
        string uri = $"{Config.AzureIoTHubHostName}.azure-devices.net/devices/{Config.DeviceID}";

        HttpClient httpClient = new HttpClient()
        {
            SslProtocols = System.Net.Security.SslProtocols.Tls12,
            HttpsAuthentCert = new X509Certificate(Config.DigiCertBaltimoreCyberTrustRoot),
            BaseAddress = new Uri($"https://{uri}/messages/events?api-version=2020-03-13"),
        };
        httpClient.DefaultRequestHeaders.Add("Authorization", SasTokenGenerate(uri, Config.Key, DateTime.UtcNow.Add(Config.SasTokenRenewFor)));

        Debug.WriteLine($"{DateTime.UtcNow:HH:mm:ss} Azure IoT Hub device {Config.DeviceID} telemetry update start");

        HttpResponseMessage response = httpClient.Post("", new StringContent(payload));

        Debug.WriteLine($"{DateTime.UtcNow:HH:mm:ss} Response code:{response.StatusCode}");

        response.EnsureSuccessStatusCode();
    }
    catch (Exception ex)
    {
        Debug.WriteLine($"{DateTime.UtcNow:HH:mm:ss} Azure IoT Hub telemetry update failed:{ex.Message} {ex?.InnerException?.Message}");

        Sleep.EnableWakeupByTimer(Config.FailureRetryInterval);
        Sleep.StartDeepSleep();
    }

    Sleep.EnableWakeupByTimer(Config.TelemetryUploadInterval);
#if SLEEP_LIGHT
    Sleep.StartLightSleep();
#endif
#if SLEEP_DEEP
    Sleep.StartDeepSleep();
#endif
 }
The LightSleep or DeepSleep based code is significantly less complex because the allocation and deallocation of resources does not have to be managed because the application is restarted when the WakeUp Timer triggers.
RAK1702 Schematic with voltage divider to ADC_VBAT connection highlighted
RAK1701 Schematic with ADC_VBAT to CPU slot connection highlighted
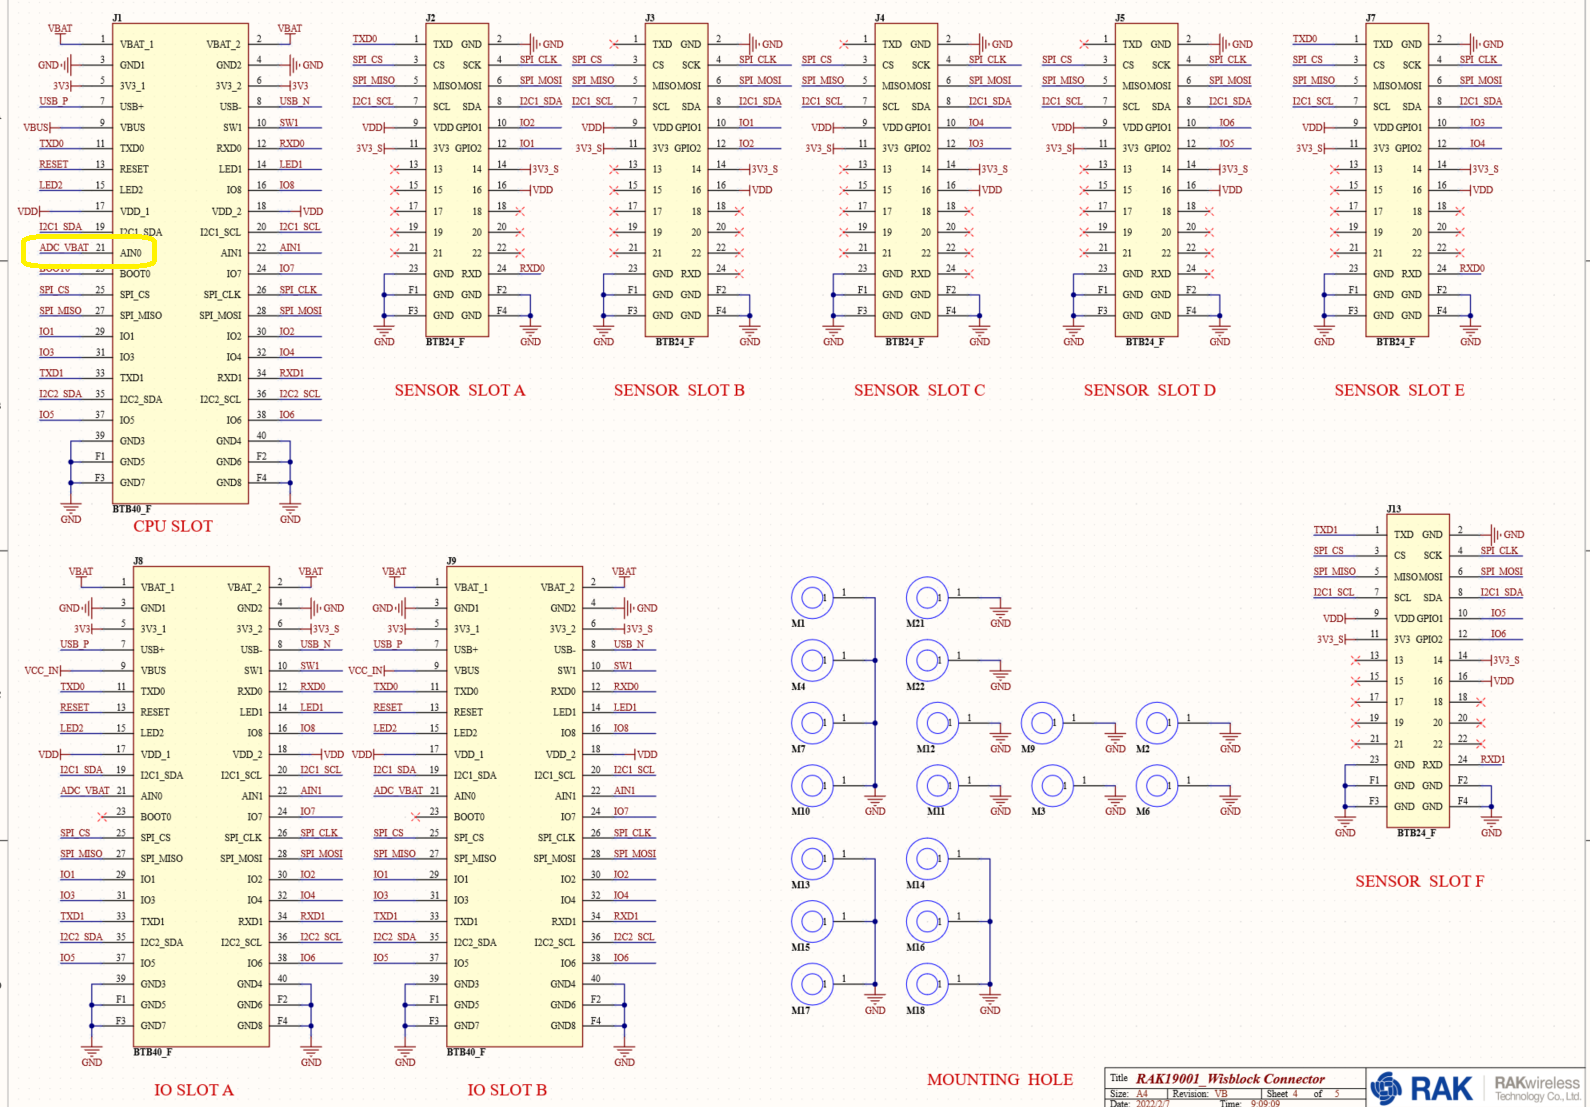
The RAK19007 WisBlock Base Board has a voltage divider (R3&R4 with output ADC_VBAT) which is connected (via R7) to pin 21(AIN0) on the CPU slot connector.
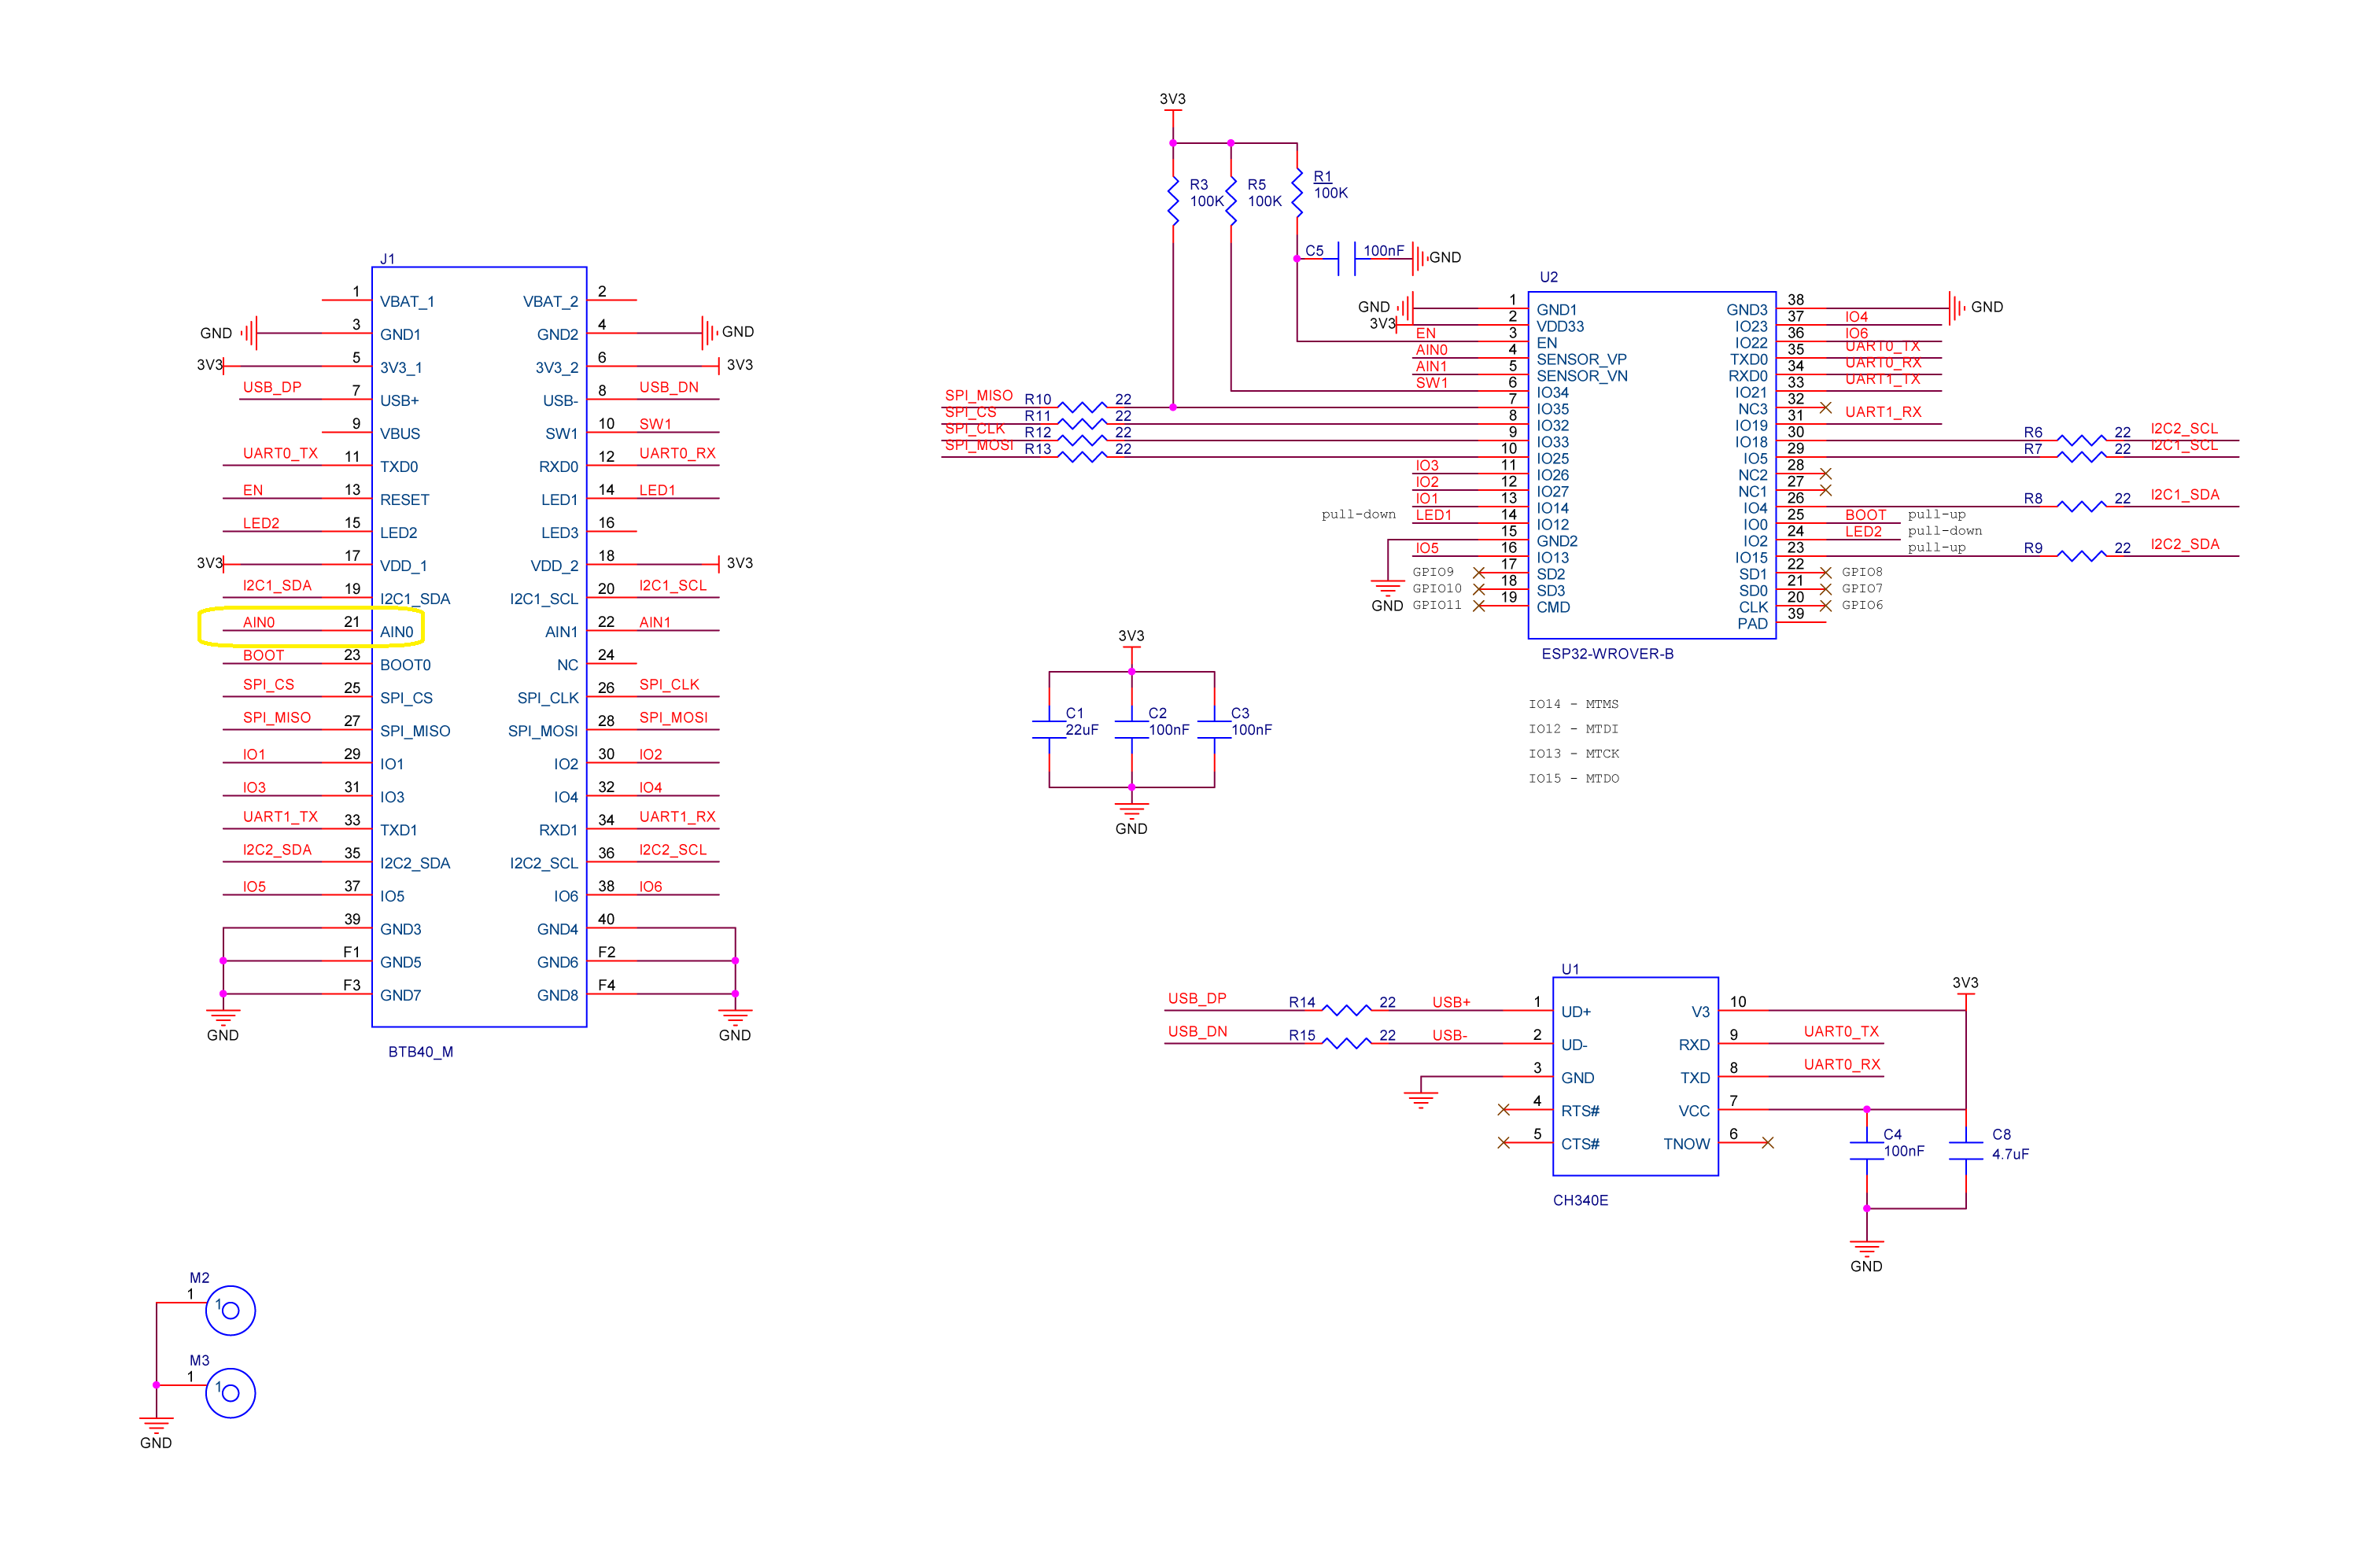
RAK11200 schematic with CPU Slot to ESP32-WROVER-B connection highlighted
 public class Program
 {
     private const int I2cDeviceBusID = 1;
     private const int AdcControllerChannel = 0;

     public static void Main()
     {
         DateTime sasTokenValidUntilUtc = DateTime.UtcNow;

         Debug.WriteLine($"{DateTime.UtcNow:HH:mm:ss} devMobile.IoT.RAK.Wisblock.AzureIoTHub.RAK11200.PowerBaseline starting");

         Configuration.SetPinFunction(Gpio.IO04, DeviceFunction.I2C1_DATA);
         Configuration.SetPinFunction(Gpio.IO05, DeviceFunction.I2C1_CLOCK);

         if (!WifiNetworkHelper.ConnectDhcp(Config.Ssid, Config.Password, requiresDateTime: true))
         {
             if (NetworkHelper.HelperException != null)
             {
                 Debug.WriteLine($"{DateTime.UtcNow:HH:mm:ss} WifiNetworkHelper.ConnectDhcp failed {NetworkHelper.HelperException}");
             }

             Thread.Sleep(Timeout.Infinite);
         }

         string uri = $"{Config.AzureIoTHubHostName}.azure-devices.net/devices/{Config.DeviceID}";

         // not setting Authorization here as it will change as SAS Token refreshed
         HttpClient httpClient = new HttpClient
         {
             SslProtocols = System.Net.Security.SslProtocols.Tls12,
             HttpsAuthentCert = new X509Certificate(Config.DigiCertBaltimoreCyberTrustRoot),
             BaseAddress = new Uri($"https://{uri}/messages/events?api-version=2020-03-13"),
         };

         I2cConnectionSettings settings = new(I2cDeviceBusID, Shtc3.DefaultI2cAddress);
         I2cDevice device = I2cDevice.Create(settings);
         Shtc3 shtc3 = new(device);

         AdcController adcController = new AdcController();
         AdcChannel batteryChargeAdcChannel = adcController.OpenChannel(AdcControllerChannel);

         string sasToken = "";

         while (true)
         {
             DateTime standardisedUtcNow = DateTime.UtcNow;

             Debug.WriteLine($"{DateTime.UtcNow:HH:mm:ss} Azure IoT Hub device {Config.DeviceID} telemetry update start");

             if (sasTokenValidUntilUtc <= standardisedUtcNow)
             {
                 sasTokenValidUntilUtc = standardisedUtcNow.Add(Config.SasTokenRenewEvery);

                 sasToken = SasTokenGenerate(uri, Config.Key, sasTokenValidUntilUtc);

                 Debug.WriteLine($" Renewing SAS token for {Config.SasTokenRenewFor} valid until {sasTokenValidUntilUtc:HH:mm:ss dd-MM-yy}");
             }

             if (!shtc3.TryGetTemperatureAndHumidity(out var temperature, out var relativeHumidity))
             {
                 Debug.WriteLine($" Temperature and Humidity read failed");

                 continue;
             }

             double batteryCharge = batteryChargeAdcChannel.ReadRatio() * 100.0;

             Debug.WriteLine($" Temperature {temperature.DegreesCelsius:F1}°C Humidity {relativeHumidity.Value:F0}% BatteryCharge {batteryCharge:F1}%");

             string payload = $"{{\"RelativeHumidity\":{relativeHumidity.Value:F0},\"Temperature\":{temperature.DegreesCelsius.ToString("F1")}, \"BatteryCharge\":{batteryCharge:F1}}}";

             try
             {
                 using (HttpContent content = new StringContent(payload))
                 {
                     content.Headers.Add("Authorization", sasToken);

                     using (HttpResponseMessage response = httpClient.Post("", content))
                     {
                         Console.WriteLine($"{DateTime.UtcNow:HH:mm:ss} Response code:{response.StatusCode}");

                         response.EnsureSuccessStatusCode();
                     }
                 }
             }
             catch (Exception ex)
             {
                 Debug.WriteLine($"{DateTime.UtcNow:HH:mm:ss} Azure IoT Hub POST failed:{ex.Message} {ex?.InnerException?.Message}");
             }

             Debug.WriteLine($"{DateTime.UtcNow:HH:mm:ss} Azure IoT Hub telemetry update done");

             Thread.Sleep(Config.TelemetryUploadInterval);
         }
     }
...
}
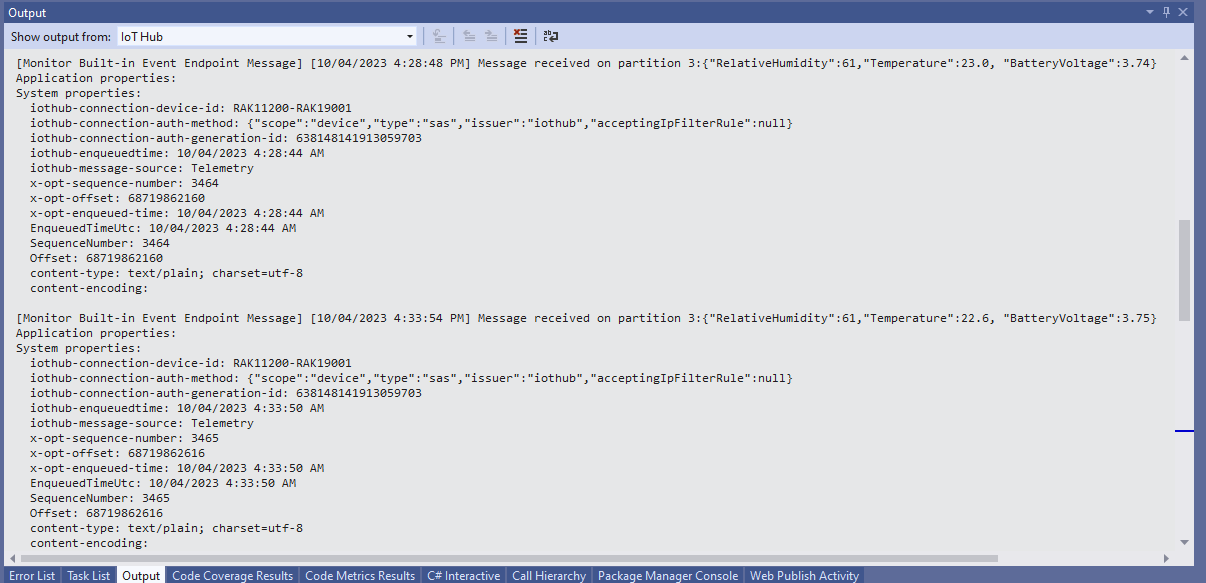
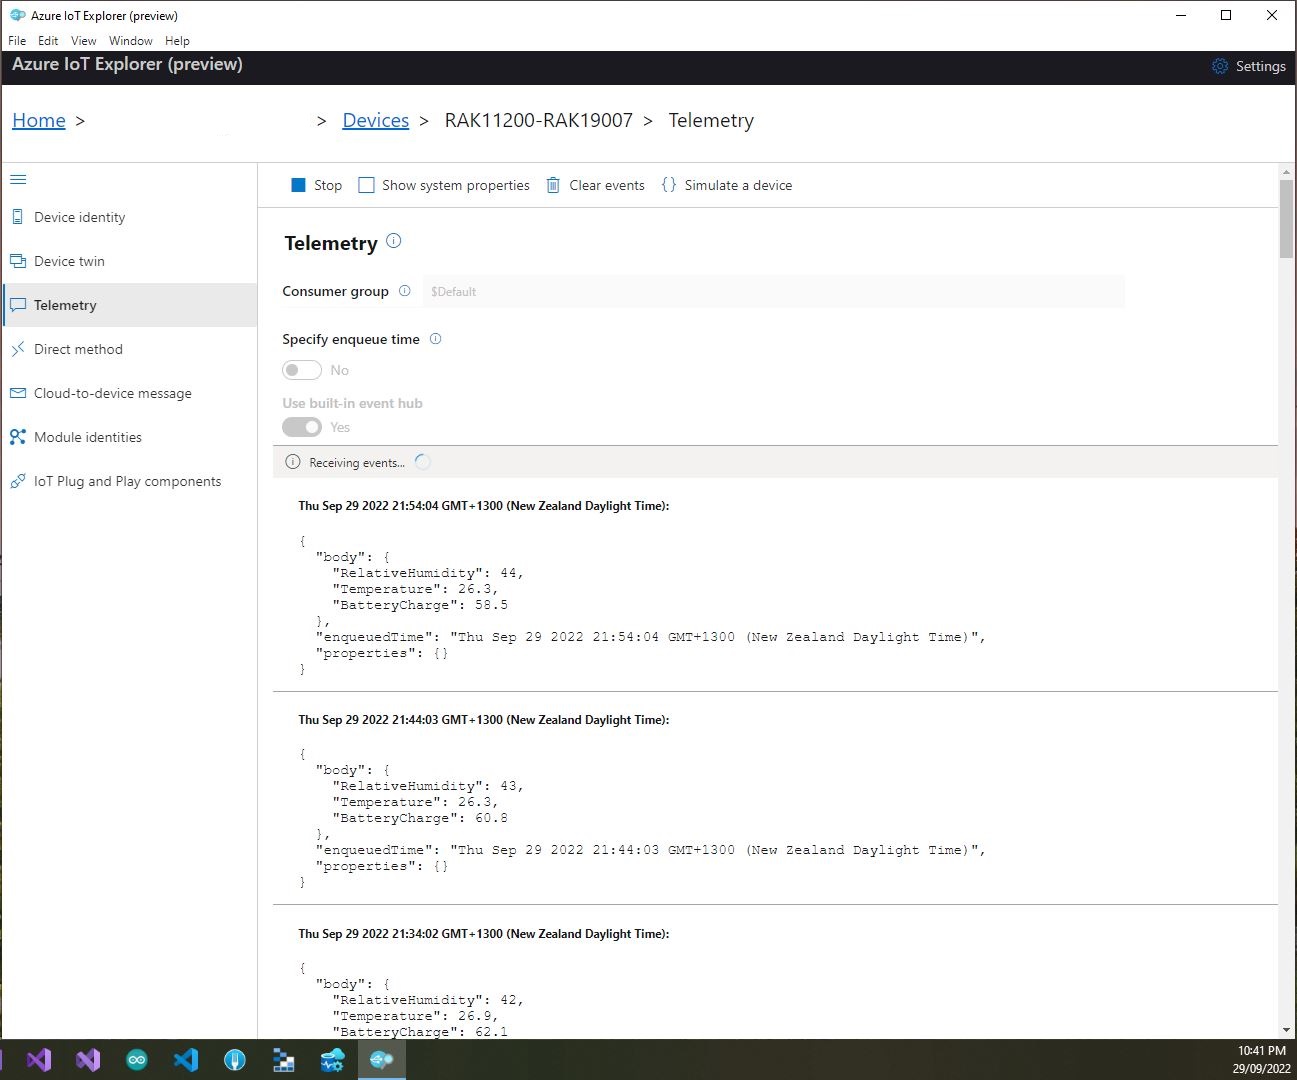
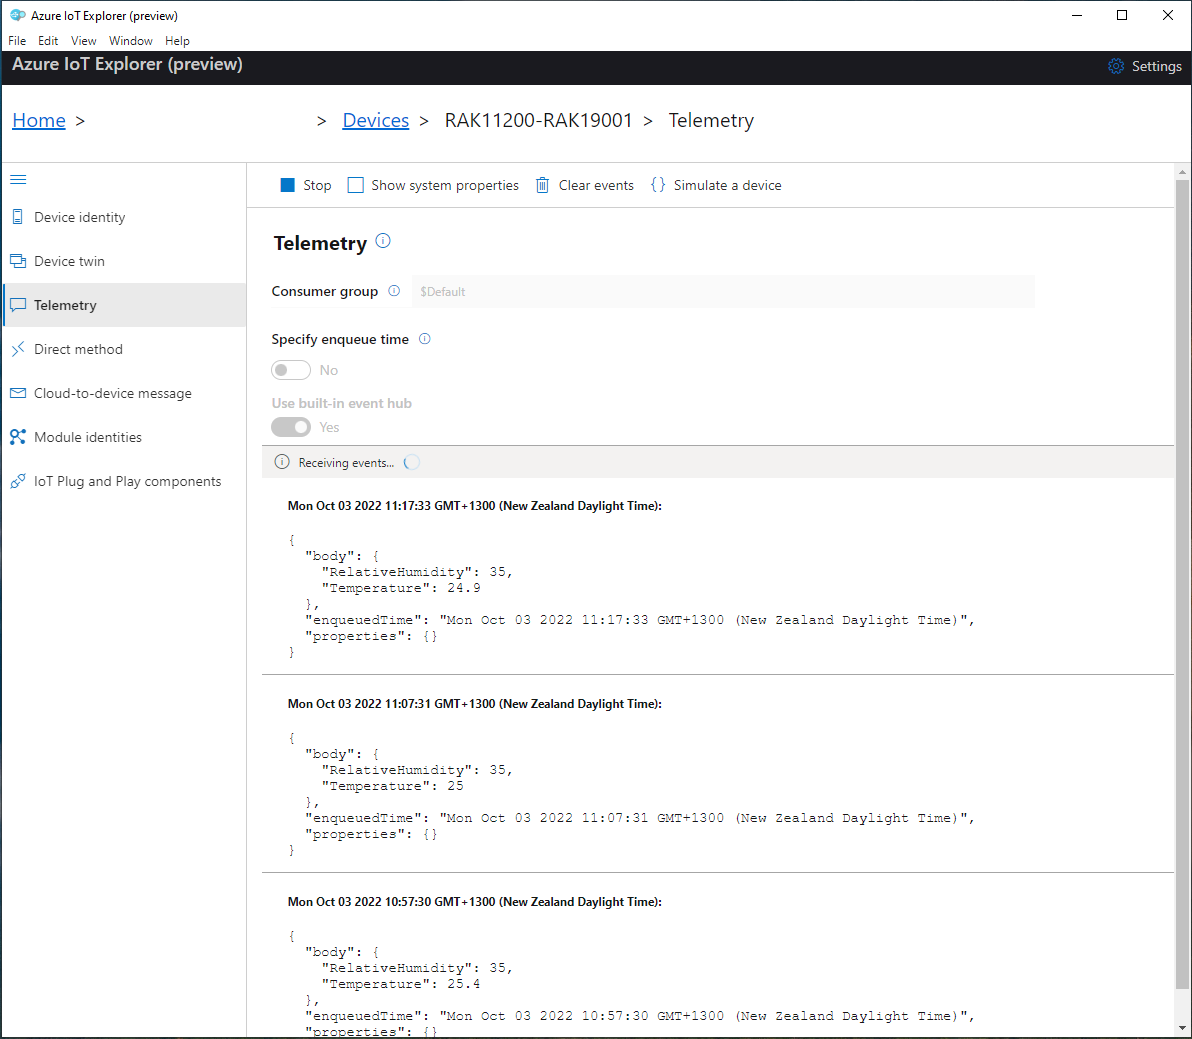
I used Azure IoT Explorer to monitor the Azure IoT Hub device telemetry to see how BatteryCharge value decreased to a level where the device wouldn’t transmit.
Azure IoT Explorer telemetry – device connected to a USB charger (11:01:19) then un-plugged (11:02:02)
Azure IoT Explorer telemetry – Last two messages sent by the device
With no use of the “power conservation” functionality of the ESP32-WROVER-B powered by a 1200mAH battery the device ran for approximately 11hrs (11:00am – 10:00pm).
RAK2305 Wisblock AIN0 pin highlighted
I think the RAK2305 will not be able to measure “battery charge” as the SENSOR_VP pin on the Espressif ESP32-WROVER-B is not connected to AIN0.