Wireless field gateway devDuino client V1

This client is a devDuino V2.2 device with an AdaFruit AM2315 temperature & humidity sensor. This sensor is powered by two AAA batteries and has an on-board support for unique device identification and encryption.

In this first iteration the focus was accessing the SHA204A crypto and authentication chip, the AM2315 sensor and message payload assembly. Reducing the power consumption, improving reliability etc. will be covered in future posts.

/*
Copyright ® 2018 Jan devMobile Software, All Rights Reserved

THIS CODE AND INFORMATION IS PROVIDED "AS IS" WITHOUT WARRANTY OF ANY
KIND, EITHER EXPRESSED OR IMPLIED, INCLUDING BUT NOT LIMITED TO THE
IMPLIED WARRANTIES OF MERCHANTABILITY AND/OR FITNESS FOR A PARTICULAR
PURPOSE.

You can do what you want with this code, acknowledgment would be nice.

http://www.devmobile.co.nz

*/
#include <RF24.h>
#include <Adafruit_AM2315.h>
#include <sha204_library.h>

// nRF24L01 ISM wireless module setup
RF24 radio(7,6);
const int nRFPayloadSize = 32 ;
char payload[nRFPayloadSize] = "";
const byte FieldGatewayAddress[5] = "Base1";
const byte FieldGatewayChannel = 10 ;
const rf24_pa_dbm_e RadioPALevel = RF24_PA_MAX;
const rf24_datarate_e RadioDataRate = RF24_250KBPS; 

// ATSHA204 secure authentication, validation with crypto and hashing (initially only used for unique serial number)
atsha204Class sha204(A2);
const int SerialNumberLength = 9 ;
uint8_t serialNumber[SerialNumberLength];

// AM2315 I2C Outdoors temperature and humdity sensor
Adafruit_AM2315 am2315;

const int LoopSleepDelay = 30000 ;

void setup()
{
  Serial.begin(9600);
  Serial.println("Setup called");

  // Retrieve the serial number then display it nicely
  sha204.getSerialNumber(serialNumber);

  Serial.print("SNo:");
  for (int i=0; i<SerialNumberLength; i++)
  {
    // Add a leading zero
    if ( serialNumber[i] < 16)
    {
      Serial.print("0");
    }
    Serial.print(serialNumber[i], HEX);
    Serial.print(" ");
  }
  Serial.println(); 

  // Configure the AM2315 temperature & humidity sensor
  Serial.println("AM2315 setup");
  am2315.begin();

  // Configure the nRF24 module
  Serial.println("nRF24 setup");
  radio.begin();
  radio.setPALevel(RadioPALevel);
  radio.setDataRate(RadioDataRate) ;
  radio.setChannel(FieldGatewayChannel);
  radio.enableDynamicPayloads();
  radio.openWritingPipe(FieldGatewayAddress);

  delay(1000);

  Serial.println("Setup done");
}

void loop()
{
  float temperature ;
  float humidity ;
  float batteryVoltage ;

  Serial.println("Loop called");
  memset( payload, 0, sizeof( payload));

  // prepare the payload header
  int payloadLength = 0 ;
  payload[0] = 1 ; // Sensor device unique ID header with CSV payload
  payloadLength += 1;

  // Copy the ATSHA204 device serial number into the payload
  payload[1] = SerialNumberLength ;
  payloadLength += 1;
  memcpy( &payload[payloadLength], serialNumber, SerialNumberLength);
  payloadLength += SerialNumberLength ;

  // Read the temperature, humidity & battery voltage values then display nicely
  am2315.readTemperatureAndHumidity(temperature, humidity);
  Serial.print("T:");
  Serial.print( temperature, 1 ) ;
  Serial.print( "C" ) ;

  Serial.print(" H:");
  Serial.print( humidity, 0 ) ;
  Serial.print( "%" ) ;

  batteryVoltage = readVcc() / 1000.0 ;
  Serial.print(" B:");
  Serial.print( batteryVoltage, 2 ) ;
  Serial.println( "V" ) ;

  // Copy the temperature into the payload
  payload[ payloadLength] = 'T';
  payloadLength += 1 ;
  dtostrf(temperature, 6, 1, &payload[payloadLength]);
  payloadLength += 6;
  payload[ payloadLength] = ',';
  payloadLength += 1 ;

  // Copy the humidity into the payload
  payload[ payloadLength] = 'H';
  payloadLength += 1 ;
  dtostrf(humidity, 4, 0, &payload[payloadLength]);
  payloadLength += 4;
  payload[ payloadLength] = ',';
  payloadLength += 1 ;

  // Copy the battery voltage into the payload
  payload[ payloadLength] = 'V';
  payloadLength += 1 ;

  dtostrf(batteryVoltage, 5, 2, &payload[payloadLength]);
  payloadLength += 5;

  // Powerup the nRF24 chipset then send the payload to base station
  Serial.print( "Payload length:");
  Serial.println( payloadLength );

  radio.powerUp();
  delay(500);

  Serial.println( "nRF24 write" ) ;
  boolean result = radio.write(payload, payloadLength);
  if (result)
    Serial.println("Write Ok...");
  else
    Serial.println("Write failed.");

 Serial.println( "nRF24 power down" ) ;
 radio.powerDown();

 delay(LoopSleepDelay);
}

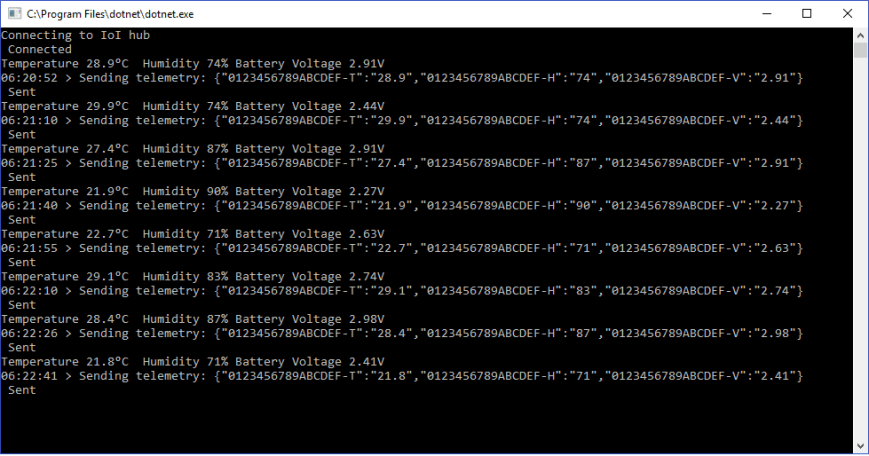
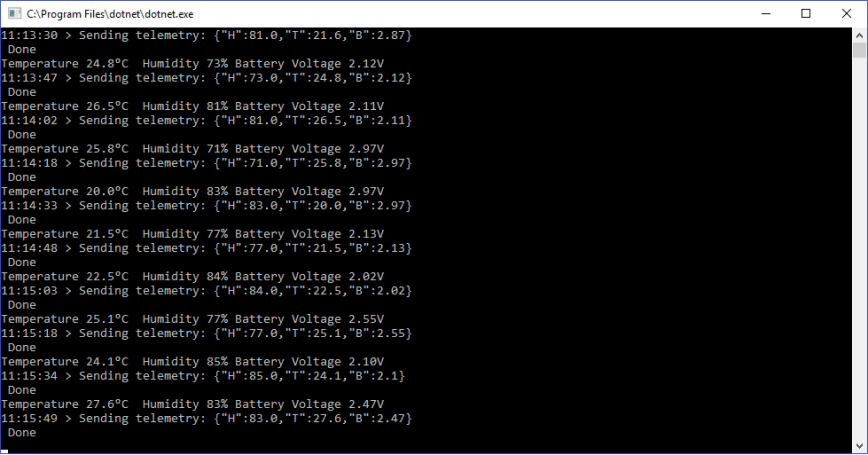
Arduino monitor output
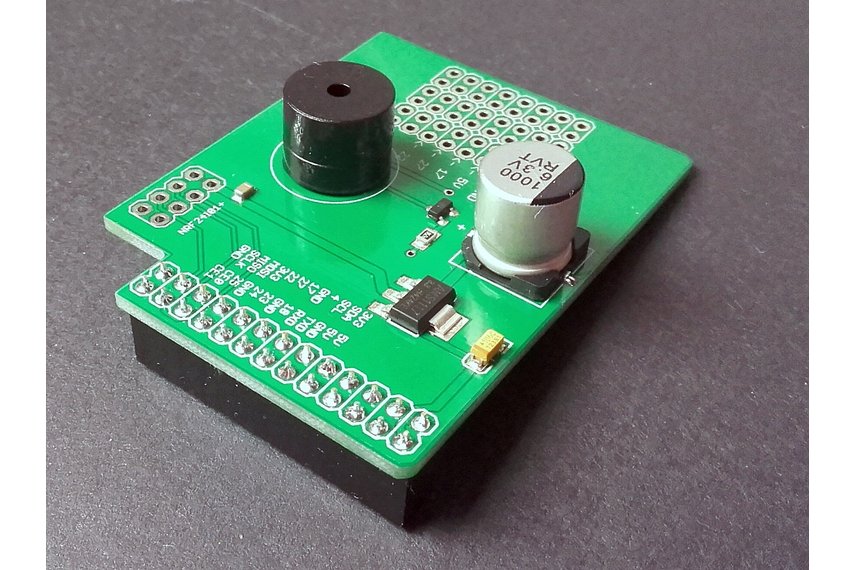
devDuinoAM2315V1Output

Prototype hardware

devDuinoAM2315V1Bill of materials (prices as at Jan 2018)

  • devDuino V2.2 USD18
  • AdaFruit AM2315 USD30
  • Grove – 5cm buckled cable USD1.90
  • Grove – Screw Terminal USD2.90
  • 10K resistors x 2

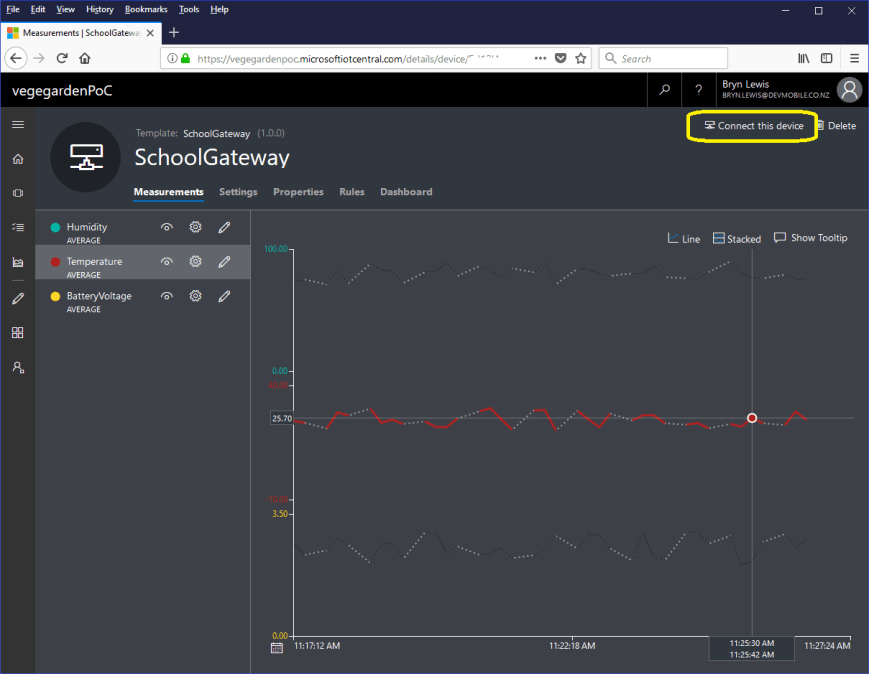
RaspberyPI UWP application diagnostic output

Interrupt Triggered: RisingEdge
Interrupt Triggered: FallingEdge
09:39:03 Address 01-23-32-66-C6-FE-0B-8D-EE Length 9 Payload T  25.0,H  48,V 3.31 Length 20
 Sensor 01-23-32-66-C6-FE-0B-8D-EE-T Value 25.0
 Sensor 01-23-32-66-C6-FE-0B-8D-EE-H Value 48
 Sensor 01-23-32-66-C6-FE-0B-8D-EE-V Value 3.31
Interrupt Triggered: RisingEdge
Interrupt Triggered: FallingEdge
09:39:33 Address 01-23-32-66-C6-FE-0B-8D-EE Length 9 Payload T  24.9,H  48,V 3.30 Length 20
 Sensor 01-23-32-66-C6-FE-0B-8D-EE-T Value 24.9
 Sensor 01-23-32-66-C6-FE-0B-8D-EE-H Value 48
 Sensor 01-23-32-66-C6-FE-0B-8D-EE-V Value 3.30
Interrupt Triggered: RisingEdge
Interrupt Triggered: FallingEdge
09:40:04 Address 01-23-32-66-C6-FE-0B-8D-EE Length 9 Payload T  24.9,H  48,V 3.31 Length 20
 Sensor 01-23-32-66-C6-FE-0B-8D-EE-T Value 24.9
 Sensor 01-23-32-66-C6-FE-0B-8D-EE-H Value 48
 Sensor 01-23-32-66-C6-FE-0B-8D-EE-V Value 3.31
Interrupt Triggered: RisingEdge

Microsoft IoT Central dynamic payload desktop client

Unlike most of the Azure IoT Hub client examples the names and number of sensor values will only be known when messages received over the nRF24L01 wireless link are processed so the JSON message payload has to be constructed on the fly.

Using the Newtonsoft.Json NuGet package and Linq + JObject made this much easier than expected so I have added some code improve robustness.

/*

Copyright ® 2018 Jan devMobile Software, All Rights Reserved

THIS CODE AND INFORMATION IS PROVIDED "AS IS" WITHOUT WARRANTY OF ANY
KIND, EITHER EXPRESSED OR IMPLIED, INCLUDING BUT NOT LIMITED TO THE
IMPLIED WARRANTIES OF MERCHANTABILITY AND/OR FITNESS FOR A PARTICULAR
PURPOSE.

You can do what you want with this code, acknowledgment would be nice.

http://www.devmobile.co.nz

*/
using System;
using System.Text;
using System.Threading;
using Microsoft.Azure.Devices.Client;
using Newtonsoft.Json;
using Newtonsoft.Json.Linq;

namespace devMobile.IoT.MicrosoftIoTCentral.Desktop.DynamicPayload
{
   class Program
   {
      const string DeviceConnectionString = "YourDeviceConnectionStringFromIoTCentralGoesHere";
      const string TelemetryDataPointPropertyNameFormat = @"{0}-{1}";
      const double temperatureBase = 20.0;
      const double temperatureRange = 10.0;
      const double humidityBase = 70.0;
      const double humidityRange = 20.0;
      const double batteryVoltageBase = 3.00;
      const double batteryVoltageRange = -1.00;
      static readonly TimeSpan feedUpdateDelay = new TimeSpan(0, 0, 15);

      static void Main(string[] args)
      {
         DeviceClient Client = null;

         try
         {
            Console.WriteLine("Connecting to IoI hub");
            Client = DeviceClient.CreateFromConnectionString(DeviceConnectionString, TransportType.Amqp);
            Console.WriteLine(" Connected");
         }
         catch (Exception ex)
         {
            Console.WriteLine("Error connecting or sending data to IoT Central: {0}", ex.Message);
            return;
         }

         while (true)
         {
            // Then send simulated temperature, humidity & battery voltage data
            Random random = new Random();
            double temperature = temperatureBase + random.NextDouble() * temperatureRange;
            double humidity = humidityBase + random.NextDouble() * humidityRange;
            double batteryVoltage = batteryVoltageBase + random.NextDouble() * batteryVoltageRange;

            Console.WriteLine("Temperature {0}°C  Humidity {1}% Battery Voltage {2}V", temperature.ToString("F1"), humidity.ToString("F0"), batteryVoltage.ToString("F2"));

            // Populate the data point -
            JObject telemetryDataPoint = new JObject(); // This could be simplified but for field gateway will use this style

            string sensorDeviceSerialNumber = "0123456789ABCDEF"; // intentionally created and initialised at this level as sensor device will send over NRF24 link

            telemetryDataPoint.Add(string.Format(TelemetryDataPointPropertyNameFormat, sensorDeviceSerialNumber, "T"), temperature.ToString("F1"));
            telemetryDataPoint.Add(string.Format(TelemetryDataPointPropertyNameFormat, sensorDeviceSerialNumber, "H"), humidity.ToString("F0"));
            telemetryDataPoint.Add(string.Format(TelemetryDataPointPropertyNameFormat, sensorDeviceSerialNumber, "V"), batteryVoltage.ToString("F2"));

            string messageString = JsonConvert.SerializeObject(telemetryDataPoint);

            Console.WriteLine("{0:hh:mm:ss} > Sending telemetry: {1}", DateTime.Now, messageString);

            try
            {
               using (Message message = new Message(Encoding.ASCII.GetBytes(messageString)))
               {
                  Client.SendEventAsync(message).Wait();
                  Console.WriteLine(" Sent");
               }
            }
            catch (Exception ex)
            {
               Console.WriteLine("Error sending data to IoT Central: {0}", ex.Message);
            }

            Thread.Sleep(feedUpdateDelay);
         }
      }
   }
}

The application produces very similar output to the basic desktop client

IoTCentralDashboardDynamicPayloadClient

Microsoft IoT Central basic desktop client

One of the replacement Internet of Things services which looked worth evaluating was Microsoft’s IoT Central. My first project was to build the simplest possible desktop client (.Net Core) which simulates a limited number of sensors (sensor names, value formats etc. configured in code) and only sends data to the cloud (no device management, control or provisioning capabilities).

The only required dependencies are the Newtonsoft.Json &  Microsoft.Azure.DevicesClient NuGet packages

/*

Copyright ® 2018 Jan devMobile Software, All Rights Reserved

THIS CODE AND INFORMATION IS PROVIDED "AS IS" WITHOUT WARRANTY OF ANY
KIND, EITHER EXPRESSED OR IMPLIED, INCLUDING BUT NOT LIMITED TO THE
IMPLIED WARRANTIES OF MERCHANTABILITY AND/OR FITNESS FOR A PARTICULAR
PURPOSE
You can do what you want with this code, acknowledgement would be nice.
http://www.devmobile.co.nz

*/
using System;
using System.Text;
using System.Threading;
using Microsoft.Azure.Devices.Client;
using Newtonsoft.Json;

namespace devMobile.IoT.MicrosoftIoTCentral.Desktop.Basic
{
 class Program
 {
 private const string DeviceConnectionString = "YourDeviceConnectionStringFromIoTCentralGoesHere";
 const double temperatureBase = 20.0;
 const double temperatureRange = 10.0;
 const double humidityBase = 70.0;
 const double humidityRange = 20.0;
 const double batteryVoltageBase = 3.00;
 const double batteryVoltageRange = -1.00;
 static readonly TimeSpan feedUpdateDelay = new TimeSpan(0, 0, 15);

private class TelemetryDataPoint
 {
 [JsonProperty(PropertyName = "H")]
 public double Humidity { get; set; }
 [JsonProperty(PropertyName = "T")]
 public double Temperature { get; set; }
 [JsonProperty(PropertyName = "B")]
 public double BatteryVoltage { get; set; }
 }

static void Main(string[] args)
 {
 DeviceClient Client ;
 Random random = new Random();

try
 {
 Console.WriteLine("Connecting to IoI hub");
 Client = DeviceClient.CreateFromConnectionString(DeviceConnectionString, TransportType.Mqtt);

while (true)
 {
 double temperature = temperatureBase + random.NextDouble() * temperatureRange;
 double humidity = humidityBase + random.NextDouble() * humidityRange;
 double batteryVoltage = batteryVoltageBase + random.NextDouble() * batteryVoltageRange;

Console.WriteLine("Temperature {0}°C Humidity {1}% Battery Voltage {2}V", temperature.ToString("F1"), humidity.ToString("F0"), batteryVoltage.ToString("F2"));

// Populate the data point - this has a static structure and name which could be a problem for field gateway
 TelemetryDataPoint telemetryDataPoint = new TelemetryDataPoint()
 {
 BatteryVoltage = Math.Round(batteryVoltage, 2),
 Humidity = Math.Round(humidity, 0),
 Temperature = Math.Round( temperature, 1 )
 };

string messageString = JsonConvert.SerializeObject(telemetryDataPoint);
 Message message = new Message(Encoding.ASCII.GetBytes(messageString));

Console.WriteLine("{0:hh:mm:ss} > Sending telemetry: {1}", DateTime.Now, messageString);
 Client.SendEventAsync(message).Wait();
 Console.WriteLine(" Done");

Thread.Sleep(feedUpdateDelay);
 }
 }
 catch (Exception ex)
 {
 Console.WriteLine("Error connecting or sending data to IoT Central: {0}", ex.Message);
 Console.WriteLine("Press <ENTER> to exit");
 Console.ReadLine();
 }
 }
 }
}

I manually provisioned the device by copying the device connection string in the IoT Central dashboard

IoTCentralDashboardBasicClient

DesktopClientSimple

Simple dotNet Core 2 IoTCentral Client

A functional client in less than 100 lines of code with support for individual device configuration. For my FieldGateway I’m going to need more flexibility in the construction of telemetry payloads, device provisioning and configuration support.

AdaFruit IO Swagger based desktop HTTP client

Manually building clients for complex RESTful APIs (like AdaFruit.IO) can be a bit tedious so I figured I would try generating a C# http client from the Swagger OpenAPI specification(OAS) metadata.

My initial attempts using the Swagger Editor and NSwag on the AdaFruit.IO public API description didn’t go so well. (for more info see this AdaFruit.IO support forum thread) You may need to manually modify the type of the id field in Data & DataResponse, plus possibly other responses.

After figuring out how to set the API key, my code which uploads simulates three individual feeds and one feed group appears to work reliably.

/*

Copyright ® 2018 Jan devMobile Software, All Rights Reserved

THIS CODE AND INFORMATION IS PROVIDED "AS IS" WITHOUT WARRANTY OF ANY
KIND, EITHER EXPRESSED OR IMPLIED, INCLUDING BUT NOT LIMITED TO THE
IMPLIED WARRANTIES OF MERCHANTABILITY AND/OR FITNESS FOR A PARTICULAR
PURPOSE.

http://www.devmobile.co.nz

*/
using System;
using System.Diagnostics;
using System.Threading.Tasks;
using AdaFruit.IO;

namespace AdaFruit.IO
{
public partial class Client
{
string adaFruitIOApiKey = "yourAPIKey";

partial void PrepareRequest(System.Net.Http.HttpClient client, System.Net.Http.HttpRequestMessage request, string url)
{
client.DefaultRequestHeaders.Add("X-AIO-Key", adaFruitIOApiKey);
}
}
}

namespace devMobile.IoT.Adafruit.IO.Desktop
{
class Program
{
static void Main(string[] args)
{
string userName = "YourUserName"; // This is mixed case & case sensitive
// The feed group and feed key are forced to lower case by UI
const string feedGroup = "devduinov2-dot-2";
const string temperatureKey = "t";
const double temperatureBase = 20.0;
const double temperatureRange = 10.0;
const string humidityKey = "h";
const double humidityBase = 70.0;
const double humidityRange = 20.0;
const string batteryVoltageKey = "v";
const double batteryVoltageBase = 3.00;
const double batteryVoltageRange = -1.00;
TimeSpan feedUpdateDelay = new TimeSpan(0, 0, 15);
TimeSpan groupUpdateDelay = new TimeSpan(0, 0, 30);
Random random = new Random();

while (true)
{
Client client = new Client();
double temperature = temperatureBase + random.NextDouble() * temperatureRange;
double humidity = humidityBase + random.NextDouble() * humidityRange;
double batteryVoltage = batteryVoltageBase + random.NextDouble() * batteryVoltageRange;

Debug.WriteLine("Temperature {0}°C  Humidity {1}%  Battery Voltage {2}V", temperature.ToString("F1"), humidity.ToString("F0"), batteryVoltage.ToString("F2"));

// First Update the 3 feeds individually
// Temperature
Datum temperatureDatum = new Datum()
{
Value = temperature.ToString("F1"),
};
client.CreateDataAsync(userName, temperatureKey, temperatureDatum).Wait();
Task.Delay(feedUpdateDelay).Wait();

// Humidity
Datum humidityDatum = new Datum()
{
Value = humidity.ToString("F0"),
};
client.CreateDataAsync(userName, humidityKey, humidityDatum).Wait();
Task.Delay(feedUpdateDelay).Wait();

// Battery
Datum batteryDatum = new Datum()
{
Value = batteryVoltage.ToString("F2"),
};
client.CreateDataAsync(userName, batteryVoltageKey, batteryDatum).Wait();
Task.Delay(feedUpdateDelay).Wait();

// Then update a feed in a group
Group_feed_data devDuinoData = new Group_feed_data();

devDuinoData.Feeds.Add(new Anonymous2() { Key = temperatureKey, Value = temperature.ToString("F1")});
devDuinoData.Feeds.Add(new Anonymous2() { Key = humidityKey, Value = humidity.ToString("F0")});
devDuinoData.Feeds.Add(new Anonymous2() { Key = batteryVoltageKey, Value = batteryVoltage.ToString("F2")});

client.CreateGroupDataAsync(userName, feedGroup, devDuinoData).Wait();
Task.Delay(groupUpdateDelay).Wait();
}
}
}
}

Xively Personal is being retired

This is going to cause me a problem especially my Netduino based nRF24 Xively Field gateway which gets used in quite a few of my student projects. I’m looking for a replacement Internet of Things service which has http/s and/or mqtt, amqp support, C & C#  client libraries (which I can get to work on Windows 10 IoT Core & NetMF) would be a bonus.

From the Xively email

”After careful consideration, LogMeIn has made the decision to retire Xively Personal from its current line of products effective January 15, 2018 at 12:00PM ET . Please note that LogMeIn will continue to offer our Xively Enterprise edition – there is no change to that edition and we will continue to support that platform as part of our IoT business.

Retiring a product is never an easy decision, and we recognize it does introduce potential challenges to active users. So we want to make sure you have all the information you need to make as seamless a transition as possible.

Access to your account:
Your Xively Personal account will remain active until January 15th. Please note that devices will not be accessible via the Xively Personal service once it is retired.

Transferring your products to another IoT service:
Should you choose to switch to another service, there are essentially two options.

1) Migrate to Xively Enterprise: The latest Enterprise version of Xively is built on a more modern and reliable architecture, which brings the benefits of pre-built hardware integrations, identity and device management features, MQTT messaging, and best-in-class security, but it may require some reconfiguring of your current devices. We do offer a 30 day free trial of Xively Enterprise should you want to try it out for yourself.

2) Migrate to another free service: If your use is primarily for experimenting and personal projects, there are several free IoT platform options on the market, such as Adafruit, Thingspeak, or SparkFun.”

One of the suggestions – Sparkfun Phant has been retired

Some possible alternatives in no particular order (this list may grow)

AdaFruit.IO – The internet of things for everyone

Microsoft IoT Central – Enterprise-grade IoT SaaS

ThingSpeak – The open IoT platform with MATLAB analytics

Blynk – Democratizing the Internet of Things

Thinger.io platform

SenseIoT – Internet of Things Data Hosting Platform

Temboo – Tools for Digital Transformation

Carriots by Altair

Nearbus – An IoT Open Project

ubidots – An application Builder for the Internet of Things

Kii Cloud

Artik – End-to-end IoT Platform

goplusplatform – Connect your things with GO+

I’m initially looking for a platform which is the “least painful” transition from Xively.

nRF24L01 Raspberry PI Gateway Hardware

For those who came to my MS Ignite AU Intelligent Cloud booth session

Building Wireless Field Gateways

Connecting wireless sensor nodes to the cloud is not the mission it used to be, because the Azure team (and many OS projects) have developed tooling which can help hobbyist and professional developers build solutions. How could you build a home scale robust, reliable and secure solution with off the shelf kit without blowing the budget?

Sparkfun nRF24L01 module &Adafruit perma proto hat

NRF24L01 Raspberry PI DIY Gateway Hardware

BoM (all prices as at Feb 2016)

You will also need some short lengths of wire and a soldering iron.

For those who want an “off the shelf” solution (still requires a minor modification for interrupt support) I have used the Raspberry Pi to NRF24l01+ Shield USD9.90

2015-09-25t072754-447z-20150925_091942-855x570_q85_pad_rcrop

Instructions for modifications and software to follow.

Mikrobus.Net Quail, Weather & nRF-C clicks and xively

My next proof of concept uses a Weather click and nRF C click to upload temperature and humidity data to a Xively gateway running on a spare Netduino 2 Plus. I have a couple of Azure Event hub gateways (direct & queued) which require a Netduino 3 Wifi (for TLS/AMQPS support) and I’ll build a client for them in a coming post.

I initially purchased an nRF T click but something wasn’t quite right with its interrupt output. The interrupt line wasn’t getting pulled low at all so there were no send success/failure events. If I disabled the pull up resistor and strobed the interrupt pin on start-up the device would work for a while.


using (OutputPort Int = new OutputPort(socket.Int, true))
{
 Int.Write(true);
};

...

_irqPin = new InterruptPort(socket.Int, false, Port.ResistorMode.Disabled, Port.InterruptMode.InterruptEdgeLow);

The code sends a reading every 10 seconds and has been running for a couple of days. It strobes Led1 for each successful send and turns on Led2 when a send fails.

private static readonly byte[] deviceAddress = Encoding.UTF8.GetBytes(&quot;Quail&quot;);
private static readonly byte[] gatewayAddress = Encoding.UTF8.GetBytes(&quot;12345&quot;);
private const byte gatewayChannel = 10;
private const NRFC.DataRate gatewayDataRate = NRFC.DataRate.DR1Mbps;
private const int XivelyUpdateDelay = 10000;
private const char XivelyGatewayChannelIdTemperature = 'J';
private const char XivelyGatewayChannelIdHumidity = 'K';

public static void Main()
{
   NRFC nRF24Click = new NRFC(Hardware.SocketFour);
   nRF24Click.Configure(deviceAddress, gatewayChannel, gatewayDataRate);
   nRF24Click.OnTransmitFailed += nRF24Click_OnTransmitFailed;
   nRF24Click.OnTransmitSuccess += nRF24Click_OnTransmitSuccess;
   nRF24Click.Enable();

   // Configure the weather click
   WeatherClick weatherClick = new WeatherClick(Hardware.SocketOne, WeatherClick.I2CAddresses.Address0);
   weatherClick.SetRecommendedMode(WeatherClick.RecommendedModes.WeatherMonitoring);

   Thread.Sleep(XivelyUpdateDelay);

   while (true)
   {
      string temperatureMessage = XivelyGatewayChannelIdTemperature + weatherClick.ReadTemperature().ToString("F1");
      Debug.Print(temperatureMessage);
      MBN.Hardware.Led1.Write(true);
      nRF24Click.SendTo(gatewayAddress, Encoding.UTF8.GetBytes(temperatureMessage));

      Thread.Sleep(XivelyUpdateDelay);

      string humidityMessage = XivelyGatewayChannelIdHumidity + weatherClick.ReadHumidity().ToString("F1");
      Debug.Print(humidityMessage);
      MBN.Hardware.Led1.Write(true);
      nRF24Click.SendTo(gatewayAddress, Encoding.UTF8.GetBytes(humidityMessage));

      Thread.Sleep(XivelyUpdateDelay);
   }
}

static void nRF24Click_OnTransmitSuccess()
{
   MBN.Hardware.Led1.Write(false);
   if (MBN.Hardware.Led2.Read())
   {
      MBN.Hardware.Led2.Write(false);
   }

   Debug.Print("nRF24Click_OnTransmitSuccess");
}

static void nRF24Click_OnTransmitFailed()
{
   MBN.Hardware.Led2.Write(true);

   Debug.Print("nRF24Click_OnTransmitFailed");
}

I need to have a look at interfacing some more sensors and soak testing the solution.

The MikroBus.Net team have done a great job with the number & quality of the drivers they have available.

Mikrobus.Net Quail, EthClick and xively

My second proof of concept application for the Mikrobus.Net Quail and EthClick uploads temperature and humidity data to Xively every 30 seconds for display and analysis.

Temperature and humidity Xively data stream

Temperature and humidity Xively data stream

The Xively REST API uses an HTTP PUT which initially didn’t work because the payload was not getting attached.

I patched the AssembleRequest method in the EtherClick driver to fix this issue.

private byte[] AssembleRequest()
{
   var a = RequestType;
   a += " " + Path + " " + Protocol + "\r\nHost: ";
   a += Host + "\r\n";

   foreach (object aHeader in Headers.Keys)
      a += (string)aHeader + ": " + (string)Headers[aHeader] + "\r\n";

   a += "\r\n"; // Cache-Control: no-cache\r\n  //Accept-Charset: utf-8;\r\n

   if (Content != null && Content != string.Empty && (RequestType == "POST" || RequestType == "PUT")) a += Content;

   return Encoding.UTF8.GetBytes(a);
}

The code reads the WeatherClick temperature and humidity values then assembles a CSV payload which it uploads with an HTTP PUT

</pre>
public class Program
{
   private const string xivelyHost = @"api.xively.com";
   private const string xivelyApiKey = @"YourAPIKey";
   private const string xivelyFeedId = @"YourFeedID";

   public static void Main()
   {
      WeatherClick weatherClick = new WeatherClick(Hardware.SocketOne, WeatherClick.I2CAddresses.Address0);
      weatherClick.SetRecommendedMode(WeatherClick.RecommendedModes.WeatherMonitoring);

      EthClick ethClick = new EthClick(Hardware.SocketTwo);
      ethClick.Start(ethClick.GenerateUniqueMacAddress("devMobileSoftware"), "QuailDevice");

      // Wait for an internet connection
      while (true)
      {
         if (ethClick.ConnectedToInternet)
         {
            Debug.Print("Connected to Internet");
            break;
         }
         Debug.Print("Waiting on Internet connection");
      }

      while (true)
      {
         Debug.Print("T " + weatherClick.ReadTemperature().ToString("F1") + " H " + weatherClick.ReadHumidity().ToString("F1") + " P " + weatherClick.ReadPressure(PressureCompensationModes.Uncompensated).ToString("F1"));

         HttpRequest request = new HttpRequest(@"http://" + xivelyHost + @"/v2/feeds/" + xivelyFeedId + @".csv");
         request.Host = xivelyHost;
         request.RequestType = "PUT";
         request.Headers.Add("Content-Type", "text/csv");
         request.Headers.Add("X-ApiKey", xivelyApiKey );

         request.Content = "OfficeT," + weatherClick.ReadTemperature().ToString("F1") + "\r\n" + "OfficeH," + weatherClick.ReadHumidity().ToString("F1") ;
         request.Headers.Add("Content-Length", request.Content.Length.ToString());

         var response = request.Send();
         if (response != null)
         {
            Debug.Print("Response: " + response.Message);
         }
         else
         {
            Debug.Print("No response");
         }
      Thread.Sleep(30000);
      }
   }
}
MikrobustNet Quail with Eth and Weather Clicks

MikrobustNet Quail with Eth and Weather Clicks

This proof of concept code appears to be reliable and has run for days at a time. The IP stack looks like it needs a bit more work.

Mikrobus.Net Quail and Weather Click

In my second batch of MikroElektronika Mikrobus sensors I had purchased a Weather click because I was interested to see how the temperature and humidity values it returned compared with the Silicon labs Si7005 devices I use with my Arduino and Netduino devices. (I was a bit suspicious of the Si7005 humidity values)

I downloaded the Mikrobus.Net driver for the BME280 and created a simple console application to see how well the sensor and driver worked

public class Program
{
   public static void Main()
   {
      WeatherClick weatherClick = new WeatherClick(Hardware.SocketOne, WeatherClick.I2CAddresses.Address0);

      weatherClick.SetRecommendedMode(WeatherClick.RecommendedModes.WeatherMonitoring);

      while (true)
      {
         Debug.Print("T " + weatherClick.ReadTemperature().ToString(" F1 ") +
" H " + weatherClick.ReadHumidity().ToString("F1") +
" P " + weatherClick.ReadPressure(PressureCompensationModes.Uncompensated).ToString("F1"));

         Thread.Sleep(30000);
      }
   }
}

The temperature values looked pretty good but the humidity values were rough half of what I was getting from the SI7005 connected to a devDuino V2 on the desk next to my Quail board

The thread ‘<No Name>’ (0x2) has exited with code 0 (0x0).
T 24.9 H 49.3 P 1014.8
T 25.0 H 49.4 P 1014.9
T 25.0 H 49.1 P 1014.8
T 25.0 H 49.9 P 1014.8
T 24.9 H 49.1 P 1014.9
T 25.0 H 50.8 P 1014.9
T 25.0 H 49.2 P 1015.0

The code for doing the conversions looked pretty complex so I modified a Netduino BME280 driver (uses a different approach for conversions) I have used on another projects to work on the Quail/Mikrobus architecture.

The modified driver returned roughly the same values so it looks like the problem is most probably with the SI7005 code.(or my understand of the humidity values it returns)

Netduino 3 Wifi Queued Azure Event Hub Field Gateway V1.0

My ADSL connection had been a bit flaky which had meant I had lost some sensor data with my initial Azure Event Hub gateway. In attempt make the solution more robust this version of the gateway queues unsent messages using the on-board MicroSD card support.

The code assumes that a file move is an “atomic operation”, so it streams the events received from the devices into a temporary directory (configurable) then moves them to the upload directory (configurable).

This code is proof of concept and needs to be soak tested, improved error handling and some additional multi threading locking added plus the magic constants refactored.

This code is called in the nRF24 receive messages handler

private void OnReceive(byte[] data)
{
   activityLed.Write(!activityLed.Read());

   // Ensure that we have a payload
   if (data.Length < 1 )
   {
      Debug.Print( "ERROR - Message has no payload" ) ;
      return ;
   }

   string message = new String(Encoding.UTF8.GetChars(data));
   Debug.Print("+" + DateTime.UtcNow.ToString("HH:mm:ss") + " L=" + data.Length + " M=" + message);

   string filename = DateTime.UtcNow.ToString("yyyyMMddhhmmssff") + ".txt";

   string tempDirectory = Path.Combine("\\sd", "temp");
   string tempFilePath = Path.Combine(tempDirectory, filename);

   string queueDirectory = Path.Combine("\\sd", "data");
   string queueFilePath = Path.Combine(queueDirectory, filename);

   File.WriteAllBytes(tempFilePath, data);

   File.Move(tempFilePath, queueFilePath);

   new Microsoft.SPOT.IO.VolumeInfo("\\sd").FlushAll();
}

A timer initiates the upload process which uses the AMQPNetlite library

bool UploadInProgress = false;

      
void uploaderCallback(object state)
{
   Debug.Print("uploaderCallback - start");

   if (UploadInProgress)
   {
      return;
   }
   UploadInProgress = true;

   string[] eventFilesToSend = Directory.GetFiles(Path.Combine("\\sd", "data")) ;

   if ( eventFilesToSend.Length == 0 )
   {
      Debug.Print("uploaderCallback - no files");
      UploadInProgress = false;
      return ;
   }

   try
   {
      Debug.Print("uploaderCallback - Connect");
      Connection connection = new Connection(new Address(serviceBusHost, serviceBusPort, serviceBusSasKeyName, serviceBusSasKey));

      Session session = new Session(connection);

      SenderLink sender = new SenderLink(session, "send-link", eventHubName);

      for (int index = 0; index < System.Math.Min(eventUploadBatchSizeMaximum, eventFilesToSend.Length); index++)
      {
         string eventFile = eventFilesToSend[ index ] ;

         Debug.Print("-" + DateTime.UtcNow.ToString("HH:mm:ss") + " " + eventFile ); ;

         Message message = new Message()
         {
            BodySection = new Data()
            {
               Binary = File.ReadAllBytes(eventFile),
            },
         ApplicationProperties = new Amqp.Framing.ApplicationProperties(),
         };

         FileInfo fileInfo = new FileInfo(eventFile);

         message.ApplicationProperties["AcquiredAtUtc"] = fileInfo.CreationTimeUtc;
         message.ApplicationProperties["UploadedAtUtc"] = DateTime.UtcNow;
         message.ApplicationProperties["GatewayId"] = gatewayId;
         message.ApplicationProperties["DeviceId"] = deviceId;
         message.ApplicationProperties["EventId"] = Guid.NewGuid();

         sender.Send(message);

         File.Delete(eventFile);

         new Microsoft.SPOT.IO.VolumeInfo("\\sd").FlushAll();
      }

      sender.Close();
      session.Close();
      connection.Close();
   }
   catch (Exception ex)
   {
      Debug.Print("ERROR: Upload failed with error: " + ex.Message);
   }
   finally
   {
      Debug.Print("uploaderCallback - finally");
      UploadInProgress = false;
   }
}

The timer period and number of files uploaded in each batch is configurable. I need to test the application to see how it handles power outages and MicroSD card corruption. The source is Netduino NRF24L01 AMQPNetLite Queued Azure EventHub Gatewaywith all the usual caveats.

This project wouldn’t have been possible without