Azure IoT Hub, Event Grid to Application Insights

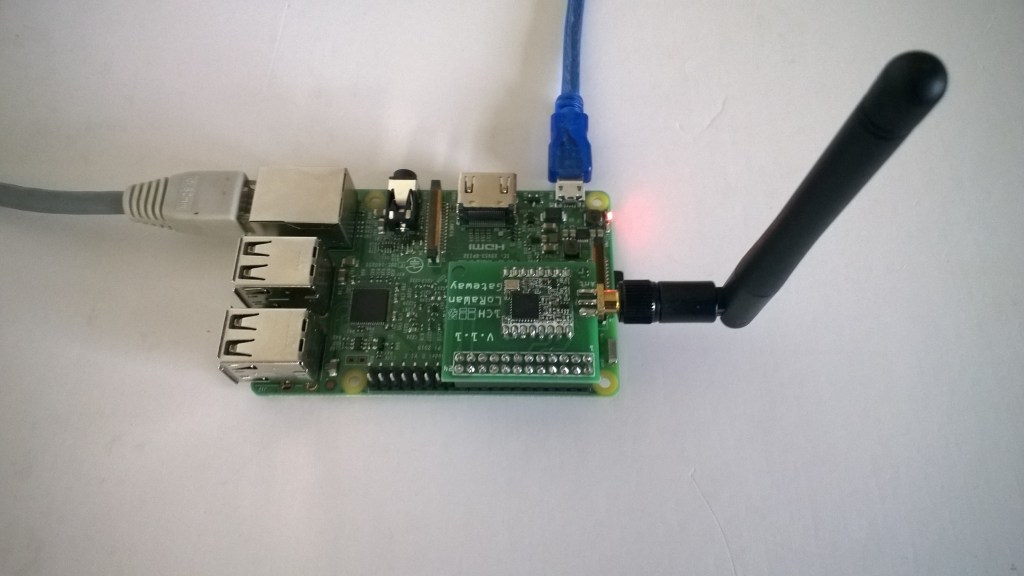
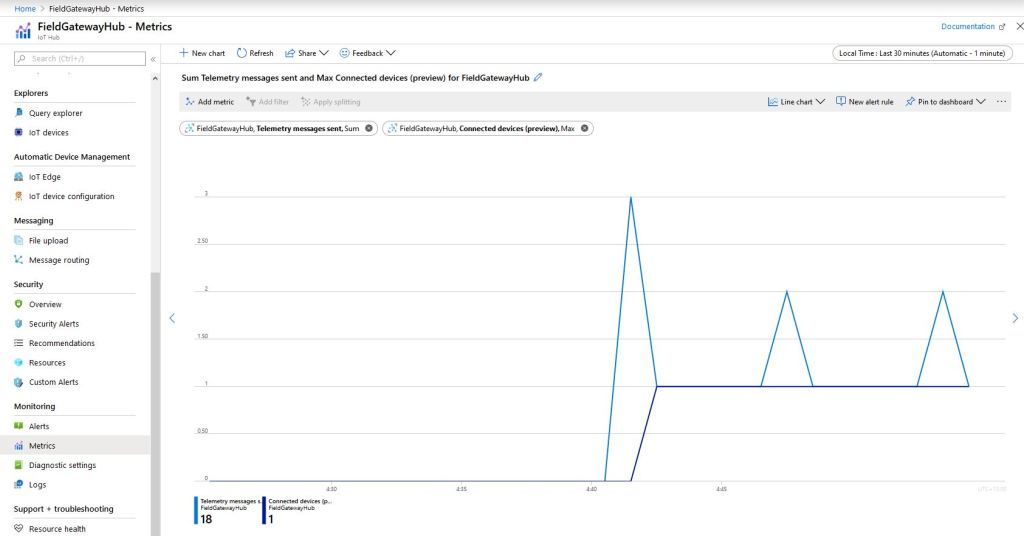
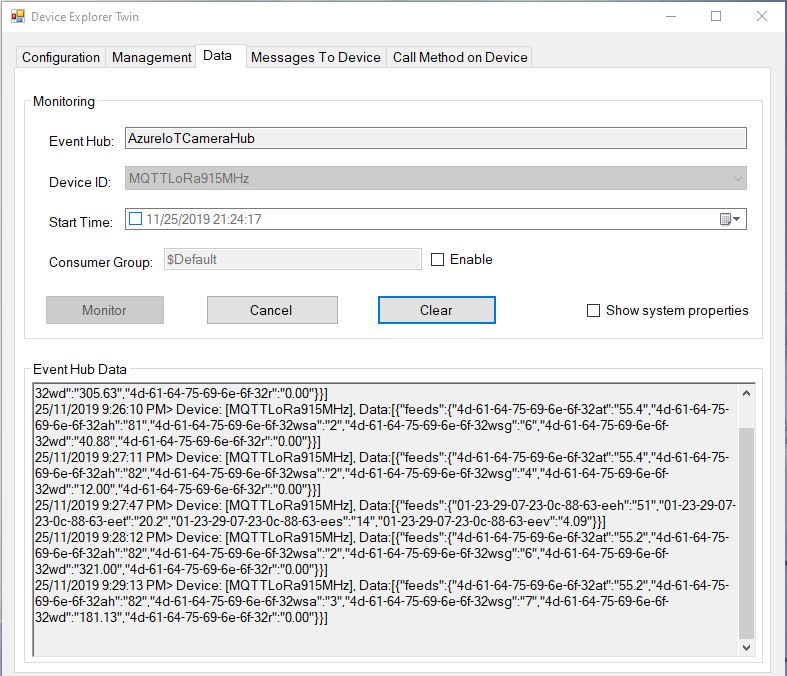
For a second Proof of Concept (PoC) I wanted to upload sensor data from my MQTT LoRa Telemetry Field Gateway to an Azure IoT Hub, then using Azure EventGrid subscribe to the stream of telemetry data events, logging the payloads in Azure Application Insights (the aim was minimal code so no database etc.).

The first step was to create and deploy a simple Azure Function for unpacking the telemetry event payload.

Azure IoT Hub Azure Function Handler

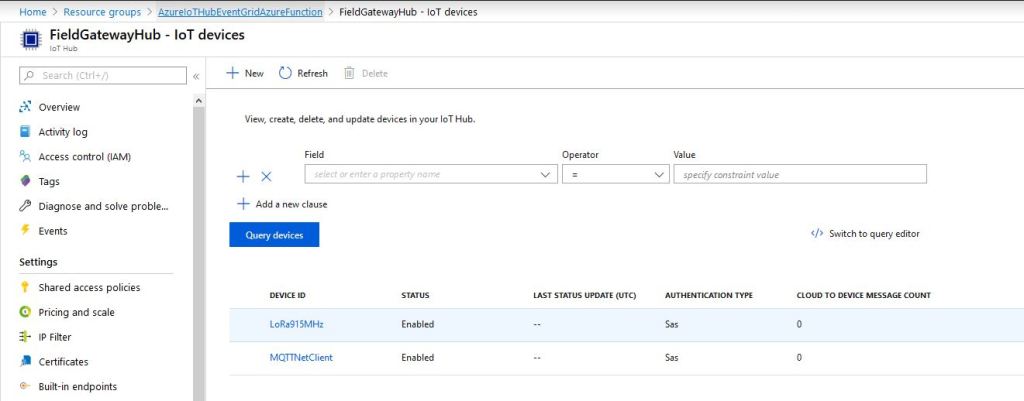
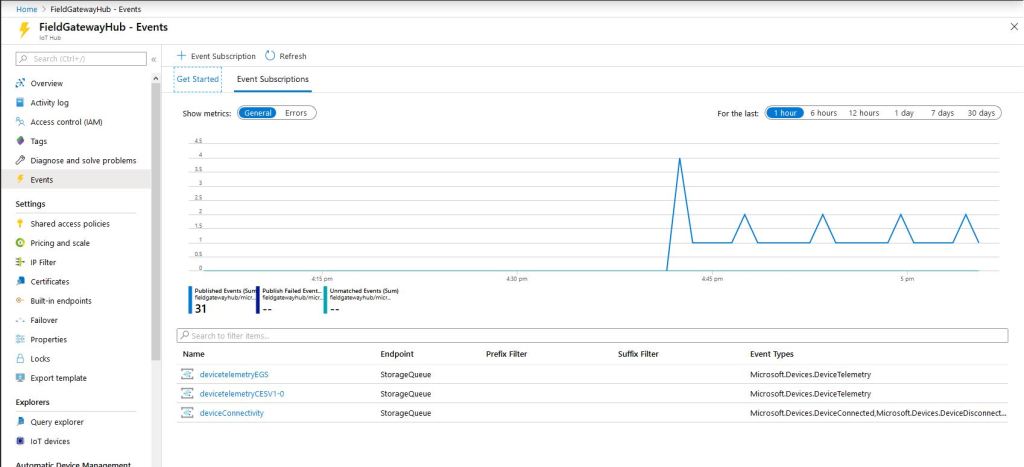
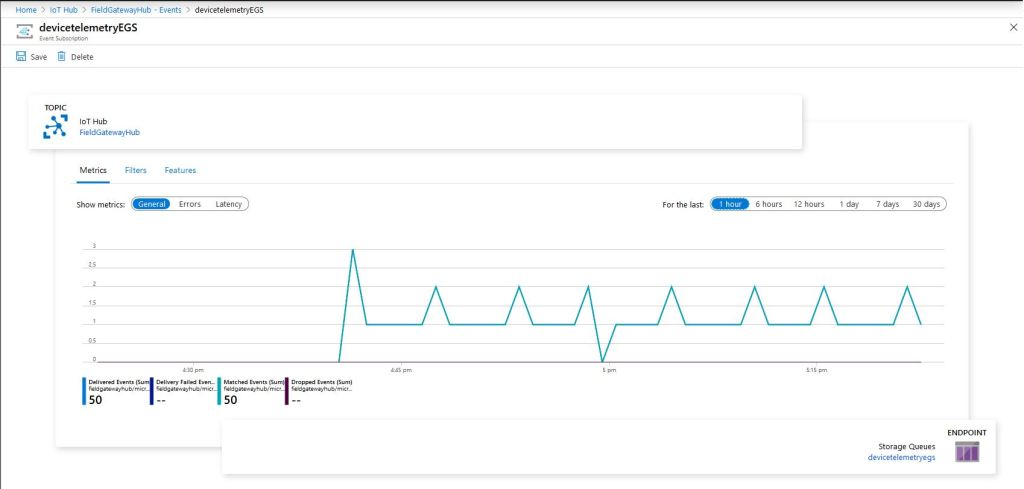
Then wire the Azure function to the Microsoft.Devices.Device.Telemetry Event Type

Azure IoT Hub Event Metrics

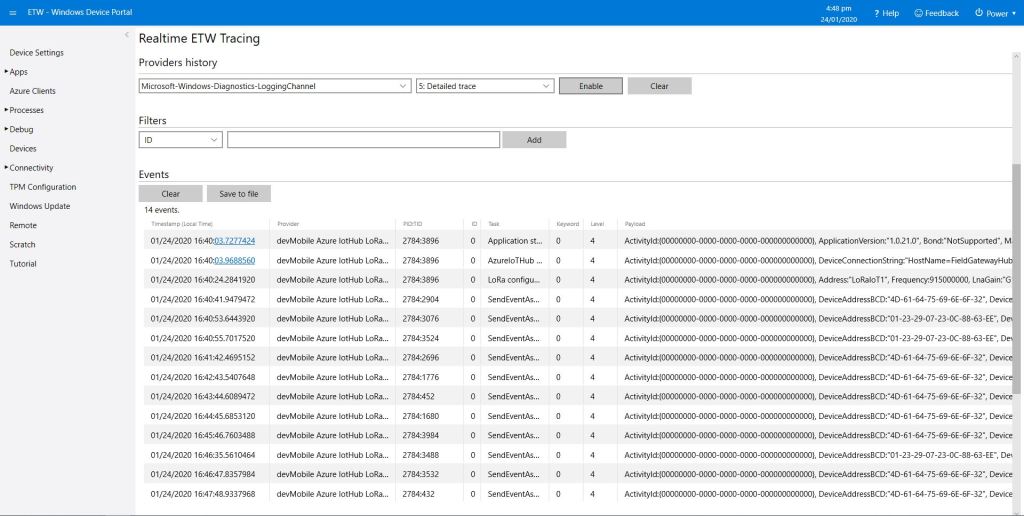
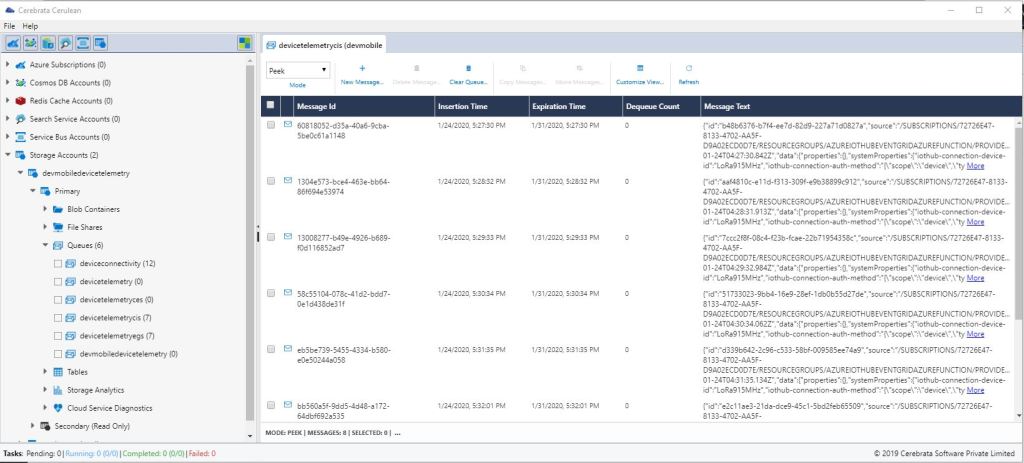
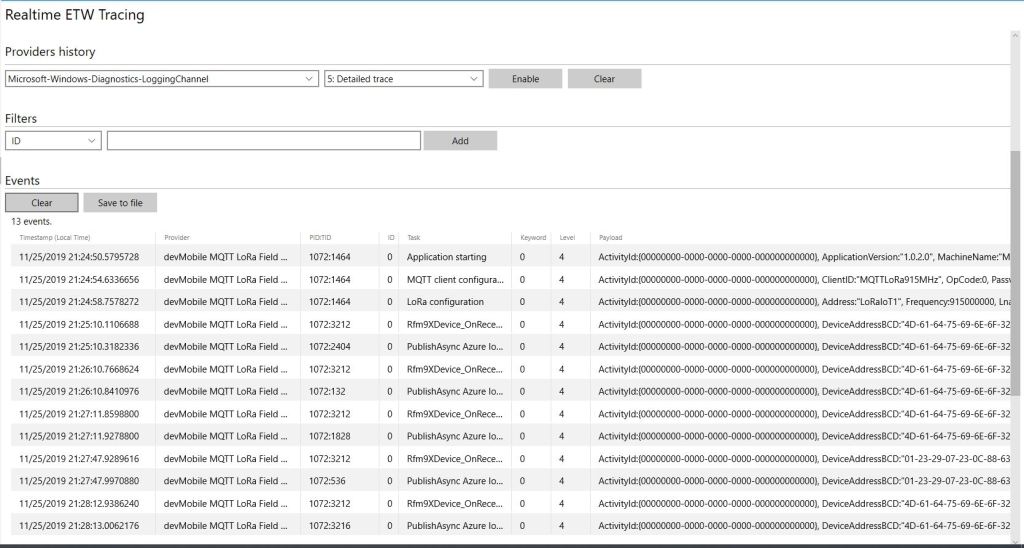
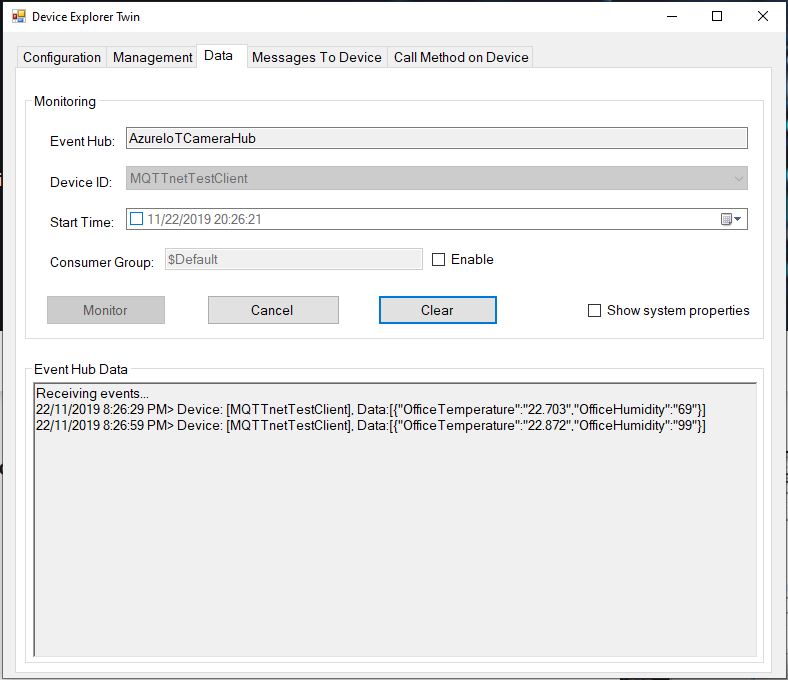
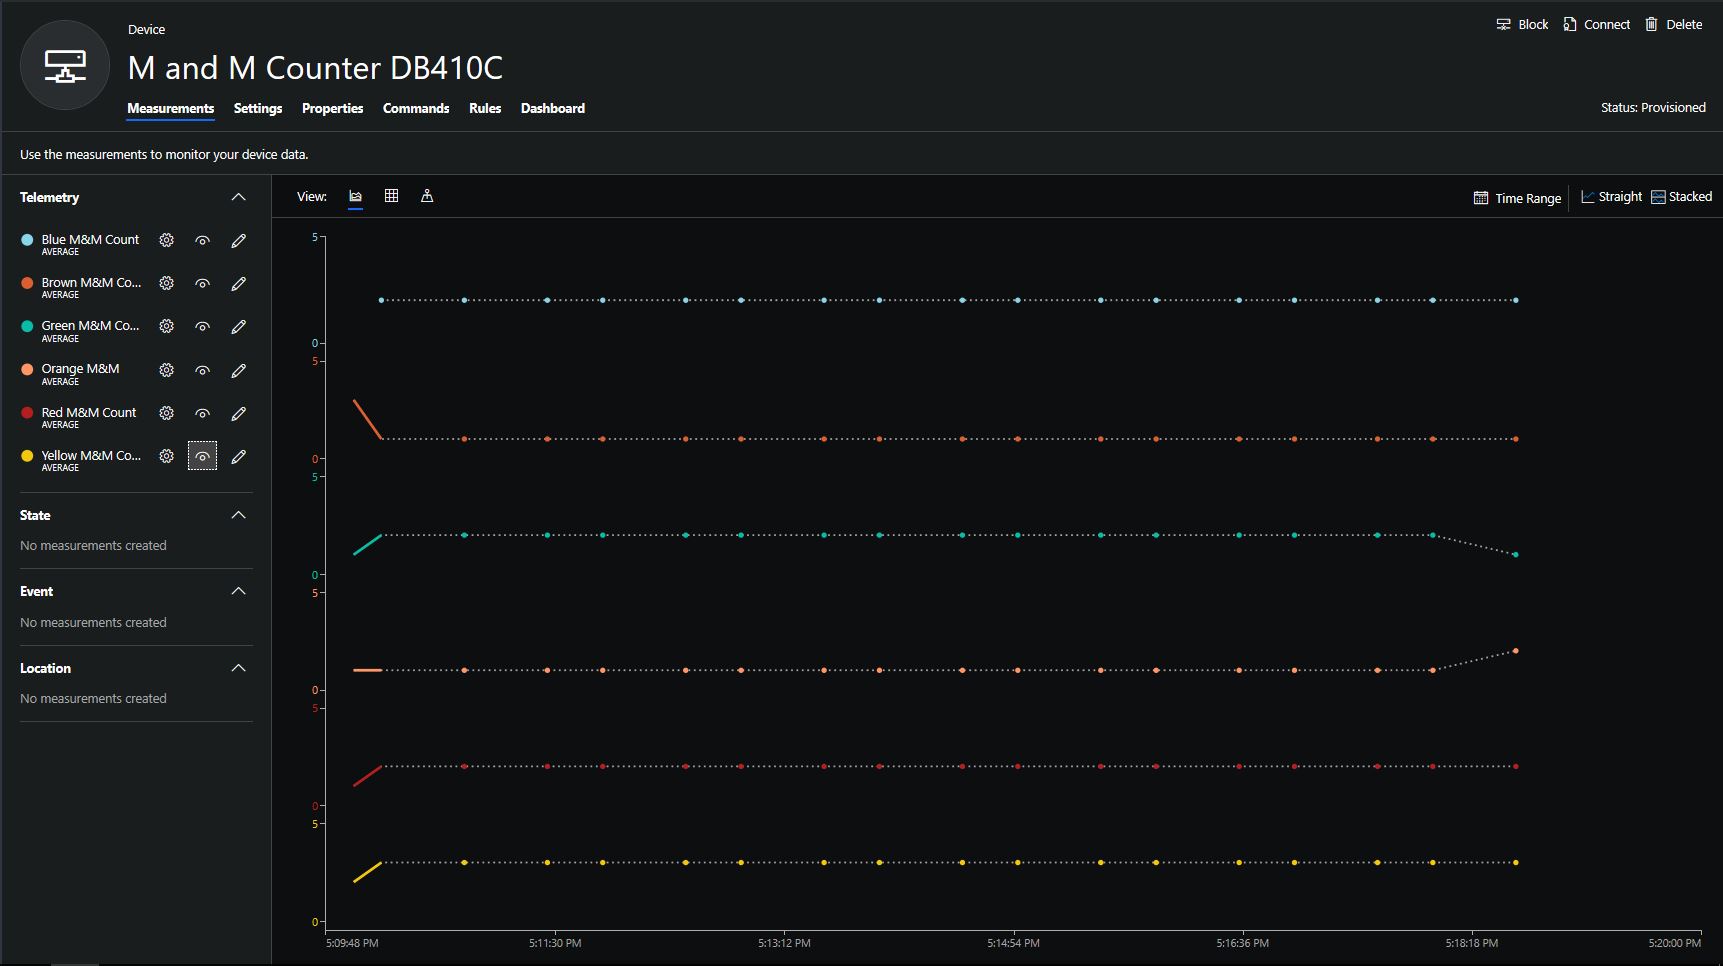
On the Windows 10 IoT Core device in the Event Tracing Window(ETW) logging on the device I could see LoRa messages arriving and being unpacked.

Windows 10 Device ETW showing message payload

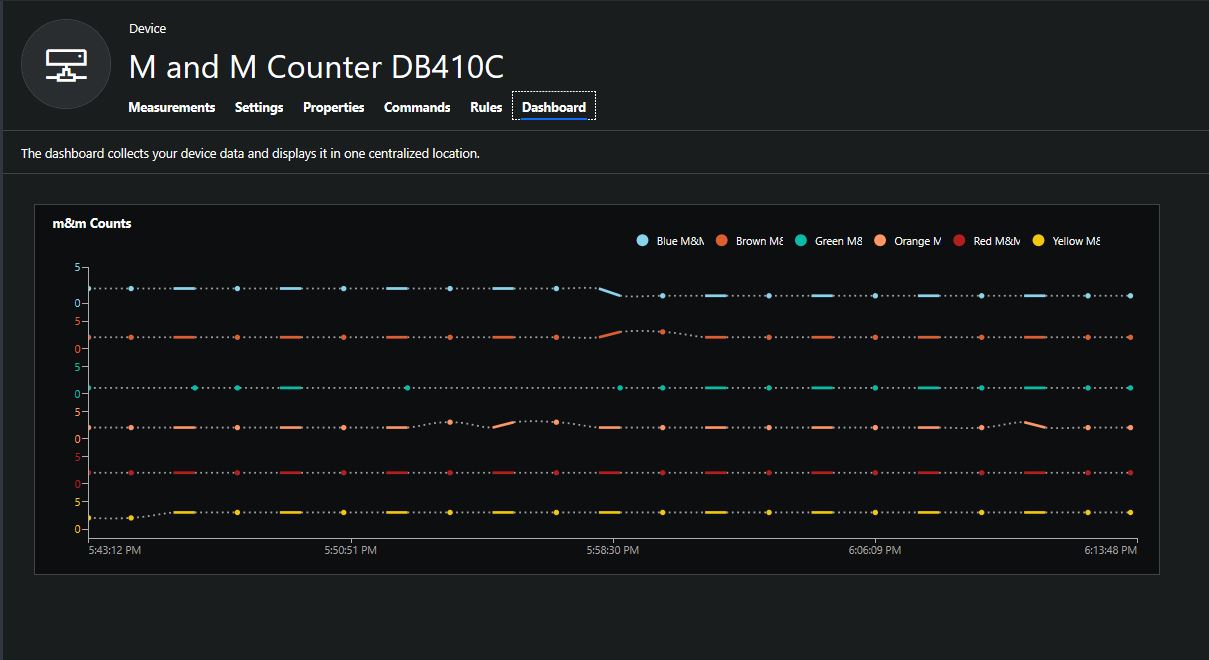
Then in Application Insights after some mucking around with code I could see in a series of Trace statements the event payload as it was unpacked.

{"id":"29108ebf-e5d5-7b95-e739-7d9048209d53","topic":"/SUBSCRIPTIONS/12345678-9012-3456-7890-123456789012/RESOURCEGROUPS/AZUREIOTHUBEVENTGRIDAZUREFUNCTION/PROVIDERS/MICROSOFT.DEVICES/IOTHUBS/FIELDGATEWAYHUB",
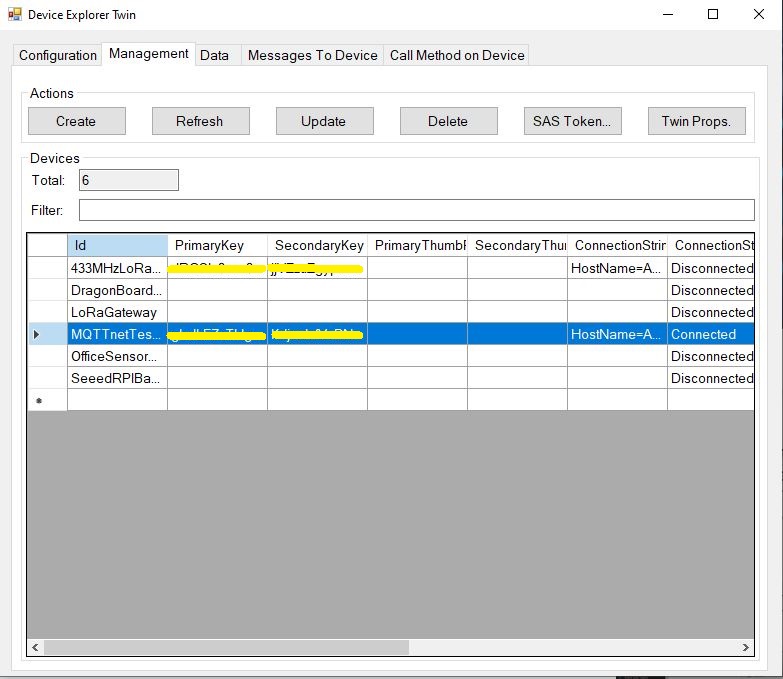
"subject":"devices/MQTTNetClient",
"eventType":"Microsoft.Devices.DeviceTelemetry",
"eventTime":"2020-02-01T04:30:51.427Z",
"data":
{
 "properties":{},
"systemProperties":{"iothub-connection-device-id":"MQTTNetClient","iothub-connection-auth-method":"{\"scope\":\"device\",\"type\":\"sas\",\"issuer\":\"iothub\",\"acceptingIpFilterRule\":null}",
"iothub-connection-auth-generation-id":"637149890997219611",
"iothub-enqueuedtime":"2020-02-01T04:30:51.427Z",
"iothub-message-source":"Telemetry"
},
"body":"eyJPZmZpY2VUZW1wZXJhdHVyZSI6IjIyLjUiLCJPZmZpY2VIdW1pZGl0eSI6IjkyIn0="
},
"dataVersion":"",
"metadataVersion":"1"
}
Application Insights logging with message unpacking
Application Insights logging message payload

Then in the last log entry the decoded message payload

/*
    Copyright ® 2020 Feb devMobile Software, All Rights Reserved
 
    MIT License

    Permission is hereby granted, free of charge, to any person obtaining a copy
    of this software and associated documentation files (the "Software"), to deal
    in the Software without restriction, including without limitation the rights
    to use, copy, modify, merge, publish, distribute, sublicense, and/or sell
    copies of the Software, and to permit persons to whom the Software is
    furnished to do so, subject to the following conditions:

    The above copyright notice and this permission notice shall be included in all
    copies or substantial portions of the Software.

    THE SOFTWARE IS PROVIDED "AS IS", WITHOUT WARRANTY OF ANY KIND, EXPRESS OR
    IMPLIED, INCLUDING BUT NOT LIMITED TO THE WARRANTIES OF MERCHANTABILITY,
    FITNESS FOR A PARTICULAR PURPOSE AND NONINFRINGEMENT. IN NO EVENT SHALL THE
    AUTHORS OR COPYRIGHT HOLDERS BE LIABLE FOR ANY CLAIM, DAMAGES OR OTHER
    LIABILITY, WHETHER IN AN ACTION OF CONTRACT, TORT OR OTHERWISE, ARISING FROM,
    OUT OF OR IN CONNECTION WITH THE SOFTWARE OR THE USE OR OTHER DEALINGS IN THE
    SOFTWARE

    Default URL for triggering event grid function in the local environment.
    http://localhost:7071/runtime/webhooks/EventGrid?functionName=functionname
 */
namespace EventGridProcessorAzureIotHub
{
   using System;
   using System.IO;
   using System.Reflection;

   using Microsoft.Azure.WebJobs;
   using Microsoft.Azure.EventGrid.Models;
   using Microsoft.Azure.WebJobs.Extensions.EventGrid;

   using log4net;
   using log4net.Config;
   using Newtonsoft.Json;

   public static class Telemetry
    {
        [FunctionName("Telemetry")]
        public static void Run([EventGridTrigger]Microsoft.Azure.EventGrid.Models.EventGridEvent eventGridEvent, ExecutionContext executionContext )//, TelemetryClient telemetryClient)
        {
			ILog log = log4net.LogManager.GetLogger(System.Reflection.MethodBase.GetCurrentMethod().DeclaringType);

		   var logRepository = LogManager.GetRepository(Assembly.GetEntryAssembly());
			XmlConfigurator.Configure(logRepository, new FileInfo(Path.Combine(executionContext.FunctionAppDirectory, "log4net.config")));

         log.Info($"eventGridEvent.Data-{eventGridEvent}");

         log.Info($"eventGridEvent.Data.ToString()-{eventGridEvent.Data.ToString()}");

        IotHubDeviceTelemetryEventData iOThubDeviceTelemetryEventData = (IotHubDeviceTelemetryEventData)JsonConvert.DeserializeObject(eventGridEvent.Data.ToString(), typeof(IotHubDeviceTelemetryEventData));

         log.Info($"iOThubDeviceTelemetryEventData.Body.ToString()-{iOThubDeviceTelemetryEventData.Body.ToString()}");

         byte[] base64EncodedBytes = System.Convert.FromBase64String(iOThubDeviceTelemetryEventData.Body.ToString());

         log.Info($"System.Text.Encoding.UTF8.GetString(-{System.Text.Encoding.UTF8.GetString(base64EncodedBytes)}");
      }
	}
}

Overall it took roughly half a page of code (mainly generated by a tool) to unpack and log the contents of an Azure IoT Hub EventGrid payload to Application Insights.

Azure IOT Hub and Event Grid Part1

I have one an Azure IoT Hub LoRa Telemetry Field Gateway running in my office and I wanted to process the data collected by the sensors around my property without using a Software as a Service(SaaS) Internet of Things (IoT) package.

Rather than lots of screen grabs of my configuration steps I figured people reading this series of posts would be able to figure the details out themselves.

Raspberry PI with M2M LoRa Hat

I created an Azure Resource Group for this project, and created an Azure IoT Hub.

Azure Resource Group with IoT Hub

I then provisioned an Azure IoT Hub device so I could get the connection string for my Windows 10 Azure IoT Hub LoRa Telemetry Field gateway.

LoRa Field Gateway Provisioned in Azure IoT Hub

I downloaded the JSON configuration file template from my Windows 10 device (which is created on first startup after installation) and configured the Azure IoT Hub connection string.

{
   "AzureIoTHubDeviceConnectionString": "HostName=FieldGatewayHub.azure-devices.net;DeviceId=LoRa915MHz;SharedAccessKey=123456789012345678901234567890123456789/arg=",
   "AzureIoTHubTransportType": "amqp",
   "SensorIDIsDeviceIDSensorID": false,
   "Address": "LoRaIoT1",
   "Frequency": 915000000.0,
   "PABoost": true
}

I then uploaded this to my Windows 10 IoT Core device and restarted the Azure IoT Hub Field gateway so it picked up the new settings.

I could then see on the device messages from sensor nodes being unpacked and uploaded to my Azure IoT Hub.

ETW logging on device

In the Azure IoT Hub metrics I graphed the number of devices connected and the number of telemetry messages sent and could see my device connect then start uploading telemetry.

Azure IoT Hub metrics

One of my customers uses Azure Event Grid for application integration and I wanted to explore using it in an IoT solution. The first step was to create an Event Grid Domain.

I then used the Azure IoT Hub Events tab to wire up these events.

  • Microsoft.Devices.DeviceConnected
  • Microsoft.Devices.DeviceDisconnected
  • Microsoft.Devices.DeviceTelemetry
Azure IoT Hub Event Metrics

To confirm my event subscriptions were successful I previously found the “simplest” approach was to use an Azure storage queue endpoint. I had to create an Azure Storage Account with two Azure Storage Queues one for device connectivity (.DeviceConnected & .DeviceDisconnected) events and the other for device telemetry (.DeviceTelemetry) events.

I created a couple of other subscriptions so I could compare the different Event schemas (Event Grid Schema & Cloud Event Schema v1.0). At this stage I didn’t configure any Filters or Additional Features.

Azure IoT Hub Telemetry Event Metrics

I use Cerebrate Cerculean for monitoring and managing a couple of other customer projects so I used it to inspect the messages in the storage queues.

Cerebrate Ceculean Storage queue Inspector

The message are quite verbose

{
"id":"b48b6376-b7f4-ee7d-82d9-12345678901a",
"source":"/SUBSCRIPTIONS/12345678-901234789-0123-456789012345/RESOURCEGROUPS/AZUREIOTHUBEVENTGRIDAZUREFUNCTION/PROVIDERS/MICROSOFT.DEVICES/IOTHUBS/FIELDGATEWAYHUB",
"specversion":"1.0",
"type":"Microsoft.Devices.DeviceTelemetry",
"dataschema":"#",
"subject":"devices/LoRa915MHz",
"time":"2020-01-24T04:27:30.842Z","data":
{"properties":{},
"systemProperties":{"iothub-connection-device-id":"LoRa915MHz",
"iothub-connection-auth-method":"{\"scope\":\"device\",\"type\":\"sas\",\"issuer\":\"iothub\",\"acceptingIpFilterRule\":null}",
"iothub-connection-auth-generation-id":"637149227434620853",
"iothub-enqueuedtime":"2020-01-24T04:27:30.842Z",
"iothub-message-source":"Telemetry"},
"body":"eyJQYWNrZXRTTlIiOiIxMC4wIiwiUGFja2V0UlNTSSI6LTY5LCJSU1NJIjotMTA5LCJEZXZpY2VBZGRyZXNzQkNEIjoiNEQtNjEtNjQtNzUtNjktNkUtNkYtMzIiLCJhdCI6Ijc2LjYiLCJhaCI6IjU4Iiwid3NhIjoiMiIsIndzZyI6IjUiLCJ3ZCI6IjMyMi44OCIsInIiOiIwLjAwIn0="
}
}

The message payload is base64 encoded, so I used an online tool to decode it.

{
 PacketSNR":"10.0",
"PacketRSSI":-69,
"RSSI":-109,
"DeviceAddressBCD":"4D-61-64-75-69-6E-6F-32",
"at":"76.6",
"ah":"58",
"wsa":"2",
"wsg":"5",
"wd":"322.88",
"r":"0.00"
}

Without writing any code (I will script the configuration) I could upload sensor data to an Azure IoT Hub, subscribe to a selection of events the Azure IoT Hub publishes and then inspect them in an Azure Storage Queue.

I did notice that the .DeviceConnected and .DeviceDisconnected events did take a while to arrive. When I started the field gateway application on the device I would get several DeviceTelemetry events before the DeviceConnected event arrived.

Azure IoT Hub SAS Tokens revisited yet again

Based my previous post on SAS Token Expiry I wrote a test harness to better understand DateTimeOffset

using System;

namespace UnixEpochTester
{
   class Program
   {
      static void Main(string[] args)
      {
         Console.WriteLine($"DIY                {new DateTime(1970, 1, 1, 0, 0, 0, DateTimeKind.Utc)}");
         Console.WriteLine($"DateTime.UnixEpoch {DateTime.UnixEpoch} {DateTime.UnixEpoch.Kind}");
         Console.WriteLine();

         TimeSpan fromUnixEpochNow = DateTime.UtcNow - DateTime.UnixEpoch;
         Console.WriteLine($"Epoc now {fromUnixEpochNow} {fromUnixEpochNow.TotalSeconds.ToString("f0")} sec");
         Console.WriteLine();

         TimeSpan fromUnixEpochFixed = new DateTime(2019, 11, 30, 2, 0, 0, DateTimeKind.Utc) - DateTime.UnixEpoch;
         Console.WriteLine($"Epoc  {fromUnixEpochFixed} {fromUnixEpochFixed.TotalSeconds.ToString("f0")} sec");
         Console.WriteLine();

         DateTimeOffset dateTimeOffset = new DateTimeOffset( new DateTime( 2019,11,30,2,0,0, DateTimeKind.Utc));
         Console.WriteLine($"Epoc DateTimeOffset {fromUnixEpochFixed} {dateTimeOffset.ToUnixTimeSeconds()}");
         Console.WriteLine();

         TimeSpan fromEpochStart = new DateTime(2019, 11, 30, 2, 0, 0, DateTimeKind.Utc) - DateTime.UnixEpoch;
         Console.WriteLine($"Epoc DateTimeOffset {fromEpochStart} {fromEpochStart.TotalSeconds.ToString("F0")}");
         Console.WriteLine();


         // https://www.epochconverter.com/ matches
         // https://www.unixtimestamp.com/index.php matches

         Console.WriteLine("Press ENTER to exit");
         Console.ReadLine();
      }
   }
}

I validated my numbers against a couple of online calculators and they matched which was a good start.

DateTimeOffset test harness

As I was testing my Azure MQTT Test Client I had noticed some oddness with MQTT connection timeouts.

string token = generateSasToken($"{server}/devices/{clientId}", password, "", new TimeSpan(0,5,0));
1/12/2019 1:29:52 PM> Device: [MQTTLoRa915MHz], Data:[{"OfficeTemperature":"22.391","OfficeHumidity":"93"}]
1/12/2019 1:30:22 PM> Device: [MQTTLoRa915MHz], Data:[{"OfficeTemperature":"22.29","OfficeHumidity":"64"}]
...
1/12/2019 1:43:56 PM> Device: [MQTTLoRa915MHz], Data:[{"OfficeTemperature":"22.591","OfficeHumidity":"98"}]
1/12/2019 1:44:26 PM> Device: [MQTTLoRa915MHz], Data:[{"OfficeTemperature":"22.754","OfficeHumidity":"68"}]


string token = generateSasToken($"{server}/devices/{clientId}", password, "", new TimeSpan(0,5,0));
1/12/2019 1:29:52 PM> Device: [MQTTLoRa915MHz], Data:[{"OfficeTemperature":"22.391","OfficeHumidity":"93"}]
1/12/2019 1:30:22 PM> Device: [MQTTLoRa915MHz], Data:[{"OfficeTemperature":"22.29","OfficeHumidity":"64"}]
...
1/12/2019 2:01:37 PM> Device: [MQTTLoRa915MHz], Data:[{"OfficeTemperature":"22.334","OfficeHumidity":"79"}]
1/12/2019 2:02:07 PM> Device: [MQTTLoRa915MHz], Data:[{"OfficeTemperature":"22.503","OfficeHumidity":"49"}]


string token = generateSasToken($"{server}/devices/{clientId}", password, "", new TimeSpan(0,5,0));
2/12/2019 9:27:21 PM> Device: [MQTTLoRa915MHz], Data:[{"OfficeTemperature":"22.196","OfficeHumidity":"61"}]
2/12/2019 9:27:51 PM> Device: [MQTTLoRa915MHz], Data:[{"OfficeTemperature":"22.788","OfficeHumidity":"91"}]
...
2/12/2019 9:36:24 PM> Device: [MQTTLoRa915MHz], Data:[{"OfficeTemperature":"22.670","OfficeHumidity":"64"}]
2/12/2019 9:36:54 PM> Device: [MQTTLoRa915MHz], Data:[{"OfficeTemperature":"22.836","OfficeHumidity":"94"}]


string token = generateSasToken($"{server}/devices/{clientId}", password, "", new TimeSpan(0,5,0));
2/12/2019 9:40:52 PM> Device: [MQTTLoRa915MHz], Data:[{"OfficeTemperature":"22.46","OfficeHumidity":"92"}]
2/12/2019 9:41:22 PM> Device: [MQTTLoRa915MHz], Data:[{"OfficeTemperature":"22.443","OfficeHumidity":"62"}]
...
2/12/2019 9:50:55 PM> Device: [MQTTLoRa915MHz], Data:[{"OfficeTemperature":"22.742","OfficeHumidity":"95"}]


string token = generateSasToken($"{server}/devices/{clientId}", password, "", new TimeSpan(0,10,0));
approx 15min as only 30 sec resolution
1/12/2019 12:50:23 PM> Device: [MQTTLoRa915MHz], Data:[{"OfficeTemperature":"22.630","OfficeHumidity":"65"}]
1/12/2019 12:50:53 PM> Device: [MQTTLoRa915MHz], Data:[{"OfficeTemperature":"22.798","OfficeHumidity":"95"}]
...
1/12/2019 1:03:59 PM> Device: [MQTTLoRa915MHz], Data:[{"OfficeTemperature":"22.677","OfficeHumidity":"41"}]
1/12/2019 1:04:30 PM> Device: [MQTTLoRa915MHz], Data:[{"OfficeTemperature":"22.26","OfficeHumidity":"72"}]


string token = generateSasToken($"{server}/devices/{clientId}", password, "", new TimeSpan(0,10,0));
approx 15min as only 30 sec resolution
1/12/2019 1:09:30 PM> Device: [MQTTLoRa915MHz], Data:[{"OfficeTemperature":"22.106","OfficeHumidity":"72"}]
1/12/2019 1:10:00 PM> Device: [MQTTLoRa915MHz], Data:[{"OfficeTemperature":"22.463","OfficeHumidity":"42"}]
...
1/12/2019 1:23:35 PM> Device: [MQTTLoRa915MHz], Data:[{"OfficeTemperature":"22.366","OfficeHumidity":"77"}]
1/12/2019 1:24:05 PM> Device: [MQTTLoRa915MHz], Data:[{"OfficeTemperature":"22.537","OfficeHumidity":"47"}]

The dataset with the 5 minute expiry which remained connected for approximately 30 mins was hopefully a configuration issue.

The updated SAS Token code not uses ToUnixTimeSeconds to eliminate the scope for local vs. UTC issues.

      public static string generateSasToken(string resourceUri, string key, string policyName, TimeSpan timeToLive)
      {
         DateTimeOffset expiryDateTimeOffset = new DateTimeOffset(DateTime.UtcNow.Add(timeToLive));

         string expiryEpoch = expiryDateTimeOffset.ToUnixTimeSeconds().ToString();
         string stringToSign = WebUtility.UrlEncode(resourceUri) + "\n" + expiryEpoch;

         HMACSHA256 hmac = new HMACSHA256(Convert.FromBase64String(key));
         string signature = Convert.ToBase64String(hmac.ComputeHash(Encoding.UTF8.GetBytes(stringToSign)));

         string token = $"SharedAccessSignature sr={WebUtility.UrlEncode(resourceUri)}&sig={WebUtility.UrlEncode(signature)}&se={expiryEpoch}";

         if (!String.IsNullOrEmpty(policyName))
         {
            token += "&skn=" + policyName;
         }

         return token;
      }

I need to test the expiry of my SAS Tokens some more especially with the client running on my development machine (NZT which is currently UTC+13) and in Azure (UTC timezone)

Azure IoT Hub MQTT LoRa Field Gateway

Back in April I started working on an MQTT LoRa Field gateway which was going to support a selection of different Software as a service(SaaS) Internet of Things IoT) platforms.

I now have a working Azure IoT Hub plug-in (Azure IoT Central support as planned as well) with the first iteration focused on Device to Cloud (D2C) messaging. In a future iteration I will add Cloud to Device messaging(C2D).

My applications use a lightweight, easy to implemented protocol which is intended for hobbyist and educational use rather than commercial applications (I have been working on a more secure version as yet another side project)

I have a number of sample Arduino with Dragino LoRa Shield for Arduino, MakerFabs Maduino, Dragino LoRa Mini Dev, M2M Low power Node and Netduino with Elecrow LoRa RFM95 Shield etc. clients. These work with both my platform specific (Adafruit.IO, Azure IoT Hub/Central) gateways and protocol specific field gateways.

Azure IoT Hub Device Explorer Data Display

When the application is first started it creates a minimal configuration file which should be downloaded, the missing information filled out, then uploaded using the File explorer in the Windows device portal.

{
  "MQTTUserName": "YourIoTHubHub.azure-devices.net/MQTTLoRa915MHz/api-version=2018-06-30",
  "MQTTPassword": "SharedAccessSignature sr=YourIoTHubHub.azure-devices.net%2Fdevices%2FMQTTLoRa915MHz&sig=123456789012345678901234567890123456789012345%3D&se=1574673583",
  "MQTTClientID": "MQTTLoRa915MHz",
  "MQTTServer": "YourIoTHubHub.azure-devices.net",
  "Address": "LoRaIoT1",
  "Frequency": 915000000.0,
  "MessageHandlerAssembly": "Mqtt.IoTCore.FieldGateway.LoRa.AzureIoTHub",
  "PlatformSpecificConfiguration": ""
}

The application logs debugging information to the Windows 10 IoT Core ETW logging Microsoft-Windows-Diagnostics-LoggingChannel

MQTT LoRa Gateway with Azure IoT Hub plug-in

The message handler uploads all values in an inbound messages in one MQTT message.

namespace devMobile.Mqtt.IoTCore.FieldGateway
{
   using System;
   using System.Diagnostics;
   using System.Text;
   using Windows.Foundation.Diagnostics;

   using devMobile.IoT.Rfm9x;
   using MQTTnet;
   using MQTTnet.Client;
   using Newtonsoft.Json.Linq;
   using Newtonsoft.Json;

   public class MessageHandler : IMessageHandler
   {
      private LoggingChannel Logging { get; set; }
      private IMqttClient MqttClient { get; set; }
      private Rfm9XDevice Rfm9XDevice { get; set; }
      private string PlatformSpecificConfiguration { get; set; }

      void IMessageHandler.Initialise(LoggingChannel logging, IMqttClient mqttClient, Rfm9XDevice rfm9XDevice, string platformSpecificConfiguration)
      {
         LoggingFields processInitialiseLoggingFields = new LoggingFields();

         this.Logging = logging;
         this.MqttClient = mqttClient;
         this.Rfm9XDevice = rfm9XDevice;
         this.PlatformSpecificConfiguration = platformSpecificConfiguration;
      }

      async void IMessageHandler.Rfm9XOnReceive(Rfm9XDevice.OnDataReceivedEventArgs e)
      {
         LoggingFields processReceiveLoggingFields = new LoggingFields();
         char[] sensorReadingSeparators = { ',' };
         char[] sensorIdAndValueSeparators = { ' ' };

         processReceiveLoggingFields.AddString("PacketSNR", e.PacketSnr.ToString("F1"));
         processReceiveLoggingFields.AddInt32("PacketRSSI", e.PacketRssi);
         processReceiveLoggingFields.AddInt32("RSSI", e.Rssi);

         string addressBcdText = BitConverter.ToString(e.Address);
         processReceiveLoggingFields.AddInt32("DeviceAddressLength", e.Address.Length);
         processReceiveLoggingFields.AddString("DeviceAddressBCD", addressBcdText);

         string messageText;
         try
         {
            messageText = UTF8Encoding.UTF8.GetString(e.Data);
            processReceiveLoggingFields.AddString("MessageText", messageText);
         }
         catch (Exception ex)
         {
            processReceiveLoggingFields.AddString("Exception", ex.ToString());
            this.Logging.LogEvent("PayloadProcess failure converting payload to text", processReceiveLoggingFields, LoggingLevel.Warning);
            return;
         }

         // Chop up the CSV text
         string[] sensorReadings = messageText.Split(sensorReadingSeparators, StringSplitOptions.RemoveEmptyEntries);
         if (sensorReadings.Length < 1)
         {
            this.Logging.LogEvent("PayloadProcess payload contains no sensor readings", processReceiveLoggingFields, LoggingLevel.Warning);
            return;
         }

         JObject payloadJObject = new JObject();

         JObject feeds = new JObject();

         // Chop up each sensor read into an ID & value
         foreach (string sensorReading in sensorReadings)
         {
            string[] sensorIdAndValue = sensorReading.Split(sensorIdAndValueSeparators, StringSplitOptions.RemoveEmptyEntries);

            // Check that there is an id & value
            if (sensorIdAndValue.Length != 2)
            {
               this.Logging.LogEvent("PayloadProcess payload invalid format", processReceiveLoggingFields, LoggingLevel.Warning);
               return;
            }

            string sensorId = string.Concat(addressBcdText, sensorIdAndValue[0]);
            string value = sensorIdAndValue[1];

            feeds.Add(sensorId.ToLower(), value);
         }
         payloadJObject.Add("feeds", feeds);

         string topic = $"devices/{MqttClient.Options.ClientId}/messages/events/";

         try
         {
            var message = new MqttApplicationMessageBuilder()
               .WithTopic(topic)
               .WithPayload(JsonConvert.SerializeObject(payloadJObject))
               .WithAtLeastOnceQoS()
               .Build();
            Debug.WriteLine(" {0:HH:mm:ss} MQTT Client PublishAsync start", DateTime.UtcNow);
            await MqttClient.PublishAsync(message);
            Debug.WriteLine(" {0:HH:mm:ss} MQTT Client PublishAsync finish", DateTime.UtcNow);

            this.Logging.LogEvent("PublishAsync Azure IoTHub payload", processReceiveLoggingFields, LoggingLevel.Information);
         }
         catch (Exception ex)
         {
            processReceiveLoggingFields.AddString("Exception", ex.ToString());
            this.Logging.LogEvent("PublishAsync Azure IoTHub payload", processReceiveLoggingFields, LoggingLevel.Error);
         }
      }

      void IMessageHandler.MqttApplicationMessageReceived(MqttApplicationMessageReceivedEventArgs e)
      {
         LoggingFields processReceiveLoggingFields = new LoggingFields();

         processReceiveLoggingFields.AddString("ClientId", e.ClientId);
#if DEBUG
         processReceiveLoggingFields.AddString("Payload", e.ApplicationMessage.ConvertPayloadToString());
#endif
         processReceiveLoggingFields.AddString("QualityOfServiceLevel", e.ApplicationMessage.QualityOfServiceLevel.ToString());
         processReceiveLoggingFields.AddBoolean("Retain", e.ApplicationMessage.Retain);
         processReceiveLoggingFields.AddString("Topic", e.ApplicationMessage.Topic);

         this.Logging.LogEvent("MqttApplicationMessageReceived topic not processed", processReceiveLoggingFields, LoggingLevel.Error);
      }

      void IMessageHandler.Rfm9xOnTransmit(Rfm9XDevice.OnDataTransmitedEventArgs e)
      {
      }
   }
}

The formatting of the username and generation of password are password are a bit awkward and will be fixed in a future refactoring. Along with regenerating the SAS connection token just before it is due to expire.

Azure IoT Hub SAS Tokens revisited again

This post has been edited (2019-11-24) my original assumption about how DateTime.Kind unspecified was handled were incorrect.

As I was testing my Azure MQTT Test Client I noticed some oddness with MQTT connection timeouts and this got me wondering about token expiry times. So, I went searching again and found this Azure IoT Hub specific sample code

public static string generateSasToken(string resourceUri, string key, string policyName, int expiryInSeconds = 3600)
{
    TimeSpan fromEpochStart = DateTime.UtcNow - new DateTime(1970, 1, 1);
    string expiry = Convert.ToString((int)fromEpochStart.TotalSeconds + expiryInSeconds);

    string stringToSign = WebUtility.UrlEncode(resourceUri) + "\n" + expiry;

    HMACSHA256 hmac = new HMACSHA256(Convert.FromBase64String(key));
    string signature = Convert.ToBase64String(hmac.ComputeHash(Encoding.UTF8.GetBytes(stringToSign)));

    string token = String.Format(CultureInfo.InvariantCulture, "SharedAccessSignature sr={0}&sig={1}&se={2}", WebUtility.UrlEncode(resourceUri), WebUtility.UrlEncode(signature), expiry);

    if (!String.IsNullOrEmpty(policyName))
    {
        token += "&skn=" + policyName;
    }

    return token;
}

This code worked first time and was more flexible than mine which was a bonus. Though while running my MQTTNet based client I noticed the connection would drop after approximately 10mins (EDIT this was probably an unrelated networking issue).

A long time ago (25 years) I had issues sharing a Unix time value between an applications written with Borland C and Microsoft Visual C which made me wonder about Unix epoch base offsets.

So to test my theory I built a Unix epoch test harness console application

using System;

namespace UnixEpocTest
{
   class Program
   {
      static void Main(string[] args)
      {
         TimeSpan ttl = new TimeSpan(0, 0, 0);

         Console.WriteLine("Current time");
         Console.WriteLine($"Local     {DateTime.Now} {DateTime.Now.Kind}");
         Console.WriteLine($"UTC       {DateTime.UtcNow} {DateTime.UtcNow.Kind}");
         Console.WriteLine($"Unix DIY  {new DateTime(1970, 1, 1)} {new DateTime(1970, 1, 1).Kind}");
         Console.WriteLine($"Unix DIY+ {new DateTime(1970, 1, 1).ToUniversalTime()} {new DateTime(1970, 1, 1).ToUniversalTime().Kind}");
         Console.WriteLine($"Unix DIY  {new DateTime(1970, 1, 1, 0,0,0, DateTimeKind.Utc)}");
         Console.WriteLine($"Unix      {DateTime.UnixEpoch} {DateTime.UnixEpoch.Kind}");
         Console.WriteLine();

         TimeSpan fromEpochStart = DateTime.UtcNow - new DateTime(1970, 1, 1);
         TimeSpan fromEpochStartUtc = DateTime.UtcNow - new DateTime(1970, 1, 1,0,0,0, DateTimeKind.Utc);
         TimeSpan fromEpochStartUnixEpoch = DateTime.UtcNow - DateTime.UnixEpoch;

         Console.WriteLine("Epoch comparison");
         Console.WriteLine($"Local {fromEpochStart} {fromEpochStart.TotalSeconds.ToString("f0")} sec");
         Console.WriteLine($"UTC   {fromEpochStartUtc} {fromEpochStartUtc.TotalSeconds.ToString("f0")} sec");
         Console.WriteLine($"Epoc  {fromEpochStartUnixEpoch} {fromEpochStartUnixEpoch.TotalSeconds.ToString("f0")} sec");
         Console.WriteLine();

         TimeSpan afterEpoch = DateTime.UtcNow.Add(ttl) - new DateTime(1970, 1, 1);
         TimeSpan afterEpochUtC = DateTime.UtcNow.Add(ttl) - new DateTime(1970, 1, 1).ToUniversalTime();
         TimeSpan afterEpochEpoch = DateTime.UtcNow.Add(ttl) - DateTime.UnixEpoch;

         Console.WriteLine("Epoch calculation");
         Console.WriteLine($"Local {afterEpoch}");
         Console.WriteLine($"UTC   {afterEpochUtC}");
         Console.WriteLine($"Epoch {afterEpochEpoch}");
         Console.WriteLine();

         Console.WriteLine("Epoch DateTime");
         Console.WriteLine($"Local :{new DateTime(1970, 1, 1)}");
         Console.WriteLine($"UTC   :{ new DateTime(1970, 1, 1).ToUniversalTime()}");

         Console.WriteLine("Press ENTER to exit");
         Console.ReadLine();

         Console.WriteLine("Hello World!");
      }
   }
}

EDIT: I now think the UtcNow to “unspecified” kind mathematics was being handled correctly. I have updated the code to use the DateTime.UnixEpoch constant so the code is more readable.

public static string generateSasToken(string resourceUri, string key, string policyName, int expiryInSeconds = 900)
      {
         TimeSpan fromEpochStart = DateTime.UtcNow - DateTime.UnixEpoch;
         string expiry = Convert.ToString((int)fromEpochStart.TotalSeconds + expiryInSeconds);

         string stringToSign = WebUtility.UrlEncode(resourceUri) + "\n" + expiry;

         HMACSHA256 hmac = new HMACSHA256(Convert.FromBase64String(key));
         string signature = Convert.ToBase64String(hmac.ComputeHash(Encoding.UTF8.GetBytes(stringToSign)));

         string token = String.Format(CultureInfo.InvariantCulture, "SharedAccessSignature sr={0}&sig={1}&se={2}", WebUtility.UrlEncode(resourceUri), WebUtility.UrlEncode(signature), expiry);

         if (!String.IsNullOrEmpty(policyName))
         {
            token += "&skn=" + policyName;
         }

         return token;
      }

I need to test the expiry of my SAS Tokens some more especially with the client running on my development machine (NZT which is currently UTC+13) and in Azure (UTC timezone)

Azure IoT Hub SAS Tokens revisited

A long time ago I wrote a post about uploading telemetry data to an Azure Event Hub from a Netduino 3 Wifi using HTTPS. To send messages to the EventHub I had to create a valid SAS Token which took a surprising amount of effort because of the reduced text encoding/decoding and cryptographic functionality available in .NET Micro Framework v4.3 (NetMF)

// Create a SAS token for a specified scope. SAS tokens are described in http://msdn.microsoft.com/en-us/library/windowsazure/dn170477.aspx.
private static string CreateSasToken(string uri, string keyName, string key)
{
   // Set token lifetime to 20 minutes. When supplying a device with a token, you might want to use a longer expiration time.
   uint tokenExpirationTime = GetExpiry(20 * 60);
 
   string stringToSign = HttpUtility.UrlEncode(uri) + "\n" + tokenExpirationTime;
 
   var hmac = SHA.computeHMAC_SHA256(Encoding.UTF8.GetBytes(key), Encoding.UTF8.GetBytes(stringToSign));
   string signature = Convert.ToBase64String(hmac);
 
   signature = Base64NetMf42ToRfc4648(signature);
 
   string token = "SharedAccessSignature sr=" + HttpUtility.UrlEncode(uri) + "&sig=" + HttpUtility.UrlEncode(signature) + "&se=" + tokenExpirationTime.ToString() + "&skn=" + keyName;
 
   return token;
}
 
private static string Base64NetMf42ToRfc4648(string base64netMf)
{
   var base64Rfc = string.Empty;
 
   for (var i = 0; i < base64netMf.Length; i++)
   {
      if (base64netMf[i] == '!')
      {
         base64Rfc += '+';
      }
      else if (base64netMf[i] == '*')
      {
         base64Rfc += '/';
      }
      else
      {
         base64Rfc += base64netMf[i];
      }
   }
   return base64Rfc;
}
 
static uint GetExpiry(uint tokenLifetimeInSeconds)
{
   const long ticksPerSecond = 1000000000 / 100; // 1 tick = 100 nano seconds
 
   DateTime origin = new DateTime(1970, 1, 1, 0, 0, 0, 0);
   TimeSpan diff = DateTime.Now.ToUniversalTime() - origin;
 
   return ((uint)(diff.Ticks / ticksPerSecond)) + tokenLifetimeInSeconds;
}

Initially for testing my Azure MQTT Test Client I manually generated the SAS tokens using Azure Device Explorer but figured it would be better if the application generated them.

An initial search lead to this article about how to generate a SAS token for an Azure Event Hub in multiple languages. For my first attempt I “copied and paste” the code sample for C# (I also wasn’t certain what to put in the KeyName parameter) and it didn’t work.

private static string createToken(string resourceUri, string keyName, string key)
{
    TimeSpan sinceEpoch = DateTime.UtcNow - new DateTime(1970, 1, 1);
    var week = 60 * 60 * 24 * 7;
    var expiry = Convert.ToString((int)sinceEpoch.TotalSeconds + week);
    string stringToSign = HttpUtility.UrlEncode(resourceUri) + "\n" + expiry;
    HMACSHA256 hmac = new HMACSHA256(Encoding.UTF8.GetBytes(key));
    var signature = Convert.ToBase64String(hmac.ComputeHash(Encoding.UTF8.GetBytes(stringToSign)));
    var sasToken = String.Format(CultureInfo.InvariantCulture, "SharedAccessSignature sr={0}&sig={1}&se={2}&skn={3}", HttpUtility.UrlEncode(resourceUri), HttpUtility.UrlEncode(signature), expiry, keyName);
    return sasToken;
}

By comparing the Device Explorer and C# generated SAS keys I worked out the keyName parameter was unnecessary so I removed.

private static string createToken(string resourceUri, string key)
{
    TimeSpan sinceEpoch = DateTime.UtcNow - new DateTime(1970, 1, 1);
    var week = 60 * 60 * 24 * 7;
    var expiry = Convert.ToString((int)sinceEpoch.TotalSeconds + week);
    string stringToSign = HttpUtility.UrlEncode(resourceUri) + "\n" + expiry;
    HMACSHA256 hmac = new HMACSHA256(Encoding.UTF8.GetBytes(key));
    var signature = Convert.ToBase64String(hmac.ComputeHash(Encoding.UTF8.GetBytes(stringToSign)));
    var sasToken = String.Format(CultureInfo.InvariantCulture, "SharedAccessSignature sr={0}&sig={1}&se={2}", HttpUtility.UrlEncode(resourceUri), HttpUtility.UrlEncode(signature), expiry);
    return sasToken;
}

The shared SAS token now looked closer to what I was expecting but the MQTTNet ConnectAsync was failing with an authentication exception. After looking at the Device Explorer SAS Key code, my .NetMF implementation and the code for the IoT Hub SDK I noticed the encoding for the HMAC Key was different. Encoding.UTF8.GetBytes vs. Convert.FromBase64String.

 private static string createToken(string resourceUri,string key, TimeSpan ttl)
      {
         TimeSpan afterEpoch = DateTime.UtcNow.Add( ttl ) - new DateTime(1970, 1, 1);

         string expiry = afterEpoch.TotalSeconds.ToString("F0");
         string stringToSign = HttpUtility.UrlEncode(resourceUri) + "\n" + expiry;
         HMACSHA256 hmac = new HMACSHA256(Convert.FromBase64String(key));
         string signature = Convert.ToBase64String(hmac.ComputeHash(Encoding.UTF8.GetBytes(stringToSign)));
         return  String.Format(CultureInfo.InvariantCulture, "SharedAccessSignature sr={0}&sig={1}&se={2}", HttpUtility.UrlEncode(resourceUri), HttpUtility.UrlEncode(signature), expiry);
      }

This approach appears to work reliably in my test harness.

MQTTnet client with new SAS Key Generator

User beware DIY Crypto often ends badly

Azure IoT Hub with MQTTnet

As I’m testing my Message Queue Telemetry Transport(MQTT) LoRa gateway I’m building a proof of concept(PoC) .Net core console application for each IoT platform I would like to support.

This PoC was to confirm that my device could connect to the Microsoft Azure IoT Hub MQTT API then format topics and payloads correctly.

Azure IoT Hub MQTT Console Client

I had tried with a couple of different MQTT libraries from micro controllers and embedded devices without success. With the benefit of hindsight (plus this article) I think I had the SAS key format wrong.

The Azure IoT Hub MQTT broker requires only a server name (fully resolved CName), device ID and SAS Key.

   class Program
   {
      private static IMqttClient mqttClient = null;
      private static IMqttClientOptions mqttOptions = null;
      private static string server;
      private static string username;
      private static string password;
      private static string clientId;
      private static string topicD2C;
      private static string topicC2D;

      static void Main(string[] args)
      {
         MqttFactory factory = new MqttFactory();
         mqttClient = factory.CreateMqttClient();

         if (args.Length != 3)
         {
            Console.WriteLine("[AzureIoTHubHostName] [deviceID] [SASKey]");
            Console.WriteLine("Press <enter> to exit");
            Console.ReadLine();
            return;
         }

         server = args[0];
         clientId = args[1];
         sasKey= args[2];

         username = $"{server}/{clientId}/api-version=2018-06-30";
         topicD2C = $"devices/{clientId}/messages/events/";
         topicC2D = $"devices/{clientId}/messages/devicebound/#";

         Console.WriteLine($"MQTT Server:{server} Username:{username} ClientID:{clientId}");

         mqttOptions = new MqttClientOptionsBuilder()
            .WithTcpServer(server, 8883)
            .WithCredentials(username, sasKey)
            .WithClientId(clientId)
            .WithTls()
            .Build();

         mqttClient.UseDisconnectedHandler(new MqttClientDisconnectedHandlerDelegate(e => MqttClient_Disconnected(e)));
         mqttClient.UseApplicationMessageReceivedHandler(new MqttApplicationMessageReceivedHandlerDelegate(e => MqttClient_ApplicationMessageReceived(e)));
         mqttClient.ConnectAsync(mqttOptions).Wait();

         mqttClient.SubscribeAsync(topicC2D, MQTTnet.Protocol.MqttQualityOfServiceLevel.AtLeastOnce).GetAwaiter().GetResult();

         while (true)
         {
            JObject payloadJObject = new JObject();

            payloadJObject.Add("OfficeTemperature", "22." + DateTime.UtcNow.Millisecond.ToString());
            payloadJObject.Add("OfficeHumidity", (DateTime.UtcNow.Second + 40).ToString());

            string payload = JsonConvert.SerializeObject(payloadJObject);
            Console.WriteLine($"Topic:{topicD2C} Payload:{payload}");

            var message = new MqttApplicationMessageBuilder()
               .WithTopic(topicD2C)
               .WithPayload(payload)
               .WithAtLeastOnceQoS()
            .Build();

            Console.WriteLine("PublishAsync start");
            mqttClient.PublishAsync(message).Wait();
            Console.WriteLine("PublishAsync finish");

            Thread.Sleep(30100);
         }
      }

      private static void MqttClient_ApplicationMessageReceived(MqttApplicationMessageReceivedEventArgs e)
      {
         Console.WriteLine($"ClientId:{e.ClientId} Topic:{e.ApplicationMessage.Topic} Payload:{e.ApplicationMessage.ConvertPayloadToString()}");
      }

      private static async void MqttClient_Disconnected(MqttClientDisconnectedEventArgs e)
      {
         Debug.WriteLine("Disconnected");
         await Task.Delay(TimeSpan.FromSeconds(5));

         try
         {
            await mqttClient.ConnectAsync(mqttOptions);
         }
         catch (Exception ex)
         {
            Debug.WriteLine("Reconnect failed {0}", ex.Message);
         }
      }
   }

Overall the initial configuration went smoothly after I figured out the required Quality of Service (QoS) settings, and the SAS Key format.

Using the approach described in the Microsoft documentation I manually generated the SAS Key.(In my Netduino samples I have code for generating a SAS Key in my HTTPS Azure IoT Hub Client)

Azure Device Explorer Device Management
Azure Device Explorer SAS Key Generator

Once I had the configuration correct I could see telemetry from the device and send it messages.

Azure Device Explorer Data View

In a future post I will upload data to the Azure IoT Central for display. Then explore using a “module” attached to a device which maybe useful for my field gateway.

Windows 10 IoT Core Cognitive Services Azure IoT Hub Client

This application builds on Windows 10 IoT Core Cognitive Services Vision API client. It uses my Lego brick classifier model and a new m&m object detection model.

m&m counter test rig

I created a new Visual Studio 2017 Windows IoT Core project and copied across the Windows 10 IoT Core Cognitive Services Custom Vision API code, (changing the namespace and manifest details) and added the Azure Devices Client NuGet package.

Azure Devices Client NuGet

In the start up code I added code to initialise the Azure IoT Hub client, retrieve the device twin settings, and update the device twin properties.

try
{
	this.azureIoTHubClient = DeviceClient.CreateFromConnectionString(this.azureIoTHubConnectionString, this.transportType);
}
catch (Exception ex)
{
	this.logging.LogMessage("AzureIOT Hub DeviceClient.CreateFromConnectionString failed " + ex.Message, LoggingLevel.Error);
	return;
}

try
{
	TwinCollection reportedProperties = new TwinCollection();

	// This is from the OS
	reportedProperties["Timezone"] = TimeZoneSettings.CurrentTimeZoneDisplayName;
	reportedProperties["OSVersion"] = Environment.OSVersion.VersionString;
	reportedProperties["MachineName"] = Environment.MachineName;

	reportedProperties["ApplicationDisplayName"] = package.DisplayName;
	reportedProperties["ApplicationName"] = packageId.Name;
	reportedProperties["ApplicationVersion"] = string.Format($"{version.Major}.{version.Minor}.{version.Build}.{version.Revision}");

	// Unique identifier from the hardware
	SystemIdentificationInfo systemIdentificationInfo = SystemIdentification.GetSystemIdForPublisher();
	using (DataReader reader = DataReader.FromBuffer(systemIdentificationInfo.Id))
	{
		byte[] bytes = new byte[systemIdentificationInfo.Id.Length];
		reader.ReadBytes(bytes);
		reportedProperties["SystemId"] = BitConverter.ToString(bytes);
	}
	this.azureIoTHubClient.UpdateReportedPropertiesAsync(reportedProperties).Wait();
}
catch (Exception ex)
{
	this.logging.LogMessage("Azure IoT Hub client UpdateReportedPropertiesAsync failed " + ex.Message, LoggingLevel.Error);
	return;
}

try
{
	LoggingFields configurationInformation = new LoggingFields();

	Twin deviceTwin = this.azureIoTHubClient.GetTwinAsync().GetAwaiter().GetResult();

	if (!deviceTwin.Properties.Desired.Contains("ImageUpdateDue") || !TimeSpan.TryParse(deviceTwin.Properties.Desired["ImageUpdateDue"].value.ToString(), out imageUpdateDue))
	{
		this.logging.LogMessage("DeviceTwin.Properties ImageUpdateDue setting missing or invalid format", LoggingLevel.Warning);
		return;
	}
	configurationInformation.AddTimeSpan("ImageUpdateDue", imageUpdateDue);

	if (!deviceTwin.Properties.Desired.Contains("ImageUpdatePeriod") || !TimeSpan.TryParse(deviceTwin.Properties.Desired["ImageUpdatePeriod"].value.ToString(), out imageUpdatePeriod))
	{
		this.logging.LogMessage("DeviceTwin.Properties ImageUpdatePeriod setting missing or invalid format", LoggingLevel.Warning);
		return;
	}
…
	if (!deviceTwin.Properties.Desired.Contains("DebounceTimeout") || !TimeSpan.TryParse(deviceTwin.Properties.Desired["DebounceTimeout"].value.ToString(), out debounceTimeout))
	{
		this.logging.LogMessage("DeviceTwin.Properties DebounceTimeout setting missing or invalid format", LoggingLevel.Warning);
		return;
	}
				configurationInformation.AddTimeSpan("DebounceTimeout", debounceTimeout);

	this.logging.LogEvent("Configuration settings", configurationInformation);
}
catch (Exception ex)
{
	this.logging.LogMessage("Azure IoT Hub client GetTwinAsync failed or property missing/invalid" + ex.Message, LoggingLevel.Error);
	return;
}

When the digital input (configured in the app.settings file) is strobed or the timer fires (configured in the device properties) an image is captured, uploaded to Azure Cognitive Services Custom Vision for processing.

The returned results are then post processed to make them Azure IoT Central friendly, and finally uploaded to an Azure IoT Hub.

For testing I have used a simple object detection model.

I trained the model with images of 6 different colours of m&m’s.

For my first dataset I tagged the location of a single m&m of each of the colour in 15 images.

Testing the training of the model

I then trained the model multiple times adding additional images where the model was having trouble distiguishing colours.

The published name comes from the training performance tab

Project settings

The projectID, AzureCognitiveServicesSubscriptionKey (PredictionKey) and PublishedName (From the Performance tab in project) are from the custom vision project properties.

All of the Custom Vision model settings are configured in the Azure IoT Hub device properties.

The app.settings file contains only the hardware configuration settings and the Azure IoT Hub connection string.

{
  "InterruptPinNumber": 24,
  "interruptTriggerOn": "RisingEdge",
  "DisplayPinNumber": 35,
  "AzureIoTHubConnectionString": "",
  "TransportType": "Mqtt"
} 

The LED connected to the display pin is illuminated while an image is being processed or briefly flashed if the insufficient time between image captures has passed.

The image data is post processed differently based on the model.

// Post process the predictions based on the type of model
switch (modelType)
{
	case ModelType.Classification:
		// Use only the tags above the specified minimum probability
		foreach (var prediction in imagePrediction.Predictions)
		{
			if (prediction.Probability >= probabilityThreshold)
			{
				// Display and log the individual tag probabilities
				Debug.WriteLine($" Tag valid:{prediction.TagName} {prediction.Probability:0.00}");
				imageInformation.AddDouble($"Tag valid:{prediction.TagName}", prediction.Probability);
					telemetryDataPoint.Add(prediction.TagName, prediction.Probability);
			}
		}
		break;

	case ModelType.Detection:
		// Group the tags to get the count, include only the predictions above the specified minimum probability
		var groupedPredictions = from prediction in imagePrediction.Predictions
										 where prediction.Probability >= probabilityThreshold
										 group prediction by new { prediction.TagName }
				into newGroup
										 select new
										 {
											 TagName = newGroup.Key.TagName,
											 Count = newGroup.Count(),
										 };

		// Display and log the agregated predictions
		foreach (var prediction in groupedPredictions)
		{
			Debug.WriteLine($" Tag valid:{prediction.TagName} {prediction.Count}");
			imageInformation.AddInt32($"Tag valid:{prediction.TagName}", prediction.Count);
			telemetryDataPoint.Add(prediction.TagName, prediction.Count);
		}
		break;
	default:
		throw new ArgumentException("ModelType Invalid");
}

For a classifier only the tags with a probability greater than or equal the specified threshold are uploaded.

For a detection model the instances of each tag are counted. Only the tags with a prediction value greater than the specified threshold are included in the count.

19-08-14 05:26:14 Timer triggered
Prediction count 33
 Tag:Blue 0.0146500813
 Tag:Blue 0.61186564
 Tag:Blue 0.0923164859
 Tag:Blue 0.7813785
 Tag:Brown 0.0100603029
 Tag:Brown 0.128318727
 Tag:Brown 0.0135991769
 Tag:Brown 0.687322736
 Tag:Brown 0.846672833
 Tag:Brown 0.1826635
 Tag:Brown 0.0183384717
 Tag:Green 0.0200069249
 Tag:Green 0.367765248
 Tag:Green 0.011428359
 Tag:Orange 0.678825438
 Tag:Orange 0.03718319
 Tag:Orange 0.8643157
 Tag:Orange 0.0296728313
 Tag:Red 0.02141669
 Tag:Red 0.7183208
 Tag:Red 0.0183610674
 Tag:Red 0.0130951973
 Tag:Red 0.82097
 Tag:Red 0.0618815944
 Tag:Red 0.0130757084
 Tag:Yellow 0.04150853
 Tag:Yellow 0.0106579047
 Tag:Yellow 0.0210028365
 Tag:Yellow 0.03392527
 Tag:Yellow 0.129197285
 Tag:Yellow 0.8089519
 Tag:Yellow 0.03723789
 Tag:Yellow 0.74729687
 Tag valid:Blue 2
 Tag valid:Brown 2
 Tag valid:Orange 2
 Tag valid:Red 2
 Tag valid:Yellow 2
 05:26:17 AzureIoTHubClient SendEventAsync start
 05:26:18 AzureIoTHubClient SendEventAsync finish

The debugging output of the application includes the different categories identified in the captured image.

I found my small model was pretty good at detection of individual m&m as long as the ambient lighting was consistent, and the background fairly plain.

Sample image from test rig

Every so often the camera contrast setting went bad and could only be restored by restarting the device which needs further investigation.

Image with contrast problem

This application could be the basis for projects which need to run an Azure Cognitive Services model to count or classify then upload the results to an Azure IoT Hub or Azure IoT Central for presentation.

With a suitable model this application could be used to count the number of people in a room, which could be displayed along with the ambient temperature, humidity, CO2, and noise levels in Azure IoT Central.

The code for this application is available In on GitHub.

Windows 10 IoT Core Cognitive Services Custom Vision API

This application was inspired by one of teachers I work with wanting to count ducks in the stream on the school grounds. The school was having problems with water quality and the they wanted to see if the number of ducks was a factor. (Manually counting the ducks several times a day would be impractical).

I didn’t have a source of training images so built an image classifier using my son’s Lego for testing. In a future post I will build an object detection model once I have some sample images of the stream captured by my Windows 10 IoT Core time lapse camera application.

To start with I added the Azure Cognitive Services Custom Vision API NuGet packages to a new Visual Studio 2017 Windows IoT Core project.

Azure Custom Vision Service NuGet packacges

Then I initialised the Computer Vision API client

try
{
	this.customVisionClient = new CustomVisionPredictionClient(new System.Net.Http.DelegatingHandler[] { })
	{
		ApiKey = this.azureCognitiveServicesSubscriptionKey,
		Endpoint = this.azureCognitiveServicesEndpoint,
	};
}
catch (Exception ex)
{
	this.logging.LogMessage("Azure Cognitive Services Custom Vision Client configuration failed " + ex.Message, LoggingLevel.Error);
	return;
}

Every time the digital input is strobed by the infra red proximity sensor or touch button an image is captured, uploaded for processing, and results displayed in the debug output.

For testing I have used a simple multiclass classifier that I trained with a selection of my son’s Lego. I tagged the brick size height x width x length (1x2x3, smallest of width/height first) and colour (red, green, blue etc.)

Azure Cognitive Services Classifier project creation
Custom vision projects
Lego classifier project properties

The projectID, AzureCognitiveServicesSubscriptionKey (PredictionKey) and PublishedName (From the Performance tab in project) in the app.settings file come from the custom vision project properties.

{
  "InterruptPinNumber": 24,
  "interruptTriggerOn": "RisingEdge",
  "DisplayPinNumber": 35,
  "AzureCognitiveServicesEndpoint": "https://australiaeast.api.cognitive.microsoft.com",
  "AzureCognitiveServicesSubscriptionKey": "41234567890123456789012345678901s,
  "DebounceTimeout": "00:00:30",
  "PublishedName": "LegoBrickClassifierV3",
  "TriggerTag": "1x2x4",
  "TriggerThreshold": "0.4",
  "ProjectID": "c1234567-abcdefghijklmn-1234567890ab"
} 

The sample application only supports one trigger tag + probability and if this condition satisfied the Light Emitting Diode (LED) is turned on for 5 seconds. If an image is being processed or the minimum period between images has not passed the LED is illuminated for 5 milliseconds .

private async void InterruptGpioPin_ValueChanged(GpioPin sender, GpioPinValueChangedEventArgs args)
{
	DateTime currentTime = DateTime.UtcNow;
	Debug.WriteLine($"Digital Input Interrupt {sender.PinNumber} triggered {args.Edge}");

	if (args.Edge != this.interruptTriggerOn)
	{
		return;
	}

	// Check that enough time has passed for picture to be taken
	if ((currentTime - this.imageLastCapturedAtUtc) < this.debounceTimeout)
	{
		this.displayGpioPin.Write(GpioPinValue.High);
		this.displayOffTimer.Change(this.timerPeriodDetectIlluminated, this.timerPeriodInfinite);
		return;
	}

	this.imageLastCapturedAtUtc = currentTime;

	// Just incase - stop code being called while photo already in progress
	if (this.cameraBusy)
	{
		this.displayGpioPin.Write(GpioPinValue.High);
		this.displayOffTimer.Change(this.timerPeriodDetectIlluminated, this.timerPeriodInfinite);
		return;
	}

	this.cameraBusy = true;

	try
	{
		using (Windows.Storage.Streams.InMemoryRandomAccessStream captureStream = new Windows.Storage.Streams.InMemoryRandomAccessStream())
		{
			this.mediaCapture.CapturePhotoToStreamAsync(ImageEncodingProperties.CreateJpeg(), captureStream).AsTask().Wait();
			captureStream.FlushAsync().AsTask().Wait();
			captureStream.Seek(0);

			IStorageFile photoFile = await KnownFolders.PicturesLibrary.CreateFileAsync(ImageFilename, CreationCollisionOption.ReplaceExisting);
			ImageEncodingProperties imageProperties = ImageEncodingProperties.CreateJpeg();
			await this.mediaCapture.CapturePhotoToStorageFileAsync(imageProperties, photoFile);

			ImageAnalysis imageAnalysis = await this.computerVisionClient.AnalyzeImageInStreamAsync(captureStream.AsStreamForRead());

			Debug.WriteLine($"Tag count {imageAnalysis.Categories.Count}");

			if (imageAnalysis.Categories.Intersect(this.categoryList, new CategoryComparer()).Any())
			{
				this.displayGpioPin.Write(GpioPinValue.High);

				// Start the timer to turn the LED off
				this.displayOffTimer.Change(this.timerPeriodFaceIlluminated, this.timerPeriodInfinite);
					}

					LoggingFields imageInformation = new LoggingFields();

					imageInformation.AddDateTime("TakenAtUTC", currentTime);
					imageInformation.AddInt32("Pin", sender.PinNumber);
					Debug.WriteLine($"Categories:{imageAnalysis.Categories.Count}");
					imageInformation.AddInt32("Categories", imageAnalysis.Categories.Count);
					foreach (Category category in imageAnalysis.Categories)
					{
						Debug.WriteLine($" Category:{category.Name} {category.Score}");
						imageInformation.AddDouble($"Category:{category.Name}", category.Score);
					}

					this.logging.LogEvent("Captured image processed by Cognitive Services", imageInformation);
				}
			}
			catch (Exception ex)
			{
				this.logging.LogMessage("Camera photo or save failed " + ex.Message, LoggingLevel.Error);
			}
			finally
			{
				this.cameraBusy = false;
			}
		}

		private void TimerCallback(object state)
		{
			this.displayGpioPin.Write(GpioPinValue.Low);
		}

		internal class CategoryComparer : IEqualityComparer<Category>
		{
			public bool Equals(Category x, Category y)
			{
				if (string.Equals(x.Name, y.Name, StringComparison.OrdinalIgnoreCase))
				{
					return true;
				}

				return false;
			}

			public int GetHashCode(Category obj)
			{
				return obj.Name.GetHashCode();
			}
		}

I found my small model was pretty good at tagging images of Lego bricks as long as the ambient lighting was consistent and the background fairly plain.

When tagging many bricks my ability to distinguish pearl light grey, light grey, sand blue and grey bricks was a problem. I should have started with a limited palette (red, green, blue) of colours and shapes for my models while evaluating different tagging approaches.

The debugging output of the application includes the different categories identified in the captured image.

Digital Input Interrupt 24 triggered RisingEdge
Digital Input Interrupt 24 triggered FallingEdge
Prediction count 54
 Tag:Lime 0.529844046
 Tag:1x1x2 0.4441353
 Tag:Green 0.252290249
 Tag:1x1x3 0.1790101
 Tag:1x2x3 0.132092983
 Tag:Turquoise 0.128928885
 Tag:DarkGreen 0.09383947
 Tag:DarkTurquoise 0.08993266
 Tag:1x2x2 0.08145093
 Tag:1x2x4 0.060960535
 Tag:LightBlue 0.0525473
 Tag:MediumAzure 0.04958712
 Tag:Violet 0.04894981
 Tag:SandGreen 0.048463434
 Tag:LightOrange 0.044860106
 Tag:1X1X1 0.0426577441
 Tag:Azure 0.0416654423
 Tag:Aqua 0.0400410332
 Tag:OliveGreen 0.0387720577
 Tag:Blue 0.035169173
 Tag:White 0.03497391
 Tag:Pink 0.0321456343
 Tag:Transparent 0.0246597622
 Tag:MediumBlue 0.0245670844
 Tag:BrightPink 0.0223842952
 Tag:Flesh 0.0221406389
 Tag:Magenta 0.0208457354
 Tag:Purple 0.0188888311
 Tag:DarkPurple 0.0187285
 Tag:MaerskBlue 0.017609369
 Tag:DarkPink 0.0173041821
 Tag:Lavender 0.0162359159
 Tag:PearlLightGrey 0.0152829709
 Tag:1x1x4 0.0133710662
 Tag:Red 0.0122602312
 Tag:Yellow 0.0118704
 Tag:Clear 0.0114340987
 Tag:LightYellow 0.009903331
 Tag:Black 0.00877647
 Tag:BrightLightYellow 0.00871937349
 Tag:Mediumorange 0.0078356415
 Tag:Tan 0.00738664949
 Tag:Sand 0.00713921571
 Tag:Grey 0.00710422
 Tag:Orange 0.00624707434
 Tag:SandBlue 0.006215865
 Tag:DarkGrey 0.00613187673
 Tag:DarkBlue 0.00578308525
 Tag:DarkOrange 0.003790971
 Tag:DarkTan 0.00348462746
 Tag:LightGrey 0.00321317
 Tag:ReddishBrown 0.00304117263
 Tag:LightBluishGrey 0.00273489812
 Tag:Brown 0.00199119

I’m going to run this application repeatedly, adding more images and retraining the model to see how it performs. Once the model is working wll I’ll try downloading it and running it on a device

Custom Vision Test Harness running on my desk

This sample could be used as a basis for projects like this cat door which stops your pet bringing in dead or wounded animals. The model could be trained with tags to indicate whether the cat is carrying a “present” for their human and locking the door if it is.

Windows 10 IoT Core Cognitive Services Computer Vision API

This application was inspired by one of teachers I work with wanting to check occupancy of different areas in the school library. I had been using the Computer Vision service to try and identify objects around my home and office which had been moderately successful but not terribly useful or accurate.

I added the Azure Cognitive Services Computer Vision API NuGet packages to my Visual Studio 2017 Windows IoT Core project.

Azure Cognitive Services Computer Vision API library

Then I initialised the Computer Vision API client

try
{
	this.computerVisionClient = new ComputerVisionClient(
			 new Microsoft.Azure.CognitiveServices.Vision.ComputerVision.ApiKeyServiceClientCredentials(this.azureCognitiveServicesSubscriptionKey),
			 new System.Net.Http.DelegatingHandler[] { })
	{
		Endpoint = this.azureCognitiveServicesEndpoint,
	};
}
catch (Exception ex)
{
	this.logging.LogMessage("Azure Cognitive Services Computer Vision client configuration failed " + ex.Message, LoggingLevel.Error);
	return;
}

Every time the digital input is strobed by the passive infra red motion detector an image is captured, then uploaded for processing, and finally results displayed. For this sample I’m looking for categories which indicate the image is of a group of people (The categories are configured in the appsettings file)

{
  "InterruptPinNumber": 24,
  "interruptTriggerOn": "RisingEdge",
  "DisplayPinNumber": 35,
  "AzureCognitiveServicesEndpoint": "https://australiaeast.api.cognitive.microsoft.com/",
  "AzureCognitiveServicesSubscriptionKey": "1234567890abcdefghijklmnopqrstuv",
  "ComputerVisionCategoryNames":"people_group,people_many",
  "LocalImageFilenameFormatLatest": "{0}.jpg",
  "LocalImageFilenameFormatHistoric": "{1:yyMMddHHmmss}.jpg",
  "DebounceTimeout": "00:00:30"
} 

If any of the specified categories are identified in the image I illuminate a Light Emitting Diode (LED) for 5 seconds, if an image is being processed or the minimum period between images has not passed the LED is illuminated for 5 milliseconds .

		private async void InterruptGpioPin_ValueChanged(GpioPin sender, GpioPinValueChangedEventArgs args)
		{
			DateTime currentTime = DateTime.UtcNow;
			Debug.WriteLine($"Digital Input Interrupt {sender.PinNumber} triggered {args.Edge}");

			if (args.Edge != this.interruptTriggerOn)
			{
				return;
			}

			// Check that enough time has passed for picture to be taken
			if ((currentTime - this.imageLastCapturedAtUtc) < this.debounceTimeout)
			{
				this.displayGpioPin.Write(GpioPinValue.High);
				this.displayOffTimer.Change(this.timerPeriodDetectIlluminated, this.timerPeriodInfinite);
				return;
			}

			this.imageLastCapturedAtUtc = currentTime;

			// Just incase - stop code being called while photo already in progress
			if (this.cameraBusy)
			{
				this.displayGpioPin.Write(GpioPinValue.High);
				this.displayOffTimer.Change(this.timerPeriodDetectIlluminated, this.timerPeriodInfinite);
				return;
			}

			this.cameraBusy = true;

			try
			{
				using (Windows.Storage.Streams.InMemoryRandomAccessStream captureStream = new Windows.Storage.Streams.InMemoryRandomAccessStream())
				{
					this.mediaCapture.CapturePhotoToStreamAsync(ImageEncodingProperties.CreateJpeg(), captureStream).AsTask().Wait();
					captureStream.FlushAsync().AsTask().Wait();
					captureStream.Seek(0);

					IStorageFile photoFile = await KnownFolders.PicturesLibrary.CreateFileAsync(ImageFilename, CreationCollisionOption.ReplaceExisting);
					ImageEncodingProperties imageProperties = ImageEncodingProperties.CreateJpeg();
					await this.mediaCapture.CapturePhotoToStorageFileAsync(imageProperties, photoFile);

					ImageAnalysis imageAnalysis = await this.computerVisionClient.AnalyzeImageInStreamAsync(captureStream.AsStreamForRead());

					Debug.WriteLine($"Tag count {imageAnalysis.Categories.Count}");

					if (imageAnalysis.Categories.Intersect(this.categoryList, new CategoryComparer()).Any())
					{
						this.displayGpioPin.Write(GpioPinValue.High);

						// Start the timer to turn the LED off
						this.displayOffTimer.Change(this.timerPeriodFaceIlluminated, this.timerPeriodInfinite);
					}

					LoggingFields imageInformation = new LoggingFields();

					imageInformation.AddDateTime("TakenAtUTC", currentTime);
					imageInformation.AddInt32("Pin", sender.PinNumber);
					Debug.WriteLine($"Categories:{imageAnalysis.Categories.Count}");
					imageInformation.AddInt32("Categories", imageAnalysis.Categories.Count);
					foreach (Category category in imageAnalysis.Categories)
					{
						Debug.WriteLine($" Category:{category.Name} {category.Score}");
						imageInformation.AddDouble($"Category:{category.Name}", category.Score);
					}

					this.logging.LogEvent("Captured image processed by Cognitive Services", imageInformation);
				}
			}
			catch (Exception ex)
			{
				this.logging.LogMessage("Camera photo or save failed " + ex.Message, LoggingLevel.Error);
			}
			finally
			{
				this.cameraBusy = false;
			}
		}

		private void TimerCallback(object state)
		{
			this.displayGpioPin.Write(GpioPinValue.Low);
		}

		internal class CategoryComparer : IEqualityComparer<Category>
		{
			public bool Equals(Category x, Category y)
			{
				if (string.Equals(x.Name, y.Name, StringComparison.OrdinalIgnoreCase))
				{
					return true;
				}

				return false;
			}

			public int GetHashCode(Category obj)
			{
				return obj.Name.GetHashCode();
			}
		}

I found that the Computer vision service was pretty good at categorising photos of images like this displayed on my second monitor as containing a group of people.

The debugging output of the application includes the different categories identified in the captured image.

Digital Input Interrupt 24 triggered RisingEdge
Digital Input Interrupt 24 triggered FallingEdge
'backgroundTaskHost.exe' (CoreCLR: CoreCLR_UWP_Domain): Loaded 'C:\Data\Programs\WindowsApps\Microsoft.NET.CoreFramework.Debug.2.2_2.2.27505.2_arm__8wekyb3d8bbwe\System.Diagnostics.DiagnosticSource.dll'. Skipped loading symbols. Module is optimized and the debugger option 'Just My Code' is enabled.
'backgroundTaskHost.exe' (CoreCLR: CoreCLR_UWP_Domain): Loaded 'C:\Data\Programs\WindowsApps\Microsoft.NET.CoreFramework.Debug.2.2_2.2.27505.2_arm__8wekyb3d8bbwe\System.Collections.NonGeneric.dll'. Skipped loading symbols. Module is optimized and the debugger option 'Just My Code' is enabled.
'backgroundTaskHost.exe' (CoreCLR: CoreCLR_UWP_Domain): Loaded 'C:\Data\Programs\WindowsApps\Microsoft.NET.CoreFramework.Debug.2.2_2.2.27505.2_arm__8wekyb3d8bbwe\System.Runtime.Serialization.Formatters.dll'. Skipped loading symbols. Module is optimized and the debugger option 'Just My Code' is enabled.
'backgroundTaskHost.exe' (CoreCLR: CoreCLR_UWP_Domain): Loaded 'C:\Data\Programs\WindowsApps\Microsoft.NET.CoreFramework.Debug.2.2_2.2.27505.2_arm__8wekyb3d8bbwe\System.Diagnostics.TraceSource.dll'. Skipped loading symbols. Module is optimized and the debugger option 'Just My Code' is enabled.
'backgroundTaskHost.exe' (CoreCLR: CoreCLR_UWP_Domain): Loaded 'C:\Data\Programs\WindowsApps\Microsoft.NET.CoreFramework.Debug.2.2_2.2.27505.2_arm__8wekyb3d8bbwe\System.Collections.Specialized.dll'. Skipped loading symbols. Module is optimized and the debugger option 'Just My Code' is enabled.
'backgroundTaskHost.exe' (CoreCLR: CoreCLR_UWP_Domain): Loaded 'C:\Data\Programs\WindowsApps\Microsoft.NET.CoreFramework.Debug.2.2_2.2.27505.2_arm__8wekyb3d8bbwe\System.Drawing.Primitives.dll'. Skipped loading symbols. Module is optimized and the debugger option 'Just My Code' is enabled.
'backgroundTaskHost.exe' (CoreCLR: CoreCLR_UWP_Domain): Loaded 'C:\Data\Programs\WindowsApps\Microsoft.NET.CoreFramework.Debug.2.2_2.2.27505.2_arm__8wekyb3d8bbwe\System.Runtime.Serialization.Primitives.dll'. Skipped loading symbols. Module is optimized and the debugger option 'Just My Code' is enabled.
'backgroundTaskHost.exe' (CoreCLR: CoreCLR_UWP_Domain): Loaded 'C:\Data\Programs\WindowsApps\Microsoft.NET.CoreFramework.Debug.2.2_2.2.27505.2_arm__8wekyb3d8bbwe\System.Data.Common.dll'. Skipped loading symbols. Module is optimized and the debugger option 'Just My Code' is enabled.
'backgroundTaskHost.exe' (CoreCLR: CoreCLR_UWP_Domain): Loaded 'C:\Data\Programs\WindowsApps\Microsoft.NET.CoreFramework.Debug.2.2_2.2.27505.2_arm__8wekyb3d8bbwe\System.Xml.ReaderWriter.dll'. Skipped loading symbols. Module is optimized and the debugger option 'Just My Code' is enabled.
'backgroundTaskHost.exe' (CoreCLR: CoreCLR_UWP_Domain): Loaded 'C:\Data\Programs\WindowsApps\Microsoft.NET.CoreFramework.Debug.2.2_2.2.27505.2_arm__8wekyb3d8bbwe\System.Private.Xml.dll'. Skipped loading symbols. Module is optimized and the debugger option 'Just My Code' is enabled.
'backgroundTaskHost.exe' (CoreCLR: CoreCLR_UWP_Domain): Loaded 'Anonymously Hosted DynamicMethods Assembly'. 
Tag count 1
Categories:1
 Category:people_group 0.8671875
The thread 0x634 has exited with code 0 (0x0).

I used an infrared motion sensor to trigger capture and processing of an image to simulate a application for detecting if there is a group of people in an area of the school library.

I’m going to run this application alongside one of my time-lapse applications to record a days worth of images and manually check the accuracy of the image categorisation. I think that camera location maybe important as well so I’ll try a selection of different USB cameras and locations.

Trial PIR triggered computer vision client

I also found the small PIR motion detector didn’t work very well in a larger space so I’m going to trial a configurable sensor and a repurposed burglar alarm sensor.