Silicon Labs Si7005 Device Driver oddness

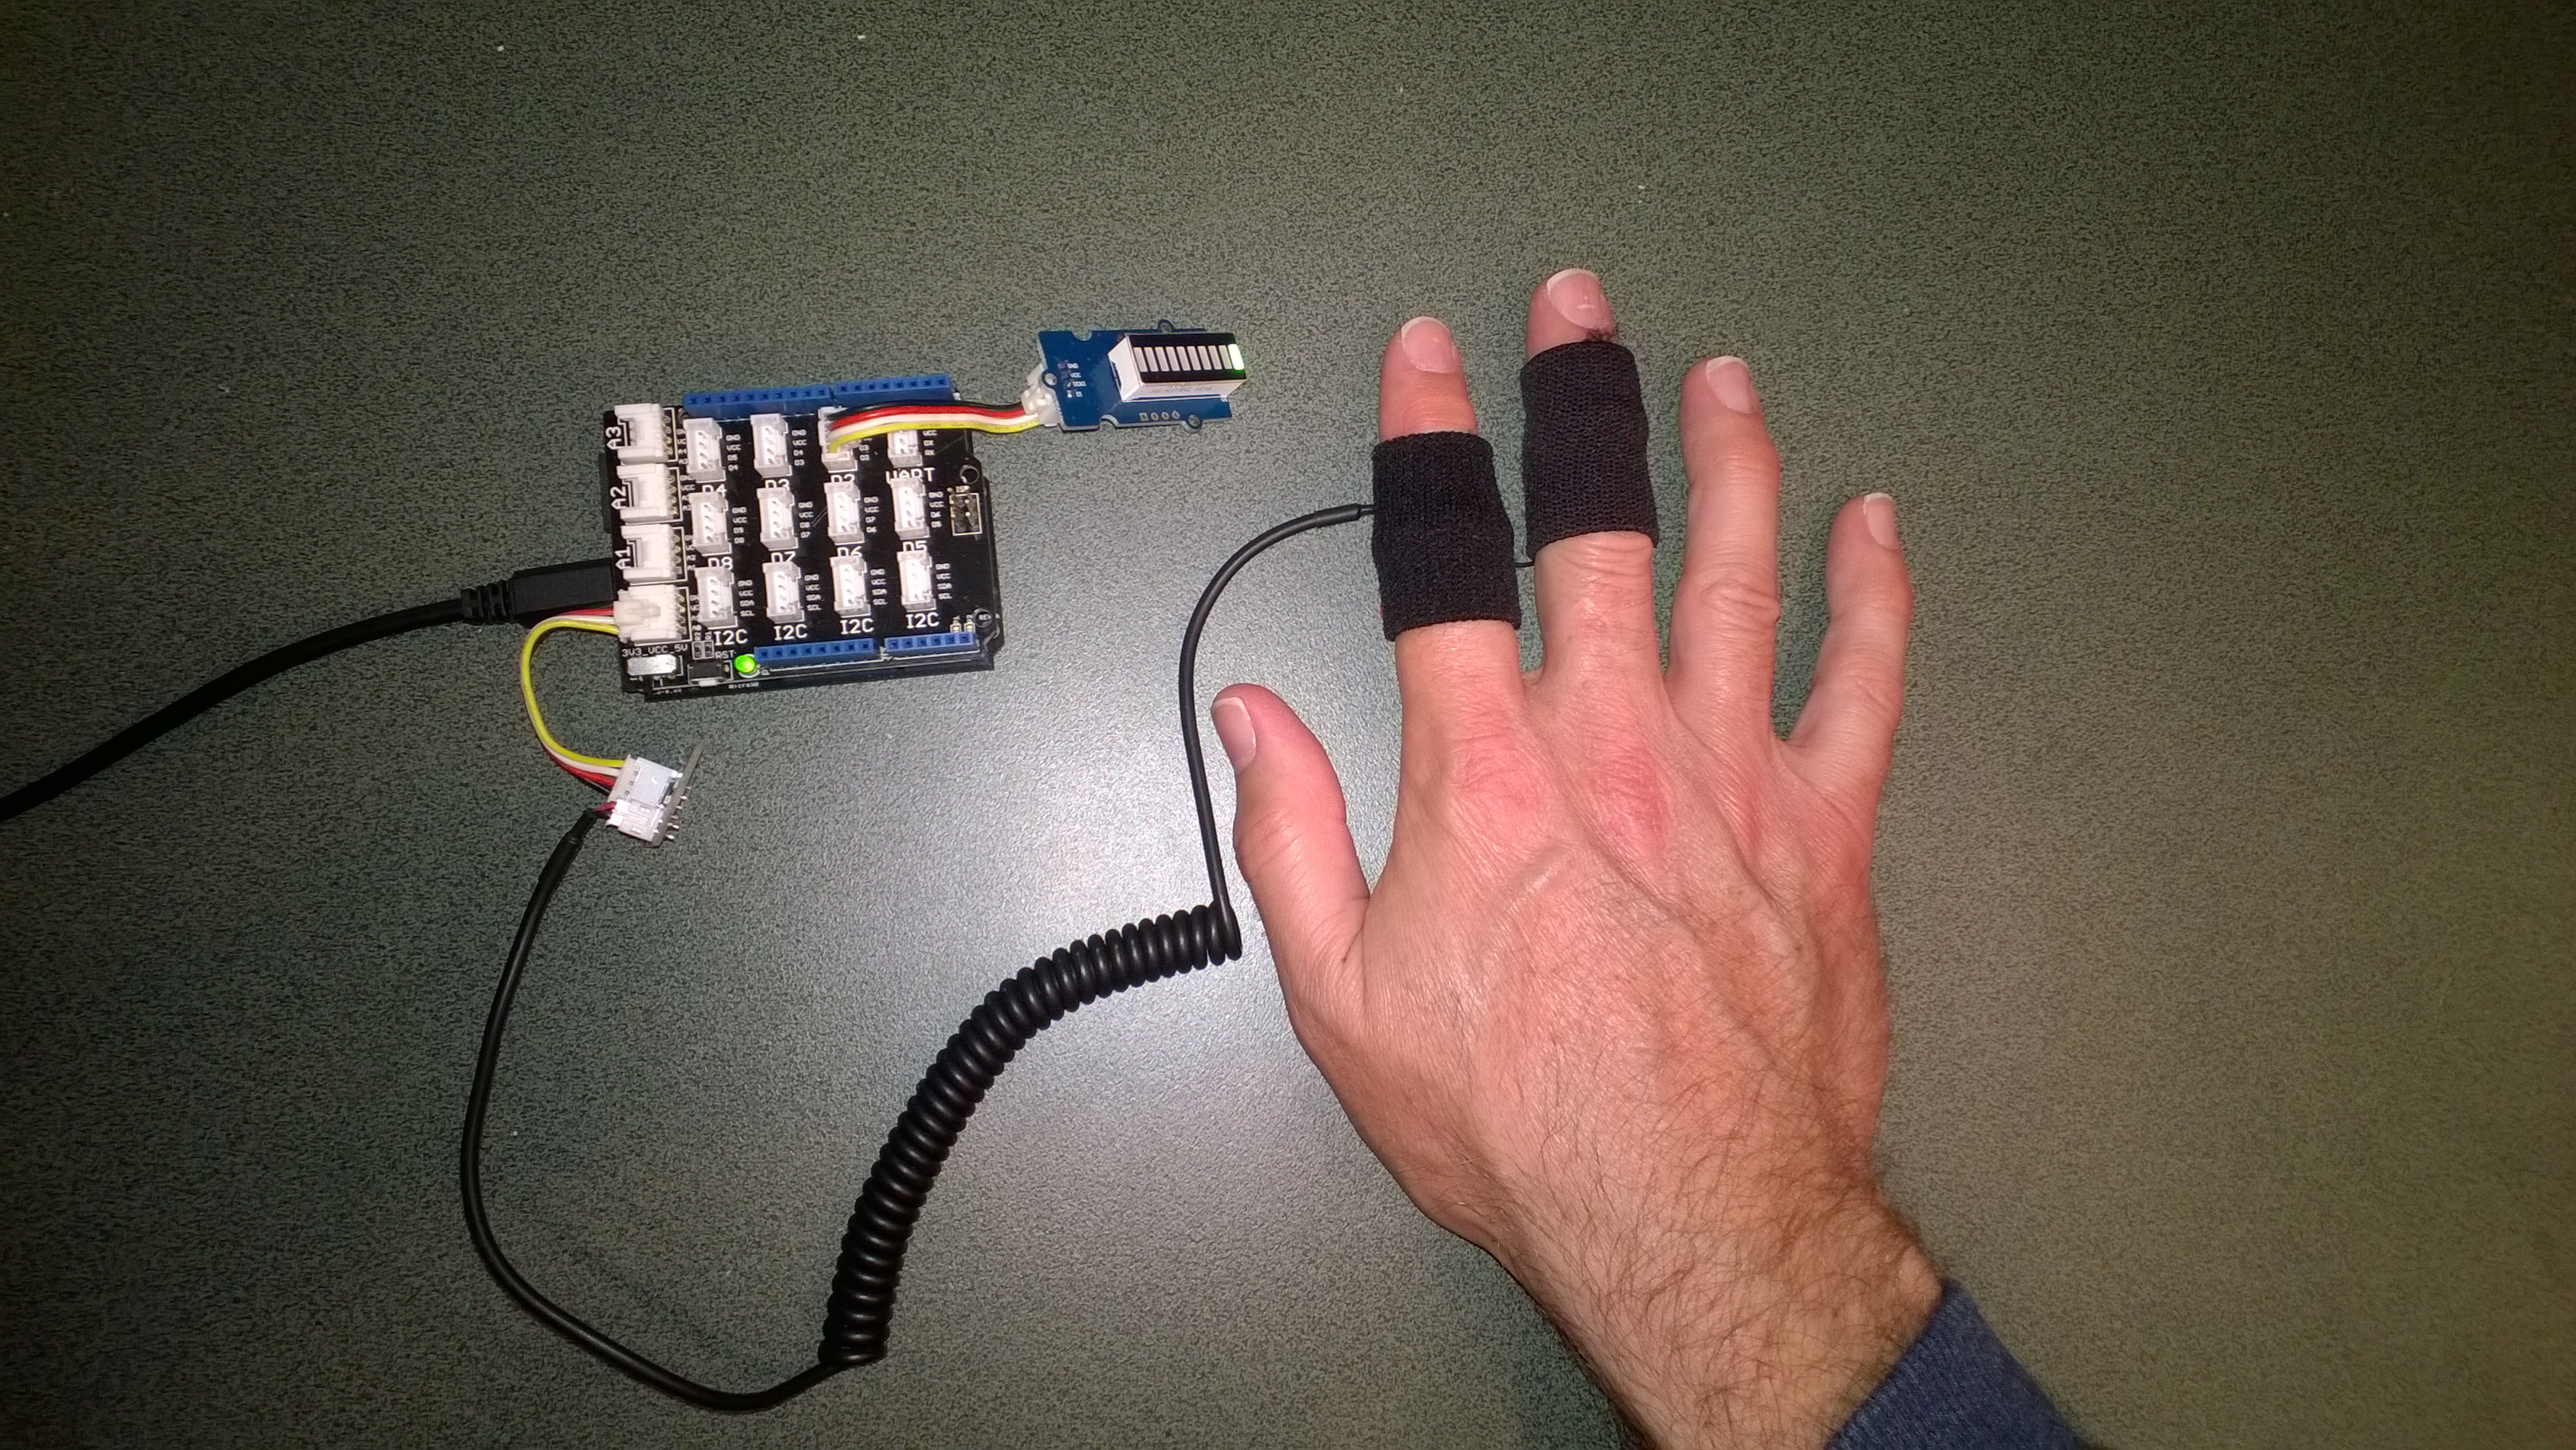
I have been working on a Netduino I2C driver for the Silicon Labs Si7005 Digital I2C Humidity & Temperature Sensor for weather station and building monitoring applications as it looks like a reasonably priced device which is not to complex to interface with.I’m using a SeeedStudio Grove – Temperature&Humidity Sensor (High-Accuracy & Mini) for development.

The first time I try and read anything from the device it fails. Otherwise my driver works as expected.

Netduino 2 Plus & Silicon Labs Si7005

Bill of materials (prices as at April 2015)

  • Netduino Plus 2 USD60 NZD108
  • Grove – Temperature&Humidity Sensor (High-Accuracy & Mini) USD11.50
  • Grove – Base Shield USD8.90

This code just shows the flow, I’ll package into a driver shortly

I strobe the I2C line which seems to help

using (OutputPort i2cPort = new OutputPort(Pins.GPIO_PIN_SDA, true))
{
   i2cPort.Write(false);
   Thread.Sleep(1000);
}

I then try and read the Device ID (0x50) from register 0X11 but this (and any other read fails)

byte[] writeBuffer = { RegisterIdDeviceId };
byte[] readBuffer = new byte[1];

I2CDevice.I2CTransaction[] action = new I2CDevice.I2CTransaction[] 
{ 
   I2CDevice.CreateWriteTransaction(writeBuffer),
   I2CDevice.CreateReadTransaction(readBuffer)
};

int length = device.Execute(action, TransactionTimeoutMilliseconds);
Debug.Print("Byte count " + length.ToString());
foreach (byte Byte in readBuffer)
{
   Debug.Print(Byte.ToString("X2"));
}

I can read the temperature and humidity by writing to the command register

byte[] writeBuffer = { RegisterIdConiguration, CMD_MEASURE_TEMP };

I2CDevice.I2CTransaction[] action = new I2CDevice.I2CTransaction[] 
{ 
   I2CDevice.CreateWriteTransaction(writeBuffer),
};

int length = device.Execute(action, TransactionTimeoutMilliseconds);
Debug.Print("Byte count" + length.ToString());

Then poll for measurement process to finish

conversionInProgress = true
do
{
   byte[] writeBuffer = { RegisterIdStatus };
   byte[] readBuffer = new byte[1];

   I2CDevice.I2CTransaction[] action = new I2CDevice.I2CTransaction[] 
   { 
      I2CDevice.CreateWriteTransaction(writeBuffer4),
      I2CDevice.CreateReadTransaction(readBuffer4)
   };

   int length = device.Execute(action, TransactionTimeoutMilliseconds);
   Debug.Print("Byte count " + length.ToString());
   foreach (byte Byte in readBuffer)
   {
      Debug.Print(Byte.ToString());
   }

   if ((readBuffer[RegisterIdStatus] && STATUS_RDY_MASK) != STATUS_RDY_MASK)
   {
      conversionInProgress = false;
   }
} while (conversionInProgress);

Then finally read and convert the value

byte[] writeBuffer = { REG_DATA_H };
byte[] readBuffer = new byte[2];

I2CDevice.I2CTransaction[] action = new I2CDevice.I2CTransaction[] 
{ 
   I2CDevice.CreateWriteTransaction(writeBuffer),
   I2CDevice.CreateReadTransaction(readBuffer)
};

int length = device.Execute(action, TransactionTimeoutMilliseconds);
Debug.Print("Byte count " + length.ToString());
foreach (byte Byte in readBuffer)
{
   Debug.Print(Byte.ToString());
}

int temp = readBuffer[0];

temp = temp << 8;
temp = temp + readBuffer[1];
temp = temp >> 2;

double temperature = (temp / 32.0) - 50.0;

Debug.Print(" Temp " + temperature.ToString("F1"));

EVolocity Innovation Challenge Parking Aids

At evelocity boot camp on the 22nd of March we talked about aids for use in the parking challenge. For example, a Netduino and one or more ultrasonic rangers could be used to measure the distance to obstacles placed around the car park.

In the picture below the LED bar is displaying the distance to the base shield box with each LED segment representing 2cm.
Netduino based Park Distance Control

Bill of Materials for this project (Prices as at March 2015)

This code is just to illustrate how this could done and should not be used in production

public class Program
{
   private static OutputPort triggerOutput;
   private static InterruptPort echoInterrupt;
   private static long pulseStartTicks;
   private static GroveLedBarGraph distanceBar;
   private const int MillimetersPerBar = 20;

   public static void Main()
   {
      OutputPort distanceCin = new OutputPort(Pins.GPIO_PIN_D8, false);
      OutputPort distanceDin = new OutputPort(Pins.GPIO_PIN_D9, false);

      distanceBar = new GroveLedBarGraph(distanceCin, distanceDin);

      triggerOutput = new OutputPort(Pins.GPIO_PIN_D5, false);
      echoInterrupt = new InterruptPort(Pins.GPIO_PIN_D4,
         true,
         Port.ResistorMode.Disabled,
         Port.InterruptMode.InterruptEdgeBoth);

      echoInterrupt.OnInterrupt += new NativeEventHandler(echoInterruptPort_OnInterrupt);

      Timer distanceUpdate = new Timer(distanceUpdateCallbackProc, null, 0, 500);

      Thread.Sleep(Timeout.Infinite);
   }

   public static void distanceUpdateCallbackProc(object state)
   {
      triggerOutput.Write(false);
      Thread.Sleep(2);
      triggerOutput.Write(true);
      Thread.Sleep(10);
      triggerOutput.Write(false);
      Thread.Sleep(2);
   }

   static void echoInterruptPort_OnInterrupt(uint data1, uint data2, DateTime time)
   {
      long pulseWidthTicks;

      if (data2 == 1) // leading edge, start of pulse
      {
         pulseStartTicks = time.Ticks;
      }
      else
      {
         pulseWidthTicks = time.Ticks - pulseStartTicks;

         long distance = pulseWidthTicks / 58;

         Debug.Print("distance = " + distance.ToString() + "mm");

         uint ledBar = 1;
         ledBar = ledBar <<(int)(distance / MillimetersPerBar );
         distanceBar.setLED(ledBar);
      }
   }
}

Azure Event Hub Service Gateway V0.5

In a previous post I had developed a simple Microsoft Azure EventHubs Service Gateway for Arduino and Netduino devices which required Internet Information Server(IIS). Running IIS in some home environments could be a bit awkward so I have got a basic light weight version going which is hosted in a self installing Windows Service. The gateway supports four command line parameters.(The install and uninstall must be run as administrator otherwise the requested process will fail)

  • Install – install the service
  • Uninstall – uninstalls the service
  • Debug – runs the service in interactive mode
  • Name – allows you to specify the name of the service in the Services Manager.

The code does some basic logging to the Windows Event log and can be configured to start automatically when the computer starts.

The configuration file has two settings

<appSettings>
<add key="Microsoft.ServiceBus.ConnectionString" value="YourConnectionStringGoesHere" />
<add key="Microsoft.ServiceBus.EventHub" value="myhomemonitor" />
<add key="baseAddress" value="http://your.URL.goes.Here:8080/" />
</appSettings>

The code is based on the self installing service sample code that ships with the Wix# toolkit.

try
{
   string connectionString = ConfigurationManager.AppSettings["Microsoft.ServiceBus.ConnectionString"];
   string eventHubName = ConfigurationManager.AppSettings["Microsoft.ServiceBus.EventHub"];

   NamespaceManager namespaceManager = NamespaceManager.CreateFromConnectionString(connectionString);

   EventHubClient client = EventHubClient.Create(eventHubName);

   EventData data = new EventData(request.Content.ReadAsByteArrayAsync().Result);

   // Set user properties if needed
   data.Properties.Add("UploadedAtUTC", DateTime.UtcNow.ToString("yyyy-MM-dd HH:mm:ss"));
   data.Properties.Add("UploadedBy", "devMobileAzureEventHubGateway");

   client.Send(data);
}
catch (Exception ex)
{
   eventLog.WriteEntry(string.Format("Application initialisation failed {0}", ex.Message), EventLogEntryType.Error);
}

The Azure EventHub Service Gateway Code V0.5 is a bit rough but I will enhance it as time allows. First steps will be improving logging then creating a WIX# based installer.

Azure Event Hub Service Gateway V0.1

My Netduino and Arduino devices can’t do https so I had been looking at different approaches for uploading sensor data to a Microsoft Azure Event Hub. In a previous post I published the “simplest” possible useful program (a console application) which could upload data and this code builds on that.

In this proof of concept I have integrated the core of the console application code into an ASP.NET MVC WebAPI 2 project which acts as a service gateway. My Netduino clients now use a website hosted on my Essentials 2012 home server to forward the requests to a Microsoft Azure Event Hub .

For more detail about how to program the energy monitor shield see these posts about the Nokia 5110 display, nrf24L01 wireless link, and non invasive current sensor algorithm optimisations.

try
{
   using (HttpWebRequest request = (HttpWebRequest)WebRequest.Create( AzureGatewayUrl ))
   {
      string payload = @&quot;{&quot;&quot;DeviceId&quot;&quot;:&quot; + deviceId + @&quot;,&quot;&quot;Usage&quot;&quot;:&quot; + value + &quot;}&quot;;
      byte[] buffer = Encoding.UTF8.GetBytes(payload);
      request.Method = &quot;POST&quot;;
      request.ContentLength = buffer.Length;
      request.ContentType = &quot;text/csv&quot;;
      request.KeepAlive = false;
      request.Timeout = 5000;
      request.ReadWriteTimeout = 5000;

      using (Stream stream = request.GetRequestStream())
      {
         stream.Write(buffer, 0, buffer.Length);
      }
      using (var response = (HttpWebResponse)request.GetResponse())
      {
         Debug.Print(&quot;HTTP Status&quot; + response.StatusCode + &quot; : &quot; + response.StatusDescription);
      }
   }
}
catch (Exception ex)
{
   Debug.Print(ex.Message);
}
Netduino power consumption monitor

Netduino power consumption monitor

Azure Service Bus Explorer by  Paolo Salvatori is great for debugging and testing Service Bus applications like this.

ServiceBus Explorer Displaying event hub power consumption data

ServiceBus Explorer displaying power consumption data

Bill of materials (prices as at Feb 2015)

The Azure Event Hub Service GatewayV0.1 is pretty basic with, no security, doesn’t have a lot of logging. wouldn’t scale terribly well (Though most home systems wouldn’t have a lot of sensors) and is hosted in Internet Information Server(IIS),

In future posts I’ll fix these limitations and make the service gateway secure, easier to install, configure and operate. But, this proof of concept proves the approach is viable

// POST api/eventhub
 public void Post(HttpRequestMessage request)
      {
         try
         {
            string connectionString = ConfigurationManager.AppSettings["Microsoft.ServiceBus.ConnectionString"];
            string eventHubName = ConfigurationManager.AppSettings["Microsoft.ServiceBus.EventHub"];

            NamespaceManager namespaceManager = NamespaceManager.CreateFromConnectionString(connectionString);

            EventHubClient client = EventHubClient.Create(eventHubName);

            EventData data = new EventData(request.Content.ReadAsByteArrayAsync().Result);

            // Set user properties if needed
            data.Properties.Add("UploadedAtUTC", DateTime.UtcNow.ToString("yyyy-MM-dd HH:mm:ss"));
            data.Properties.Add("UploadedBy", "devMobileAzureEventHubGateway");

            client.Send(data);
         }
         catch (Exception ex)
         {
            Debug.WriteLine("Send failed " + ex.Message);
         }
      }

Electric Longboard First Assembly

My next project an electric motor powered longboard.

DIY longboard

Electric Longboard Parts

Bill of Materials for this project (Prices as at Jan 2014)

  • Single Motor Mechanical Electric Longboard Kit USD223
  • Turnigy Aerodrive SK3-6364-245kv Brushless Outrunner Motor USD70.68
  • HobbyKing 150A High Performance Brushless Car ESC USD68.99
  • ZIPPY Flightmax 5000mAh battery X 2 USD31.99 each
  • HXT4mm Battery Harness 14AWG for 2 Packs in Series USD2.43
  • HXT 4mm Gold Connector with Protector (10pcs/set) USD4.44
  • Netduino 2 Plus (may replace this with a Netduino) USD59.95
  • Grove Base Shield V2 USD 8.90
  • Grove Nunchuck Adaptor USD2.90
  • Wireless Nunchuck NZD25.00
  • Moose 9.5×42 Longboard Flush Mount Deck Green Stain NZ57

Initial trials of the Wireless Nunchuck have not been very positive. As the Netduino device starts the connection to the handset is dropped. Need to do some more investigation to see if I can get this to work otherwise I will have to use a wired Nunchuck.

Netduino Crazyflie Wii Nunchuk Remote Control V1.0

After flying the Crazyflie for a couple of days with the Joystick shield based remote control I figured an alternate user interface based on a Wii Nunchuk could be interesting. (It might also make the Crazyflie easier to operate for novice pilots). After a couple of hours coding I have a proof of concept Netduino based Crazyflie Nanocopter Wii Nunchck remote control unit.

Initially the nanocopter was difficult to fly, bouncing up and down (thrust control issues) and swaying side to side (roll & pitch control issues). After some digging I found that every so often the Wii nunchuk (my cheap clone) would return a buffer full of 0xFF or 0x00 bytes.  The 0xFF case had been handled but not the 0x00 one. I added a second test into the GetData  method (around line 335) to catch the 0x00 scenario and this appeared to fix the problem.

cnt = 0;
for (int i = 0; i &lt; inputBuffer.Length; i++)
   if (inputBuffer[i] == 0x0) cnt++;
if (cnt == inputBuffer.Length)
{
   return false;
}
CrazyFlie Netduino Wiichuck based Remote

CrazyFlie Netduino Wiichuck based Remote

Bill on Materials (Prices as at Jan 2014)

This software was built using tooling created and shared by others.

Big thanks to

Jakub Bartkowiak – Gralin.NETMF.Nordic.NRF24L01Plus

Szymon Kobalczyk – Wiichuck I2C driver

Antao Almada – HydraMF.BitConverter

The nunchuck accelerometer provides roll and pitch, the joystick is for thrust and yaw. The first version of the CrazyFlieWiiChuckV1.0 is pretty basic and I have intentionally reduced the maximum roll, pitch, thrust and yaw values to make it easier to fly. (Need to set the Grove Base Shield to 3V3 for my code to work)

Currently I only calculate offset values for thrust & yaw. After a couple of test flights some visual indication of the pitch and roll values from the nunchuk would be helpfull.

Netduino Crazyflie Joystick Shield Remote Control V1.0

Sometimes you start with a goal in mind then a couple of days later you have built something interesting but totally unrelated to what you originally intended to do….

I have several devices (both Netduino & Arduino) which I want to use to collect and upload data to the cloud so I can monitor the resource usage of my house.

I had read Clemens Vaster post on Service Assisted Communication and I was planning to use a Windows Server Essentials 2012 box I have running 24/7 in the hallway to forward updates to the cloud.

I wanted to connect the remote data acquisition nodes directly to the server using their baked in nRF24L01+ support. On the server end the Crazyradio 2.4 Hhz nRF24LU1 USB dongle looked ideal. After some initial positive results I found that the CrazyRadio firmware had been implemented in a way that made it not suitable for my application. (I even considered downloading the BitCraze development VM and building my own custom firmware)

After spending a few hours trying to get the CrazyRadio dongle working I looked at my Crazyflie Nano QuadCopter sitting on the bookshelf.

Then I realised what I really needed is a more portable Crazyflie remote control unit so I didn’t have to unpack my laptop. So two nights later I have a proof of concept Netduino based Crazyflie Nanocopter remote control unit.

CrazyFlie nano copter and Netduino Based Remote

CrazyFlie Netduino based Remote

Bill on Materials (Prices as at Jan 2014)

This software was built using tooling created and shared by others.

Big thanks to

Jakub Bartkowiak – Gralin.NETMF.Nordic.NRF24L01Plus

Antao Almada – HydraMF.BitConverter

Mike McCauley – NRF24 library for Arduino.

I used the NRF24 CrazyFlie emulator to debug my project. No doubt stopping me crashing my Crazyflie many times while debugging.

The Joystick shield has to be modified to work with the common Netduino nRF24L01 libraries which use interrupts rather than polling.

The joystick on the shield is for roll and pitch, the external joystick is for thrust and yaw. The first version of the JoystickShieldnRF24l01V1.0 is pretty basic but I’ll try and enhance it over the next couple of posts.

Netduino Water flow Sensor

A few months ago I purchased 1/2” and 3/4″ inch water flow sensors from SeeedStudio. My plan was to monitor our water and power consumption data to see what environmental impact my house has.

To see how the sensor works I built a simple proof of concept Netduino application which counted the pulses produced by the sensor and calculated the instantaneous water flow.

The next steps are to upload the water flow data to the cloud over a cabled then wireless connections.

public class Program
{
   private static int waterFlowCounter = 0;

   public static void Main()
   {
      InterruptPort flowCounterSensor = new InterruptPort(Pins.GPIO_PIN_D5, false, Port.ResistorMode.Disabled, Port.InterruptMode.InterruptEdgeHigh);
      flowCounterSensor.OnInterrupt += new NativeEventHandler(flowCounter_OnInterrupt);

      Timer waterFlowUpdate = new Timer(waterFlowUpdateProc, null, 0, 1000);
      Thread.Sleep(Timeout.Infinite);
   }

   static void flowCounter_OnInterrupt(uint data1, uint data2, DateTime time)
   {
      Interlocked.Increment(ref waterFlowCounter);
   }

   static void waterFlowUpdateProc(object status)
   {
      int flowCount = Interlocked.Exchange(ref waterFlowCounter, 0);
      double flowLitresMinute = flowCount / 5.5 ; // The q value from documentation
      Debug.Print(flowLitresMinute.ToString("F1") + "L/m";);
    }
}
Netduino based water flow sensor

water flow sensor

Bill of Materials (Prices as at 12-2014)

Netduino Plus 2 USD60 NZD108

Grove Base Shield V2 USD8.90

G3/4″ Water Flow Sensor USD14.90

G1/2″ Water Flow Sensor USD9.50 NZD8.30

Azure Event Hub Updates from a NetMF Device

I had read about how Azure Event Hubs supported both Advanced Message Queuing Protocol(AMQP) & Hypertext Transfer Protocol (HTTP) access and was keen to see how easy the REST API was to use from a .Net Microframework (NetMF) device.

My initial concept was an exercise monitoring system with a Global Positioning System (GPS) unit and a pulse oximeter connected to a FEZ Spider device. My posting GPS Tracker Azure Service Bus has more info about GPS Drivers  and Azure Service Bus connectivity.

FEZ Spider, GPS and PulseOximeter

Fez spider and sensors for exercise monitoring device

The software was inspired by the Service Bus Event Hubs Getting started, Scale Out Event Processing with Event Hubs,Service Bus Event Hubs Large Scale Secure Publishing and OBD Recorder for .Net Micro Framework with ServiceBus, AMQP (for IoT) samples. I created an Event Hub and associated device access keys and fired up Service Bus Explorer so I could monitor and tweak the configuration.

I started by porting the REST API SendMessage implementation of Service Bus Event Hubs Large Scale Secure Publishing sample to NetMF. My approach was to get the application into my local source control and then cut ‘n’ paste the code into a NetMF project and see what breaks. I then modified the code over several iterations so it ran on both the desktop and NetMF clients.

The next step was to download the HTTPS certificates and add them to the project as resources so the requests could be secured. See this post for more detail.

For the connection to be secured you need to set the local time (so the certificate valid to/from can be checked) and load the certificates so they can be attached to the HTTP requests

void ProgramStarted()
{
   ...
   Microsoft.SPOT.Hardware.Utility.SetLocalTime(NtpClient.GetNetworkTime());
   caCerts = new X509Certificate[] { new X509Certificate(Resources.GetBytes(Resources.BinaryResources.Baltimore)) };

I used the Network Time Protocol (NTP) library from the OBD Recorder for .Net Micro Framework sample to get the current time.

The Service Bus Event Hubs Large Scale Secure Publishing uses an asynchronous HTTP request which is not available on the NetMF platform. So I had to replace it with a synchronous version.

static void EventHubSendMessage(string eventHubAddressHttps, string token, string messageBody)
{
   try
   {
      HttpWebRequest request = (HttpWebRequest)HttpWebRequest.Create(eventHubAddressHttps + "/messages" + "?timeout=60" + ApiVersion);
      {
         ...
         request.Headers.Add("Authorization", token);
         request.Headers.Add("ContentType", "application/atom+xml;type=entry;charset=utf-8");
         byte[] buffer = Encoding.UTF8.GetBytes(messageBody);
         request.ContentLength = buffer.Length;

         // request body
         using (Stream stream = request.GetRequestStream())
         {
            stream.Write(buffer, 0, buffer.Length);
         }
         using (HttpWebResponse response = (HttpWebResponse)request.GetResponse())
         {
            Debug.Print("HTTP Status:" + response.StatusCode + " : " + response.StatusDescription);
         }
      }
   }
   catch (WebException we)
   {
      Debug.Print(we.Message);
   }
}

The code to generate the SAS Token also required some modification as string.format, timespan, and SHA256 functionality are not natively available on the .NetMF platform. The GetExpiry, and SHA256 implementations were part of the OBD Recorder for .Net Micro Framework sample.

static string CreateSasToken(string uri, string keyName, string key)
{
   // Set token lifetime to 20 minutes. When supplying a device with a token, you might want to use a longer expiration time.
   uint tokenExpirationTime = GetExpiry(20 * 60);

   string stringToSign = HttpUtility.UrlEncode(uri) + "\n" + tokenExpirationTime;
   var hmac = SHA.computeHMAC_SHA256(Encoding.UTF8.GetBytes(key), Encoding.UTF8.GetBytes(stringToSign));

   string signature = Convert.ToBase64String(hmac);
   signature = Base64NetMf42ToRfc4648(signature);

   string token = "SharedAccessSignature sr=" + HttpUtility.UrlEncode(uri) + "&sig=" + HttpUtility.UrlEncode(signature) + "&se=" + tokenExpirationTime.ToString() + "&skn=" + keyName;
   return token;
}

static uint GetExpiry(uint tokenLifetimeInSeconds)
{
   const long ticksPerSecond = 1000000000 / 100; // 1 tick = 100 nano seconds</code>

   DateTime origin = new DateTime(1970, 1, 1, 0, 0, 0, 0);
   TimeSpan diff = DateTime.Now.ToUniversalTime() - origin;

   return ((uint)(diff.Ticks / ticksPerSecond)) + tokenLifetimeInSeconds;
}

private static string Base64NetMf42ToRfc4648(string base64netMf)
{
   var base64Rfc = string.Empty;
   for (var i = 0; i < base64netMf.Length; i++)
   {
      if (base64netMf[i] == '!')
      {
         base64Rfc += '+';
      }
      else if (base64netMf[i] == '*')
      {
         base64Rfc += '/';
      }
      else
      {
         base64Rfc += base64netMf[i];
      }
   }
return base64Rfc;
}

The HttpUtility class came from the OBD Recorder for .Net Micro Framework sample. The Base64NetMf42ToRfc4648 functionality is still necessary on NetMF 4.3.

After a couple of hours I had data upload working.(No GPS data as the device was running on my desk where GPS coverage is poor)

ServiceBusExplorerEventHub

Netduino Galvanic Skin Response(GSR)

One of CodeClub’s sponsors is Orion Health so I have been evaluating sensors suitable for health focused projects. We already use the SeeedStudio Grove Heart rate sensor and Grove EMG Detector, so I purchased a Grove GSR sensor for testing. Galvanic Skin Response(GSR) is a method of measuring the electrical conductivity of the skin, which depends on the amount of sweat on the skin.

Netduino with Grove GSR sensor

Netduino with Grove GSR sensor

The GSR detector outputs a single analog signal which I connected to A0. For the evaluation I averaged the first 3000 samples to determine the initial offset, then sampled roughly every 100mSec.

I’m a bit worried about the robustness of the wires connecting the two probes to the black cable so it will be interesting to see how long they last at Code Club.

I also updated the Minimum and Maximum values with each sample as this appeared to make the display more reliable.

I found the display responded well to me holding my breath for as long as I could.

Pulse rate + EMG + GSR = Polygraph or DIY lie detector maybe a project for next term.

for (int sampleCounter = 0; sampleCounter < calibrationSampleCount; sampleCounter++)
{
   double value = gsr.Read();
   sampleSum += value;
}
offset = sampleSum / calibrationSampleCount ;

I then displayed the magnitude of the adjusted signal on a Seeedstudio LED bar using code written by Famoury Toure

while(true)
{
   double value = emg.Read() - offset;

   if (value < valueMinimum)
   {
      valueMinimum = value;
   }

   if (value > valueMaximum)
   {
      valueMaximum = value;
   }
   range = valueMaximum - valueMinimum;
   if (value < 0)
   {
      value = value / valueMaximum * 10.0;
   }
   else
   {
      value = value / valueMinimum * 10.0;
   }
   Debug.Print("Val " + value.ToString("F3") + " Max " + valueMaximum.ToString("F3") + " Min " +valueMinimum.ToString("F3"));

   int bar = 1;
   value = 10.0 - value;
   bar = bar << (int)value ;
   ledBar.setLED((uint)bar);
   Thread.Sleep(100);
}

Bill of Materials (Prices as at October 2014)