Netduino 3 Wifi Azure Service Bus client certificate issue

A few months ago I wrote a post about using a Netduino 3 wifi device to push data to an Azure Event Hub. Last week I wanted to reuse some of the code for another gateway I was building but it didn’t appear to work. When my application made an HTTPS request to the service bus endpoint of my Event Hub it failed with an exception. Initially I though it might be a problem with wildcard certificates so I build a small demo program which makes three HTTPS requests to endpoints with different certificate configurations (for more detail see the code below).

using System;
using System.Net;
using System.Threading;
using Microsoft.SPOT;
using Microsoft.SPOT.Net.NetworkInformation;

namespace devMobile.Netduino3WifiCertificateQuery
{
   public class Program
   {
      public static void Main()
      {
         // Wait for Network address if DHCP
         NetworkInterface networkInterface = NetworkInterface.GetAllNetworkInterfaces()[0];
         if (networkInterface.IsDhcpEnabled)
         {
            Debug.Print(" Waiting for IP address ");
            while (NetworkInterface.GetAllNetworkInterfaces()[0].IPAddress == IPAddress.Any.ToString())
            {
               Debug.Print(".");
               Thread.Sleep(250);
            }
         }

         // Baseline check with google
         Debug.Print("https://www.google.co.nz");
         try
         {
            using (HttpWebRequest request = (HttpWebRequest)WebRequest.Create(@"https://www.google.co.nz"))
            {
               request.Method = "GET";
               request.KeepAlive = false;
               request.Timeout = 5000;
               request.ReadWriteTimeout = 5000;
               request.KeepAlive = false;

               using (var response = (HttpWebResponse)request.GetResponse())
               {
                  Debug.Print("HTTP Status:" + response.StatusCode + " : " + response.StatusDescription);
               }
            }
         }
         catch (Exception ex)
         {
            Debug.Print(ex.Message);
         }

         /*
         DNS Name=*.wordpress.com
         DNS Name=wordpress.com
         */
         Debug.Print("https://wordpress.wordpress.com/");
         try
         {
            using (HttpWebRequest request = (HttpWebRequest)WebRequest.Create(@"https://wordpress.wordpress.com/"))
            {
               //request.Proxy = proxy; 
               request.Method = "GET";
               request.KeepAlive = false;
               request.Timeout = 5000;
               request.ReadWriteTimeout = 5000;
               request.KeepAlive = false;


               using (var response = (HttpWebResponse)request.GetResponse())
               {
                  Debug.Print("HTTP Status:" + response.StatusCode + " : " + response.StatusDescription);
               }
            }
         }
         catch (Exception ex)
         {
            Debug.Print(ex.Message);
         }


         /*
         DNS Name=*.servicebus.windows.net
         DNS Name=servicebus.windows.net
         */
         Debug.Print(@"https://myhomemonitor.servicebus.windows.net/");
         try
         {
            using (HttpWebRequest request = (HttpWebRequest)WebRequest.Create(@"https://myhomemonitor.servicebus.windows.net/"))
            {
               //request.Proxy = proxy; 
               request.Method = "GET";
               request.KeepAlive = false;
               request.Timeout = 5000;
               request.ReadWriteTimeout = 5000;
               request.KeepAlive = false;

               using (var response = (HttpWebResponse)request.GetResponse())
               {
                  Debug.Print("HTTP Status:" + response.StatusCode + " : " + response.StatusDescription);
               }
            }
         }
         catch (Exception ex)
         {
            Debug.Print(ex.Message);
         }
      }
   }
}

I then noticed that when I looked at the certificate details of the endpoint where the requests were failing in Google Chrome (only occurred in Chrome) there was a warming about “obsolete cryptography”.

Google Chrome info about ok certificate

Google Chrome info about ok certificate

Google Chrome info about error causing certificate

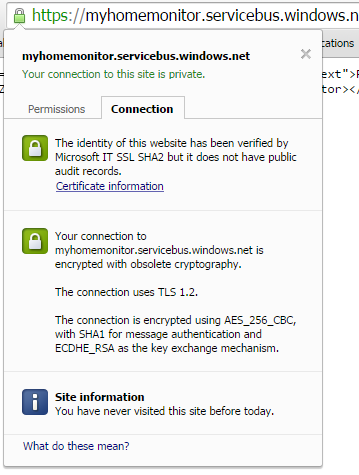
Google Chrome info about possibly error causing certificate

I have downloaded the Netduino 3 Wifi IP stack code from github and have traced down to the native interop call which appears to be failing at the very bottom of the stack. My post at Netduino.com has additional detail about my debugging efforts.

Now I’m wondering if the crypto required by newish certificate for the service bus endpoint is not supported/needs to be enabled for the TI CC3100 SimpleLink Wifi network processor.


Netduino 3 Wifi xively nRF24L01 Gateway

The first version of this code acquired data from a number of *duino devices and uploaded it to xively for a week without any problems(bar my ADSL modem dropping out every so often which it recovered from without human intervention). The data streams are the temperature and humidity for the three bedrooms in my house (the most reliable stream is Bedroom 1). Next version will use the new Netduino.IP stack and run on a Netduino 2 Plus

Netduino 3 Wifi with nRF24L01 shield

Netduino 3 Wifi + nRF24L01 shield

To make the software easy to setup all the gateway configuration is stored on a MicroSD and can be modified with a text editor. When the application starts it looks for a file in the root directory of the MicroSD card called app.config. If the file does not exist an empty template is created.

httprequestreadwritetimeoutmsec=2500
httprequesttimeoutmsec=2500
webproxyaddress=
webproxyport=
xivelyapibaseurl=http://api.xively.com/v2/feeds/
xivelyapikey=XivelyAPIKeyGoesHere
xivelyapifeedid=XivelyFeedIDGoesHere
xivelyapicontenttype=text/csv
xivelyapiendpoint=.csv
nrf2l01address=AddressGoesHere
nrf2l01channel=ChannelGoesHere
nrf2l01datarate=0
channel1=Sensor1
channel2=Sensor2
channel3=Sensor3
channel4=Sensor4
channel5=Sensor5
...
...

The first byte of each (upto 32 byte) nRF24L01 message is used to determine the Xively channel.

For testing I used a simple *duino program which uploads temperature and humidity readings every 5 seconds. It’s not terribly efficient or elegant and is just to illustrate how to package up the data.

#include <RF24_config>
#include <nRF24L01.h>
#include <SPI.h>
#include <RF24.h>
#include "Wire.h"
#include <TH02_dev.h>

//UNO R3 with embedded coolness board
//RF24 radio(3, 7);
//devDuino  with onboard
RF24 radio(8, 7);

char payload[32] = "";
const uint64_t pipe = 0x3165736142LL; // Base1 pay attention to byte ordering and address length

void setup()
{
  Serial.begin(9600);

  radio.begin();
  radio.setPALevel(RF24_PA_MAX);
  radio.setChannel(10);
  radio.enableDynamicPayloads();
  radio.openWritingPipe(pipe);

  radio.printDetails();

  /* Power up,delay 150ms,until voltage is stable */
  delay(150);

  TH02.begin();

  delay(1000);
}

void loop()
{
  float temperature = TH02.ReadTemperature();
  float humidity = TH02.ReadHumidity();

  radio.powerUp();

  payload[0] = 'A';
  dtostrf(temperature, 5, 1, &payload[1]);
  Serial.println(payload);
  boolean result = radio.write(payload, strlen(payload));
  if (result)
    Serial.println("T Ok...");
  else
    Serial.println("T failed.");

  payload[0] = 'B';
  dtostrf(humidity, 5, 1, &payload[1]);
  Serial.println(payload);
  result = radio.write(payload, strlen(payload));
  if (result)
    Serial.println("H Ok...");
  else
    Serial.println("H failed.");

  radio.powerDown();

  delay(5000);
}

The gateway code creates a thread for each call to the Xively REST API. (In future the code may need to limit the number of concurrent requests)

private void OnReceive(byte[] data)
{
   activityLed.Write(!activityLed.Read());

   // Ensure that we have a valid payload
   if ( data.Length == 0 )
   {
      Debug.Print( "ERROR - Message has no payload" ) ;
      return ;
   }

   // Extract the device id
   string deviceId = xivelyApiChannleIDPrefix + data[0].ToString();
   string message = new String(Encoding.UTF8.GetChars(data, 1, data.Length - 1));

   string xivelyApiChannel = appSettings.GetString( deviceId, string.Empty ) ;
   if ( xivelyApiChannel.Length == 0 )
   {
      Debug.Print("ERROR - Inbound message has unknown channel " + deviceId);
      return ;
   }
   Debug.Print(DateTime.Now.ToString("HH:mm:ss") + " " + xivelyApiChannel + " " + message); ;

   Thread thread = new Thread(() =&gt; xivelyFeedUpdate(xivelyApiChannel, message ));
   thread.Start();
   }

private void xivelyFeedUpdate( string channel, string value)
{
   #region Assertions
   Debug.Assert(channel != null);
   Debug.Assert(channel != string.Empty );
   Debug.Assert(value != null);
   #endregion

   try
   {
      WebProxy webProxy = null;

      if (webProxyAddress.Length &gt; 1)
      {
         webProxy = new WebProxy(webProxyAddress, webProxyPort);
      }

      using (HttpWebRequest request = (HttpWebRequest)WebRequest.Create(xivelyApiBaseUrl + xivelyApiFeedID + xivelyApiEndpoint))
      {
         byte[] buffer = Encoding.UTF8.GetBytes(channel + "," + value);

         DateTime httpRequestedStartedAtUtc = DateTime.UtcNow;

         if (webProxy != null)
         {
            request.Proxy = webProxy;
         }
         request.Method = "PUT";
         request.ContentLength = buffer.Length;
         request.ContentType = xivelyApiContentType;
         request.Headers.Add("X-ApiKey", xivelyApiKey);
         request.KeepAlive = false;
         request.Timeout = httpRequestTimeoutmSec;
         request.ReadWriteTimeout = httpRequestReadWriteTimeoutmSec;

         // request body
         Debug.Print("HTTP request");
         using (Stream stream = request.GetRequestStream())
         {
            stream.Write(buffer, 0, buffer.Length);
         }

         using (var response = (HttpWebResponse)request.GetResponse())
         {
            Debug.Print(" Status: " + response.StatusCode + " : " + response.StatusDescription);
         }

         TimeSpan duration = DateTime.UtcNow - httpRequestedStartedAtUtc;
         Debug.Print(" Duration: " + duration.ToString());
      }
   }
   catch (Exception ex)
   {
      Debug.Print(ex.Message);
   }
}

To use this code download the Nordic nRF24L01 library from Codeplex then include that plus my Netduino NRF24L01 Xively Gateway in a new solution and it should just work.

Deploy the application to a Netduino 2 Plus or Netduino 3 Wifi device and run it to create the app.config file, then use a text editor to update the file with your Xively & device settings.

I’ll upload this and a couple of other projects to GitHub shortly.

Bill of materials (prices as at July 2015)

Mikrobus.Net Quail and Click boards arrived

A couple of weeks ago I ordered a NetMF board from MikroElektronika in Serbia. Last night I downloaded the platform libraries and built my first application for the device (the obligatory flashing an LED). This afternoon I soldered the headers onto the clicks and hopefully didn’t make a mess of it.

MikroBusNet Quail board and a selection of click boards

MikroElektronika MikroBusNet Quail board and a selection of click boards

using MBN;
using MBN.Exceptions;
using System.Threading;
using Microsoft.SPOT.Hardware;

namespace MBFlashy
{
   public class Program
   {
      public static void Main()
      {
         while( true )
         {
            MBN.Hardware.Led1.Write(!MBN.Hardware.Led1.Read());
            Thread.Sleep(500);
         }
      }
   }
}

Next steps will be to get the nRF24L01 and joystick clicks working, maybe as a remote control for my 4WD robot.

Netduino 3 Wifi xively nRF24L01 Gateway data stream live

The gateway is now live, I’m regularly updating the Netduino 3 wifi code and the client arduino, devDuino + netduino devices so there maybe short periods of downtime and/or missing data points.

The stream is available here and is currently just temperature and humidity readings from two bedrooms updating roughly once a minute.

I live in New Zealand which is currently UTC + 12.

Netduino 3 Wifi xively nRF24L01 Gateway introduction

Around home I have a number of Arduino, devDuino and Netduino devices collecting power consumption, temperature & humidity measurements. Previously I had built an Azure event hub gateway which runs on Windows 7(or later) which acts as a gateway forwarding local http requests to an Microsoft Azure event hub.

Not all my embedded devices are capable of making an http request but an nRF24l01 based approach is supported.

For this application I wanted something a bit simpler than an Azure Event hub which could plot basic graphs and as I didn’t require massive scale Xively looked ideal.

Netduino 3 Wifi xively gateway + duino clients

Netduino 3 Wifi xively gateway and *duino clients

Over the next few blog postings I will show how I built the Netduino 3 wifi application and the Arduino based clients.

Bill of materials for the Xively gateway (prices at June 2015)

First step is to configure the network

NetworkInterface networkInterface = NetworkInterface.GetAllNetworkInterfaces()[0];

if (networkInterface.IsDhcpEnabled)
{
   Debug.Print(" Waiting for IP address ");

   while (NetworkInterface.GetAllNetworkInterfaces()[0].IPAddress == IPAddress.Any.ToString()) 
   {
      Thread.Sleep(100);
   }
}

// Display network config for debugging
Debug.Print("Network configuration");
Debug.Print(" Network interface type: " + networkInterface.NetworkInterfaceType.ToString());
Debug.Print(" MAC Address: " + BytesToHexString(networkInterface.PhysicalAddress));
Debug.Print(" DHCP enabled: " + networkInterface.IsDhcpEnabled.ToString());
Debug.Print(" Dynamic DNS enabled: " + networkInterface.IsDynamicDnsEnabled.ToString());
Debug.Print(" IP Address: " + networkInterface.IPAddress.ToString());
Debug.Print(" Subnet Mask: " + networkInterface.SubnetMask.ToString());
Debug.Print(" Gateway: " + networkInterface.GatewayAddress.ToString());

foreach (string dnsAddress in networkInterface.DnsAddresses)
{
   Debug.Print(" DNS Server: " + dnsAddress.ToString());
}

_module = new NRF24L01Plus();

Then setup the nRF24l01 driver

_module.OnDataReceived += OnReceive;
_module.OnTransmitFailed += OnSendFailure;
_module.OnTransmitSuccess += OnSendSuccess;

_module.Initialize(SPI.SPI_module.SPI1, Pins.GPIO_PIN_D7, Pins.GPIO_PIN_D3, Pins.GPIO_PIN_D2);
_module.Configure(myAddress, channel, NRFDataRate.DR1Mbps);
_module.Enable();

The setup required for the Xively API and mapping the devices highlighted the need for a means of storing configuration which could be modified using a simple text editor.

Netduino 3 Wifi with nRF24L01 shield

Netduino 3 Wifi + nRF24L01 shield

This software was built using tooling created and shared by others.

Big thanks to

Jakub Bartkowiak – Gralin.NETMF.Nordic.NRF24L01Plus

EVolocity 3 Axis G-Meter

A telemetry system could be used to monitor the progress of your electric vehicle and provide feedback to the team & driver about how efficiently/fast it is being driven. As part of a telemetry system lateral, longitudinal, and vertical acceleration could be monitored using a cheap ADXL345 mems accelerometer

Netduino based 3D GMeter

Netduino based 3D G-Meter

Bill of Materials for my engineering proof of concept (Prices as at May 2015)

The sample code reads the acceleration data from the ADXL345 using a driver originally created by Love Electronics. It then displays the magnitude of the scaled acceleration on 3 x LED Bars using code written by Famoury Toure

OutputPort Xcin = new OutputPort(Pins.GPIO_PIN_D0, false);
OutputPort Xdin = new OutputPort(Pins.GPIO_PIN_D1, false);
OutputPort Ycin = new OutputPort(Pins.GPIO_PIN_D3, false);
OutputPort Ydin = new OutputPort(Pins.GPIO_PIN_D4, false);
OutputPort Zcin = new OutputPort(Pins.GPIO_PIN_D5, false);
OutputPort Zdin = new OutputPort(Pins.GPIO_PIN_D6, false);

GroveLedBarGraph Xbar = new GroveLedBarGraph(Xcin, Xdin);
GroveLedBarGraph Ybar = new GroveLedBarGraph(Ycin, Ydin);
GroveLedBarGraph Zbar = new GroveLedBarGraph(Zcin, Zdin);

using (OutputPort i2cPort = new OutputPort(Pins.GPIO_PIN_SDA, true))
{
   i2cPort.Write(false);
}

ADXL345 accel = new ADXL345(0x53);
accel.EnsureConnected();
accel.Range = 2;
accel.FullResolution = true;
accel.EnableMeasurements();
accel.SetDataRate(0x0F);

while (true)
{
   accel.ReadAllAxis();

   uint xValue = (uint)(((accel.ScaledXAxisG / 1.0 ) + 1.0) * 5.0) ;
   uint xbar = 1;
   xbar = xbar << (int)xValue;
   Xbar.setLED(xbar);

   uint yValue = (uint)(((accel.ScaledYAxisG / 1.0) + 1.0) * 5.0);
   uint ybar = 1;
   ybar = ybar << (int)yValue;
   Ybar.setLED(ybar);

   uint zValue = (uint)((-(accel.ScaledZAxisG / 1.0) + 2.0) * 5.0);
   uint zbar = 1;
   zbar = zbar << (int)zValue;
   Zbar.setLED(zbar);

   Thread.Sleep(20);
   }
}

Netduino 3 wifi Azure Event Hub client

Over the last couple of weeks I have been beta testing a Netduino 3 Wifi board. One of the great features of the new board is baked in support for SSL 3.0 and TLS 1.2 which enables direct connection to services which require https.

EDIT: The device has been running under my desk powered by a wall wart for a week. It has been monitoring the temperature of my office and the air gap between the curtains and the glass. My ADSL has gone down a couple of times but the N3 has recovered all by itself and kept on going.

In a couple of previous blog posts I have shown how to upload data to an Azure Event Hub from other NetMFdevices. I built an application that runs on a FEZ Spider and a lightweight Service Gateway so I was keen to see how well a Netduino 3 Wifi based solution worked.

To get something working on my Netduino 3 device I started with the application I had written for the FEZ spider. The code is based on OBD Recorder for .Net Micro Framework with ServiceBus, AMQP (for IoT) samples. The test client used a couple of DS18B20 temperature sensors to monitor the temperature of my fridge and freezer.

Netduino 3 device with temperature sensors

Netduino 3 device with Seeedstudio Shield and two temperature sensors

I created an Event Hub and associated device access keys and fired up Service Bus Explorer so I could see what was happening.ServiceBus Explorer showing my fridge and freezer temperatures

In the application the first step was to add code to wait for the device to acquire an IP address. (Will replace this code with a more efficient approach)

// Wait for Network address if DHCP
NetworkInterface networkInterface = NetworkInterface.GetAllNetworkInterfaces()[0];

if (networkInterface.IsDhcpEnabled)
{
   Debug.Print(" Waiting for IP address " );

   while (NetworkInterface.GetAllNetworkInterfaces()[0].IPAddress == IPAddress.Any.ToString()) ;
}

// Display network config for debugging
Debug.Print("Network configuration");
Debug.Print(" Network interface type: " + networkInterface.NetworkInterfaceType.ToString());
Debug.Print(" MAC Address: " + BytesToHexString(networkInterface.PhysicalAddress));
Debug.Print(" DHCP enabled: " + networkInterface.IsDhcpEnabled.ToString());
Debug.Print(" Dynamic DNS enabled: " + networkInterface.IsDynamicDnsEnabled.ToString());
Debug.Print(" IP Address: " + networkInterface.IPAddress.ToString());
Debug.Print(" Subnet Mask: " + networkInterface.SubnetMask.ToString());
Debug.Print(" Gateway: " + networkInterface.GatewayAddress.ToString());

foreach (string dnsAddress in networkInterface.DnsAddresses)
{
   Debug.Print(" DNS Server: " + dnsAddress.ToString());
}

deviceId = BytesToHexString(networkInterface.PhysicalAddress);

Then to send the message to the event hub the request has to have a authorisation token attached

private void EventHubSendMessage(string eventHubAddressHttps, string messageBody)
{
   string token = CreateSasToken(eventHubAddressHttps + "/messages", sasKeyName, sasKeyText);

   try
   {
      using( HttpWebRequest request = (HttpWebRequest)HttpWebRequest.Create(eventHubAddressHttps + "/messages" + "?timeout=60" + ApiVersion))
      {
         request.Timeout = 2500;
         request.Method = "POST";

         // Enable these options to suit your environment
         //request.Proxy = new WebProxy("myproxy.myorganisation.com", true);
         //request.Credentials = new NetworkCredential("myusername", "mytopsecretpassword"); 

         request.Headers.Add("Authorization", token);
         request.Headers.Add("ContentType", "application/json;charset=utf-8");

         byte[] buffer = Encoding.UTF8.GetBytes(messageBody);

         request.ContentLength = buffer.Length;

         // request body
         using (Stream stream = request.GetRequestStream())
         {
            stream.Write(buffer, 0, buffer.Length);
         }

         using (HttpWebResponse response = (HttpWebResponse)request.GetResponse())
         {
            Debug.Print("HTTP Status:" + response.StatusCode + " : " + response.StatusDescription);
         }
      }
   }
   catch (WebException we)
   {
      Debug.Print(we.Message);
   }
}

// Create a SAS token for a specified scope. SAS tokens are described in http://msdn.microsoft.com/en-us/library/windowsazure/dn170477.aspx.
private static string CreateSasToken(string uri, string keyName, string key)
{
   // Set token lifetime to 20 minutes. When supplying a device with a token, you might want to use a longer expiration time.
   uint tokenExpirationTime = GetExpiry(20 * 60);

   string stringToSign = HttpUtility.UrlEncode(uri) + "\n" + tokenExpirationTime;

   var hmac = SHA.computeHMAC_SHA256(Encoding.UTF8.GetBytes(key), Encoding.UTF8.GetBytes(stringToSign));
   string signature = Convert.ToBase64String(hmac);

   signature = Base64NetMf42ToRfc4648(signature);

   string token = "SharedAccessSignature sr=" + HttpUtility.UrlEncode(uri) + "&sig=" + HttpUtility.UrlEncode(signature) + "&se=" + tokenExpirationTime.ToString() + "&skn=" + keyName;

   return token;
}

private static string Base64NetMf42ToRfc4648(string base64netMf)
{
   var base64Rfc = string.Empty;

   for (var i = 0; i < base64netMf.Length; i++)
   {
      if (base64netMf[i] == '!')
      {
         base64Rfc += '+';
      }
      else if (base64netMf[i] == '*')
      {
         base64Rfc += '/';
      }
      else
      {
         base64Rfc += base64netMf[i];
      }
   }
   return base64Rfc;
}

static uint GetExpiry(uint tokenLifetimeInSeconds)
{
   const long ticksPerSecond = 1000000000 / 100; // 1 tick = 100 nano seconds

   DateTime origin = new DateTime(1970, 1, 1, 0, 0, 0, 0);
   TimeSpan diff = DateTime.Now.ToUniversalTime() - origin;

   return ((uint)(diff.Ticks / ticksPerSecond)) + tokenLifetimeInSeconds;
}

The initial version of the Netduino TI CC3100 driver has some limitations e.g. no server certificate validation but these should be attended to in future releases.

The software was based on Brad’s One-Wire and DS18B20 library with fixes from here.

EVolocity Innovation Challenge Parking Aids

At evelocity boot camp on the 22nd of March we talked about aids for use in the parking challenge. For example, a Netduino and one or more ultrasonic rangers could be used to measure the distance to obstacles placed around the car park.

In the picture below the LED bar is displaying the distance to the base shield box with each LED segment representing 2cm.
Netduino based Park Distance Control

Bill of Materials for this project (Prices as at March 2015)

This code is just to illustrate how this could done and should not be used in production

public class Program
{
   private static OutputPort triggerOutput;
   private static InterruptPort echoInterrupt;
   private static long pulseStartTicks;
   private static GroveLedBarGraph distanceBar;
   private const int MillimetersPerBar = 20;

   public static void Main()
   {
      OutputPort distanceCin = new OutputPort(Pins.GPIO_PIN_D8, false);
      OutputPort distanceDin = new OutputPort(Pins.GPIO_PIN_D9, false);

      distanceBar = new GroveLedBarGraph(distanceCin, distanceDin);

      triggerOutput = new OutputPort(Pins.GPIO_PIN_D5, false);
      echoInterrupt = new InterruptPort(Pins.GPIO_PIN_D4,
         true,
         Port.ResistorMode.Disabled,
         Port.InterruptMode.InterruptEdgeBoth);

      echoInterrupt.OnInterrupt += new NativeEventHandler(echoInterruptPort_OnInterrupt);

      Timer distanceUpdate = new Timer(distanceUpdateCallbackProc, null, 0, 500);

      Thread.Sleep(Timeout.Infinite);
   }

   public static void distanceUpdateCallbackProc(object state)
   {
      triggerOutput.Write(false);
      Thread.Sleep(2);
      triggerOutput.Write(true);
      Thread.Sleep(10);
      triggerOutput.Write(false);
      Thread.Sleep(2);
   }

   static void echoInterruptPort_OnInterrupt(uint data1, uint data2, DateTime time)
   {
      long pulseWidthTicks;

      if (data2 == 1) // leading edge, start of pulse
      {
         pulseStartTicks = time.Ticks;
      }
      else
      {
         pulseWidthTicks = time.Ticks - pulseStartTicks;

         long distance = pulseWidthTicks / 58;

         Debug.Print("distance = " + distance.ToString() + "mm");

         uint ledBar = 1;
         ledBar = ledBar <<(int)(distance / MillimetersPerBar );
         distanceBar.setLED(ledBar);
      }
   }
}

Azure Event Hub Service Gateway V0.5

In a previous post I had developed a simple Microsoft Azure EventHubs Service Gateway for Arduino and Netduino devices which required Internet Information Server(IIS). Running IIS in some home environments could be a bit awkward so I have got a basic light weight version going which is hosted in a self installing Windows Service. The gateway supports four command line parameters.(The install and uninstall must be run as administrator otherwise the requested process will fail)

  • Install – install the service
  • Uninstall – uninstalls the service
  • Debug – runs the service in interactive mode
  • Name – allows you to specify the name of the service in the Services Manager.

The code does some basic logging to the Windows Event log and can be configured to start automatically when the computer starts.

The configuration file has two settings

<appSettings>
<add key="Microsoft.ServiceBus.ConnectionString" value="YourConnectionStringGoesHere" />
<add key="Microsoft.ServiceBus.EventHub" value="myhomemonitor" />
<add key="baseAddress" value="http://your.URL.goes.Here:8080/" />
</appSettings>

The code is based on the self installing service sample code that ships with the Wix# toolkit.

try
{
   string connectionString = ConfigurationManager.AppSettings["Microsoft.ServiceBus.ConnectionString"];
   string eventHubName = ConfigurationManager.AppSettings["Microsoft.ServiceBus.EventHub"];

   NamespaceManager namespaceManager = NamespaceManager.CreateFromConnectionString(connectionString);

   EventHubClient client = EventHubClient.Create(eventHubName);

   EventData data = new EventData(request.Content.ReadAsByteArrayAsync().Result);

   // Set user properties if needed
   data.Properties.Add("UploadedAtUTC", DateTime.UtcNow.ToString("yyyy-MM-dd HH:mm:ss"));
   data.Properties.Add("UploadedBy", "devMobileAzureEventHubGateway");

   client.Send(data);
}
catch (Exception ex)
{
   eventLog.WriteEntry(string.Format("Application initialisation failed {0}", ex.Message), EventLogEntryType.Error);
}

The Azure EventHub Service Gateway Code V0.5 is a bit rough but I will enhance it as time allows. First steps will be improving logging then creating a WIX# based installer.

Azure Event Hub Service Gateway V0.1

My Netduino and Arduino devices can’t do https so I had been looking at different approaches for uploading sensor data to a Microsoft Azure Event Hub. In a previous post I published the “simplest” possible useful program (a console application) which could upload data and this code builds on that.

In this proof of concept I have integrated the core of the console application code into an ASP.NET MVC WebAPI 2 project which acts as a service gateway. My Netduino clients now use a website hosted on my Essentials 2012 home server to forward the requests to a Microsoft Azure Event Hub .

For more detail about how to program the energy monitor shield see these posts about the Nokia 5110 display, nrf24L01 wireless link, and non invasive current sensor algorithm optimisations.

try
{
   using (HttpWebRequest request = (HttpWebRequest)WebRequest.Create( AzureGatewayUrl ))
   {
      string payload = @&quot;{&quot;&quot;DeviceId&quot;&quot;:&quot; + deviceId + @&quot;,&quot;&quot;Usage&quot;&quot;:&quot; + value + &quot;}&quot;;
      byte[] buffer = Encoding.UTF8.GetBytes(payload);
      request.Method = &quot;POST&quot;;
      request.ContentLength = buffer.Length;
      request.ContentType = &quot;text/csv&quot;;
      request.KeepAlive = false;
      request.Timeout = 5000;
      request.ReadWriteTimeout = 5000;

      using (Stream stream = request.GetRequestStream())
      {
         stream.Write(buffer, 0, buffer.Length);
      }
      using (var response = (HttpWebResponse)request.GetResponse())
      {
         Debug.Print(&quot;HTTP Status&quot; + response.StatusCode + &quot; : &quot; + response.StatusDescription);
      }
   }
}
catch (Exception ex)
{
   Debug.Print(ex.Message);
}
Netduino power consumption monitor

Netduino power consumption monitor

Azure Service Bus Explorer by  Paolo Salvatori is great for debugging and testing Service Bus applications like this.

ServiceBus Explorer Displaying event hub power consumption data

ServiceBus Explorer displaying power consumption data

Bill of materials (prices as at Feb 2015)

The Azure Event Hub Service GatewayV0.1 is pretty basic with, no security, doesn’t have a lot of logging. wouldn’t scale terribly well (Though most home systems wouldn’t have a lot of sensors) and is hosted in Internet Information Server(IIS),

In future posts I’ll fix these limitations and make the service gateway secure, easier to install, configure and operate. But, this proof of concept proves the approach is viable

// POST api/eventhub
 public void Post(HttpRequestMessage request)
      {
         try
         {
            string connectionString = ConfigurationManager.AppSettings["Microsoft.ServiceBus.ConnectionString"];
            string eventHubName = ConfigurationManager.AppSettings["Microsoft.ServiceBus.EventHub"];

            NamespaceManager namespaceManager = NamespaceManager.CreateFromConnectionString(connectionString);

            EventHubClient client = EventHubClient.Create(eventHubName);

            EventData data = new EventData(request.Content.ReadAsByteArrayAsync().Result);

            // Set user properties if needed
            data.Properties.Add("UploadedAtUTC", DateTime.UtcNow.ToString("yyyy-MM-dd HH:mm:ss"));
            data.Properties.Add("UploadedBy", "devMobileAzureEventHubGateway");

            client.Send(data);
         }
         catch (Exception ex)
         {
            Debug.WriteLine("Send failed " + ex.Message);
         }
      }