Random wanderings through Microsoft Azure esp. PaaS plumbing, the IoT bits, AI on Micro controllers, AI on Edge Devices, .NET nanoFramework, .NET Core on *nix and ML.NET+ONNX
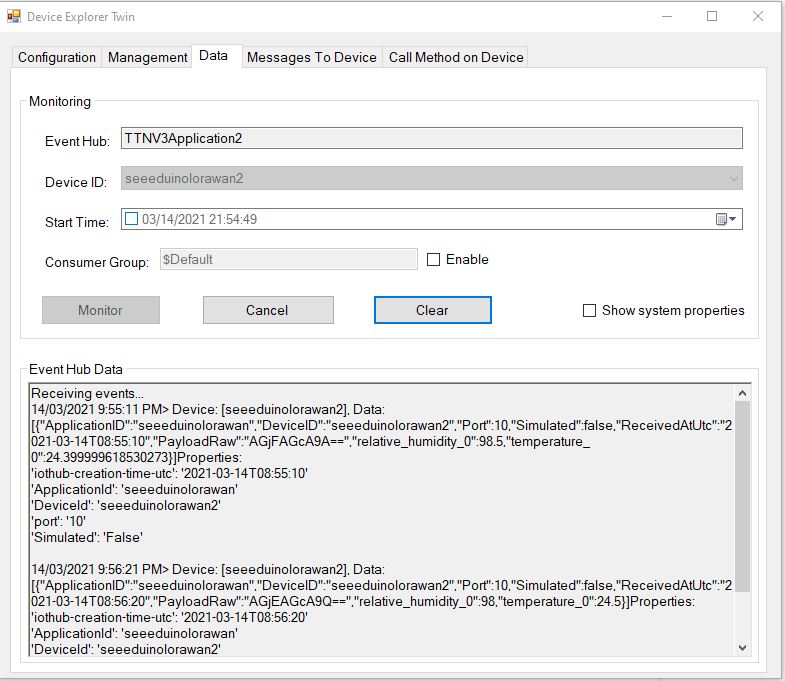
Device Twin Explorer displaying telemetry from one of the Seeeduino devices
My integration uses only queued messages as often they won’t be delivered to the sensor node immediately, especially if the sensor node only sends an uplink message every 30 minutes/hour/day.
The confirmed flag should be used with care as the Azure IoT Hub messages may expire before a delivery Ack/Nack/Failed is received from the TTI.
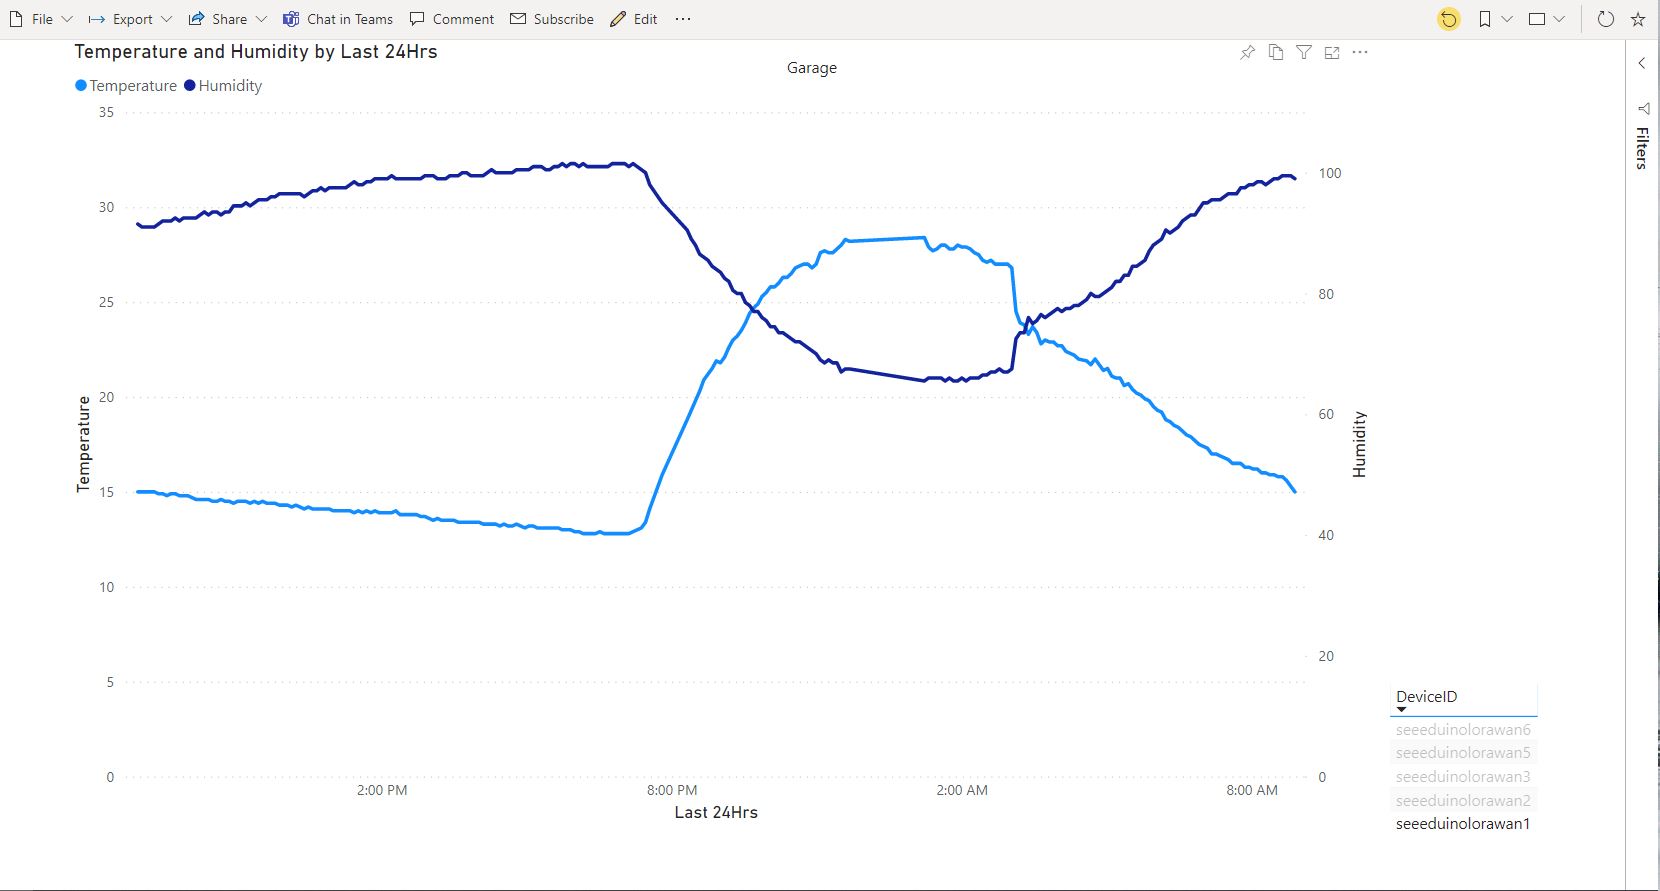
PowerBI graph of temperature and humidity in my garage over 24 hours
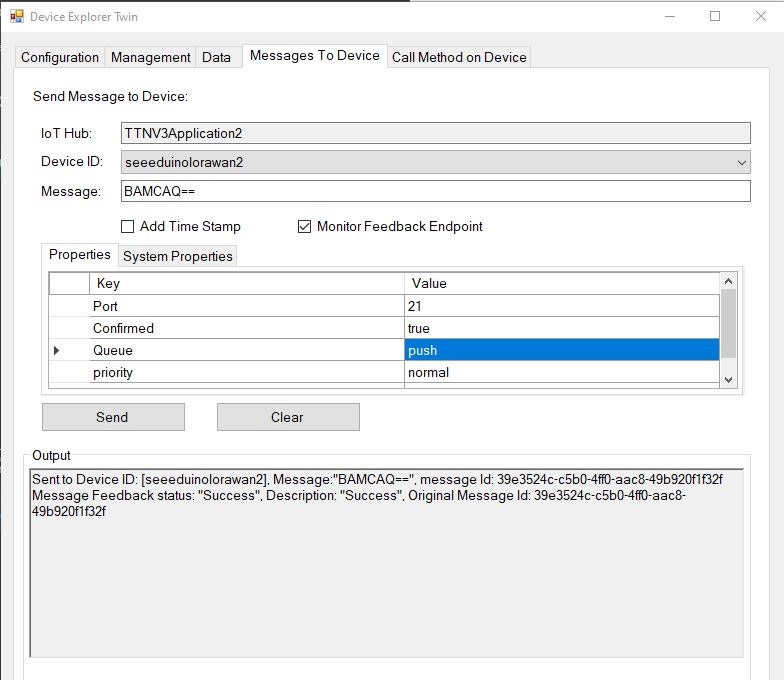
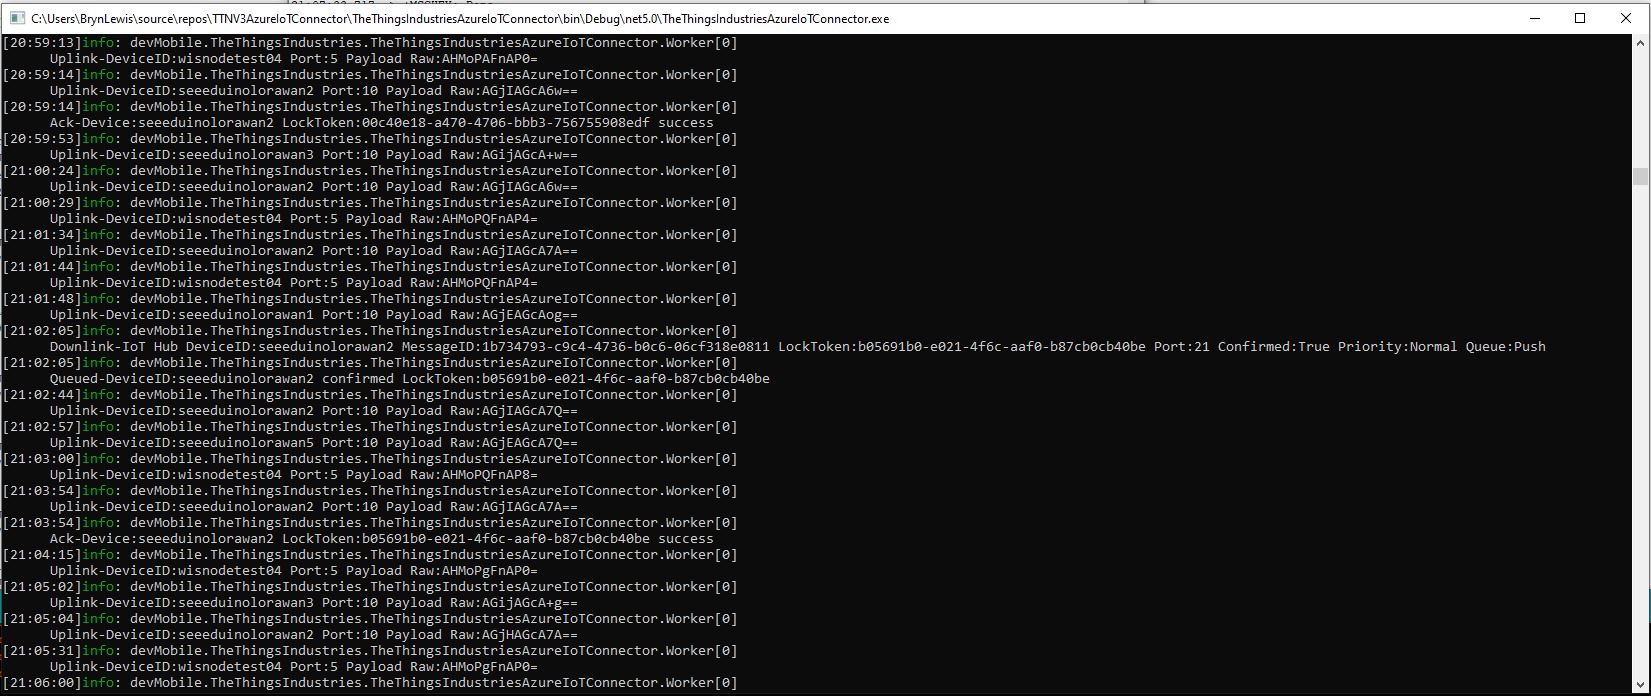
Device explorer displaying a raw payload message which has been confirmed delivered
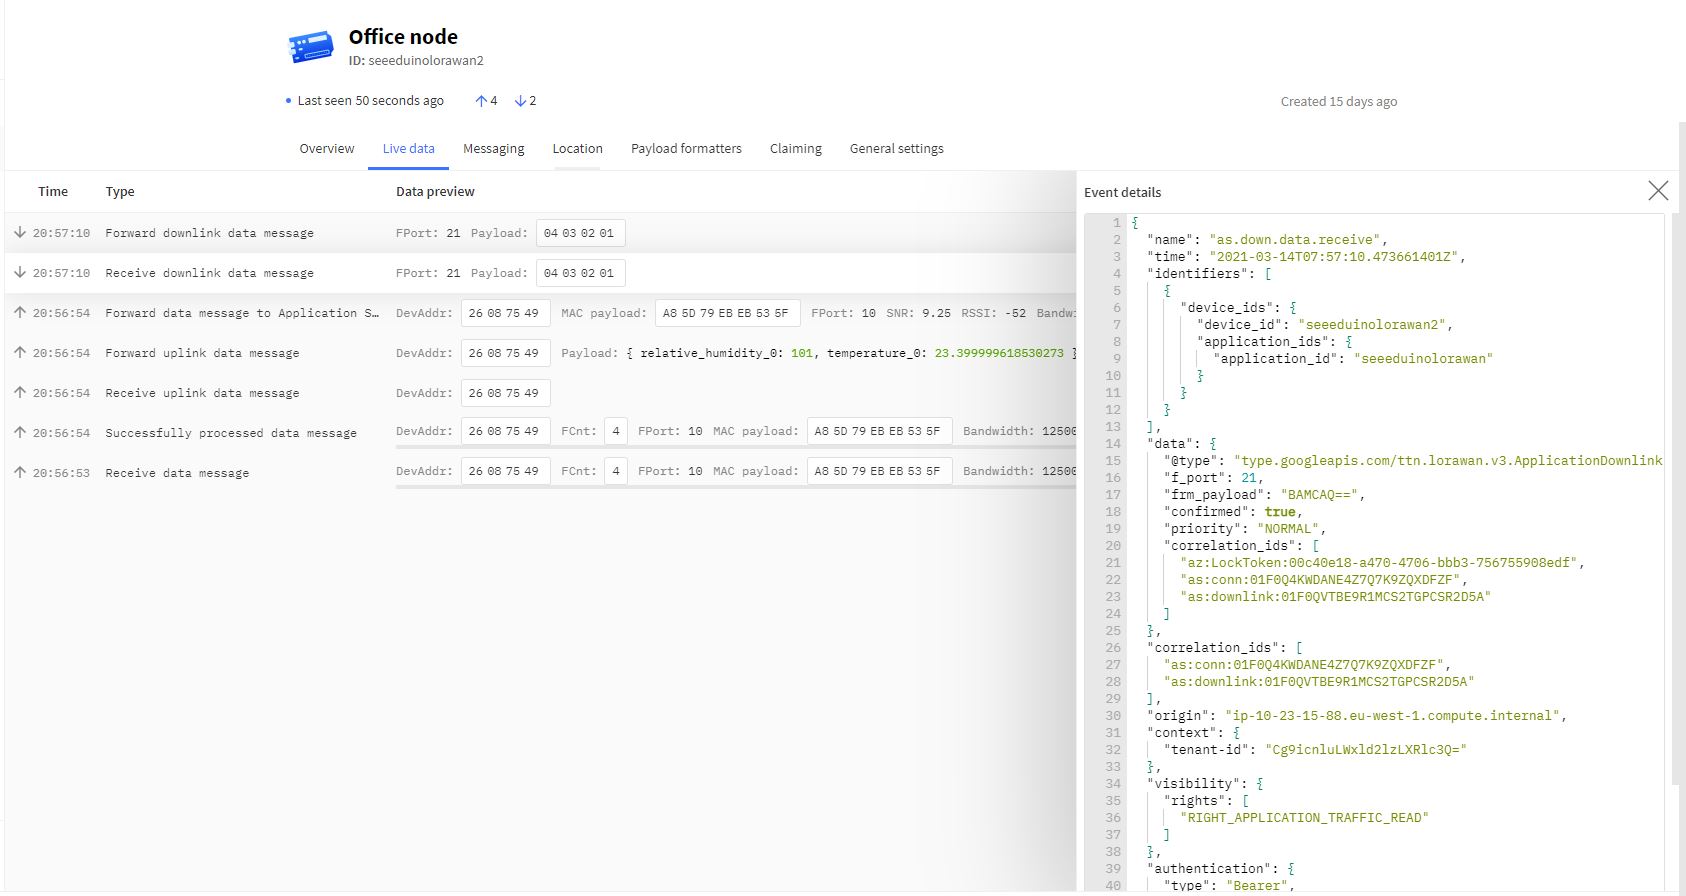
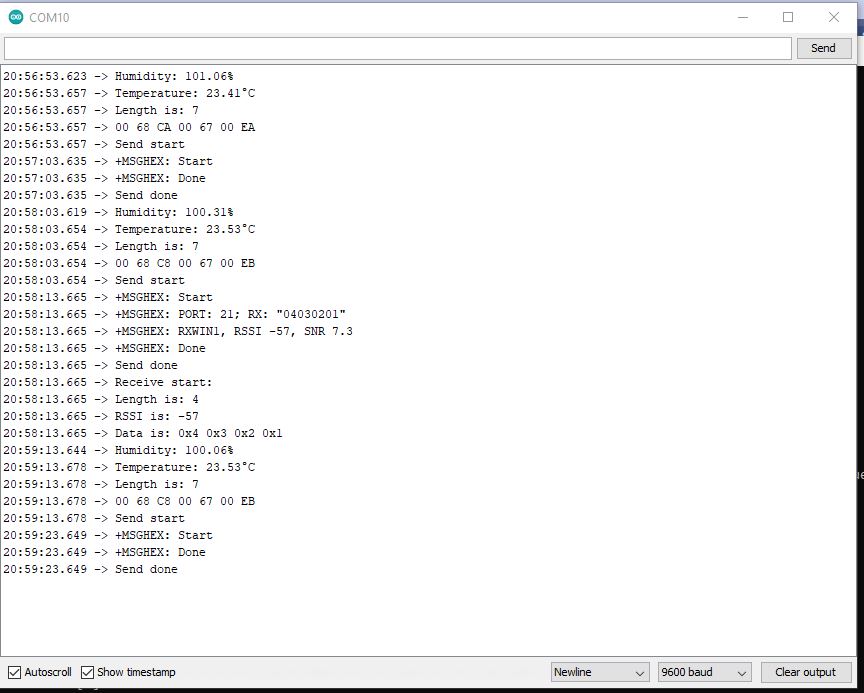
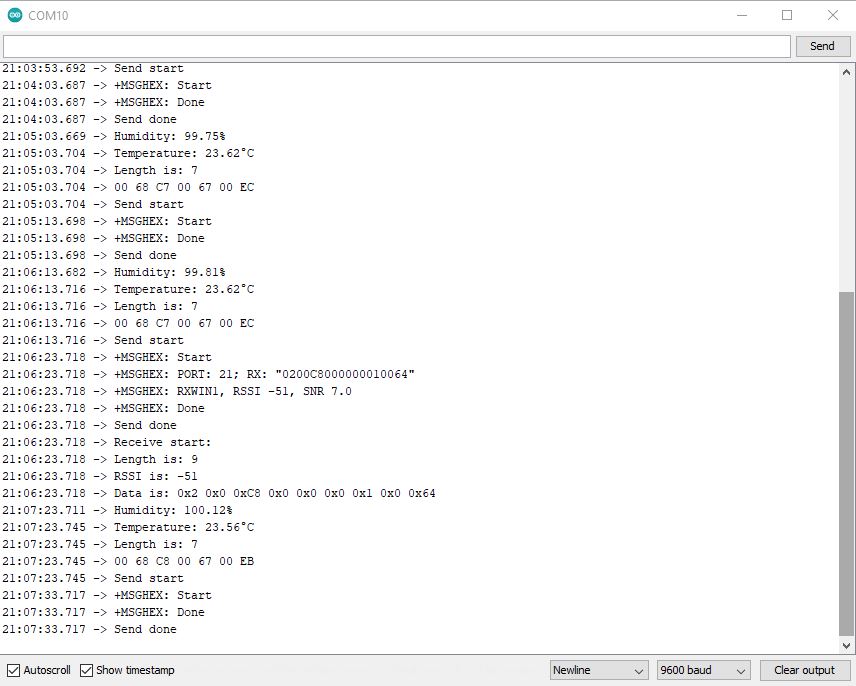
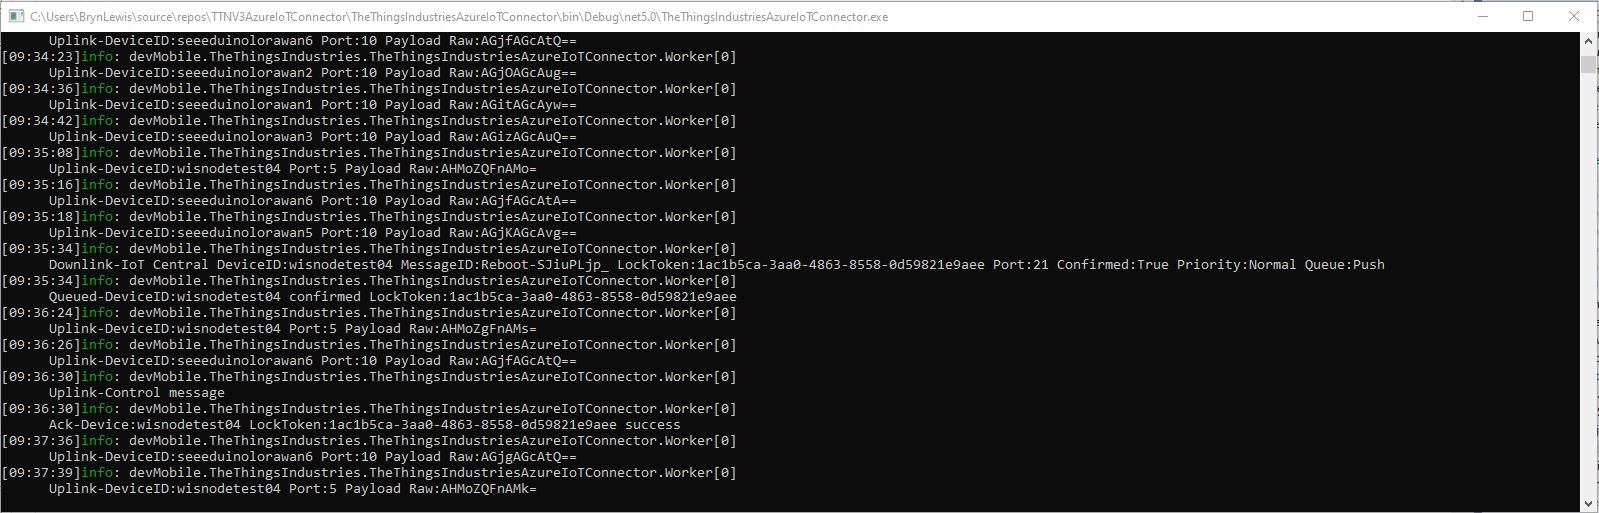
TTI device live data tab displaying raw payload in downlink message information tabAzure IoT Connector console application sending raw payload to sensor node with confirmation ack
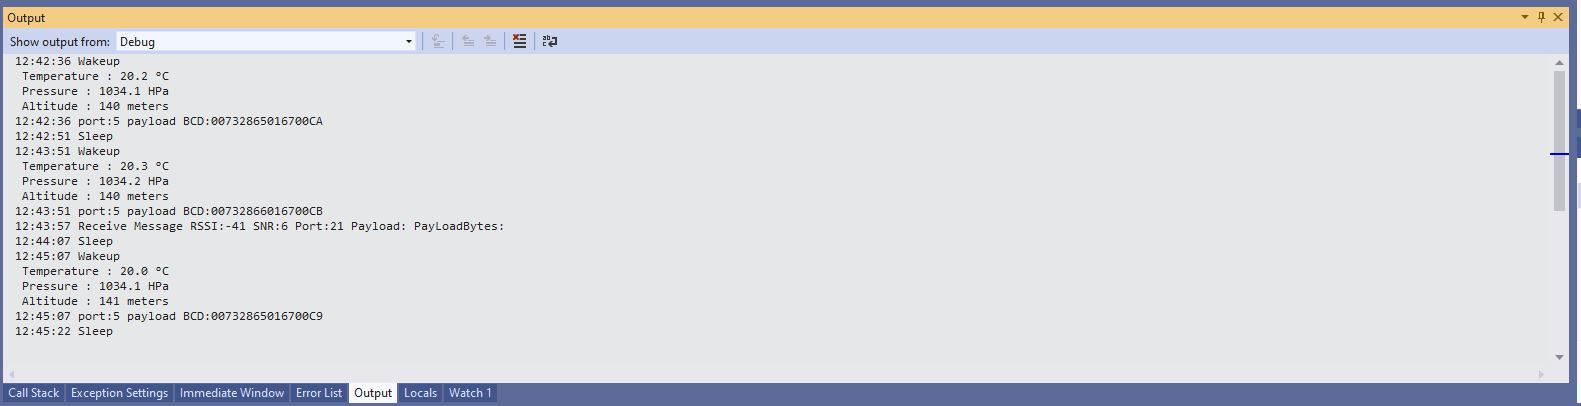
Arduino monitor displaying received raw payload from TTI
If the Azure IoT Hub message payload is valid JSON it is copied into the payload decoded downlink message property. and if it is not valid JSON it assumed to be a Base64 encoded value and copied into the payload raw downlink message property.
try
{
	// Split over multiple lines in an attempt to improve readability. A valid JSON string should start/end with {/} for an object or [/] for an array
	if (!(payloadText.StartsWith("{") && payloadText.EndsWith("}"))
										&&
		(!(payloadText.StartsWith("[") && payloadText.EndsWith("]"))))
	{
		throw new JsonReaderException();
	}

	downlink.PayloadDecoded = JToken.Parse(payloadText);
}
catch (JsonReaderException)
{
	downlink.PayloadRaw = payloadText;
}
Like the Azure IoT Central JSON validation I had to add a check that the string started with a “{” and finished with a “}” (a JSON object) or started with a “[” and finished with a “]” (a JSON array) as part of the validation process.
Device explorer displaying a JSON payload message which has been confirmed delivered
I normally wouldn’t use exceptions for flow control but I can’t see a better way of doing this.
TTI device live data tab displaying JSON payload in downlink message information tabAzure IoT Connector console application sending JSON payload to sensor node with confirmation ackArduino monitor displaying received JSON payload from TTI
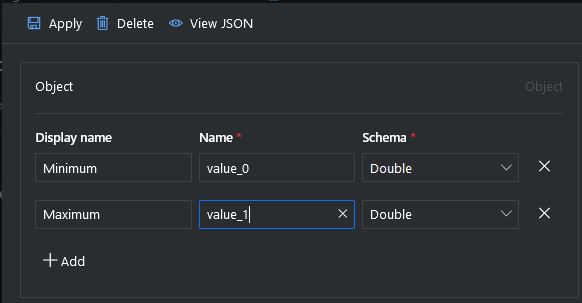
The build in TTI decoder only supports downlink decoded payloads with property names “value_0” through “value_x” custom encoders may support other property names.
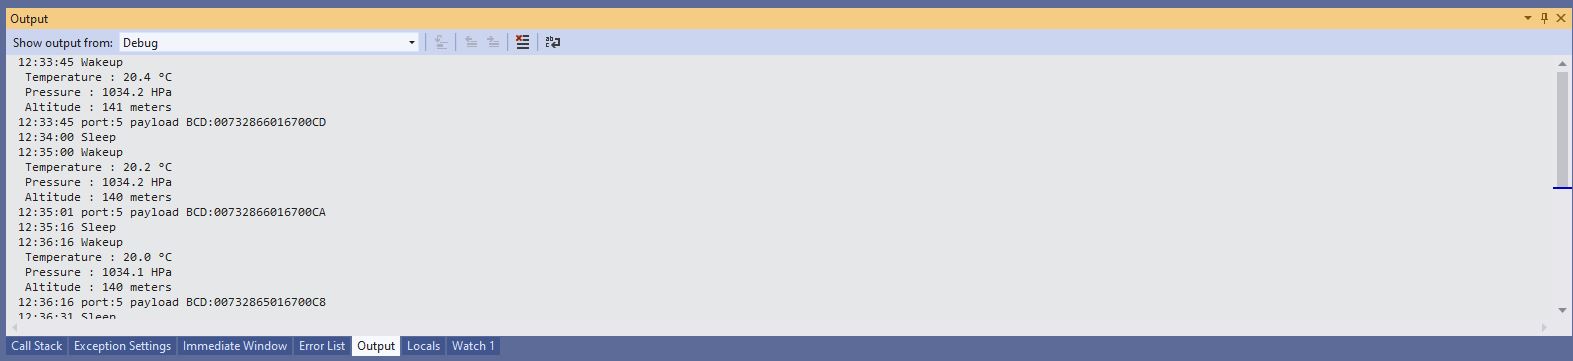
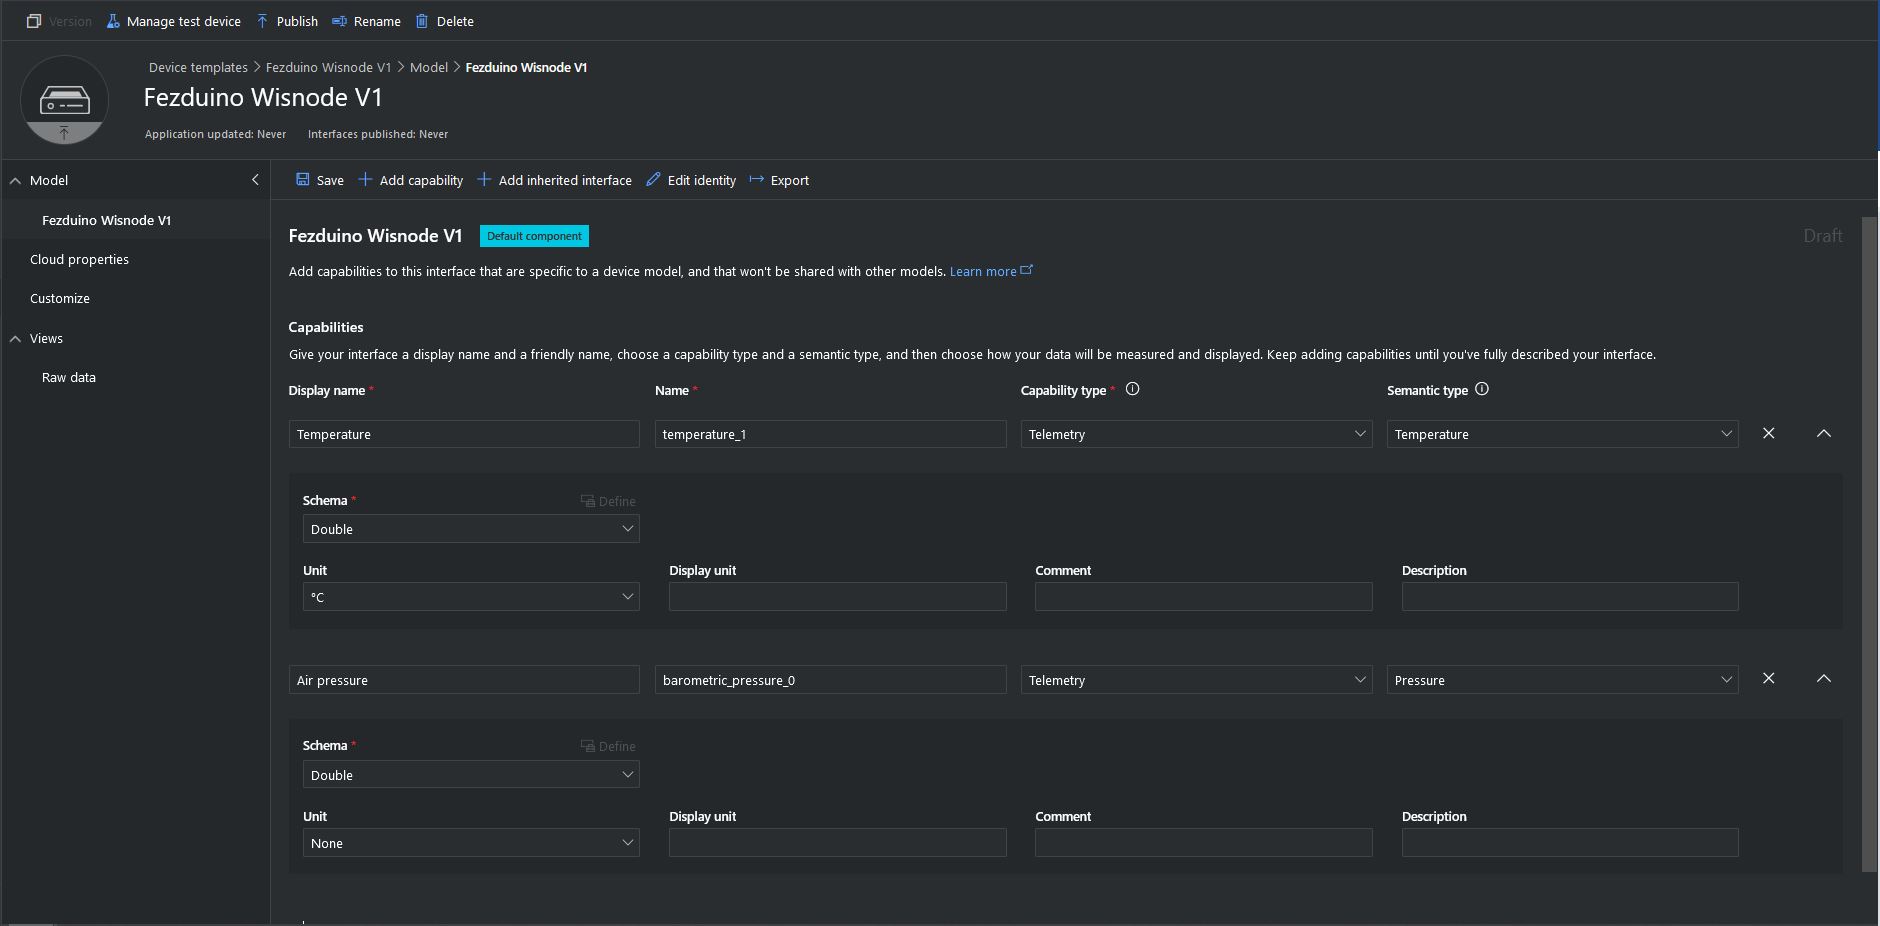
The first step was to display the temperature and barometric pressure values from the Seeedstudio Grove BMP180 attached to my sensor node.
Sensor node displaying temperature and barometric pressure values
Azure IoT Central temperature and barometric pressure telemetry configuration
Azure IoT Central Telemetry Dashboard displaying temperature and barometric pressure values
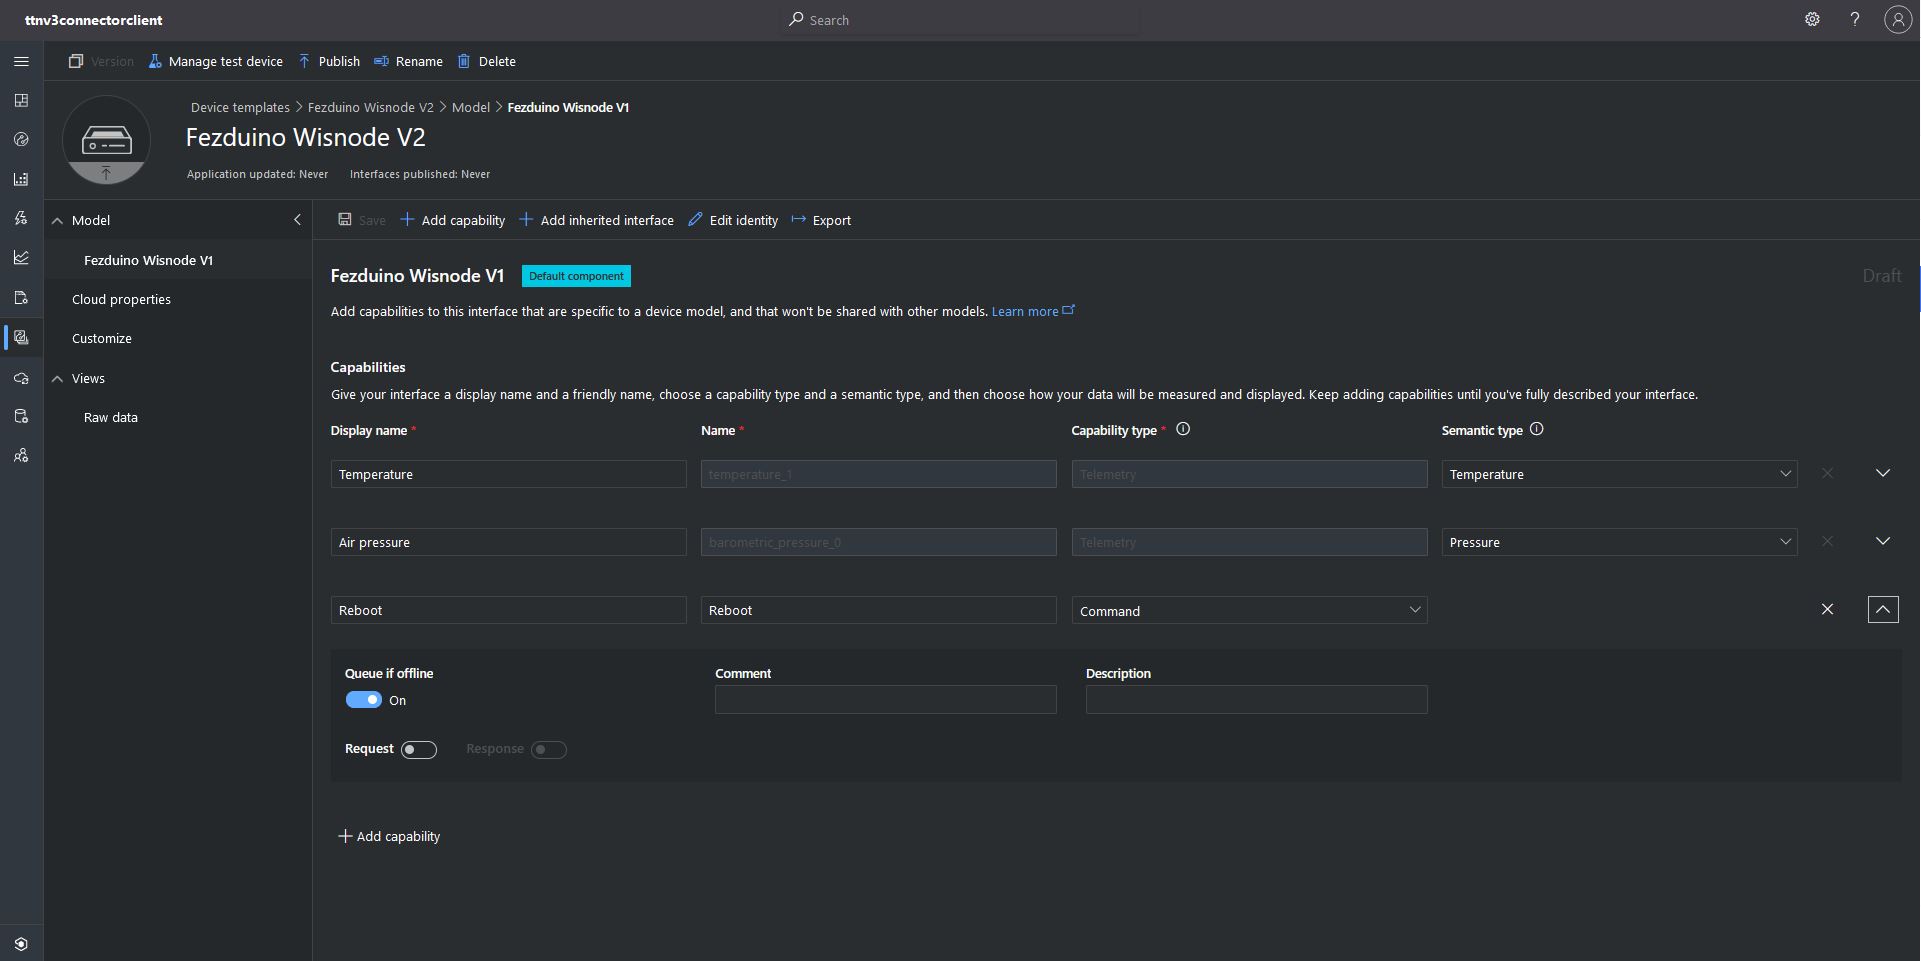
The next step was to configure a simple Azure IoT Central command to send to the sensor node. This was a queued request with no payload. An example of this sort of command would be a request for a sensor node to reboot or turn on an actuator.
My integration uses only offline queued commands as often messages won’t be delivered to the sensor node immediately, especially if the sensor node only sends a message every half hour/hour/day. The confirmed flag should be used with care as the Azure IoT Hub messages may expire before a delivery Ack/Nack/Failed is received from the TTI and it consumes downlink bandwidth.
if (message.Properties.ContainsKey("method-name"))
{
}
Azure IoT Central command with out a request payload value command configuration
To send a downlink message, TTI needs a LoRaWAN port number (plus optional queue, confirmed and priority values) which can’t be provided via the Azure IoT Central command setup so these values are configured in the app.settings file.
Each TTI application has zero or more Azure IoT Central command configurations which supply the port, confirmed, priority and queue settings.
Azure IoT Central simple command dashboardAzure IoT Central simple command initiationAzure IoT TTI connector application sending a simple command to my sensor nodeSensor node display simple command information. The note message payload is empty
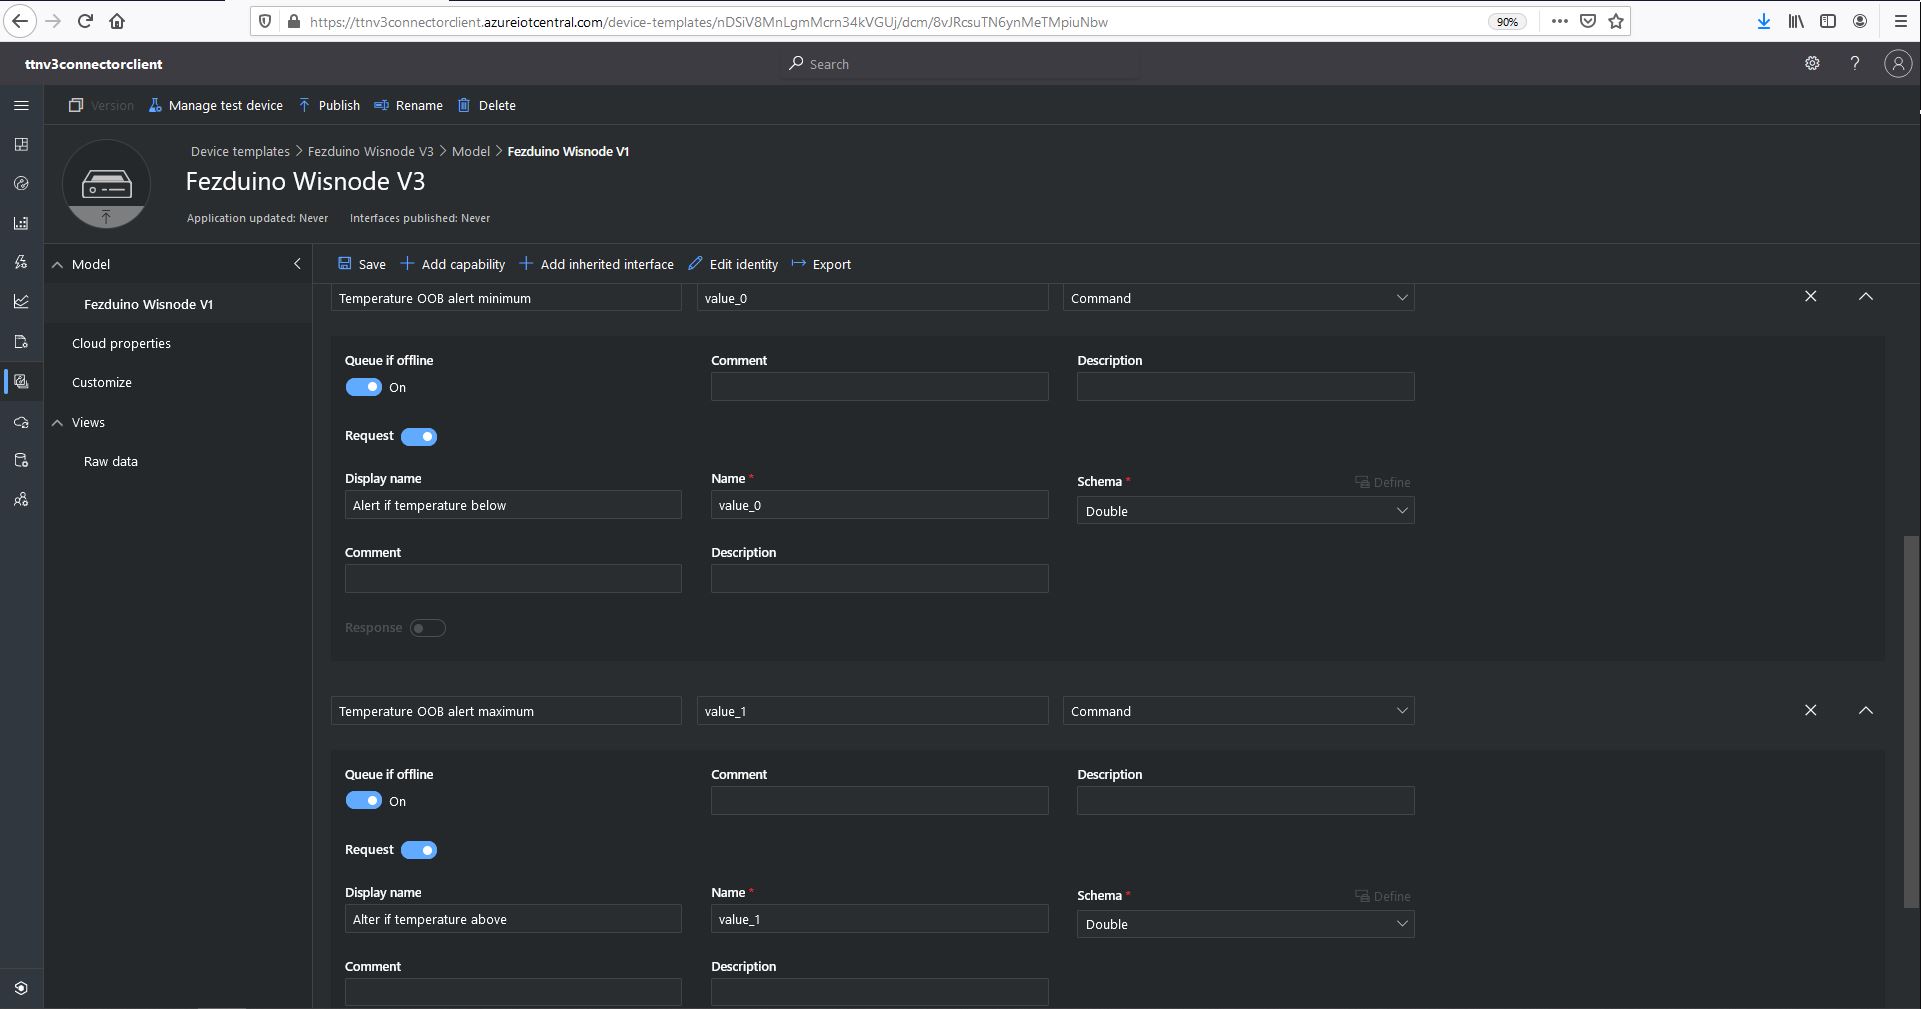
The next step was to configure a more complex Azure IoT Central command to send to the sensor node. This was a queued request with a single value payload. An example of this sort of command could be setting the speed of a fan or the maximum temperature of a freezer for an out of band (OOB) notification to be sent.
Azure IoT Central single value command configuration
The value_0 settings are for the minimum temperature the value_1 settings are for the maximum temperature value.
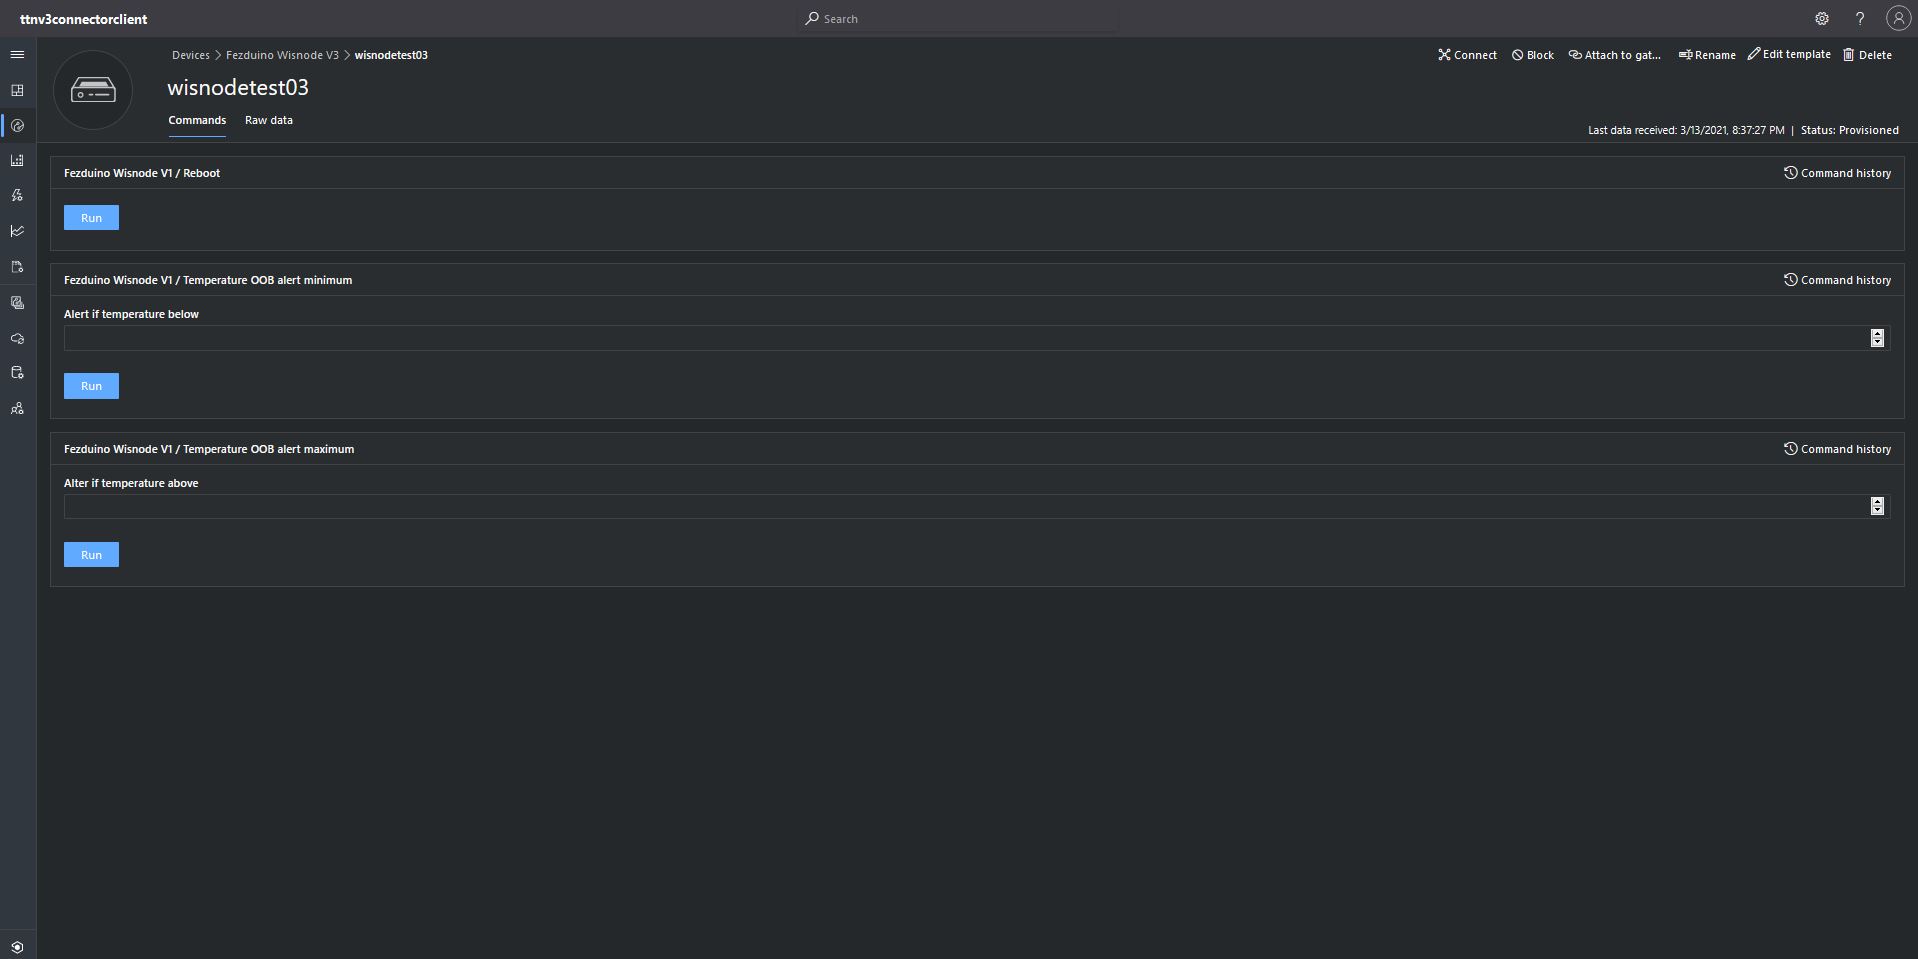
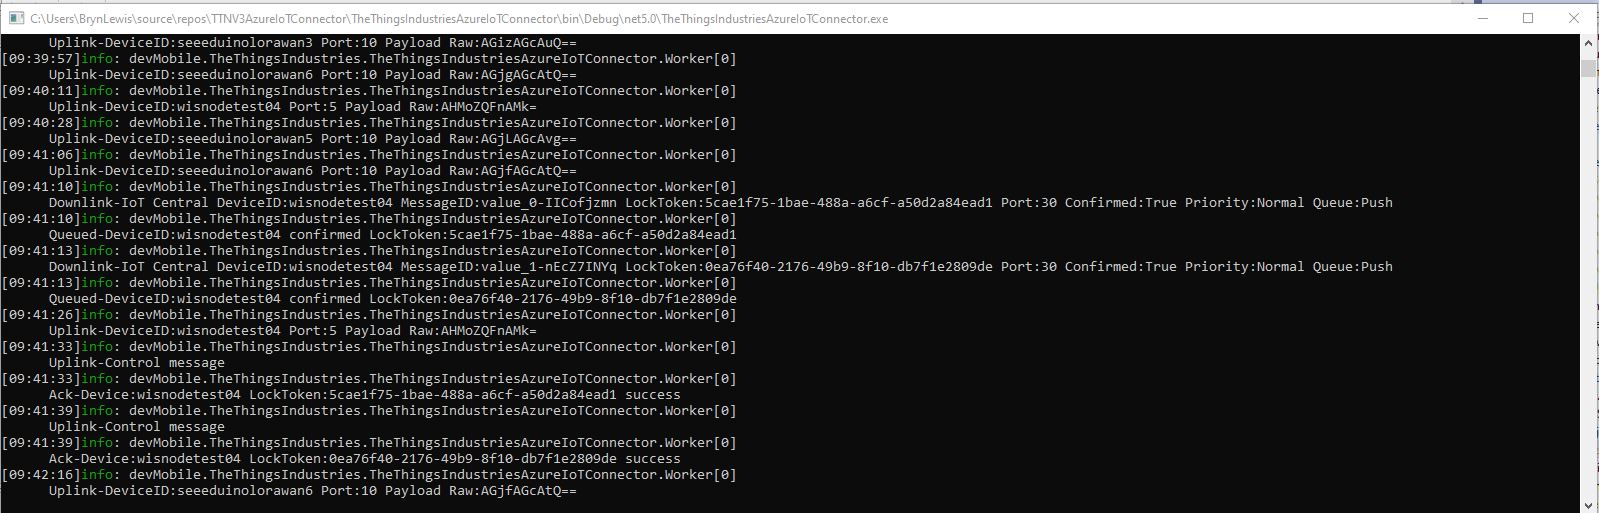
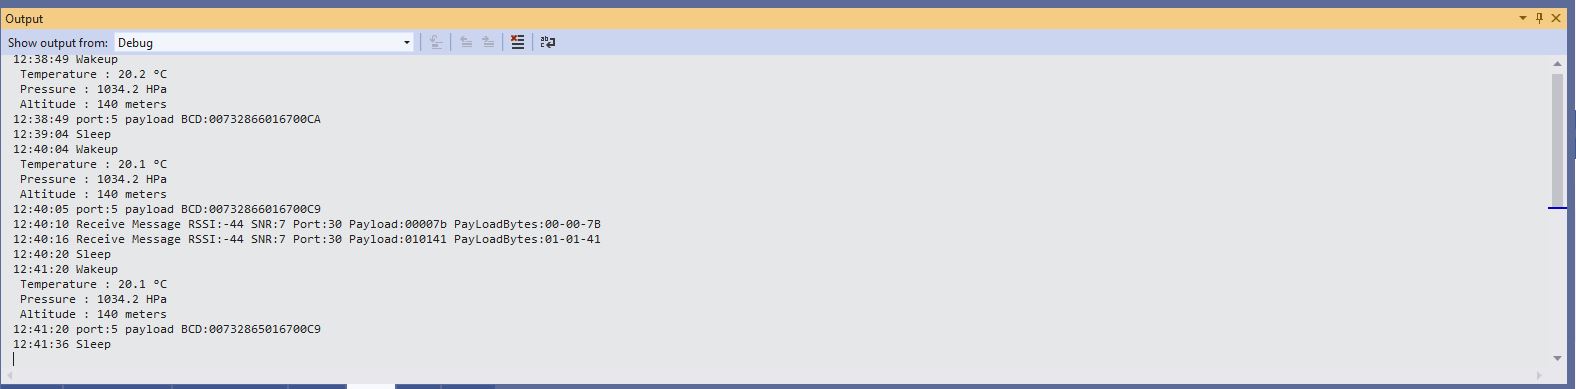
Azure IoT Central single value command initiationAzure IoT TTI connector application sending a single value command to my sensor nodeSensor node displaying single value command information. There are two downlink messages and each payload contains a single value
The single value command payload contains the textual representation of the value e.g. “true”/”false” or “1.23” which are also valid JSON. This initially caused issues as I was trying to splice a single value into the decoded payload.
I had to add a check that the string started with a “{” and finished with a “}” (a JSON object) or started with a “[” and finished with a “]” (a JSON array) as part of the validation process.
For a single value command the payload decoded has a single property with the method-name value as the name and the payload as the value. For a command with a JSON payload the message payload is copied into the PayloadDecoded.
I normally wouldn’t use exceptions for flow control but I can’t see a better way of doing this.
	try
	{
		// Split over multiple lines to improve readability
		if (!(payloadText.StartsWith("{") && payloadText.EndsWith("}"))
									&&
			(!(payloadText.StartsWith("[") && payloadText.EndsWith("]"))))
		{
			throw new JsonReaderException();
		}

		downlink.PayloadDecoded = JToken.Parse(payloadText);
	}
	catch (JsonReaderException)
	{
		try
		{
			JToken value = JToken.Parse(payloadText);

			downlink.PayloadDecoded = new JObject(new JProperty(methodName, value));
		}
		catch (JsonReaderException)
		{
			downlink.PayloadDecoded = new JObject(new JProperty(methodName, payloadText));
		}
	}
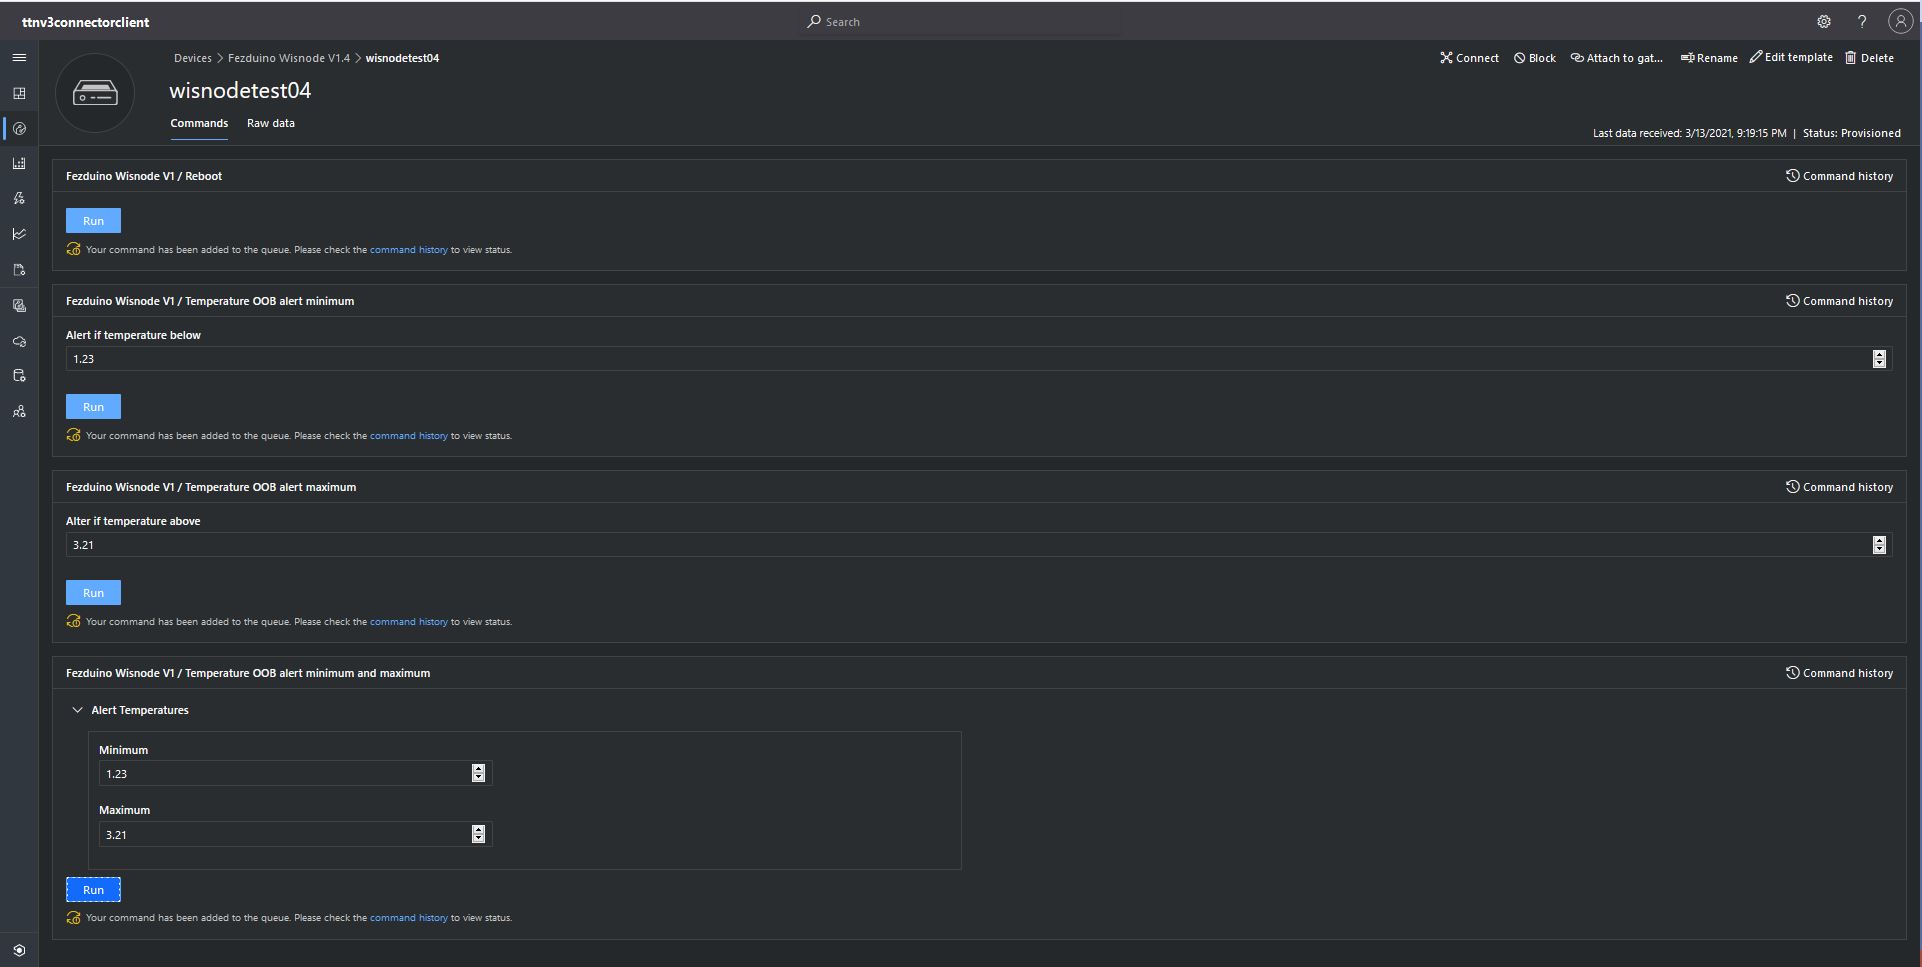
The final step was to configure an another Azure IoT Central command with a JSON payload to send to the sensor node. A “real-world” example of this sort of command would be setting the minimum and maximum temperatures of a freezer in a single downlink message.
Azure IoT Central JSON payload command setup
Azure IoT Central JSON payload command payload configuration
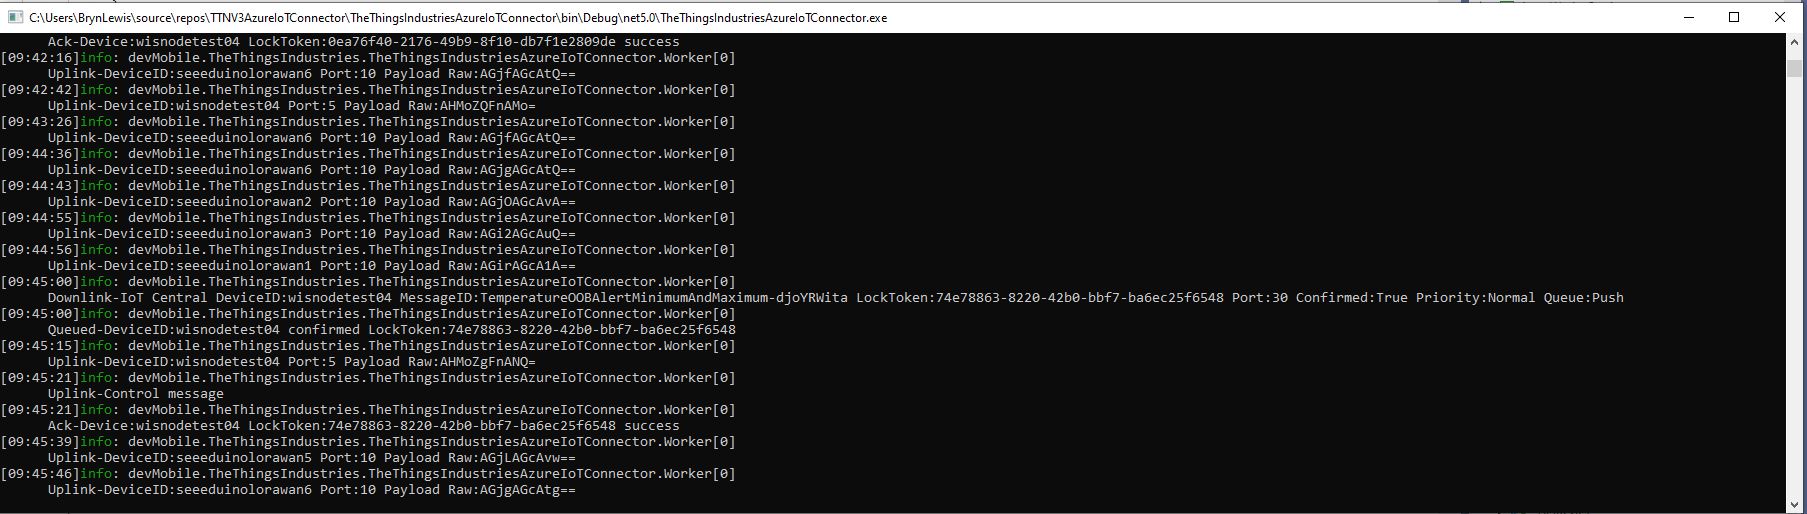
Azure IoT TTI connector application sending a JSON payload command to my sensor node
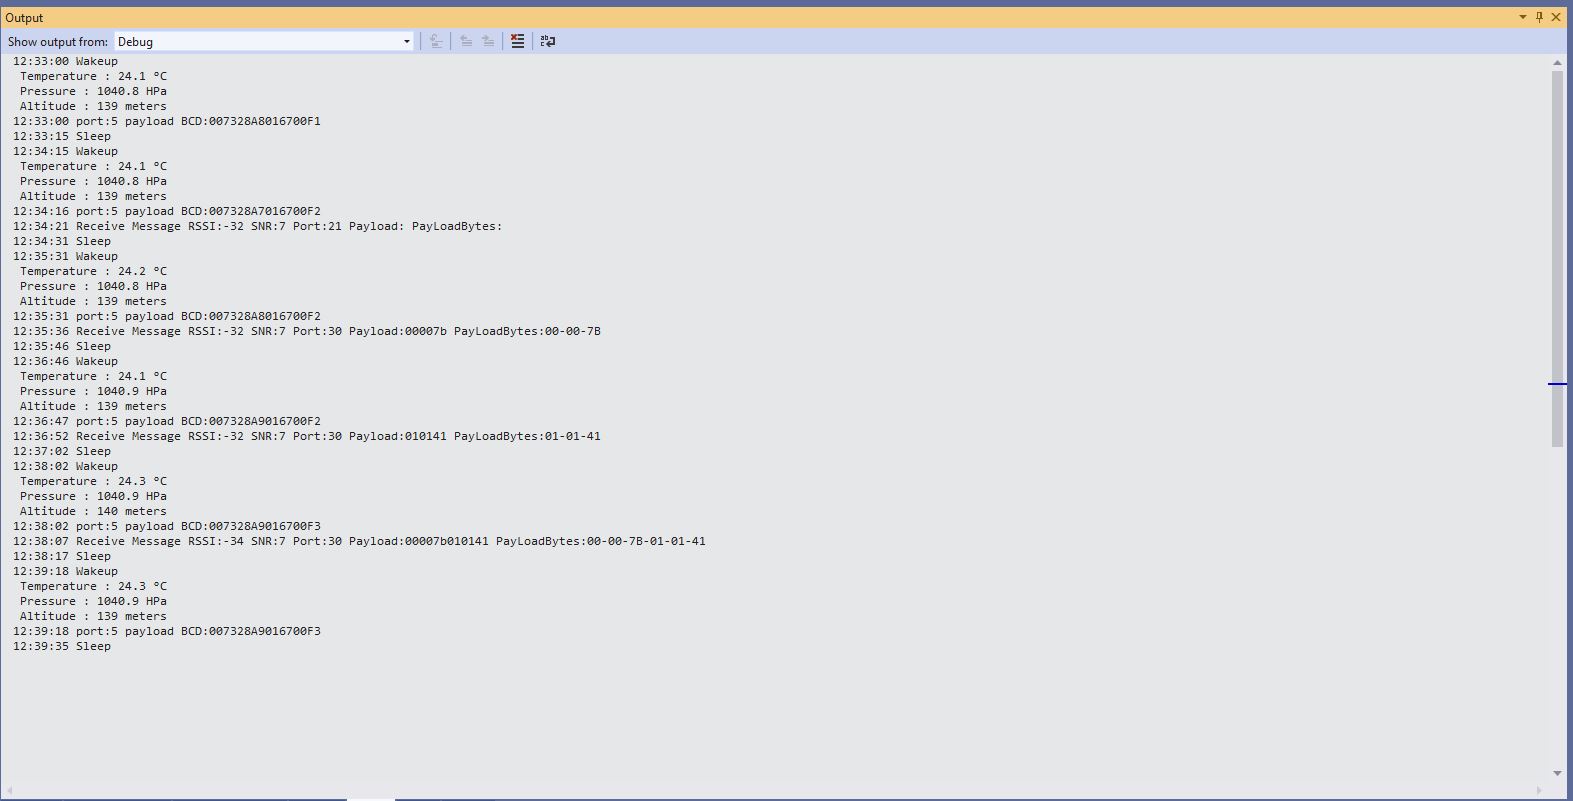
Sensor node displaying JSON command information. There is a single payload which contains a two values
The build in TTI decoder only supports downlink decoded payloads with property names “value_0” through “value_x” which results in some odd command names and JSON payload property names. (Custom encoders may support other property names). Case sensitivity of some configuration values also tripped me up.
return DeviceClient.CreateFromConnectionString(connectionString, deviceId,
	new ITransportSettings[]
	{
		new AmqpTransportSettings(TransportType.Amqp_Tcp_Only)
		{
			PrefetchCount = 0,
			AmqpConnectionPoolSettings = new AmqpConnectionPoolSettings()
			{
				Pooling = true,
			}
		}
	});
I hadn’t noticed this issue in my Azure IoT The Things Network Integration because I hadn’t built support for C2D messaging. After some trial and error I figured out the issue was the PrefetchCount initialisation.
return DeviceClient.CreateFromConnectionString(connectionString, deviceId,
	new ITransportSettings[]
	{
		new AmqpTransportSettings(TransportType.Amqp_Tcp_Only)
		{
			AmqpConnectionPoolSettings = new AmqpConnectionPoolSettings()
			{
				Pooling = true,
			}
		}
	});
Even though the Service Bus APIs do not directly expose such an option today, a lower-level AMQP protocol client can use the link-credit model to turn the “pull-style” interaction of issuing one unit of credit for each receive request into a “push-style” model by issuing a large number of link credits and then receive messages as they become available without any further interaction. Push is supported through the MessagingFactory.PrefetchCount or MessageReceiver.PrefetchCount property settings. When they are non-zero, the AMQP client uses it as the link credit.
n this context, it’s important to understand that the clock for the expiration of the lock on the message inside the entity starts when the message is taken from the entity, not when the message is put on the wire. Whenever the client indicates readiness to receive messages by issuing link credit, it is therefore expected to be actively pulling messages across the network and be ready to handle them. Otherwise the message lock may have expired before the message is even delivered. The use of link-credit flow control should directly reflect the immediate readiness to deal with available messages dispatched to the receiver.
In the Azure IoT Hub SDK the prefetch count is set to 50 (around line 57) and throws an exception if less that zero (around line 90) and there is some information about tuning the prefetch value for Azure Service Bus.
“You are correct, the pre-fetch count is used to set the link credit over AMQP. What this signifies is the max. no. of messages that can be “in-flight” from the service to the client, at any given time. (This value defaults to 50 for the IoT Hub .NET client). The client specifies its link-credit, that the service must respect. In simplest terms, any time the service sends a message to the client, it decrements the link credit, and will continue sending messages until linkCredit > 0. Once the client acknowledges the message, it will increment the link credit.”
In summary if Prefetch count is set to zero on startup in my application no messages will be sent to the client….
After trialing a couple of different approaches I have removed the AzureSettingsDefault. If an application has a connectionstring configured that is used, if there is not one then the DPS configuration is used, if there are neither currently the application logs an error. In the future I will look at adding a configuration option to make the application optionally shutdown
After configuring, deploying and then operating my The Things Network(TTN) V2 gateway I have made some changes to my The Things Industries(TTI) V3 gateway.
Using Azure KeyVault to store configuration was an interesting learning exercise but made configuration difficult for users, so for the initial V3 version(s) I have dropped support and reverted to an app.settings file.
The V2 gateway used an Azure HTTP Trigger function to process TTN uplink messages which were placed into an Azure Storage Queue for processing by an Azure Queue Trigger function. This was complex to deploy and caused message ordering problems when multiple instances of the storage queue trigger function where spun up to process a backlog of messages.
The V2 Gateway only provisioned devices with the Azure Device Provisioning Service on the first uplink message. This made it difficult to process Downlink messages as there was no Azure DeviceClient connection for devices which hadn’t sent a message. The V3 gateway uses the TTN API to enumerate the devices in each TTN Application configured in the app.settings.json file. For each application a Message Queue Telemetry Transport(MQTT) (using MQTTNet) connection is opened for receiving uplink messages, sending downlink messages and tracking the progress of downlink messages. Then for each TTN Device a connection is establish to the specified Azure IoT Hub to enable Cloud to Device(C2D) and Device to Cloud messaging.
With so many components the V2 gateway was difficult to debug, so the V3 version runs locally as a console application and in Azure as an Azure continuous Webjob
The amount of diagnostic logging sent to Azure Application Insights was making it difficult to identify and then diagnose issues so the way logging is implemented has been revisited.
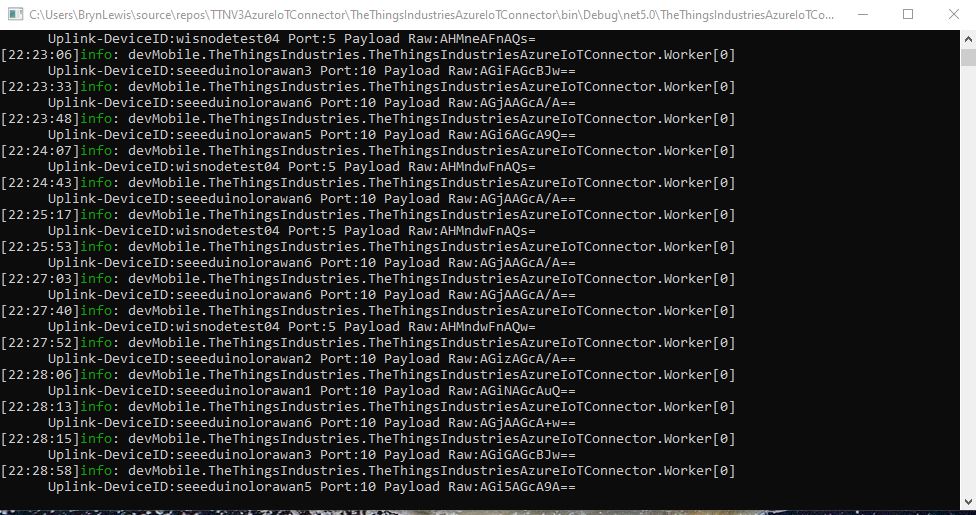
TTI V3 Gateway running as a console application on my desktop
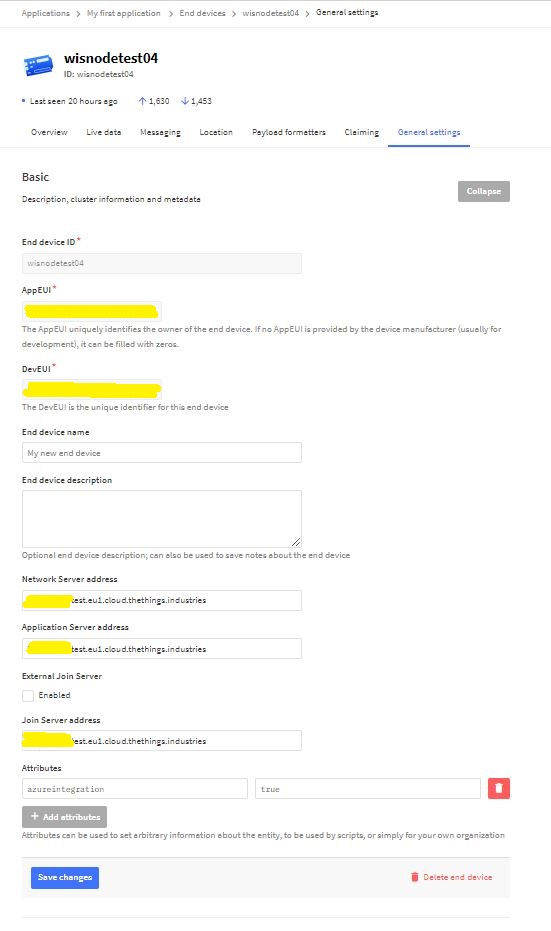
Azure IoT integration can be configured at the Device (TTN Device “azureintegration” attribute).
TTN Device AzureIntegration Attribute
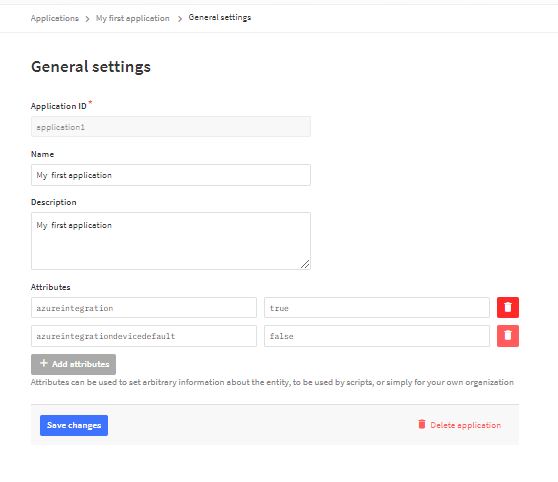
Then falls back to the Application default (TTN application “azureintegrationdevicedefault” attribute).
Then falls back to the “DeviceIntegrationDefault” setting for the Application then finally “DeviceIntegrationDefault” setting for the webjob the in the app.settings.json file
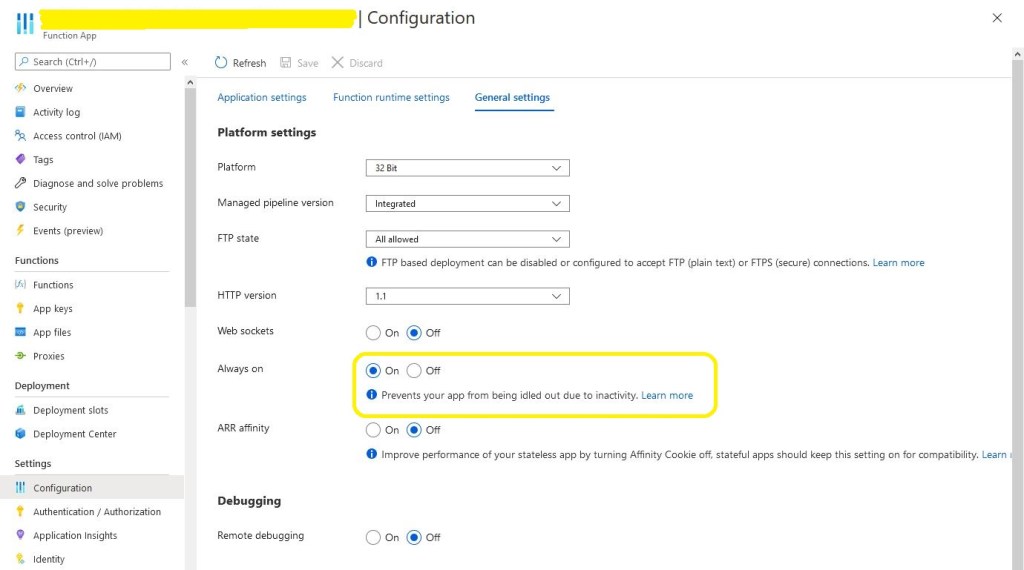
The next “learning” was that if you forget to enable “always on” the caching won’t work and your application will call the DPS way more often than expected.
Azure Application “always on configuration
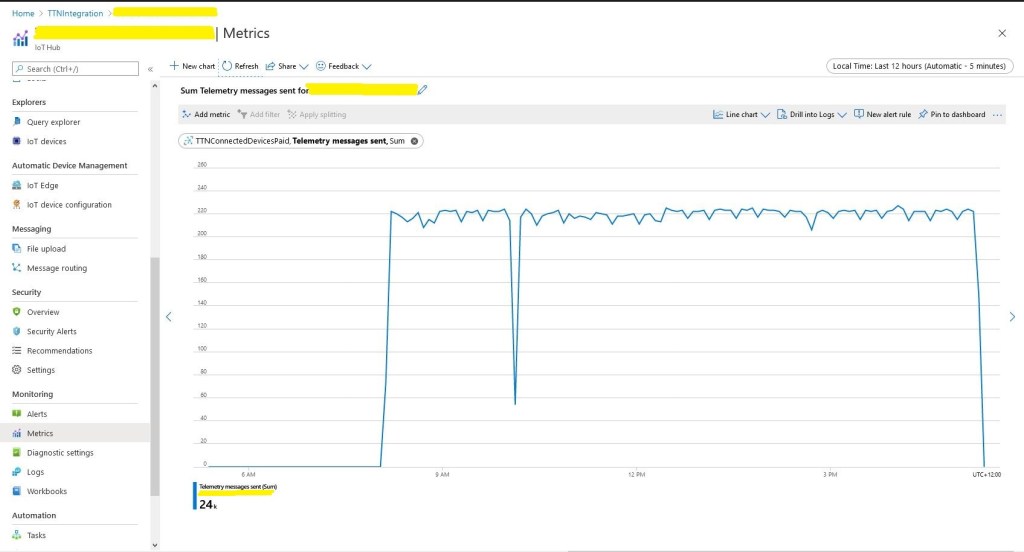
The next “learning” was if your soak test sends 24000 messages it will start to fail just after you go out to get a coffee because of the 8000 msgs/day limit on the free version of IoT Hub.
Azure IoT Hub Free tier 8000 messages/day limit
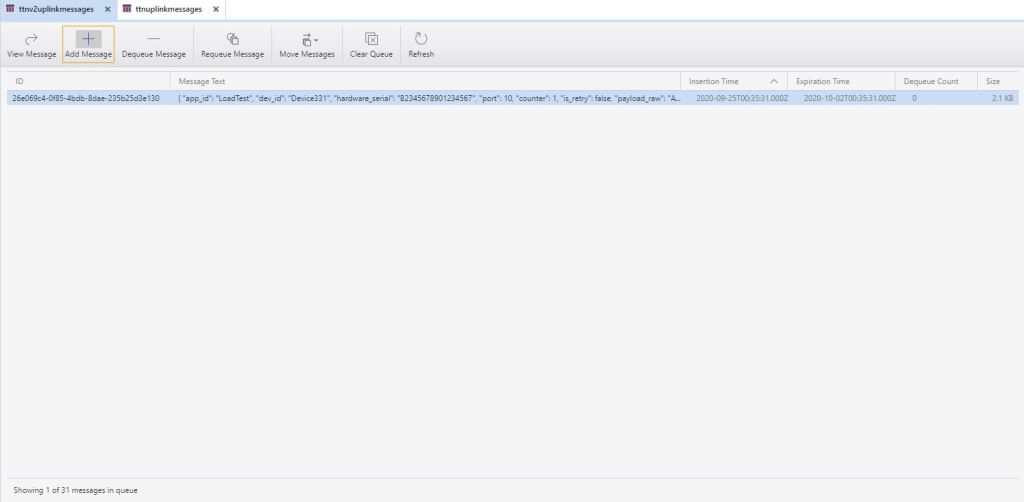
After these “learnings” the application appeared to be working and every so often a message would briefly appear in Azure Storage Explorer queue view.
Azure storage explorer view of uplink messages queue
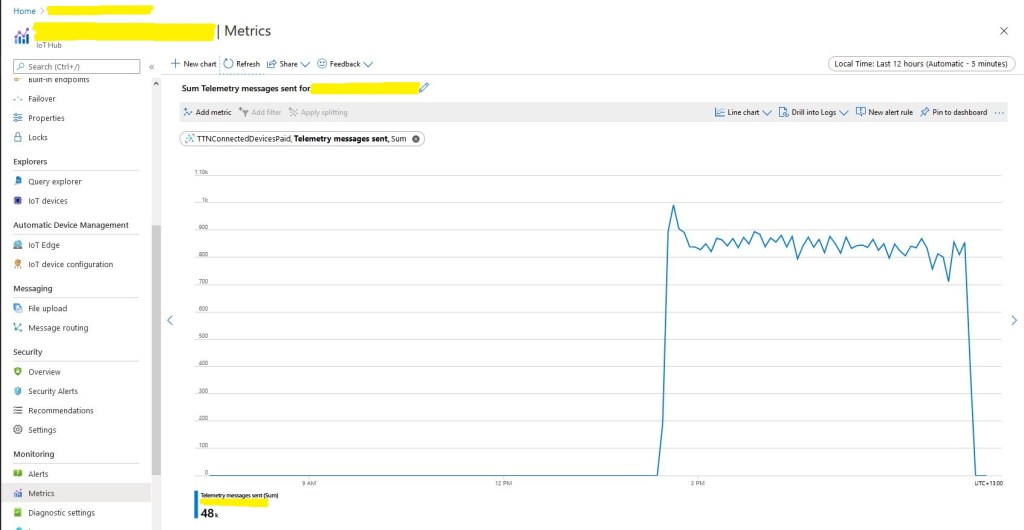
The console test application simulated 1000 devices sending 24 messages every so often and took roughly 8 hours to complete.
Message generator finished
In the Azure IoT Hub telemetry 24000 messages had been received after roughly 8 hours confirming the test rig was working as expected.
The notch was another “learning”, if you go and do some gardening then after roughly 40 minutes of inactivity your desktop PC will go into power save mode and the test client will stop sending messages.
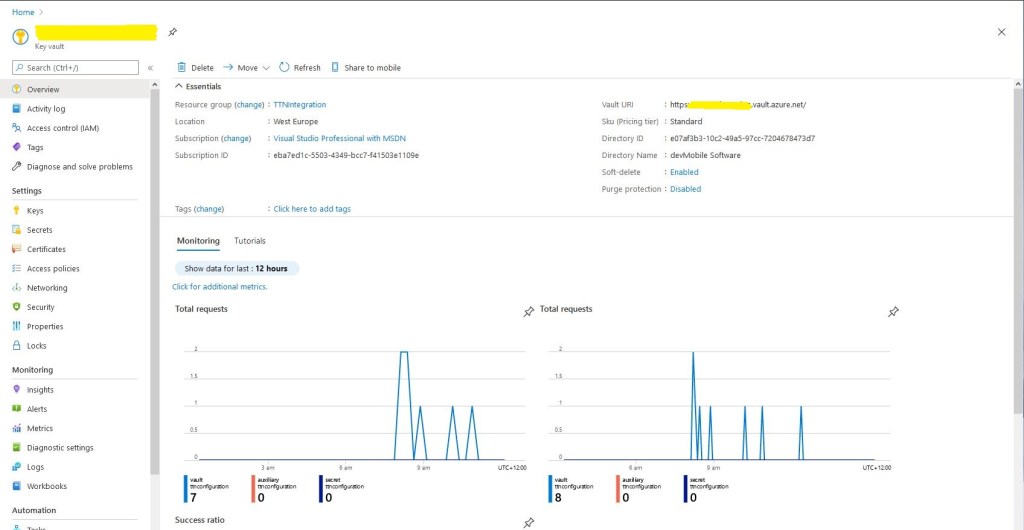
The caching of settings appeared to be work as there were only a couple of requests to my Azure Key Vault where sensitive information like connection strings, symmetric keys etc. are stored.
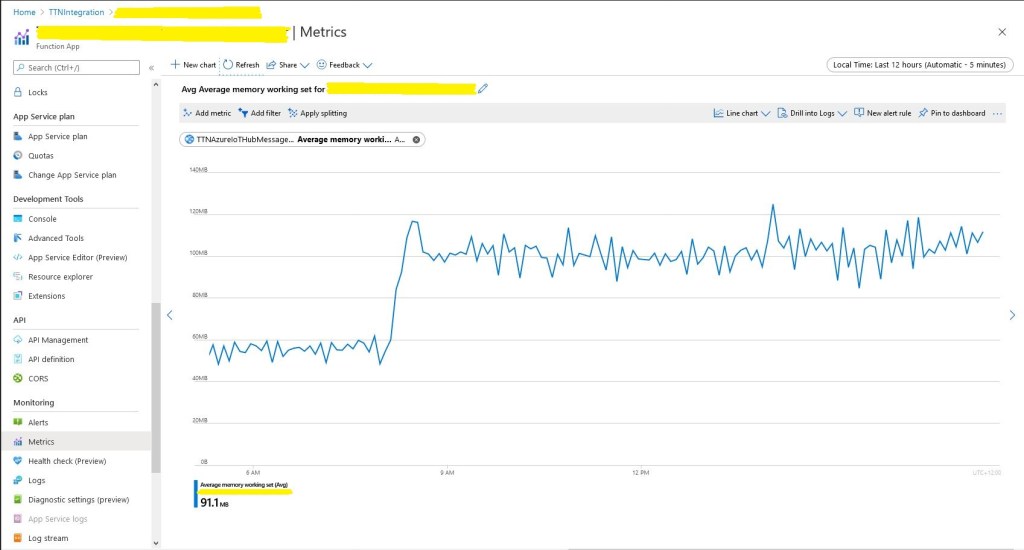
Memory consumption did look to bad and topped out at roughly 120M.
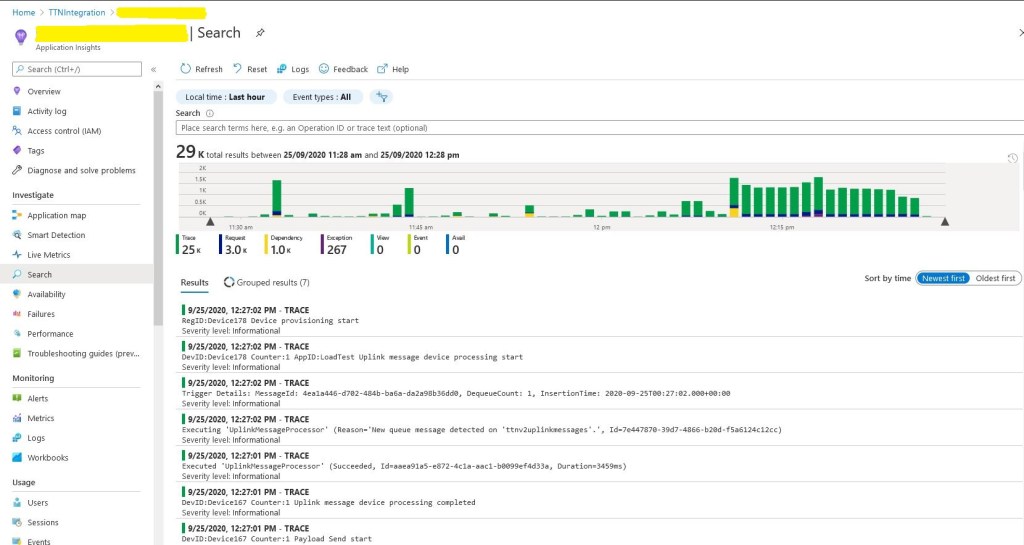
In the application logging you can see the 1000 calls to DPS at the beginning (the yellow dependency events) then the regular processing of messages.
Application Insights logging
Even with the “learnings” the testing went pretty well overall. I do need to run the test rig for longer and with even more simulated devices.
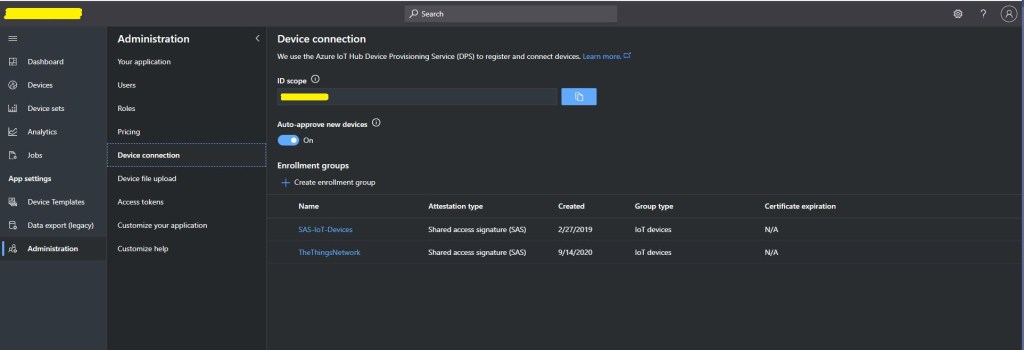
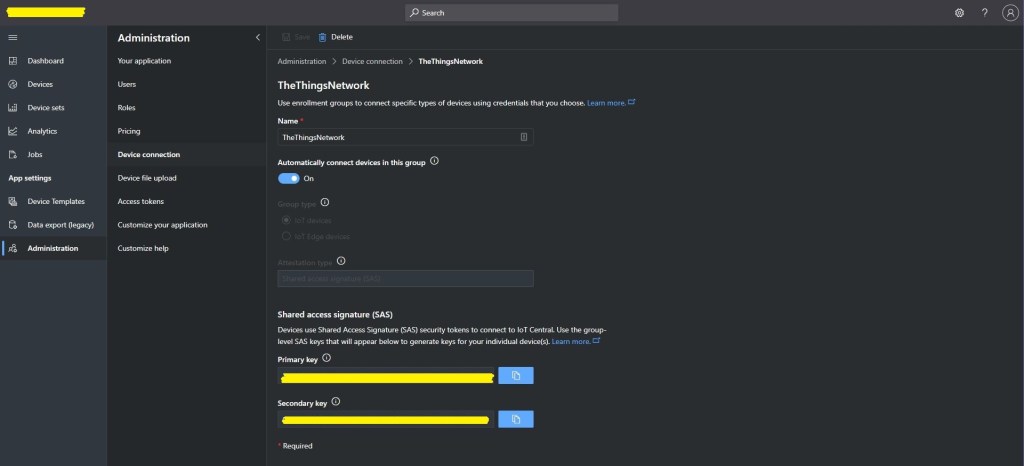
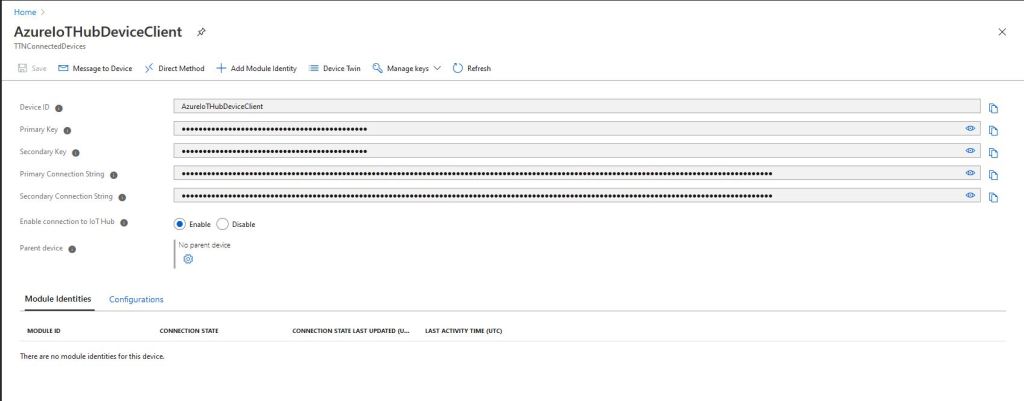
The first step is to copy the IDScope from the Device connection blade.
Device connection blade
Then copy one of the primary or secondary keys
For more complex deployment the ApplicationEnrollmentGroupMapping configuration enables The Things Network(TTN) devices to be provisioned using different GroupEnrollment keys based on the applicationid in the Uplink message which initiates their provisoning.
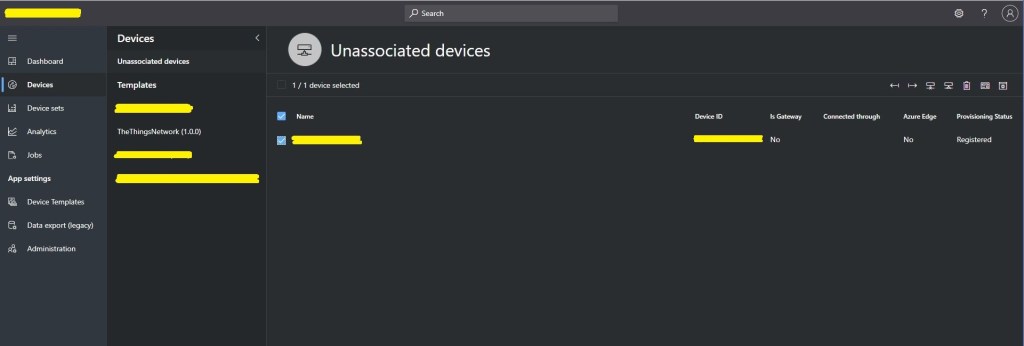
Shortly after the first uplink message from a TTN device is processed, it will listed in the “Unassociated devices” blade with the DevEUI as the Device ID.
Unassociated devices blade
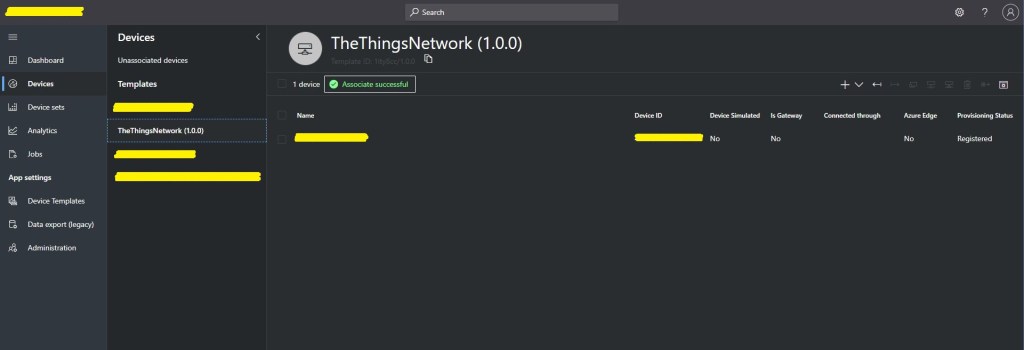
The device can then be associated with an Azure IoT Central Device Template.
The device template provides for the mapping of uplink message payload_fields to measurements. In this example the payload field has been generated by the TTN HTTP integration Low Power Protocol(LPP) decoder. Many LoRaWAN devices use LPP to minimise the size of the network payload.
Azure IoT Central Device template blade
Once the device has been associated with a template a user friendly device name etc. can be configured.
Azure IoT Central Device properties blade
In the telemetry event payload sent to Azure IoT Central there are some extra fields to help with debugging and tracing.
// Assemble the JSON payload to send to Azure IoT Hub/Central.
log.LogInformation($"{messagePrefix} Payload assembly start");
JObject telemetryEvent = new JObject();
try
{
   JObject payloadFields = (JObject)payloadObect.payload_fields;
   telemetryEvent.Add("HardwareSerial", payloadObect.hardware_serial);
   telemetryEvent.Add("Retry", payloadObect.is_retry);
   telemetryEvent.Add("Counter", payloadObect.counter);
   telemetryEvent.Add("DeviceID", payloadObect.dev_id);
   telemetryEvent.Add("ApplicationID", payloadObect.app_id);
   telemetryEvent.Add("Port", payloadObect.port);
   telemetryEvent.Add("PayloadRaw", payloadObect.payload_raw);
   telemetryEvent.Add("ReceivedAtUTC", payloadObect.metadata.time);

   // If the payload has been unpacked in TTN backend add fields to telemetry event payload
   if (payloadFields != null)
   {
      foreach (JProperty child in payloadFields.Children())
      {
         EnumerateChildren(telemetryEvent, child);
      }
   }
}
catch (Exception ex)
{
   log.LogError(ex, $"{messagePrefix} Payload processing or Telemetry event assembly failed");
   throw;
}
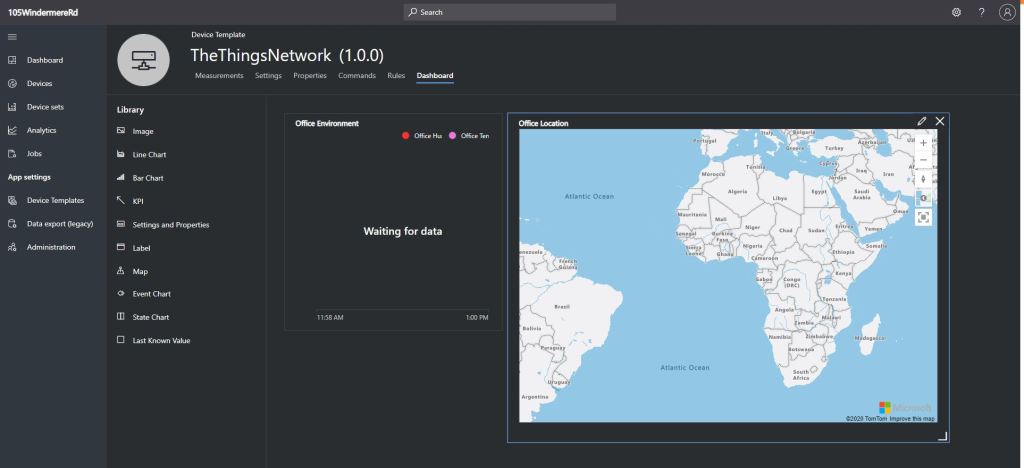
Azure IoT Central has mapping functionality which can be used to display the location of a device.
Azure Device
The format of the location payload generated by the TTN LPP decoder is different to the one required by Azure IoT Central. I have added temporary code (“a cost effective modification to expedite deployment” aka. a hack) to format the TelemetryEvent payload so it can be processed.
if (token.First is JValue)
{
   // Temporary dirty hack for Azure IoT Central compatibility
   if (token.Parent is JObject possibleGpsProperty)
   {
      if (possibleGpsProperty.Path.StartsWith("GPS", StringComparison.OrdinalIgnoreCase))
      {
         if (string.Compare(property.Name, "Latitude", true) == 0)
         {
            jobject.Add("lat", property.Value);
         }
         if (string.Compare(property.Name, "Longitude", true) == 0)
         {
            jobject.Add("lon", property.Value);
         }
         if (string.Compare(property.Name, "Altitude", true) == 0)
         {
            jobject.Add("alt", property.Value);
         }
      }
   }
   jobject.Add(property.Name, property.Value);
}
I need review the IoT Plug and Play specification documentation to see what other payload transformations maybe required.
I did observe that if a device had not reported its position the default location was zero degrees latitude and zero degrees longitude which is about 610 KM south of Ghana and 1080 KM west of Gabon in the Atlantic Ocean.
Azure IoT Central mapping default position
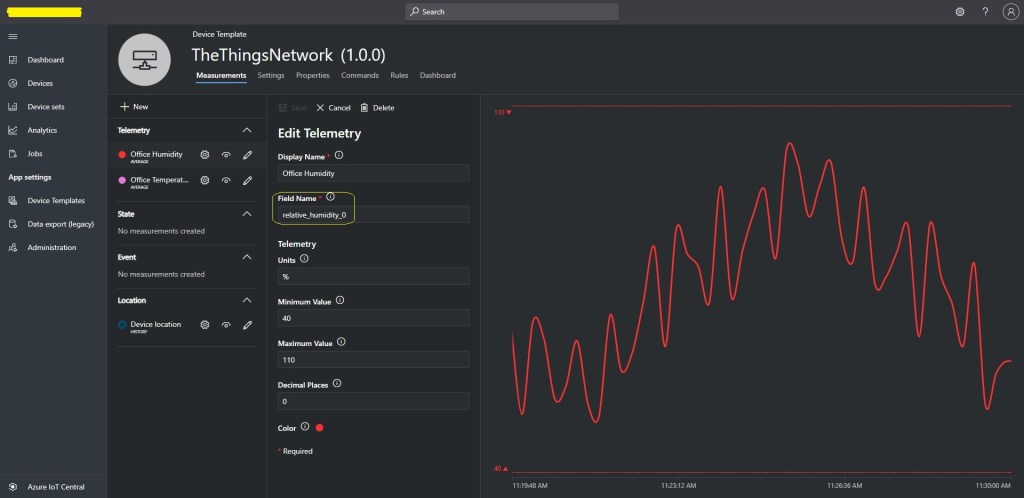
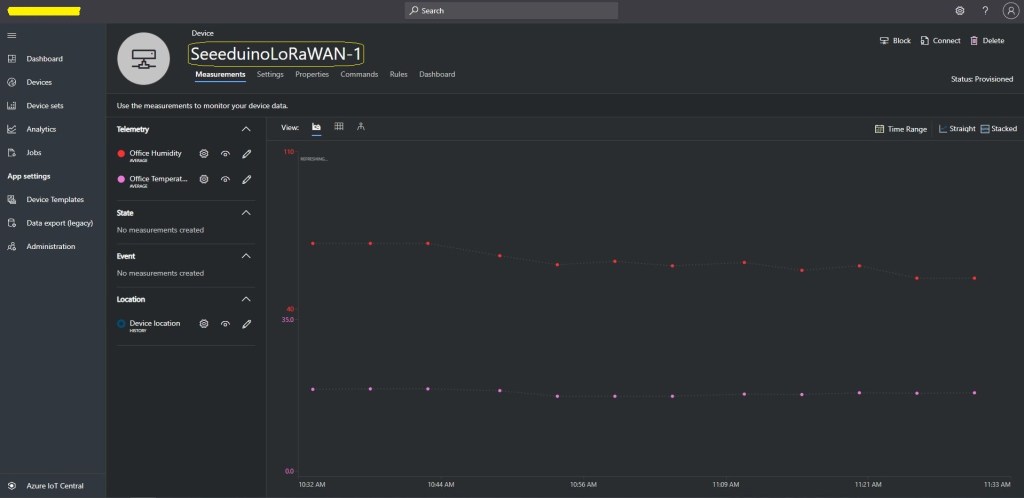
After configuring a device template, associating my devices with the template, and modifying each device’s properties I could create a dashboard to view the temperature and humidity information returned by my Seeeduino LoRaWAN devices.
For development and testing being able to provision an individual device is really useful, though for Azure IoT Central it is not easy (especially with the deprecation of DPS-KeyGen). With an Azure IoT Hub device connection strings are available in the portal which is convenient but not terribly scalable.
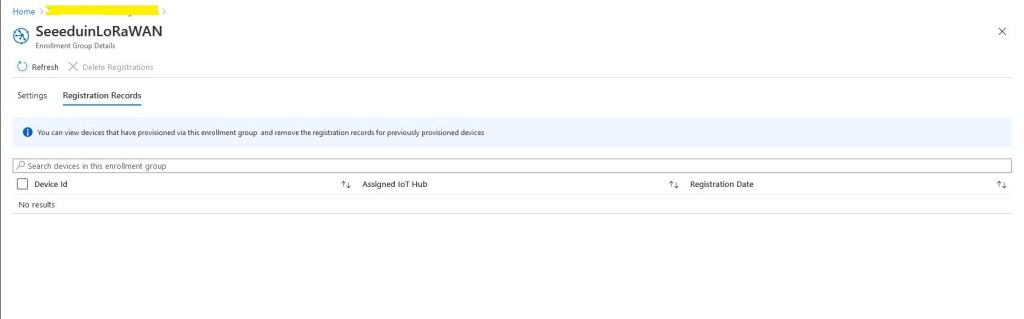
Initially the enrollment group had no registration records so I ran my command-line application to generate group enrollment keys for one of my devices.
Device registration before running my command line application
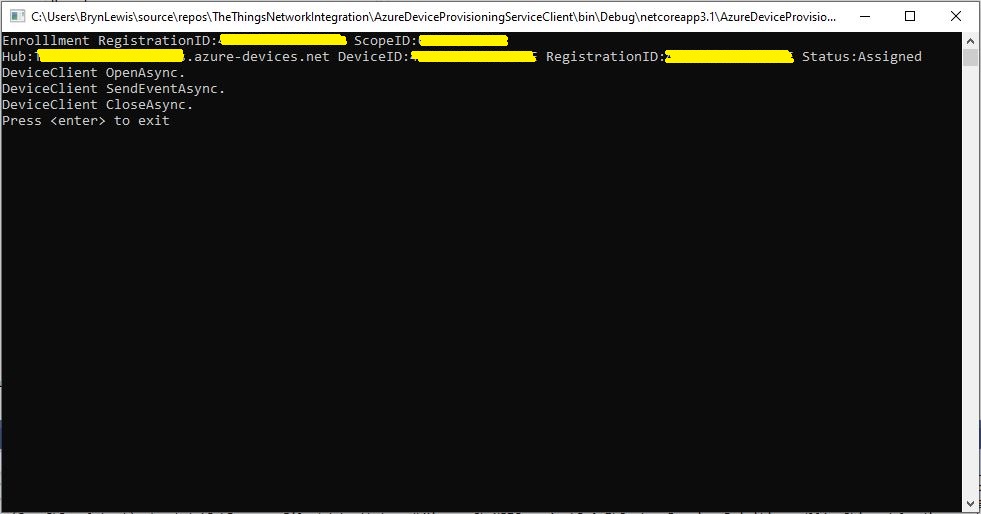
Then I ran the command-line application with my scopeID, registrationID (LoRaWAN deviceEUI) and the device group enrollment key I had generated in the previous step.
Registering a device and sending a message to the my Azure IoT Hub
After running the command line application the device was visible in the enrollment group registration records.
Device registration after running my command line application
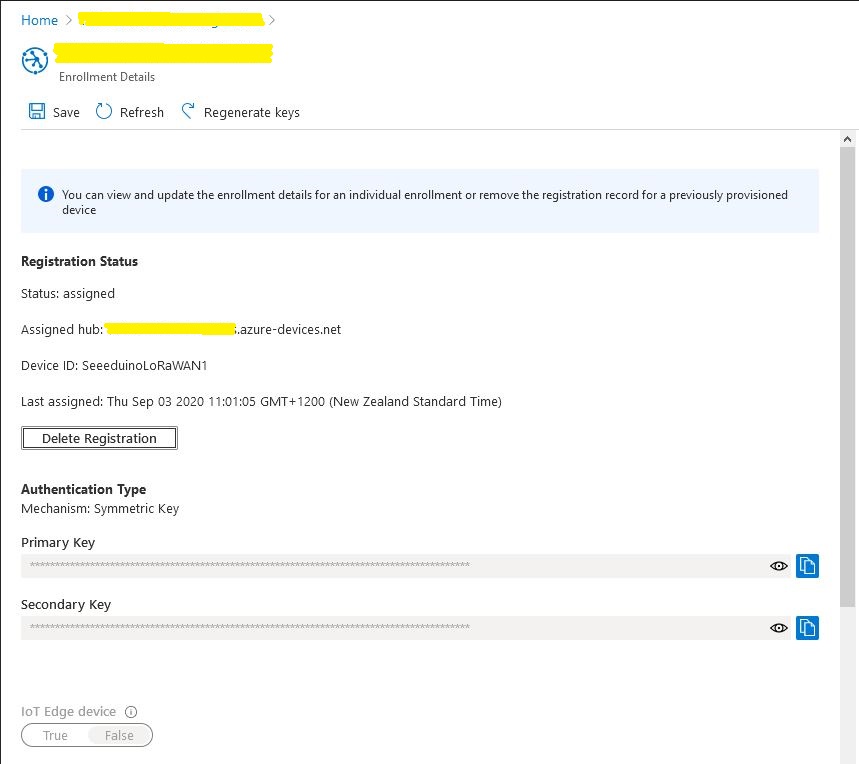
Provisioning a device with an individual enrollment has a different workflow. I had to run my command-line application with the RegistrationID, ScopeID, and one of the symmetric keys from the DPS individual enrollment device configuration.
DPS Individual enrollment configuration
A major downside to an individual enrollment is either the primary or the secondary symmetric key for the device has to be deployed on the device which could be problematic if the device has no secure storage.
With a group enrollment only the registration ID and the derived symmetric key have to be deployed on the device which is more secure.
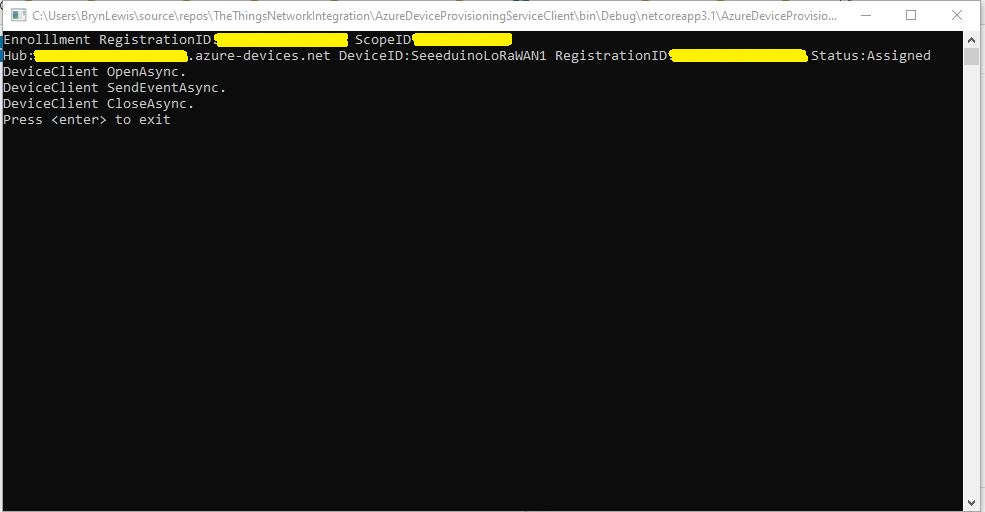
Registering a device and sending a message to the my Azure IoT Hub
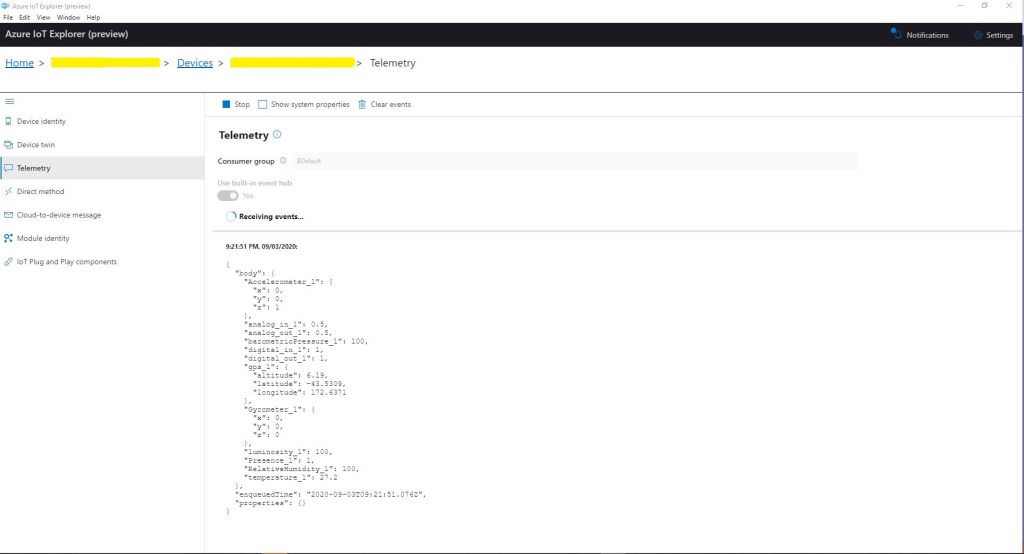
In Azure IoT Explorer I could see messages from both my group and individually enrolled devices arriving at my Azure IoT hub
After some initial issues I found DPS was quite reliable and surprisingly easy to configure. I did find the DPS ProvisioningDeviceClient.RegisterAsync method sometimes took several seconds to execute which may have some ramifications when my application is doing this on demand.