Azure Event Grid esp-mqtt-arduino Client – Success

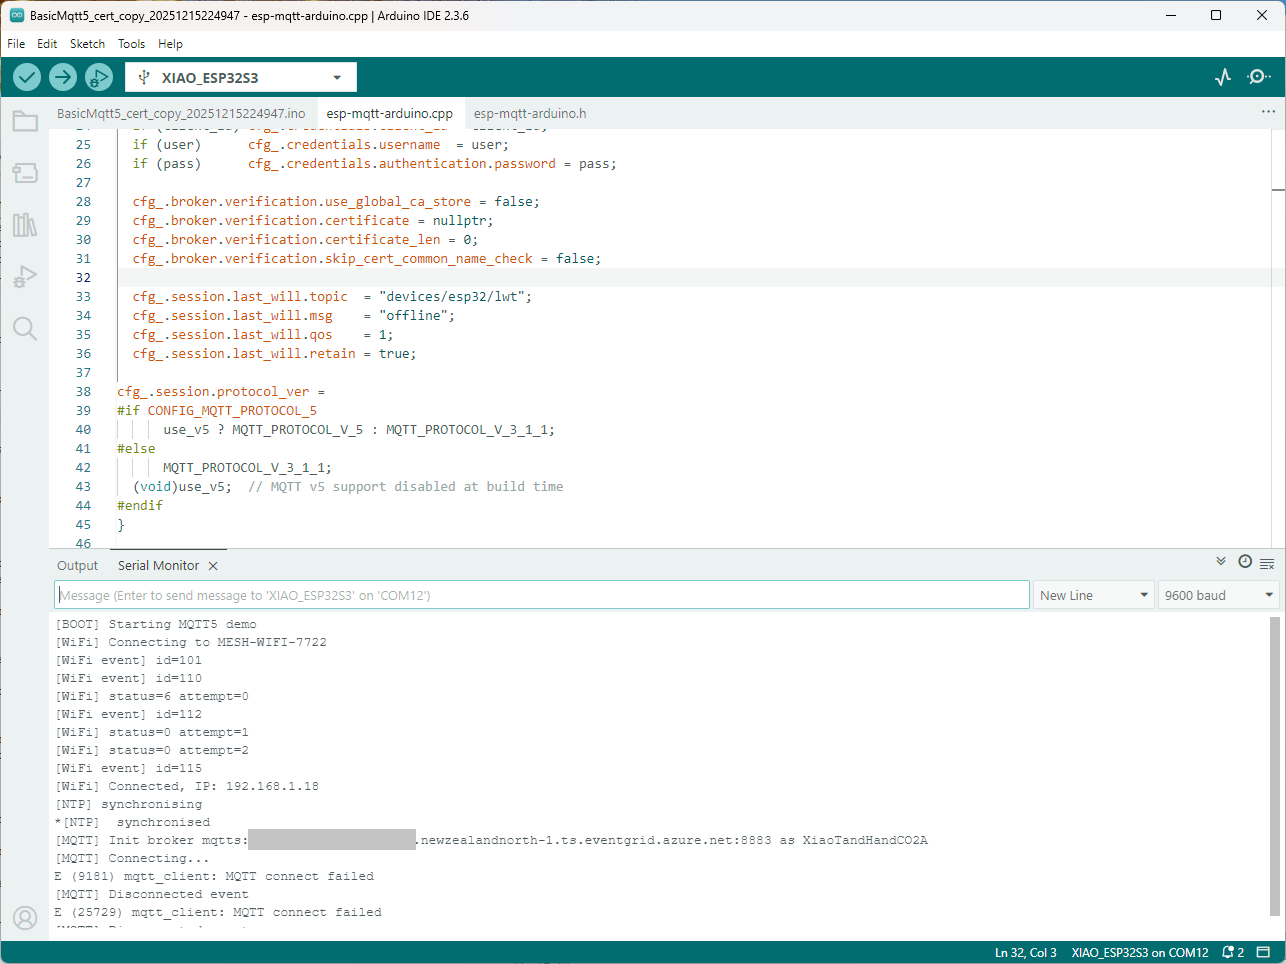
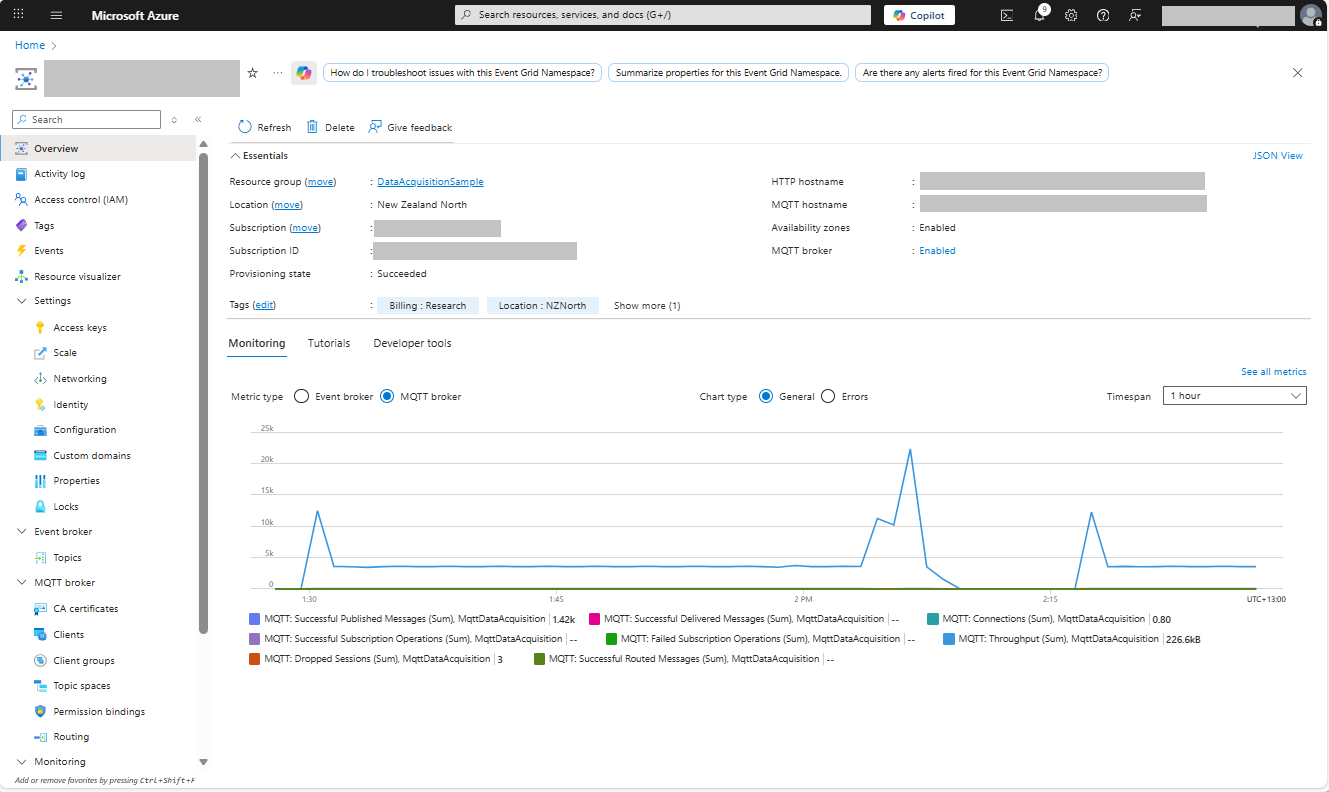
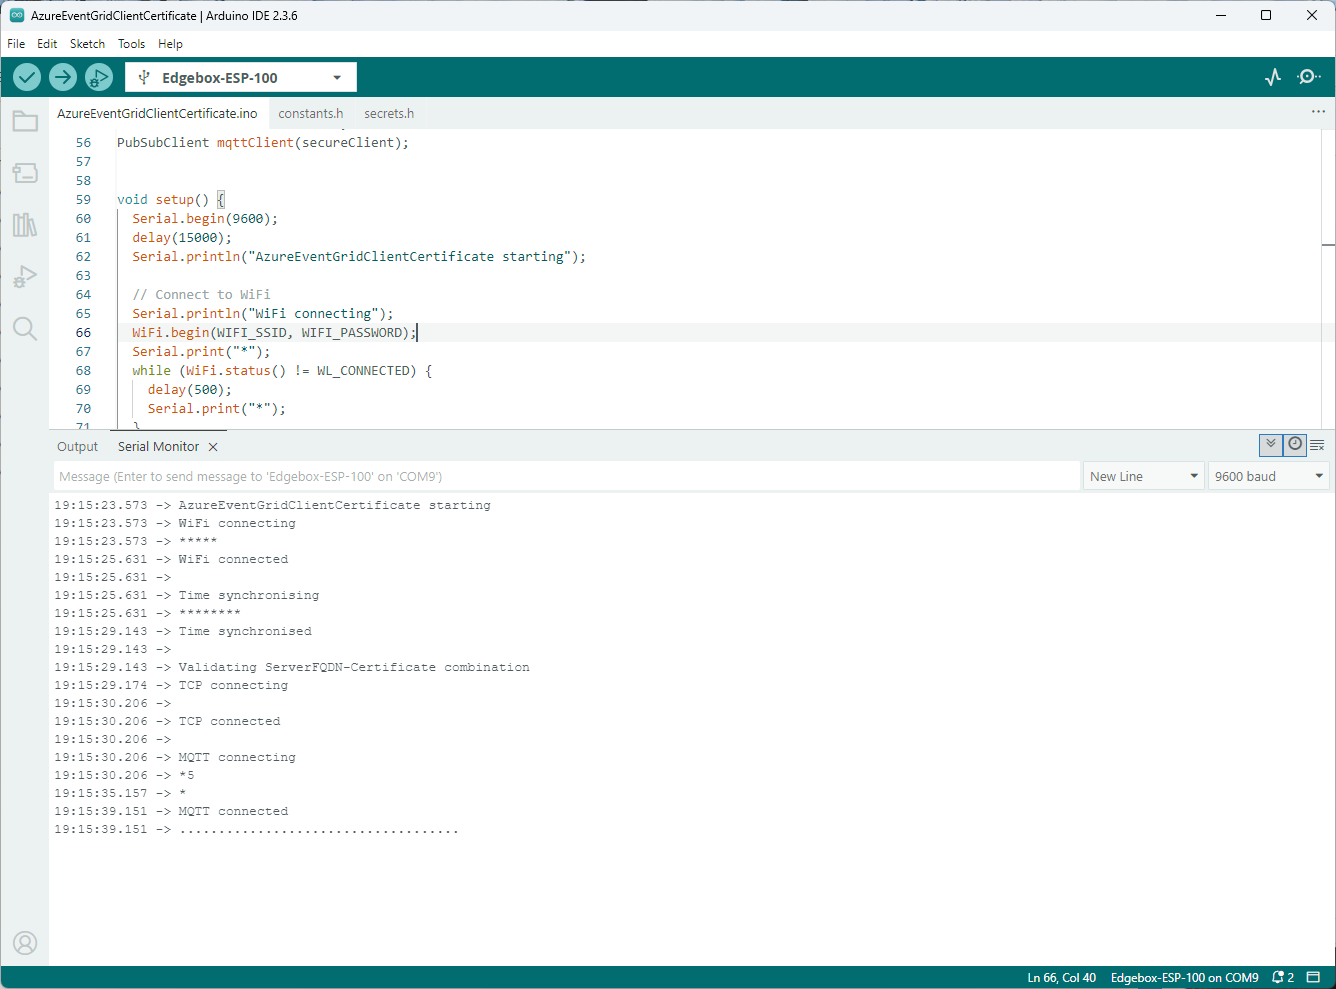
Still couldn’t figure out why my code was failing so I turned up logging to 11 and noticed a couple of messages which didn’t make sense. The device was connecting than disconnecting which indicated a another problem. As part of the Message Queue Telemetry Transport(MQTT) specification there is a “feature” Last Will and Testament(LWT) which a client can configure so that the MQTT broker sends a message to a topic if the device disconnects unexpectedly.

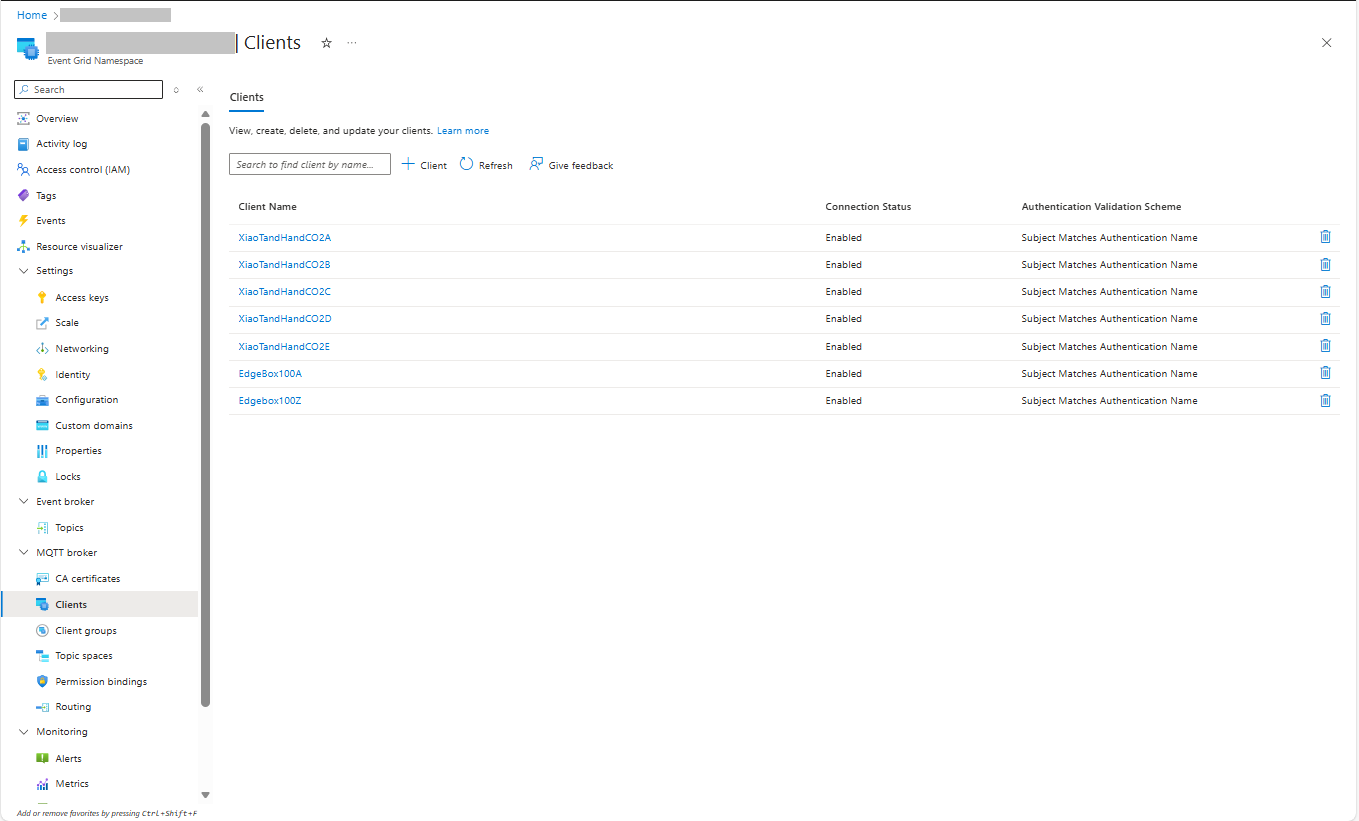
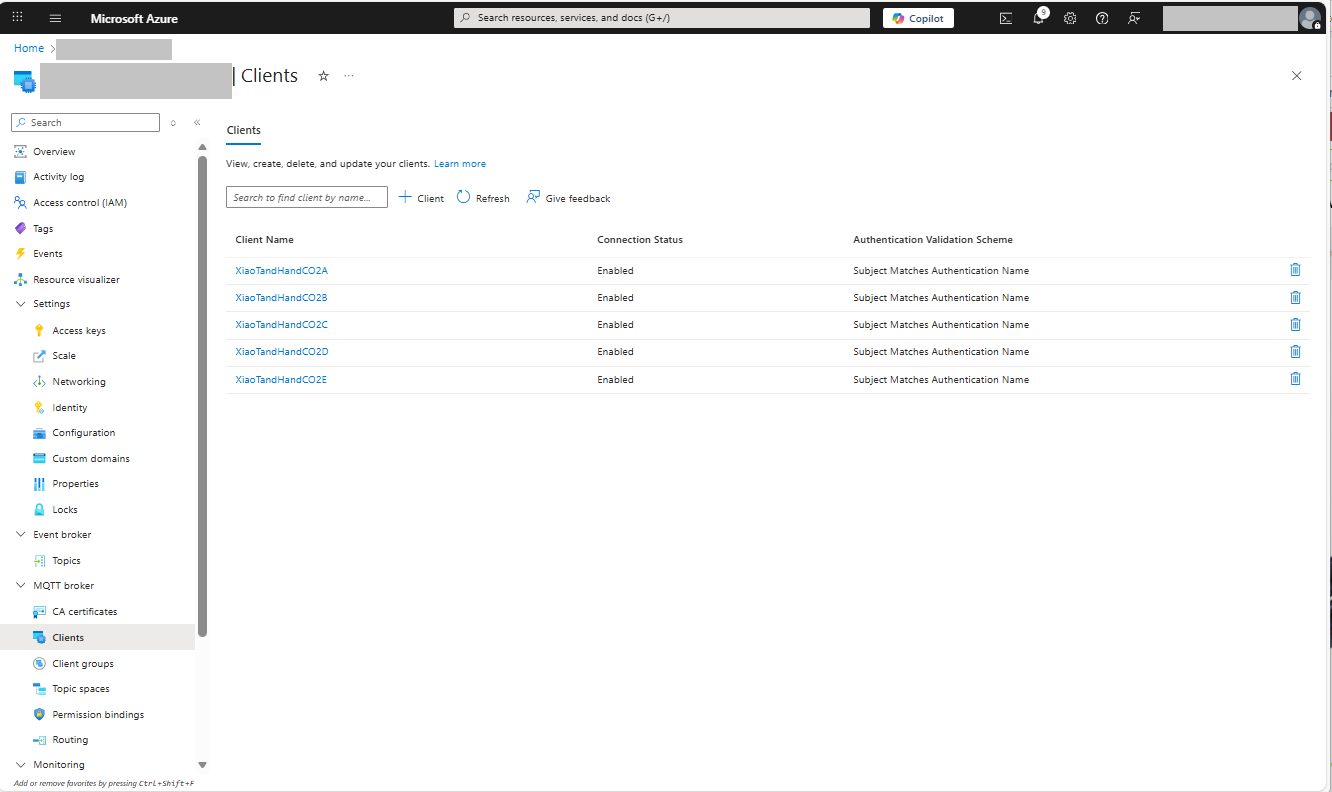
I was looking at the code and noticed that LWT was being used and that the topic didn’t exist in my Azure Event Grid MQTT Broker namespace. When the LWT configuration was commented out the application worked.

void Mqtt5ClientESP32::begin(const char* uri, const char* client_id, const char* user, const char* pass, bool use_v5) {
  connected_ = false;
  insecure_ = false;
  cfg_.broker.address.uri = uri;
  if (client_id) cfg_.credentials.client_id = client_id;
  if (user)      cfg_.credentials.username  = user;
  if (pass)      cfg_.credentials.authentication.password = pass;

  cfg_.broker.verification.use_global_ca_store = false;
  cfg_.broker.verification.certificate = nullptr;
  cfg_.broker.verification.certificate_len = 0;
  cfg_.broker.verification.skip_cert_common_name_check = false;
  
/*
  cfg_.session.last_will.topic  = "devices/esp32/lwt";
  cfg_.session.last_will.msg    = "offline";
  cfg_.session.last_will.qos    = 1;
  cfg_.session.last_will.retain = true;
*/

cfg_.session.protocol_ver = 
#if CONFIG_MQTT_PROTOCOL_5
      use_v5 ? MQTT_PROTOCOL_V_5 : MQTT_PROTOCOL_V_3_1_1;
#else
      MQTT_PROTOCOL_V_3_1_1;
  (void)use_v5;  // MQTT v5 support disabled at build time
#endif
}

Two methods were added so that the LWT could be configured if required

void SetLWT(const char *topic, const char *msg, int msg_len,int qos, int retain);
void Mqtt5ClientESP32::SetLWT(const char *topic, const char *msg, int msg_len,int qos, int retain){
   cfg_.session.last_will.topic  = topic;
   cfg_.session.last_will.msg    = msg;
   cfg_.session.last_will.msg_len= msg_len;
   cfg_.session.last_will.qos    = qos;
   cfg_.session.last_will.retain = retain;
}

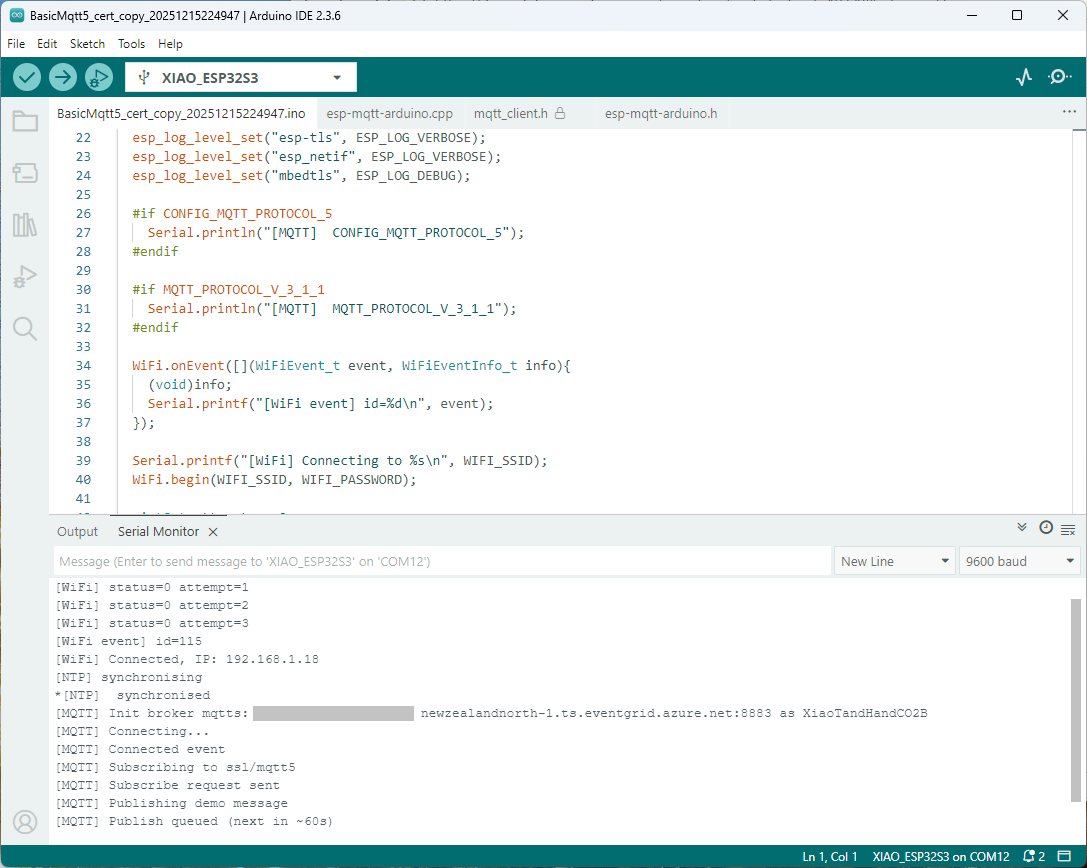
Paying close attention to the logging I noticed the “Subscribing to ssl/mqtts” followed by “Subscribe request sent”

I checked the sample application and found that if the connect was successful the application would then try and subscribe to a topic that didn’t exist.

mqtt.onConnected([]{
  Serial.println("[MQTT] Connected event");

   mqttReady = true;
/*
Serial.println("[MQTT] Subscribing to ssl/mqtt5");
if (mqtt.subscribe("ssl/mqtt5", 1, true)) {
  Serial.println("[MQTT] Subscribe request sent");
} else {
  Serial.println("[MQTT] Subscribe request failed");
}
*/

I commented out that code and the application started without any messages

Just to make sure I checked that the message count in the Azure Storage Queue was increasing and the payload client ID matched my device

Yet again a couple of hours lost from my life which I can never get back

Azure Event Grid nanoFramework Client – Publisher

Building a .NET nanoFramework application for testing Azure Event Grid MQTT Broker connectivity that would run on my Seeedstudio EdgeBox ESP100 and Seeedstudio Xiao ESP32S3 devices took a couple of hours. Most of that time was spent figuring out how to generate the certificate and elliptic curve private key

Create an elliptic curve private key

 openssl ecparam -name prime256v1 -genkey -noout -out device.key

Generate a certificate signing request

openssl req -new -key device.key -out device.csr -subj "/CN=device.example.com/O=YourOrg/OU=IoT"

Then use the intermediate certificate and key file from earlier to generate a device certificate and key.

 openssl x509 -req -in device.csr -CA IntermediateCA.crt -CAkey IntermediateCA.key -CAcreateserial -out device.crt -days 365 -sha256

In this post I have assumed that the reader is familiar with configuring Azure Event Grid clients, client groups, topic spaces, permission bindings and routing.

The PEM encoded root CA certificate chain that is used to validate the server
public const string CA_ROOT_PEM = @"-----BEGIN CERTIFICATE-----
CN: CN = Microsoft Azure ECC TLS Issuing CA 03
-----END CERTIFICATE-----
-----BEGIN CERTIFICATE-----
CN: CN = DigiCert Global Root G3
-----END CERTIFICATE-----";

The PEM encoded certificate chain that is used to authenticate the device
public const string CLIENT_CERT_PEM_A = @"-----BEGIN CERTIFICATE-----
-----BEGIN CERTIFICATE-----
 CN=Self signed device certificate
-----END CERTIFICATE-----
-----BEGIN CERTIFICATE-----
 CN=Self signed Intermediate certificate
-----END CERTIFICATE-----";

 The PEM encoded private key of device
public const string CLIENT_KEY_PEM_A = @"-----BEGIN EC PRIVATE KEY-----
-----END EC PRIVATE KEY-----";

My application was “inspired” by the .NET nanoFramework m2mqtt example.

public static void Main()
{
   int sequenceNumber = 0;
   MqttClient mqttClient = null;
   Thread.Sleep(1000); // Found this works around some issues with running immediately after a reset

   bool wifiConnected = false;
   Console.WriteLine("WiFi connecting...");
   do
   {
      // Attempt to connect using DHCP
      wifiConnected = WifiNetworkHelper.ConnectDhcp(Secrets.WIFI_SSID, Secrets.WIFI_PASSWORD, requiresDateTime: true);

      if (!wifiConnected)
      {
         Console.WriteLine($"Failed to connect. Error: {WifiNetworkHelper.Status}");
         if (WifiNetworkHelper.HelperException != null)
         {
            Console.WriteLine($"Exception: {WifiNetworkHelper.HelperException}");
         }

         Thread.Sleep(1000);
      }
   }
   while (!wifiConnected);
   Console.WriteLine("WiFi connected");

   var caCert = new X509Certificate(Constants.CA_ROOT_PEM);

   X509Certificate2 clientCert = null;
   try
   {
      clientCert = new X509Certificate2(Secrets.CLIENT_CERT_PEM_A, Secrets.CLIENT_KEY_PEM_A, string.Empty);
   }
   catch (Exception ex)
   {
      Console.WriteLine($"Client Certificate Exception: {ex.Message}");
   }

   mqttClient = new MqttClient(Secrets.MQTT_SERVER, Constants.MQTT_PORT, true, caCert, clientCert, MqttSslProtocols.TLSv1_2);

   mqttClient.ProtocolVersion = MqttProtocolVersion.Version_5;

   bool mqttConnected = false;
   Console.WriteLine("MQTT connecting...");
   do
   {
      try
      {
         // Regular connect
         var resultConnect = mqttClient.Connect(Secrets.MQTT_CLIENTID, Secrets.MQTT_USERNAME, Secrets.MQTT_PASSWORD);
         if (resultConnect != MqttReasonCode.Success)
         {
            Console.WriteLine($"MQTT ERROR connecting: {resultConnect}");
            Thread.Sleep(1000);
         }
         else
         {
            mqttConnected = true;
         }
      }
      catch (Exception ex)
      {
         Console.WriteLine($"MQTT ERROR Exception '{ex.Message}'");
         Thread.Sleep(1000);
      }
   }
   while (!mqttConnected);
   Console.WriteLine("MQTT connected...");

   mqttClient.MqttMsgPublishReceived += MqttMsgPublishReceived;
   mqttClient.MqttMsgSubscribed += MqttMsgSubscribed;
   mqttClient.MqttMsgUnsubscribed += MqttMsgUnsubscribed;
   mqttClient.ConnectionOpened += ConnectionOpened;
   mqttClient.ConnectionClosed += ConnectionClosed;
   mqttClient.ConnectionClosedRequest += ConnectionClosedRequest;

   string topicPublish = string.Format(MQTT_TOPIC_PUBLISH_FORMAT, Secrets.MQTT_CLIENTID);
   while (true)
   {
      Console.WriteLine("MQTT publish message start...");

      var payload = new MessagePayload() { ClientID = Secrets.MQTT_CLIENTID, Sequence = sequenceNumber++ };

      string jsonPayload = JsonSerializer.SerializeObject(payload);

      var result = mqttClient.Publish(topicPublish, Encoding.UTF8.GetBytes(jsonPayload), "application/json; charset=utf-8", null);

      Debug.WriteLine($"MQTT published ({result}): {jsonPayload}");

      Thread.Sleep(100);
   }
}

I then configured my client (Edgebox100Z) and updated the “secrets.cs” file

Azure Event Grid MQTT Broker Clients

The application connected to the Azure Event Grid MQTT broker and started publishing the JSON payload with the incrementing sequence number.

Visual Studio debugger output of JSON payload publishing

The published messages were “routed” to an Azure Storage Queue where they could be inspected with a tool like Azure Storage Explorer.

Azure Event Grid MQTT Broker metrics with messages published selected

I could see the application was working in the Azure Event Grid MQTT broker metrics because the number of messages published was increasing.

Azure Event Grid Arduino Client – Publisher

The Arduino application for testing Azure Event Grid MQTT Broker connectivity worked on my Seeedstudio EdgeBox ESP100 and Seeedstudio Xiao ESP32S3 devices, so the next step was to modify it to publish some messages.

The first version generated the JSON payload using an snprintf which was a bit “nasty”

static uint32_t sequenceNumber = 0;

void loop() {
  mqttClient.loop();

  Serial.println("MQTT Publish start");

  char payloadBuffer[64];

  snprintf(payloadBuffer, sizeof(payloadBuffer), "{\"ClientID\":\"%s\", \"Sequence\": %i}", MQTT_CLIENTID, sequenceNumber++);

  Serial.println(payloadBuffer);

  if (!mqttClient.publish(MQTT_TOPIC_PUBLISH, payloadBuffer, strlen(payloadBuffer))) {
    Serial.print("\nMQTT publish failed:");        
    Serial.println(mqttClient.state());    
  }
  Serial.println("MQTT Publish finish");

  delay(60000);
}

I then configured my client (Edgebox100A) and updated the “secrets.h” file

Azure Event Grid MQTT Broker Clients

The application connected to the Azure Event Grid MQTT broker and started publishing the JSON payload with the incrementing sequence number.

Arduino IDE serial monitor output of JSON payload publishing

The second version generated the JSON payload using ArduinoJson library.

static uint32_t sequenceNumber = 0;

void loop() {
  mqttClient.loop();

  Serial.println("MQTT Publish start");

  // Create a static JSON document with fixed size
  StaticJsonDocument<64> doc;

  doc["Sequence"] = counter++;
  doc["ClientID"] = MQTT_CLIENTID;

  // Serialize JSON to a buffer
  char jsonBuffer[64];
  size_t n = serializeJson(doc, jsonBuffer);

  Serial.println(jsonBuffer);

  if(!mqttClient.publish(MQTT_TOPIC_PUBLISH, jsonBuffer, n))
  {
    Serial.println(mqttClient.state());    
  }

  Serial.println("MQTT Publish finish");

  delay(2000);
}

I could see the application was working in the Azure Event Grid MQTT broker metrics because the number of messages published was increasing.

Azure Event Grid MQTT Broker metrics with messages published selected

The published messages were “routed” to an Azure Storage Queue where they can be inspected with a tool like Azure Storage Explorer.

Azure Storage Explorer displaying a message’s payload

The message payload is in Base64 encoded so I used copilot convert it to text.

Microsoft copilot decoding the Base64 payload

In this post I have assumed that the reader is familiar with configuring Azure Event Grid clients, client groups, topic spaces, permission bindings and routing.

Bonus also managed to slip in a reference to copilot.

Azure Event Grid Arduino Client – The joy of certs

“Lets start at the very beginning, A very good place to start”

The Azure Event Grid MQTT Broker server X509 certificate chain can be copy ‘n’ paste from the output of the openssl command

openssl s_client -connect YourNamespace.newzealandnorth-1.ts.eventgrid.azure.net:8883 -showcerts

A self-signed X509 root certificate which can sign intermediate X509 certificates and key file can be generated with a single openssl command.

openssl req -x509 -newkey rsa:4096 -keyout rootCA.key -out rootCA.crt -days 3650 -nodes -subj "/CN=devMobile  /O=devMobile.co.nz /C=NZ" -addext "basicConstraints=critical,CA:TRUE" -addext "keyUsage=critical,keyCertSign"

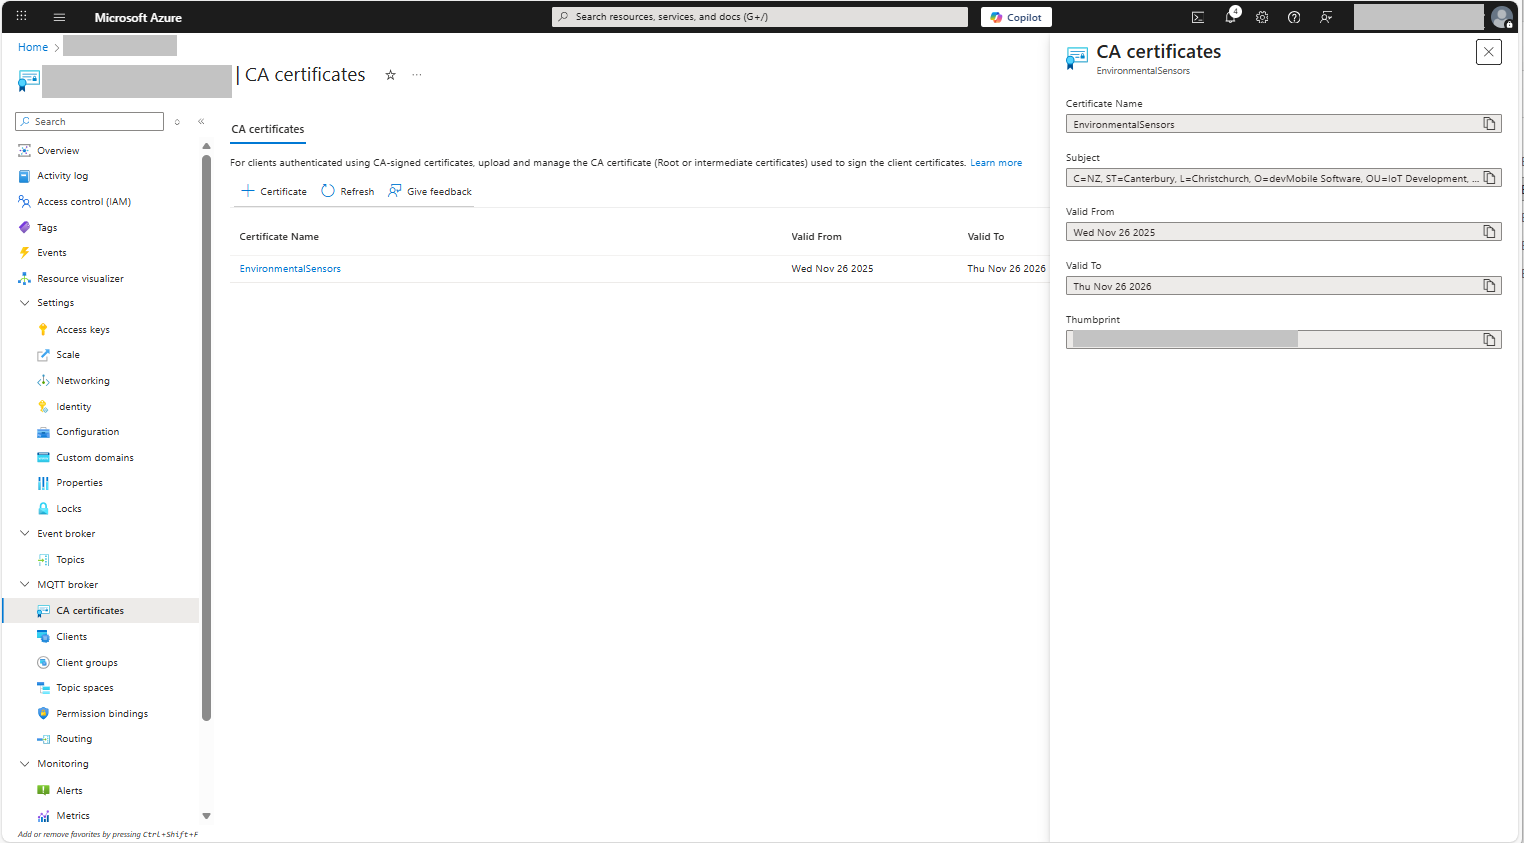
For a non-trivial system there should be a number of intermediate certificates. I have tried creating intermediate certificates for a device type, geography, application, customer and combinations of these. The first couple of times got it wrong so start with a field trial so that it isn’t so painful to go back and fix. (beware the sunk cost fallacy)

openssl genrsa -out intermediate.key 4096

openssl req -new -key intermediate.key -out intermediate.csr -subj "/CN=intermediate  /O=devMobile.co.nz /C=NZ"

I found creating an intermediate certificate that could sign device certificates required a conf file for the basicConstraints and keyUsage configuration.

[ v3_intermediate_ca ]
basicConstraints = critical, CA:TRUE, pathlen:0
keyUsage = critical, keyCertSign
  • critical-The extension must be understood and processed by any application validating the certificate. If the application does not understand it, the certificate must be rejected.
  • CA:TRUE-This certificate is allowed to act as a Certificate Authority (CA), meaning it can sign other certificates.
  • pathlen:0-This CA can only issue end-entity (leaf) certificates and cannot issue further intermediate CA certificates.
  • keyCertSig- The certificate can be used to sign other certificates (i.e., it’s a CA certificate).
openssl x509 -req -in intermediate.csr  -CA rootCA.crt -CAkey rootCA.key -CAcreateserial -out intermediate.crt -days 1825 -extfile intermediate_ext.cnf -extensions v3_intermediate_ca

Creating a device certificate is similar to the process for the intermediate certificate but doesn’t need to be able to sign certificates.

openssl genrsa -out EdgeBox100A.key 4096

openssl req -new -key EdgeBox100A.key -out EdgeBox100A.csr -subj "/CN=EdgeBox100A"

openssl x509 -req -in EdgeBox100A.csr -CA intermediate.crt -CAkey intermediate.key -CAcreateserial -out EdgeBox100A.crt -days 365 

For production systems putting some thought into the Common name(CN), Organizational unit name(OU), Organization name(O), locality name(L), state or province name(S) and Country name(C)

// Minimalist ESP32 + Event Grid MQTT (mTLS) with PubSubClient
// Copyright (c) November 2025, devMobile Software
#include <PubSubClient.h>
#include <WiFi.h>
#include <WiFiClientSecure.h>

#include "constants.h"
#include "secrets.h"

// --- Wi-Fi ---
//const char* WIFI_SSID     = "";
//const char* WIFI_PASSWORD = "";

// --- Event Grid MQTT ---
//const char* MQTT_SERVER = "";
const uint16_t MQTT_PORT = 8883;

//const char* MQTT_CLIENTID = "";
//const char* MQTT_USERNAME = "";
//const char* MQTT_PASSWORD = "";
//const char* MQTT_TOPIC_PUBLISH = "devices/";
//const char* MQTT_TOPIC_SUBSCRIBE = "devices/";

/*
// The certificate that is used to authenticate the MQTT Broker
const char CA_ROOT_PEM[] PROGMEM = R"PEM(
-----BEGIN CERTIFICATE-----
      Thumbprint: 56D955C849887874AA1767810366D90ADF6C8536
      CN: CN=Microsoft Azure ECC TLS Issuing CA 03
-----END CERTIFICATE-----
-----BEGIN CERTIFICATE-----
      Thumbprint: 7E04DE896A3E666D00E687D33FFAD93BE83D349E
      CN: CN=DigiCert Global Root G3
-----END CERTIFICATE-----
)PEM";

The certificate that is used to authenticate the device
static const char CLIENT_CERT_PEM[] PROGMEM = R"PEM(
-----BEGIN CERTIFICATE-----
 CN=Self signed device certificate
-----END CERTIFICATE-----
-----BEGIN CERTIFICATE-----
 CN=Self signed Intermediate certificate
-----END CERTIFICATE-----
)PEM";

 The PEM encoded private key of device
static const char CLIENT_KEY_PEM[] PROGMEM = R"PEM(
-----BEGIN PRIVATE KEY-----
-----END PRIVATE KEY-----
)PEM";
*/

WiFiClientSecure secureClient;
PubSubClient mqttClient(secureClient);

void setup() {
  Serial.begin(9600);
  delay(5000);
  Serial.println();

  // Connect to WiFi
  Serial.println("WiFi connecting");
  WiFi.begin(WIFI_SSID, WIFI_PASSWORD);
  Serial.print("*");
  while (WiFi.status() != WL_CONNECTED) {
    delay(500);
    Serial.print("*");
  }
  Serial.println("\nWiFi connected");

  // Sync time for TLS
  Serial.println("\nTime synchronising");
  configTime(0, 0, "pool.ntp.org", "time.nist.gov");
  Serial.print("*");
  while (time(nullptr) < 100000) {
    delay(500);
    Serial.print("*");
  }
  Serial.println("\nTime synchronised");

  Serial.println("\nValidating ServerFQDN-Certificate combination");
  secureClient.setCACert(CA_ROOT_PEM);

  Serial.println("TCP connecting");
  if (secureClient.connect(MQTT_SERVER, MQTT_PORT)) {
    Serial.println("\nTCP connected");
  } else {
    Serial.println("\nTCP connection failed");
    return;
  }

  secureClient.setCertificate(CLIENT_CERT_A_PEM);
  secureClient.setPrivateKey(CLIENT_KEY_A_PEM);

  mqttClient.setServer(MQTT_SERVER, MQTT_PORT);

  Serial.println("\nMQTT connecting");
  Serial.print("*");
  while (!mqttClient.connect(MQTT_CLIENTID, MQTT_USERNAME, MQTT_PASSWORD)) {
    Serial.println(mqttClient.state());
    delay(5000);
    Serial.print("*");
  }
  Serial.println("\nMQTT connected");
}

static uint32_t sequenceNumber = 0;

void loop() {
  mqttClient.loop();

  Serial.print("'.");
  delay(10000);
}

My Arduino Xiao ESP32S3 and EdgeBox-ESP-100-Industrial Edge Controller devices could connect to the local Wi-Fi, get the time and date using the network time protocol(NTP), and validate the Azure Event Grid MQTT broker certificate. Then connect to the Azure Event Grid MQTT broker with the client name specified in the subject name of its X509 certificate.

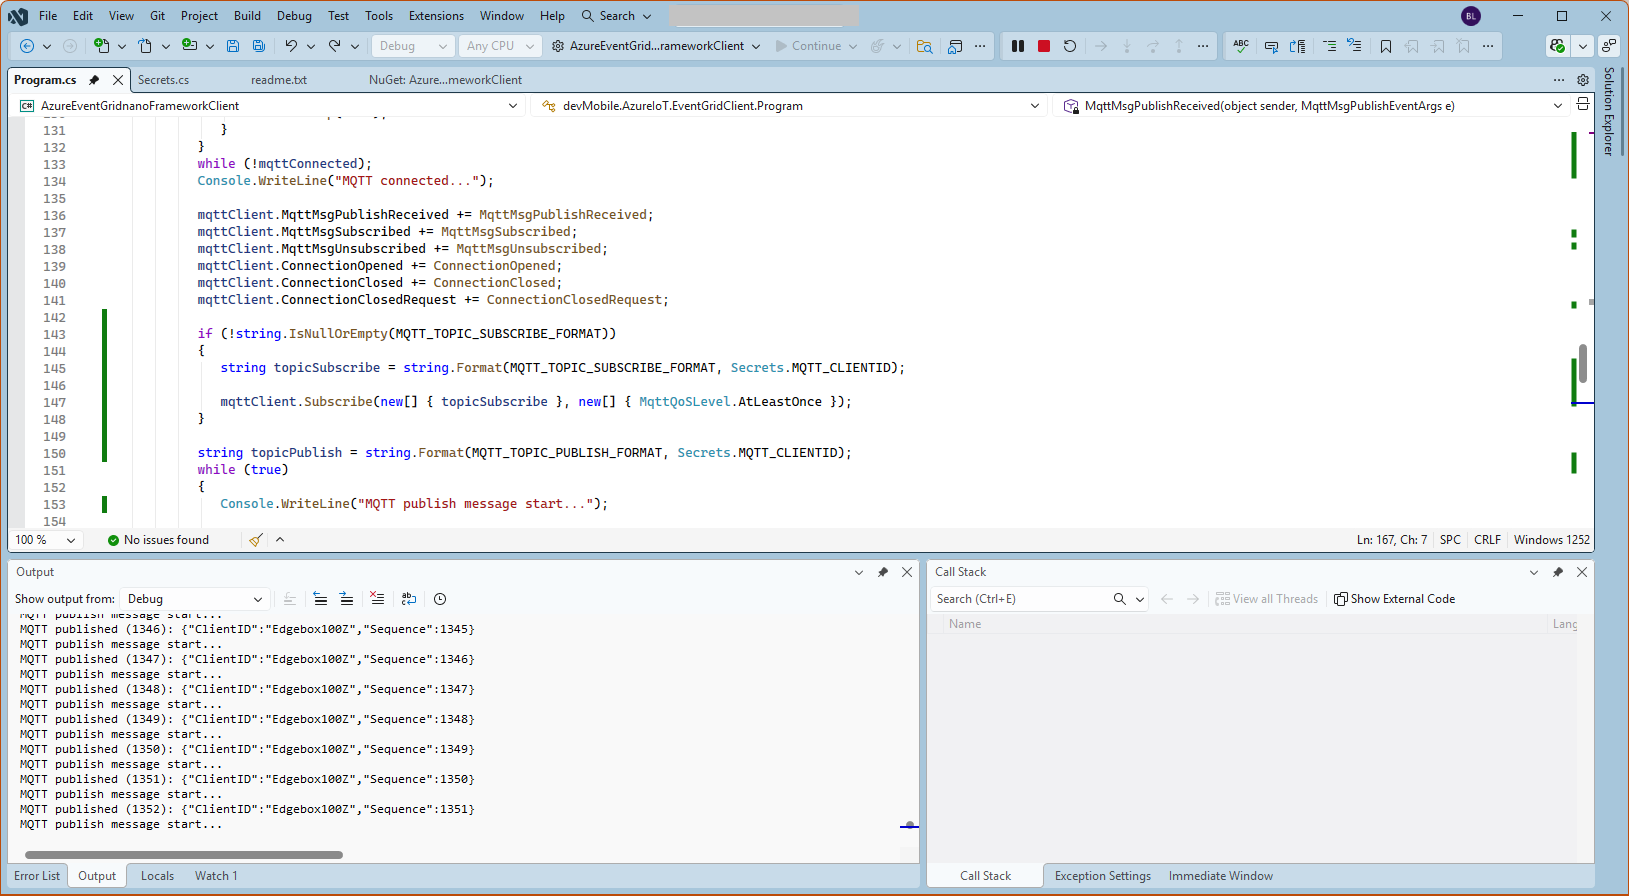
Establishing a connection to the Azure Event Grid MQTT broker often failed which surprised me. Initially I didn’t have any retry logic which meant I wasted quite a bit of time trying to debug failed connections

Swarm Space – Asset Tracker Payload Formatter

After writing Swarm Space – Payload Formatter Debugging I then tested it creating a new payload formatter for my new Swarm Asset Tracker.

Swarm Asset Tracker device

The Swarm Asset Tracker has a slightly different payload to the Swarm Eval Kit which is detailed in the product manual.

Swarm Asset Tracker JSON payload

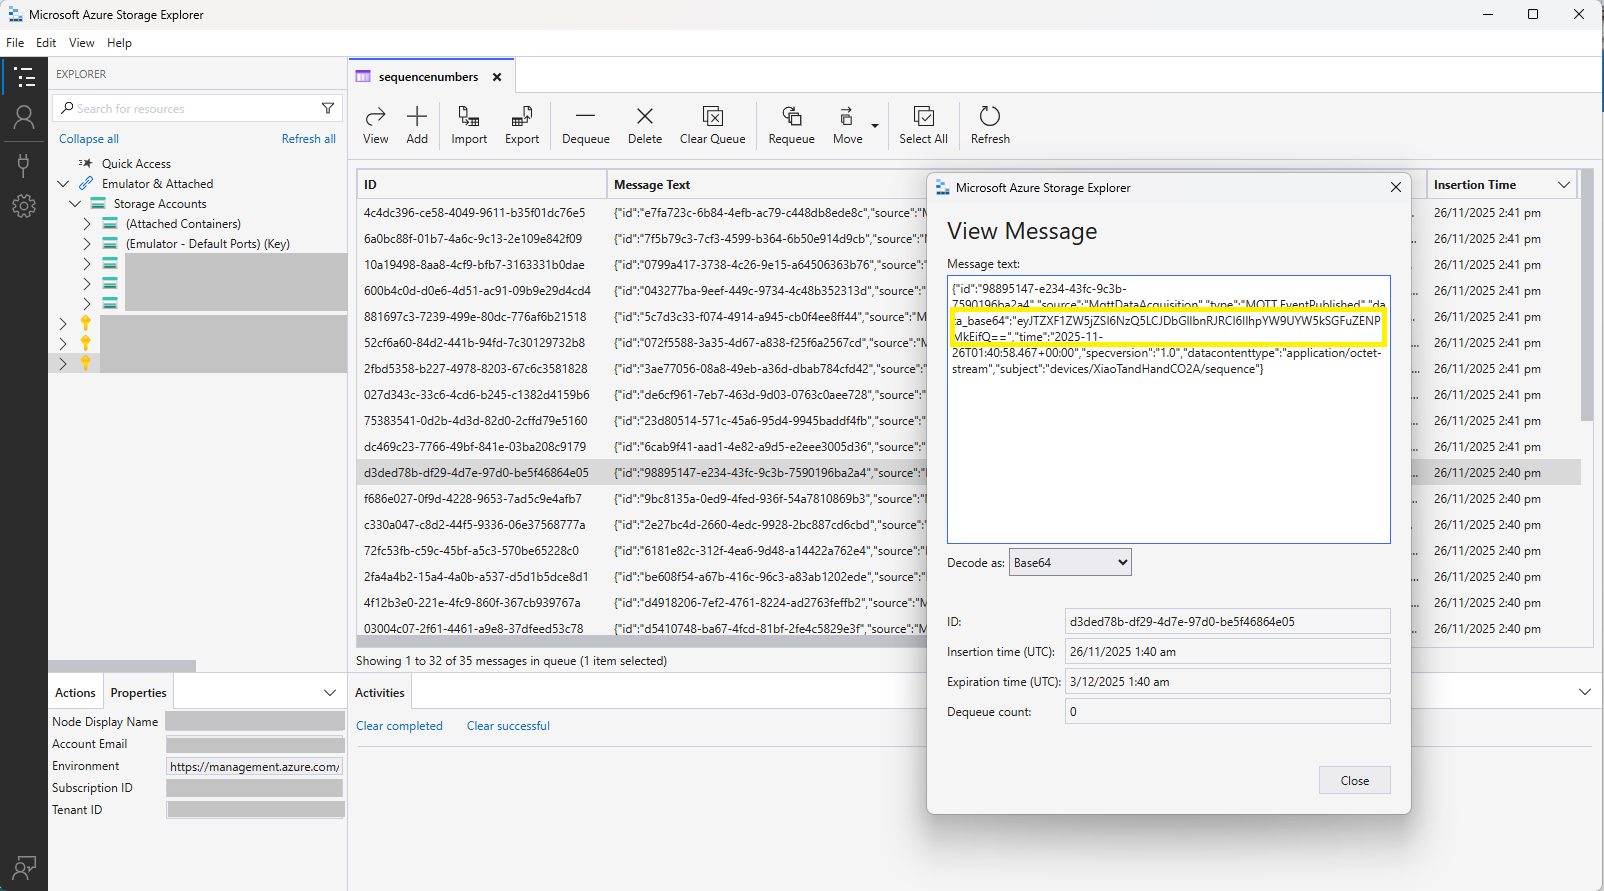
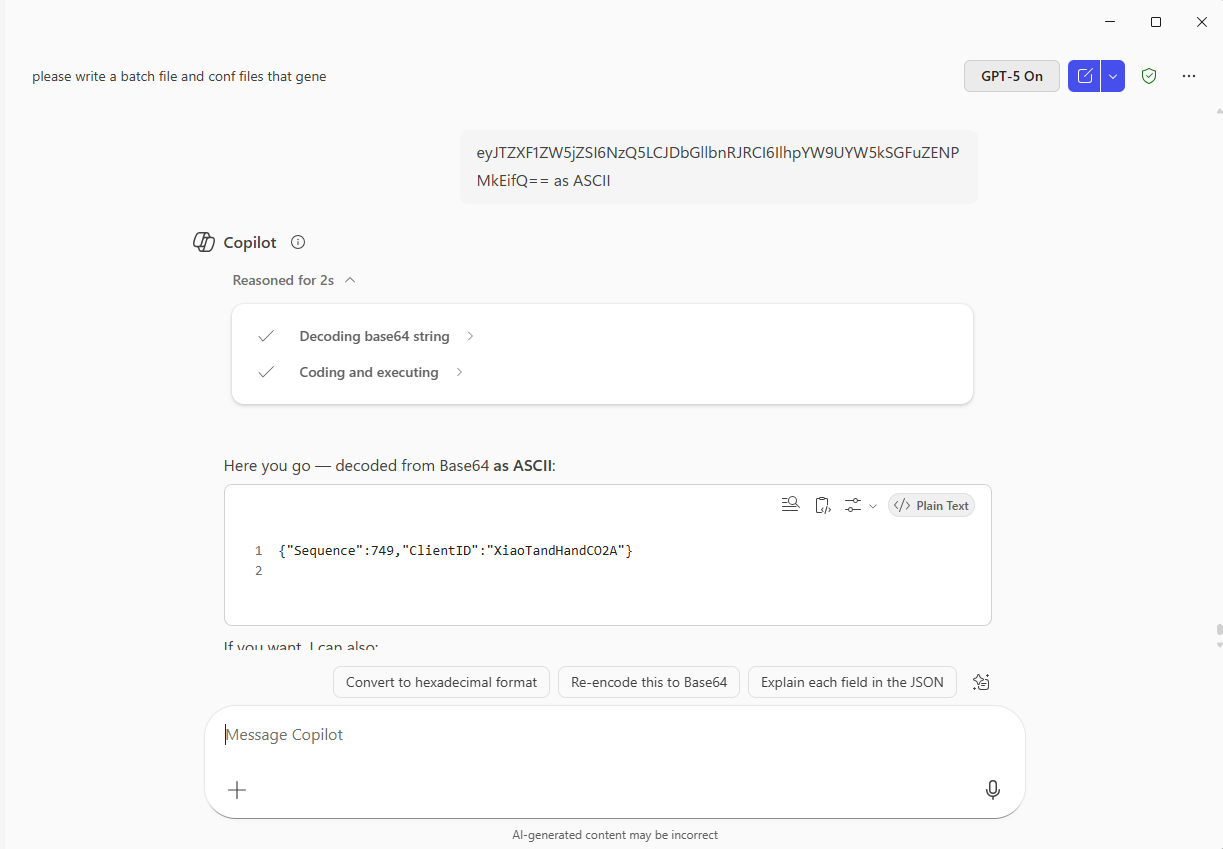
The first message sent shortly after I powered up the device had the latitude and longitude of Null Island

The Asset Tracker UserApplicationId is 65002 and the payload is similar to the Swarm Eval Kit. I created some message payloads (location of Christchurch Cathedral) for testing.

The JSON payload sent by my Swarm Asset Tracker

{
  "dt": 1677396395,
  "lt": -43.5333,
  "ln": 172.6333,
  "al": 25,
  "sp": 0,
  "hd": 126,
  "gj": 92,
  "gs": 1,
  "bv": 4103,
  "tp": 20,
  "rs": -110,
  "tr": -107,
  "ts": 3,
  "td": 1677396357,
  "hp": 166,
  "vp": 187,
  "tf": 36526
}

The Base64 representation of the payload sent by my Swarm Asset Tracker

ew0KICAiZHQiOiAxNjc3Mzk2Mzk1LA0KICAibHQiOiAtNDMuNTMzMywNCiAgImxuIjogMTcyLjYzMzMsDQogICJhbCI6IDI1LA0KICAic3AiOiAwLA0KICAiaGQiOiAxMjYsDQogICJnaiI6IDkyLA0KICAiZ3MiOiAxLA0KICAiYnYiOiA0MTAzLA0KICAidHAiOiAyMCwNCiAgInJzIjogLTExMCwNCiAgInRyIjogLTEwNywNCiAgInRzIjogMywNCiAgInRkIjogMTY3NzM5NjM1NywNCiAgImhwIjogMTY2LA0KICAidnAiOiAxODcsDQogICJ0ZiI6IDM2NTI2DQp9

The initial version of my payload formatter

using System;
using System.Collections.Generic;
using System.Globalization;
using Newtonsoft.Json.Linq;

public class FormatterUplink : PayloadFormatter.IFormatterUplink
{
    public JObject Evaluate(IDictionary<string, string> properties, uint organisationId, uint deviceId, byte deviceType, ushort userApplicationId, JObject payloadJson, string payloadText, byte[] payloadBytes)
    {
        JObject telemetryEvent = new JObject();

        if ((payloadText != "") && (payloadJson != null))
        {
            JObject location = new JObject();

            location.Add("lat", payloadJson.GetValue("lt"));
            location.Add("lon", payloadJson.GetValue("ln"));
            location.Add("alt", payloadJson.GetValue("al"));

            telemetryEvent.Add("DeviceLocation", location);
        }

        // Course & speed
        telemetryEvent.Add("Course", payloadJson.GetValue("hd"));
        telemetryEvent.Add("Speed", payloadJson.GetValue("sp"));

        // Battery voltage
        telemetryEvent.Add("BatteryVoltage", payloadJson.GetValue("bv"));

        // RSSI
        telemetryEvent.Add("RSSI", payloadJson.GetValue("rs"));

        properties.Add("iothub-creation-time-utc", DateTimeOffset.FromUnixTimeSeconds((long)payloadJson.GetValue("dt")).ToString("s", CultureInfo.InvariantCulture));

        return telemetryEvent;
    }
}

The PayloadFormatterMaintenanceApplication command line I used for testing my Swarm Asset Tracker payload formatter

The console output of my Swarm Asset Tracker payload formatter

The PayloadFormatterMaintenanceApplication is better than trying to debug a payload formatter in a staging/production environment.

Currently the payload formatters still have to be manually uploaded to the application’s Azure Blob Storage for final testing.

Swarm Space – Payload Formatter Debugging

After Swarm Space – Uplink Payload Formatters revisited I wrote a couple of payload formatters and they were easy to get wrong and the Azure Application Insights error messages were unhelpful.

namespace PayloadFormatter // Additional namespace for shortening interface when usage in formatter code
{
    using System.Collections.Generic;

    using Newtonsoft.Json.Linq;

    public interface IFormatterUplink
    {
        public JObject Evaluate(IDictionary<string, string> properties, uint organisationId, uint deviceId, byte deviceType, ushort userApplicationId, JObject payloadJson, string payloadText, byte[] payloadBytes);
    }

    public interface IFormatterDownlink
    {
        public byte[] Evaluate(IDictionary<string, string> properties, uint organisationId, uint deviceId, byte deviceType, ushort userApplicationId, JObject payloadJson, string payloadText, byte[] payloadBytes);
    }
}

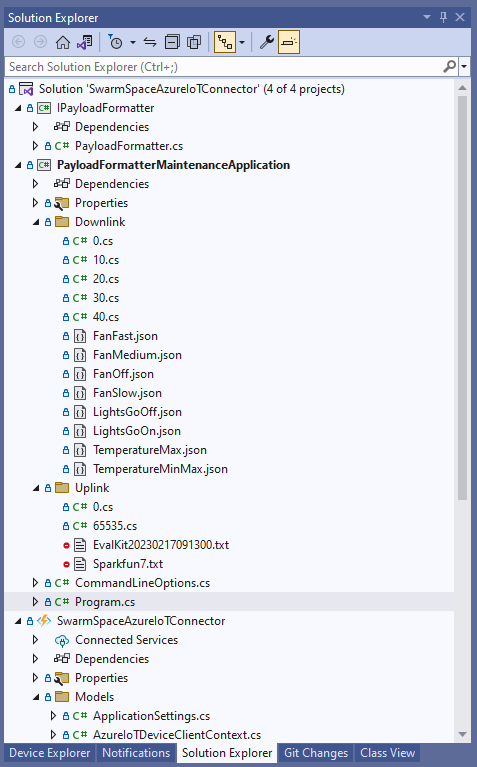
The definitions of the uplink & downlink payload formatter evaluator interfaces have been updated and shifted to a new project.

Visual Studio 2022 Solution with payloadformatter maintenance application

I built a console application to help with developing and debugging uplink or downlink formatters. The application has a number of command line parameters which specify the formatter to be used, UserApplicationId, OrganizationId, DeviceType etc.

public class CommandLineOptions
{
    [Option('d', "Direction", Required = true, HelpText = "Test Uplink or DownLink formatter")]
	public string Direction { get; set; }

    [Option('p', "filename", HelpText = "Uplink or Downlink Payload file name")]
    public string PayloadFilename { get; set; } = string.Empty;

    [Option('o', "OrganisationId", Required = true, HelpText = "Organisation unique identifier")]
    public uint OrganizationId { get; set; }

    [Option('i', "DeviceId", Required = true, HelpText = "Device unique identitifer")]
    public uint DeviceId { get; set; }

    [Option('t', "DeviceType", Required = true, HelpText = "Device type number")]
    public byte DeviceType { get; set; }

    [Option('u', "UserApplicationId", Required = true, HelpText = "User Application Id")]
    public ushort UserApplicationId { get; set; }

    [Option('h', "SwarmHiveReceivedAtUtc", HelpText = "Swarm Hive received at time UTC")]
    public DateTime? SwarmHiveReceivedAtUtc { get; set; }

    [Option('w', "UplinkWebHookReceivedAtUtc", HelpText = "Webhook received at time UTC")]
    public DateTime? UplinkWebHookReceivedAtUtc { get; set; }

    [Option('s', "Status", HelpText = "Uplink local file system file name")]
    public byte? Status { get; set; }

    [Option('c', "Client", HelpText = "Uplink local file system file name")]
    public string Client { get; set; } 
 }

The downlink formatter (similar approach for uplink) loads the sample file as an array of bytes, then tries to convert it to text, and finally to JSON. Then the formatter code is “compiled” and the executed with the file payload and command line parameters.

private static async Task DownlinkFormatterCore(CommandLineOptions options)
{
    Dictionary<string, string> properties = new Dictionary<string, string>();

    string formatterFolder = Path.Combine(Environment.CurrentDirectory, "downlink");
    Console.WriteLine($"Downlink- uplinkFormatterFolder: {formatterFolder}");

    string formatterFile = Path.Combine(formatterFolder, $"{options.UserApplicationId}.cs");
    Console.WriteLine($"Downlink- UserApplicationId: {options.UserApplicationId}");
    Console.WriteLine($"Downlink- Payload formatter file: {formatterFile}");

    PayloadFormatter.IFormatterDownlink evalulator;
    try
    {
        evalulator = CSScript.Evaluator.LoadFile<PayloadFormatter.IFormatterDownlink>(formatterFile);
     }
    catch (CSScriptLib.CompilerException cex)
    {
        Console.Write($"Loading or compiling file:{formatterFile} failed Exception:{cex}");
        return;
    }

    string payloadFilename = Path.Combine(formatterFolder, options.PayloadFilename);
    Console.WriteLine($"Downlink- payloadFilename:{payloadFilename}");
    byte[] uplinkBytes;

    try
    {
        uplinkBytes = File.ReadAllBytes(payloadFilename);
    }
    catch (DirectoryNotFoundException dex)
    {
        Console.WriteLine($"Uplink payload filename directory {formatterFolder} not found:{dex}");
        return;
    }
    catch (FileNotFoundException fnfex)
    {
        Console.WriteLine($"Uplink payload filename {payloadFilename} not found:{fnfex}");
        return;
    }
    catch (FormatException fex)
    {
        Console.WriteLine($"Uplink payload file invalid format {payloadFilename} not found:{fex}");
        return;
    }

    // See if payload can be converted to a string
    string uplinkText = string.Empty;
    try
    {
        uplinkText = Encoding.UTF8.GetString(uplinkBytes);
    }
    catch (FormatException fex)
    {
        Console.WriteLine("Encoding.UTF8.GetString failed:{0}", fex.Message);
    }

    // See if payload can be converted to JSON
    JObject uplinkJson;
    try
    {
        uplinkJson = JObject.Parse(uplinkText);
    }
    catch (JsonReaderException jrex)
    {
        Console.WriteLine("JObject.Parse failed Exception:{1}", jrex);

        uplinkJson = new JObject();
    }

    Console.WriteLine("Properties");
    foreach (var property in properties)
    {
        Console.WriteLine($"{property.Key}:{property.Value}");
    }

    // Transform the byte and optional text and JSON payload
    Byte[] payload;
    try
    {
        payload = evalulator.Evaluate(properties, options.OrganizationId, options.DeviceId, options.DeviceType, options.UserApplicationId, uplinkJson, uplinkText, uplinkBytes);
    }
    catch (Exception ex)
    {
        Console.WriteLine($"evalulatorUplink.Evaluate failed Exception:{ex}");
        return;
    }

    Console.WriteLine("Payload");
    Console.WriteLine(Convert.ToBase64String(payload));
}

The sample JSON payload is what would be sent by Azure IoT Central to a device to configure the fan speed

Azure IoT Central M138 Breakout device template with the Fan Status command selected
{
  "FanStatus": 2
}

If the downlink payload formatter is compiled and executes successfully the Base64 representation output is displayed

using System;
using System.Collections.Generic;
using Newtonsoft.Json.Linq;

public class FormatterDownlink : PayloadFormatter.IFormatterDownlink
{
    public byte[] Evaluate(IDictionary<string, string> properties, uint organisationId, uint deviceId, byte deviceType, ushort userApplicationId, JObject payloadJson, string payloadText, byte[] payloadBytes)
    {
        byte? status = payloadJson.Value<byte?>("FanStatus");

        if ( status.HasValue ) 
        { 
            return new byte[] { status.Value };
        }

        return new byte[]{};
    }
}

If the downlink payload formatter syntax is incorrect e.g. { status.Value ; }; an error message with the line and column is displayed.

using System;
using System.Collections.Generic;
using Newtonsoft.Json.Linq;

public class FormatterDownlink : PayloadFormatter.IFormatterDownlink
{
    public byte[] Evaluate(IDictionary<string, string> properties, uint organisationId, uint deviceId, byte deviceType, ushort userApplicationId, JObject payloadJson, string payloadText, byte[] payloadBytes)
    {
        byte? status = payloadJson.Value<byte?>("FanStatus");

        if ( status.HasValue ) 
        {
            return new byte[] { status.Value ; };
        }

        return new byte[]{};
    }
}

If the downlink payload formatter syntax is correct but execution fails (in the example code division by zero) an error message is displayed.

using System;
using System.Collections.Generic;
using Newtonsoft.Json.Linq;

public class FormatterDownlink : PayloadFormatter.IFormatterDownlink
{
    public byte[] Evaluate(IDictionary<string, string> properties, uint organisationId, uint deviceId, byte deviceType, ushort userApplicationId, JObject payloadJson, string payloadText, byte[] payloadBytes)
    {
        byte? status = payloadJson.Value<byte?>("FanStatus");

        if ( status.HasValue ) 
        {
            int divideByZero = 10;

            divideByZero = divideByZero / 0;

            return new byte[] { status.Value };
        }

        return new byte[]{};
    }
}

The PayloadFormatterMaintenanceApplication makes it significantly easier to develop formatters. Currently the payload formatters have to be manually uploaded to the application’s Azure Blob Storage for final testing.

Swarm Space – Underlying Architecture sorted

After figuring out that calling an Azure Http Trigger function to load the cache wasn’t going to work reliably, I have revisited the architecture one last time and significantly refactored the SwarmSpaceAzuureIoTConnector project.

Visual Studio 2022 solution

The application now has a StartUpService which loads the Azure DeviceClient cache (Lazy Cache) in the background as the application starts up. If an uplink message is received from a SwarmDevice before, it has been loaded by the FunctionsStartup the DeviceClient information is cached and another connection to the Azure IoT Hub is not established.

...
using Microsoft.Azure.Functions.Extensions.DependencyInjection;

[assembly: FunctionsStartup(typeof(devMobile.IoT.SwarmSpaceAzureIoTConnector.Connector.StartUpService))]
namespace devMobile.IoT.SwarmSpaceAzureIoTConnector.Connector
{
...
    public class StartUpService : BackgroundService
    {
        private readonly ILogger<StartUpService> _logger;
        private readonly ISwarmSpaceBumblebeeHive _swarmSpaceBumblebeeHive;
        private readonly Models.ApplicationSettings _applicationSettings;
        private readonly IAzureDeviceClientCache _azureDeviceClientCache;

        public StartUpService(ILogger<StartUpService> logger, IAzureDeviceClientCache azureDeviceClientCache, ISwarmSpaceBumblebeeHive swarmSpaceBumblebeeHive, IOptions<Models.ApplicationSettings> applicationSettings)//, IOptions<Models.AzureIoTSettings> azureIoTSettings)
        {
            _logger = logger;
            _azureDeviceClientCache = azureDeviceClientCache;
            _swarmSpaceBumblebeeHive = swarmSpaceBumblebeeHive;
            _applicationSettings = applicationSettings.Value;
        }

        protected override async Task ExecuteAsync(CancellationToken cancellationToken)
        {
            await Task.Yield();

            _logger.LogInformation("StartUpService.ExecuteAsync start");

            try
            {
                _logger.LogInformation("BumblebeeHiveCacheRefresh start");

                foreach (SwarmSpace.BumblebeeHiveClient.Device device in await _swarmSpaceBumblebeeHive.DeviceListAsync(cancellationToken))
                {
                    _logger.LogInformation("BumblebeeHiveCacheRefresh DeviceId:{DeviceId} DeviceName:{DeviceName}", device.DeviceId, device.DeviceName);

                    Models.AzureIoTDeviceClientContext context = new Models.AzureIoTDeviceClientContext()
                    {
                        OrganisationId = _applicationSettings.OrganisationId,
                        DeviceType = (byte)device.DeviceType,
                        DeviceId = (uint)device.DeviceId,
                    };

                    await _azureDeviceClientCache.GetOrAddAsync(context.DeviceId, context);
                }

                _logger.LogInformation("BumblebeeHiveCacheRefresh finish");
            }
            catch (Exception ex)
            {
                _logger.LogError(ex, "StartUpService.ExecuteAsync error");

                throw;
            }

            _logger.LogInformation("StartUpService.ExecuteAsync finish");
        }
    }
}

The uplink and downlink payload formatters are stored in Azure Blob Storage are compiled (CS-Script) as they are loaded then cached (Lazy Cache)

Azure Storage explorer displaying list of uplink payload formatter blobs.
Azure Storage explorer displaying list of downlink payload formatter blobs.
private async Task<IFormatterDownlink> DownlinkLoadAsync(int userApplicationId)
{
    BlobClient blobClient = new BlobClient(_payloadFormatterConnectionString, _applicationSettings.PayloadFormattersDownlinkContainer, $"{userApplicationId}.cs");

    if (!await blobClient.ExistsAsync())
    {
        _logger.LogInformation("PayloadFormatterDownlink- UserApplicationId:{0} Container:{1} not found using default:{2}", userApplicationId, _applicationSettings.PayloadFormattersUplinkContainer, _applicationSettings.PayloadFormatterUplinkBlobDefault);

        blobClient = new BlobClient(_payloadFormatterConnectionString, _applicationSettings.PayloadFormatterDownlinkBlobDefault, _applicationSettings.PayloadFormatterDownlinkBlobDefault);
    }

    BlobDownloadResult downloadResult = await blobClient.DownloadContentAsync();

    return CSScript.Evaluator.LoadCode<PayloadFormatter.IFormatterDownlink>(downloadResult.Content.ToString());
}

The uplink and downlink formatters can be edited in Visual Studio 2022 with syntax highlighting (currently they have to be manually uploaded).

The SwarmSpaceBumbleebeehive module no longer has public login or logout methods.

    public interface ISwarmSpaceBumblebeeHive
    {
        public Task<ICollection<Device>> DeviceListAsync(CancellationToken cancellationToken);

        public Task SendAsync(uint organisationId, uint deviceId, byte deviceType, ushort userApplicationId, byte[] payload);
    }

The DeviceListAsync and SendAsync methods now call the BumblebeeHive login method after configurable period of inactivity.

public async Task<ICollection<Device>> DeviceListAsync(CancellationToken cancellationToken)
{
        if ((_TokenActivityAtUtC + _bumblebeeHiveSettings.TokenValidFor) < DateTime.UtcNow)
        {
            await Login();
        }

        using (HttpClient httpClient = _httpClientFactory.CreateClient())
       {
            Client client = new Client(httpClient);

            client.BaseUrl = _bumblebeeHiveSettings.BaseUrl;

            httpClient.DefaultRequestHeaders.Add("Authorization", $"bearer {_token}");

            return await client.GetDevicesAsync(null, null, null, null, null, null, null, null, null, cancellationToken);
        }
}

I’m looking at building a webby user interface where users an interactivity list, create, edit, delete formatters with syntax highlighter support, and the executing the formatter with sample payloads.

Swarm Space Azure IoT Connector Identity Translation Gateway Architecture

This approach uses most of the existing building blocks, and that’s it no more changes.

Swarm Space – Azure IoT FromDevice with webhooks

The initial versions of the Swarm Space Azure Cloud Identity Gateway were based on my The Things Industries(TTI) Azure IoT Connector which used six HTTP Triggered Azure Functions. My Swarm Space Azure IoT connector only has one webhook endpoint so a .NET Core WebAPI with controllers based solution appeared to be more practical. The first step was to get some sample JavaScript Object Notation(JSON) uplink message payloads with the SwarmSpace-From Device with Webhooks project.

{
  "packetId": 0,
  "deviceType": 1,
  "deviceId": 0,
  "userApplicationId": 0,
  "organizationId": 65760,
  "data": "VGhpcyBpcyBhIHRlc3QgbWVzc2FnZS4gVGhlIHBhY2tldElkIGFuZCBkZXZpY2VJZCBhcmUgbm90IHBvcHVsYXRlZCwgYnV0IHdpbGwgYmUgZm9yIGEgcmVhbCBtZXNzYWdlLg==",
  "len": 100,
  "status": 0,
  "hiveRxTime": "2022-11-29T04:52:06"
}

I used JSON2CSharp to generate an initial version of a Plain Old CLR(ComonLanguage Runtime) Object(POCO) to deserialise the Delivery Webhook payload.

 https://json2csharp.com/
    
    // Root myDeserializedClass = JsonConvert.DeserializeObject<Root>(myJsonResponse);
    public class Root
    {
        public int packetId { get; set; }
        public int deviceType { get; set; }
        public int deviceId { get; set; }
        public int userApplicationId { get; set; }
        public int organizationId { get; set; }
        public string data { get; set; }
        public int len { get; set; }
        public int status { get; set; }
        public DateTime hiveRxTime { get; set; }
    }
*/

I then “tweaked” the JSON2CSharp class

 public class UplinkPayload
    {
        [JsonProperty("packetId")]
        public int PacketId { get; set; }

        [JsonProperty("deviceType")]
        public int DeviceType { get; set; }

        [JsonProperty("deviceId")]
        public int DeviceId { get; set; }

        [JsonProperty("userApplicationId")]
        public int UserApplicationId { get; set; }

        [JsonProperty("organizationId")]
        public int OrganizationId { get; set; }

        [JsonProperty("data")]
        [JsonRequired]
        public string Data { get; set; }

        [JsonProperty("len")]
        public int Len { get; set; }

        [JsonProperty("status")]
        public int Status { get; set; }

        [JsonProperty("hiveRxTime")]
        public DateTime HiveRxTime { get; set; }
    }

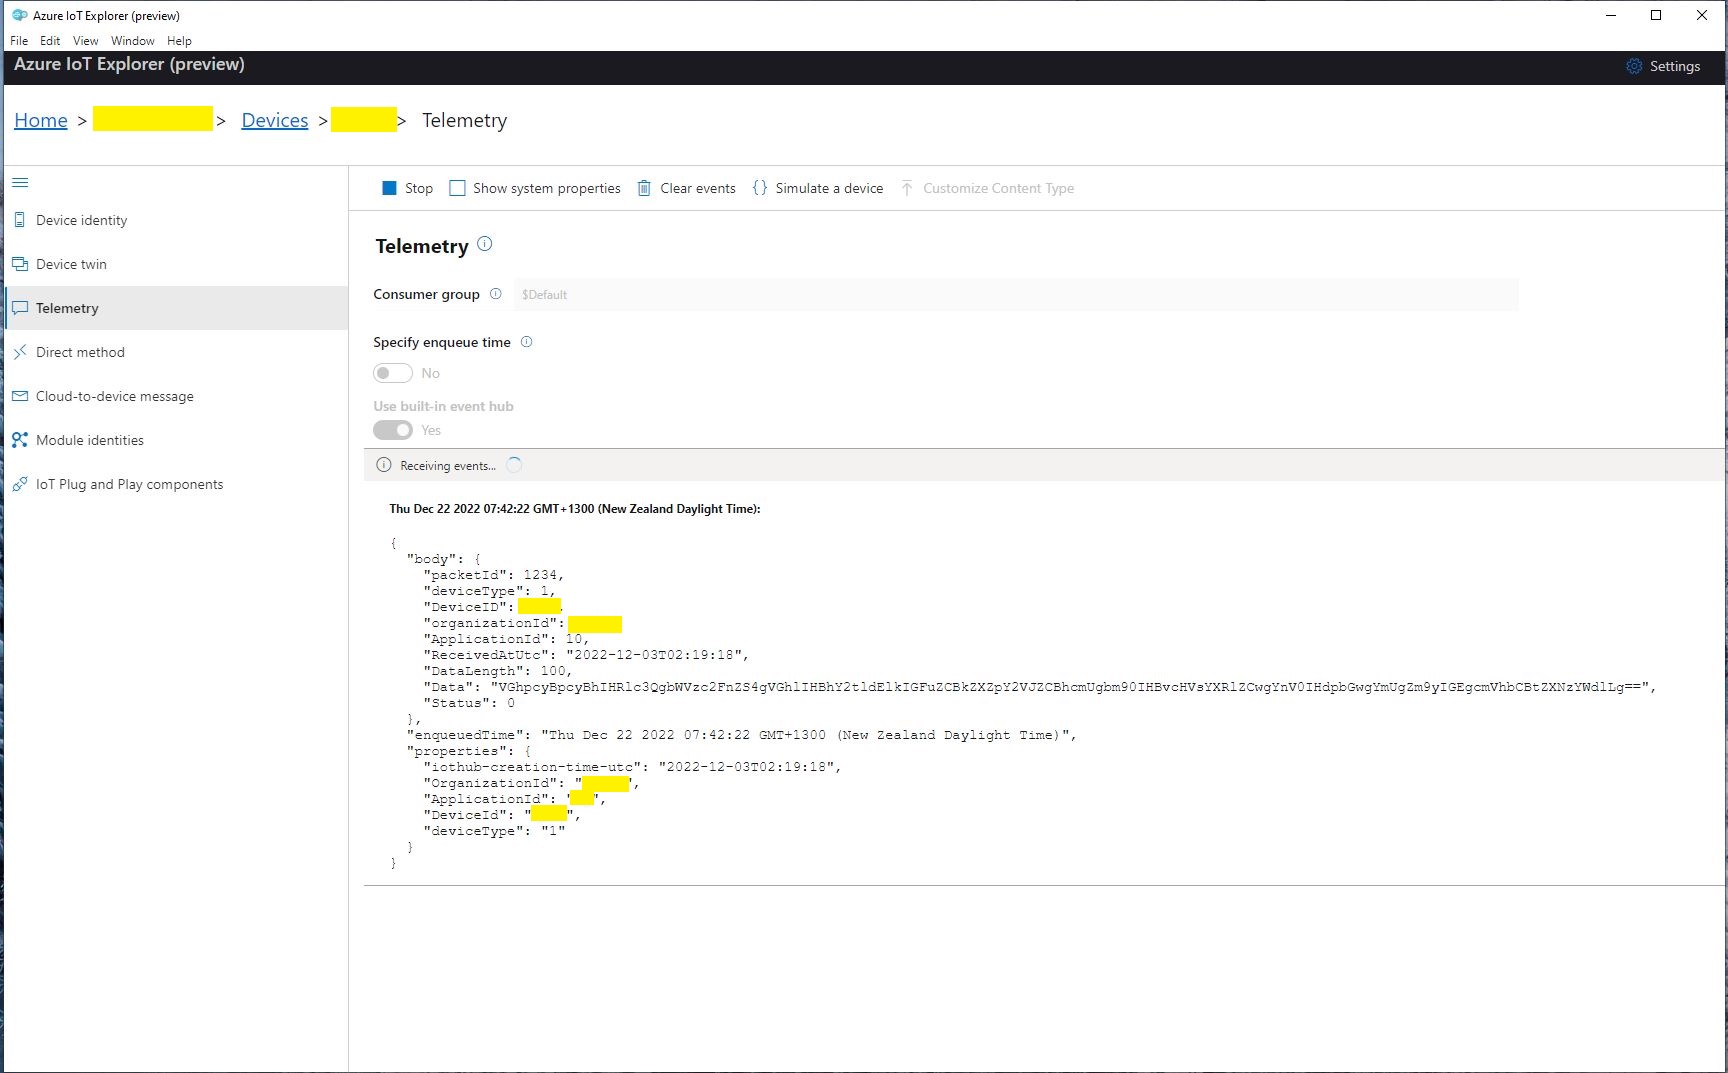
This class is used to “automagically” deserialise Delivery Webhook payloads. There is also some additional payload validation which discards test messages (not certain this is a good idea) etc.

//---------------------------------------------------------------------------------
// Copyright (c) December 2022, devMobile Software
//
// Licensed under the Apache License, Version 2.0 (the "License");
// you may not use this file except in compliance with the License.
// You may obtain a copy of the License at
//
//     http://www.apache.org/licenses/LICENSE-2.0
//
// Unless required by applicable law or agreed to in writing, software
// distributed under the License is distributed on an "AS IS" BASIS,
// WITHOUT WARRANTIES OR CONDITIONS OF ANY KIND, either express or implied.
// See the License for the specific language governing permissions and
// limitations under the License.
//
//---------------------------------------------------------------------------------
namespace devMobile.IoT.SwarmSpace.AzureIoT.Connector.Controllers
{
    using System.Globalization;
    using System.Text;
    using System.Threading.Tasks;

    using Microsoft.AspNetCore.Mvc;
    using Microsoft.Azure.Devices.Client;
    using Microsoft.Extensions.Logging;

    using Newtonsoft.Json;
    using Newtonsoft.Json.Linq;

    [ApiController]
    [Route("api/[controller]")]
    public class UplinkController : ControllerBase
    {
        private readonly ILogger<UplinkController> _logger;
        private readonly IAzureIoTDeviceClientCache _azureIoTDeviceClientCache;

        public UplinkController(ILogger<UplinkController> logger, IAzureIoTDeviceClientCache azureIoTDeviceClientCache)
        {
            _logger = logger;
            _azureIoTDeviceClientCache = azureIoTDeviceClientCache;
        }

        [HttpPost]
        public async Task<IActionResult> Uplink([FromBody] Models.UplinkPayload payload)
        {
            DeviceClient deviceClient;

            _logger.LogDebug("Payload {0}", JsonConvert.SerializeObject(payload, Formatting.Indented));

            if (payload.PacketId == 0)
            {
                _logger.LogWarning("Uplink-payload simulated DeviceId:{DeviceId}", payload.DeviceId);

                return this.Ok();
            }

            if ((payload.UserApplicationId < Constants.UserApplicationIdMinimum) || (payload.UserApplicationId > Constants.UserApplicationIdMaximum))
            {
                _logger.LogWarning("Uplink-payload invalid User Application Id:{UserApplicationId}", payload.UserApplicationId);

                return this.BadRequest($"Invalid User Application Id {payload.UserApplicationId}");
            }

            if ((payload.Len < Constants.PayloadLengthMinimum) || string.IsNullOrEmpty(payload.Data))
            {
                _logger.LogWarning("Uplink-payload.Data is empty PacketId:{PacketId}", payload.PacketId);

                return this.Ok("payload.Data is empty");
            }

            Models.AzureIoTDeviceClientContext context = new Models.AzureIoTDeviceClientContext()
            {
                OrganisationId = payload.OrganizationId,
                UserApplicationId = payload.UserApplicationId,
                DeviceType = payload.DeviceType,
                DeviceId = payload.DeviceId,
            };

            deviceClient = await _azureIoTDeviceClientCache.GetOrAddAsync(payload.DeviceId.ToString(), context);

            JObject telemetryEvent = new JObject
            {
                { "packetId", payload.PacketId},
                { "deviceType" , payload.DeviceType},
                { "DeviceID", payload.DeviceId },
                { "organizationId", payload.OrganizationId },
                { "ApplicationId", payload.UserApplicationId},
                { "ReceivedAtUtc", payload.HiveRxTime.ToString("s", CultureInfo.InvariantCulture) },
                { "DataLength", payload.Len },
                { "Data", payload.Data },
                { "Status", payload.Status },
            };

            // Send the message to Azure IoT Hub
            using (Message ioTHubmessage = new Message(Encoding.ASCII.GetBytes(JsonConvert.SerializeObject(telemetryEvent))))
            {
                // Ensure the displayed time is the acquired time rather than the uploaded time. 
                ioTHubmessage.Properties.Add("iothub-creation-time-utc", payload.HiveRxTime.ToString("s", CultureInfo.InvariantCulture));
                ioTHubmessage.Properties.Add("OrganizationId", payload.OrganizationId.ToString());
                ioTHubmessage.Properties.Add("ApplicationId", payload.UserApplicationId.ToString());
                ioTHubmessage.Properties.Add("DeviceId", payload.DeviceId.ToString());
                ioTHubmessage.Properties.Add("deviceType", payload.DeviceType.ToString());

                await deviceClient.SendEventAsync(ioTHubmessage);

                _logger.LogInformation("Uplink-DeviceID:{deviceId} SendEventAsync success", payload.DeviceId);
            }

            return this.Ok();
        }
    }
}

I initially debugged and tested the Uplink controller with Telerik Fiddler using sample payloads captured with the SwarmSpace-From Device with Webhooks project.

Using Telerik Fiddler to make test delivery webhook calls

Which I could then inspect with Azure IoT Explorer as they arrived

Azure IoT Explorer displaying a test message

The next step was to create a new Delivery Method

Swarm delivery webhook creation

Configured to call my Uplink controller endpoint.

Swarm delivery webhook configuration

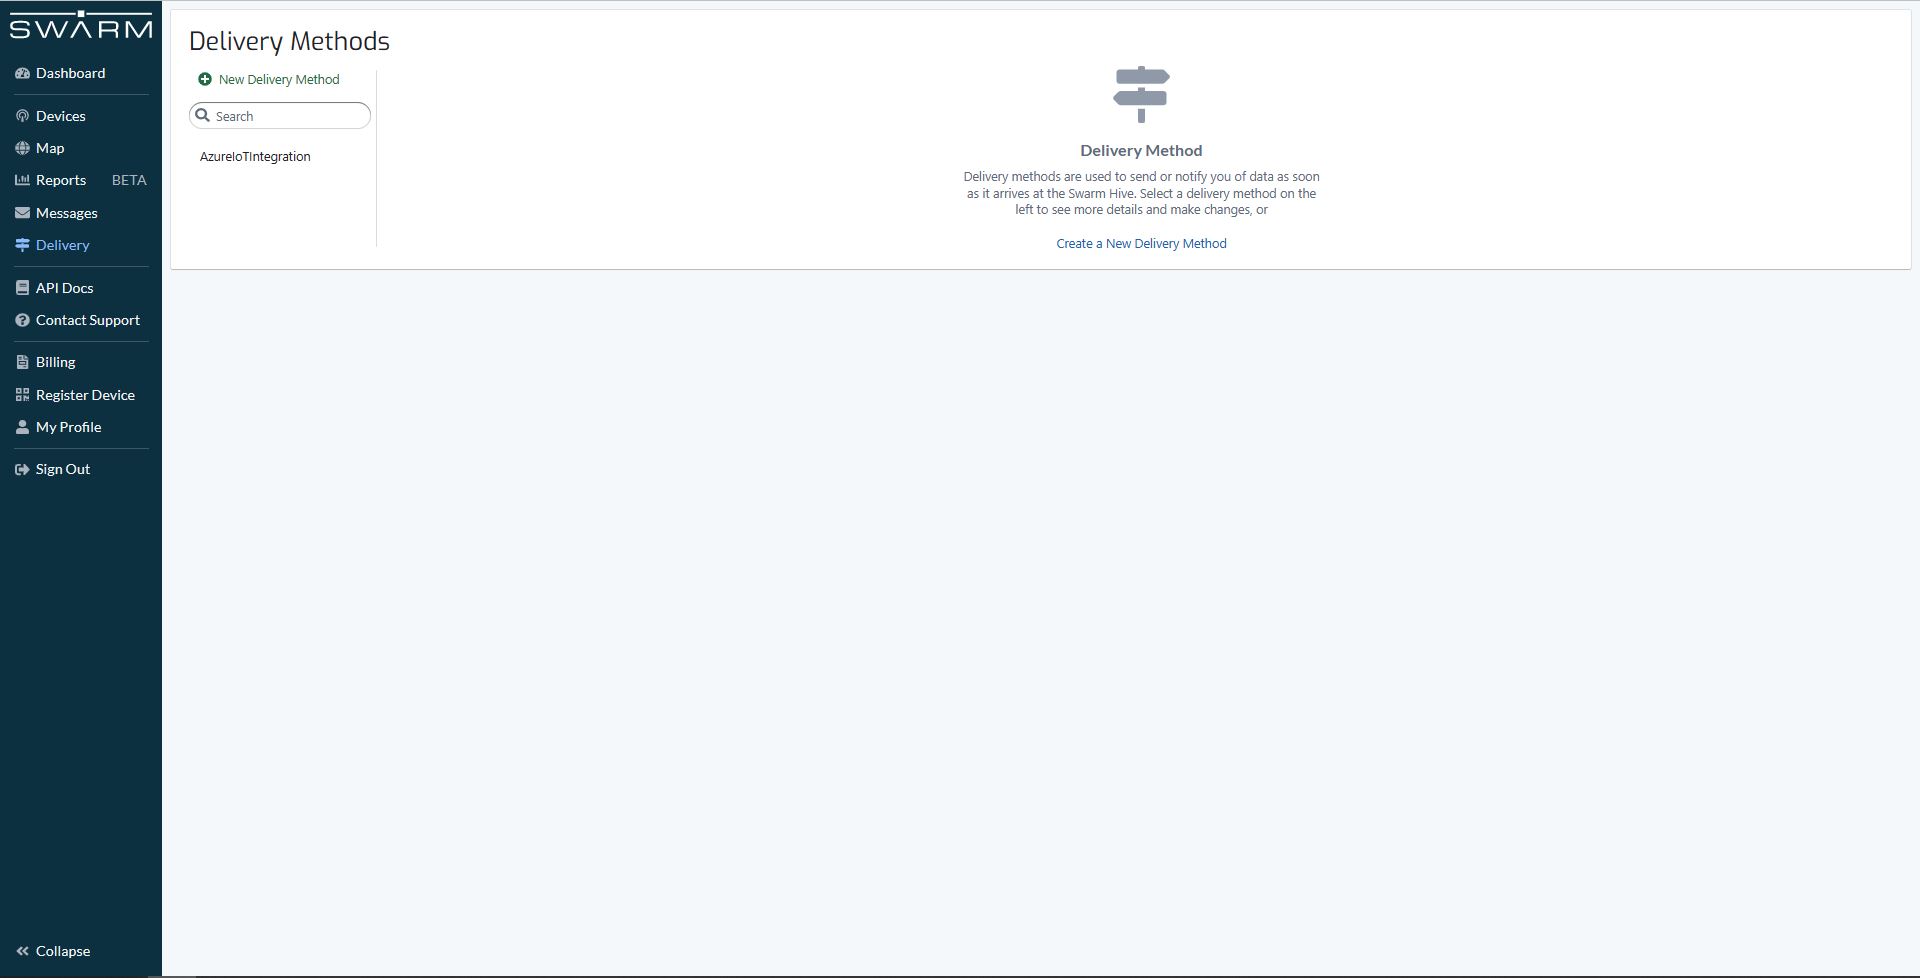
The webhook was configured to “acknowledge messages on successful delivery”. I then checked my Delivery Method configuration with a couple of “Test” messages.

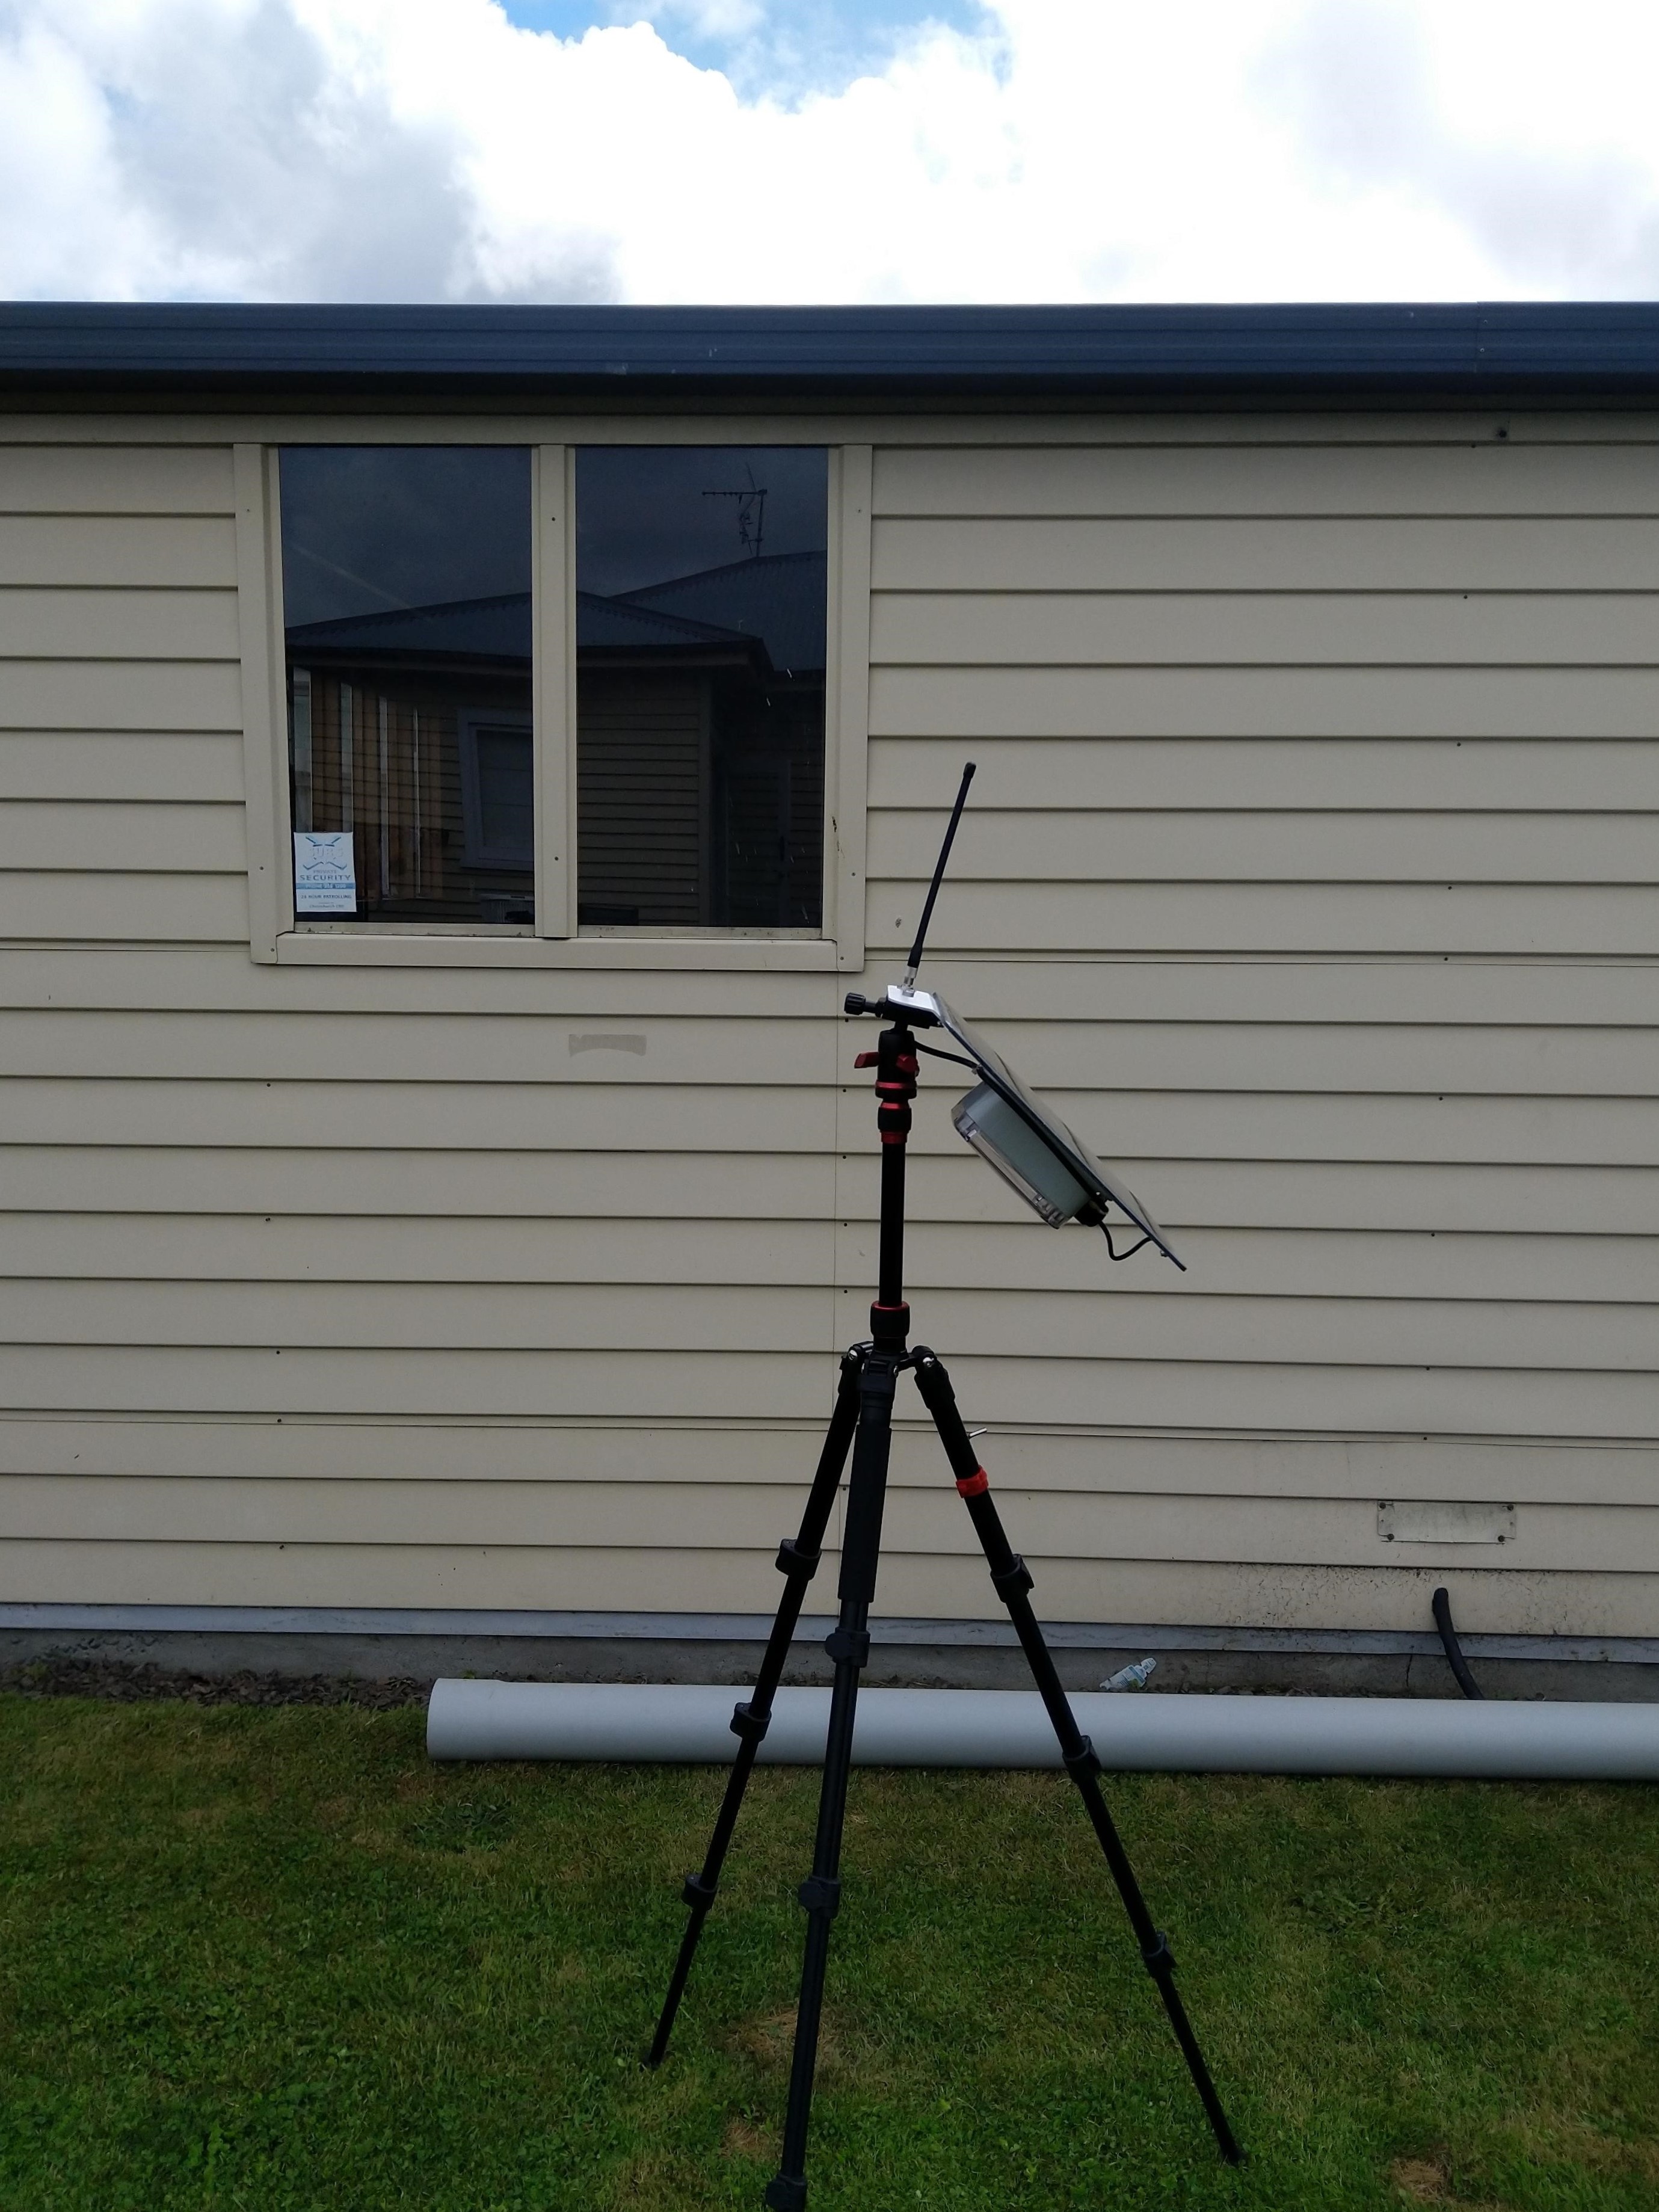
My Swarm Space Eval Kit arrived md-week and after some issues with jumper settings it started reporting position and status information.

Swarm Eval Kit in my backyard

The first position was just of the coast of West Africa(null island)

Swarm Map centered on Null Island

After the Global Positioning System(GPS) receiver got a good fix the location of the Eval Kit was in the middle of my backyard.

Azure IoT Explorer displaying payload with good latitude and longitude
Swarm Map displaying the location of my device (zoomed out)

Swarm Space – FromDevice with webhooks

I modified my TTI V3 Connector Azure Storage Queues project which uses Azure Functions HTTP Triggers to put messages into Azure Storage Queues to process Swarm FromDevice Webhook messages.

First step was to configure a webhook with the Swarm dashboard

Swarm dashboard webhooks configuration

I configured the webhook, and to “acknowledge messages on successful delivery”. Then checked my configuration with a couple of “Test” messages.

Swarm dashboard webhook configuration

The Swagger API documentation has methods for configuring endpoints which can be called by an application.

Swagger API Documentation for managing endpoints

I queued a couple of messages on my Satellite Transceiver Breakout and when the next satellite passed overhead, shortly after they were visible in the Swarm Dashboard Messages tab.

Swarm Dashboard with test and live fromdevice messages

The messages were also delivered to an Azure Storage Queue, and I could view them with Azure Storage Explorer.

Azure Storage Explorer displaying a webhook message payload

Smartish Edge Camera – Azure Storage Service

The AzureIoTSmartEdgeCameraService was a useful proof of concept(PoC) but the codebase was starting to get unwieldy so it has been split into the SmartEdgeCameraAzureStorageService and SmartEdgeCameraAzureIoTService.

The initial ML.Net +You only look once V5(YoloV5) project uploaded raw (effectively a time lapse camera) and marked-up (with searchable tags) images to Azure Storage. But, after using it in a “real” project I found…

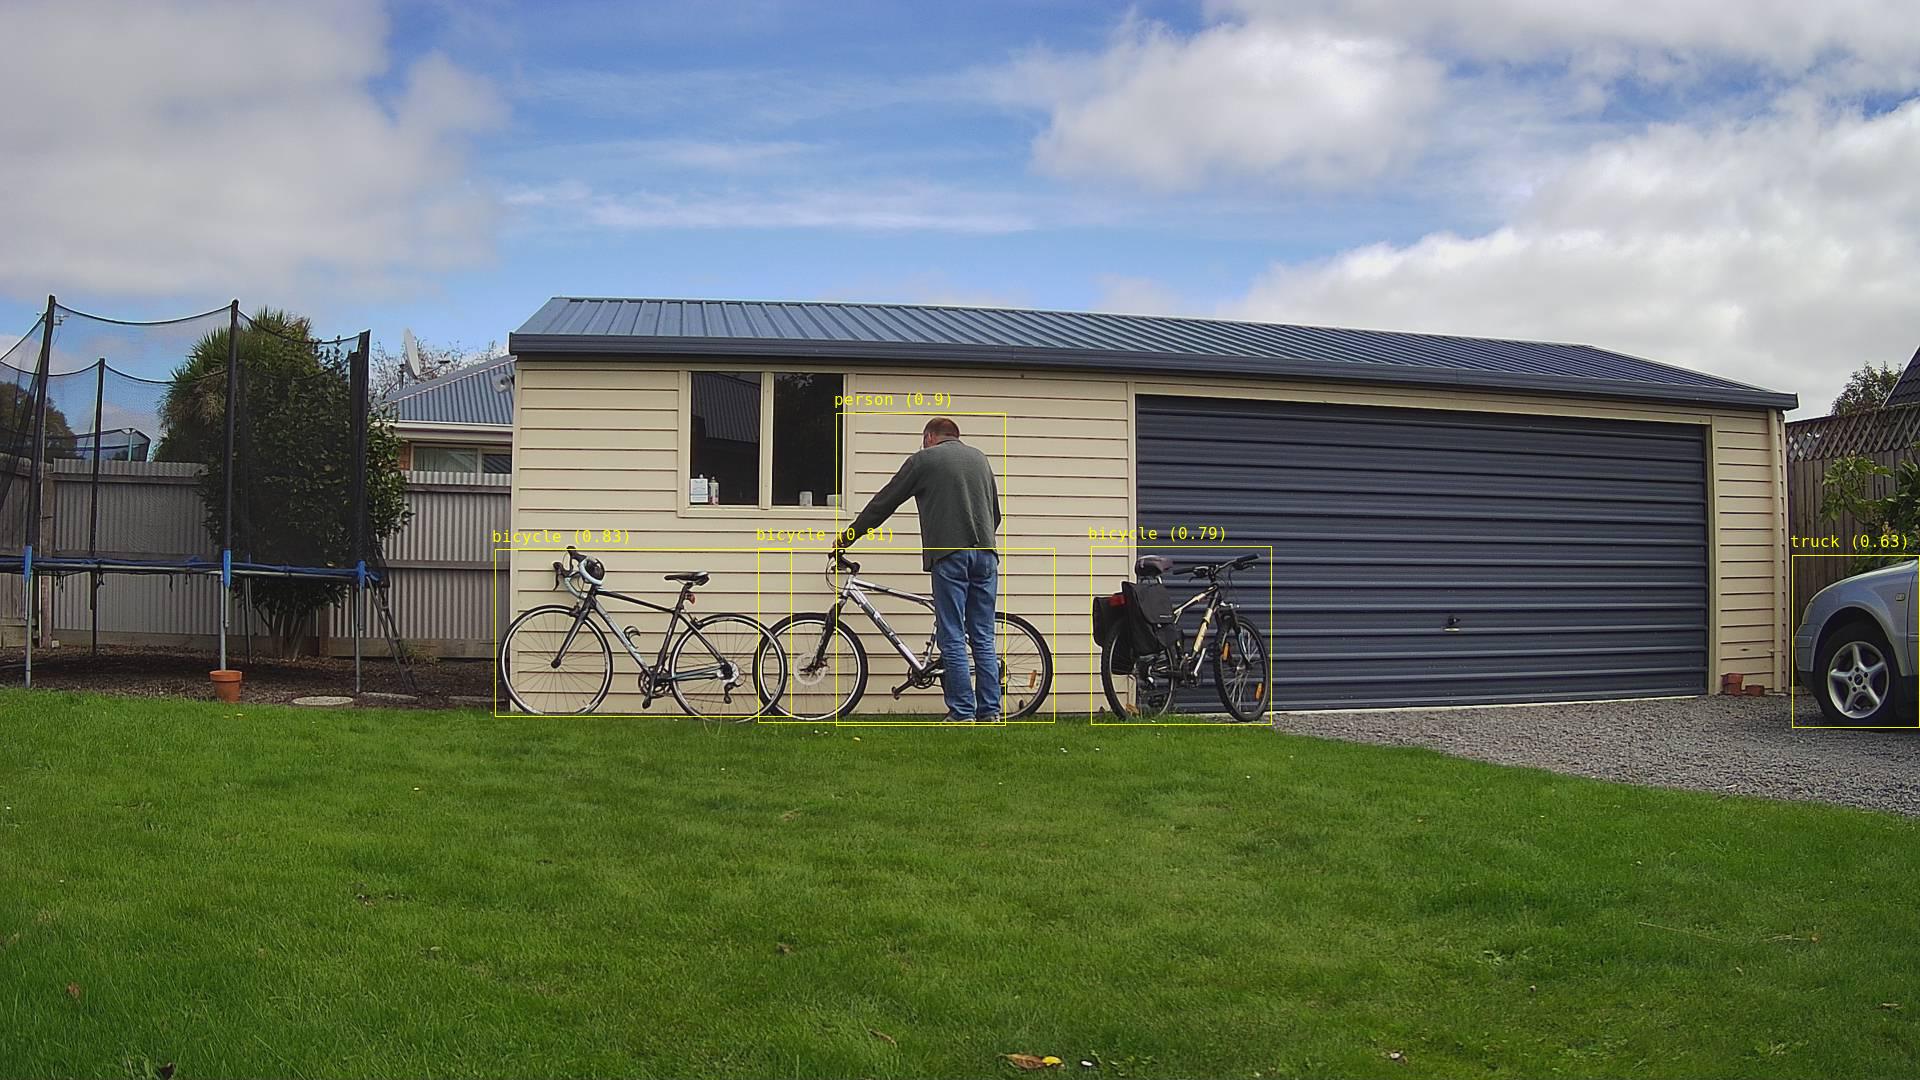
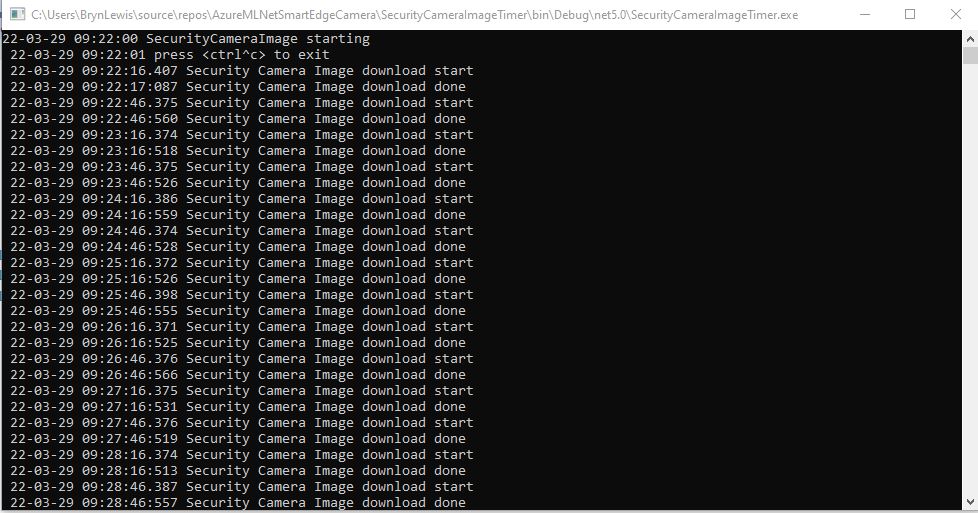
  • The time-lapse functionality which continually uploaded images wasn’t that useful. I have another standalone application which has that functionality.
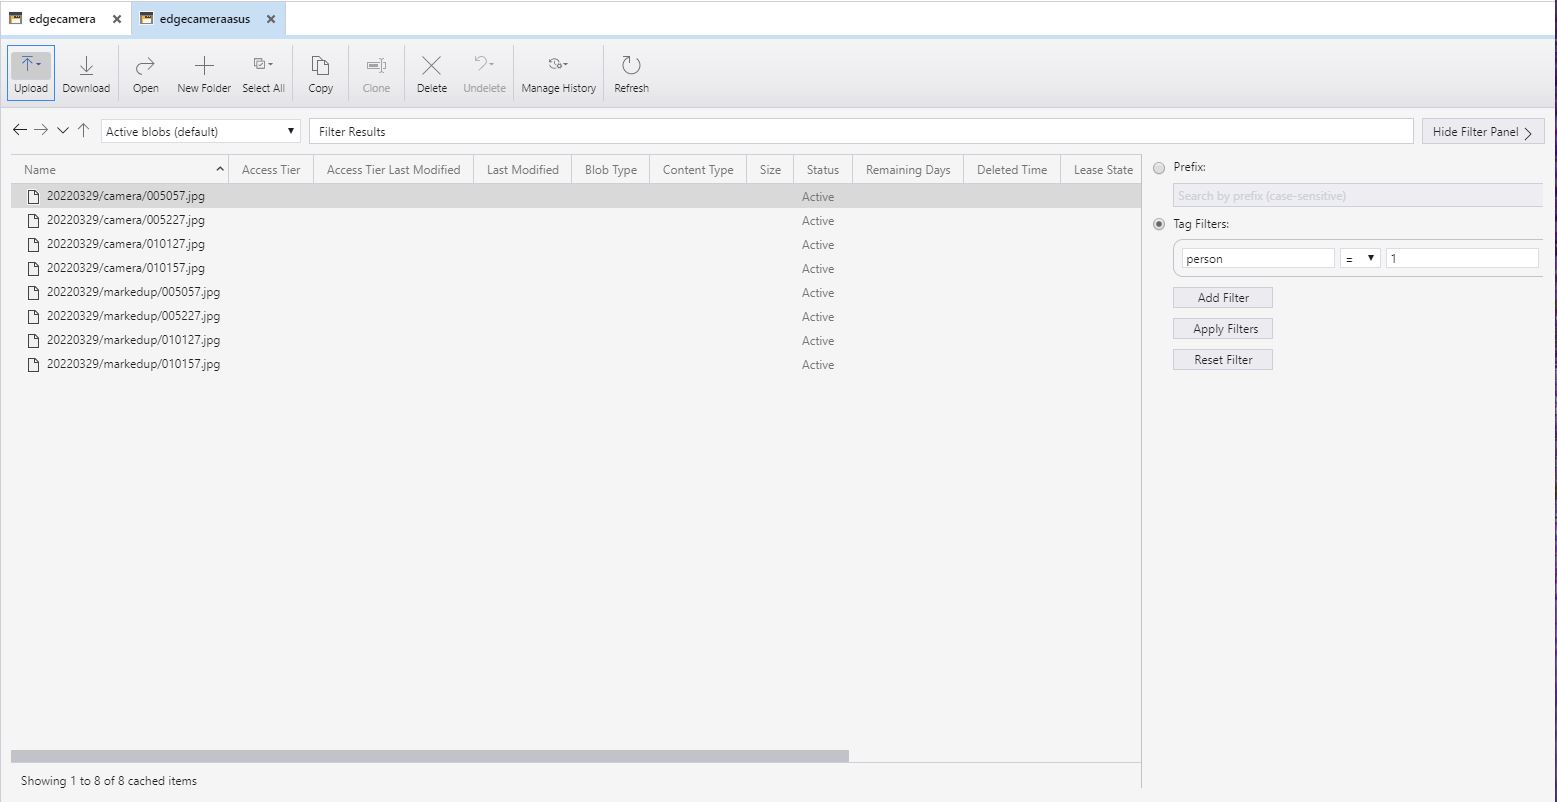
  • If an object with a label in the “PredictionLabelsOfInterest” and a score greater than PredicitionScoreThreshold was detected it was useful to have the option to upload the camera and/or marked-up (including objects below the threshold) image(s).
  • Having both camera and marked-up images tagged so they were searchable with an application like Azure Storage Explorer was very useful.
Security Camera Image
Security Camera image with bounding boxes around all detected objects
Azure Storage Explorer filter for images containing 1 person

After the You Only Look Once(YOLOV5)+ML.Net+Open Neural Network Exchange(ONNX) plumbing has loaded a timer with a configurable due time and period was started.

private async void ImageUpdateTimerCallback(object state)
{
	DateTime requestAtUtc = DateTime.UtcNow;

	// Just incase - stop code being called while photo already in progress
	if (_cameraBusy)
	{
		return;
	}
	_cameraBusy = true;

	_logger.LogInformation("Image processing start");

	try
	{
#if CAMERA_RASPBERRY_PI
		RaspberryPIImageCapture();
#endif
#if CAMERA_SECURITY
		SecurityCameraImageCapture();
#endif
		List<YoloPrediction> predictions;

		using (Image image = Image.FromFile(_applicationSettings.ImageCameraFilepath))
		{
			_logger.LogTrace("Prediction start");
			predictions = _scorer.Predict(image);
			_logger.LogTrace("Prediction done");

			OutputImageMarkup(image, predictions, _applicationSettings.ImageMarkedUpFilepath);
		}

		if (_logger.IsEnabled(LogLevel.Trace))
		{
			_logger.LogTrace("Predictions {0}", predictions.Select(p => new { p.Label.Name, p.Score }));
		}

		var predictionsOfInterest = predictions.Where(p => p.Score > _applicationSettings.PredicitionScoreThreshold).Select(c => c.Label.Name).Intersect(_applicationSettings.PredictionLabelsOfInterest, StringComparer.OrdinalIgnoreCase);
		if (_logger.IsEnabled(LogLevel.Trace))
		{
			_logger.LogTrace("Predictions of interest {0}", predictionsOfInterest.ToList());
		}

		var predictionsTally = predictions.Where(p => p.Score >= _applicationSettings.PredicitionScoreThreshold)
									.GroupBy(p => p.Label.Name)
									.Select(p => new
									{
										Label = p.Key,
										Count = p.Count()
									});

		if (predictionsOfInterest.Any())
		{
			BlobUploadOptions blobUploadOptions = new BlobUploadOptions()
			{
				Tags = new Dictionary<string, string>()
			};

			foreach (var predicition in predictionsTally)
			{
				blobUploadOptions.Tags.Add(predicition.Label, predicition.Count.ToString());
			}

			if (_applicationSettings.ImageCameraUpload)
			{
				_logger.LogTrace("Image camera upload start");

				string imageFilenameCloud = string.Format(_azureStorageSettings.ImageCameraFilenameFormat, requestAtUtc);

				await _imagecontainerClient.GetBlobClient(imageFilenameCloud).UploadAsync(_applicationSettings.ImageCameraFilepath, blobUploadOptions);

				_logger.LogTrace("Image camera upload done");
			}

			if (_applicationSettings.ImageMarkedupUpload)
			{
				_logger.LogTrace("Image marked-up upload start");

				string imageFilenameCloud = string.Format(_azureStorageSettings.ImageMarkedUpFilenameFormat, requestAtUtc);

				await _imagecontainerClient.GetBlobClient(imageFilenameCloud).UploadAsync(_applicationSettings.ImageMarkedUpFilepath, blobUploadOptions);

				_logger.LogTrace("Image marked-up upload done");
			}
		}

		if (_logger.IsEnabled(LogLevel.Information))
		{
			_logger.LogInformation("Predictions tally {0}", predictionsTally.ToList());
		}
	}
	catch (Exception ex)
	{
		_logger.LogError(ex, "Camera image download, post procesing, image upload, or telemetry failed");
	}
	finally
	{
		_cameraBusy = false;
	}

	TimeSpan duration = DateTime.UtcNow - requestAtUtc;

	_logger.LogInformation("Image processing done {0:f2} sec", duration.TotalSeconds);
}

The test-rig consisted of a Unv ADZK-10 Security Camera, Power over Ethernet(PoE) module, D-Link Switch and a Raspberry Pi 4B 8G, or ASUS PE100A, or my HP Prodesk 400G4 DM (i7-8700T)

Security Camera Image download times

Excluding the first download it takes on average 0.16 secs to download a security camera image with my network setup.

Development PC image download and processing console

The HP Prodesk 400G4 DM (i7-8700T) took on average 1.16 seconds to download an image from the camera, run the model, and upload the two images to Azure Storage

Raspberry PI 4B image download and processing console

The Raspberry Pi 4B 8G took on average 2.18 seconds to download an image from the camera, run the model, then upload the two images to Azure Storage

ASUS PE100A image download an processing console

The ASUS PE100A took on average 3.79 seconds to download an image from the camera, run the model, then upload the two images to Azure Storage.