TinyCLR OS V2 Seeed LoRa-E5 LoRaWAN library Part5

Receive of two parts

After getting basic connectivity for my Seeedstudio LoRa-E5 Development Kit and Fezduino test rig working I started to build a general purpose library for GHI Electronics TinyCLR powered devices.

The code wasn’t very robust so when I sent messages from The Things Network (TTN) EndDevice messaging tab my first implementation didn’t work.

In the Visual Studio 2019 Debug output window

The thread '<No Name>' (0x2) has exited with code 0 (0x0).
devMobile.IoT.SeeedE5.NetworkJoinOTAA starting
TX: DR 13 bytes
RX :+DR: AS923

TX: MODE 16 bytes
RX :+MODE: LWOTAA

TX: ID=AppEui 40 bytes
RX :+ID: AppEui, 00:00:00:00:00:00:00:00

TX: KEY=APPKEY 48 bytes
RX :+KEY: APPKEY 12345678901234567890123456789012

TX: PORT 11 bytes
RX :+PORT: 1

TX: JOIN 9 bytes
RX :+JOIN: Start
+JOIN: NORMAL
+JOIN: Network joined
+JOIN: NetID 000013 DevAddr 00:00:00:00
+JOIN: Done

TX: MSGHEX 22 bytes
RX :+MSGHEX: Start
+MSGHEX: FPENDING
+MSGHEX: RXWIN1, RSSI -31, SNR 8.0
+MSGHEX: Done

TX: MSGHEX 22 bytes
RX :+MSGHEX: Start
+MSGHEX: PORT: 10; RX: "0102030405"
+MSGHEX: RXWIN1, RSSI -31, SNR 15.0
+MSGHEX: Done

TX: MSGHEX 22 bytes
RX :+MSGHEX: Start
+MSGHEX: FPENDING
+MSGHEX: PORT: 20; RX: "0504030201"
+MSGHEX: RXWIN1, RSSI -31, SNR 14.0
+MSGHEX: Done

TX: MSGHEX 22 bytes
RX :+MSGHEX: Start
+MSGHEX: Done

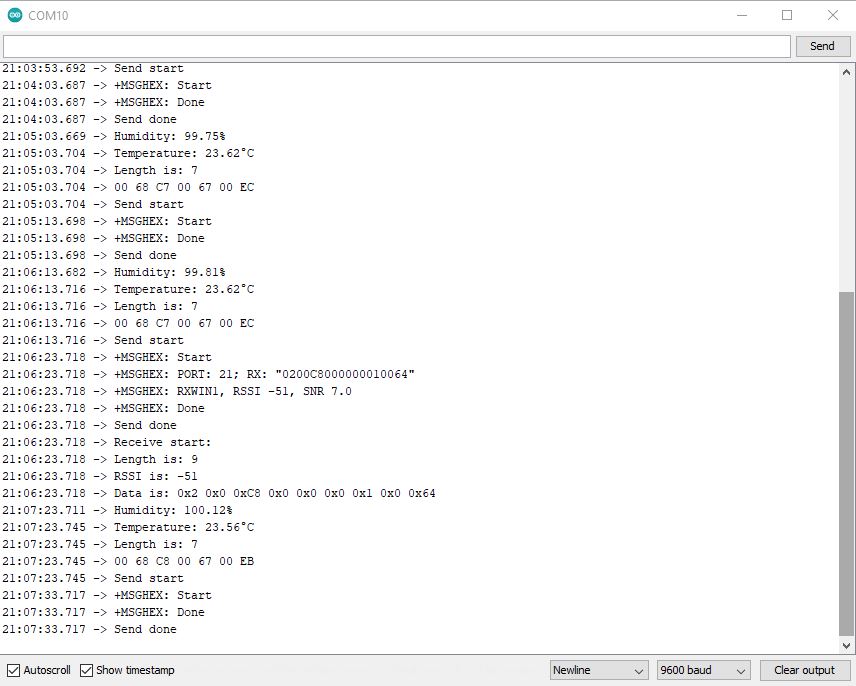
After going back and looking at the module documentation and the diagnostic output I realised that the downlink message and confirmation were sent in two responses.

The first (optional) part of the response had the port number and message payload

+MSGHEX: PORT: 20; RX: "0504030201"

The second had the signal strength information

+MSGHEX: RXWIN1, RSSI -31, SNR 14.0

I had to add some code to the SerialDevice_DataReceived method for assembling the two responses. It would be good if the Seeedstudio LoRa-E5 only used one response. (Sample below based on RAK811)

at+send=lora:1:5A00
OK
at+recv=1,-105,-12,0

at+send=lora:1:5A00
OK
at+recv=0,-105,-12,8,00010203

The other LoRa-E5 implementation detail which frustrated me was the inclusion of labels for values e.g. PORT, RSSI, SNR etc.

 +MSGHEX: RXWIN1, RSSI -31, SNR 14.0 

It would be simpler if the first parameter was the receive window, the second Received Signal Strength Indication(RSSI) and third Signal to Noise Ratio(SNR) etc..

The inconsistent use of separators also made unpacking messages more complex (esp. ‘;’ vs ‘:’ which was hard to see)

+MSGHEX: PORT: 20; RX: “0504030201” uses ‘:’ + ‘;’ + ‘”” + ‘ ‘

+MSGHEX: RXWIN1, RSSI -31, SNR 14.0 uses ‘:’ + ‘,’ + ‘ ‘

Now that I have a proof of concept library I need to functionality and soak test it.

TinyCLR OS V2 Seeed LoRa-E5 LoRaWAN library Part4

Failure is an option

After getting basic connectivity for my Seeedstudio LoRa-E5 Development Kit and Fezduino test rig working I started to build a general purpose library for GHI Electronics TinyCLR powered devices.

The code currently isn’t very robust so when I accidentally used an invalid region, then AppEUI the responses weren’t consistent. When the region configuration failed the response was +DR: ERROR(-1) which maps to “Parameters is invalid” and when the Join failed the response was “+JOIN: Join failed”.

// Set the Region to AS923
txByteCount = serialDevice.Write(UTF8Encoding.UTF8.GetBytes("AT+DR=AS924\r\n"));
Debug.WriteLine($"TX: DR {txByteCount} bytes");
Thread.Sleep(500);

//Read the response
rxByteCount = serialDevice.BytesToRead;
if (rxByteCount > 0)
{
   byte[] rxBuffer = new byte[rxByteCount];
   serialDevice.Read(rxBuffer);
   Debug.WriteLine($"RX :{UTF8Encoding.UTF8.GetString(rxBuffer)}");
}

In the Visual Studio 2019 Debug output window

The thread '<No Name>' (0x2) has exited with code 0 (0x0).
devMobile.IoT.SeeedE5.NetworkJoinOTAA starting
TX: DR 13 bytes
RX :+DR: ERROR(-1)

When I tried an invalid AppEui and the AT+JOIN failed the error message was “+JOIN: Join failed”

In the Visual Studio 2019 Debug output window

devMobile.IoT.SeeedE5.NetworkJoinOTAA starting
TX: DR 13 bytes
RX :+DR: AS923

TX: MODE 16 bytes
RX :+MODE: LWOTAA

TX: ID=AppEui 40 bytes
RX :+ID: AppEui, 00:00:00:00:00:00:00:00

TX: KEY=APPKEY 48 bytes
RX :+KEY: APPKEY 01234567890123456789012345678901

TX: PORT 11 bytes
RX :+PORT: 1

TX: JOIN 9 bytes
RX :+JOIN: Start
+JOIN: NORMAL
+JOIN: Join failed
+JOIN: Done

I had to add some code to the SerialDevice_DataReceived method for handling the “+JOIN: Join failed” case. It would be good if the Seeedstudio LoRa-E5 reported errors in a consistent way for all commands, without the ERROR(..) marker.

TinyCLR OS V2 Seeed LoRa-E5 LoRaWAN library Part3

DevAddr, DevEui and AppEui Oddness

After getting basic connectivity for my Seeedstudio LoRa-E5 Development Kit and Fezduino test rig working I wanted to build a general purpose library for GHI Electronics TinyCLR powered devices.

The code currently isn’t very robust but this caught my attention…

devMobile.IoT.SeeedE5.NetworkJoinOTAA starting
TX: DR 13 bytes
RX :+DR: AS923

TX: MODE 16 bytes
RX :+MODE: LWOTAA

TX: ID=AppEui 40 bytes
RX :+ID: AppEui, 00:00:00:00:00:00:00:00

TX: KEY=APPKEY 48 bytes
RX :+KEY: APPKEY 0123456789ABCDEFGHIJKLMOPQRSTRU 

TX: PORT 11 bytes
RX :+PORT: 1

TX: JOIN 9 bytes
RX :+JOIN: Start
+JOIN: NORMAL
+JOIN: Network joined
+JOIN: NetID 000013 DevAddr 00:01:02:03
+JOIN: Done

In my code I validate the values returned by commands

AT+ID=AppEui, “0000000000000”

AT+ID=APPEUI, “00 00 00 00 00 00 00 00”

Response to either of the above commands

+ID: AppEui, 00:00:00:00:00:00:00:00

It just seem a bit odd that to set the AppEUI (similar for the DevEUI and DevAddr) there are two possible formats available, neither of which is the format returned.

This was unlike the RAK811 module where most commands just return OK when they are successful.

at+set_config=lora:app_eui:0000000000000001
OK

TinyCLR OS V2 Seeed LoRa-E5 LoRaWAN library Part2

Nasty OTAA connect

After getting basic connectivity for my Seeedstudio LoRa-E5 Development Kit and Fezduino test rig working I wanted to see if I could get the device connected to The Things Industries(TTI) via the RAK7258 WisGate Edge Lite on the shelf in my office.

My Over the Air Activation (OTAA) implementation is very “nasty” as it is assumed that there are no timeouts or failures and it only sends one BCD message “48656c6c6f204c6f526157414e” which is “hello LoRaWAN”. The code just sequentially steps through the necessary commands (with a suitable delay after each is sent) to join the TTI network.

public class Program
{
#if TINYCLR_V2_FEZDUINO
   private static string SerialPortId = SC20100.UartPort.Uart5;
#endif
   private const string AppKey = "................................";

   //txByteCount = serialDevice.Write(UTF8Encoding.UTF8.GetBytes($"AT+ID=AppEui,{AppEui}\r\n"));
   //private const string AppEui = "................";

   //txByteCount = serialDevice.Write(UTF8Encoding.UTF8.GetBytes($"AT+ID=AppEui,\"{AppEui}\"\r\n"));
   private const string AppEui = ".. .. .. .. .. .. .. ..";

   private const byte messagePort = 1;

   //private const string payload = "48656c6c6f204c6f526157414e"; // Hello LoRaWAN
   private const string payload = "01020304"; // AQIDBA==
   //private const string payload = "04030201"; // BAMCAQ==

   public static void Main()
   {
      UartController serialDevice;
      int txByteCount;
      int rxByteCount;

      Debug.WriteLine("devMobile.IoT.SeeedE5.NetworkJoinOTAA starting");

      try
      {
         serialDevice = UartController.FromName(SerialPortId);

         serialDevice.SetActiveSettings(new UartSetting()
         {
            BaudRate = 9600,
            Parity = UartParity.None,
            StopBits = UartStopBitCount.One,
            Handshaking = UartHandshake.None,
            DataBits = 8
         });

         serialDevice.Enable();

         // Set the Region to AS923
         txByteCount = serialDevice.Write(UTF8Encoding.UTF8.GetBytes("AT+DR=AS923\r\n"));
         Debug.WriteLine($"TX: DR {txByteCount} bytes");
         Thread.Sleep(500);

         // Read the response
         rxByteCount = serialDevice.BytesToRead;
         if (rxByteCount > 0)
         {
            byte[] rxBuffer = new byte[rxByteCount];
            serialDevice.Read(rxBuffer);
            Debug.WriteLine($"RX :{UTF8Encoding.UTF8.GetString(rxBuffer)}");
         }

         // Set the Join mode
         txByteCount = serialDevice.Write(UTF8Encoding.UTF8.GetBytes("AT+MODE=LWOTAA\r\n"));
         Debug.WriteLine($"TX: MODE {txByteCount} bytes");
         Thread.Sleep(500);

         // Read the response
         rxByteCount = serialDevice.BytesToRead;
         if (rxByteCount > 0)
         {
            byte[] rxBuffer = new byte[rxByteCount];
            serialDevice.Read(rxBuffer);
            Debug.WriteLine($"RX :{UTF8Encoding.UTF8.GetString(rxBuffer)}");
         }

         // Set the appEUI
         txByteCount = serialDevice.Write(UTF8Encoding.UTF8.GetBytes($"AT+ID=AppEui,\"{AppEui}\"\r\n"));
         Debug.WriteLine($"TX: ID=AppEui {txByteCount} bytes");
         Thread.Sleep(500);

         // Read the response
         rxByteCount = serialDevice.BytesToRead;
         if (rxByteCount > 0)
         {
            byte[] rxBuffer = new byte[rxByteCount];
            serialDevice.Read(rxBuffer);
            Debug.WriteLine($"RX :{UTF8Encoding.UTF8.GetString(rxBuffer)}");
         }
            
         // Set the appKey
         txByteCount = serialDevice.Write(UTF8Encoding.UTF8.GetBytes($"AT+KEY=APPKEY,{AppKey}\r\n"));
         Debug.WriteLine($"TX: KEY=APPKEY {txByteCount} bytes");
         Thread.Sleep(500);

         // Read the response
         rxByteCount = serialDevice.BytesToRead;
         if (rxByteCount > 0)
         {
            byte[] rxBuffer = new byte[rxByteCount];
            serialDevice.Read(rxBuffer);
            Debug.WriteLine($"RX :{UTF8Encoding.UTF8.GetString(rxBuffer)}");
         }

         // Set the PORT
         txByteCount = serialDevice.Write(UTF8Encoding.UTF8.GetBytes($"AT+PORT={messagePort}\r\n"));
         Debug.WriteLine($"TX: PORT {txByteCount} bytes");
         Thread.Sleep(500);

         // Read the response
         rxByteCount = serialDevice.BytesToRead;
         if (rxByteCount > 0)
         {
            byte[] rxBuffer = new byte[rxByteCount];
            serialDevice.Read(rxBuffer);
            Debug.WriteLine($"RX :{UTF8Encoding.UTF8.GetString(rxBuffer)}");
         }

         // Join the network
         txByteCount = serialDevice.Write(UTF8Encoding.UTF8.GetBytes("AT+JOIN\r\n"));
         Debug.WriteLine($"TX: JOIN {txByteCount} bytes");
         Thread.Sleep(10000);

         // Read the response
         rxByteCount = serialDevice.BytesToRead;
         if (rxByteCount > 0)
         {
            byte[] rxBuffer = new byte[rxByteCount];
            serialDevice.Read(rxBuffer);
            Debug.WriteLine($"RX :{UTF8Encoding.UTF8.GetString(rxBuffer)}");
         }

         while (true)
         {
            // Unconfirmed message
            txByteCount = serialDevice.Write(UTF8Encoding.UTF8.GetBytes($"AT+MSGHEX=\"{payload}\"\r\n"));
            Debug.WriteLine($"TX: MSGHEX {txByteCount} bytes");

            // Confirmed message
            //txByteCount = serialDevice.Write(UTF8Encoding.UTF8.GetBytes($"AT+CMSGHEX=\"{payload}\"\r\n"));
            //Debug.WriteLine($"TX: CMSGHEX {txByteCount} bytes");

            Thread.Sleep(10000);

            // Read the response
            rxByteCount = serialDevice.BytesToRead;
            if (rxByteCount > 0)
            {
               byte[] rxBuffer = new byte[rxByteCount];
               serialDevice.Read(rxBuffer);
               Debug.WriteLine($"RX :{UTF8Encoding.UTF8.GetString(rxBuffer)}");
            }

            Thread.Sleep(30000);
         }
      }
      catch (Exception ex)
      {
         Debug.WriteLine(ex.Message);
      }
   }
}

The code is not suitable for production but it confirmed my software and hardware configuration worked.

The thread '<No Name>' (0x2) has exited with code 0 (0x0).
devMobile.IoT.SeeedE5.NetworkJoinOTAA starting
TX: DR 13 bytes
RX :+DR: AS923

TX: MODE 16 bytes
RX :+MODE: LWOTAA

TX: ID=AppEui 40 bytes
RX :+ID: AppEui, ..:..:.:.:.:.:.:.

TX: KEY=APPKEY 48 bytes
RX :+KEY: APPKEY ................................

TX: PORT 11 bytes
RX :+PORT: 1

TX: JOIN 9 bytes
RX :+JOIN: Start
+JOIN: NORMAL
+JOIN: Network joined
+JOIN: NetID 000013 DevAddr ..:..:..:..
+JOIN: Done

TX: MSGHEX 22 bytes
RX :+MSGHEX: Start
+MSGHEX: FPENDING
+MSGHEX: RXWIN1, RSSI -41, SNR 9.0
+MSGHEX: Done

TX: MSGHEX 22 bytes
RX :+MSGHEX: Start
+MSGHEX: Done

In the Visual Studio 2019 debug output I could see messages getting sent and then after a short delay they were visible in the TTI console.

Seeed E5 LoRaWAN dev Kit connecting in The Things Industries Device Live data tab

I had an issue with how the AppUI parameter was handled

   private const string AppKey = "................................";

   //txByteCount = serialDevice.Write(UTF8Encoding.UTF8.GetBytes($"AT+ID=AppEui,{AppEui}\r\n"));
   //private const string AppEui = "................";

   //txByteCount = serialDevice.Write(UTF8Encoding.UTF8.GetBytes($"AT+ID=AppEui,\"{AppEui}\"\r\n"));
   private const string AppEui = ".. .. .. .. .. .. .. ..";


It appears that If the appkey (or other string parameter) has spaces it has to be enclosed in quotations.

TTI V3 Connector Device EUI Representation

While debugging The Things Industries(TTI) V3 connector on my desktop I had noticed the Device EUI‘s were wrong.

TTI V3 Connector application running as a console application showing incorrect DeviceEUIs

The TTI V3 Connector code…

foreach (V3EndDevice device in endDevices.End_devices)
{
   if (DeviceAzureEnabled(device))
   {
      _logger.LogInformation("Config-ApplicationID:{0} DeviceID:{1} Device EUI:{2}", device.Ids.Application_ids.Application_id, device.Ids.Device_id, BitConverter.ToString(device.Ids.Dev_eui));

      tasks.Add(DeviceRegistration(device.Ids.Application_ids.Application_id, device.Ids.Device_id, _programSettings.ResolveDeviceModelId(device.Ids.Application_ids.Application_id, device.Attributes), stoppingToken));
   }
}

…uses some classes generated by nSwag based on the TheThingsNetwork/LoRaWAN-stack api.swagger.json

public partial class V3EndDeviceIdentifiers 
{
        [Newtonsoft.Json.JsonProperty("device_id", Required = Newtonsoft.Json.Required.Default, NullValueHandling = Newtonsoft.Json.NullValueHandling.Ignore)]
        public string Device_id { get; set; }
    
        [Newtonsoft.Json.JsonProperty("application_ids", Required = Newtonsoft.Json.Required.Default, NullValueHandling = Newtonsoft.Json.NullValueHandling.Ignore)]
        public V3ApplicationIdentifiers Application_ids { get; set; }
    
        /// <summary>The LoRaWAN DevEUI.</summary>
        [Newtonsoft.Json.JsonProperty("dev_eui", Required = Newtonsoft.Json.Required.Default, NullValueHandling = Newtonsoft.Json.NullValueHandling.Ignore)]
        public byte[] Dev_eui { get; set; }
    
        /// <summary>The LoRaWAN JoinEUI (AppEUI until LoRaWAN 1.0.3 end devices).</summary>
        [Newtonsoft.Json.JsonProperty("join_eui", Required = Newtonsoft.Json.Required.Default, NullValueHandling = Newtonsoft.Json.NullValueHandling.Ignore)]
        public byte[] Join_eui { get; set; }
    
        /// <summary>The LoRaWAN DevAddr.</summary>
        [Newtonsoft.Json.JsonProperty("dev_addr", Required = Newtonsoft.Json.Required.Default, NullValueHandling = Newtonsoft.Json.NullValueHandling.Ignore)]
        public byte[] Dev_addr { get; set; }
}

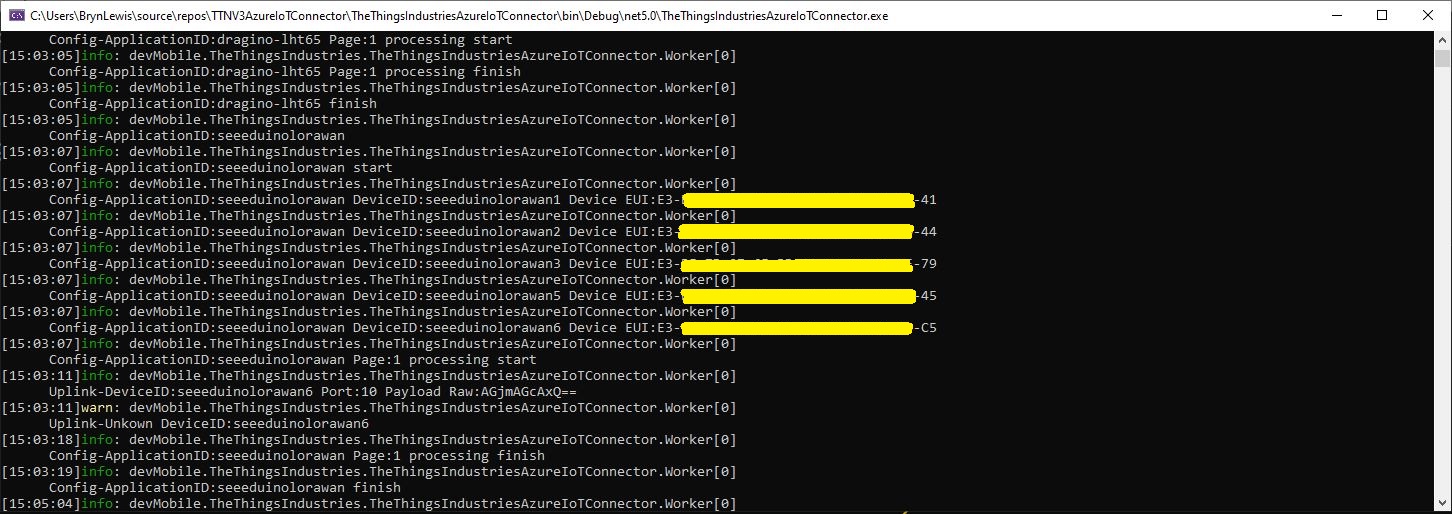
After some research I found references to the underlying problem in TTN and OpenAPI forums. The Dev_addr and Dev_eui fields are Base16(Hexidecimal) encoded binary but are being processed as if they were Base64(mime) encoded.

The TTI connector only displays the Device EUI so I changed the Dev_eui property to a string

public partial class V3EndDeviceIdentifiers 
{
        [Newtonsoft.Json.JsonProperty("device_id", Required = Newtonsoft.Json.Required.Default, NullValueHandling = Newtonsoft.Json.NullValueHandling.Ignore)]
        public string Device_id { get; set; }
    
        [Newtonsoft.Json.JsonProperty("application_ids", Required = Newtonsoft.Json.Required.Default, NullValueHandling = Newtonsoft.Json.NullValueHandling.Ignore)]
        public V3ApplicationIdentifiers Application_ids { get; set; }
    
        /// <summary>The LoRaWAN DevEUI.</summary>
        [Newtonsoft.Json.JsonProperty("dev_eui", Required = Newtonsoft.Json.Required.Default, NullValueHandling = Newtonsoft.Json.NullValueHandling.Ignore)]
        public string Dev_eui { get; set; }

      /// <summary>The LoRaWAN JoinEUI (AppEUI until LoRaWAN 1.0.3 end devices).</summary>
      [Newtonsoft.Json.JsonProperty("join_eui", Required = Newtonsoft.Json.Required.Default, NullValueHandling = Newtonsoft.Json.NullValueHandling.Ignore)]
        public byte[] Join_eui { get; set; }
    
        /// <summary>The LoRaWAN DevAddr.</summary>
        [Newtonsoft.Json.JsonProperty("dev_addr", Required = Newtonsoft.Json.Required.Default, NullValueHandling = Newtonsoft.Json.NullValueHandling.Ignore)]
        public byte[] Dev_addr { get; set; }
}

I also had to remove the BitConverter.ToString call

foreach (V3EndDevice device in endDevices.End_devices)
{
   if (DeviceAzureEnabled(device))
   {
      _logger.LogInformation("Config-ApplicationID:{0} DeviceID:{1} Device EUI:{2}", device.Ids.Application_ids.Application_id, device.Ids.Device_id, device.Ids.Dev_eui);

      tasks.Add(DeviceRegistration(device.Ids.Application_ids.Application_id, device.Ids.Device_id, _programSettings.ResolveDeviceModelId(device.Ids.Application_ids.Application_id, device.Attributes), stoppingToken));
   }
}

Now the DeviceEUI values are displayed correctly and searching for EndDevices in Azure Application Insights is easier

TTI V3 Connector application running as a console application showing correct DeviceEUIs

Modifying the nSwag generated classes is a really nasty way of fixing the problem but I think this approach is okay as it’s only one field and any other solution I could find was significantly more complex.

TTI V3 Gateway Device Provisioning Service(DPS) Concurrent Requests

While debugging The Things Industries(TTI) V3 connector on my desktop I had noticed that using an Azure IoT Hub device connection string was quite a bit faster than using the Azure Device Provisioning Service(DPS). The Azure Webjob connector was executing the requests sequentially which made the duration of the DPS call even more apparent.

To reduce the impact of the RegisterAsync call duration this Proof of Concept(PoC) code uses the System.Tasks.Threading library to execute each request in its own thread and then wait for all the requests to finish.

try
{
   int devicePage = 1;
   V3EndDevices endDevices = await endDeviceRegistryClient.ListAsync(
      applicationSetting.Key,
      field_mask_paths: Constants.DevicefieldMaskPaths,
      page: devicePage,
      limit: _programSettings.TheThingsIndustries.DevicePageSize,
      cancellationToken: stoppingToken);

   while ((endDevices != null) && (endDevices.End_devices != null)) // If no devices returns null rather than empty list
   {
      List<Task<bool>> tasks = new List<Task<bool>>();

      _logger.LogInformation("Config-ApplicationID:{0} start", applicationSetting.Key);

      foreach (V3EndDevice device in endDevices.End_devices)
      {
         if (DeviceAzureEnabled(device))
         {
            _logger.LogInformation("Config-ApplicationID:{0} DeviceID:{1} Device EUI:{2}", device.Ids.Application_ids.Application_id, device.Ids.Device_id, BitConverter.ToString(device.Ids.Dev_eui));

            tasks.Add(DeviceRegistration(device.Ids.Application_ids.Application_id,
                                       device.Ids.Device_id,
                                       _programSettings.ResolveDeviceModelId(device.Ids.Application_ids.Application_id, device.Attributes),
                                       stoppingToken));
         }
      }

      _logger.LogInformation("Config-ApplicationID:{0} Page:{1} processing start", applicationSetting.Key, devicePage);

      Task.WaitAll(tasks.ToArray(),stoppingToken);

      _logger.LogInformation("Config-ApplicationID:{0} Page:{1} processing finish", applicationSetting.Key, devicePage);

      endDevices = await endDeviceRegistryClient.ListAsync(
         applicationSetting.Key,
         field_mask_paths: Constants.DevicefieldMaskPaths,
         page: devicePage += 1,
         limit: _programSettings.TheThingsIndustries.DevicePageSize,
         cancellationToken: stoppingToken);
   }
   _logger.LogInformation("Config-ApplicationID:{0} finish", applicationSetting.Key);
}
catch (ApiException ex)
{
   _logger.LogError("Config-Application configuration API error:{0}", ex.StatusCode);
}

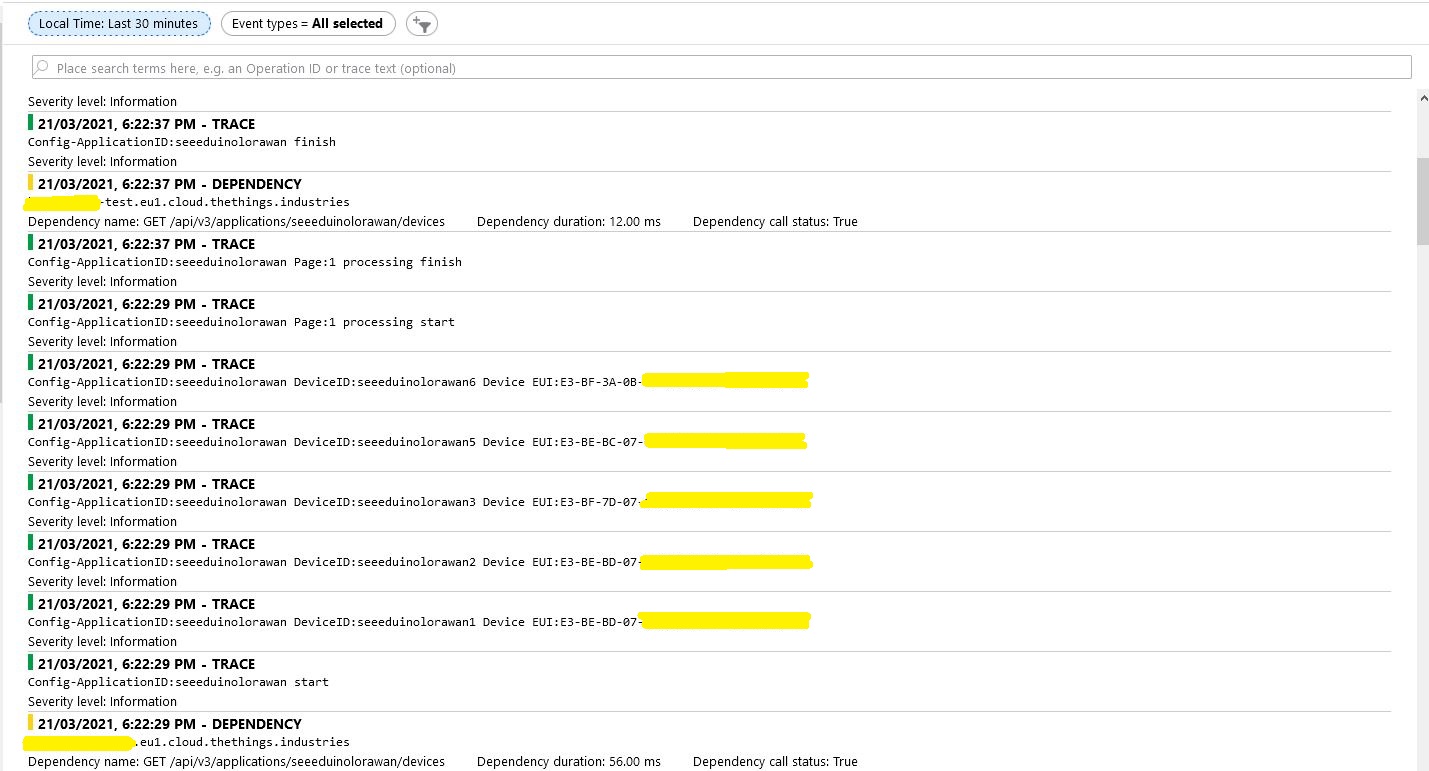
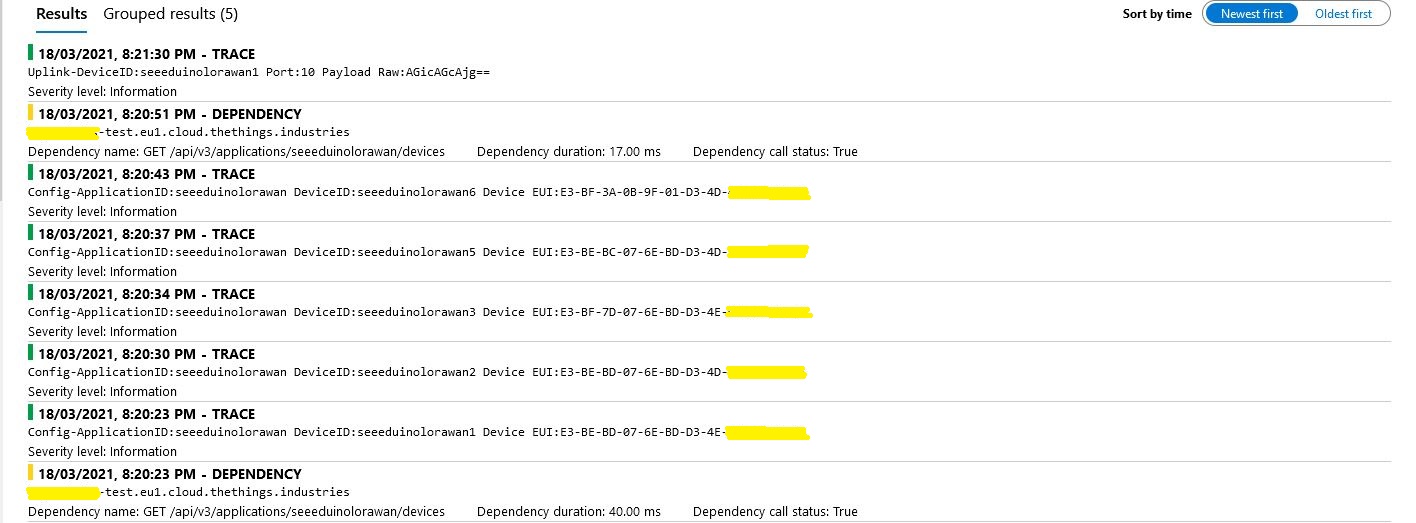
The connector application paginates the retrieval of device configuration from TTI API and a Task is created for each device returned in a page. In the Application Insights Trace logging the duration of a single page of device registrations was approximately the duration of the longest call.

There will be a tradeoff between device page size (resource utilisation by many threads) and startup duration (to many sequential page operations) which will need to be explored.

TTI V3 Gateway Device Provisioning Service(DPS) Performance

My The Things Industries(TTI) V3 connector is an Identity Translation Cloud Gateway, it maps LoRaWAN devices to Azure IoT Hub devices. The connector creates a DeviceClient for each TTI LoRaWAN device and can use an Azure Device Connection string or the Azure Device Provisioning Service(DPS).

While debugging the connector on my desktop I had noticed that using a connection string was quite a bit faster than using DPS and I had assumed this was just happenstance. While doing some testing in the Azure North Europe data-center (Closer to TTI European servers) I grabbed some screen shots of the trace messages in Azure Application Insights as the TTI Connector Application was starting.

I only have six LoRaWAN devices configured in my TTI dev instance, but I repeated each test several times and the results were consistent so the request durations are reasonable. My TTI Connector application, IoT Hub, DPS and Application insights instances are all in the same Azure Region and Azure Resource Group so networking overheads shouldn’t be significant.

Azure IoT Hub Connection device connection string

Using an Azure IoT Hub Device Shared Access policy connection string establishing a connection took less than a second.

My Azure DPS Instance

Using my own DPS instance to provide the connection string and then establishing a connection took between 3 and 7 seconds.

Azure IoT Central DPS

For my Azure IoT Central instance getting a connection string and establishing a connection took between 4 and 7 seconds.

The Azure DPS client code was copied from one of the sample applications so I have assumed it is “correct”.

using (var transport = new ProvisioningTransportHandlerAmqp(TransportFallbackType.TcpOnly))
{
	ProvisioningDeviceClient provClient = ProvisioningDeviceClient.Create( 
		Constants.AzureDpsGlobalDeviceEndpoint,
		deviceProvisiongServiceSettings.IdScope,
		securityProvider,
		transport);

	DeviceRegistrationResult result;

	if (!string.IsNullOrEmpty(modelId))
	{
		ProvisioningRegistrationAdditionalData provisioningRegistrationAdditionalData = new ProvisioningRegistrationAdditionalData()
		{
			JsonData = $"{{"modelId": "{modelId}"}}"
		};

		result = await provClient.RegisterAsync(provisioningRegistrationAdditionalData, stoppingToken);
	}
	else
    {
		result = await provClient.RegisterAsync(stoppingToken);
	}

	if (result.Status != ProvisioningRegistrationStatusType.Assigned)
	{
		_logger.LogError("Config-DeviceID:{0} Status:{1} RegisterAsync failed ", deviceId, result.Status);

		return false;
	}

	IAuthenticationMethod authentication = new DeviceAuthenticationWithRegistrySymmetricKey(result.DeviceId, (securityProvider as SecurityProviderSymmetricKey).GetPrimaryKey());

	deviceClient = DeviceClient.Create(result.AssignedHub, authentication, transportSettings);
}

I need to investigate why getting a connection string from the DPS then connecting take significantly longer (I appreciate that “behind the scenes” service calls maybe required). This wouldn’t be an issue for individual devices connecting from different locations but for my Identity Translation Cloud gateway which currently open connections sequentially this could be a problem when there are a large number of devices.

If the individual requests duration can’t be reduced (using connection pooling etc.) I may have to spin up multiple threads so multiple devices can be connecting concurrently.

TTI V3 Gateway Azure IoT Central Digital Twin Definition Language(DTDL) support

Over the last couple of days I have added limited Digital Twin Definition Language(DTDLV2) support to my The Things Industries(TTI) V3 connector so that Azure IoT Central devices can be “zero touch” provisioned. For this blog post I used five Seeeduino LoRaWAN devices left over from another abandoned project.

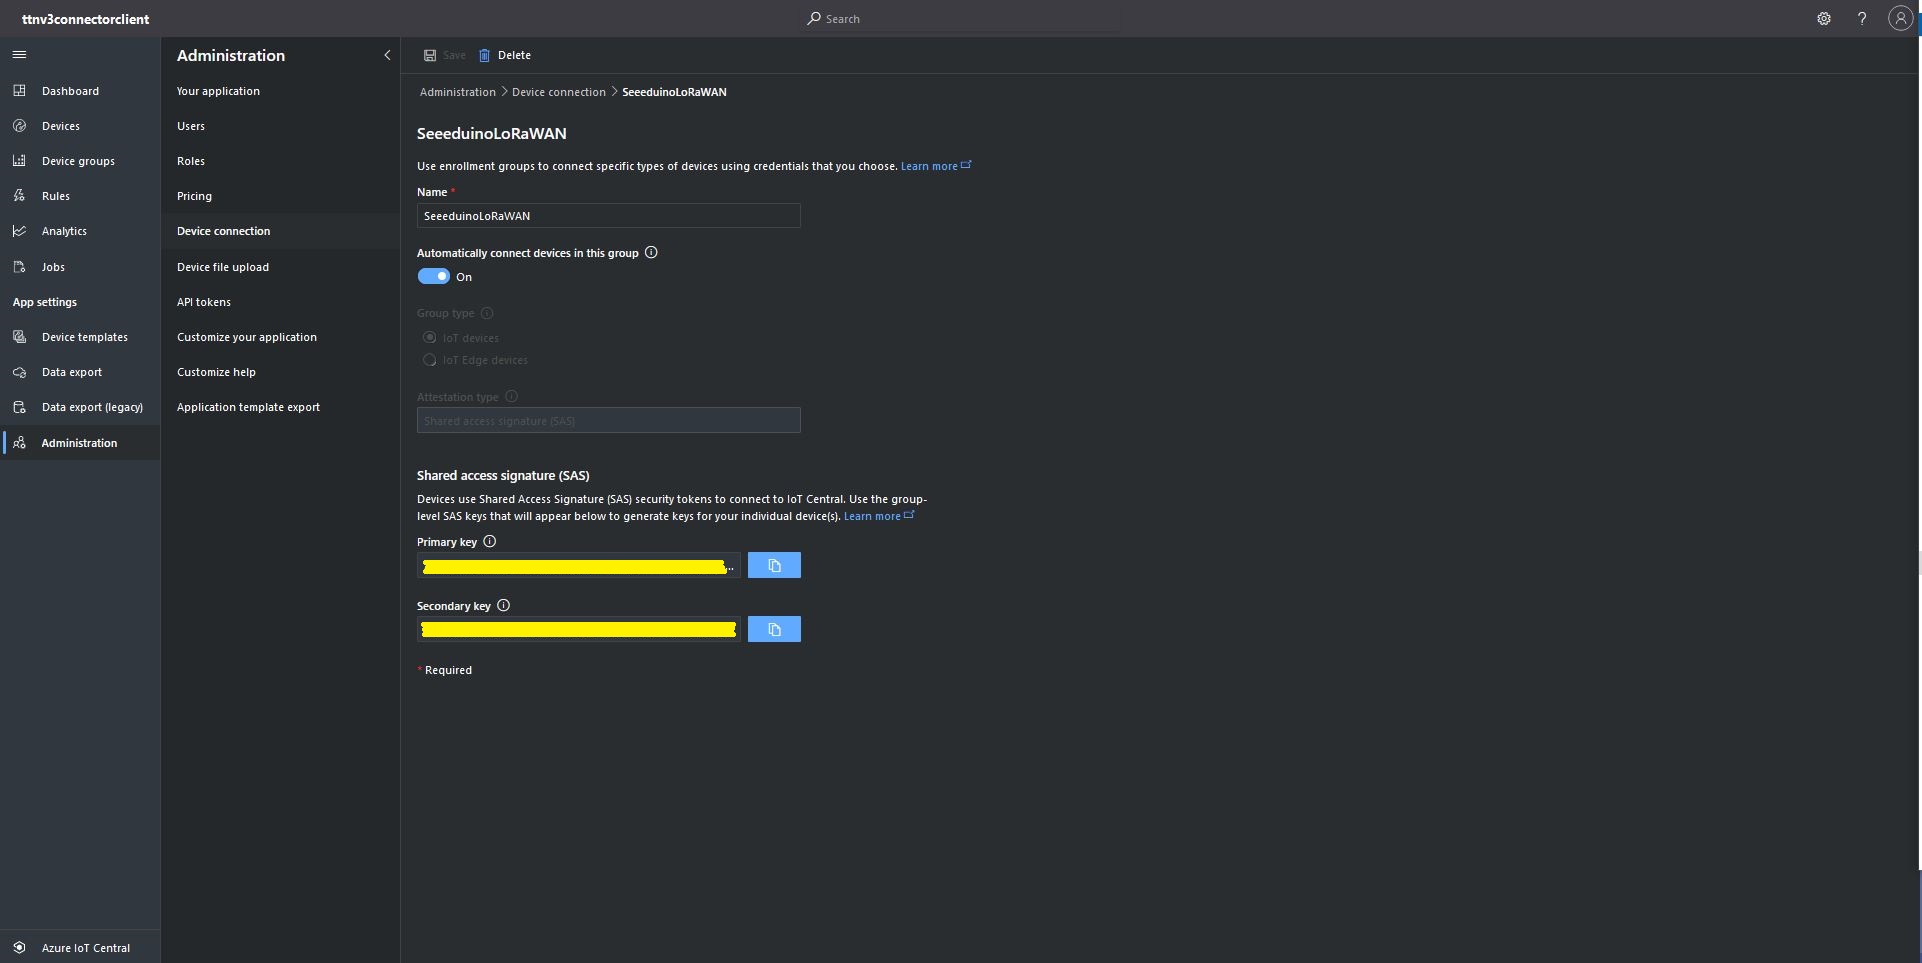
The first step was to configure and Azure IoT Central enrollment group (ensure “Automatically connect devices in this group” is on) and copy the IDScope and Group Enrollment key to the appsettings.json file (see sample file below for more detail)

Azure IoT Central Enrollment Group configuration

Then I created an Azure IoT Central template for the seeeduino LoRAWAN devices which are running software (developed with the Arduino tooling) that read values from a Grove – Temperature&Humidity sensor. The naming of telemetry properties in specified by the Low Power Protocol(LPP) encoder/decoder (I check the decoded payload in TTI EndDevice “Live Data” tab).

Configuring Seeeduino LoRaWAN device template

Then I mapped the Azure IoT Central Device Group to my Azure IoT Central Enrollment Group

Associating Device Group with Group Enrollment configuration

The Device Template @Id can be configured as the “default” template for all the devices in a TTI application in the app.settings.json file.

{
...
   "ProgramSettings": {
      "Applications": {
...
      "seeeduinolorawan": {
        "AzureSettings": {
           "DeviceProvisioningServiceSettings": {
              "IdScope": "...",
              "GroupEnrollmentKey": "..."
            }
         },
         "DTDLModelId": "dtmi:ttnv3connectorclient:SeeeduinoLoRaWAN4cz;1",
         "MQTTAccessKey": "...",
         "DeviceIntegrationDefault": true,
         "DevicePageSize": 10
      }
   }.
...

The Device Template @Id can also be set using a dtdlmodelid attribute in a TTI end device settings so devices can be individually configured.

TTI Application EndDevice dtdlmodelid attribute usage

At startup the TTI Gateway enumerates through the devices in each application configured in the app.settings.json. The Azure Device Provisioning Service(DPS) is used to retrieve each device’s connection string and configure it in Azure IoT Central if required.

Azure IoT Central Device Group with no provisioned Devices
TTI Connector application connecting and provisioning EndDevices
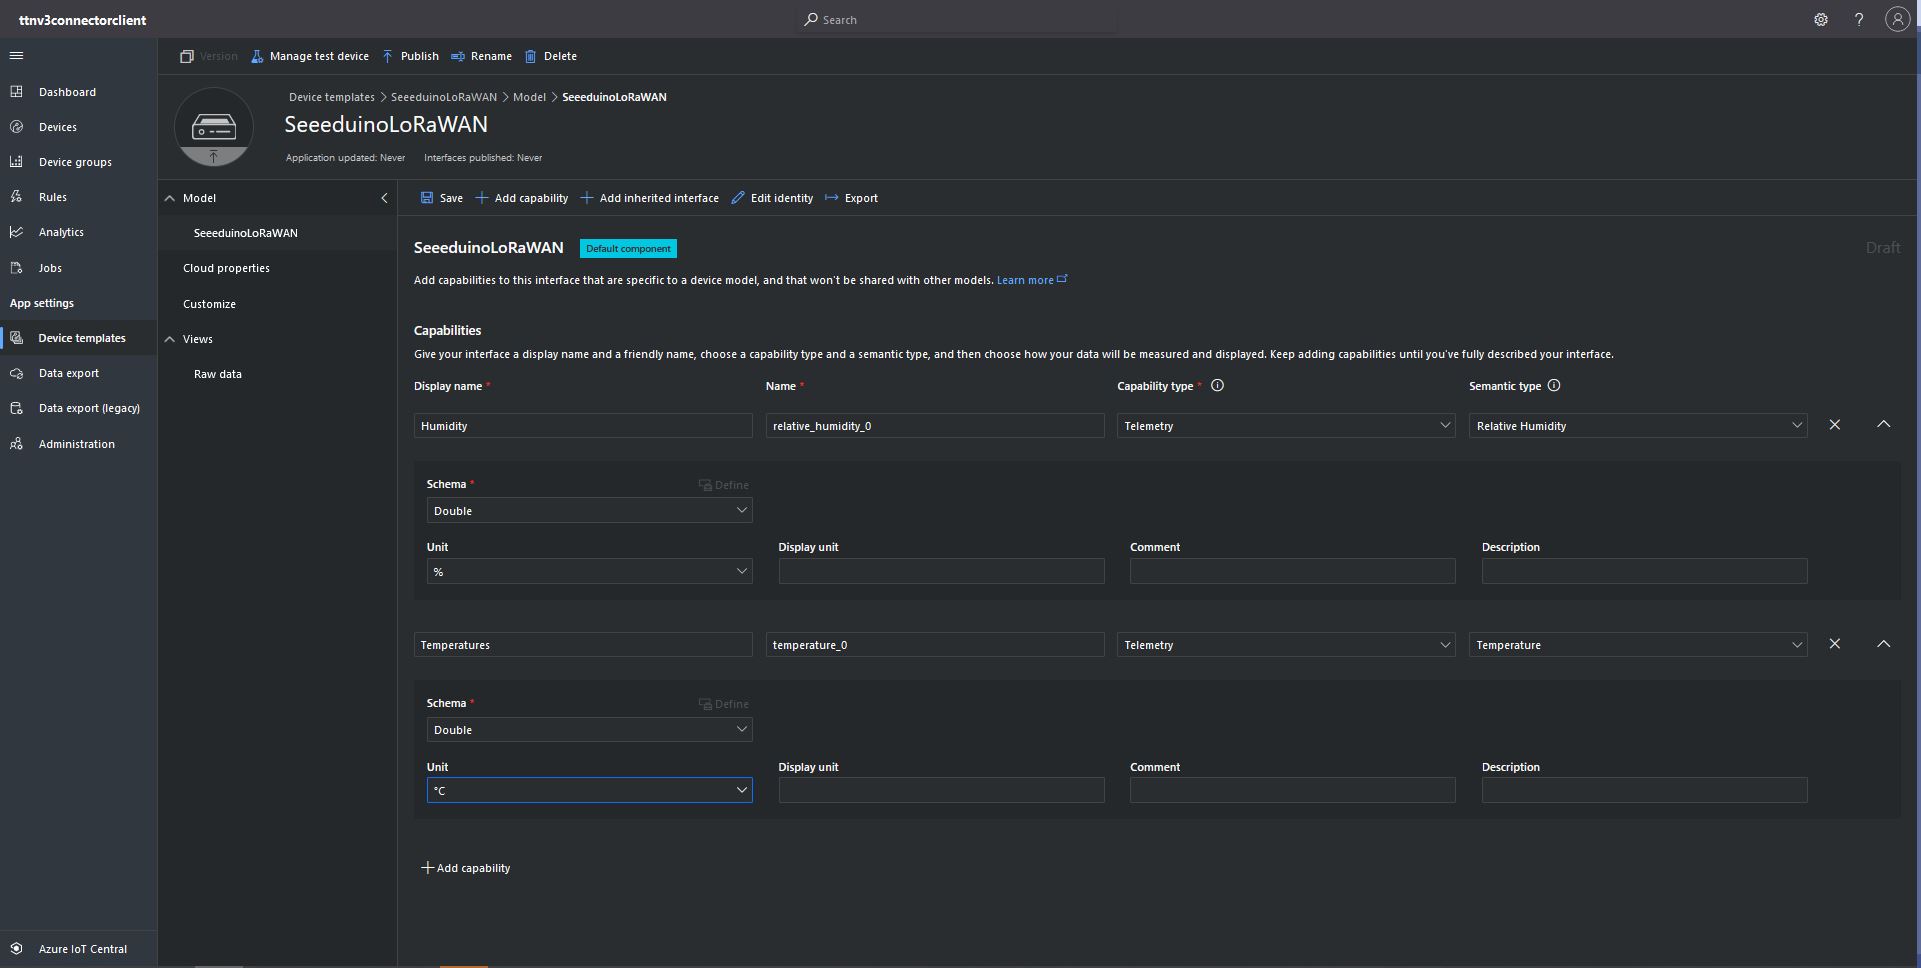
Azure IoT Central devices mapped to an Azure IoT Central Template via the modelID

The ProvisioningRegistrationAdditionalData optional parameter of the DPS RegisterAsync method has a JSON property which is used to the specify the device ModelID.

using (var transport = new ProvisioningTransportHandlerAmqp(TransportFallbackType.TcpOnly))
{
	ProvisioningDeviceClient provClient = ProvisioningDeviceClient.Create( 
		Constants.AzureDpsGlobalDeviceEndpoint,
		deviceProvisiongServiceSettings.IdScope,
		securityProvider,
		transport);

	DeviceRegistrationResult result;

	if (!string.IsNullOrEmpty(modelId))
	{
		ProvisioningRegistrationAdditionalData provisioningRegistrationAdditionalData = new ProvisioningRegistrationAdditionalData()
		{
			JsonData = $"{{\"modelId\": \"{modelId}\"}}"
		};

		result = await provClient.RegisterAsync(provisioningRegistrationAdditionalData, stoppingToken);
	}
	else
    {
		result = await provClient.RegisterAsync(stoppingToken);
	}

	if (result.Status != ProvisioningRegistrationStatusType.Assigned)
	{
		_logger.LogError("Config-DeviceID:{0} Status:{1} RegisterAsync failed ", deviceId, result.Status);

		return false;
	}

	IAuthenticationMethod authentication = new DeviceAuthenticationWithRegistrySymmetricKey(result.DeviceId, (securityProvider as SecurityProviderSymmetricKey).GetPrimaryKey());

	deviceClient = DeviceClient.Create(result.AssignedHub, authentication, transportSettings);
}

My implementation was “inspired” by TemperatureController project in the PnP Device Samples.

Azure IoT Central Dashboard with Seeeduino LoRaWAN devices around my house that were “automagically” provisioned

I need to do some testing to confirm my code works reliably with both DPS and user provided connection strings. The RegisterAsync call is currently taking about four seconds which could be an issue for TTI applications with many devices.

TTI V3 Gateway Azure IoT Hub Support

After a couple of weeks work my The Things Industries(TTI) V3 gateway is in beta testing. For this blog post I have configured five Seeeduino LoRaWAN devices. My sensor nodes connect to an Azure IoT Hub with a Shared Access Signature(SAS) device policy connection string. I’m using Device Twin Explorer to display Telemetry from and send messages to the sensor nodes. I have also configured Azure Stream Analytics and PowerBI to graph telemetry from the sensor nodes.

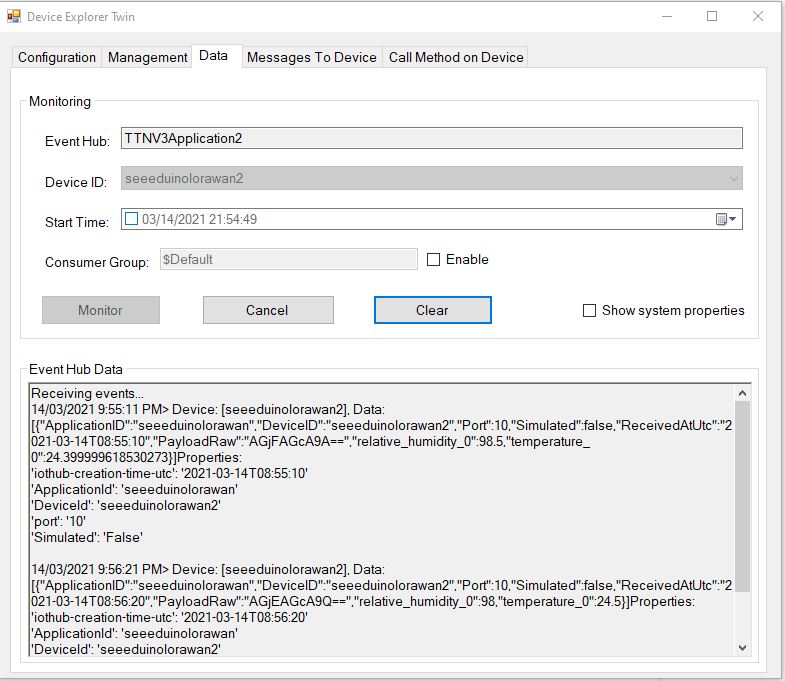
Device Twin Explorer displaying telemetry from one of the Seeeduino devices

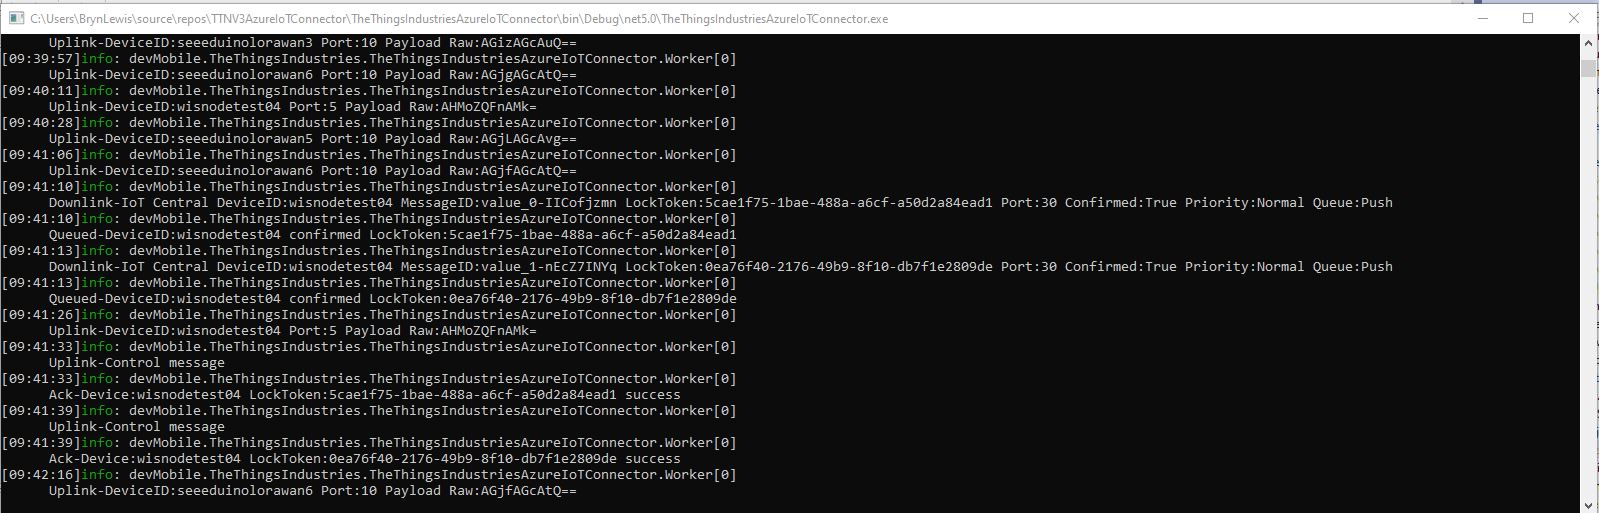
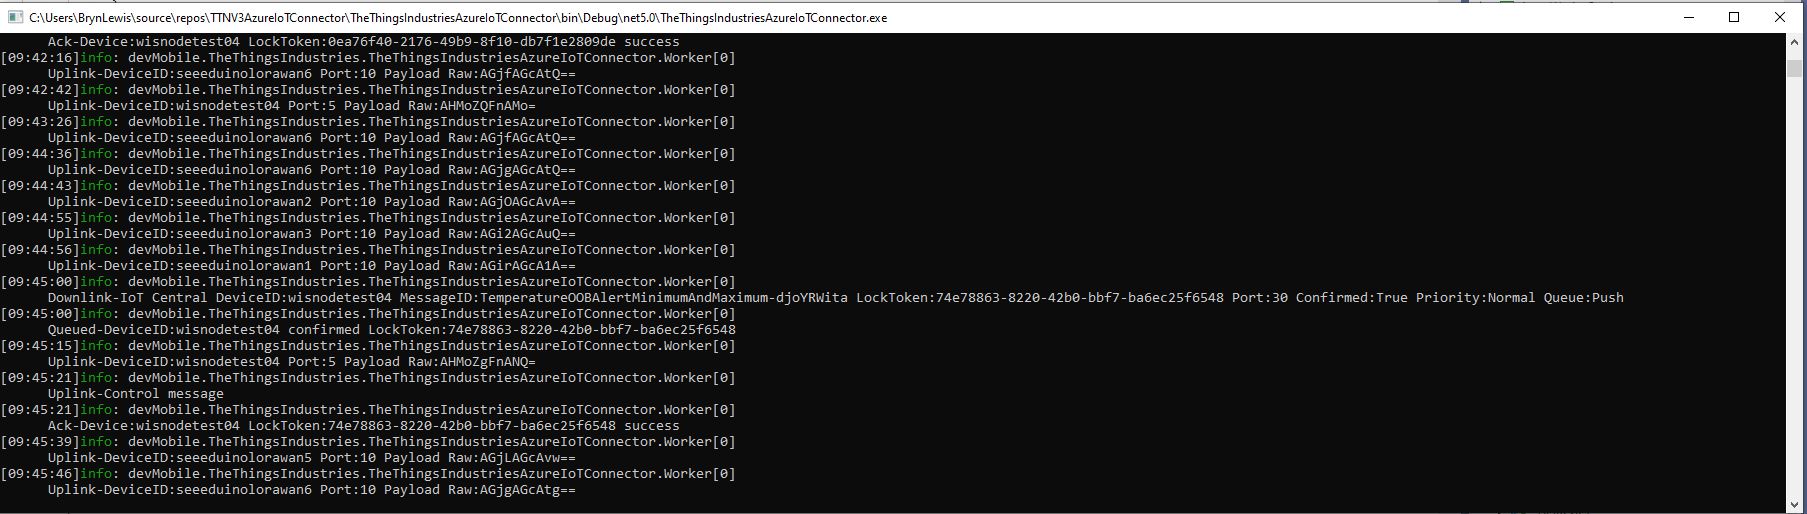
My integration uses only queued messages as often they won’t be delivered to the sensor node immediately, especially if the sensor node only sends an uplink message every 30 minutes/hour/day.

The confirmed flag should be used with care as the Azure IoT Hub messages may expire before a delivery Ack/Nack/Failed is received from the TTI.

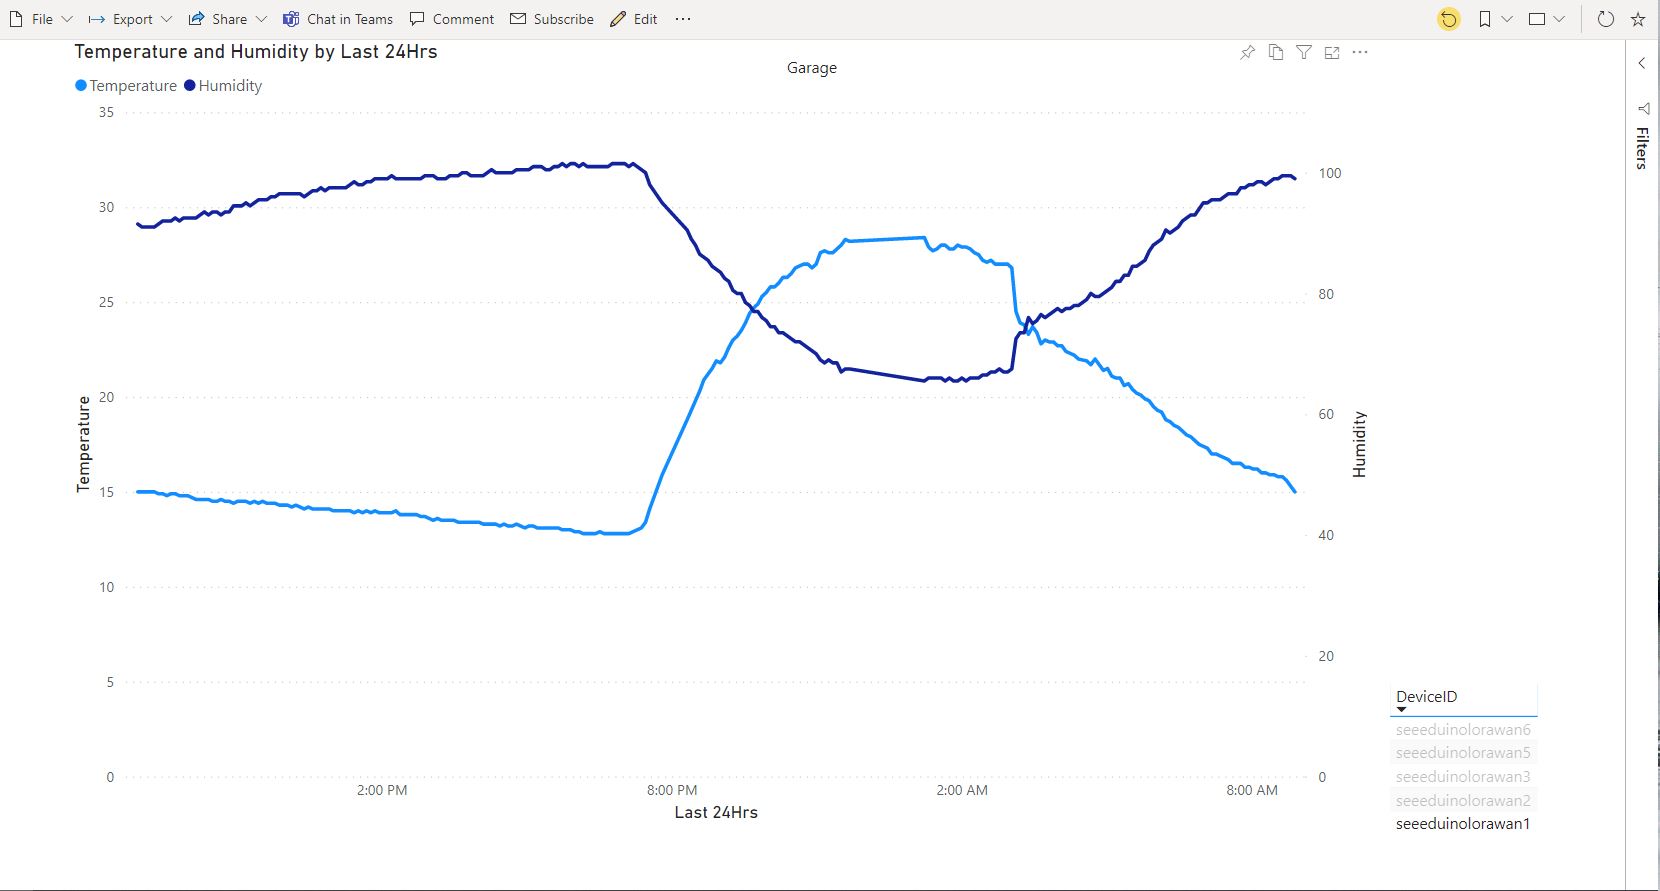
PowerBI graph of temperature and humidity in my garage over 24 hours

To send a downlink message, TTI needs a LoRaWAN port number (plus optional queue, confirmed and priority values) which is specified in the Azure IoT Hub message custom properties.

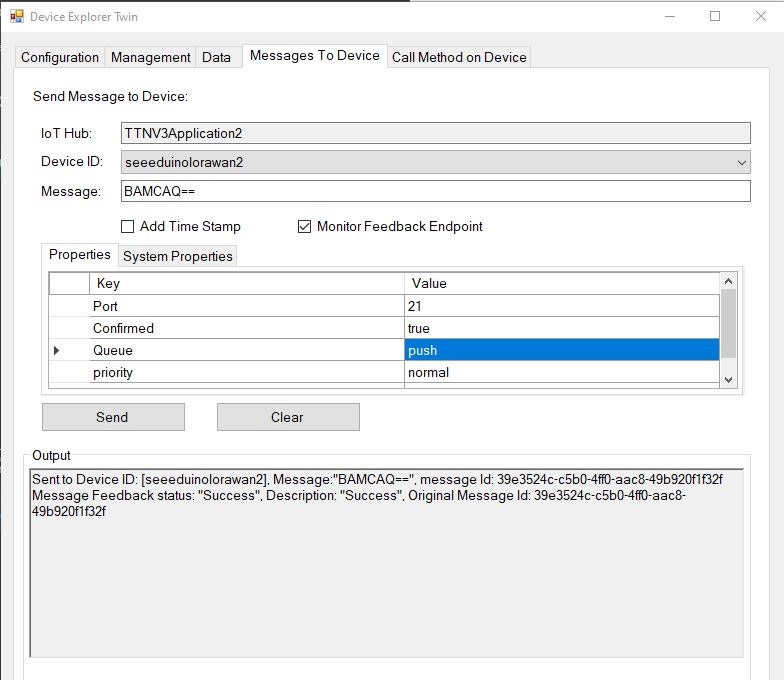
Device explorer displaying a raw payload message which has been confirmed delivered
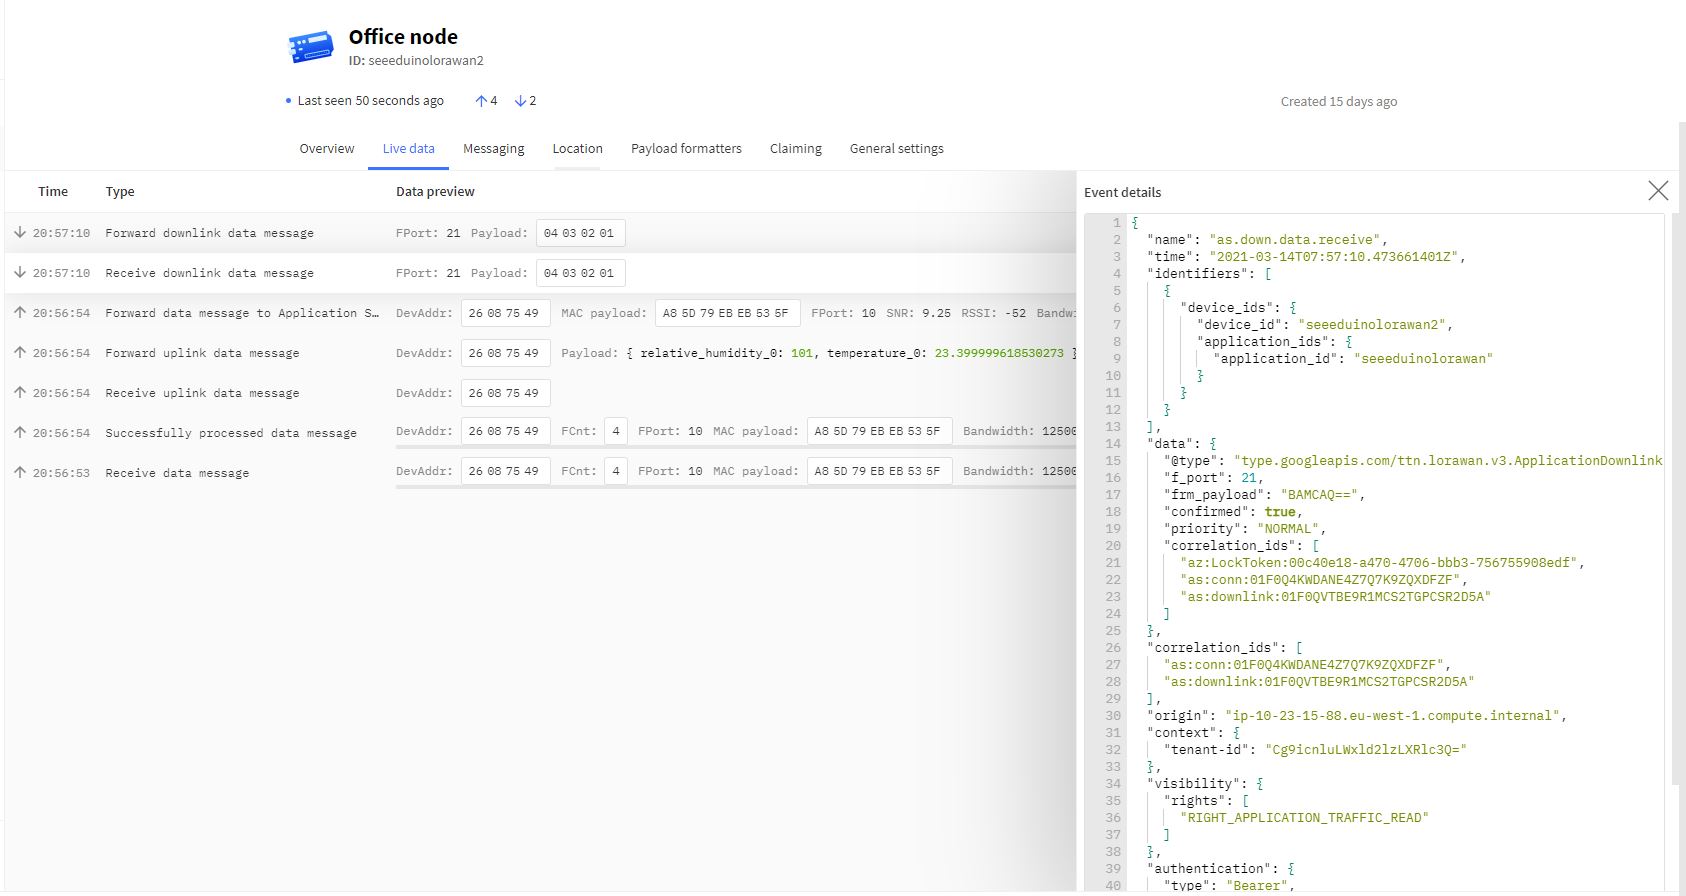
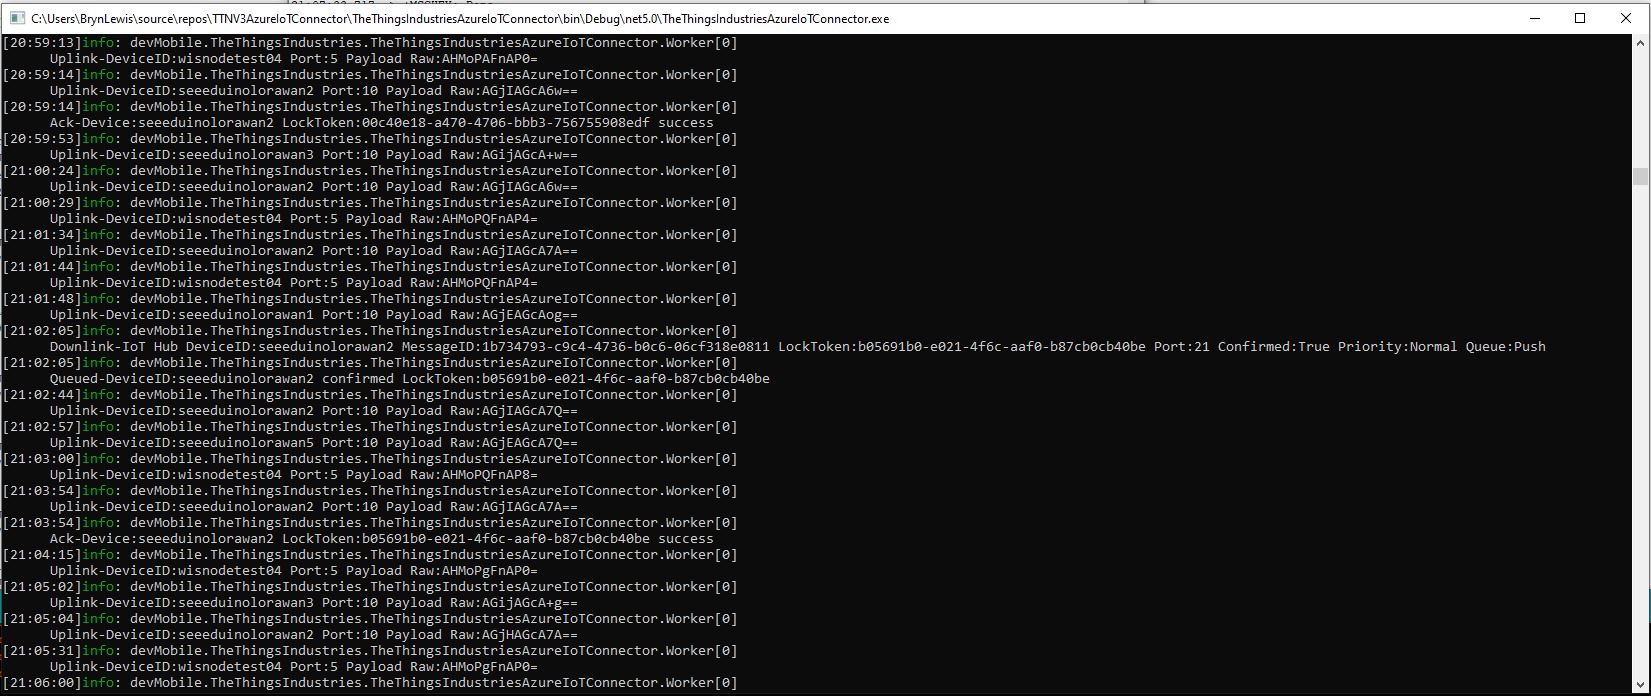
TTI device live data tab displaying raw payload in downlink message information tab
Azure IoT Connector console application sending raw payload to sensor node with confirmation ack
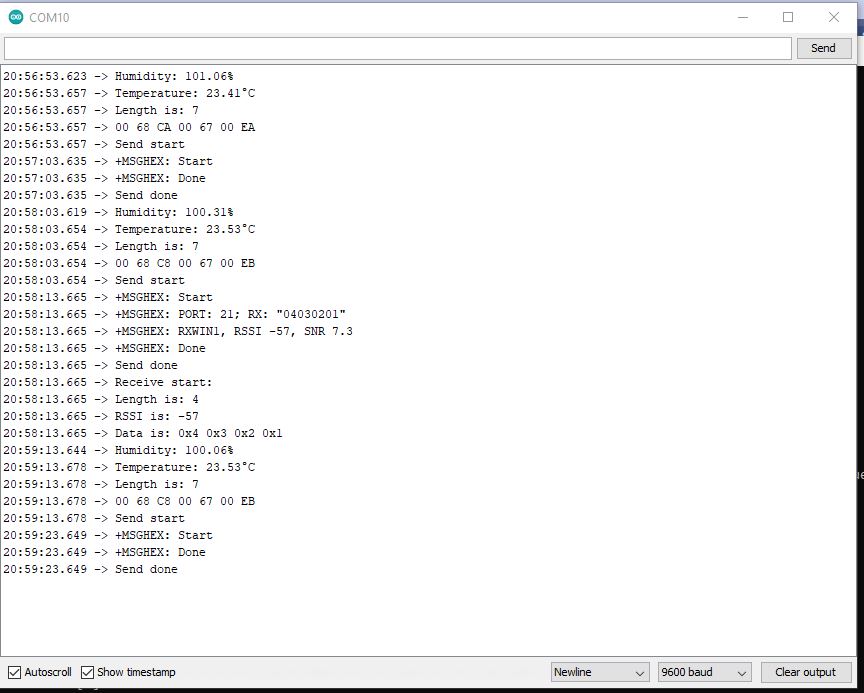
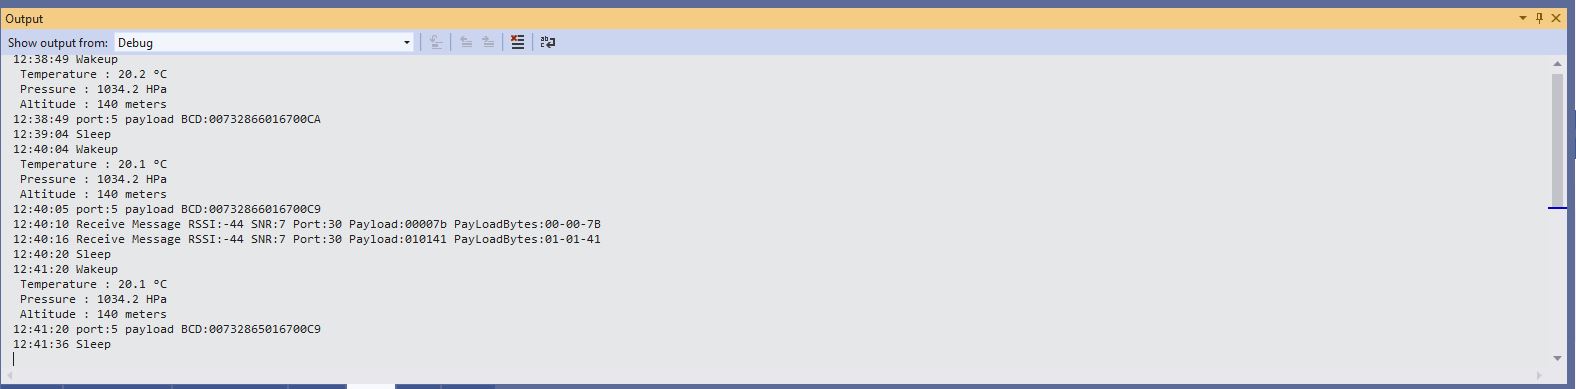
Arduino monitor displaying received raw payload from TTI

If the Azure IoT Hub message payload is valid JSON it is copied into the payload decoded downlink message property. and if it is not valid JSON it assumed to be a Base64 encoded value and copied into the payload raw downlink message property.

try
{
	// Split over multiple lines in an attempt to improve readability. A valid JSON string should start/end with {/} for an object or [/] for an array
	if (!(payloadText.StartsWith("{") && payloadText.EndsWith("}"))
										&&
		(!(payloadText.StartsWith("[") && payloadText.EndsWith("]"))))
	{
		throw new JsonReaderException();
	}

	downlink.PayloadDecoded = JToken.Parse(payloadText);
}
catch (JsonReaderException)
{
	downlink.PayloadRaw = payloadText;
}

Like the Azure IoT Central JSON validation I had to add a check that the string started with a “{” and finished with a “}” (a JSON object) or started with a “[” and finished with a “]” (a JSON array) as part of the validation process.

Device explorer displaying a JSON payload message which has been confirmed delivered

I normally wouldn’t use exceptions for flow control but I can’t see a better way of doing this.

TTI device live data tab displaying JSON payload in downlink message information tab
Azure IoT Connector console application sending JSON payload to sensor node with confirmation ack
Arduino monitor displaying received JSON payload from TTI

The build in TTI decoder only supports downlink decoded payloads with property names “value_0” through “value_x” custom encoders may support other property names.

TTI V3 Gateway Azure IoT Central Support

After a couple of weeks work my The Things Industries(TTI) V3 gateway is in beta testing. For this blog post the client is a GHI Electronics Fezduino with a RAK811 LPWAN Evaluation Board(EVB). My test device was configured in Azure IoT Central by the Device Provisioning Service(DPS) and I then manually migrated the device to each of the four templates used in this post.

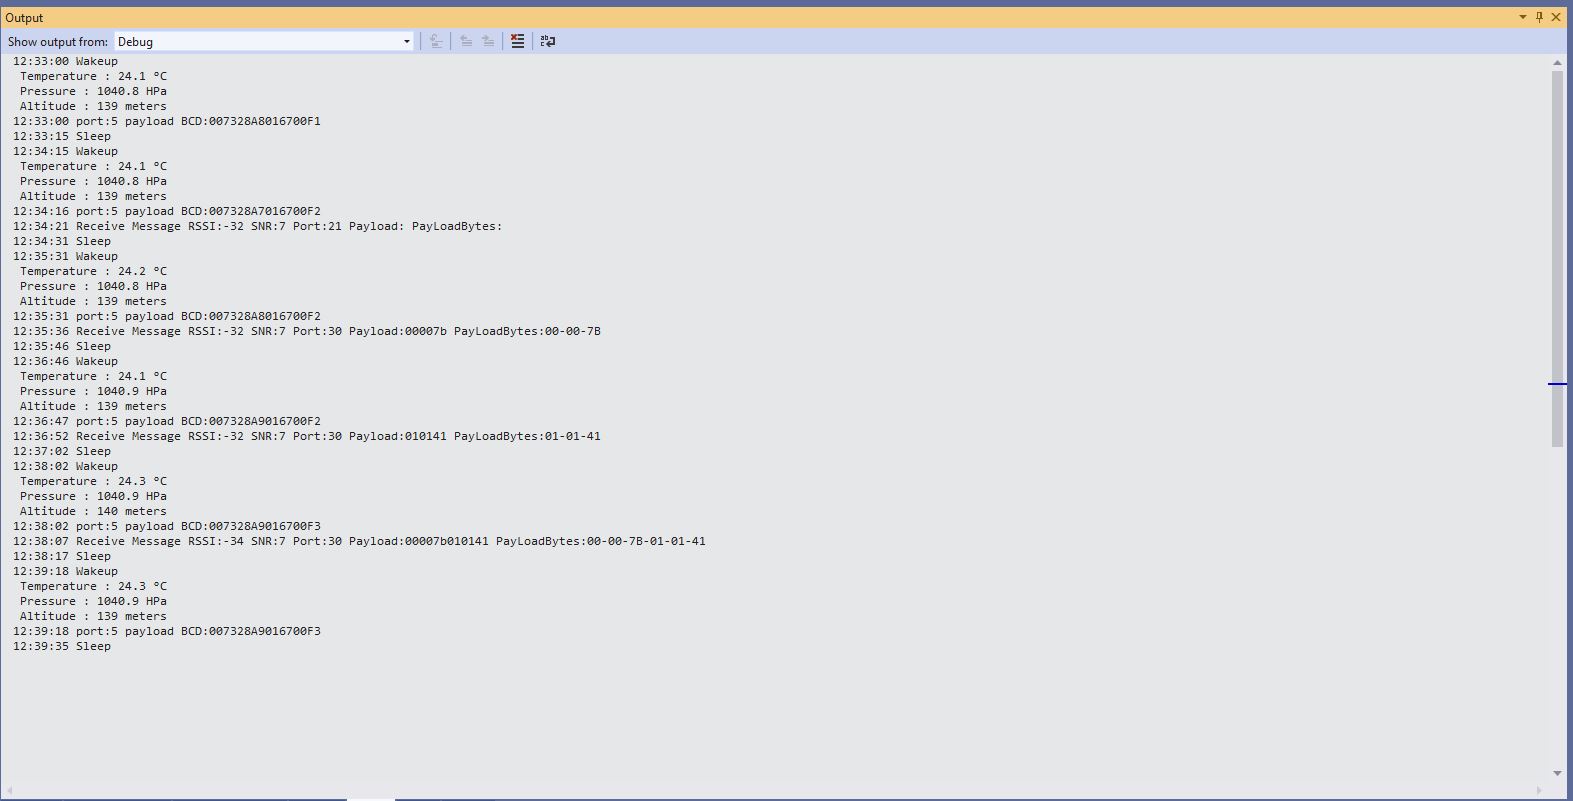
The first step was to display the temperature and barometric pressure values from the Seeedstudio Grove BMP180 attached to my sensor node.

Sensor node displaying temperature and barometric pressure values
Azure IoT Central temperature and barometric pressure telemetry configuration
Azure IoT Central Telemetry Dashboard displaying temperature and barometric pressure values

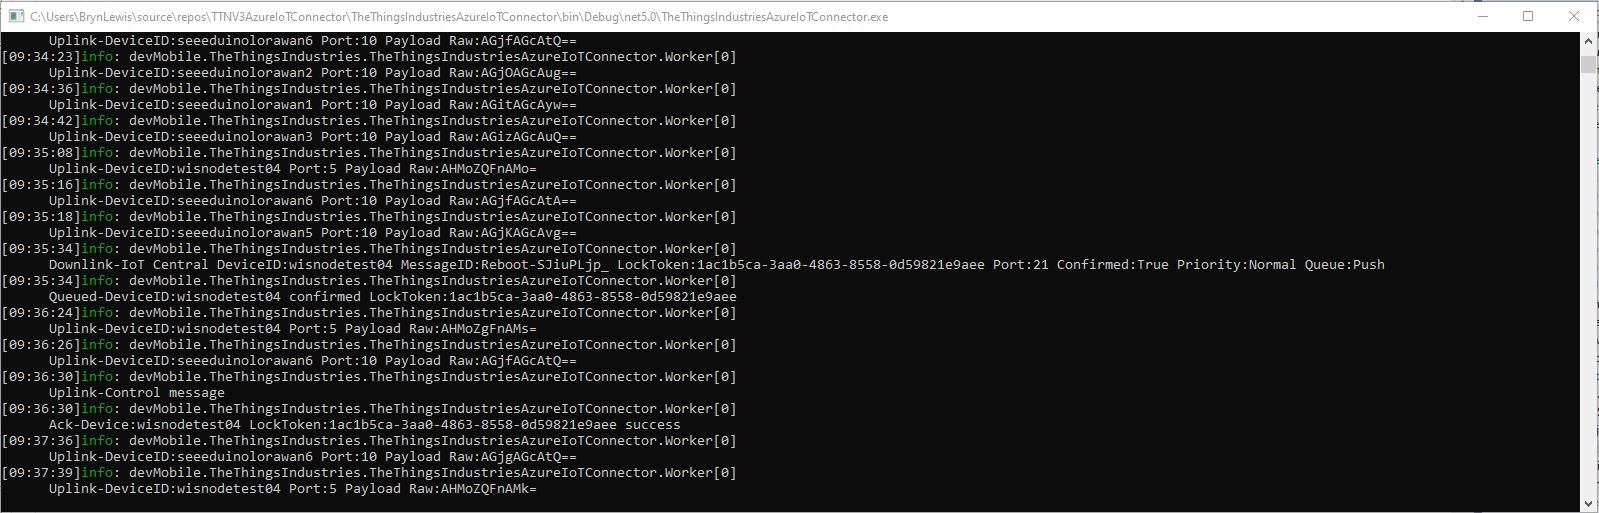
The next step was to configure a simple Azure IoT Central command to send to the sensor node. This was a queued request with no payload. An example of this sort of command would be a request for a sensor node to reboot or turn on an actuator.

My integration uses only offline queued commands as often messages won’t be delivered to the sensor node immediately, especially if the sensor node only sends a message every half hour/hour/day. The confirmed flag should be used with care as the Azure IoT Hub messages may expire before a delivery Ack/Nack/Failed is received from the TTI and it consumes downlink bandwidth.

if (message.Properties.ContainsKey("method-name"))
{
}

I determine an Azure IoT Hub message is an Azure IoT Central command by the presence of the “method-name” property. If the Azure IoT Central command does not have a request payload the Azure IoT Hub message payload will contain a single “@” character so the Azure IoT Connector sends a TTI downlink message with an empty raw payload via the TTI Data API(MQTT).

if (payloadText.CompareTo("@") != 0)
{
   .
}
else
{
   downlink.PayloadRaw = "";
}
Azure IoT Central command with out a request payload value command configuration

To send a downlink message, TTI needs a LoRaWAN port number (plus optional queue, confirmed and priority values) which can’t be provided via the Azure IoT Central command setup so these values are configured in the app.settings file.

Each TTI application has zero or more Azure IoT Central command configurations which supply the port, confirmed, priority and queue settings.

  "ProgramSettings": {
    "Applications": {
      "application1": {
        "AzureSettings": {
          ...
          }
        },
        "MQTTAccessKey": "...",
        "DeviceIntegrationDefault": false,
        "MethodSettings": {
          "Reboot": {
            "Port": 21,
            "Confirmed": true,
            "Priority": "normal",
            "Queue": "push"
          },
        }
      },
      "seeeduinolorawan": {
        "AzureSettings": {
        }
        "MQTTAccessKey": "...",
        "DeviceIntegrationDefault": true,
        "DevicePageSize": 10
      }
    },
    "TheThingsIndustries": {
...
   }
}
Azure IoT Central simple command dashboard
Azure IoT Central simple command initiation
Azure IoT TTI connector application sending a simple command to my sensor node
Sensor node display simple command information. The note message payload is empty

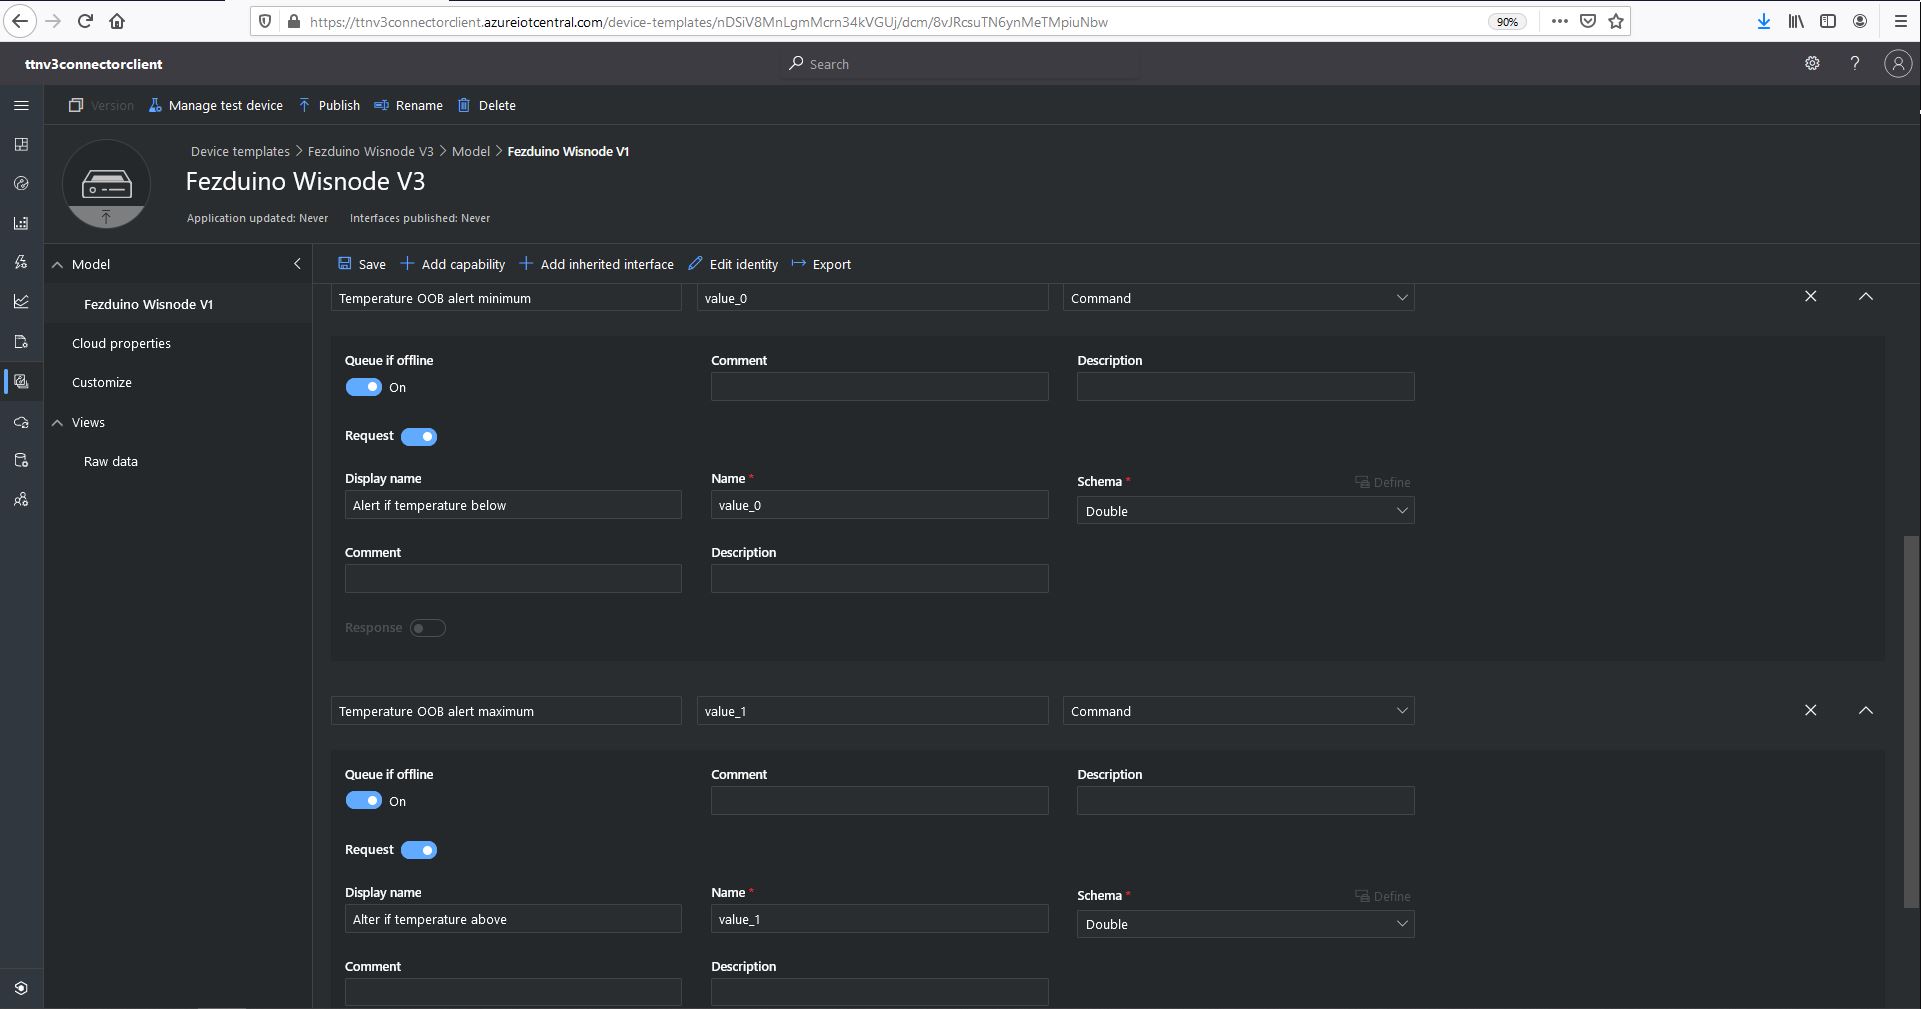
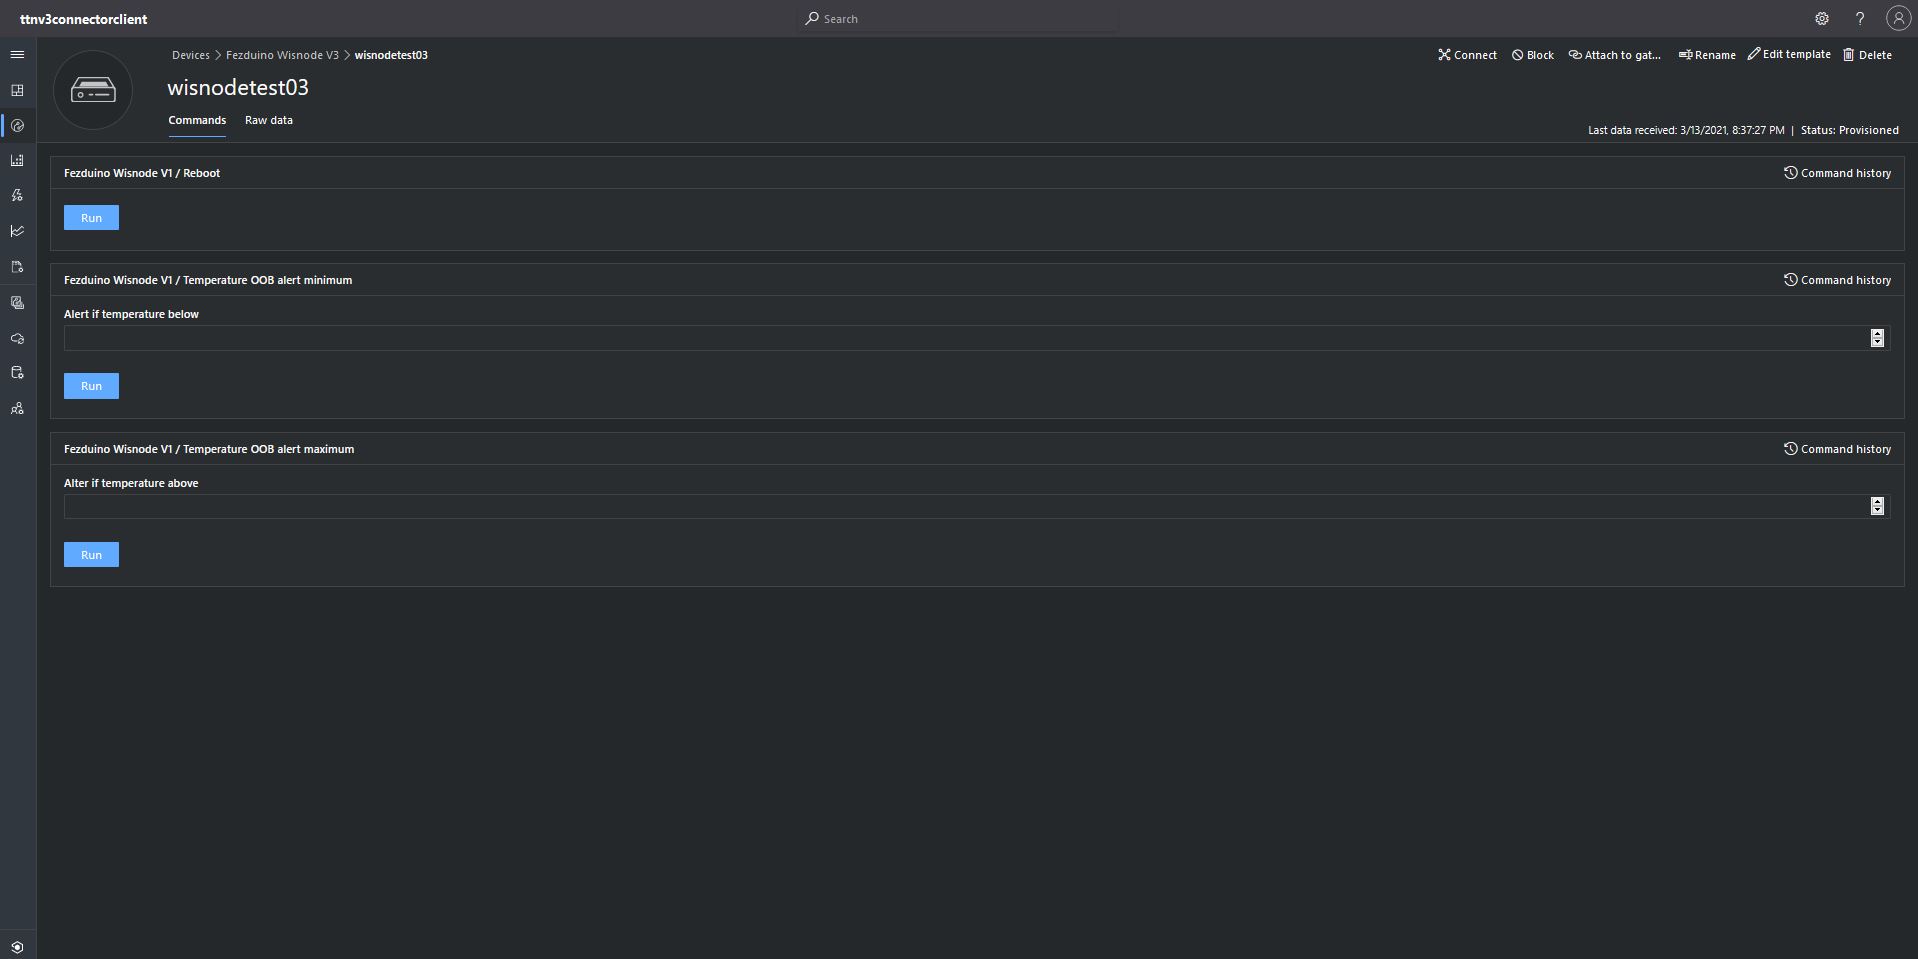
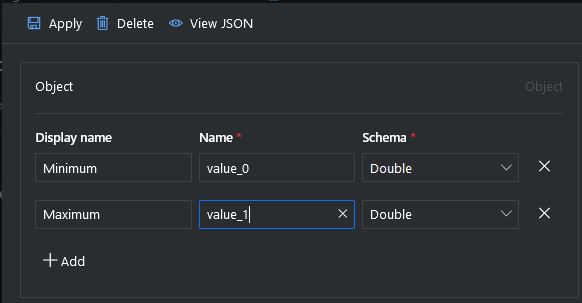
The next step was to configure a more complex Azure IoT Central command to send to the sensor node. This was a queued request with a single value payload. An example of this sort of command could be setting the speed of a fan or the maximum temperature of a freezer for an out of band (OOB) notification to be sent.

Azure IoT Central single value command configuration
  "ProgramSettings": {
    "Applications": {
      "application1": {
        "AzureSettings": {
          ...
          }
        },
        "MQTTAccessKey": "...",
        "DeviceIntegrationDefault": false,
        "MethodSettings": {
          "Reboot": {
            "Port": 21,
            "Confirmed": true,
            "Priority": "normal",
            "Queue": "push"
          },
          "value_0": {
            "Port": 30,
            "Confirmed": true,
            "Priority": "normal",
            "Queue": "push"
          },
          "value_1": {
            "Port": 30,
            "Confirmed": true,
            "Priority": "normal",
            "Queue": "push"
          },
        }
      },
      "seeeduinolorawan": {
        "AzureSettings": {
        }
        "MQTTAccessKey": "...",
        "DeviceIntegrationDefault": true,
        "DevicePageSize": 10
      }
    },
    "TheThingsIndustries": {
...
   }
}

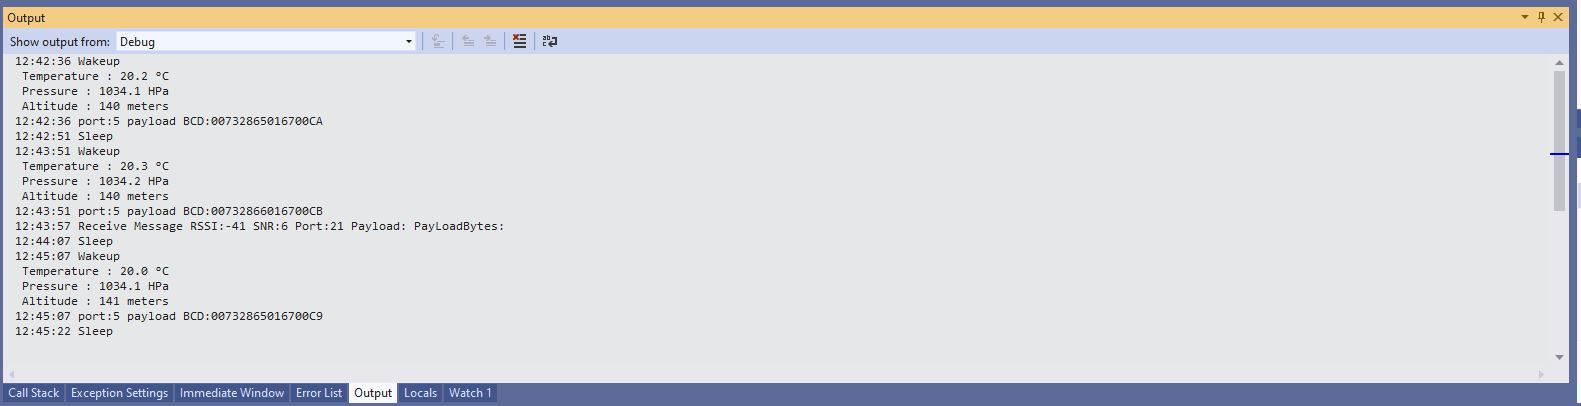
The value_0 settings are for the minimum temperature the value_1 settings are for the maximum temperature value.

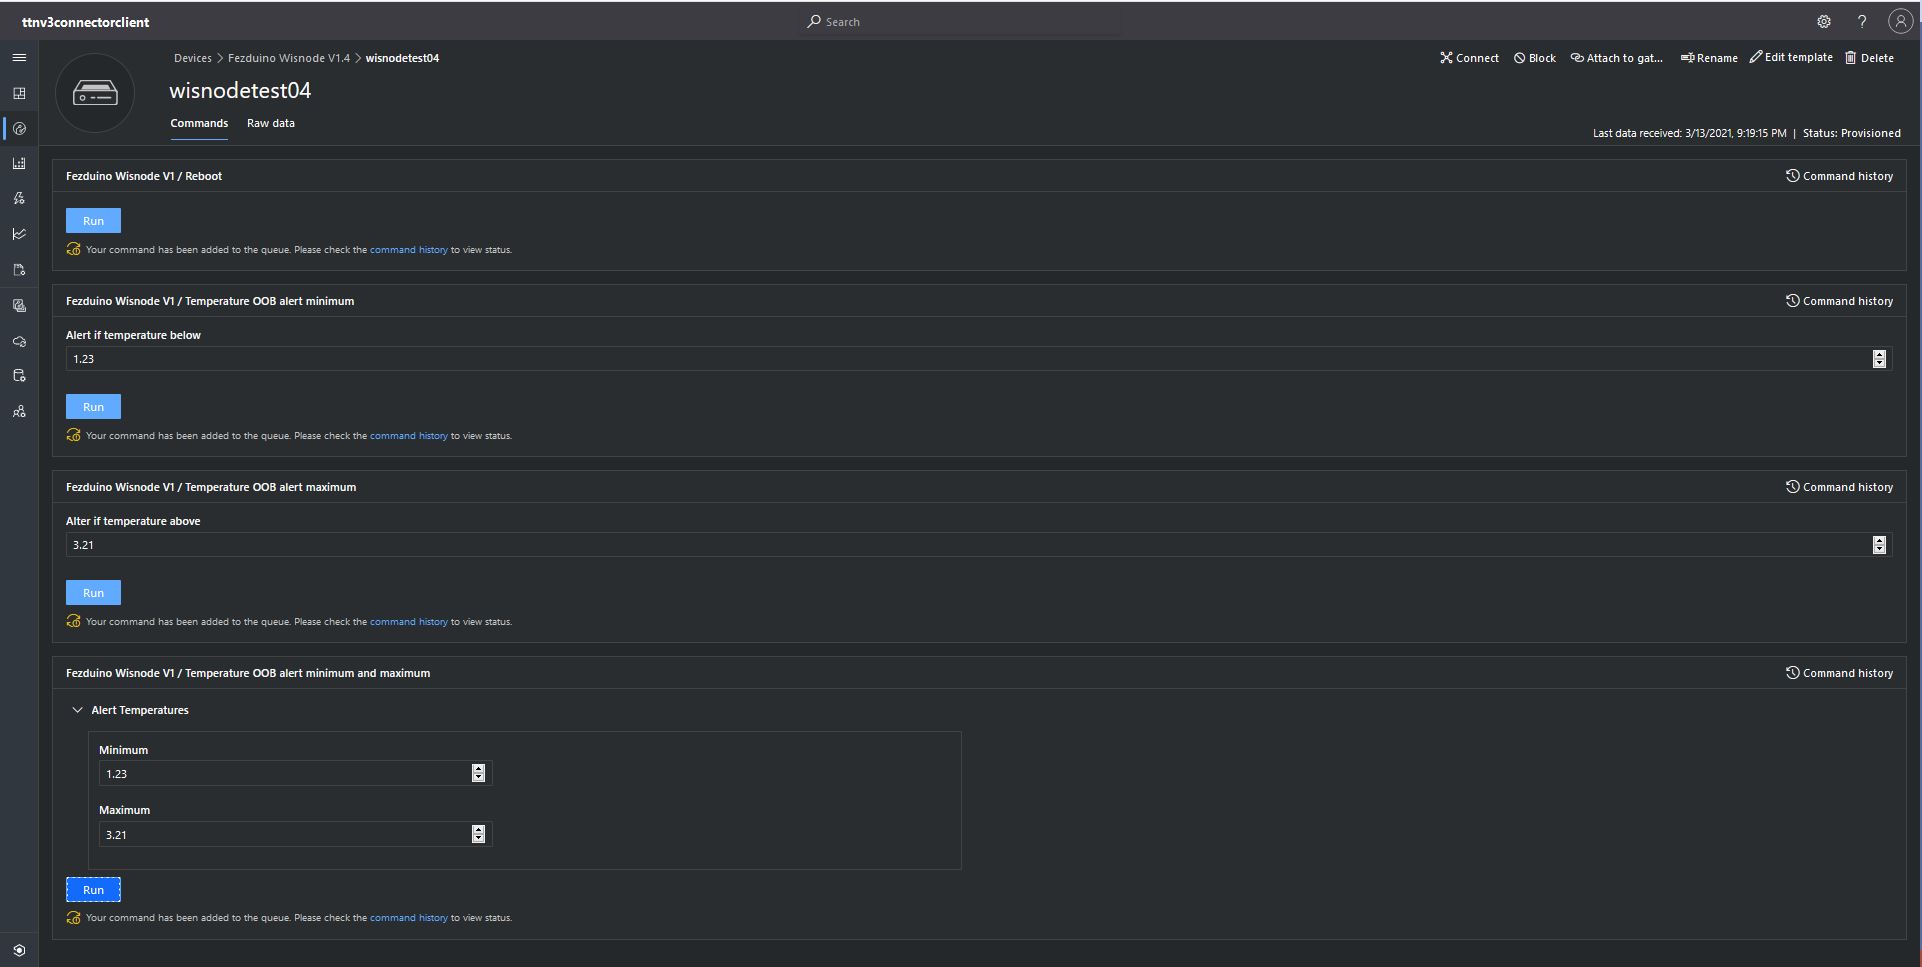
Azure IoT Central single value command initiation
Azure IoT TTI connector application sending a single value command to my sensor node
Sensor node displaying single value command information. There are two downlink messages and each payload contains a single value

The single value command payload contains the textual representation of the value e.g. “true”/”false” or “1.23” which are also valid JSON. This initially caused issues as I was trying to splice a single value into the decoded payload.

I had to add a check that the string started with a “{” and finished with a “}” (a JSON object) or started with a “[” and finished with a “]” (a JSON array) as part of the validation process.

For a single value command the payload decoded has a single property with the method-name value as the name and the payload as the value. For a command with a JSON payload the message payload is copied into the PayloadDecoded.

I normally wouldn’t use exceptions for flow control but I can’t see a better way of doing this.

	try
	{
		// Split over multiple lines to improve readability
		if (!(payloadText.StartsWith("{") && payloadText.EndsWith("}"))
									&&
			(!(payloadText.StartsWith("[") && payloadText.EndsWith("]"))))
		{
			throw new JsonReaderException();
		}

		downlink.PayloadDecoded = JToken.Parse(payloadText);
	}
	catch (JsonReaderException)
	{
		try
		{
			JToken value = JToken.Parse(payloadText);

			downlink.PayloadDecoded = new JObject(new JProperty(methodName, value));
		}
		catch (JsonReaderException)
		{
			downlink.PayloadDecoded = new JObject(new JProperty(methodName, payloadText));
		}
	}

The final step was to configure an another Azure IoT Central command with a JSON payload to send to the sensor node. A “real-world” example of this sort of command would be setting the minimum and maximum temperatures of a freezer in a single downlink message.

Azure IoT Central JSON payload command setup
Azure IoT Central JSON payload command payload configuration
  "ProgramSettings": {
    "Applications": {
      "application1": {
        "AzureSettings": {
          ...
          }
        },
        "MQTTAccessKey": "...",
        "DeviceIntegrationDefault": false,
        "MethodSettings": {
          "Reboot": {
            "Port": 21,
            "Confirmed": true,
            "Priority": "normal",
            "Queue": "push"
          },
          "value_0": {
            "Port": 30,
            "Confirmed": true,
            "Priority": "normal",
            "Queue": "push"
          },
          "value_1": {
            "Port": 30,
            "Confirmed": true,
            "Priority": "normal",
            "Queue": "push"
          },
          "TemperatureOOBAlertMinimumAndMaximum": {
            "Port": 30,
            "Confirmed": true,
            "Priority": "normal",
            "Queue": "push"
          }
        }
      },
      "seeeduinolorawan": {
        "AzureSettings": {
        }
        "MQTTAccessKey": "...",
        "DeviceIntegrationDefault": true,
        "DevicePageSize": 10
      }
    },
    "TheThingsIndustries": {
...
   }
}
Azure IoT Central JSON payload command initiation

Azure IoT TTI connector application sending a JSON payload command to my sensor node
Sensor node displaying JSON command information. There is a single payload which contains a two values

The build in TTI decoder only supports downlink decoded payloads with property names “value_0” through “value_x” which results in some odd command names and JSON payload property names. (Custom encoders may support other property names). Case sensitivity of some configuration values also tripped me up.