Random wanderings through Microsoft Azure esp. PaaS plumbing, the IoT bits, AI on Micro controllers, AI on Edge Devices, .NET nanoFramework, .NET Core on *nix and ML.NET+ONNX
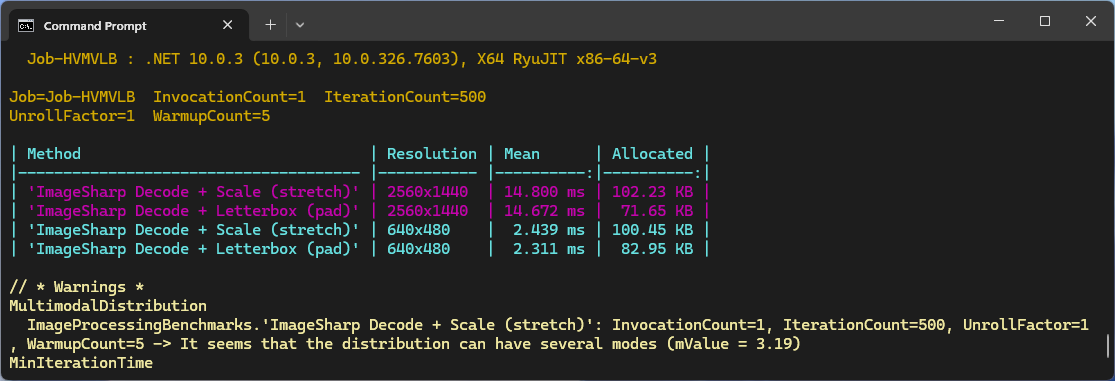
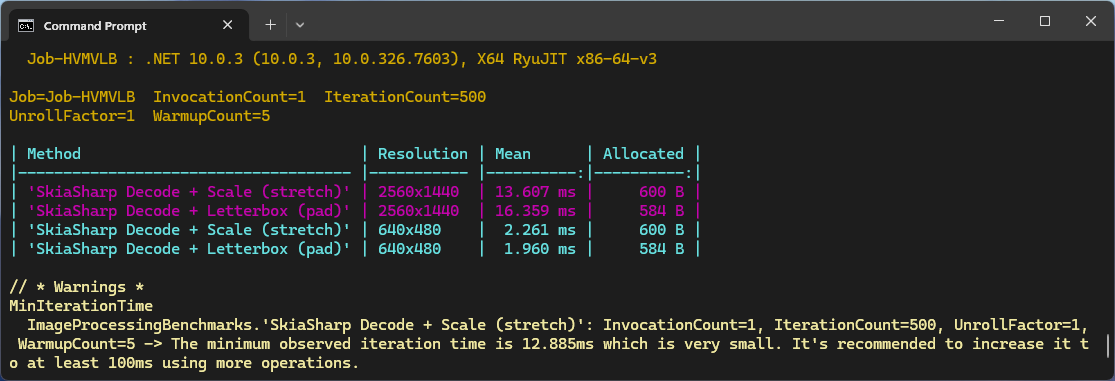
The initial comparison running on my development box (will benchmark on my Seeedstudio EdgeBox RPi 200.) was roughly what I was expecting though the SkaiSharp 2560×1440 mean duration was a bit odd. I think that the difference in the amount of memory allocated is because SkaiSharp’s memory is allocated by the native code. Both benchmarks need some refactoring to improve repeatability on my different platforms.
These benchmarks should be treated as indicative not authoritative
After some investigation I think the scaling of the image used for inferencing (based on the requirements on the model), then the scaling of the minimum bounding rectangles isn’t quite right.
static void Main(string[] args)
{
// Path to the ONNX model and input image
string modelPath = "FasterRCNN-10.onnx";
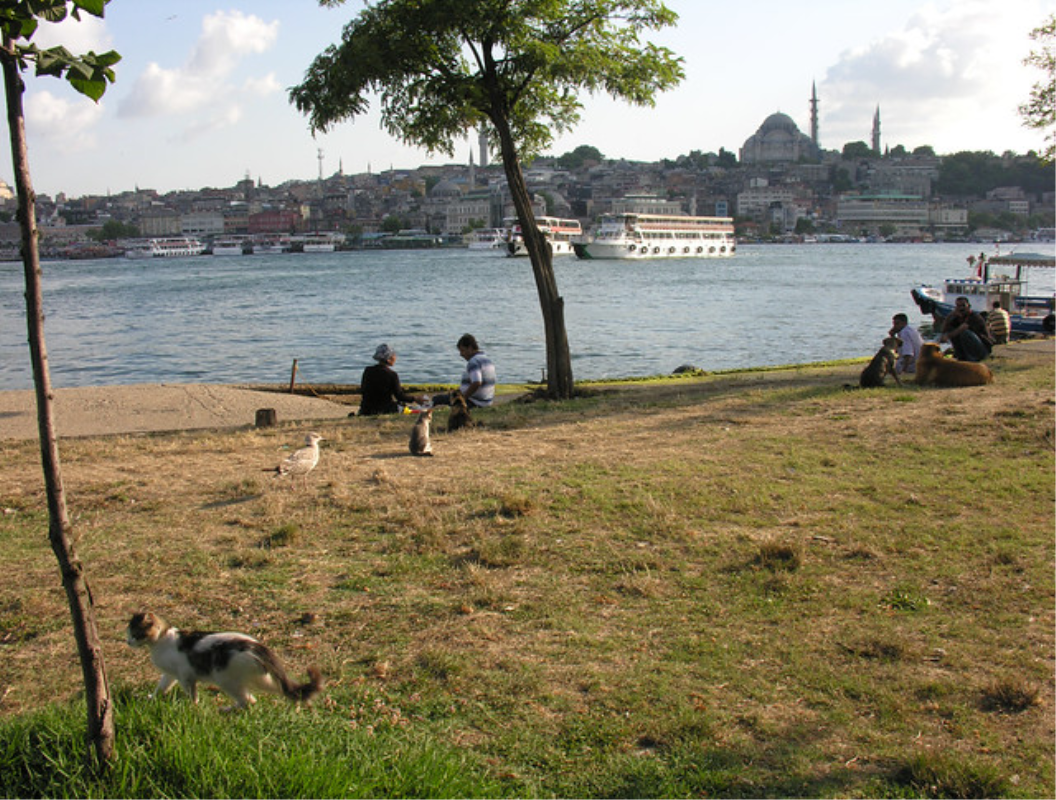
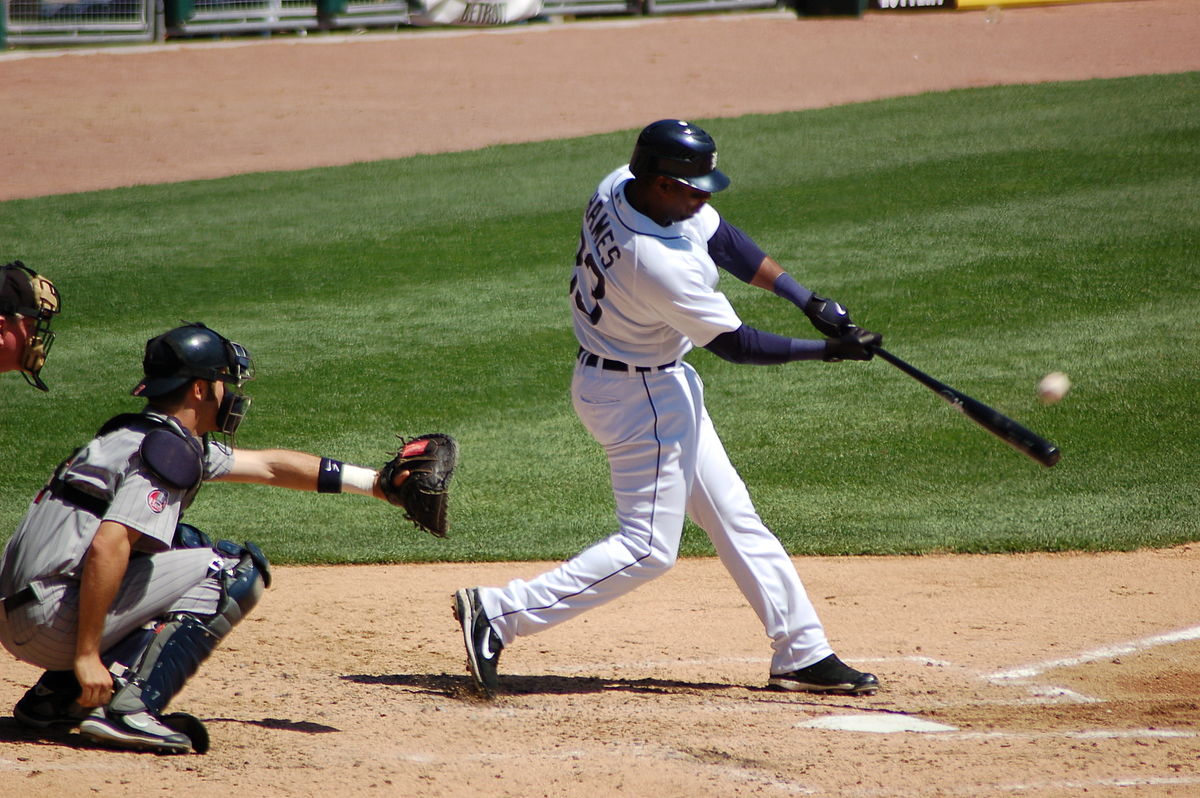
string imagePath = "sports.jpg";
// Load the image
Bitmap image = new Bitmap(imagePath);
var inputTensor = PreprocessImage(image);
// Load the ONNX model
using var session = new InferenceSession(modelPath);
// Create input data
var inputName = session.InputMetadata.Keys.First();
var inputs = new List<NamedOnnxValue>
{
NamedOnnxValue.CreateFromTensor(inputName, inputTensor)
};
//// Run inference
using IDisposableReadOnlyCollection<DisposableNamedOnnxValue> results = session.Run(inputs);
// Process output
foreach (var result in results)
{
Console.WriteLine($"{result.Name}: {string.Join(", ", result.AsEnumerable<float>())}");
}
}
static DenseTensor<float> PreprocessImage(Bitmap image)
{
// Resize image to model's expected input size (e.g., 224x224)
int targetWidth = 224;
int targetHeight = 224;
Bitmap resizedImage = new Bitmap(image, new Size(targetWidth, targetHeight));
// Convert image to float array and normalize
var input = new DenseTensor<float>(new[] { 1, 3, targetHeight, targetWidth });
for (int y = 0; y < targetHeight; y++)
{
for (int x = 0; x < targetWidth; x++)
{
Color pixel = resizedImage.GetPixel(x, y);
input[0, 0, y, x] = pixel.R / 255f;
input[0, 1, y, x] = pixel.G / 255f;
input[0, 2, y, x] = pixel.B / 255f;
}
}
return input;
}
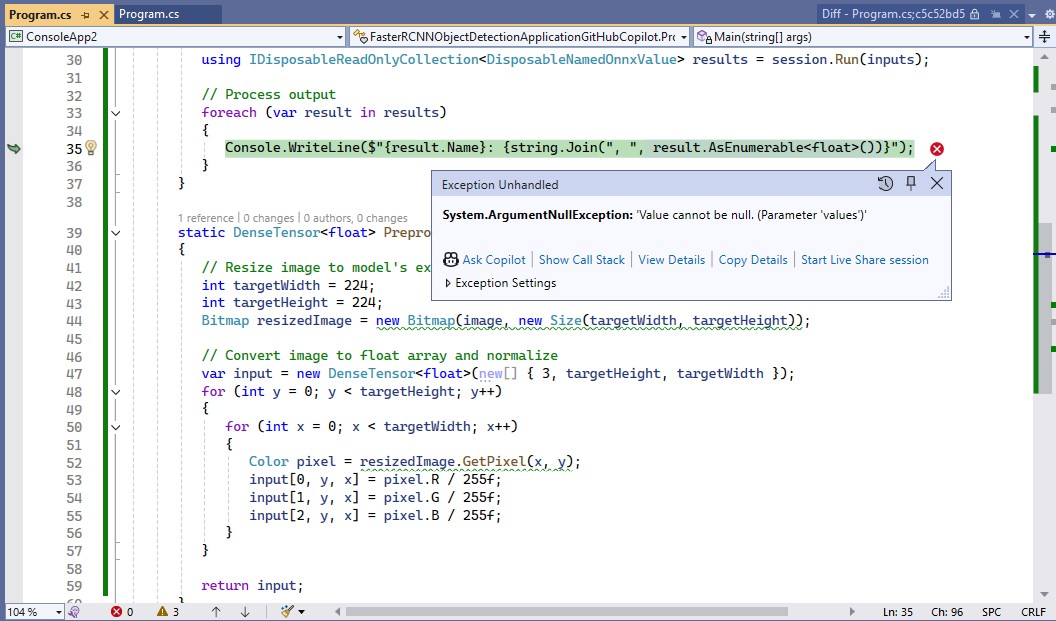
I fixed the paths to the ONNX model and image file, so the application ran but there was an error.
The dimensions of the input tensor were wrong based on the Faster R-CNN documentation because the declaration had an extra dimension.
Change dimensions of tensor by removing batch from declaration
static DenseTensor<float> PreprocessImage(Bitmap image)
{
// Resize image to model's expected input size (e.g., 224x224)
int targetWidth = 224;
int targetHeight = 224;
Bitmap resizedImage = new Bitmap(image, new Size(targetWidth, targetHeight));
// Convert image to float array and normalize
var input = new DenseTensor<float>(new[] { 3, targetHeight, targetWidth });
for (int y = 0; y < targetHeight; y++)
{
for (int x = 0; x < targetWidth; x++)
{
Color pixel = resizedImage.GetPixel(x, y);
input[0, y, x] = pixel.R / 255f;
input[1, y, x] = pixel.G / 255f;
input[2, y, x] = pixel.B / 255f;
}
}
return input;
}
GitHub Copilot fixed the tensor declaration by removing the batch id, then the application ran but there was an error.
resize the image such that both height and width are within the range of [800, 1333], such that both height and width are divisible by 32
static Bitmap ResizeImageForModel(Bitmap image)
{
// Define the target range and divisibility
const int minSize = 800;
const int maxSize = 1333;
const int divisor = 32;
// Get original dimensions
int originalWidth = image.Width;
int originalHeight = image.Height;
// Calculate scale factor to fit within the range while maintaining aspect ratio
float scale = Math.Min((float)maxSize / Math.Max(originalWidth, originalHeight),
                                (float)minSize / Math.Min(originalWidth, originalHeight));

// Calculate new dimensions
int newWidth = (int)(originalWidth * scale);
int newHeight = (int)(originalHeight * scale);

// Ensure dimensions are divisible by 32
newWidth = (newWidth / divisor) * divisor;
newHeight = (newHeight / divisor) * divisor;
// Resize the image
return new Bitmap(image, new Size(newWidth, newHeight));
}
GitHub Copilot fixed the image resizing, so the application ran but there was still an error.
I also manually added the using directive for System.Drawing.Drawing2D
static void ProcessOutput(IDisposableReadOnlyCollection<DisposableNamedOnnxValue> results, Bitmap image)
{
   // Extract output tensors
   var boxes = results.First(r => r.Name == "boxes").AsEnumerable<float>().ToArray();
   var labels = results.First(r => r.Name == "labels").AsEnumerable<long>().ToArray();
   var scores = results.First(r => r.Name == "scores").AsEnumerable<float>().ToArray();

   using Graphics graphics = Graphics.FromImage(image);
   graphics.SmoothingMode = SmoothingMode.AntiAlias;

   for (int i = 0; i < labels.Length; i++)
   {
      if (scores[i] < 0.5) continue; // Filter low-confidence detections

      // Extract bounding box coordinates
      float x1 = boxes[i * 4];
      float y1 = boxes[i * 4 + 1];
      float x2 = boxes[i * 4 + 2];
      float y2 = boxes[i * 4 + 3];

      // Draw bounding box
      RectangleF rect = new RectangleF(x1, y1, x2 - x1, y2 - y1);
      graphics.DrawRectangle(Pens.Red, rect.X, rect.Y, rect.Width, rect.Height);

      // Display label and confidence
      string label = $"Label: {labels[i]}, Confidence: {scores[i]:0.00}";
      graphics.DrawString(label, new Font("Arial", 12), Brushes.Yellow, new PointF(x1, y1 - 20));
   }

   // Save the image with annotations
   image.Save("output.jpg");
   Console.WriteLine("Output image saved as 'output.jpg'.");
}
The application ran but there was an error because the output tensor names were wrong.
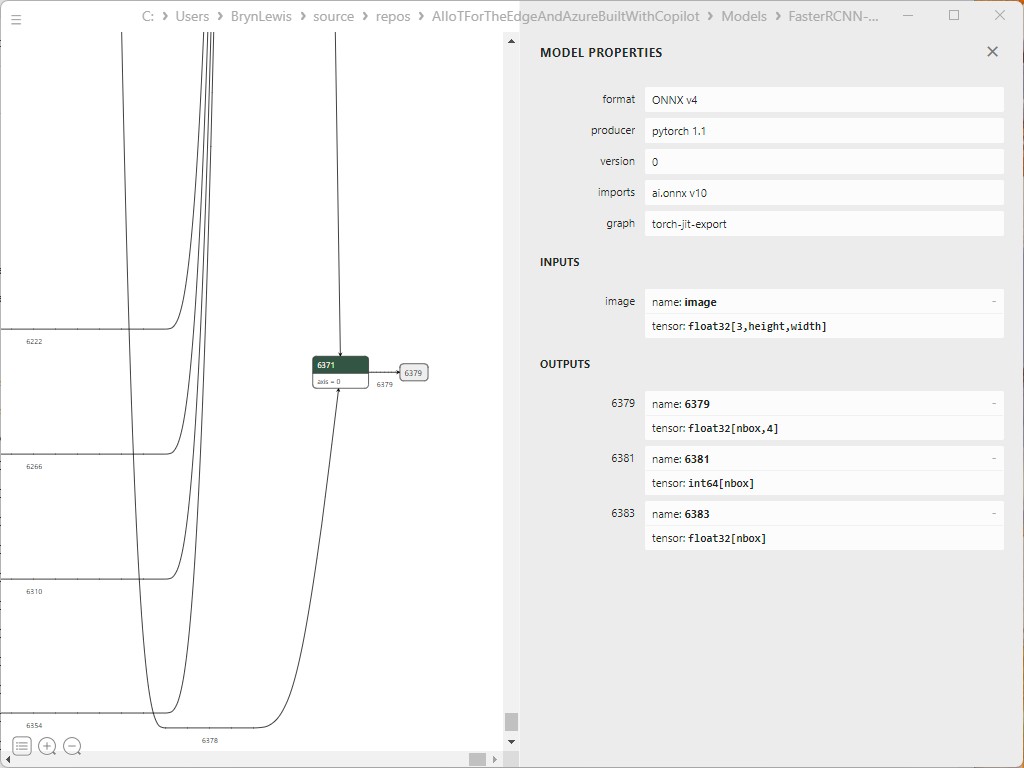
I used Netron to determine the correct output tensor names.
It was quicker to manually fix the output tensor names
static void ProcessOutput(IDisposableReadOnlyCollection<DisposableNamedOnnxValue> results, Bitmap image)
 {
    // Extract output tensors
    var boxes = results.First(r => r.Name == "6379").AsEnumerable<float>().ToArray();
    var labels = results.First(r => r.Name == "6381").AsEnumerable<long>().ToArray();
    var scores = results.First(r => r.Name == "6383").AsEnumerable<float>().ToArray();

    using Graphics graphics = Graphics.FromImage(image);
    graphics.SmoothingMode = SmoothingMode.AntiAlias;

    for (int i = 0; i < labels.Length; i++)
    {
       if (scores[i] < 0.5) continue; // Filter low-confidence detections

       // Extract bounding box coordinates
       float x1 = boxes[i * 4];
       float y1 = boxes[i * 4 + 1];
       float x2 = boxes[i * 4 + 2];
       float y2 = boxes[i * 4 + 3];

       // Draw bounding box
       RectangleF rect = new RectangleF(x1, y1, x2 - x1, y2 - y1);
       graphics.DrawRectangle(Pens.Red, rect.X, rect.Y, rect.Width, rect.Height);

       // Display label and confidence
       string label = $"Label: {labels[i]}, Confidence: {scores[i]:0.00}";
       graphics.DrawString(label, new Font("Arial", 12), Brushes.Yellow, new PointF(x1, y1 - 20));
    }

    // Save the image with annotations
    image.Save("output.jpg");
    Console.WriteLine("Output image saved as 'output.jpg'.");
 }
The application ran but the results were bad, so I checked format of the input tensor and figured out the mean adjustment was missing.
Apply mean to each channel
I used GitHub Copilot to add code for the mean adjustment for each pixel
static DenseTensor<float> PreprocessImage(Bitmap image)
{
   // Resize image to model's expected input size
   Bitmap resizedImage = ResizeImageForModel(image);

   // Apply FasterRCNN mean values to each channel
   float[] mean = { 102.9801f, 115.9465f, 122.7717f };

   // Convert image to float array and normalize
   var input = new DenseTensor<float>(new[] { 3, resizedImage.Height, resizedImage.Width });
   for (int y = 0; y < resizedImage.Height; y++)
   {
      for (int x = 0; x < resizedImage.Width; x++)
      {
         Color pixel = resizedImage.GetPixel(x, y);
         input[0, y, x] = (pixel.R - mean[0]) / 255f;
         input[1, y, x] = (pixel.G - mean[1]) / 255f;
         input[2, y, x] = (pixel.B - mean[2]) / 255f;
      }
   }

   return input;
}
The application ran but the results were still bad, so I checked format of the input tensor and figured out the mean adjustment was wrong. It was quicker to manually fix up the mean calculation.
static DenseTensor<float> PreprocessImage(Bitmap image)
{
   // Resize image to model's expected input size
   Bitmap resizedImage = ResizeImageForModel(image);

   // Apply FasterRCNN mean values to each channel
   float[] mean = { 102.9801f, 115.9465f, 122.7717f };

   // Convert image to float array and normalize
   var input = new DenseTensor<float>(new[] { 3, resizedImage.Height, resizedImage.Width });
   for (int y = 0; y < resizedImage.Height; y++)
   {
      for (int x = 0; x < resizedImage.Width; x++)
      {
         Color pixel = resizedImage.GetPixel(x, y);

         input[0, y, x] = pixel.R - mean[0];
         input[1, y, x] = pixel.G - mean[1];
         input[2, y, x] = pixel.B - mean[2];
      }
   }

   return input;
}
The application ran but the results were still bad, so I checked format of the input tensor and figured out the input tensor was BGR rather than RGB.
Change to B,G,R
static DenseTensor<float> PreprocessImage(Bitmap image)
{
   // Resize image to model's expected input size
   Bitmap resizedImage = ResizeImageForModel(image);

   // Apply FasterRCNN mean values to each channel
   float[] mean = { 102.9801f, 115.9465f, 122.7717f };

   // Convert image to float array and normalize
   var input = new DenseTensor<float>(new[] { 3, resizedImage.Height, resizedImage.Width });
   for (int y = 0; y < resizedImage.Height; y++)
   {
      for (int x = 0; x < resizedImage.Width; x++)
      {
         Color pixel = resizedImage.GetPixel(x, y);
         input[0, y, x] = pixel.B - mean[0] ;
         input[1, y, x] = pixel.G - mean[1] ;
         input[2, y, x] = pixel.R - mean[2] ;
      }
   }

   return input;
}
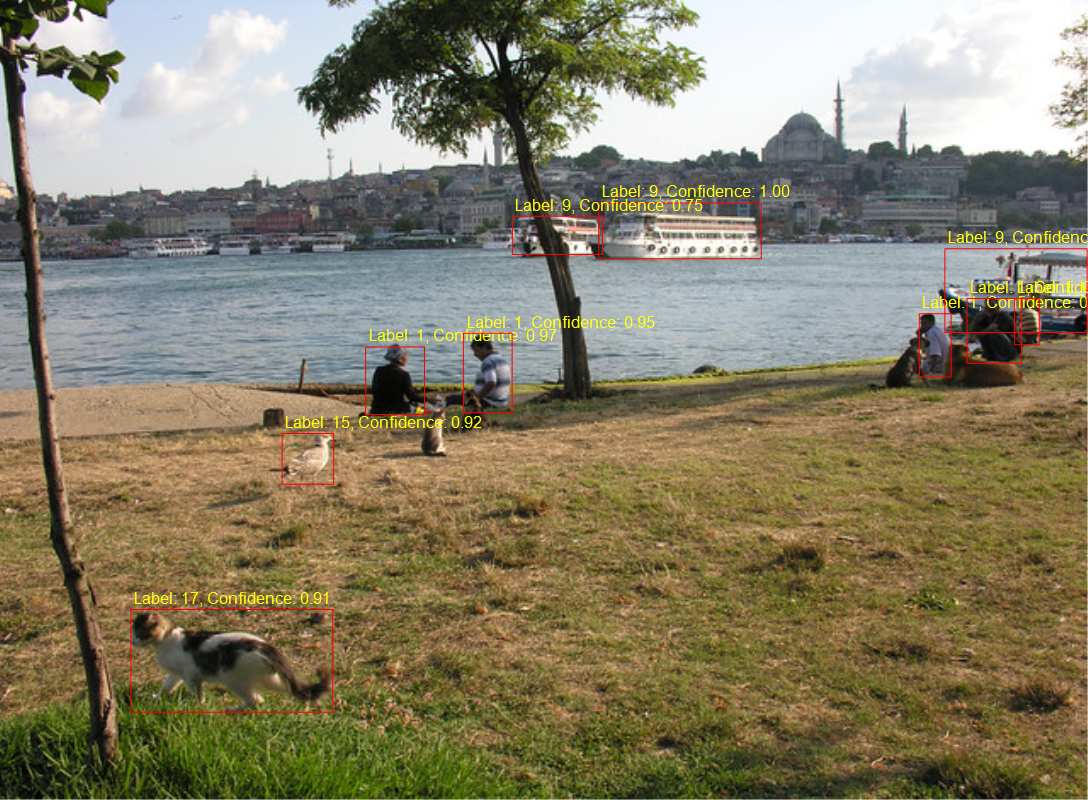
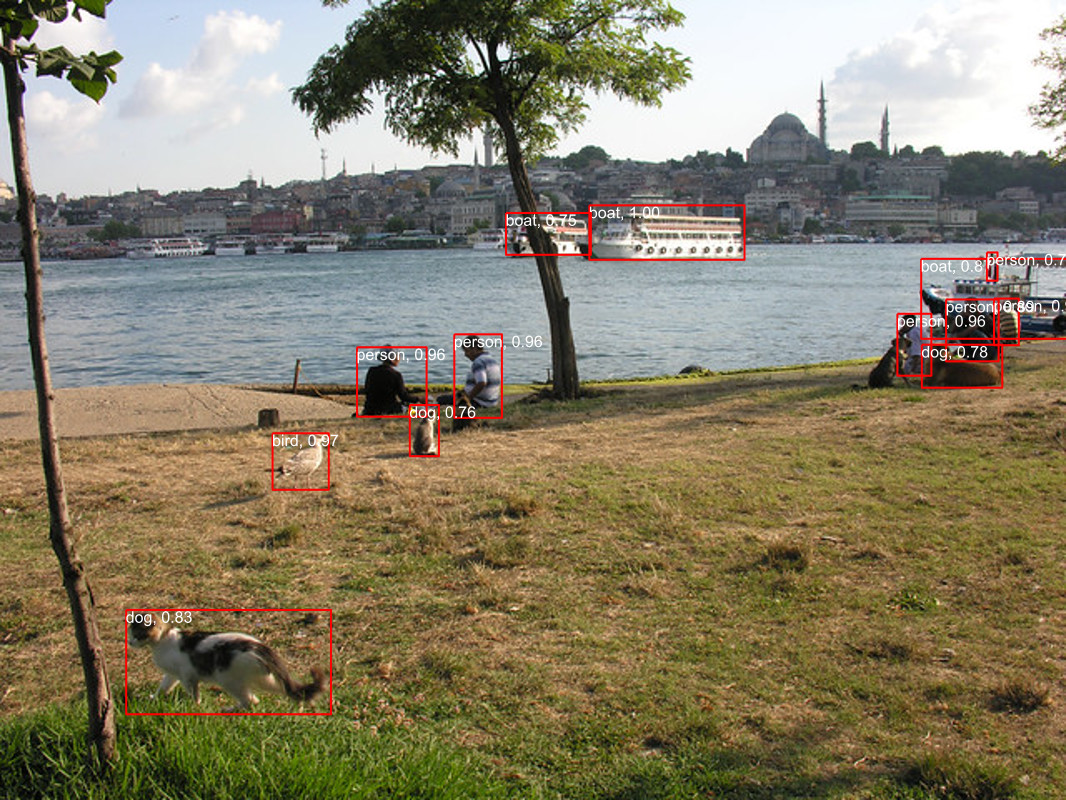
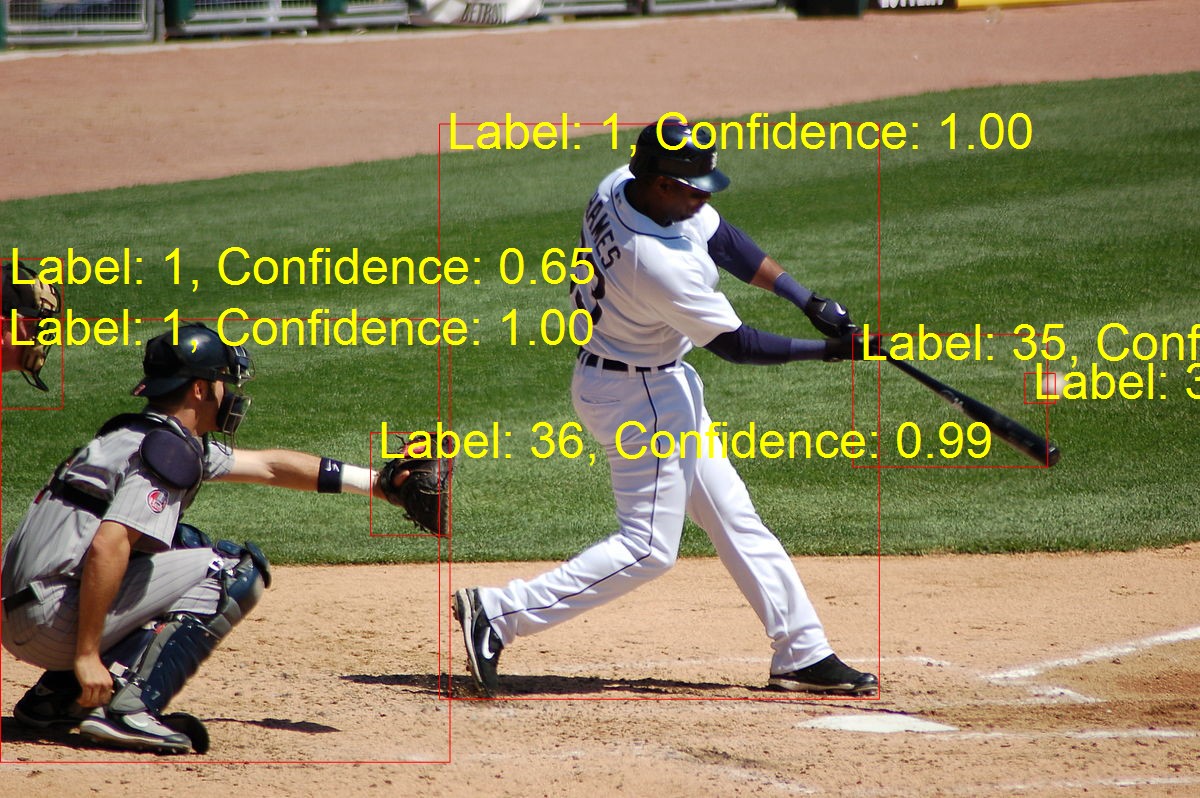
Finally, the application minimum bounding rectangles (MBRs), labels and confidences looked correct.
The additional code for marking up the image in the ProcessOutput was unexpected and I wonder if there wasn’t a Sixlabors.ImageSharp example for “inspiration”
The Copilot generated code in this post is not suitable for production
For this post I’ll be using GitHub Copilot to generate code for a console application that uses a Faster R-CNNONNX model to process an image loaded from disk.
please write a C# console application that uses Onnx to run a ONNX Faster-RCNN object detection model on an image loaded from disk
static void Main(string[] args)
{
   string modelPath = "FasterRCNN-10.onnx";
   string imagePath = "sports.jpg";

   using var session = new InferenceSession(modelPath);
   using var image = new Bitmap(imagePath);

   var inputTensor = ExtractTensorFromImage(image);
   var inputs = new List<NamedOnnxValue>
   {
       NamedOnnxValue.CreateFromTensor("image", inputTensor)
   };

   using IDisposableReadOnlyCollection<DisposableNamedOnnxValue> results = session.Run(inputs);
   var output = results.First().AsEnumerable<float>().ToArray();

   // Process the output (e.g., draw bounding boxes on the image)
   ProcessOutput(output, image);

   image.Save("output.jpg", ImageFormat.Jpeg);
   Console.WriteLine("Object detection completed. Output saved as output.jpg");
}

private static DenseTensor<float> ExtractTensorFromImage(Bitmap image)
{
   int width = image.Width;
   int height = image.Height;
   var tensor = new DenseTensor<float>(new[] { 1, 3, height, width });

   for (int y = 0; y < height; y++)
   {
      for (int x = 0; x < width; x++)
      {
         Color pixel = image.GetPixel(x, y);
         tensor[0, 0, y, x] = pixel.R / 255.0f;
         tensor[0, 1, y, x] = pixel.G / 255.0f;
         tensor[0, 2, y, x] = pixel.B / 255.0f;
      }
   }

   return tensor;
}

private static void ProcessOutput(float[] output, Bitmap image)
{
   // Implement the logic to process the output and draw bounding boxes on the image
   // This is a placeholder for the actual implementation
}
I fixed the paths to the ONNX model and image files, so the application ran but there was an error.
The dimensions of the input tensor were wrong because the declaration included a batch id.
Change dimensions of tensor by removing batch from declaration
private static DenseTensor<float> ExtractTensorFromImage(Bitmap image)
{
   int width = image.Width;
   int height = image.Height;
   var tensor = new DenseTensor<float>(new[] { 3, height, width });

   for (int y = 0; y < height; y++)
   {
      for (int x = 0; x < width; x++)
      {
         Color pixel = image.GetPixel(x, y);
         tensor[0, y, x] = pixel.R / 255.0f;
         tensor[1, y, x] = pixel.G / 255.0f;
         tensor[2, y, x] = pixel.B / 255.0f;
      }
   }

   return tensor;
 }
GitHub Copilot fixed the tensor declaration by removing the batch id. The application also used System.Drawing which is not supported on my target embedded platforms.
Use ImageSharp to resize the image such that both height and width are within the range of [800, 1333], such that both height and width are divisible by 32.
 private static void ResizeImage(Image<Rgb24> image)
 {
    const int minSize = 800;
    const int maxSize = 1333;

    int originalWidth = image.Width;
    int originalHeight = image.Height;

    float scale = Math.Min((float)maxSize / Math.Max(originalWidth, originalHeight), (float)minSize / Math.Min(originalWidth, originalHeight));
    int newWidth = (int)(originalWidth * scale);
    int newHeight = (int)(originalHeight * scale);

    // Ensure dimensions are divisible by 32
    newWidth = (newWidth / 32) * 32;
    newHeight = (newHeight / 32) * 32;

    image.Mutate(x => x.Resize(newWidth, newHeight));
 }
The application ran but the results were bad, so I checked format of the input tensor and figured out the R,G,B values need to be adjusted.
Apply mean to each channel
private static DenseTensor<float> ExtractTensorFromImage(Image<Rgb24> image)
{
   int width = image.Width;
   int height = image.Height;
   var tensor = new DenseTensor<float>(new[] { 3, height, width });

   // Mean values for each channel
   float[] mean = { 0.485f, 0.456f, 0.406f };

   image.ProcessPixelRows(accessor =>
   {
      for (int y = 0; y < height; y++)
      {
         var pixelRow = accessor.GetRowSpan(y);
         for (int x = 0; x < width; x++)
         {
            tensor[0, y, x] = (pixelRow[x].R / 255.0f) - mean[0];
            tensor[1, y, x] = (pixelRow[x].G / 255.0f) - mean[1];
            tensor[2, y, x] = (pixelRow[x].B / 255.0f) - mean[2];
         }
      }
   });

   return tensor;
 }
The application ran but the results were still bad, so I checked format of the input tensor and figured out the Resnet50 means had be used and the input tensor was BGR rather than RGB
Use FasterRCNN means not resnet ones Change to B,G,R
private static DenseTensor<float> ExtractTensorFromImage(Image<Rgb24> image)
{
   int width = image.Width;
   int height = image.Height;
   var tensor = new DenseTensor<float>(new[] { 3, height, width });

   // Mean values for each channel for FasterRCNN
   float[] mean = { 102.9801f, 115.9465f, 122.7717f };

   image.ProcessPixelRows(accessor =>
   {
      for (int y = 0; y < height; y++)
      {
         var pixelRow = accessor.GetRowSpan(y);
         for (int x = 0; x < width; x++)
         {
            tensor[0, y, x] = pixelRow[x].B - mean[0];
            tensor[1, y, x] = pixelRow[x].G - mean[1];
            tensor[2, y, x] = pixelRow[x].R - mean[2];
         }
      }
   });

   return tensor;
}
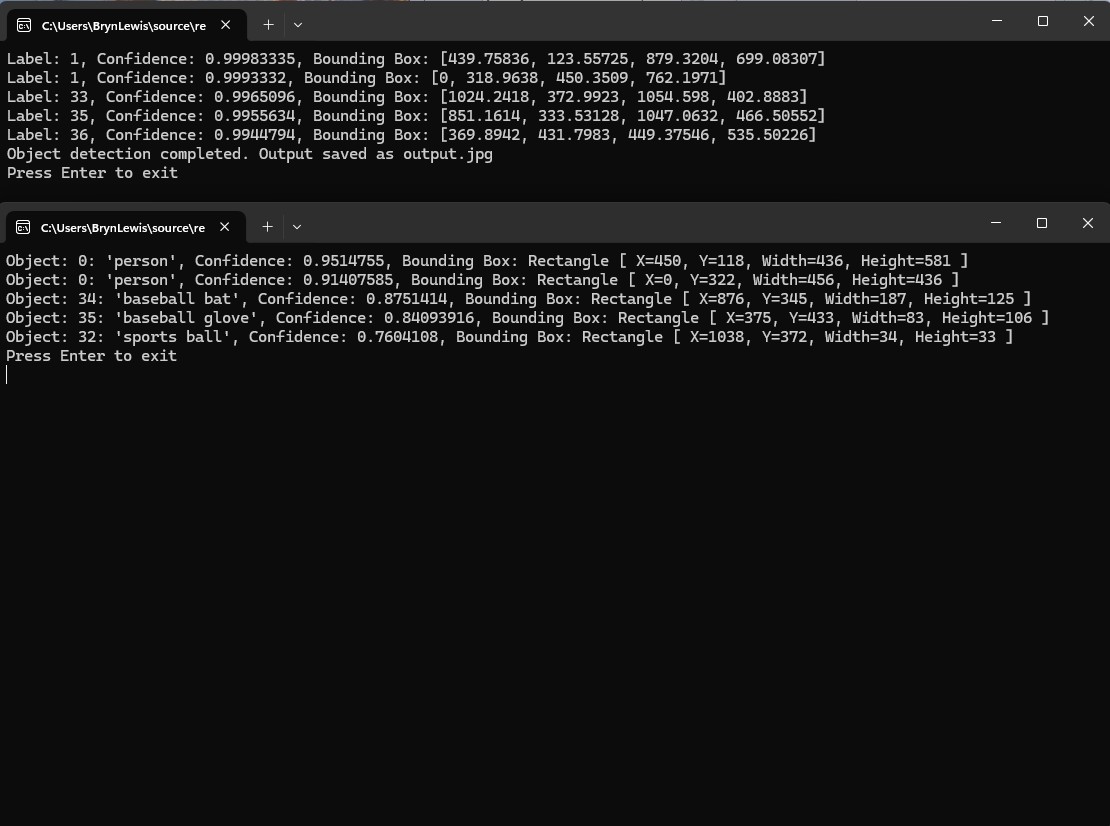
When I inspected the values in the output tensor in the debugger they looked “reasonable” so got GitHub Copilot to add the code required to display the results.
Display label, confidence and bounding box
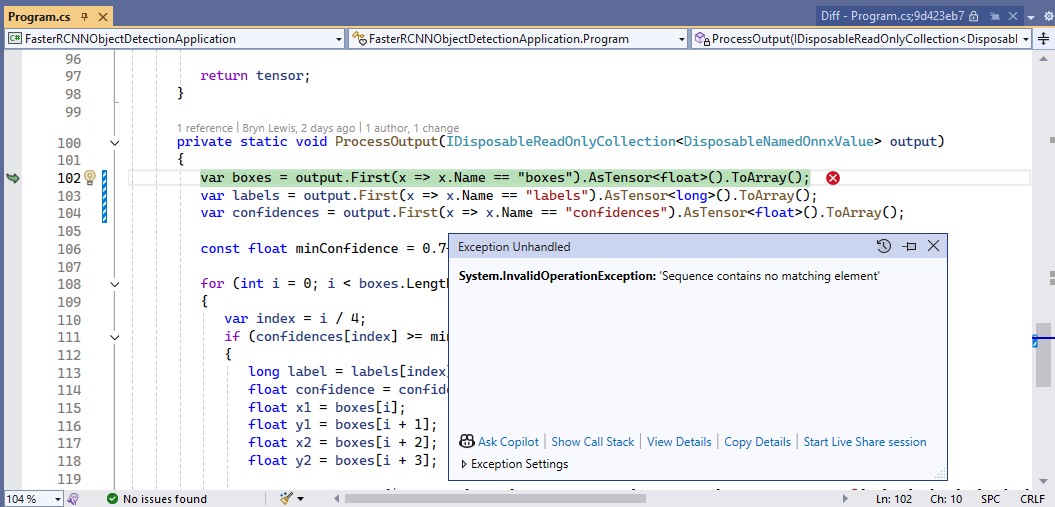
The application ran but there was an exception because the names of the output tensor “dimensions” were wrong.
I used Netron to get the correct output tensor “dimension” names.
I then manually fixed the output tensor “dimension” names
private static void ProcessOutput(IDisposableReadOnlyCollection<DisposableNamedOnnxValue> output)
{
   var boxes = output.First(x => x.Name == "6379").AsTensor<float>().ToArray();
   var labels = output.First(x => x.Name == "6381").AsTensor<long>().ToArray();
   var confidences = output.First(x => x.Name == "6383").AsTensor<float>().ToArray();

   const float minConfidence = 0.7f;

   for (int i = 0; i < boxes.Length; i += 4)
   {
      var index = i / 4;
      if (confidences[index] >= minConfidence)
      {
         long label = labels[index];
         float confidence = confidences[index];
         float x1 = boxes[i];
         float y1 = boxes[i + 1];
         float x2 = boxes[i + 2];
         float y2 = boxes[i + 3];

         Console.WriteLine($"Label: {label}, Confidence: {confidence}, Bounding Box: [{x1}, {y1}, {x2}, {y2}]");
      }
   }
}
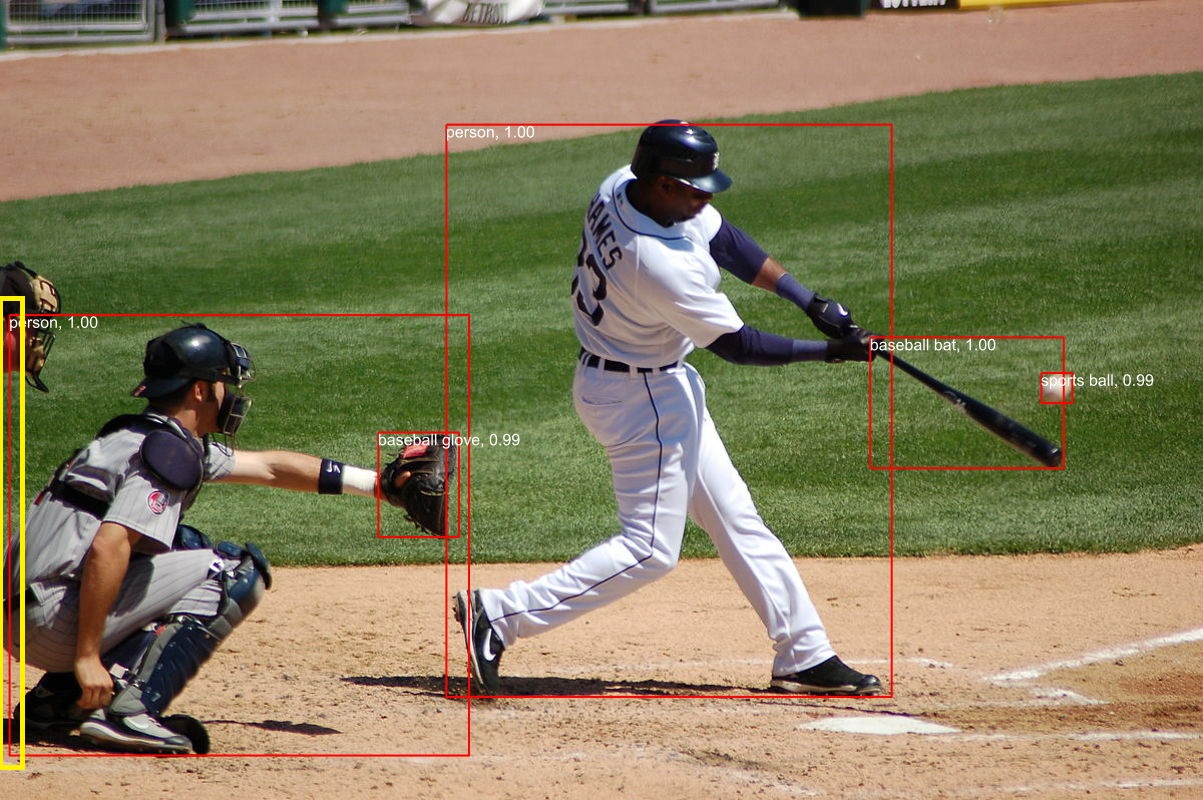
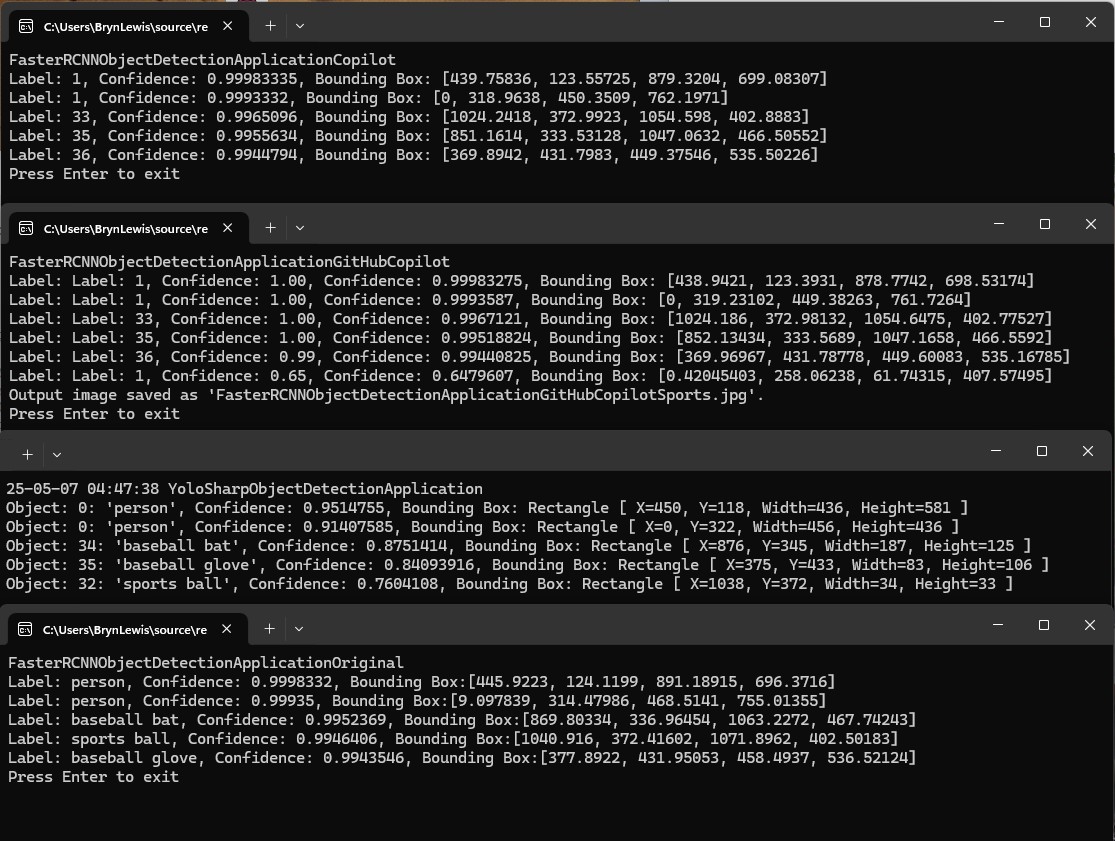
I manually compared the output of the console application with equivalent YoloSharp application output and the results looked close enough.
Summary
The Copilot prompts required to generate code were significantly more complex than previous examples and I had to regularly refer to the documentation to figure out what was wrong. The code wasn’t great and Copilot didn’t add much value
The Copilot generated code in this post is not suitable for production
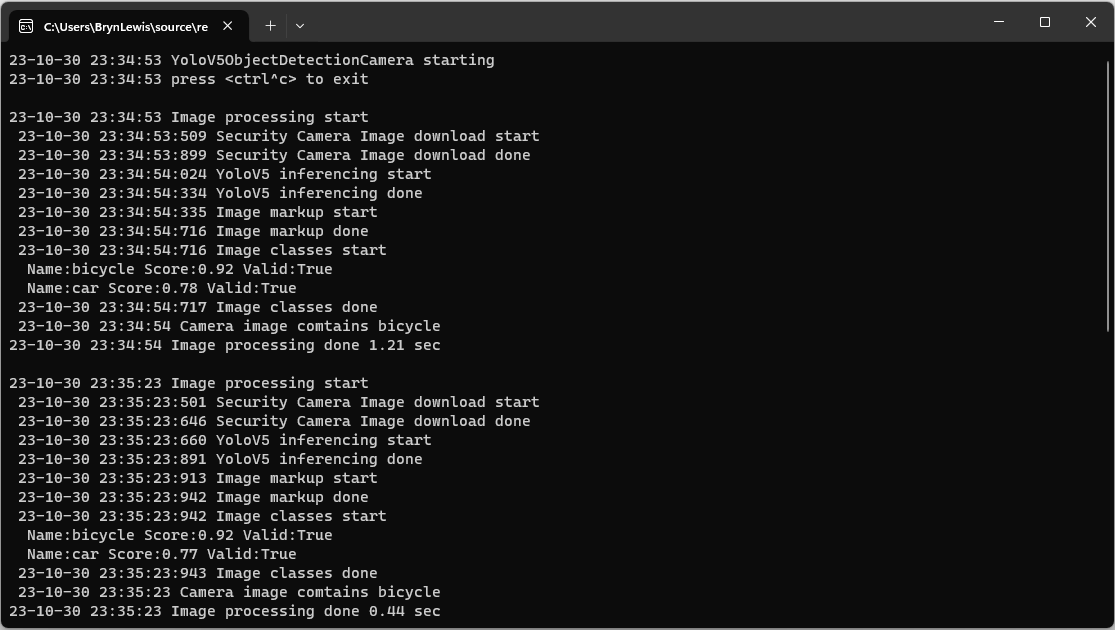
private static async void ImageUpdateTimerCallback(object state)
{
   DateTime requestAtUtc = DateTime.UtcNow;

   // Just incase - stop code being called while photo already in progress
   if (_cameraBusy)
   {
      return;
   }
   _cameraBusy = true;

   Console.WriteLine($"{DateTime.UtcNow:yy-MM-dd HH:mm:ss} Image processing start");

   try
   {
#if SECURITY_CAMERA
      Console.WriteLine($" {DateTime.UtcNow:yy-MM-dd HH:mm:ss:fff} Security Camera Image download start");

      using (Stream cameraStream = await _httpClient.GetStreamAsync(_applicationSettings.CameraUrl))
      using (Stream fileStream = File.Create(_applicationSettings.ImageInputFilenameLocal))
      {
         await cameraStream.CopyToAsync(fileStream);
      }

      Console.WriteLine($" {DateTime.UtcNow:yy-MM-dd HH:mm:ss:fff} Security Camera Image download done");
#endif

      List<YoloPrediction> predictions;

      // Process the image on local file system
      using (Image<Rgba32> image = await Image.LoadAsync<Rgba32>(_applicationSettings.ImageInputFilenameLocal))
      {
         Console.WriteLine($" {DateTime.UtcNow:yy-MM-dd HH:mm:ss:fff} YoloV5 inferencing start");
         predictions = _scorer.Predict(image);
         Console.WriteLine($" {DateTime.UtcNow:yy-MM-dd HH:mm:ss:fff} YoloV5 inferencing done");

#if OUTPUT_IMAGE_MARKUP
         Console.WriteLine($" {DateTime.UtcNow:yy-MM-dd HH:mm:ss:fff} Image markup start");

         var font = new Font(new FontCollection().Add(_applicationSettings.ImageOutputMarkupFontPath), _applicationSettings.ImageOutputMarkupFontSize);

         foreach (var prediction in predictions) // iterate predictions to draw results
         {
            double score = Math.Round(prediction.Score, 2);

            var (x, y) = (prediction.Rectangle.Left - 3, prediction.Rectangle.Top - 23);

            image.Mutate(a => a.DrawPolygon(Pens.Solid(prediction.Label.Color, 1),
                  new PointF(prediction.Rectangle.Left, prediction.Rectangle.Top),
                  new PointF(prediction.Rectangle.Right, prediction.Rectangle.Top),
                  new PointF(prediction.Rectangle.Right, prediction.Rectangle.Bottom),
                  new PointF(prediction.Rectangle.Left, prediction.Rectangle.Bottom)
            ));

            image.Mutate(a => a.DrawText($"{prediction.Label.Name} ({score})",
                  font, prediction.Label.Color, new PointF(x, y)));
         }

         await image.SaveAsJpegAsync(_applicationSettings.ImageOutputFilenameLocal);

         Console.WriteLine($" {DateTime.UtcNow:yy-MM-dd HH:mm:ss:fff} Image markup done");
#endif
      }


#if PREDICTION_CLASSES
      Console.WriteLine($" {DateTime.UtcNow:yy-MM-dd HH:mm:ss:fff} Image classes start");
      foreach (var prediction in predictions)
      {
         Console.WriteLine($"  Name:{prediction.Label.Name} Score:{prediction.Score:f2} Valid:{prediction.Score > _applicationSettings.PredictionScoreThreshold}");
      }
      Console.WriteLine($" {DateTime.UtcNow:yy-MM-dd HH:mm:ss:fff} Image classes done");
#endif

#if PREDICTION_CLASSES_OF_INTEREST
      IEnumerable<string> predictionsOfInterest = predictions.Where(p => p.Score > _applicationSettings.PredictionScoreThreshold).Select(c => c.Label.Name).Intersect(_applicationSettings.PredictionLabelsOfInterest, StringComparer.OrdinalIgnoreCase);

      if (predictionsOfInterest.Any())
      {
         Console.WriteLine($" {DateTime.UtcNow:yy-MM-dd HH:mm:ss} Camera image comtains {String.Join(",", predictionsOfInterest)}");
      }

#endif
   }
   catch (Exception ex)
   {
      Console.WriteLine($"{DateTime.UtcNow:yy-MM-dd HH:mm:ss} Camera image download, upload or post procesing failed {ex.Message}");
   }
   finally
   {
      _cameraBusy = false;
   }

   TimeSpan duration = DateTime.UtcNow - requestAtUtc;

   Console.WriteLine($"{DateTime.UtcNow:yy-MM-dd HH:mm:ss} Image processing done {duration.TotalSeconds:f2} sec");
   Console.WriteLine();
}
The names of the input image, output image and yoloV5 model file are configured in the appsettings.json (on device) or secrets.json (Visual Studio 2022 desktop) file. The location (ImageOutputMarkupFontPath) and size (ImageOutputMarkupFontSize) of the font used are configurable to make it easier run the application on different devices and operating systems.