Introduction
While building the first GitHub Copilot version I noticed that when System.Drawing.Common was changed to Sixlabors.ImageSharp made a significant difference to the generated code. For this post I’ll be using GitHub Copilot to generate code for a console application that uses a Faster R-CNN ONNX model to process an image loaded from disk.
please write a C# console application that uses Onnx to run a ONNX Faster-RCNN object detection model on an image loaded from disk

I manually added the System.Drawing.Commom, Microsoft.ML.OnnxRuntime NuGet packages, using directives and then the code compiled.
static void Main(string[] args)
{
// Path to the ONNX model and input image
string modelPath = "FasterRCNN-10.onnx";
string imagePath = "sports.jpg";
// Load the image
Bitmap image = new Bitmap(imagePath);
var inputTensor = PreprocessImage(image);
// Load the ONNX model
using var session = new InferenceSession(modelPath);
// Create input data
var inputName = session.InputMetadata.Keys.First();
var inputs = new List<NamedOnnxValue>
{
NamedOnnxValue.CreateFromTensor(inputName, inputTensor)
};
//// Run inference
using IDisposableReadOnlyCollection<DisposableNamedOnnxValue> results = session.Run(inputs);
// Process output
foreach (var result in results)
{
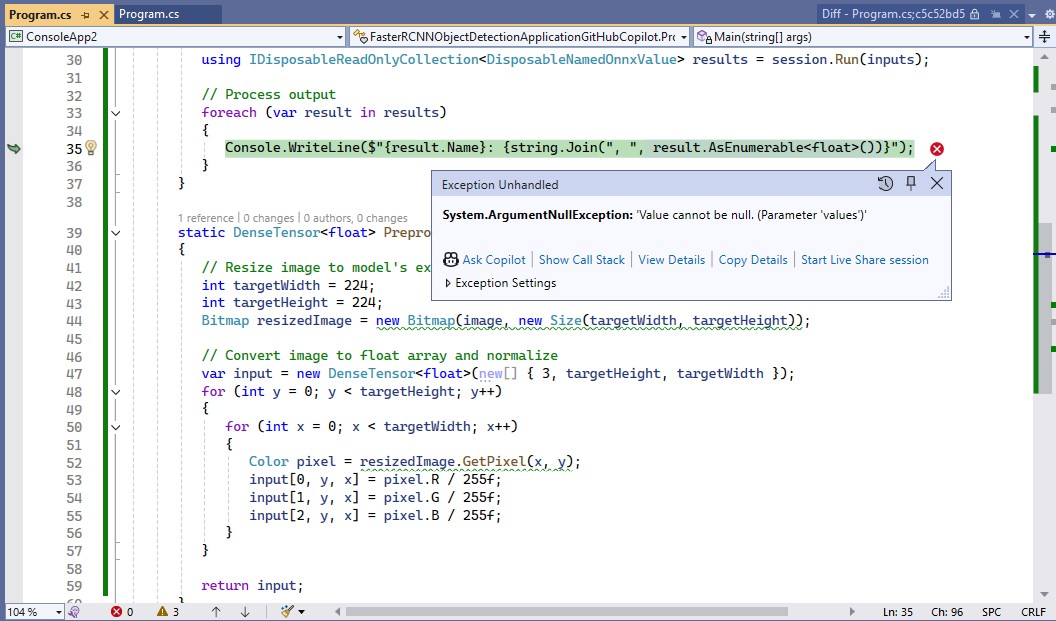
Console.WriteLine($"{result.Name}: {string.Join(", ", result.AsEnumerable<float>())}");
}
}
static DenseTensor<float> PreprocessImage(Bitmap image)
{
// Resize image to model's expected input size (e.g., 224x224)
int targetWidth = 224;
int targetHeight = 224;
Bitmap resizedImage = new Bitmap(image, new Size(targetWidth, targetHeight));
// Convert image to float array and normalize
var input = new DenseTensor<float>(new[] { 1, 3, targetHeight, targetWidth });
for (int y = 0; y < targetHeight; y++)
{
for (int x = 0; x < targetWidth; x++)
{
Color pixel = resizedImage.GetPixel(x, y);
input[0, 0, y, x] = pixel.R / 255f;
input[0, 1, y, x] = pixel.G / 255f;
input[0, 2, y, x] = pixel.B / 255f;
}
}
return input;
}
I fixed the paths to the ONNX model and image file, so the application ran but there was an error.

The dimensions of the input tensor were wrong based on the Faster R-CNN documentation because the declaration had an extra dimension.
Change dimensions of tensor by removing batch from declaration
static DenseTensor<float> PreprocessImage(Bitmap image)
{
   // Resize image to model's expected input size (e.g., 224x224)
   int targetWidth = 224;
   int targetHeight = 224;
   Bitmap resizedImage = new Bitmap(image, new Size(targetWidth, targetHeight));

   // Convert image to float array and normalize
   var input = new DenseTensor<float>(new[] { 3, targetHeight, targetWidth });
   for (int y = 0; y < targetHeight; y++)
   {
      for (int x = 0; x < targetWidth; x++)
      {
         Color pixel = resizedImage.GetPixel(x, y);
         input[0, y, x] = pixel.R / 255f;
         input[1, y, x] = pixel.G / 255f;
         input[2, y, x] = pixel.B / 255f;
      }
   }

   return input;
}
GitHub Copilot fixed the tensor declaration by removing the batch id, then the application ran but there was an error.

The dimensions of the input image were wrong so, based on the Faster R-CNN documentation I used GitHub Copilot to resize the image
resize the image such that both height and width are within the range of [800, 1333], such that both height and width are divisible by 32
static Bitmap ResizeImageForModel(Bitmap image)
{
   // Define the target range and divisibility
   const int minSize = 800;
   const int maxSize = 1333;
   const int divisor = 32;

   // Get original dimensions
   int originalWidth = image.Width;
   int originalHeight = image.Height;

   // Calculate scale factor to fit within the range while maintaining aspect ratio
   float scale = Math.Min((float)maxSize / Math.Max(originalWidth, originalHeight),
                          (float)minSize / Math.Min(originalWidth, originalHeight));

   // Calculate new dimensions
   int newWidth = (int)(originalWidth * scale);
   int newHeight = (int)(originalHeight * scale);

   // Ensure dimensions are divisible by 32
   newWidth = (newWidth / divisor) * divisor;
   newHeight = (newHeight / divisor) * divisor;

   // Resize the image
   return new Bitmap(image, new Size(newWidth, newHeight));
}
GitHub Copilot fixed the image resizing, so the application ran but there was still an error.

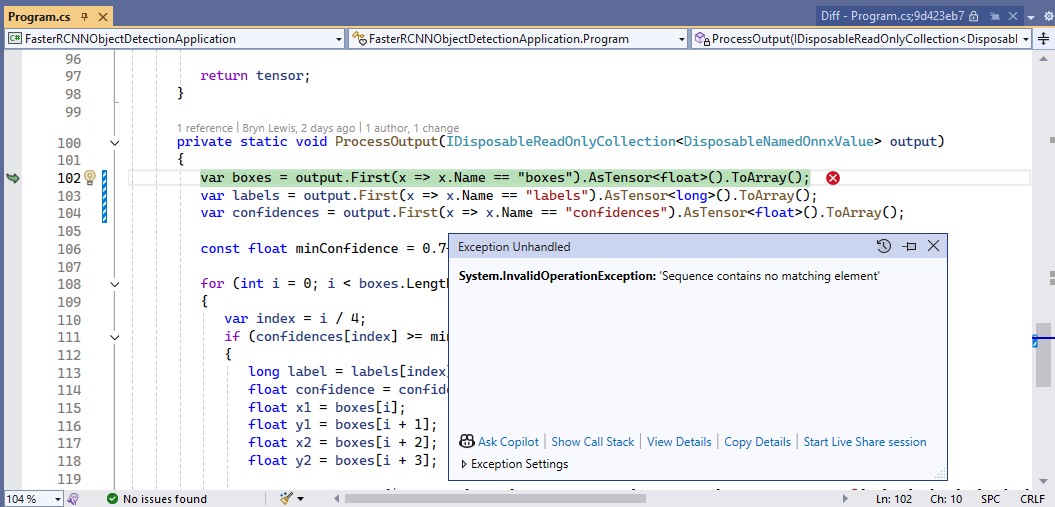
The processing of the output tensor was wrong so, based on the Faster R-CNN documentation I used GitHub Copilot to add the code required to “correctly” display the results.
Display label, confidence and bounding box
I also manually added the using directive for System.Drawing.Drawing2D
static void ProcessOutput(IDisposableReadOnlyCollection<DisposableNamedOnnxValue> results, Bitmap image)
{
   // Extract output tensors
   var boxes = results.First(r => r.Name == "boxes").AsEnumerable<float>().ToArray();
   var labels = results.First(r => r.Name == "labels").AsEnumerable<long>().ToArray();
   var scores = results.First(r => r.Name == "scores").AsEnumerable<float>().ToArray();

   using Graphics graphics = Graphics.FromImage(image);
   graphics.SmoothingMode = SmoothingMode.AntiAlias;

   for (int i = 0; i < labels.Length; i++)
   {
      if (scores[i] < 0.5) continue; // Filter low-confidence detections

      // Extract bounding box coordinates
      float x1 = boxes[i * 4];
      float y1 = boxes[i * 4 + 1];
      float x2 = boxes[i * 4 + 2];
      float y2 = boxes[i * 4 + 3];

      // Draw bounding box
      RectangleF rect = new RectangleF(x1, y1, x2 - x1, y2 - y1);
      graphics.DrawRectangle(Pens.Red, rect.X, rect.Y, rect.Width, rect.Height);

      // Display label and confidence
      string label = $"Label: {labels[i]}, Confidence: {scores[i]:0.00}";
      graphics.DrawString(label, new Font("Arial", 12), Brushes.Yellow, new PointF(x1, y1 - 20));
   }

   // Save the image with annotations
   image.Save("output.jpg");
   Console.WriteLine("Output image saved as 'output.jpg'.");
}
The application ran but there was an error because the output tensor names were wrong.

I used Netron to determine the correct output tensor names.
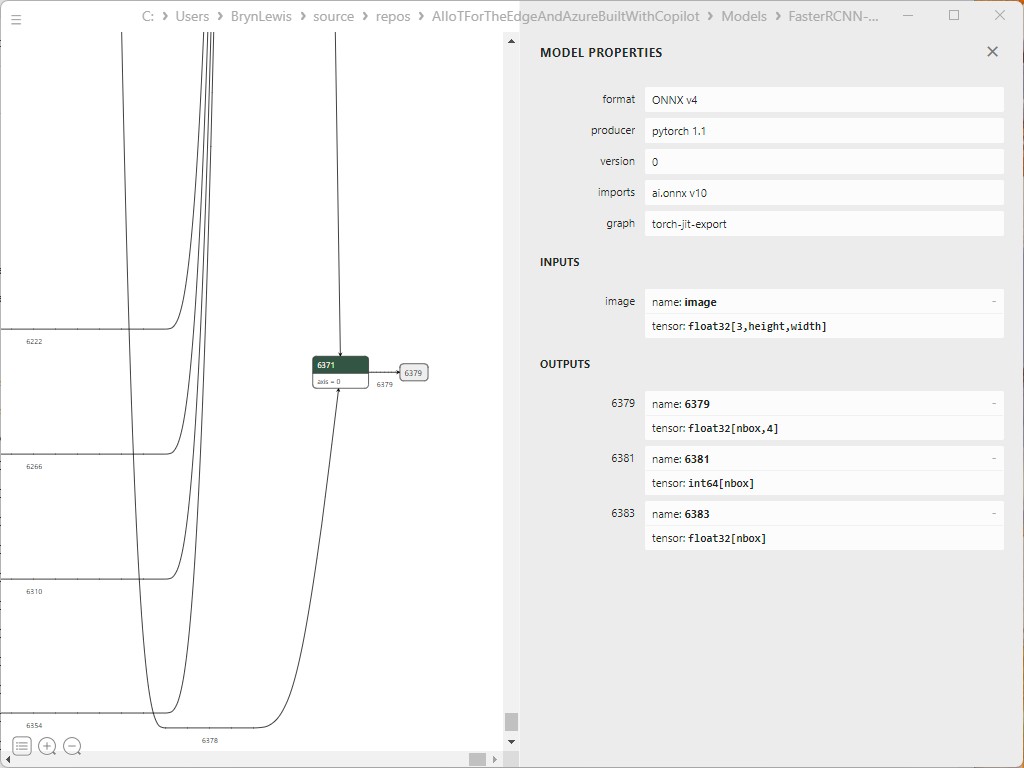
It was quicker to manually fix the output tensor names
static void ProcessOutput(IDisposableReadOnlyCollection<DisposableNamedOnnxValue> results, Bitmap image)
 {
    // Extract output tensors
    var boxes = results.First(r => r.Name == "6379").AsEnumerable<float>().ToArray();
    var labels = results.First(r => r.Name == "6381").AsEnumerable<long>().ToArray();
    var scores = results.First(r => r.Name == "6383").AsEnumerable<float>().ToArray();

    using Graphics graphics = Graphics.FromImage(image);
    graphics.SmoothingMode = SmoothingMode.AntiAlias;

    for (int i = 0; i < labels.Length; i++)
    {
       if (scores[i] < 0.5) continue; // Filter low-confidence detections

       // Extract bounding box coordinates
       float x1 = boxes[i * 4];
       float y1 = boxes[i * 4 + 1];
       float x2 = boxes[i * 4 + 2];
       float y2 = boxes[i * 4 + 3];

       // Draw bounding box
       RectangleF rect = new RectangleF(x1, y1, x2 - x1, y2 - y1);
       graphics.DrawRectangle(Pens.Red, rect.X, rect.Y, rect.Width, rect.Height);

       // Display label and confidence
       string label = $"Label: {labels[i]}, Confidence: {scores[i]:0.00}";
       graphics.DrawString(label, new Font("Arial", 12), Brushes.Yellow, new PointF(x1, y1 - 20));
    }

    // Save the image with annotations
    image.Save("output.jpg");
    Console.WriteLine("Output image saved as 'output.jpg'.");
 }
The application ran but the results were bad, so I checked format of the input tensor and figured out the mean adjustment was missing.
Apply mean to each channel
I used GitHub Copilot to add code for the mean adjustment for each pixel
static DenseTensor<float> PreprocessImage(Bitmap image)
{
   // Resize image to model's expected input size
   Bitmap resizedImage = ResizeImageForModel(image);

   // Apply FasterRCNN mean values to each channel
   float[] mean = { 102.9801f, 115.9465f, 122.7717f };

   // Convert image to float array and normalize
   var input = new DenseTensor<float>(new[] { 3, resizedImage.Height, resizedImage.Width });
   for (int y = 0; y < resizedImage.Height; y++)
   {
      for (int x = 0; x < resizedImage.Width; x++)
      {
         Color pixel = resizedImage.GetPixel(x, y);
         input[0, y, x] = (pixel.R - mean[0]) / 255f;
         input[1, y, x] = (pixel.G - mean[1]) / 255f;
         input[2, y, x] = (pixel.B - mean[2]) / 255f;
      }
   }

   return input;
}
The application ran but the results were still bad, so I checked format of the input tensor and figured out the mean adjustment was wrong. It was quicker to manually fix up the mean calculation.
static DenseTensor<float> PreprocessImage(Bitmap image)
{
   // Resize image to model's expected input size
   Bitmap resizedImage = ResizeImageForModel(image);

   // Apply FasterRCNN mean values to each channel
   float[] mean = { 102.9801f, 115.9465f, 122.7717f };

   // Convert image to float array and normalize
   var input = new DenseTensor<float>(new[] { 3, resizedImage.Height, resizedImage.Width });
   for (int y = 0; y < resizedImage.Height; y++)
   {
      for (int x = 0; x < resizedImage.Width; x++)
      {
         Color pixel = resizedImage.GetPixel(x, y);

         input[0, y, x] = pixel.R - mean[0];
         input[1, y, x] = pixel.G - mean[1];
         input[2, y, x] = pixel.B - mean[2];
      }
   }

   return input;
}
The application ran but the results were still bad, so I checked format of the input tensor and figured out the input tensor was BGR rather than RGB.
Change to B,G,R
static DenseTensor<float> PreprocessImage(Bitmap image)
{
   // Resize image to model's expected input size
   Bitmap resizedImage = ResizeImageForModel(image);

   // Apply FasterRCNN mean values to each channel
   float[] mean = { 102.9801f, 115.9465f, 122.7717f };

   // Convert image to float array and normalize
   var input = new DenseTensor<float>(new[] { 3, resizedImage.Height, resizedImage.Width });
   for (int y = 0; y < resizedImage.Height; y++)
   {
      for (int x = 0; x < resizedImage.Width; x++)
      {
         Color pixel = resizedImage.GetPixel(x, y);
         input[0, y, x] = pixel.B - mean[0] ;
         input[1, y, x] = pixel.G - mean[1] ;
         input[2, y, x] = pixel.R - mean[2] ;
      }
   }

   return input;
}
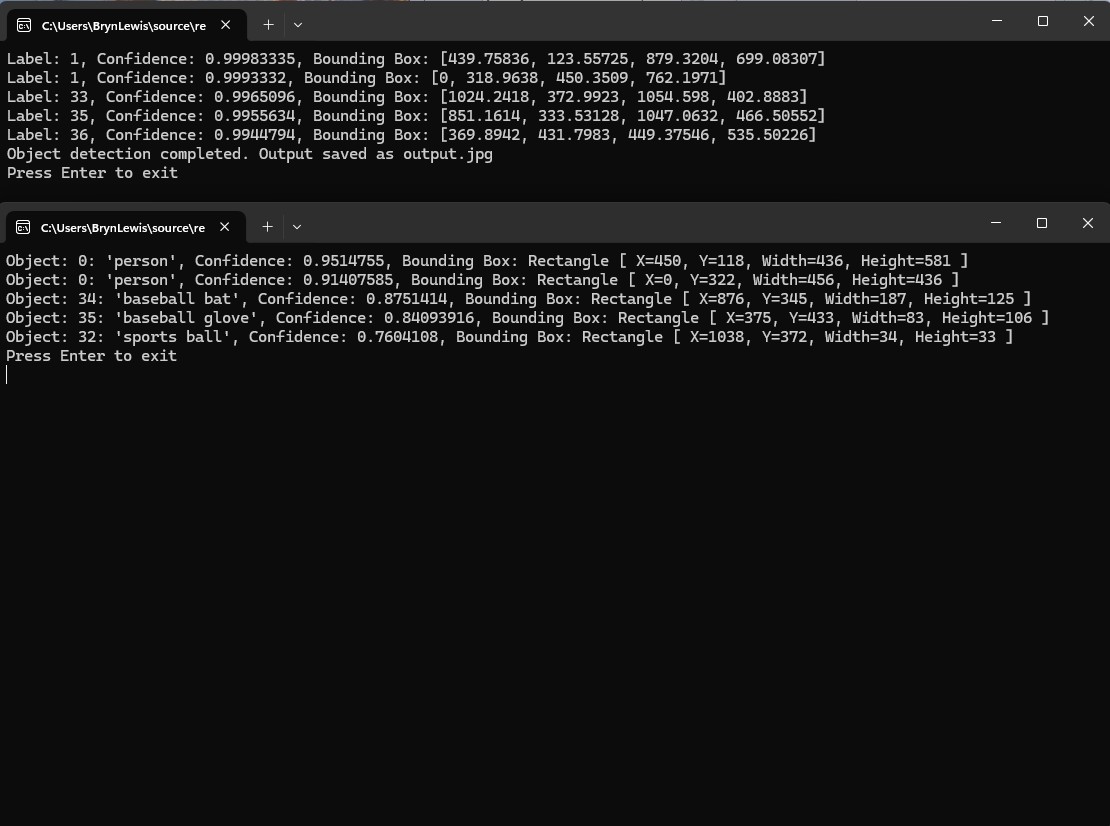
Finally, the application minimum bounding rectangles (MBRs), labels and confidences looked correct.

Summary
The GitHub Copilot generated code looked like it was “inspired” by the onnxruntime.ai Object detection with Faster RCNN Deep Learning in C# sample.
The additional code for marking up the image in the ProcessOutput was unexpected and I wonder if there wasn’t a Sixlabors.ImageSharp example for “inspiration”
The Copilot generated code in this post is not suitable for production