Last week an ESP32 Development Board – WT32-SC01 with 3.5in 320×480 Multi-Touch capactive Screen, support Bluetooth & Wifi arrived from Elecrow. The development board was USD39.90 (June 2023) and appeared to be sourced from Wireless-Tag Technology.

The first step was to flash the WT32-SC01 with the latest version of the .NET nanoFramework for ESP32 devices. To get the device into “boot” mode I used a jumper wire to connect GPIO0 to ground before powering it up.

The .NET nanoFramework nanoff utility identified the device, downloaded the runtime package, and updated the device.

The next step was to run the blank NET nanoFramework sample application.
using System;
using System.Diagnostics;
using System.Threading;

namespace HelloWorld
{
    public class Program
    {
        public static void Main()
        {
            Debug.WriteLine("Hello from nanoFramework!");

            Thread.Sleep(Timeout.Infinite);

            // Browse our samples repository: https://github.com/nanoframework/samples
            // Check our documentation online: https://docs.nanoframework.net/
            // Join our lively Discord community: https://discord.gg/gCyBu8T
        }
    }
}

The WT32-SC01 doesn’t have a user LED so I modified the .NET nanoFramework blinky sample to flash the Liquid Crystal Display(LCD) backlight.

//
// Copyright (c) .NET Foundation and Contributors
// See LICENSE file in the project root for full license information.
//

using System.Device.Gpio;
using System;
using System.Threading;
using nanoFramework.Hardware.Esp32;

namespace Blinky
{
    public class Program
    {
        private static GpioController s_GpioController;
        public static void Main()
        {
            s_GpioController = new GpioController();

            // IO23 is LCD backlight
            GpioPin led = s_GpioController.OpenPin(Gpio.IO23,PinMode.Output );

            led.Write(PinValue.Low);

            while (true)
            {
                led.Toggle();
                Thread.Sleep(125);
                led.Toggle();
                Thread.Sleep(125);
                led.Toggle();
                Thread.Sleep(125);
                led.Toggle();
                Thread.Sleep(525);
            }
        }
    }
}
The
Next steps getting the LCD+Touch panel and Wifi working

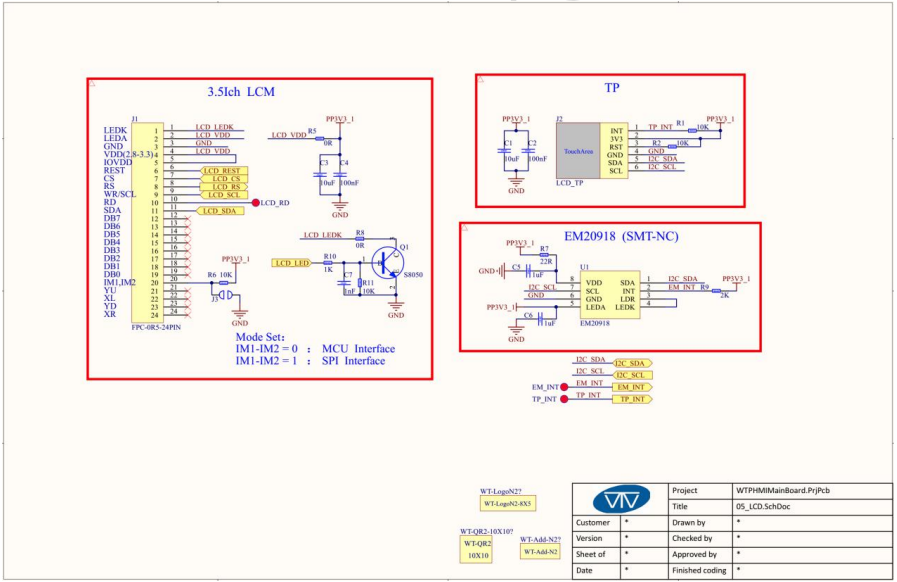
Did you every get the LCD and touch working with the nano framework on this WT32-SCO1 ?
Also looks like there’s a PLUS version, but I cannot find the SPI pins for using it with the nano framework.
Hi Scott,
Doing renovations my office is a disaster zone all my gear is in garage.
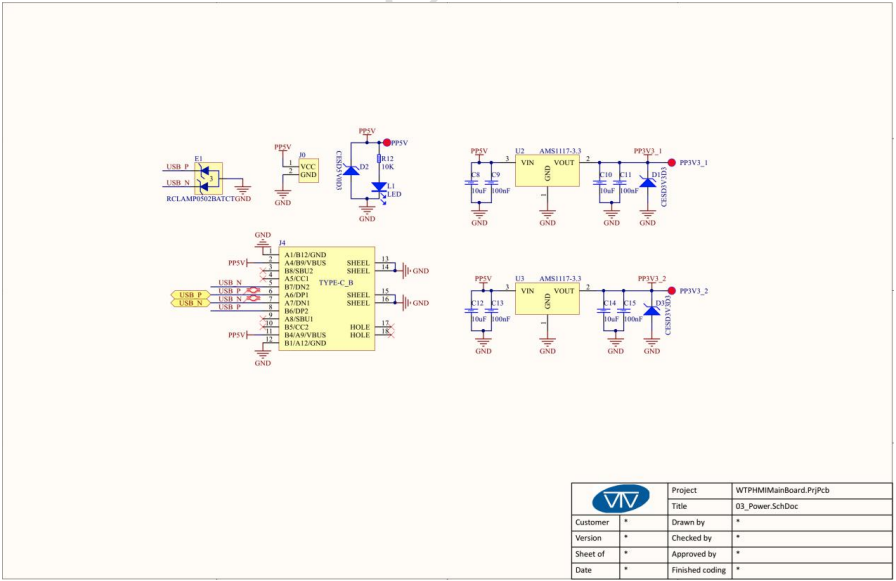
I’ve got schematics that helped a lot.
Will find module and get back to you
Bryn
That would be great! I’ll pick one up on amazon. I mainly wanted confirm it the screen and touch works with the nanoFramework before I buy one and spend hours only to find it won’t work. I plan create an HMI interface for a project and was hoping to use the nanoFramework. The nanoFramework graphics only supports SPI and it’s quite limited hardware wise for the onboard MCU and display screen in an all in one package, especially ones that you can find the SPI pins documented.
Thanks again!