Netduino 3 Wifi Azure Event Hub Field Gateway V1.0

The Netduino 3 Wifi device supports TLS connectivity and looked like it could provide a low power consumption field gateway to an Azure EventHub for my nRF24L01 equipped Netduino, Arduino & devDuino 1.3, 2.0 & 3.0 devices.

Netduino 3 Wifi Azure Event Hub Field Gateway

Netduino 3 Wifi Azure Field Gateway and a selection of arduino & devDuino devices

Bill of materials for field gateway prices as at (Sept 2015)

  • Netduino 3 Wifi USD69.95
  • SeeedStudio Solar Shield USD13.95
  • Lithium Ion 3000mAH battery USD15.00
  • Embedded coolness nRF24L01 shield with high power module USD17.85

The software uses AMQPNetLite which provides a lightweight implementation of the AMQP protocol (on the .Net framework, .Net Compact Framework, .Net Micro Framework, and WindowsPhone platforms) and the Nordic nRF24L01 Net Micro Framework Driver.The first version of the software is a proof of concept and over time I will add functionality and improve the reliability.

On application start up the nRF24L01, Azure Event Hub and network settings are loaded from the built in MicroSD card.

// Write empty template of the configuration settings to the SD card if pin D0 is high
if (!File.Exists(Path.Combine("\\sd", "app.config")))
{
   Debug.Print("Writing template configuration file then stopping");

   ConfigurationFileGenerate();

   Thread.Sleep(Timeout.Infinite);
}
appSettings.Load();

If there is no configuration file on the MicroSD card an empty template is created.

private void ConfigurationFileGenerate()
{
   // Write empty configuration file
   appSettings.SetString(nRF2L01AddressSetting, "Base1");
   appSettings.SetString(nRF2L01ChannelSetting, "10");
   appSettings.SetString(nRF2L01DataRateSetting, "0");

   appSettings.SetString(serviceBusHostSetting, "serviceBusHost");
   appSettings.SetString(serviceBusPortSetting, "5671");
   appSettings.SetString(serviceBusSasKeyNameSetting, "serviceBusSasKeyName");
   appSettings.SetString(serviceBusSasKeySetting, "serviceBusSasKey");
   appSettings.SetString(eventHubNameSetting, "eventHubName");

   appSettings.Save();
}

Once the Wifi connection has been established the device connects to a specified NTP server so any messages have an accurate timestamp and then initiates an AMQP connection.

Debug.Print("Network time");
try
{
   DateTime networkTime = NtpClient.GetNetworkTime(ntpServerHostname);
   Microsoft.SPOT.Hardware.Utility.SetLocalTime(networkTime);
   Debug.Print(networkTime.ToString(" dd-MM-yy HH:mm:ss"));
}
catch (Exception ex)
{
   Debug.Print("ERROR: NtpClient.GetNetworkTime: " + ex.Message);
   Thread.Sleep(Timeout.Infinite);
}
Debug.Print("Network time done");

// Connect to AMQP gateway
Debug.Print("AMQP Establish connection");
try
{
   Address address = new Address(serviceBusHost, serviceBusPort, serviceBusSasKeyName, serviceBusSasKey);
   connection = new Connection(address);
}
catch (Exception ex)
{
   Debug.Print("ERROR: AMQP Establish connection: " + ex.Message);
   Thread.Sleep(Timeout.Infinite);
}
Debug.Print("AMQP Establish connection done");

After the device has network connectivity, downloaded the correct time and connected to AMQP hub the nRF241L01 device is initialised.

The first version of the software starts a new thread to handle each message and handles connectivity failures badly. These issues and features like local queuing of messages will be added in future iterations.

private void OnReceive(byte[] data)
{
   activityLed.Write(!activityLed.Read());

   // Ensure that we have a payload
   if (data.Length < 1 ) { Debug.Print( "ERROR - Message has no payload" ) ; return ; } string message = new String(Encoding.UTF8.GetChars(data)); Debug.Print(DateTime.UtcNow.ToString("HH:mm:ss") + " " + gatewayId + " " + data.Length + " " + message); Thread thread = new Thread(() => EventHubSendMessage(connection, eventHubName, deviceId, gatewayId, data));
   thread.Start();
}


private void EventHubSendMessage(Connection connection, string eventHubName, string deviceId, string gatewayId, byte[] messageBody)
{
   try
   {
      Session session = new Session(connection);
      SenderLink sender = new SenderLink(session, "send-link", eventHubName);

      Message message = new Message()
      {
         BodySection = new Data()
         {
            Binary = messageBody
         },
         ApplicationProperties = new Amqp.Framing.ApplicationProperties(),
      };

      message.ApplicationProperties["UploadedAtUtc"] = DateTime.UtcNow;
      message.ApplicationProperties["GatewayId"] = gatewayId;
      message.ApplicationProperties["DeviceId"] = deviceId;
      message.ApplicationProperties["EventId"] = Guid.NewGuid().ToString();

      sender.Send(message);

      sender.Close();
      session.Close();
      }
   catch (Exception ex)
   {
      Debug.Print("ERROR: Publish failed with error: " + ex.Message);
   }
}

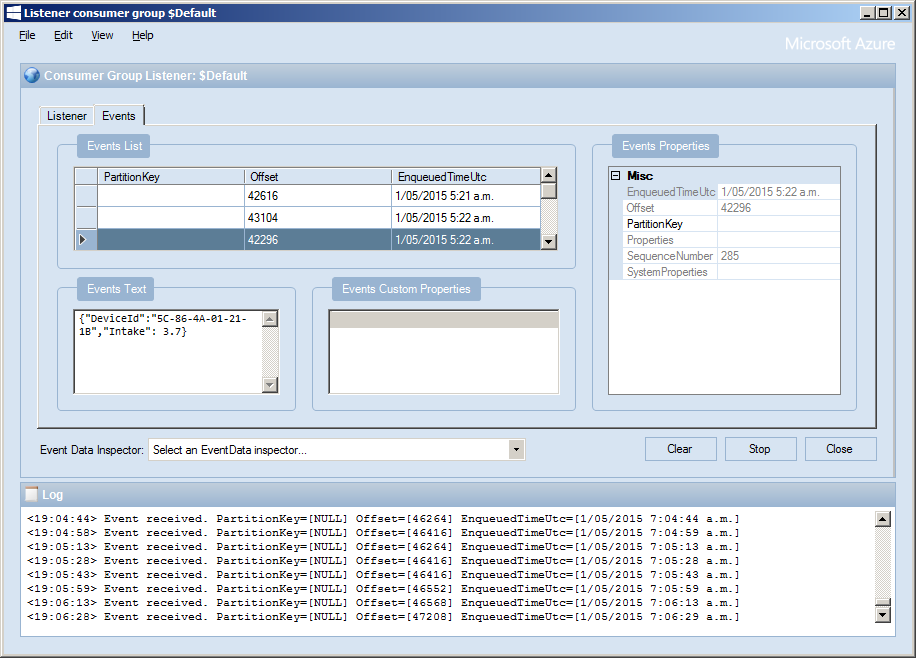
Initially the devices send events with a JSON payload.

ServiceBus Explorer

JSON Event messages displayed in ServiceBus Explorer

The code is available NetduinoNRF24L01AMQPNetLiteAzureEventHubGatewayV1.0 and when I have a spare afternoon I will upload to github.

My first AzureSBLite program

Extending on the theme for my previous post I decided to take a look at Azure ServiceBus Lite by Paolo Patierno. Same objective as last time, a minimalist application running on my Netduino 3 Wifi which connects to my home wifi, waits for an IP address then uploads an event to an Azure EventHub.

public class Program
{
   private const string connectionString = "Endpoint=sb://[YourNamespace].servicebus.windows.net/;SharedAccessKeyName=[YourKeyName];SharedAccessKey=[YourSaSKey]";
   private const string eventHub = "[YourEventHub]";

...

// Wait for Network address if DHCP
NetworkInterface networkInterface = NetworkInterface.GetAllNetworkInterfaces()[0];
if (networkInterface.IsDhcpEnabled)
{
   Debug.Print(" Waiting for IP address ");

   while (NetworkInterface.GetAllNetworkInterfaces()[0].IPAddress == IPAddress.Any.ToString())
   {
      Debug.Print(".");
   }
}

// Display network config for debugging
Debug.Print("Network configuration");
Debug.Print(" Network interface type: " + networkInterface.NetworkInterfaceType.ToString());
Debug.Print(" MAC Address: " + BytesToHexString(networkInterface.PhysicalAddress));
Debug.Print(" DHCP enabled: " + networkInterface.IsDhcpEnabled.ToString());
Debug.Print(" Dynamic DNS enabled: " + networkInterface.IsDynamicDnsEnabled.ToString());
Debug.Print(" IP Address: " + networkInterface.IPAddress.ToString());
Debug.Print(" Subnet Mask: " + networkInterface.SubnetMask.ToString());
Debug.Print(" Gateway: " + networkInterface.GatewayAddress.ToString());

foreach (string dnsAddress in networkInterface.DnsAddresses)
{
   Debug.Print(" DNS Server: " + dnsAddress.ToString());
}

string deviceId = BytesToHexString(networkInterface.PhysicalAddress);
Debug.Print("DeviceId " + deviceId.ToString());

A bit less code is required to send an event using AzureSBLite

try
{
   MessagingFactory factory = MessagingFactory.CreateFromConnectionString(connectionString);

   EventHubClient client = factory.CreateEventHubClient(eventHub);

   string messageBody = @"{""DeviceId"":""" + deviceId + @""",""Time"":""" + DateTime.Now.ToString("yy-MM-dd hh:mm:ss") + @"""}";
   EventData data = new EventData(Encoding.UTF8.GetBytes(messageBody));

   //EventData data = new EventData();
   //data.Properties.Add("Time", DateTime.Now);
   //data.Properties.Add("DeviceId", deviceId);

   client.Send(data);
   client.Close();

   factory.Close();
}
catch (Exception ex)
{
   Debug.Print("ERROR: Send failed with error: " + ex.Message);
}

Over all, a very similar experience to “MyFirst AMQPNetLite” program, after a couple of typos, and fixing a copy ‘n’ paste issue with the connection string my application worked, with the bonus of less code. Both AMQPNetLite and AzureSBLite look suitable for my application so I’ll need to evaluate them in more detail.

My first AMQPNetLite program

After having some problems with my Netduino 3 wifi Azure Event Hub client code (which are most probably due to the issues discussed here) I decided to have a look at AMQPNetLite which had been suggested by Paolo Patierno in a response to one of my posts in the Netduino forums.

I usually create a “minimalist” project so I can figure out how a new library works without an domain specific code getting in the way. Overall, my first experience was pretty positive, the code compiled first time, ran second time and worked third time.

The objective for my first AMQPNetLite application running on my Netduino 3 Wifi was to connect to my home wifi, wait for an IP address then upload an event to an Azure EventHub

private const int amqpPortNumber = 5671;
private const string sbNamespace = "ServiceBus Namespace";
private const string keyName = "SaS Key name";
private const string keyValue = "SaS Key value";
private const string eventHub = "EventHub name";

...

// Wait for Network address if DHCP
NetworkInterface networkInterface = NetworkInterface.GetAllNetworkInterfaces()[0];
if (networkInterface.IsDhcpEnabled)
{
   Debug.Print(" Waiting for IP address ");

   while (NetworkInterface.GetAllNetworkInterfaces()[0].IPAddress == IPAddress.Any.ToString())
   {
      Debug.Print(".");
   }
}

// Display network config for debugging
Debug.Print("Network configuration");
Debug.Print(" Network interface type: " + networkInterface.NetworkInterfaceType.ToString());
Debug.Print(" MAC Address: " + BytesToHexString(networkInterface.PhysicalAddress));
Debug.Print(" DHCP enabled: " + networkInterface.IsDhcpEnabled.ToString());
Debug.Print(" Dynamic DNS enabled: " + networkInterface.IsDynamicDnsEnabled.ToString());
Debug.Print(" IP Address: " + networkInterface.IPAddress.ToString());
Debug.Print(" Subnet Mask: " + networkInterface.SubnetMask.ToString());
Debug.Print(" Gateway: " + networkInterface.GatewayAddress.ToString());

foreach (string dnsAddress in networkInterface.DnsAddresses)
{
   Debug.Print(" DNS Server: " + dnsAddress.ToString());
}

string deviceId = BytesToHexString(networkInterface.PhysicalAddress);
Debug.Print("DeviceId " + deviceId.ToString());

Then I constructed the AMQP address for the event hub, started an AMQP session and sent the message. I tried sending a message with a JSON payload and also using the “type safe” application properties.

try
{
   Address address = new Address(sbNamespace, amqpPortNumber, keyName, keyValue);
   Connection connection = new Connection(address);

   Session session = new Session(connection);

   SenderLink sender = new SenderLink(session, "send-link", eventHub);

   string messageBody = @"{""DeviceId"":""" + deviceId + @""",""Time"":""" + DateTime.Now.ToString("yy-MM-dd hh:mm:ss") + @"""}";

   Message message = new Message()
   {
      //BodySection = new Data() { Binary = Encoding.UTF8.GetBytes(messageBody)},
      ApplicationProperties = new Amqp.Framing.ApplicationProperties(),
   };

   message.ApplicationProperties["Time"] = DateTime.Now;
   message.ApplicationProperties["DeviceId"] = deviceId;

   sender.Send(message);

   sender.Close();
   session.Close();
   connection.Close();
}
catch (Exception ex)
{
   Debug.Print("ERROR: Publish failed with error: " + ex.Message);
}

For my scenario I was pleasantly surprised how easy it was to get working.

AMQP has a non TLS option (only for non sensitive data) and if this is supported I could use a device like a Netduino 3 Ethernet which don’t have baked in TLS support.

Netduino 3 wifi Azure Event Hub client

Over the last couple of weeks I have been beta testing a Netduino 3 Wifi board. One of the great features of the new board is baked in support for SSL 3.0 and TLS 1.2 which enables direct connection to services which require https.

EDIT: The device has been running under my desk powered by a wall wart for a week. It has been monitoring the temperature of my office and the air gap between the curtains and the glass. My ADSL has gone down a couple of times but the N3 has recovered all by itself and kept on going.

In a couple of previous blog posts I have shown how to upload data to an Azure Event Hub from other NetMFdevices. I built an application that runs on a FEZ Spider and a lightweight Service Gateway so I was keen to see how well a Netduino 3 Wifi based solution worked.

To get something working on my Netduino 3 device I started with the application I had written for the FEZ spider. The code is based on OBD Recorder for .Net Micro Framework with ServiceBus, AMQP (for IoT) samples. The test client used a couple of DS18B20 temperature sensors to monitor the temperature of my fridge and freezer.

Netduino 3 device with temperature sensors

Netduino 3 device with Seeedstudio Shield and two temperature sensors

I created an Event Hub and associated device access keys and fired up Service Bus Explorer so I could see what was happening.ServiceBus Explorer showing my fridge and freezer temperatures

In the application the first step was to add code to wait for the device to acquire an IP address. (Will replace this code with a more efficient approach)

// Wait for Network address if DHCP
NetworkInterface networkInterface = NetworkInterface.GetAllNetworkInterfaces()[0];

if (networkInterface.IsDhcpEnabled)
{
   Debug.Print(" Waiting for IP address " );

   while (NetworkInterface.GetAllNetworkInterfaces()[0].IPAddress == IPAddress.Any.ToString()) ;
}

// Display network config for debugging
Debug.Print("Network configuration");
Debug.Print(" Network interface type: " + networkInterface.NetworkInterfaceType.ToString());
Debug.Print(" MAC Address: " + BytesToHexString(networkInterface.PhysicalAddress));
Debug.Print(" DHCP enabled: " + networkInterface.IsDhcpEnabled.ToString());
Debug.Print(" Dynamic DNS enabled: " + networkInterface.IsDynamicDnsEnabled.ToString());
Debug.Print(" IP Address: " + networkInterface.IPAddress.ToString());
Debug.Print(" Subnet Mask: " + networkInterface.SubnetMask.ToString());
Debug.Print(" Gateway: " + networkInterface.GatewayAddress.ToString());

foreach (string dnsAddress in networkInterface.DnsAddresses)
{
   Debug.Print(" DNS Server: " + dnsAddress.ToString());
}

deviceId = BytesToHexString(networkInterface.PhysicalAddress);

Then to send the message to the event hub the request has to have a authorisation token attached

private void EventHubSendMessage(string eventHubAddressHttps, string messageBody)
{
   string token = CreateSasToken(eventHubAddressHttps + "/messages", sasKeyName, sasKeyText);

   try
   {
      using( HttpWebRequest request = (HttpWebRequest)HttpWebRequest.Create(eventHubAddressHttps + "/messages" + "?timeout=60" + ApiVersion))
      {
         request.Timeout = 2500;
         request.Method = "POST";

         // Enable these options to suit your environment
         //request.Proxy = new WebProxy("myproxy.myorganisation.com", true);
         //request.Credentials = new NetworkCredential("myusername", "mytopsecretpassword"); 

         request.Headers.Add("Authorization", token);
         request.Headers.Add("ContentType", "application/json;charset=utf-8");

         byte[] buffer = Encoding.UTF8.GetBytes(messageBody);

         request.ContentLength = buffer.Length;

         // request body
         using (Stream stream = request.GetRequestStream())
         {
            stream.Write(buffer, 0, buffer.Length);
         }

         using (HttpWebResponse response = (HttpWebResponse)request.GetResponse())
         {
            Debug.Print("HTTP Status:" + response.StatusCode + " : " + response.StatusDescription);
         }
      }
   }
   catch (WebException we)
   {
      Debug.Print(we.Message);
   }
}

// Create a SAS token for a specified scope. SAS tokens are described in http://msdn.microsoft.com/en-us/library/windowsazure/dn170477.aspx.
private static string CreateSasToken(string uri, string keyName, string key)
{
   // Set token lifetime to 20 minutes. When supplying a device with a token, you might want to use a longer expiration time.
   uint tokenExpirationTime = GetExpiry(20 * 60);

   string stringToSign = HttpUtility.UrlEncode(uri) + "\n" + tokenExpirationTime;

   var hmac = SHA.computeHMAC_SHA256(Encoding.UTF8.GetBytes(key), Encoding.UTF8.GetBytes(stringToSign));
   string signature = Convert.ToBase64String(hmac);

   signature = Base64NetMf42ToRfc4648(signature);

   string token = "SharedAccessSignature sr=" + HttpUtility.UrlEncode(uri) + "&sig=" + HttpUtility.UrlEncode(signature) + "&se=" + tokenExpirationTime.ToString() + "&skn=" + keyName;

   return token;
}

private static string Base64NetMf42ToRfc4648(string base64netMf)
{
   var base64Rfc = string.Empty;

   for (var i = 0; i < base64netMf.Length; i++)
   {
      if (base64netMf[i] == '!')
      {
         base64Rfc += '+';
      }
      else if (base64netMf[i] == '*')
      {
         base64Rfc += '/';
      }
      else
      {
         base64Rfc += base64netMf[i];
      }
   }
   return base64Rfc;
}

static uint GetExpiry(uint tokenLifetimeInSeconds)
{
   const long ticksPerSecond = 1000000000 / 100; // 1 tick = 100 nano seconds

   DateTime origin = new DateTime(1970, 1, 1, 0, 0, 0, 0);
   TimeSpan diff = DateTime.Now.ToUniversalTime() - origin;

   return ((uint)(diff.Ticks / ticksPerSecond)) + tokenLifetimeInSeconds;
}

The initial version of the Netduino TI CC3100 driver has some limitations e.g. no server certificate validation but these should be attended to in future releases.

The software was based on Brad’s One-Wire and DS18B20 library with fixes from here.